service SKODA FABIA 2003 1.G / 6Y Owner's Guide
[x] Cancel search | Manufacturer: SKODA, Model Year: 2003, Model line: FABIA, Model: SKODA FABIA 2003 1.G / 6YPages: 233, PDF Size: 32.04 MB
Page 181 of 233
Inspecting and Replenishing
180
models is positioned on the other side of the engine compart-
ment.
– Switch the engine off.
– Open the bonnet ⇒ in “Working in the engine compart-
ment” on page 172.
– Inspect the brake fluid level in the reservoir ⇒page 179,
fig. 130 . The level must be between the “MIN” and “MAX”
markings.
A slight drop in the fluid level results when driving due to normal wear-and-
tear and automatic adjustment of the brake pads, and is perfectly normal.
There may be an indication of a leak in the brake system, however, if the
fluid level drops significantly within a short time or if it drops below the
“MIN” marking. A situation where the brake fluid level is too low is indi-
cated by the warning light
lighting up in the instrument cluster
⇒ page 35. You should drive carefully and immediately to the nearest
Škoda Dealer and have the brake system inspected.
Replacing brake fluid
Brake fluid absorbs moisture. This causes the fluid to absorb moisture
from the surrounding air over a period of time. Excessive water in the
brake fluid may be the cause of corrosion in the brake system. The water
content also lowers the boiling point of the brake fluid. This is why brake
fluid must be replaced every two years.
You must only use new genuine brake fluid from Skoda Auto. The speci-
fication for the brake fluid is “FMVSS 116 DOT 4”. We recommend that you have the brake fluid replaced by a
Škoda Dealer
as part of an Inspection Service.
Caution
Brake fluid damages the paintwork of the vehicle.
For the sake of the environment
In view of the problems involved with proper disposal of brake fluid, the
special tools and the professional knowledge required, you should have
the brake fluid replaced by a Škoda dealer.
WARNING
•Using old brake fluid can result in severe stress on the brakes
because of the formation of vapour bubbles in the brake system.
This greatly impairs the braking efficiency and thus also the safety
of your vehicle.
•Brake fluid is toxic! It must therefore be kept safely in closed
original containers and well away from children.
Page 184 of 233
Inspecting and Replenishing183
Using the systemSafetyDriving TipsGeneral MaintenanceBreakdown assist-
anceTechnical DataFabia Praktik
Battery with a charge level indicator, the so-called
magic eye*
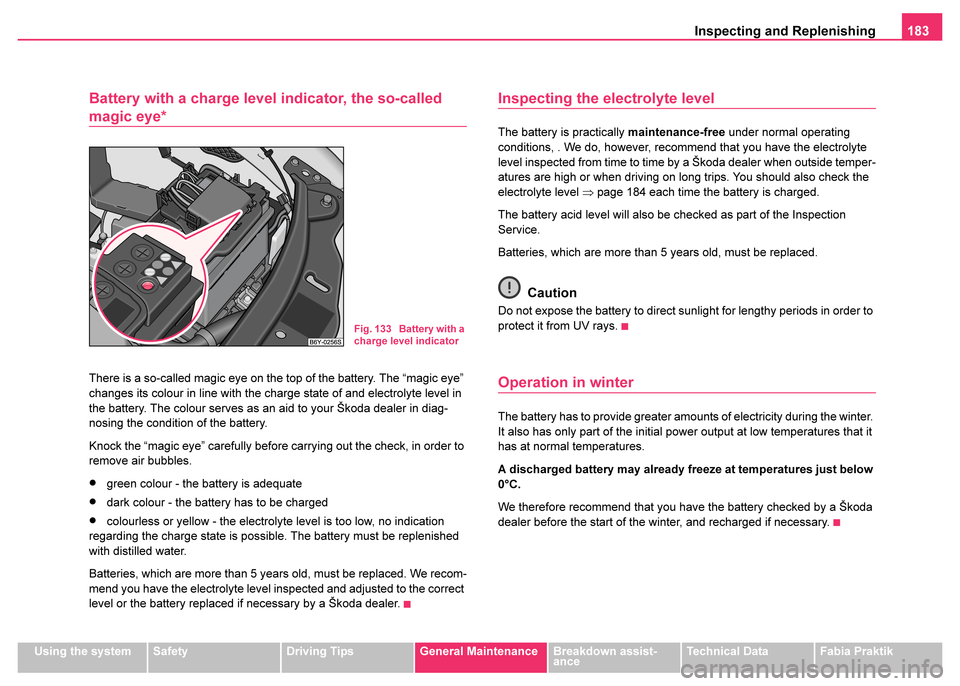
There is a so-called magic eye on the top of the battery. The “magic eye”
changes its colour in line with the charge state of and electrolyte level in
the battery. The colour serves as an aid to your Škoda dealer in diag-
nosing the condition of the battery.
Knock the “magic eye” carefully before carrying out the check, in order to
remove air bubbles.
•green colour - the battery is adequate
•dark colour - the battery has to be charged
•colourless or yellow - the electrolyte level is too low, no indication
regarding the charge state is possible. The battery must be replenished
with distilled water.
Batteries, which are more than 5 years old, must be replaced. We recom-
mend you have the electrolyte level inspected and adjusted to the correct
level or the battery replaced if necessary by a Škoda dealer.
Inspecting the electrolyte level
The battery is practically maintenance-free under normal operating
conditions, . We do, however, recommend that you have the electrolyte
level inspected from time to time by a Škoda dealer when outside temper-
atures are high or when driving on long trips. You should also check the
electrolyte level ⇒page 184 each time the battery is charged.
The battery acid level will also be checked as part of the Inspection
Service.
Batteries, which are more than 5 years old, must be replaced.
Caution
Do not expose the battery to direct sunlight for lengthy periods in order to
protect it from UV rays.
Operation in winter
The battery has to provide greater amounts of electricity during the winter.
It also has only part of the initial power output at low temperatures that it
has at normal temperatures.
A discharged battery may already freeze at temperatures just below
0°C.
We therefore recommend that you have the battery checked by a Škoda
dealer before the start of the winter, and recharged if necessary.
Fig. 133 Battery with a
charge level indicator
Page 187 of 233
Inspecting and Replenishing
186
ated spirits must not be more than 15 %. Please note, however, that the
antifreeze protection at this concentration is only adequate down to -5°C.
Caution
•On no account should you add radiator antifreeze or other additives to
the windscreen washer fluid.
•If the vehicle is fitted with headlight cleaning system, you should only
add cleaning products which do not attack the polycarbonate coating of
the headlights to the windscreen washer fluid. Please contact a Škoda
dealer, he will tell you, which cleaning product you can use.
Note
Do not take the filter out of the windscreen wash container when filling it
up again with liquid otherwise dirt can get into the liquid transportation
system and can lead to faults in operation of the windscreen wash
system.
Spark plugs
The spark plugs will also be checked as part of the Inspection Service.
Please observe the following if spark plugs have to be renewed inbetween
inspection services.
•Spark plugs and the ignition system are matched to the engine and
therefore contribute to lower emissions in the exhaust gases.
•Only use the spark plugs foreseen for the engine concerned if you wish
to avoid operational faults, engine damage and loss of approval and
licensing of the vehicle due to false exhaust gas values or unshielded
spark plugs. Particularly important parameters include the number of elec- trodes, the thermal value and possibly also the radio frequency suppres-
sion level.
Spark plugs are constantly being further developed. It is therefore advis-
able to just obtain spark plugs from Skoda dealers since they are informed
about latest developments.
V-ribbed belts
The V-ribbed is one of the most highly loaded components on a vehicle.
This is why there are high demands on quality made on the V-ribbed belt.
It not sufficient when replacing the V-ribbed belt to choose just any one of
the same size.
One should only use the V-ribbed belt foreseen for use
on that vehicle for safety reason.
V-ribbed belts are constantly being further developed. It is therefore advis-
able to just obtain them from Skoda dealers since they are informed about
latest developments.
The dust and pollen filter*
The dust and pollen filter for the heating and ventilation system is located
in the heater. The filter is replaced according to directions given in the
Service Plan. The filter should be replaced even earlier when the air flow
is reduced significantly.
Changing of the filter is undertaken by a Skoda dealer as part of the
inspection service.
Page 199 of 233
Breakdown assistance
198
•The spare wheel provided with a car fitted with unidirectional tyres has
different dimensions. The wheel is provided with a warning sticker.
•After fitting on the wheel, the warning sticker must not be concealed
(e.g. by the wheel trim).
•Do not drive with this spare wheel at more than 80 km/h - risk of acci-
dent. Avoid accelerating at full throttle, sharp braking and fast cornering.
•The inflation pressure for this spare wheel is identical to the inflation
pressure of the standard tyres.
•Use this spare wheel only to reach the nearest service station as it is
not intended for continuous use.
Note
Some vehicles are only fitted with spray to make tyre repairs
⇒ page 196.
Changing a wheel
Preliminary work
The following steps should be carried out before actually
changing the wheel.
– If it is necessary to change a wheel, park the vehicle as far
away as possible from the traffic flow. The place you choose
should be level.
– Have all the occupants get out. While changing a wheel, the
occupants of the vehicle should not stand on the road (it is
better behind a crash barrier). – Apply the
handbrake firmly.
– Engage 1st gear or if your vehicle is fitted with an automatic
gearbox, move the selector lever into position P .
– If a trailer is coupled, uncouple it.
– Take the vehicle tool kit and the spare wheel ⇒ page 196
out of the luggage compartment.
Caution
If you have to change a wheel on a slope first block the opposite wheel
with a stone or similar object in order to secure the vehicle from unexpect-
edly rolling away.
Note
Comply with any legal regulations.
WARNING
•If you find yourself in flowing traffic put on the hazard warning
lights system and place the warning triangle on the side of the road
at the prescribed distance from your vehicle while observing all
national legal provisions. In this way you are protecting not only
yourself but also other road users.
•Never start the engine with the vehicle sitting on the raised jack
- danger of suffering injury!
Page 208 of 233
Breakdown assistance207
Using the systemSafetyDriving TipsGeneral MaintenanceBreakdown assist-
anceTechnical DataFabia Praktik
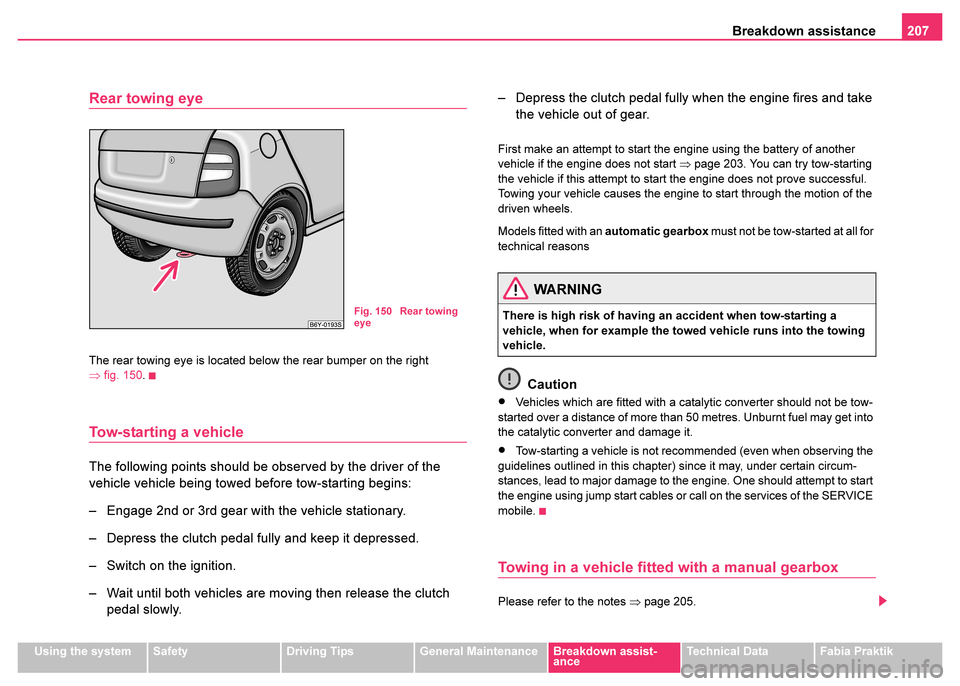
Rear towing eye
The rear towing eye is located below the rear bumper on the right
⇒fig. 150 .
Tow-starting a vehicle
The following points should be observed by the driver of the
vehicle vehicle being towed before tow-starting begins:
– Engage 2nd or 3rd gear with the vehicle stationary.
– Depress the clutch pedal fully and keep it depressed.
– Switch on the ignition.
– Wait until both vehicles are moving then release the clutch
pedal slowly. – Depress the clutch pedal fully when the engine fires and take
the vehicle out of gear.
First make an attempt to start the engine using the battery of another
vehicle if the engine does not start ⇒page 203. You can try tow-starting
the vehicle if this attempt to start the engine does not prove successful.
Towing your vehicle causes the engine to start through the motion of the
driven wheels.
Models fitted with an automatic gearbox must not be tow-started at all for
technical reasons
Caution
•Vehicles which are fitted with a catalytic converter should not be tow-
started over a distance of more than 50 metres. Unburnt fuel may get into
the catalytic converter and damage it.
•Tow-starting a vehicle is not recommended (even when observing the
guidelines outlined in this chapter) since it may, under certain circum-
stances, lead to major damage to the engine. One should attempt to start
the engine using jump start cables or call on the services of the SERVICE
mobile.
Towing in a vehicle fitted with a manual gearbox
Please refer to the notes ⇒page 205.
Fig. 150 Rear towing
eye
WARNING
There is high risk of having an accident when tow-starting a
vehicle, when for example the towed vehicle runs into the towing
vehicle.
Page 224 of 233
General223
Using the systemSafetyDriving TipsGeneral MaintenanceBreakdown assist-
anceTechnical DataFabia Praktik
Technical Data
General
Identification data
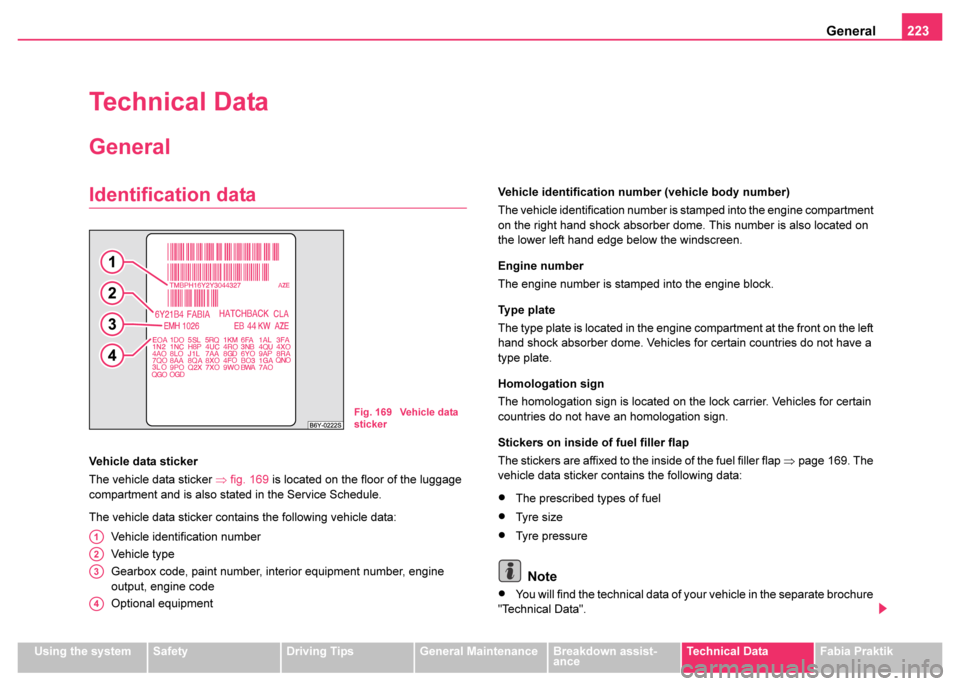
Vehicle data sticker
The vehicle data sticker ⇒fig. 169 is located on the floor of the luggage
compartment and is also stated in the Service Schedule.
The vehicle data sticker contains the following vehicle data:
Vehicle identification number
Vehicle type
Gearbox code, paint number, interior equipment number, engine
output, engine code
Optional equipment Vehicle identification number (vehicle body number)
The vehicle identification number is stamped into the engine compartment
on the right hand shock absorber dome. This number is also located on
the lower left hand edge below the windscreen.
Engine number
The engine number is stamped into the engine block.
Ty p e p l at e
The type plate is located in the engine compartment at the front on the left
hand shock absorber dome. Vehicles for certain countries do not have a
type plate.
Homologation sign
The homologation sign is located on the lock carrier. Vehicles for certain
countries do not have an homologation sign.
Stickers on inside of fuel filler flap
The stickers are affixed to the inside of the fuel filler flap
⇒page 169. The
vehicle data sticker contains the following data:
•The prescribed types of fuel
•Tyre size
•Tyre pressure
Note
•You will find the technical data of your vehicle in the separate brochure
"Technical Data".
Fig. 169 Vehicle data
sticker
A1
A2
A3
A4
Page 230 of 233
Index229
L
Lashing eyes . . . . . . . . . . . . . . . . . . . . . . . . . 70
Leather care . . . . . . . . . . . . . . . . . . . . . . . . 164
Lighting of the interior of the vehicle . . . . . . . 56
Lights
Converting/masking over headlights . . . 154
switching them on and off . . . . . . . . . . . . 52
Warning lights . . . . . . . . . . . . . . . . . . . . . 27
Lights and Visibility . . . . . . . . . . . . . . . . . . . . 53
Locking . . . . . . . . . . . . . . . . . . . . . . . . . . 39, 40
Low beam . . . . . . . . . . . . . . . . . . . . . . . . . . . 52 Warning light . . . . . . . . . . . . . . . . . . . . . . 29
Luggage compartment . . . . . . . . . . . . . . . . . 69
Luggage compartment door . . . . . . . . . . . . . 43 Lighting . . . . . . . . . . . . . . . . . . . . . . . . . . 57
Warning light . . . . . . . . . . . . . . . . . . . . . . 33
M
Main beam . . . . . . . . . . . . . . . . . . . . . . . . 52, 54Warning light . . . . . . . . . . . . . . . . . . . . . . 29
Manual shifting of gears . . . . . . . . . . . . . . . . 98
Memory for the on-board computer . . . . . . . . 17
Mobile phone . . . . . . . . . . . . . . . . . . . . 108, 109
Motoring abroad . . . . . . . . . . . . . . . . . . . . . 154
Multi-functional indicator . . . . . . . . . . . . . . . . 17
N
Navigation system . . . . . . . . . . . . . . . . . . . . . 26 Note holder . . . . . . . . . . . . . . . . . . . . . . . . . . 78
O
Oil . . . . . . . . . . . . . . . . . . . . . . . . . . . . . . . . 174
Warning light . . . . . . . . . . . . . . . . . . . . . . 32
Onboard computer . . . . . . . . . . . . . . . . . . . . . 17
Open door Warning light . . . . . . . . . . . . . . . . . . . . . . 33
Operation in winter Biodiesel . . . . . . . . . . . . . . . . . . . . . . . . . 168
De-icing windows . . . . . . . . . . . . . . . . . . 162
The battery . . . . . . . . . . . . . . . . . . . . . . . 183
Overview of the engine compartment . . . . . 173
P
Paint . . . . . . . . . . . . . . . . . . . . . . . . . . . . . . . 161
Paint damage . . . . . . . . . . . . . . . . . . . . . . . . 161
Parking aid . . . . . . . . . . . . . . . . . . . . . . . . . . 100
Parking light . . . . . . . . . . . . . . . . . . . . . . . . . . 55
Parking lights . . . . . . . . . . . . . . . . . . . . . . . . . 52
Pedals . . . . . . . . . . . . . . . . . . . . . . . . . . . . . . 69
Petrol . . . . . . . . . . . . . . . . . . . . . . . . . . . . . . 167
Power socket . . . . . . . . . . . . . . . . . . . . . . . . . 81
Power steering . . . . . . . . . . . . . . . . . . . . . . . 146 Warning light . . . . . . . . . . . . . . . . . . . . . . 30
Power windows . . . . . . . . . . . . . . . . . . . . . . . 47 Operational problems . . . . . . . . . . . . . . . . 48
R
Rear fog light . . . . . . . . . . . . . . . . . . . . . . . . . 53Warning light . . . . . . . . . . . . . . . . . . . . . . . 29
Rear seats . . . . . . . . . . . . . . . . . . . . . . . . . . . 67
Rear window heater . . . . . . . . . . . . . . . . . . . . 58
Rear-view mirror . . . . . . . . . . . . . . . . . . . . . . 62
Recirculated air mode Heating . . . . . . . . . . . . . . . . . . . . . . . . . . . 89
The air conditioning system . . . . . . . . . . . 93
Refuelling . . . . . . . . . . . . . . . . . . . . . . . . . . . 169
Remote control . . . . . . . . . . . . . . . . . . . . . . . . 44
Replacing fuses . . . . . . . . . . . . . . . . . . . . . . 209
Roof aerial . . . . . . . . . . . . . . . . . . . . . . . . . . 160
Running in the car . . . . . . . . . . . . . . . . . . . . 147
S
Safety wheel bolts . . . . . . . . . . . . . . . . . . . . 202
Saving energy . . . . . . . . . . . . . . . . . . . . . . . 149
Seat belt height adjuster . . . . . . . . . . . . . . . 116
Seat belt warning light . . . . . . . . . . . . . . . . . 115
Seat belts . . . . . . . . . . . . . . . . . . . . . . . . . . . 112 Cleaning . . . . . . . . . . . . . . . . . . . . . . . . . 165
Fasten . . . . . . . . . . . . . . . . . . . . . . . . . . . 115
Height adjustment . . . . . . . . . . . . . . . . . . 116
Safety instructions . . . . . . . . . . . . . . . . . 114
Seats . . . . . . . . . . . . . . . . . . . . . . . . . . . . . . . 63
Service Display . . . . . . . . . . . . . . . . . . . . . . . 15
Service Interval Display . . . . . . . . . . . . . . . . . 15