tow SKODA FABIA 2003 1.G / 6Y Owner's Guide
[x] Cancel search | Manufacturer: SKODA, Model Year: 2003, Model line: FABIA, Model: SKODA FABIA 2003 1.G / 6YPages: 233, PDF Size: 32.04 MB
Page 86 of 233

Seats and Stowage85
Using the systemSafetyDriving TipsGeneral MaintenanceBreakdown assist-
anceTechnical DataFabia Praktik
Storage compartment in the luggage compartment
(estate car)*
There are storage compartments situated on the right and the left
in the luggage compartment ⇒ fig. 75.
Rear armrest with stowage compartment*
– You can fold down the armrest to enhance occupant comfort
⇒fig. 76 .
Fig. 75 Luggage
compartment: Storage
compartmentsFig. 76 Rear seats:
Armrest
1 2
Fig. 77 Armrest:
Storage compartment
Page 87 of 233

Seats and Stowage
86
The armrest includes a stowage compartment. You open the compartment
by pressing the button on the front of the armrest and raising the cover
⇒ page 85, fig. 77 .
Page 89 of 233
Heating and air conditioning system
88
Note
•The whole heat output will be needed to unfrost the windscreen and
side windows. No warm air will be fed to the footwell. This can lead to
restriction of the heating comfort.
•The used air streams out through the air removal openings in the
luggage compartment.
Set heating
Recommended settings of heating controls for:
Defrosting the windscreen and side windows
•Turn control dial ⇒page 87, fig. 78 to the right up to the stop
•Control dial in the position 4
•Control dial in the position
•Open air outlet vents 4 ⇒ page 89, fig. 79 and point towards the side
window.
Keeping windscreen and side windows demisted
We recommend that you use the following setting in cases where the
windows are misted up more than usual (e.g. when it is raining):
•Control dial where necessary to the heating range
•Control dial in position 2 or 3
•Control dial to or as required or to any desired position
between these symbols
•Open air outlet vents 4 and point towards the side window
Warming up the inside of the vehicle as rapidly as possible
•Turn control dial to the right up to the stop
•Control dial in the position 4
•Control dial in the position
•Open the air outlet vents 4
•We recommend pressing button air recirculation mode. The
windows can steam up in this position however.
Heating the vehicle to a comfortable temperature
We recommend the following setting once the windows are no longer
misted up and the desired teperature has been reached:
•Control dial at the desired heat output
•Control dial in position 2 or 3
•Control dial in the position
•Open the air outlet vents 4
•Set the air distribution regulator as required between positions
and , if the windscreen gets misted up again.
Fresh air mode - ventilation
Non- pre-warmed fresh air streams through the air inlet nozzles 3 and 4
for the following settings.
Recirculated air mode must not be switched on.
•Turn the control dial ⇒ page 87, fig. 78 to the left up to the stop
•Control dial into the desired position
•Control dial in the position
•Open air outlet vents 3 and 4 ⇒page 89, fig. 79
WARNING
You should not leave recirculated air mode on over a longer period
of time. “Stale air” may result in fatigue in the driver and passen-
gers, reduce attention levels and also cause the windows to mist
up. The risk of having an accident increases. Switch recirculated
air mode off as soon as the windows begin misting up.
AA
AB
AC
AA
AB
AC
AA
AB
AC
AD
AA
AB
AC
AC
AA
AB
AC
Page 93 of 233
Heating and air conditioning system
92
of the year - in order to remove such odours. Also open a window for a
short time.
•Please refer to the information regarding recirculated air mode
⇒ page 93.
Setting air conditioning system
Recommended settings of air conditioning controls for individual opera-
tions:
Defrosting the windscreen and side windows
•Turn control dial ⇒page 91, fig. 80 to the right up to the stop
•Control dial in the position 4
•Control dial in the position
•Open air outlet vents 4 ⇒ page 93, fig. 81 and point towards the side
window.
Warming up the inside of the vehicle as rapidly as possible
•Turn control dial to the right up to the stop
•Control dial in the position 4
•Control dial in the position
•Open the air outlet vents 4
•We recommend pressing button air recirculation mode. The
windows can steam up in this position however.
Heating the vehicle to a comfortable temperature
We recommend the following setting once the windows are no longer
misted up and the desired teperature has been reached:
•Control dial at the desired heat temperature
•Control dial in position 2 or 3
•Control dial in the position
•Open the air outlet vents 4
•Set the air distribution regulator as required between positions
and , if the windscreen gets misted up again.
Maximum cooling
•Close all windows and the sliding/tilting roof.
•Turn the control dial to the left up to the stop
•Control dial in the position 4
•Control dial in the position
•Open air outlet vents 3 and 4
•Switch on the air conditioning system by pressing button
•Switch on recirculated air mode by pressing button .
In this operating mode the air will be sucked out of the inside of the vehicle
and cooled (recirculated air mode). The recirculated air mode should only
be used for a short time since no fresh air from outside is being brought in.
Do not smoke in the vehicle when in recirculated air mode.
Optimum cooling
•Control dial at the desired heat temperature. This temperature will
be maintained automatically.
•Control dial in position 1 , 2, or 3
•Control dial in the position
•Open air outlet vents 3 and 4
•Switch on the air conditioning system by pressing button
•We recommend setting the air outlet vents 3 and 4 in such a way that
the air flows to the rear over the heads of the occupants. Do not press
button - recirculated air mode.
In this operating mode fresh air is drawn from outside and cooled.
AA
AB
AC
AA
AB
AC
AD
AA
AB
AC
AC
AA
AB
AC
AE
AD
AA
AB
AC
AE
AD
Page 98 of 233
Starting-off and Driving97
Using the systemSafetyDriving TipsGeneral MaintenanceBreakdown assist-
anceTechnical DataFabia Praktik
•The clutch pedal should be fully depressed when starting the engine
which means that the starter only has to crank the engine.
•Let go of the key as soon as the engine starts otherwise there may be
damage to the starter.
The engine running noises may louder at first be louder for a short time
after starting the cold engine until oil pressure can be built up in the
hydraulic valve clearance compensation. This is quite normal and is not
an operating problem.
If the engine does not start ...
You can use the battery of another vehicle as a jump-start aid
⇒ page 203.
It is only possible to tow-start vehicles fitted with a manual gearbox. The
tow-starting distance must not be more than 50 metres ⇒page 207.
Caution
•Avoid high engine revolutions, full throttle and high engine loads as
long as the engine has not yet reached its normal operating temperature
- risk of damaging the engine!
•Vehicles which are fitted with an exhaust gas catalytic converter
should not be tow-started over a distance of more than 50 metres.
For the sake of the environment
Never warm up the engine when the vehicle is standing. Drive off right
away. This enables you to avoid unnecessary pollutant emissions.
Petrol engines
These engines are fitted with a starter system which selects the correct
fuel/air mixture for every external air temperature.
•Do not operate the accelerator before and when starting engine if the
engine is cold or at normal operating temperature.
•Interrupt the attempt at starting after 10 seconds if the engine does not
start right awayand wait for about 30 seconds before repeating the
attempt.
•It is possible that the fuse on the electrical fuel pump is defect if the
engine still does not start ⇒page 209.
Contact the nearest Škoda dealer to obtain professional assistance.
•It may be necessary, if the engine is very hot, to slightly depress the
accelerator after the engine has started.
Diesel engines
Glow plug system
Diesel engines are equipped with a glow plug system, the preglow period
being controlled automatically in line with the coolant temperature and
outside temperature.
The preglow indicator light
comes on after the ignition has been
switched on.
You should not switch on any major electrical components during
the heating period otherwise the vehicle battery will be drained
unnecessarily.
•You should start the engine immediately after the glow plug warning
light has gone out.
WARNING
There is the danger of poisoning if the engine is left running in an
enclosed space!
Page 101 of 233
Starting-off and Driving
100
Parking aid*
The parking aid provides a warning of obstacles behind
the vehicle.
The audible parking aid determines the distance between the rear bumper
and an obstacle located behind the vehicle with the aid of ultrasound
sensors. The sensors are integrated in the rear bumper.
The parking aid is activated automatically when reverse gear is engaged
and the ignition is turned on. This is confirmed by a brief signal.
The clearance warning begins at a distance of about 160 cm from the
obstacle. The interval between the warning signals becomes shorter as
the clearance is reduced.
A continuous tone sounds from a clearance of just 30 cm - danger area.
You should not reverse any further after this signal sounds.
Note
•The parking aid does not operate if you are towing a trailer (applies to
models which feature a factory-fitted towing device*).
•A system fault is indicated if a warning signal sounds for about 5
seconds after switching the ignition on and engaging reverse gear and there is no obstacle close to your vehicle. Have the fault rectified by a
Škoda dealer.
•The sensors must be kept clean and free of ice to enable the parking
aid to operate properly.
Cruise control system (CCS)*
Introduction
The cruise control system makes it possible for the driver to maintain a
constant speed of his choosing from a speed of 30 km/h or higher. This,
of course, is only possible within the range which is permitted by the
power output and braking power of the engine. Using the cruise control
system - particularly on long journeys - makes it possible for you to rest
your “accelerator foot”.
Caution
Models fitted with a manual gearbox: Always depress the clutch pedal if
you switch on the cruise control system when the gearbox is in Neutral.
The engine will rev up and may even be damaged under certain circum-
stances.
WARNING
•The parking aid is not a substitute for the driver paying proper
attention. It is always the driver's responsibility to take care when
parking the vehicle or carrying out similar manoeuvres.
•You should therefore satisfy yourself, before reversing, that
there is no small obstacle, such as a rock, thin post, trailer drawbar
etc., behind your vehicle. Such an obstacle might not be within the
range detected by the sensors.
WARNING
The cruise control system must not, for safety reasons, be used in
dense traffic or on unfavourable road surfaces (such as icy roads,
slippery roads or loose chippings) - risk of accident!
Page 108 of 233
Automatic gearbox*107
Using the systemSafetyDriving TipsGeneral MaintenanceBreakdown assist-
anceTechnical DataFabia Praktik
down at higher engine speeds than is the case for the economy-oriented
programmes.
Selecting the most appropriate driving programme for the particular style
of driving is a continuous process. Irrespective of this it is, however,
possible to switch into a sporty driving programme by depressing the
accelerator rapidly. The gearbox shifts down into a lower gear matching
the speed of the car and this allows you to accelerate rapidly (e.g. when
overtaking) without having to depress the accelerator pedal fully into the
kickdown range. The original programme will be reactivated to match your
particular style of driving once the gearbox has shifted up again.
When driving in hilly regions, the gears are selected to match uphill and
downhill sections. This avoids the gearbox frequently shifting up and down
when negotiating an uphill stretch. Depressing the brake pedal while
driving downhill causes the gearbox to shift down into the next lower gear.
This makes it possible for you to exploit the engine braking power without
the need for shifting gears manually.
Emergency programme
An emergency programme exists in the event of a fault in
the system.
The gearbox operates in a corresponding emergency programme if there
are functional faults in the gearbox electronics.
•The gearbox still switches automaticallly but stronger switching shocks
are noticeable.
•The gearbox does not switch anymore automatically. The gearbox can
now only be switched manually but there are only 3 gears available over
the selector lever positions namely D, 3 and 2. The 1st gear and reverse
are available as before over the selector lever positions 1 and R. If the gearbox has switched over to emergency mode, drive to the
nearest Škoda dealer in order to have the fault rectified.
Tow-starting and towing vehicle
Tow-starting a vehicle
For technical reasons it is not possible to tow-start a car fitted with an auto-
matic gearbox
⇒page 205.
You can use jump-start cables connected to the battery of another vehicle
for starting your car if the vehicle battery is flat ⇒page 203.
Towing a vehicle
Please pay attention to the following information if it comes necessary to
tow-in your car ⇒page 205.
Page 113 of 233
Seat belts
112
Seat belts
Why seat belts?
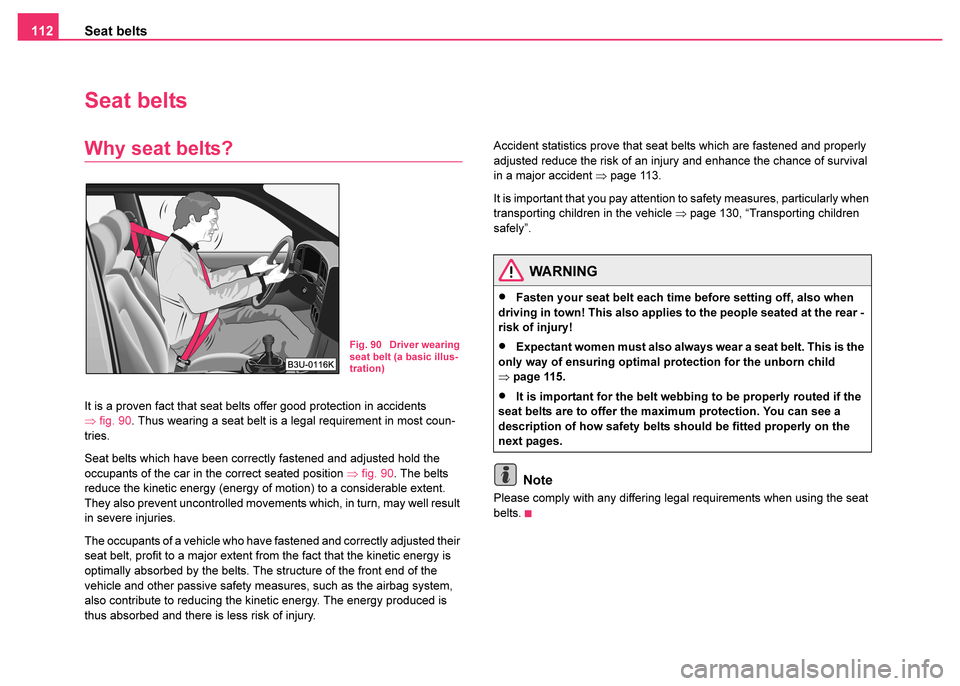
It is a proven fact that seat belts offer good protection in accidents
⇒ fig. 90. Thus wearing a seat belt is a legal requirement in most coun-
tries.
Seat belts which have been correctly fastened and adjusted hold the
occupants of the car in the correct seated position ⇒fig. 90 . The belts
reduce the kinetic energy (energy of motion) to a considerable extent.
They also prevent uncontrolled movements which, in turn, may well result
in severe injuries.
The occupants of a vehicle who have fastened and correctly adjusted their
seat belt, profit to a major extent from the fact that the kinetic energy is
optimally absorbed by the belts. The structure of the front end of the
vehicle and other passive safety measures, such as the airbag system,
also contribute to reducing the kinetic energy. The energy produced is
thus absorbed and there is less risk of injury. Accident statistics prove that seat belts which are fastened and properly
adjusted reduce the risk of an injury and enhance the chance of survival
in a major accident
⇒page 113.
It is important that you pay attention to safety measures, particularly when
transporting children in the vehicle ⇒page 130, “Transporting children
safely”.
Note
Please comply with any differing legal requirements when using the seat
belts.
Fig. 90 Driver wearing
seat belt (a basic illus-
tration)
WARNING
•Fasten your seat belt each time before setting off, also when
driving in town! This also applies to the people seated at the rear -
risk of injury!
•Expectant women must also always wear a seat belt. This is the
only way of ensuring optimal protection for the unborn child
⇒ page 115.
•It is important for the belt webbing to be properly routed if the
seat belts are to offer the maximum protection. You can see a
description of how safety belts should be fitted properly on the
next pages.
Page 119 of 233
Seat belts
118
Three-point safety belt for the middle rear seat*
It is used in the same way as the normal three-point seat belts on the left
and right (at front and rear). The middle three-point seat belt must be put
on first to allow the pelvic part of the belt to be pulled through between the
belt lock for the right three-point seat belt and the backrest, while avoiding
crossing the belt webbing of the middle and side seat belts.
Belt tensioners
Safety for the driver and front passenger wearing their seat belts is
enhanced by the belt tensioners fitted to the inertia reels of the front three-
point seat belts. The fastened three-point seat belts are automatically tensioned in the
event of a frontal collision of a certain severity. On vehicles fitted with side
airbags, a seat belt which is not fastened is also tensioned.
The belt tensioner is deployed in the event of a frontal collision of major
severity. A powder charge is ignited in the inertia reels during deployment.
The belt webbing is pulled into the inertia reels by a mechanical system
and the belt is tensioned.
Belt tensioners are not activated in the event of minor frontal collisions,
side and rear-end collisions, in the case of a rollover and also not in acci-
dents in which no major forces are produced from the front.
Note
•Smoke is generated when the belt tensioners are deployed. This is not
an indication of a fire in the vehicle.
•It is essential to pay attention to relevant safety regulations if the
vehicle or individual parts of the system are scrapped. Škoda dealers are
familiar with these regulations and will be able to provide you with detailed
information in this respect.
WARNING
•The pelvic belt must always sit firmly across the pelvis; tighten
the belt webbing if necessary.
•An unused pelvic belt should be stowed away together with the
lock for safety reasons.
WARNING
The three-point safety belt for the middle of the rear seat can only
fulfil its function reliably when the backrests of the rear seats are
correctly locked into position ⇒page 29.
WARNING
•The service life of seat belts and belt tensioners is 15 years from
the date of manufacture of the vehicle. It is then necessary to have
the seat belts replaced by a Škoda dealer.
•Any work on the belt tightener system, including removal and
installation of system components because of other repair work,
must only be carried out by Škoda dealer.
•The protective function of the system is only adequate for a
single accident. If the belt tensioners have been deployed, it is then
necessary to replace the entire system.
•The Owner's Manual must also be handed over to the new
owner if the vehicle is sold.
Page 128 of 233
Airbag system127
Using the systemSafetyDriving TipsGeneral MaintenanceBreakdown assist-
anceTechnical DataFabia Praktik
Deactivating an airbag
Deactivating airbags
If any airbags have been deactivated, switch them on
again as soon as possible so that they are able to again
provide their proper protection.
There is the technical means installed within your vehicle to switch off the
front passenger airbag or side airbag (take out of commission).
Have the airbags and also the side airbags deactivated by a Škoda
Dealer.
On Vehicles equipped with the switch for deactivation of the airbags, you
can deactivate the front passenger airbag or the front passenger side
airbag be means of this switch ⇒page 128.
Deactivation of airbags is envisaged only for particular instances,
such as if:
•You must in exceptional cases use a child seat on the front
passenger seat where the child is seated with its back to the direction of
travel (in some countries this must be in the direction of travel due to other
legal regulations applying) ⇒ page 130, “Important safety information on
using child safety seats”.
•You are not able to maintain the distance of at least 25 cm between
middle of steering wheel and chest, despite the driver seat being correctly
adjusted.
•Special attachments are required in the area of the steering wheel
because of a physical disability.
•You have installed other seats (e.g. orthopaedic seats without side
airbags). Your Škoda dealer will be able to advise you whether national legislation
in your country allows airbags in your vehicle to be deactivated, and which
ones.
Monitoring the airbag system
The functionality of the airbag system is monitored electronically, also
when the airbags have been switched off
An airbag which has been switched off by a Škoda dealer using the
vehicle system tester:
•The airbag indicator light in the instrument cluster lights up for about 3
seconds after switching on the ignition and then flashes after that for about
12 seconds.
Front passenger airbags switched off using the switch for front
passenger airbags* in stowage compartment on the front passenger
side:
•The airbag indicator light in the instrument cluster comes on for about
3 seconds each time the ignition is switched on.
•Switching off airbags is indicated in the middle of the dash panel by the
lighting up of the indicator light ⇒ page 128.
Note
Your Škoda dealer can provide you with further information regarding the
possibility of deactivating airbags.