technical data SKODA FABIA 2003 1.G / 6Y Service Manual
[x] Cancel search | Manufacturer: SKODA, Model Year: 2003, Model line: FABIA, Model: SKODA FABIA 2003 1.G / 6YPages: 233, PDF Size: 32.04 MB
Page 86 of 233

Seats and Stowage85
Using the systemSafetyDriving TipsGeneral MaintenanceBreakdown assist-
anceTechnical DataFabia Praktik
Storage compartment in the luggage compartment
(estate car)*
There are storage compartments situated on the right and the left
in the luggage compartment ⇒ fig. 75.
Rear armrest with stowage compartment*
– You can fold down the armrest to enhance occupant comfort
⇒fig. 76 .
Fig. 75 Luggage
compartment: Storage
compartmentsFig. 76 Rear seats:
Armrest
1 2
Fig. 77 Armrest:
Storage compartment
Page 88 of 233
Heating and air conditioning system87
Using the systemSafetyDriving TipsGeneral MaintenanceBreakdown assist-
anceTechnical DataFabia Praktik
Heating and air conditioning system
Heating
Using the system
The heating system delivers air into the interior of the
vehicle and warms it as required.
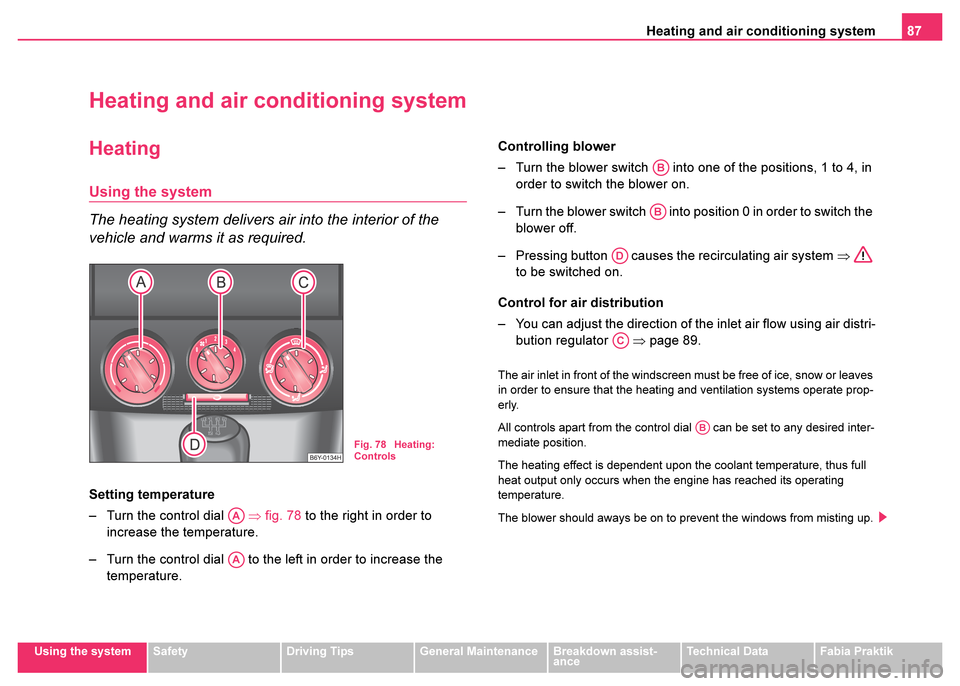
Setting temperature
– Turn the control dial ⇒fig. 78 to the right in order to
increase the temperature.
– Turn the control dial to the left in order to increase the temperature. Controlling blower
– Turn the blower switch into one of the positions, 1 to 4, in
order to switch the blower on.
– Turn the blower switch into position 0 in order to switch the blower off.
– Pressing button causes the recirculating air system ⇒
to be switched on.
Control for air distribution
– You can adjust the direction of the inlet air flow using air distri- bution regulator ⇒page 89.
The air inlet in front of the windscreen must be free of ice, snow or leaves
in order to ensure that the heating and ventilation systems operate prop-
erly.
All controls apart from the control dial can be set to any desired inter-
mediate position.
The heating effect is dependent upon the coolant temperature, thus full
heat output only occurs when the engine has reached its operating
temperature.
The blower should aways be on to prevent the windows from misting up.
Fig. 78 Heating:
Controls
AA
AA
AB
AB
AD
AC
AB
Page 90 of 233
Heating and air conditioning system89
Using the systemSafetyDriving TipsGeneral MaintenanceBreakdown assist-
anceTechnical DataFabia Praktik
The control dial can be set to other positions as required.
Recirculated air mode
In recirculated air mode air is sucked out of the interior of
the vehicle and then fed back into the interior.
Recirculated air mode prevents po
lluted air outside the vehicle
from getting into the vehicle, for example when driving through a
tunnel or when standing in a traffic jam.
Switching recirculated air mode on
– Press button , the button symbol
lights up ⇒page 87,
fig. 78 .
Switching recirculated air mode off
– Press button again, the button symbol
goes out.
Recirculated air mode is switched off automatically if the air distribution
control is in position ⇒ page 87, fig. 78 ⇒page 87, fig. 78 .
Air outlet vents
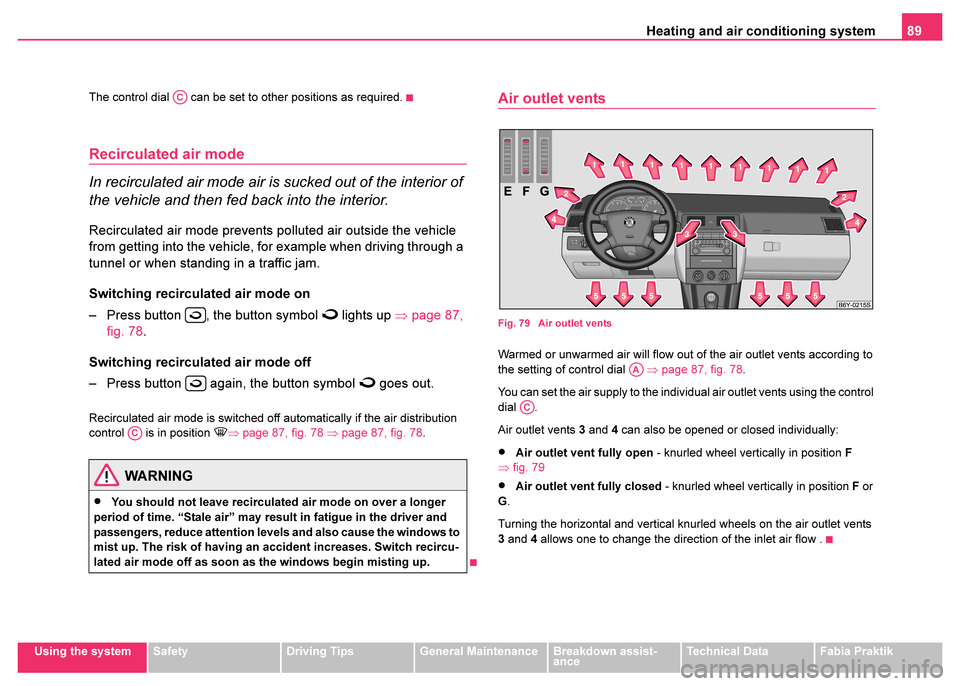
Fig. 79 Air outlet vents
Warmed or unwarmed air will flow out of the air outlet vents according to
the setting of control dial ⇒page 87, fig. 78.
You can set the air supply to the individual air outlet vents using the control
dial .
Air outlet vents 3 and 4 can also be opened or closed individually:
•Air outlet vent fully open - knurled wheel vertically in position F
⇒ fig. 79
•Air outlet vent fully closed - knurled wheel vertically in position F or
G .
Turning the horizontal and vertical knurled wheels on the air outlet vents
3 and 4 allows one to change the direction of the inlet air flow .WARNING
•You should not leave recirculated air mode on over a longer
period of time. “Stale air” may result in fatigue in the driver and
passengers, reduce attention levels and also cause the windows to
mist up. The risk of having an accident increases. Switch recircu-
lated air mode off as soon as the windows begin misting up.
AC
AC
AA
AC
Page 92 of 233

Heating and air conditioning system91
Using the systemSafetyDriving TipsGeneral MaintenanceBreakdown assist-
anceTechnical DataFabia Praktik
Using the system
Setting temperature
– Turn the control dial ⇒fig. 80 to the right in order to
increase the temperature.
– Turn the control dial to the left in order to increase the temperature.
Controlling blower
– Turn the blower switch into one of the positions, 1 to 4, in order to switch the blower on.
– Turn the blower switch into position 0 in order to switch the blower off.
– Pressing button causes the recirculating air system ⇒page 93 to be switched on. Control for air distribution
– You can adjust the direction of the inlet air flow using air distri-
bution regulator ⇒page 93.
Switching air conditioning on/off
– Press the button . The symbol
in the button comes
on.
– When you again press the button , the air conditioning system is switched off. The symbol
in the button is no
longer illuminated.
The set temperature will be automatically maintained other than
when the control dial is on the extreme right or extreme left position:
Extreme right position - full heating
Extreme left position - full cooling
All controls apart from the control dial and buttons and can be
set to any desired intermediate position.
The blower should aways be on to prevent the windows from misting up.
Note
•The whole heat output will be needed to unfrost the windscreen and
side windows. No warm air will be fed to the footwell. This can lead to
restriction of the heating comfort.
•The used air streams out through the air removal openings in the
luggage compartment.
•If the air conditioning system has not been switched on for a lengthy
period, odours may be produced at the evaporator because of deposits.
Switch the air conditioning system on at least once a month for approxi-
mately 5 minutes at the highest blower stage - also during the cold season
Fig. 80 The air condi-
tioning system:
Controls
AA
AA
AB
AB
AD
AC
ACAE
AC
ABADAE
Page 94 of 233

Heating and air conditioning system93
Using the systemSafetyDriving TipsGeneral MaintenanceBreakdown assist-
anceTechnical DataFabia Praktik
Fresh air mode - ventilation
Non- pre-warmed fresh air streams through the air inlet nozzles
3 and 4
for the following settings.
•Turn the control dial ⇒page 91, fig. 80 to the left up to the stop
•Control dial into the desired position
•Control dial in the position
•Open air outlet vents 3 and 4 ⇒ fig. 81
•Switch off the recirculated air mode by pressing button .
•Switch off the cooling by pressing button
The control dial can be set to other positions as required.
Recirculated air mode
In recirculated air mode air is sucked out of the interior of
the vehicle and then fed back into the interior.
Recirculated air mode prevents po lluted air outside the vehicle
from getting into the vehicle, for example when driving through a
tunnel or when standing in a traffic jam.
Switching recirculated air mode on
– Press button ⇒page 91, fig. 80 , the button symbol
lights up.
Switching recirculated air mode off
– Press button again, the button symbol
goes out.
Recirculated air mode is switched off automatically if the air distribution
control is in position ⇒ page 91, fig. 80 . You can also switch recir- culated air mode on again from this setting by repeatedly pressing button
.
Air outlet vents
Fig. 81 Air outlet vents
Unwarmed or cooled air will flow out of the air outlet vents according to the
setting of control dial ⇒page 91, fig. 80 and the atmospheric condi-
tions.
AA
AB
AC
AD
AE
AC
AC
WARNING
You should not leave recirculated air mode on over a longer period
of time. “Stale air” may result in fatigue in the driver and passen-
gers, reduce attention levels and also cause the windows to mist
up. The risk of having an accident increases. Switch recirculated
air mode off as soon as the windows begin misting up.
AD
AA
Page 96 of 233
Starting-off and Driving95
Using the systemSafetyDriving TipsGeneral MaintenanceBreakdown assist-
anceTechnical DataFabia Praktik
Starting-off and Driving
Setting steering wheel position*
You can set the height and the forward/back position of the
steering wheel to the desired position.
– Adjust the driver seat ⇒page 63.
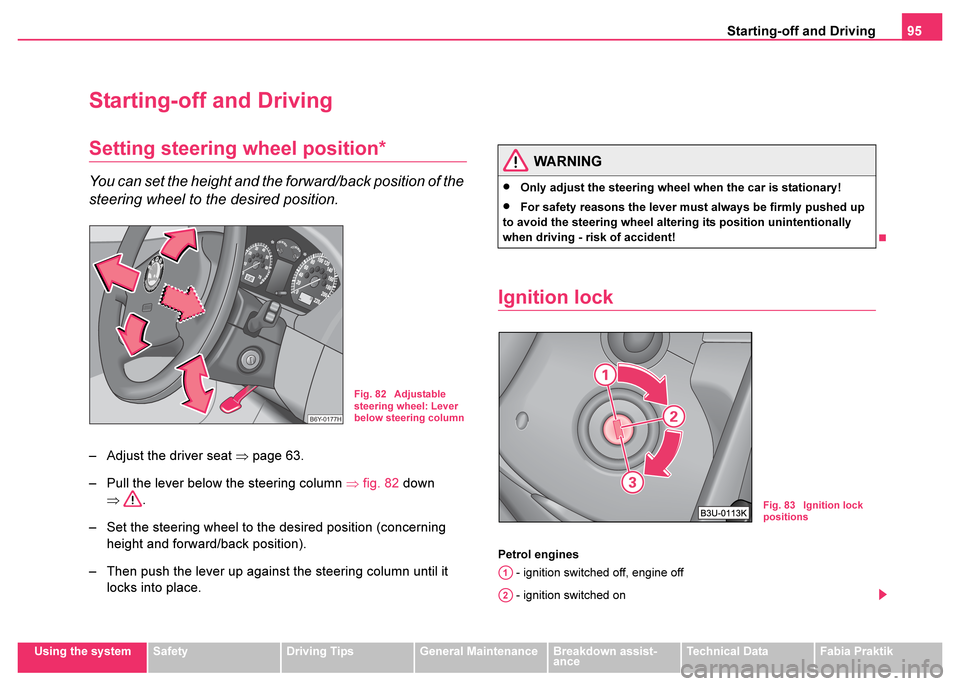
– Pull the lever below the steering column ⇒fig. 82 down
⇒ .
– Set the steering wheel to the desired position (concerning height and forward/back position).
– Then push the lever up against the steering column until it locks into place.
Ignition lock
Petrol engines
- ignition switched off, engine off
- ignition switched on
Fig. 82 Adjustable
steering wheel: Lever
below steering column
WARNING
•Only adjust the steering wheel when the car is stationary!
•For safety reasons the lever must always be firmly pushed up
to avoid the steering wheel altering its position unintentionally
when driving - risk of accident!
Fig. 83 Ignition lock
positions
A1
A2
Page 98 of 233
Starting-off and Driving97
Using the systemSafetyDriving TipsGeneral MaintenanceBreakdown assist-
anceTechnical DataFabia Praktik
•The clutch pedal should be fully depressed when starting the engine
which means that the starter only has to crank the engine.
•Let go of the key as soon as the engine starts otherwise there may be
damage to the starter.
The engine running noises may louder at first be louder for a short time
after starting the cold engine until oil pressure can be built up in the
hydraulic valve clearance compensation. This is quite normal and is not
an operating problem.
If the engine does not start ...
You can use the battery of another vehicle as a jump-start aid
⇒ page 203.
It is only possible to tow-start vehicles fitted with a manual gearbox. The
tow-starting distance must not be more than 50 metres ⇒page 207.
Caution
•Avoid high engine revolutions, full throttle and high engine loads as
long as the engine has not yet reached its normal operating temperature
- risk of damaging the engine!
•Vehicles which are fitted with an exhaust gas catalytic converter
should not be tow-started over a distance of more than 50 metres.
For the sake of the environment
Never warm up the engine when the vehicle is standing. Drive off right
away. This enables you to avoid unnecessary pollutant emissions.
Petrol engines
These engines are fitted with a starter system which selects the correct
fuel/air mixture for every external air temperature.
•Do not operate the accelerator before and when starting engine if the
engine is cold or at normal operating temperature.
•Interrupt the attempt at starting after 10 seconds if the engine does not
start right awayand wait for about 30 seconds before repeating the
attempt.
•It is possible that the fuse on the electrical fuel pump is defect if the
engine still does not start ⇒page 209.
Contact the nearest Škoda dealer to obtain professional assistance.
•It may be necessary, if the engine is very hot, to slightly depress the
accelerator after the engine has started.
Diesel engines
Glow plug system
Diesel engines are equipped with a glow plug system, the preglow period
being controlled automatically in line with the coolant temperature and
outside temperature.
The preglow indicator light
comes on after the ignition has been
switched on.
You should not switch on any major electrical components during
the heating period otherwise the vehicle battery will be drained
unnecessarily.
•You should start the engine immediately after the glow plug warning
light has gone out.
WARNING
There is the danger of poisoning if the engine is left running in an
enclosed space!
Page 100 of 233
Starting-off and Driving99
Using the systemSafetyDriving TipsGeneral MaintenanceBreakdown assist-
anceTechnical DataFabia Praktik
Note
One should not lay the hand on the shift lever while driving the vehicle.
The pressure of the hand will be transferred to the gearshift forks in the
gearbox. This can, over a period of time, lead to early wear of the gearshift
forks.
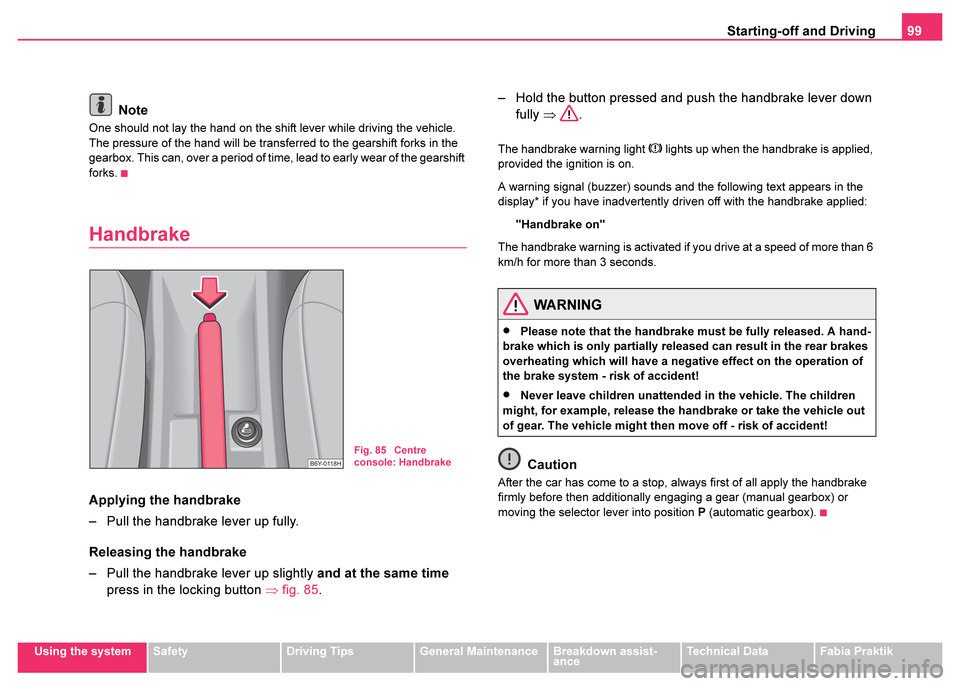
Handbrake
Applying the handbrake
– Pull the handbrake lever up fully.
Releasing the handbrake
– Pull the handbrake lever up slightly and at the same time
press in the locking button ⇒fig. 85 . – Hold the button pressed and push the handbrake lever down
fully ⇒ .
The handbrake warning light lights up when the handbrake is applied,
provided the ignition is on.
A warning signal (buzzer) sounds and the following text appears in the
display* if you have inadvertently driven off with the handbrake applied:
"Handbrake on"
The handbrake warning is activated if you drive at a speed of more than 6
km/h for more than 3 seconds.
Caution
After the car has come to a stop, always first of all apply the handbrake
firmly before then additionally engaging a gear (manual gearbox) or
moving the selector lever into position P (automatic gearbox).
Fig. 85 Centre
console: Handbrake
WARNING
•Please note that the handbrake must be fully released. A hand-
brake which is only partially released can result in the rear brakes
overheating which will have a negative effect on the operation of
the brake system - risk of accident!
•Never leave children unattended in the vehicle. The children
might, for example, release the handbrake or take the vehicle out
of gear. The vehicle might then move off - risk of accident!
Page 102 of 233
Starting-off and Driving101
Using the systemSafetyDriving TipsGeneral MaintenanceBreakdown assist-
anceTechnical DataFabia Praktik
Note
•The cruise control system is not able to maintain a constant speed
when driving on steep downhill sections. The weight of the vehicle
increases the speed at which it travels. One should shift down in good time
to a lower gear or slow the vehicle down by applying the foot brake.
•It is not possible on vehicles fitted with an automatic gearbox to switch
on the cruise control system if the selector lever is in the position P, N, R
or 1.
Storing a speed
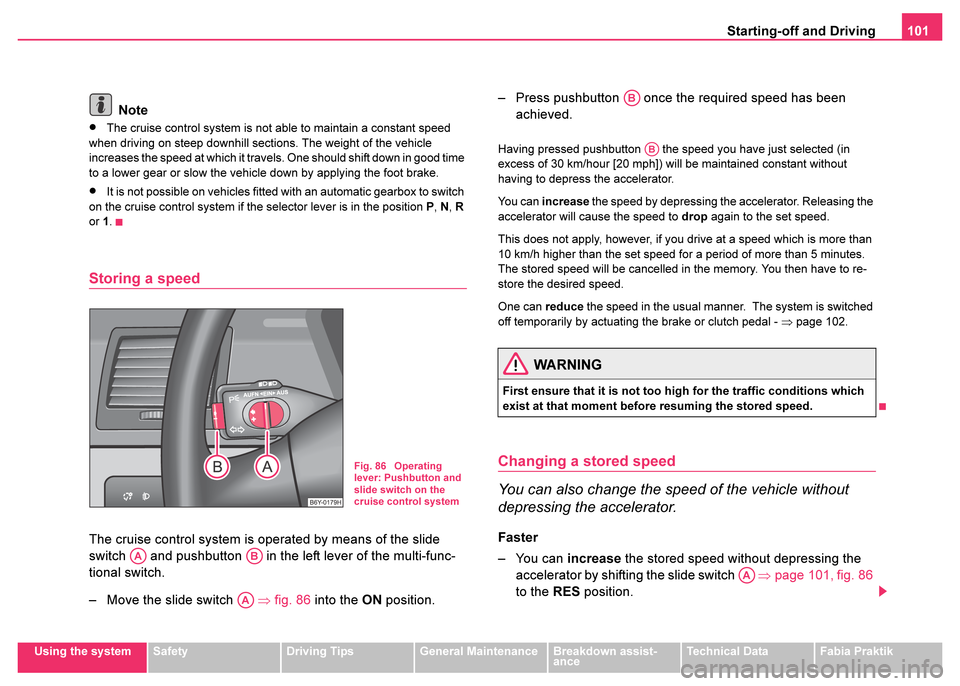
The cruise control system is operated by means of the slide
switch and pushbutton in the left lever of the multi-func-
tional switch.
– Move the slide switch ⇒fig. 86 into the ON position. – Press pushbutton once the required speed has been
achieved.
Having pressed pushbutton the speed you have just selected (in
excess of 30 km/hour [20 mph]) will be maintained constant without
having to depress the accelerator.
You can increase the speed by depressing the accelerator. Releasing the
accelerator will cause the speed to drop again to the set speed.
This does not apply, however, if you drive at a speed which is more than
10 km/h higher than the set speed for a period of more than 5 minutes.
The stored speed will be cancelled in the memory. You then have to re-
store the desired speed.
One can reduce the speed in the usual manner. The system is switched
off temporarily by actuating the brake or clutch pedal - ⇒page 102.
Changing a stored speed
You can also change the speed of the vehicle without
depressing the accelerator.
Faster
– You can increase the stored speed without depressing the
accelerator by shifting the slide switch ⇒page 101, fig. 86
to the RES position.
Fig. 86 Operating
lever: Pushbutton and
slide switch on the
cruise control system
AAAB
AA
WARNING
First ensure that it is not too high for the traffic conditions which
exist at that moment before resuming the stored speed.
AB
AB
AA
Page 104 of 233
Automatic gearbox*103
Using the systemSafetyDriving TipsGeneral MaintenanceBreakdown assist-
anceTechnical DataFabia Praktik
Automatic gearbox*
4-speed automatic gearbox
Information for driving with an automatic gearbox
Shifting up and down through the gears is performed auto-
matically.
Starting-off and Driving
– Depress the brake pedal and hold it depressed.
– Press the Shiftlock button (button in handle of the selector
lever), move the selector lever into the desired position, e.g. D
⇒ page 104, fig. 87 , and then release the Shiftlock button.
– Wait a moment until the gearbox has shifted (a slight engage- ment nudge can be felt).
– Release the brake pedal and depress the accelerator ⇒.
Stopping for a short time
– The selector lever position N does not have to be selected
when stopping just for a short time, such as at a cross roads.
It is sufficient to hold the vehicle stationary using the foot
brake. The engine can, however, be allowed just to idle.
Parking
– Depress the brake pedal and hold it depressed.
– Apply the handbrake firmly. – Press and Shiftlock button in the selector lever, move the
selector lever to P and then release the Shiftlock button.
The engine can only be started when the selector lever is in position P or
N ⇒ page 96.
It is sufficient to engage selector lever position P when parking on a flat
surface. When parking on a slope you should first apply the handbrake
firmly and then move the selector lever into position P. This is to ensure
that there is no excessive pressure acting on the lock mechanism and that
it is easier to subsequently move the selector lever out of position P.
If the selector lever position N is selected by accident while driving it is first
necessary to release pressure on the accelerator pedal and wait for idling
speed of the engine to be reached before engaging a drive position in the
selector lever.
WARNING
•Do not depress the accelerator when changing the position of
the selector lever if the car is stationary and the engine is running
- risk of accident!
•Never move the selector lever into position R or P when driving
- risk of an accident!
•When the engine is running and the vehicle is stationary, it is
necessary to hold the car with the brake pedal in all the positions
of the selector lever (except P and N) since the power transmission
is never completely interrupted, also not when the engine is idling
- the vehicle "creeps".