SKODA FABIA 2003 1.G / 6Y Manual Online
Manufacturer: SKODA, Model Year: 2003, Model line: FABIA, Model: SKODA FABIA 2003 1.G / 6YPages: 233, PDF Size: 32.04 MB
Page 81 of 233

Seats and Stowage
80
Cigarette lighter* and power socket*
Cigarette lighter
You can also use the socket on the cigarette lighter for
other electrical appliances.
Using the cigarette lighter
– Press in the button of the cigarette lighter ⇒fig. 67 .
– Wait until the button jumps forward.
– Remove the cigarette lighter immediately and use it.
– Insert the cigarette lighter again into the socket.
Using the power socket
– Take out the cigarette lighter. – Insert the plug of the electrical appliance into the socket of the
cigarette lighter.
The 12 volt power socket or the lighter holder can also be used for further
electrical appliance with a power uptake of up to 180 watts.
Caution
Only use matching plugs, which fulfils the DIN - ISO Standard 4165, to
avoid damaging the power sockets.
Note
Connecting electrical components when the engine is not running
will drain the battery of the vehicle - risk of battery draining!
Fig. 67 Centre
console: Cigarette
lighter
WARNING
•Take care when using the cigarette lighter! Not paying proper
attention or incorrect use the cigarette lighter in an uncontrolled
manner may result in burns.
•The cigarette lighter and the power socket also operates when
the ignition is switched off or the ignition key withdrawn. This is
why you should never leave children unattended in the vehicle.
Page 82 of 233
Seats and Stowage81
Using the systemSafetyDriving TipsGeneral MaintenanceBreakdown assist-
anceTechnical DataFabia Praktik
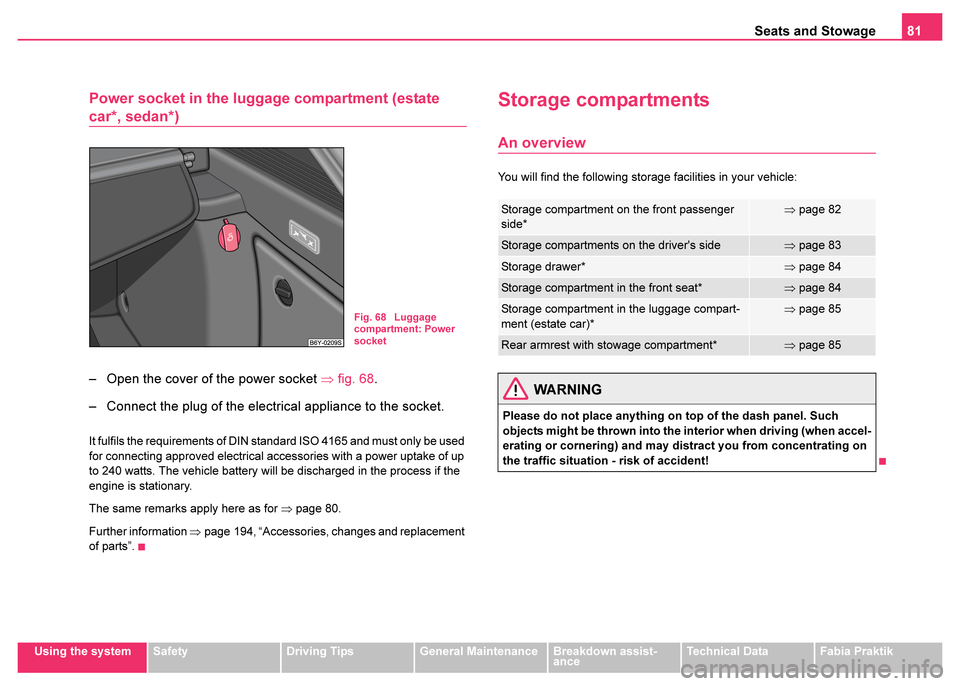
Power socket in the luggage compartment (estate
car*, sedan*)
– Open the cover of the power socket ⇒fig. 68 .
– Connect the plug of the electrical appliance to the socket.
It fulfils the requirements of DIN standard ISO 4165 and must only be used
for connecting approved electrical accessories with a power uptake of up
to 240 watts. The vehicle battery will be discharged in the process if the
engine is stationary.
The same remarks apply here as for ⇒page 80.
Further information ⇒ page 194, “Accessories, changes and replacement
of parts”.
Storage compartments
An overview
You will find the following storage facilities in your vehicle:
Fig. 68 Luggage
compartment: Power
socket
Storage compartment on the front passenger
side*⇒ page 82
Storage compartments on the driver's side⇒page 83
Storage drawer*⇒page 84
Storage compartment in the front seat*⇒page 84
Storage compartment in the luggage compart-
ment (estate car)*⇒page 85
Rear armrest with stowage compartment*⇒page 85
WARNING
Please do not place anything on top of the dash panel. Such
objects might be thrown into the interior when driving (when accel-
erating or cornering) and may distract you from concentrating on
the traffic situation - risk of accident!
Page 83 of 233

Seats and Stowage
82
Storage compartment on the front passenger side*
There a further storage compartment in the inner room of the
storage compartment located under the tiltable partition wall*
⇒ fig. 70 . Opening and closing the storage compartment on the front
passenger side
– Pull the handle in the lid in direction of arrow
⇒fig. 69 and pull
the lid down.
– Raise the lid and press it until the catch is heard to engage.
Folding up the partition wall
– Take hold of the partition wall at the edge or in the recess and folds it open in the direction ⇒fig. 70 .
– Press the partition wall until it clicks into place.
Folding down the partition wall
– Take hold of the partition wall at the edge (near the driver) and fold it down into its original position.
There is a depression on the inside of the flap for placing a drinks can in
and also a holder for writing implements*.
Fig. 69 Dash panel:
Storage compartment
on the front passenger
side
Fig. 70 Storage
compartment: tiltable
partition wall
WARNING
•The storage compartment must always be closed when driving
for safety reasons.
•The drinks can holder should not be used while driving.
Page 84 of 233
Seats and Stowage83
Using the systemSafetyDriving TipsGeneral MaintenanceBreakdown assist-
anceTechnical DataFabia Praktik
Cooling of storage compartment on front passenger
side*
The storage compartment is for vehicles fitted with an air-
conditioning system with a closable inlet for cooled air.
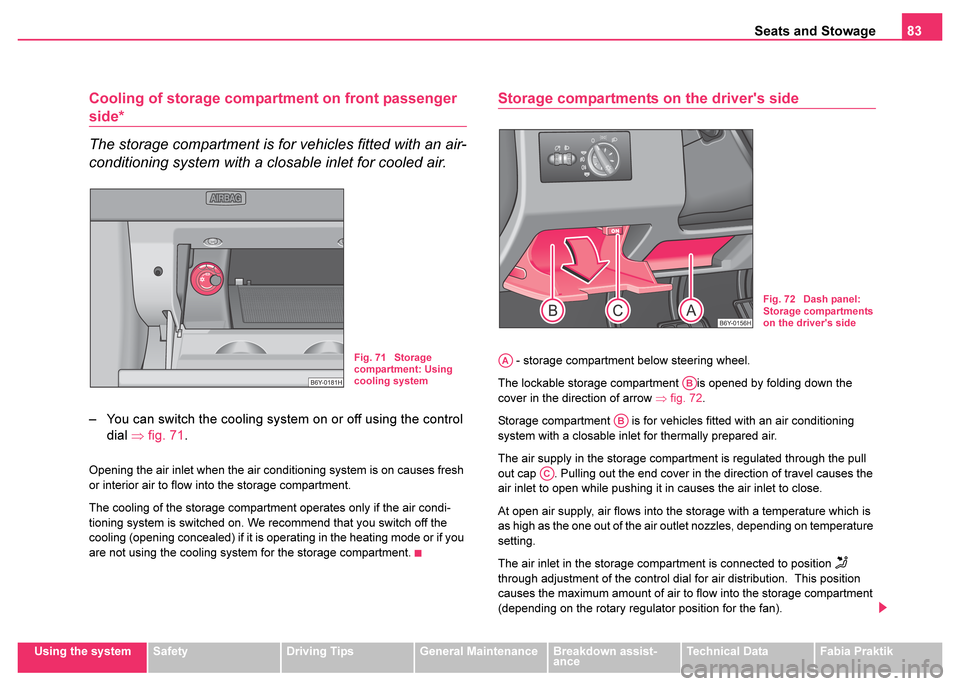
– You can switch the cooling system on or off using the control
dial ⇒ fig. 71.
Opening the air inlet when the air conditioning system is on causes fresh
or interior air to flow into the storage compartment.
The cooling of the storage compartment operates only if the air condi-
tioning system is switched on. We recommend that you switch off the
cooling (opening concealed) if it is operating in the heating mode or if you
are not using the cooling system for the storage compartment.
Storage compartments on the driver's side
- storage compartment below steering wheel.
The lockable storage compartment is opened by folding down the
cover in the direction of arrow ⇒fig. 72 .
Storage compartment is for vehicles fitted with an air conditioning
system with a closable inlet for thermally prepared air.
The air supply in the storage compartment is regulated through the pull
out cap . Pulling out the end cover in the direction of travel causes the
air inlet to open while pushing it in causes the air inlet to close.
At open air supply, air flows into the storage with a temperature which is
as high as the one out of the air outlet nozzles, depending on temperature
setting.
The air inlet in the storage compartment is connected to position
through adjustment of the control dial for air distribution. This position
causes the maximum amount of air to flow into the storage compartment
(depending on the rotary regulator position for the fan).
Fig. 71 Storage
compartment: Using
cooling system
Fig. 72 Dash panel:
Storage compartments
on the driver's side
AA
AB
AB
AC
Page 85 of 233

Seats and Stowage
84
You can use the storage compartment, for example, to temper drinks
cans, etc.
If you do not use the air inlet in the storage compartment, the end
cover should always be kept closed.
There is a holder for a pen on the outside of the storage compartment
.
Storage drawer*
– Press in the middle of the storage compartment ⇒fig. 73 and
the storage compartment will come out.
Storage compartment in the front seat*
The storage compartment is foreseen for storing small objects of
up to 1 kg. in weight.
– Tilt the lock to open the flap and pull out the flap ⇒fig. 74 .
– Hold the lock to close the flap until the flap is closed.
AB
Fig. 73 Dash panel:
Storage drawer
WARNING
•The storage compartment is not a substitute for the ashtray and
can also not be used for such purposes. Risk of fire!
•The pull-out storage compartment must always be kept closed
when driving for safety reasons.
Fig. 74 Front seat:
Storage compartment
Page 86 of 233

Seats and Stowage85
Using the systemSafetyDriving TipsGeneral MaintenanceBreakdown assist-
anceTechnical DataFabia Praktik
Storage compartment in the luggage compartment
(estate car)*
There are storage compartments situated on the right and the left
in the luggage compartment ⇒ fig. 75.
Rear armrest with stowage compartment*
– You can fold down the armrest to enhance occupant comfort
⇒fig. 76 .
Fig. 75 Luggage
compartment: Storage
compartmentsFig. 76 Rear seats:
Armrest
1 2
Fig. 77 Armrest:
Storage compartment
Page 87 of 233

Seats and Stowage
86
The armrest includes a stowage compartment. You open the compartment
by pressing the button on the front of the armrest and raising the cover
⇒ page 85, fig. 77 .
Page 88 of 233
Heating and air conditioning system87
Using the systemSafetyDriving TipsGeneral MaintenanceBreakdown assist-
anceTechnical DataFabia Praktik
Heating and air conditioning system
Heating
Using the system
The heating system delivers air into the interior of the
vehicle and warms it as required.
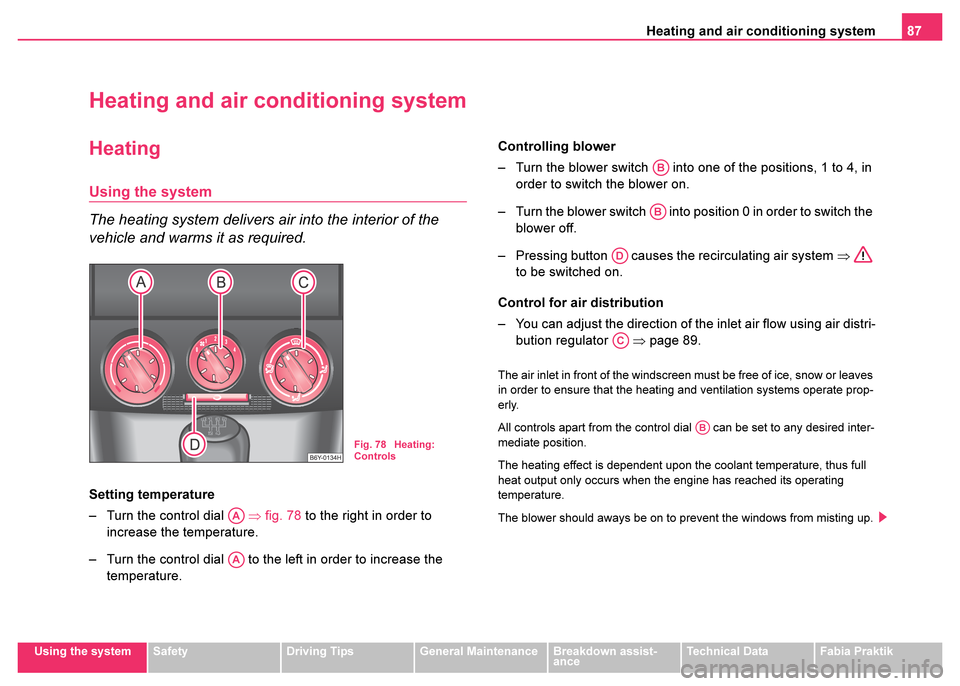
Setting temperature
– Turn the control dial ⇒fig. 78 to the right in order to
increase the temperature.
– Turn the control dial to the left in order to increase the temperature. Controlling blower
– Turn the blower switch into one of the positions, 1 to 4, in
order to switch the blower on.
– Turn the blower switch into position 0 in order to switch the blower off.
– Pressing button causes the recirculating air system ⇒
to be switched on.
Control for air distribution
– You can adjust the direction of the inlet air flow using air distri- bution regulator ⇒page 89.
The air inlet in front of the windscreen must be free of ice, snow or leaves
in order to ensure that the heating and ventilation systems operate prop-
erly.
All controls apart from the control dial can be set to any desired inter-
mediate position.
The heating effect is dependent upon the coolant temperature, thus full
heat output only occurs when the engine has reached its operating
temperature.
The blower should aways be on to prevent the windows from misting up.
Fig. 78 Heating:
Controls
AA
AA
AB
AB
AD
AC
AB
Page 89 of 233
Heating and air conditioning system
88
Note
•The whole heat output will be needed to unfrost the windscreen and
side windows. No warm air will be fed to the footwell. This can lead to
restriction of the heating comfort.
•The used air streams out through the air removal openings in the
luggage compartment.
Set heating
Recommended settings of heating controls for:
Defrosting the windscreen and side windows
•Turn control dial ⇒page 87, fig. 78 to the right up to the stop
•Control dial in the position 4
•Control dial in the position
•Open air outlet vents 4 ⇒ page 89, fig. 79 and point towards the side
window.
Keeping windscreen and side windows demisted
We recommend that you use the following setting in cases where the
windows are misted up more than usual (e.g. when it is raining):
•Control dial where necessary to the heating range
•Control dial in position 2 or 3
•Control dial to or as required or to any desired position
between these symbols
•Open air outlet vents 4 and point towards the side window
Warming up the inside of the vehicle as rapidly as possible
•Turn control dial to the right up to the stop
•Control dial in the position 4
•Control dial in the position
•Open the air outlet vents 4
•We recommend pressing button air recirculation mode. The
windows can steam up in this position however.
Heating the vehicle to a comfortable temperature
We recommend the following setting once the windows are no longer
misted up and the desired teperature has been reached:
•Control dial at the desired heat output
•Control dial in position 2 or 3
•Control dial in the position
•Open the air outlet vents 4
•Set the air distribution regulator as required between positions
and , if the windscreen gets misted up again.
Fresh air mode - ventilation
Non- pre-warmed fresh air streams through the air inlet nozzles 3 and 4
for the following settings.
Recirculated air mode must not be switched on.
•Turn the control dial ⇒ page 87, fig. 78 to the left up to the stop
•Control dial into the desired position
•Control dial in the position
•Open air outlet vents 3 and 4 ⇒page 89, fig. 79
WARNING
You should not leave recirculated air mode on over a longer period
of time. “Stale air” may result in fatigue in the driver and passen-
gers, reduce attention levels and also cause the windows to mist
up. The risk of having an accident increases. Switch recirculated
air mode off as soon as the windows begin misting up.
AA
AB
AC
AA
AB
AC
AA
AB
AC
AD
AA
AB
AC
AC
AA
AB
AC
Page 90 of 233
Heating and air conditioning system89
Using the systemSafetyDriving TipsGeneral MaintenanceBreakdown assist-
anceTechnical DataFabia Praktik
The control dial can be set to other positions as required.
Recirculated air mode
In recirculated air mode air is sucked out of the interior of
the vehicle and then fed back into the interior.
Recirculated air mode prevents po
lluted air outside the vehicle
from getting into the vehicle, for example when driving through a
tunnel or when standing in a traffic jam.
Switching recirculated air mode on
– Press button , the button symbol
lights up ⇒page 87,
fig. 78 .
Switching recirculated air mode off
– Press button again, the button symbol
goes out.
Recirculated air mode is switched off automatically if the air distribution
control is in position ⇒ page 87, fig. 78 ⇒page 87, fig. 78 .
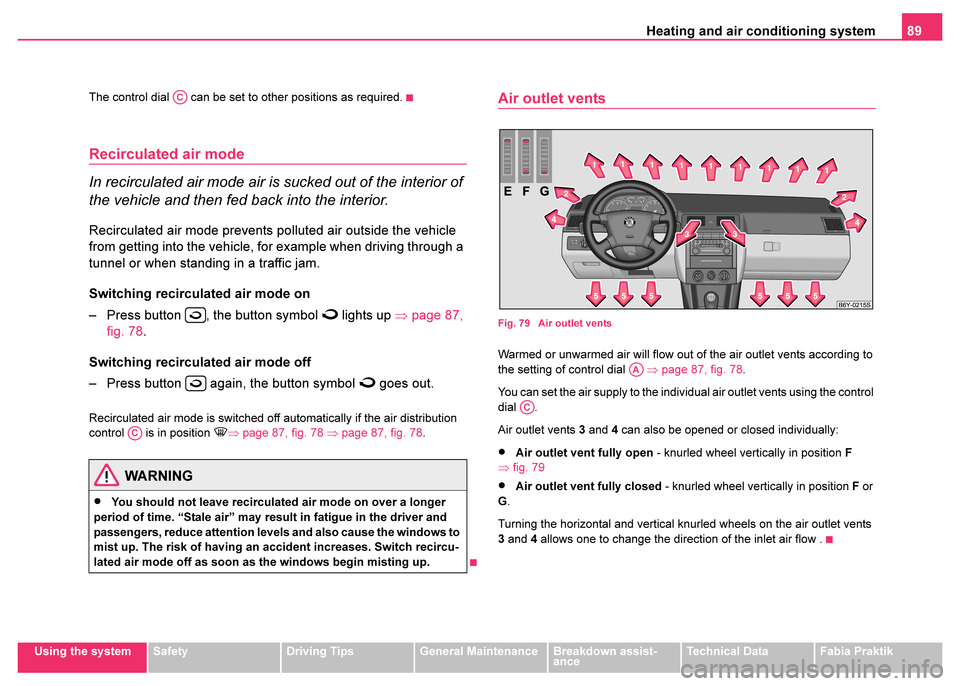
Air outlet vents
Fig. 79 Air outlet vents
Warmed or unwarmed air will flow out of the air outlet vents according to
the setting of control dial ⇒page 87, fig. 78.
You can set the air supply to the individual air outlet vents using the control
dial .
Air outlet vents 3 and 4 can also be opened or closed individually:
•Air outlet vent fully open - knurled wheel vertically in position F
⇒ fig. 79
•Air outlet vent fully closed - knurled wheel vertically in position F or
G .
Turning the horizontal and vertical knurled wheels on the air outlet vents
3 and 4 allows one to change the direction of the inlet air flow .WARNING
•You should not leave recirculated air mode on over a longer
period of time. “Stale air” may result in fatigue in the driver and
passengers, reduce attention levels and also cause the windows to
mist up. The risk of having an accident increases. Switch recircu-
lated air mode off as soon as the windows begin misting up.
AC
AC
AA
AC