Oil SKODA FABIA 2003 1.G / 6Y Owner's Manual
[x] Cancel search | Manufacturer: SKODA, Model Year: 2003, Model line: FABIA, Model: SKODA FABIA 2003 1.G / 6YPages: 233, PDF Size: 32.04 MB
Page 5 of 233
Contents
4
Driving Tips . . . . . . . . . . . . . . . . . . . . . .
Intelligent Technology . . . . . . . . . . . . . . . . . .
Electronic stability programme (ESP)* . . . . . .
Brakes . . . . . . . . . . . . . . . . . . . . . . . . . . . . . .
Antilock brake system (ABS)* . . . . . . . . . . . .
Power steering* . . . . . . . . . . . . . . . . . . . . . . .
Driving and the Environment. . . . . . . . . . . .
The first 1 500 kilometres and then afterwards
Catalytic converter . . . . . . . . . . . . . . . . . . . . .
Driving in an economical and environmentally
conscious manner . . . . . . . . . . . . . . . . . . . . .
Environmental compatibility . . . . . . . . . . . . . .
Motoring abroad . . . . . . . . . . . . . . . . . . . . . . .
Towing a trailer . . . . . . . . . . . . . . . . . . . . . . . .
Towing a trailer . . . . . . . . . . . . . . . . . . . . . . . .
Detachable towing device* . . . . . . . . . . . . . .
General Maintenance . . . . . . . . . .
Care and cleaning . . . . . . . . . . . . . . . . . . . . .
General . . . . . . . . . . . . . . . . . . . . . . . . . . . . .
Care of the exterior of vehicle . . . . . . . . . . . .
Care of the interior of vehicle . . . . . . . . . . . . .
Engine compartment . . . . . . . . . . . . . . . . . . .
Fuel. . . . . . . . . . . . . . . . . . . . . . . . . . . . . . . . . .
Petrol . . . . . . . . . . . . . . . . . . . . . . . . . . . . . . .
Diesel . . . . . . . . . . . . . . . . . . . . . . . . . . . . . . .
Refuelling . . . . . . . . . . . . . . . . . . . . . . . . . . . .
Inspecting and Replenishing. . . . . . . . . . . .
Engine compartment . . . . . . . . . . . . . . . . . . .
Engine oil . . . . . . . . . . . . . . . . . . . . . . . . . . . .
Cooling system . . . . . . . . . . . . . . . . . . . . . . .
Brake fluid . . . . . . . . . . . . . . . . . . . . . . . . . . .
The battery . . . . . . . . . . . . . . . . . . . . . . . . . . .
Windscreen Wiper and Washer System . . . . Spark plugs . . . . . . . . . . . . . . . . . . . . . . . . . .
V-ribbed belts . . . . . . . . . . . . . . . . . . . . . . . . .
The dust and pollen filter* . . . . . . . . . . . . . . .
Wheels and Tyres . . . . . . . . . . . . . . . . . . . . .
Wheels . . . . . . . . . . . . . . . . . . . . . . . . . . . . .
Accessories, changes and replacement of
parts . . . . . . . . . . . . . . . . . . . . . . . . . . . . . . . . .
General . . . . . . . . . . . . . . . . . . . . . . . . . . . . .
Breakdown assistance . . . . . . . .
Breakdown assistance . . . . . . . . . . . . . . . . .
First-aid box* and warning triangle* . . . . . . . .
Fire extinguisher* . . . . . . . . . . . . . . . . . . . . . .
Vehicle tool kit . . . . . . . . . . . . . . . . . . . . . . . .
Spray for repairing a tyre* . . . . . . . . . . . . . . .
Tyre repair kit* . . . . . . . . . . . . . . . . . . . . . . . .
Spare wheel* . . . . . . . . . . . . . . . . . . . . . . . . .
Changing a wheel . . . . . . . . . . . . . . . . . . . . .
Jump-starting . . . . . . . . . . . . . . . . . . . . . . . . .
Tow-starting and towing vehicle . . . . . . . . . . .
Fuses and light bulbs . . . . . . . . . . . . . . . . . .
Electric fuses . . . . . . . . . . . . . . . . . . . . . . . . .
Bulbs . . . . . . . . . . . . . . . . . . . . . . . . . . . . . . .
Technical Data. . . . . . . . . . . . . . . . . . .
General . . . . . . . . . . . . . . . . . . . . . . . . . . . . . .
Identification data . . . . . . . . . . . . . . . . . . . . .
Fabia Praktik . . . . . . . . . . . . . . . . . . . .
Praktik . . . . . . . . . . . . . . . . . . . . . . . . . . . . . . .
The fold-away storage compartment . . . . . . .
Lashing eyes . . . . . . . . . . . . . . . . . . . . . . . . .
Fixing the loading area floor in place . . . . . .
Index . . . . . . . . . . . . . . . . . . . . . . . . . . . . . .
141
141
141
144
145
146
147
147
148
149
153
154
155
155
157
159
159
159
159
164
166
167
167
167
169
171
171
174
177
179
181
185 186
186
186
187
187
194
194
195
195
195
195
196
196
197
197
198
203
205
209
209
212
223
223
223
225
225
225
225
226
227
Page 16 of 233
Instruments and Indicator/Warning Lights15
Using the systemSafetyDriving TipsGeneral MaintenanceBreakdown assist-
anceTechnical DataFabia Praktik
Service Interval DisplayThe Service Interval Display for vehicles with fixed service intervals
QG0
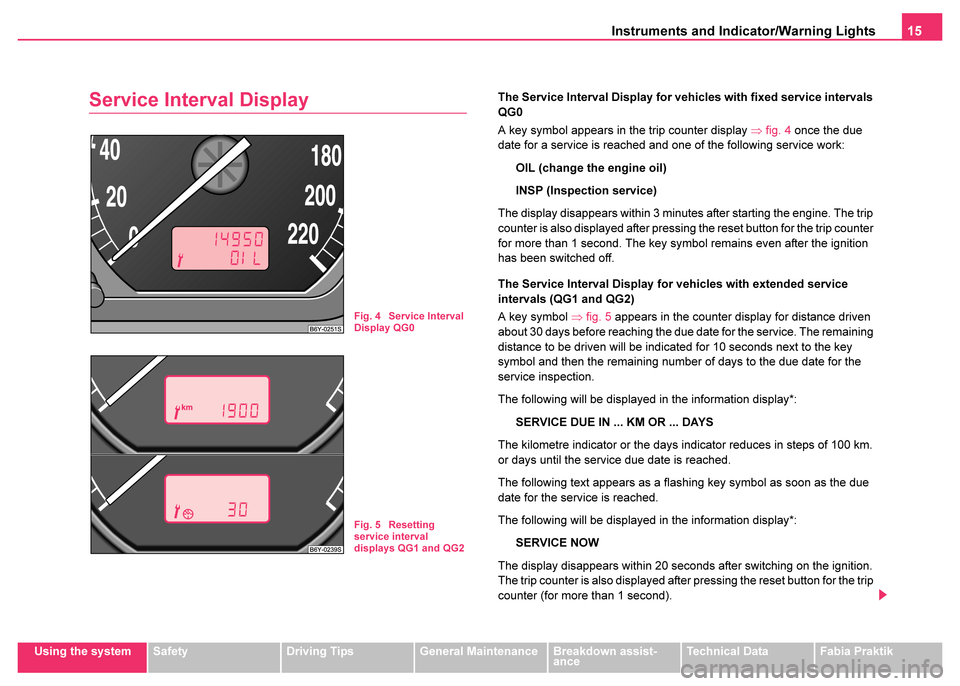
A key symbol appears in the trip counter display ⇒fig. 4 once the due
date for a service is reached and one of the following service work:
OIL (change the engine oil)
INSP (Inspection service)
The display disappears within 3 minutes after starting the engine. The trip
counter is also displayed after pressing the reset button for the trip counter
for more than 1 second. The key symbol remains even after the ignition
has been switched off.
The Service Interval Display for vehicles with extended service
intervals (QG1 and QG2)
A key symbol ⇒fig. 5 appears in the counter display for distance driven
about 30 days before reaching the due date for the service. The remaining
distance to be driven will be indicated for 10 seconds next to the key
symbol and then the remaining number of days to the due date for the
service inspection.
The following will be displayed in the information display*:
SERVICE DUE IN ... KM OR ... DAYS
The kilometre indicator or the days indicator reduces in steps of 100 km.
or days until the service due date is reached.
The following text appears as a flashing key symbol as soon as the due
date for the service is reached.
The following will be displayed in the information display*: SERVICE NOW
The display disappears within 20 seconds after switching on the ignition.
The trip counter is also displayed after pressing the reset button for the trip
counter (for more than 1 second).
Fig. 4 Service Interval
Display QG0
Fig. 5 Resetting
service interval
displays QG1 and QG2
Page 17 of 233
Instruments and Indicator/Warning Lights
16
Resetting Service Interval Display
We recommend having this resetting performed by a Škoda Dealer.
Škoda dealer:
•resets the memory of the display after the appropriate inspection;
•makes an entry in the Service Schedule;
•affix the sticker to the side of the dash panel on the driver's side, where
the following service interval is shown.
The service interval displays can also be reset as follows by using the
reset button for the counter for distance driven:
Models with fixed service intervals (QG0)
Switch off the ignition, press the reset button of the trip counter for
distance driven and hold it down.
Switching the ignition on causes a service interval to appear in the display.
Holding the reset button down for 10 seconds will cause the counter to be
reset (the display shows “- - -” and then the trip counter readout).
The readout OIL will appear in the display after resetting the indicator
INSP and releasing the reset button when both service intervals (INSP
and OIL) were reached together.
Repress the reset button and hold it down for 10 seconds to also reset this
interval.
Vehicles with extended service intervals (QG1 and QG2)
Switch off the ignition, press the reset button of the trip counter for
distance driven and hold it down.
Switch the ignition on and release the reset button. Now turn the reset
button to the right. All counters will be reset to 0.
Caution
We recommend that you do not reset the Service Interval Display yourself
otherwise this can result in the service interval display being incorrectly
set, which may also result in problems with operation of your vehicle.
Note
•Information is retained in the Service Interval Display also after the
battery of the vehicle is disconnected.
•It is necessary to re-code the Service Interval Display if a new instru-
ment cluster is installed during repair work. this work is carried out by a
Škoda dealer.
•Never reset the display between service intervals otherwise this may
result in incorrect readouts.
•The data displayed is the same after resetting the display with flexible
service intervals (QG1) using the reset button as that for a vehicle with
fixed service intervals (QG2).
•We therefore recommend having the Service Interval Display reset
only by a Škoda dealer who is familiar with the procedure for resetting the
display with a vehicle system tester.
•Please refer to the brochure Service Plan for extensive information
about the service intervals.
Digital clock
A reset button is installed on the left below beside the speedom-
eter for adjusting the clock ⇒page 12, fig. 3 .
Set hours
– Turn the reset button to the left.
Page 25 of 233
Instruments and Indicator/Warning Lights
24
The red symbols indicate danger (priority 1) while the yellow symbols indi-
cate a warning (priortity 2). Information for the driver may also appear in
addition to the symbols ⇒page 27.
Investigate the displayed faults as soon as possible. If several operational
faults exist at the same time, the symbols will appear one after the other
and are each visible for about 2 seconds.
The error messages are faded out after 10 seconds or by actuating the
rocker switch ⇒page 22, fig. 11 and are stored under the information
CAR STATUS .
There is at least one error message to be read when the term CAR
STATUS is flashing in the main menu. The display will show STATUS 1/2
(for example) if a number of error messages are present. This display indi-
cates that the first of a total of two error messages should be displayed.
Actuate the rocker switch , to call up the individual error messages.
If a fault occurs, a warning signal will also sound in addition to the symbol
and text in the display:
•Priority 1 - three warning signals
•Priority 2 - one warning signal
Operational check of the automatic gearbox
When the ignition is switched on, the Auto Check Control automatically
carries out an operational check. The following text will appear first in the
display if the selector lever is the position P or N:
P LOCKED
or N LOCKED You must depress the brake pedal first and press the Shiftlock button at
the same time in order to move the selector lever out of these positions.
The text will disappear once you select a drive position (
R, D etc.), and the
Auto Check Control function is displayed.
Any faults existing will be displayed for about 15 seconds after starting the
engine in place of the text shown above. A warning signal sounds at the
same time.
Red symbols
A red symbol signals danger.
Proceed as follows if a red symbol is displayed:
– Stop the vehicle.
– Switch the engine off.
AA
AA
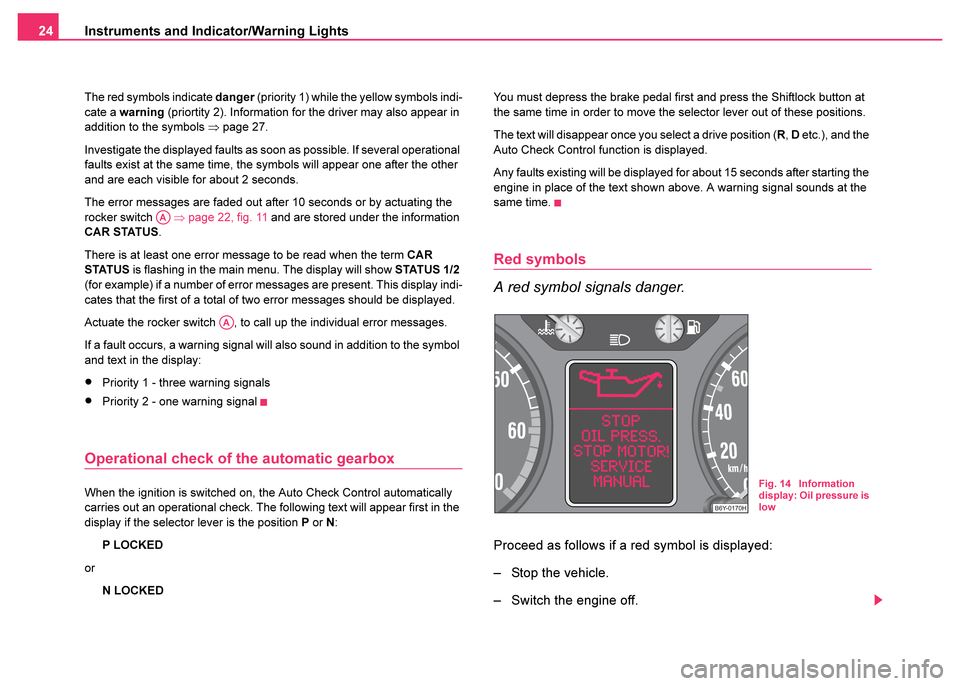
Fig. 14 Information
display: Oil pressure is
low
Page 26 of 233
Instruments and Indicator/Warning Lights25
Using the systemSafetyDriving TipsGeneral MaintenanceBreakdown assist-
anceTechnical DataFabia Praktik
– Investigate the function indicated.
– Obtain professional assistance.
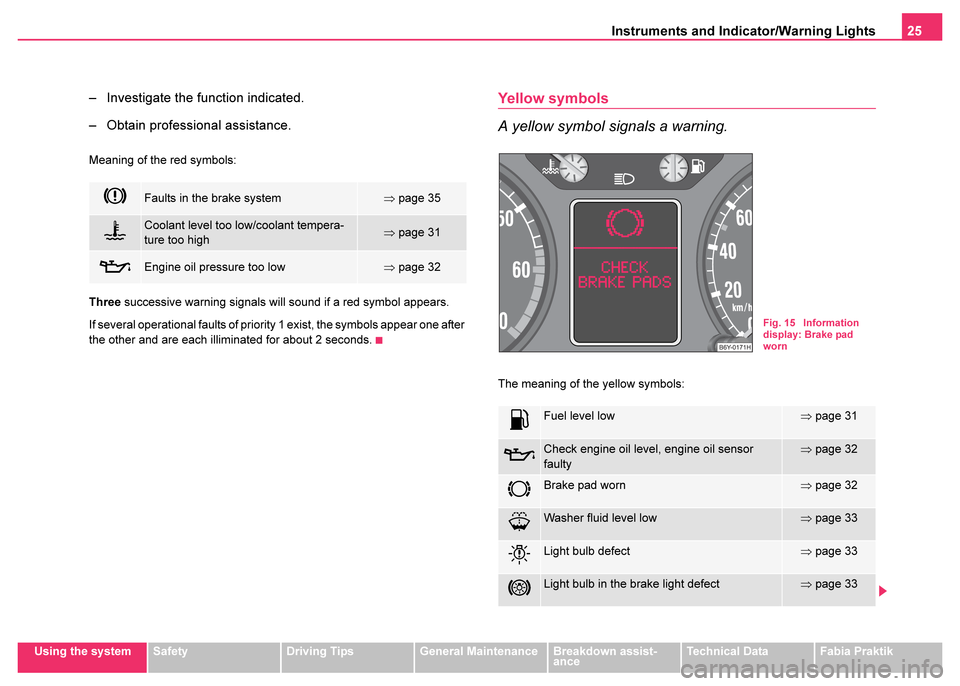
Meaning of the red symbols:
Three successive warning signals will sound if a red symbol appears.
If several operational faults of priority 1 exist, the symbols appear one after
the other and are each illiminated for about 2 seconds.
Yellow symbols
A yellow symbol signals a warning.
The meaning of the yellow symbols:
Faults in the brake system⇒ page 35
Coolant level too low/coolant tempera-
ture too high⇒page 31
Engine oil pressure too low⇒page 32
Fuel level low⇒page 31
Check engine oil level, engine oil sensor
faulty⇒page 32
Brake pad worn⇒page 32
Washer fluid level low⇒page 33
Light bulb defect⇒page 33
Light bulb in the brake light defect⇒page 33
Fig. 15 Information
display: Brake pad
worn
Page 29 of 233
Instruments and Indicator/Warning Lights
28
Note
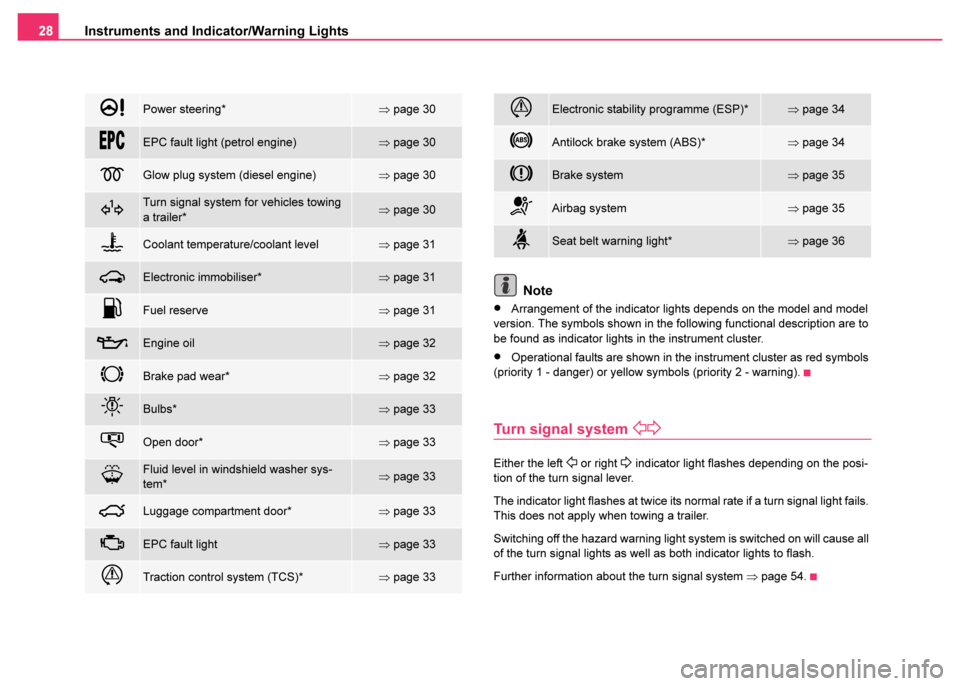
•Arrangement of the indicator lights depends on the model and model
version. The symbols shown in the following functional description are to
be found as indicator lights in the instrument cluster.
•Operational faults are shown in the instrument cluster as red symbols
(priority 1 - danger) or yellow symbols (priority 2 - warning).
Turn signal system
Either the left or right indicator light flashes depending on the posi-
tion of the turn signal lever.
The indicator light flashes at twice its normal rate if a turn signal light fails.
This does not apply when towing a trailer.
Switching off the hazard warning light system is switched on will cause all
of the turn signal lights as well as both indicator lights to flash.
Further information about the turn signal system ⇒page 54.
!Power steering*⇒page 30
EPC fault light (petrol engine)⇒page 30
Glow plug system (diesel engine)⇒page 30
Turn signal system for vehicles towing
a trailer*⇒page 30
Coolant temperature/coolant level⇒page 31
Electronic immobiliser*⇒page 31
Fuel reserve⇒page 31
Engine oil⇒page 32
Brake pad wear*⇒page 32
Bulbs*⇒page 33
Open door*⇒page 33
Fluid level in windshield washer sys-
tem*⇒page 33
Luggage compartment door*⇒page 33
EPC fault light⇒page 33
Traction control system (TCS)*⇒page 33
Electronic stability programme (ESP)*⇒page 34
Antilock brake system (ABS)*⇒page 34
Brake system⇒page 35
Airbag system⇒page 35
Seat belt warning light*⇒page 36
Page 31 of 233
Instruments and Indicator/Warning Lights
30
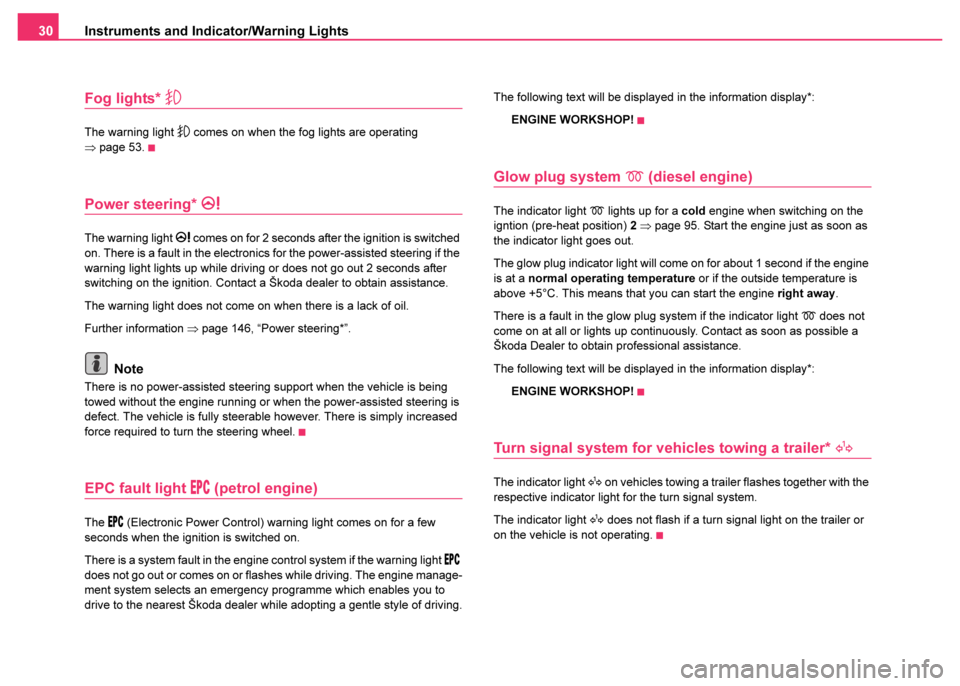
Fog lights*
The warning light comes on when the fog lights are operating
⇒ page 53.
Power steering* !
The warning light ! comes on for 2 seconds after the ignition is switched
on. There is a fault in the electronics for the power-assisted steering if the
warning light lights up while driving or does not go out 2 seconds after
switching on the ignition. Contact a Škoda dealer to obtain assistance.
The warning light does not come on when there is a lack of oil.
Further information ⇒page 146, “Power steering*”.
Note
There is no power-assisted steering support when the vehicle is being
towed without the engine running or when the power-assisted steering is
defect. The vehicle is fully steerable however. There is simply increased
force required to turn the steering wheel.
EPC fault light \b (petrol engine)
The \b (Electronic Power Control) warning light comes on for a few
seconds when the ignition is switched on.
There is a system fault in the engine control system if the warning light
\b
does not go out or comes on or flashes while driving. The engine manage-
ment system selects an emergency programme which enables you to
drive to the nearest Škoda dealer while adopting a gentle style of driving. The following text will be displayed in the information display*:
ENGINE WORKSHOP!
Glow plug system (diesel engine)
The indicator light lights up for a cold engine when switching on the
igntion (pre-heat position) 2 ⇒page 95. Start the engine just as soon as
the indicator light goes out.
The glow plug indicator light will come on for about 1 second if the engine
is at a normal operating temperature or if the outside temperature is
above +5°C. This means that you can start the engine right away.
There is a fault in the glow plug system if the indicator light
does not
come on at all or lights up continuously. Contact as soon as possible a
Škoda Dealer to obtain professional assistance.
The following text will be displayed in the information display*:
ENGINE WORKSHOP!
Turn signal system for vehicles towing a trailer*
The indicator light on vehicles towing a trailer flashes together with the
respective indicator light for the turn signal system.
The indicator light
does not flash if a turn signal light on the trailer or
on the vehicle is not operating.
Page 33 of 233
Instruments and Indicator/Warning Lights
32
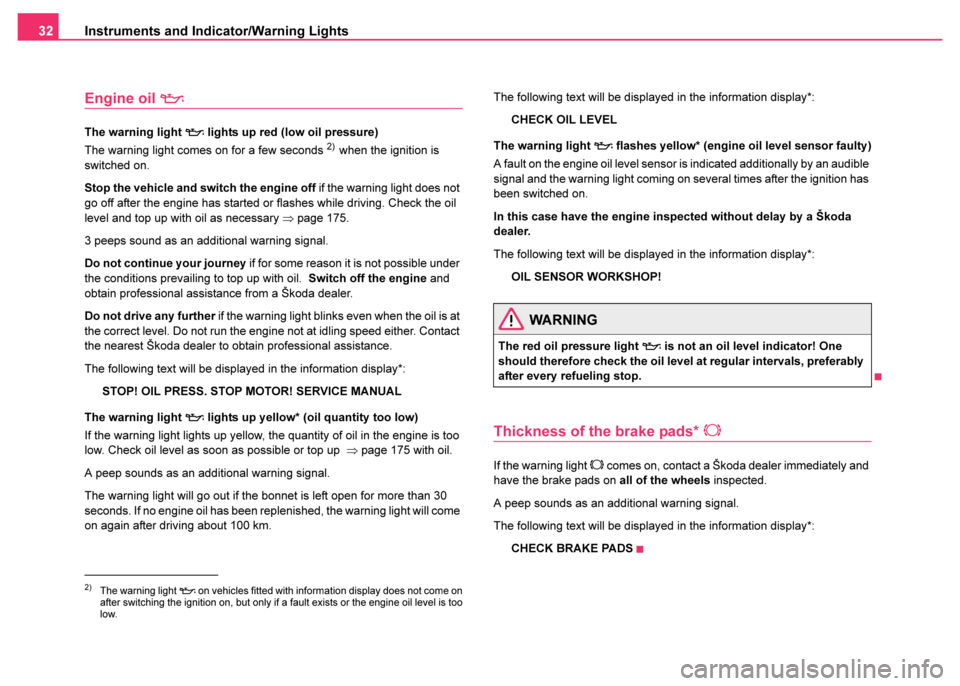
Engine oil
The warning light lights up red (low oil pressure)
The warning light comes on for a few seconds 2) when the ignition is
switched on.
Stop the vehicle and switch the engine off if the warning light does not
go off after the engine has started or flashes while driving. Check the oil
level and top up with oil as necessary ⇒ page 175.
3 peeps sound as an additional warning signal.
Do not continue your journey if for some reason it is not possible under
the conditions prevailing to top up with oil. Switch off the engine and
obtain professional assistance from a Škoda dealer.
Do not drive any further if the warning light blinks even when the oil is at
the correct level. Do not run the engine not at idling speed either. Contact
the nearest Škoda dealer to obtain professional assistance.
The following text will be displayed in the information display*:
STOP! OIL PRESS. STOP MOTOR! SERVICE MANUAL
The warning light
lights up yellow* (oil quantity too low)
If the warning light lights up yellow, the quantity of oil in the engine is too
low. Check oil level as soon as possible or top up ⇒page 175 with oil.
A peep sounds as an additional warning signal.
The warning light will go out if the bonnet is left open for more than 30
seconds. If no engine oil has been replenished, the warning light will come
on again after driving about 100 km. The following text will be displayed in the information display*:
CHECK OIL LEVEL
The warning light
flashes yellow* (engine oil level sensor faulty)
A fault on the engine oil level sensor is indicated additionally by an audible
signal and the warning light coming on several times after the ignition has
been switched on.
In this case have the engine inspected without delay by a Škoda
dealer.
The following text will be displayed in the information display*:
OIL SENSOR WORKSHOP!
Thickness of the brake pads*
If the warning light comes on, contact a Škoda dealer immediately and
have the brake pads on all of the wheels inspected.
A peep sounds as an additional warning signal.
The following text will be displayed in the information display*: CHECK BRAKE PADS
2)The warning light on vehicles fitted with information display does not come on
after switching the ignition on, but only if a fault exists or the engine oil level is too
low.
WARNING
The red oil pressure light is not an oil level indicator! One
should therefore check the oil level at regular intervals, preferably
after every refueling stop.
Page 98 of 233
Starting-off and Driving97
Using the systemSafetyDriving TipsGeneral MaintenanceBreakdown assist-
anceTechnical DataFabia Praktik
•The clutch pedal should be fully depressed when starting the engine
which means that the starter only has to crank the engine.
•Let go of the key as soon as the engine starts otherwise there may be
damage to the starter.
The engine running noises may louder at first be louder for a short time
after starting the cold engine until oil pressure can be built up in the
hydraulic valve clearance compensation. This is quite normal and is not
an operating problem.
If the engine does not start ...
You can use the battery of another vehicle as a jump-start aid
⇒ page 203.
It is only possible to tow-start vehicles fitted with a manual gearbox. The
tow-starting distance must not be more than 50 metres ⇒page 207.
Caution
•Avoid high engine revolutions, full throttle and high engine loads as
long as the engine has not yet reached its normal operating temperature
- risk of damaging the engine!
•Vehicles which are fitted with an exhaust gas catalytic converter
should not be tow-started over a distance of more than 50 metres.
For the sake of the environment
Never warm up the engine when the vehicle is standing. Drive off right
away. This enables you to avoid unnecessary pollutant emissions.
Petrol engines
These engines are fitted with a starter system which selects the correct
fuel/air mixture for every external air temperature.
•Do not operate the accelerator before and when starting engine if the
engine is cold or at normal operating temperature.
•Interrupt the attempt at starting after 10 seconds if the engine does not
start right awayand wait for about 30 seconds before repeating the
attempt.
•It is possible that the fuse on the electrical fuel pump is defect if the
engine still does not start ⇒page 209.
Contact the nearest Škoda dealer to obtain professional assistance.
•It may be necessary, if the engine is very hot, to slightly depress the
accelerator after the engine has started.
Diesel engines
Glow plug system
Diesel engines are equipped with a glow plug system, the preglow period
being controlled automatically in line with the coolant temperature and
outside temperature.
The preglow indicator light
comes on after the ignition has been
switched on.
You should not switch on any major electrical components during
the heating period otherwise the vehicle battery will be drained
unnecessarily.
•You should start the engine immediately after the glow plug warning
light has gone out.
WARNING
There is the danger of poisoning if the engine is left running in an
enclosed space!
Page 115 of 233
Seat belts
114
Important safety information regarding
the use of seat belts
The correct use of the seat belts considerably reduces the
risk of injury!
WARNING
•The belt webbing must not be jammed in-between at any point
or twisted, or chafe against any sharp edges.
•No two persons (also not children) should ever use a single
seat belt together.
•The maximum protection which seat belts can offer is only
achieved if you are correctly seated ⇒page 63.
•The belt webbing must not run across solid or fragile objects
(e.g. spectacles, ball-point pens, keys etc.) as this may be a cause
of injuries.
•Bulky, loose clothing (e.g. a winter coat over a jacket) does not
allow you to be correctly seated and impairs proper operation of
the seat belts.
•It is prohibited to use clamps or other objects to adjust seat
belts (e.g. for shortening the belts for smaller persons).
•The lock tongue should only be inserted into the lock which is
the correct one for your seat. Wrong use of the safety belt will
reduce its capacity to protect.
•The backrests of the front seats must not be tilted too far to the
rear otherwise the seatbelts can lose their effectiveness.
•The belt webbing must always be kept clean. Soiled belt
webbing may impair proper operation of the inertia reel
⇒ page 165.
WARNING (continued)
•The slot of the belt tongue must not be blocked by paper or
similar objects otherwise the belt tongue will not lock in place
properly.
•Damaged seat belts which have been subjected to stress in an
accident and were therefore stretched, must be replaced - this is
best done by a Škoda dealer. The anchorage points of the belts
must also be inspected. The anchorage points for the belts should
also be checked.
•In certain export countries it is possible to use seat belts which
differ in terms of their operation from the inertia reel and lap belts
which are described on the pages which follow.