reverse light SKODA FABIA 2003 1.G / 6Y Owner's Manual
[x] Cancel search | Manufacturer: SKODA, Model Year: 2003, Model line: FABIA, Model: SKODA FABIA 2003 1.G / 6YPages: 233, PDF Size: 32.04 MB
Page 61 of 233

Lights and Visibility
60
Switching windscreen wipers off
– Move the lever back into its home position .
The windscreen wipers and the windscreen washer system only operate
if the ignition is switched on.
The rear window will be wiped again if the window wipers are on when
reverse gear is selected.
The windscreen washer nozzles are heated* when the ignition is switched
on.
Top up with wash liquid ⇒page 185.
Caution
In frosty weather, please first of all check whether the windscreen wiper
blades are not frozen to the windscreen before switching them on.
Switching on windscreen wipers when the blades are frozen to the wind-
screen may result in damage both to the blades and the motor of the wind-
screen wipers!
Headlight cleaning system*
Washing of the headlights lenses occurs for approximately 1 second
about 3 seconds after movement of the lever into position ⇒page 59,
fig. 39. You should remove stubborn dirt (such as insect residues) from the head-
light lenses at regular intervals, for example when refuelling. Please refer
to the notes
⇒page 162.
You should remove any snow from the fixtures of the washer nozzles and
clear ice in winter with a de-icing spray in order to ensure proper operation
of the cleaning system.
Replacing wiper blades on the windscreen wipers
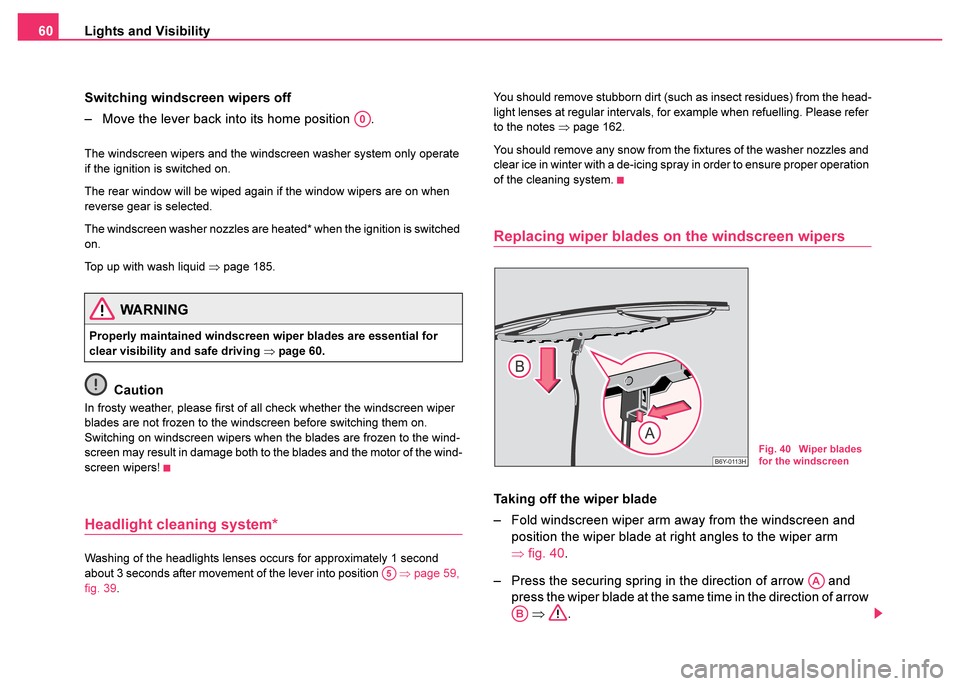
Taking off the wiper blade
– Fold windscreen wiper arm away from the windscreen and position the wiper blade at right angles to the wiper arm
⇒fig. 40 .
– Press the securing spring in the direction of arrow and press the wiper blade at the same time in the direction of arrow ⇒ .
WARNING
Properly maintained windscreen wiper blades are essential for
clear visibility and safe driving ⇒page 60.
A0
A5
Fig. 40 Wiper blades
for the windscreen
AA
AB
Page 63 of 233

Lights and Visibility
62
Rear-view mirror
You can adjust the exterior mirrors electrically*.
Adjust the reverse view mirror before commencing to drive so
that there is a clear view to the rear.
Dimming the interior mirror
– Pull the lever on the bottom edge of the mirror toward rear (the
lever on the interior mirror must point forwards in it home posi-
tion).
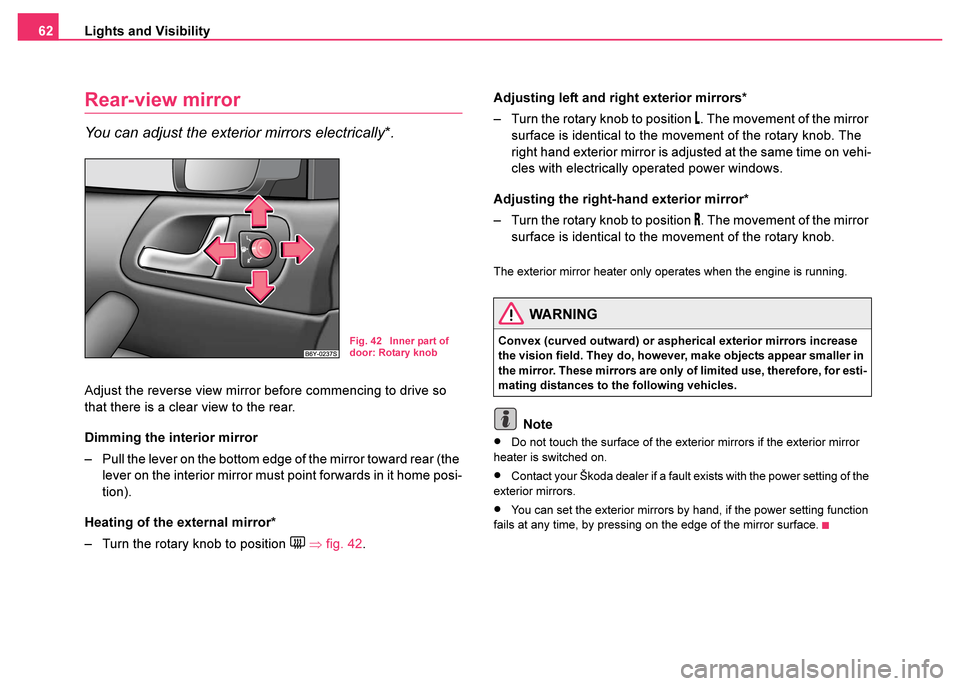
Heating of the external mirror*
– Turn the rotary knob to position
⇒ fig. 42 . Adjusting left and right exterior mirrors*
– Turn the rotary knob to position
. The movement of the mirror
surface is identical to the movement of the rotary knob. The
right hand exterior mirror is adjusted at the same time on vehi-
cles with electrically operated power windows.
Adjusting the right-hand exterior mirror*
– Turn the rotary knob to position
. The movement of the mirror
surface is identical to the movement of the rotary knob.
The exterior mirror heater only operates when the engine is running.
Note
•Do not touch the surface of the exterior mirrors if the exterior mirror
heater is switched on.
•Contact your Škoda dealer if a fault exists with the power setting of the
exterior mirrors.
•You can set the exterior mirrors by hand, if the power setting function
fails at any time, by pressing on the edge of the mirror surface.
Fig. 42 Inner part of
door: Rotary knob
WARNING
Convex (curved outward) or aspherical exterior mirrors increase
the vision field. They do, however, make objects appear smaller in
the mirror. These mirrors are only of limited use, therefore, for esti-
mating distances to the following vehicles.
Page 99 of 233

Starting-off and Driving
98
•The glow plug warning light will come on for about one second if the
engine is at a normal operating temperature or if the outside temperature
is above +5°C. This means that you can start the engine right away.
•Interrupt the attempt at starting after 10 seconds if the engine does not
start right awayand wait for about 30 seconds before repeating the
attempt.
•It is possible that the fuse on the diesel preglow system is defect if the
engine still does not start ⇒page 209.
Contact the nearest Škoda dealer to obtain professional assistance.
Starting the engine after the fuel tank has run dry
It may take longer than normal to start the engine after refuelling if the fuel
tank has run completely dry - up to one minute. This is because the fuel
system must first of all be filled while the attempting to start the engine.
Switching the engine off
– The engine can be switched off by turning the ignition key from position ⇒page 95, fig. 83 into position .
Caution
you should not switch the engine off right away at the end of your journey
after the engine has been operated for a lengthy period at high loads but
should be allowed it to run at idling speed for about 2 minutes. This
prevents any accumulation of heat when the engine is switched off.
Note
•The radiator fan may continue running for a further 10 minutes or so
after the engine and the ignition have been switched off. The coolant fan
may, however, also switch on again after some time if the coolant temper- ature rises because of an accumulation of heat in the engine or if the
engine is warm and the engine compartment is additionally heated by
strong sunlight.
•This is why particular care is required when carrying out any work in
the engine compartment ⇒ page 172, “Working in the engine
compartment”.
Shifting gear ( on a manual gearbox)
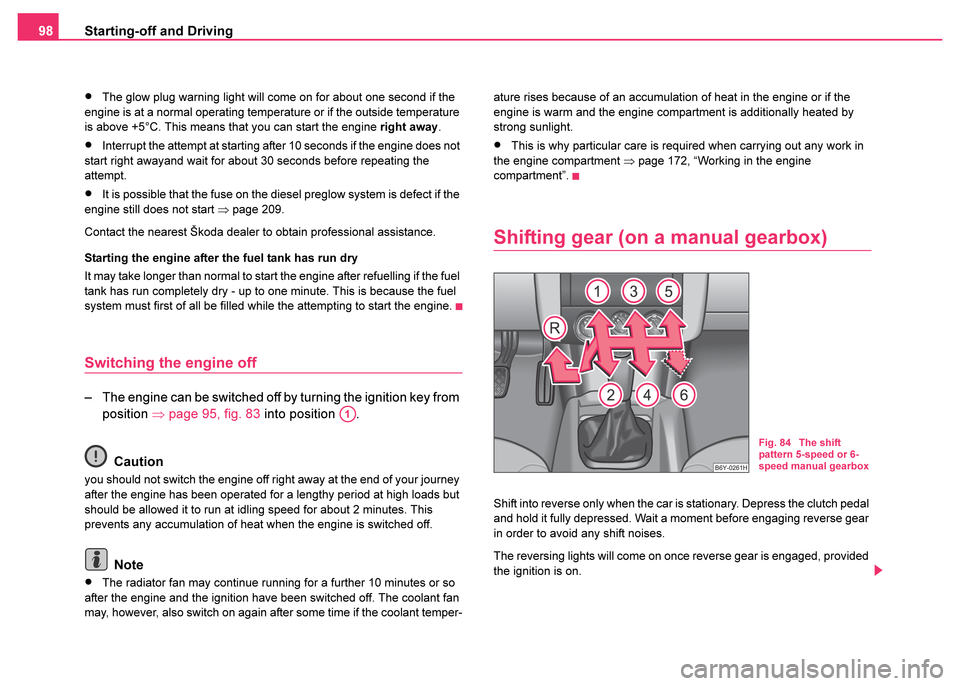
Shift into reverse only when the car is stationary. Depress the clutch pedal
and hold it fully depressed. Wait a moment before engaging reverse gear
in order to avoid any shift noises.
The reversing lights will come on once reverse gear is engaged, provided
the ignition is on.
A1
Fig. 84 The shift
pattern 5-speed or 6-
speed manual gearbox
Page 105 of 233

Automatic gearbox*
104
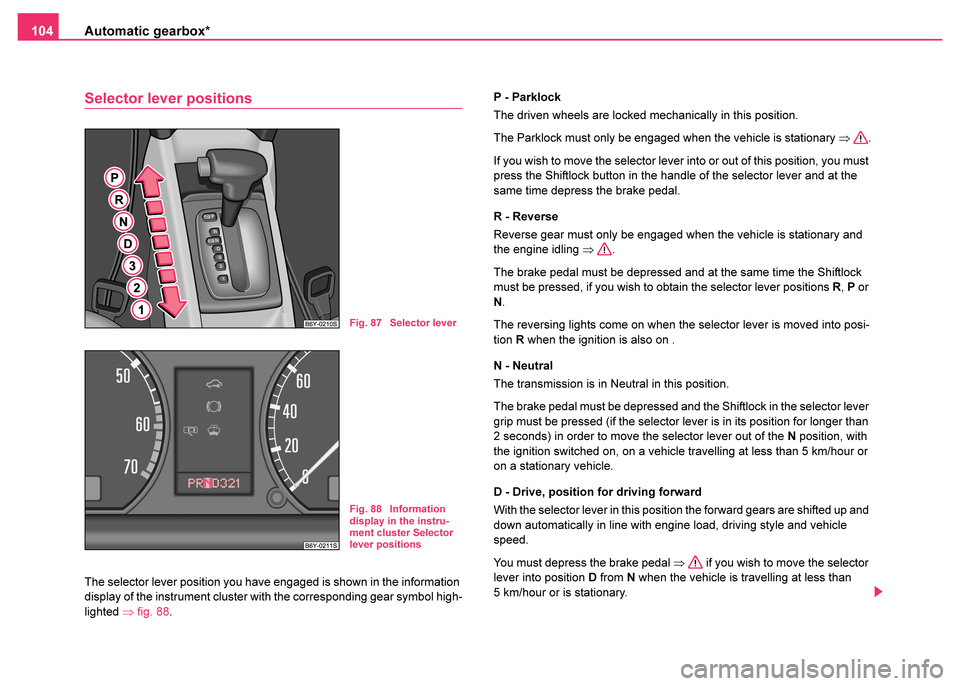
Selector lever positions
The selector lever position you have engaged is shown in the information
display of the instrument cluster with the corresponding gear symbol high-
lighted ⇒fig. 88. P - Parklock
The driven wheels are locked mechanically in this position.
The Parklock must only be engaged when the vehicle is stationary
⇒.
If you wish to move the selector lever into or out of this position, you must
press the Shiftlock button in the handle of the selector lever and at the
same time depress the brake pedal.
R - Reverse
Reverse gear must only be engaged when the vehicle is stationary and
the engine idling ⇒.
The brake pedal must be depressed and at the same time the Shiftlock
must be pressed, if you wish to obtain the selector lever positions R, P or
N.
The reversing lights come on when the selector lever is moved into posi-
tion R when the ignition is also on .
N - Neutral
The transmission is in Neutral in this position.
The brake pedal must be depressed and the Shiftlock in the selector lever
grip must be pressed (if the selector lever is in its position for longer than
2 seconds) in order to move the selector lever out of the N position, with
the ignition switched on, on a vehicle travelling at less than 5 km/hour or
on a stationary vehicle.
D - Drive, position for driving forward
With the selector lever in this position the forward gears are shifted up and
down automatically in line with engine load, driving style and vehicle
speed.
You must depress the brake pedal ⇒ if you wish to move the selector
lever into position D from N when the vehicle is travelling at less than
5 km/hour or is stationary.
Fig. 87 Selector lever
Fig. 88 Information
display in the instru-
ment cluster Selector
lever positions