technical data SKODA FABIA 2004 1.G / 6Y Owner's Manual
[x] Cancel search | Manufacturer: SKODA, Model Year: 2004, Model line: FABIA, Model: SKODA FABIA 2004 1.G / 6YPages: 247
Page 222 of 247

Breakdown assistance221
Using the systemSafetyDriving TipsGeneral MaintenanceBreakdown assistanceTechnical Data
damage resulting at the points to which you attach the tow rope or tow bar
when you attempt to tow a vehicle which is not standing on a paved road.
Caution
If the gearbox of your vehicle no longer contains any oil because of a
defect, your vehicle must only be towed in with the driven wheels raised
clear of the ground, or on a special vehicle transporter or trailer.
Note
•Please comply with any legal requirements particularly regarding the
switched on signal systems, when towing in or tow-starting another
vehicle.
•The tow rope must not be twisted as it may in certain circumstances
result in the front towing eye being unscrewed out of your vehicle.
Front towing eye
The towing eye is stored in the box for the vehicle tool kit.
Remove the protective grille carefully as follows:
Fig. 160 Front
bumper: Protective
grille
Fig. 161 Front
bumper: Installing the
towing eye
Page 224 of 247
Breakdown assistance223
Using the systemSafetyDriving TipsGeneral MaintenanceBreakdown assistanceTechnical Data
– Switch on the ignition.
– Wait until both vehicles are moving then release the clutch
pedal slowly.
– Depress the clutch pedal fully when the engine fires and take the vehicle out of gear.
For technical reasons it is not possible to tow-start a car fitted with an
automatic gearbox .
WARNING
There is high risk of having an accident when tow-starting a
vehicle, when for example the towe d vehicle runs into the towing
vehicle.
Caution
Vehicles which are fitted with a catalytic converter should not be tow-
started over a distance of more than 50 metres. Unburnt fuel may get into
the catalytic converter and damage it.
Towing in a vehicle fitted with a manual gearbox
Please refer to the notes ⇒page 220.
The car can be towed in with a tow bar or a tow rope or with the front or
rear wheels raised. The maximum towing speed is 50 km/h.
Towing of a vehicle with an automatic gearbox
Please refer to the notes ⇒page 220.
The car can be towed in with a tow bar or a tow rope. Refer at the same
time to the following guidelines:
•Move selector lever into N .
•The maximum towing speed is 50 km/h.
•The maximum permissible towing distance is 50 km. The gear oil
pump does not operate when the engine is not running and the gear would
not be adequately lubricated at higher speeds and over longer towing
distance.
Caution
If the vehicle is towed in by a recovery vehicle, it should only be towed in
with the front wheels raised. If the vehicle is raised at rear, the automatic
gearbox is damaged!
Note
The vehicle must be transported on a special vehicle or trailer if it is not
possible to tow in the vehicle in the way described or if the towing distance
is greater than 50 km.
Page 226 of 247
Fuses and light bulbs225
Using the systemSafetyDriving TipsGeneral MaintenanceBreakdown assistanceTechnical Data
Caution
•Never attempt to “repair” fuses and also do not replace them with a
fuse of a higher amperage - risk of fire! This may also cause damage at
another part of the electrical system.
•Have the electrical system checked as quickly as possible by a Škoda
dealer if a newly inserted fuse blows again after a short time.
Fuse assignment at battery
Certain electrical components are only standard on certain vehicle model
versions or only suppliable as optional equipment for certain models.
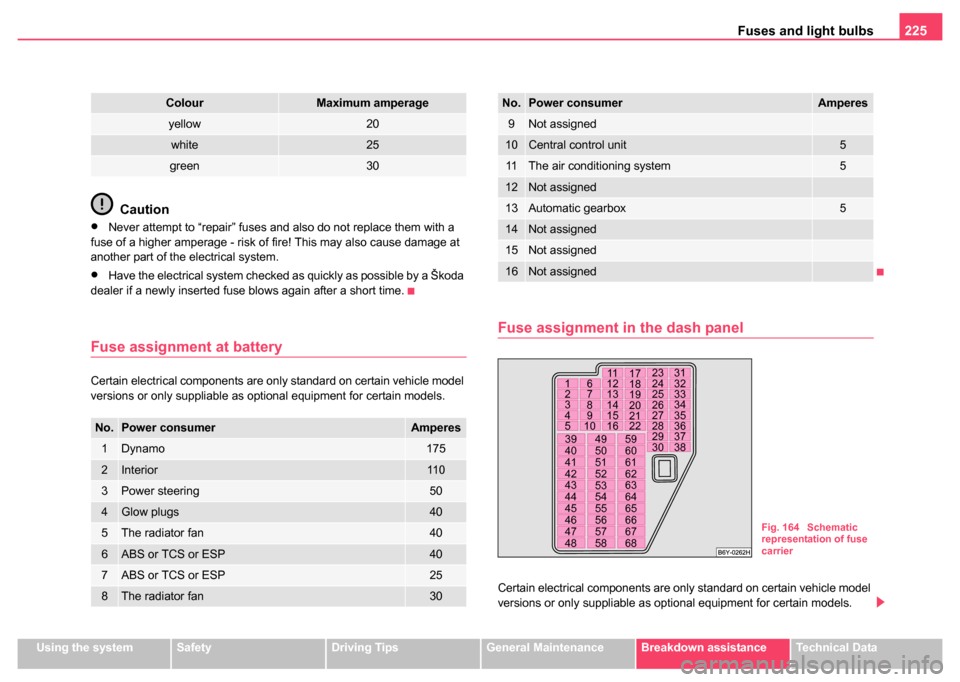
Fuse assignment in the dash panel
Certain electrical components are only standard on certain vehicle model
versions or only suppliable as optional equipment for certain models.
yellow20
white25
green30
No.Power consumerAmperes
1Dynamo175
2Interior11 0
3Power steering50
4Glow plugs40
5The radiator fan40
6ABS or TCS or ESP40
7ABS or TCS or ESP25
8The radiator fan30
ColourMaximum amperage
9Not assigned
10Central control unit5
11The air conditioning system5
12Not assigned
13Automatic gearbox5
14Not assigned
15Not assigned
16Not assigned
No.Power consumerAmperes
1
2
3
4
5 6
7
8
9
10 12
13
14
15
1611
18
19
20
21
22 17 24
25
26
27
28 23
32
33
34
35
36 31
29 37
30 38
39
40
41
42
43
44
45
46
47
48 49
50
51
52
53
54
55
56
57
5859
60
61
62
63
64
65
66
67
68
Fig. 164 Schematic
representation of fuse
carrier
Page 228 of 247
Fuses and light bulbs227
Using the systemSafetyDriving TipsGeneral MaintenanceBreakdown assistanceTechnical Data
Bulbs
Replacing bulbs
The relevant lamp must always be switched off before a light bulb is
replaced.
Do not take hold of the glass bulb with naked fingers (even the smallest
amount of dirt reduces the working life of the light bulb). Use a clean cloth,
serviette or something similar.
Defect light bulbs should only be replaced with light bulbs of the same
type. The designation is located on the light socket or the glass bulb.
Changing certain bulbs is not something which you can do yourself, but
requires to be done by a specialist. Other parts of the vehcle must be
removed in order to change the light bulbs. This applies, in particular, to
bulbs which can only be reached from the engine compartment.
We therefore recommend that you have any bulbs changed by a Škoda
dealer or, in exceptional cases, by calling on other professional assist-
ance.
Please note that the engine compartment is a hazardous area
⇒page 183, “Working in the engine compartment”.
We recommend that you carry the set of light bulbs with you which was
delivered in your vehicle. Replacement light bulbs
7) are available at
Škoda dealers.
45Radio, navigation system20
46Electrical power window (at the front on the right)25
47Not assigned
48Diesel engine - control unit, injector30
49Central locking system15
50Low beam on the right15
51Power socket in the luggage compartment15
52Ignition15
53Electrical power window (at the rear on the right)25
54Low beam on the left15
55Not assigned
56Control unit - petrol engine20
57Towing device25
58Electrical power window (at the front on the left)25
59Not assigned
60Horn for the anti-theft alarm system15
61Fuel pump - petrol engine15
62Electric sliding/tilting roof25
63Seat heaters15
64Headlight cleaning system20
65Fog lights15
66Electrical power window (at the rear on the left)25
67Not assigned
68Fresh air blower25
No.Power consumerAmperesa)For power consumers, e.g. the radio, which can be operated with the ignition
switched off as long as the ignition key is not withdrawn.
b)For vehicles with an electrical power window systemc)It is 15 amps for a vehicle with a 1.2 litre engine.
Page 230 of 247
Fuses and light bulbs229
Using the systemSafetyDriving TipsGeneral MaintenanceBreakdown assistanceTechnical Data
Front headlight
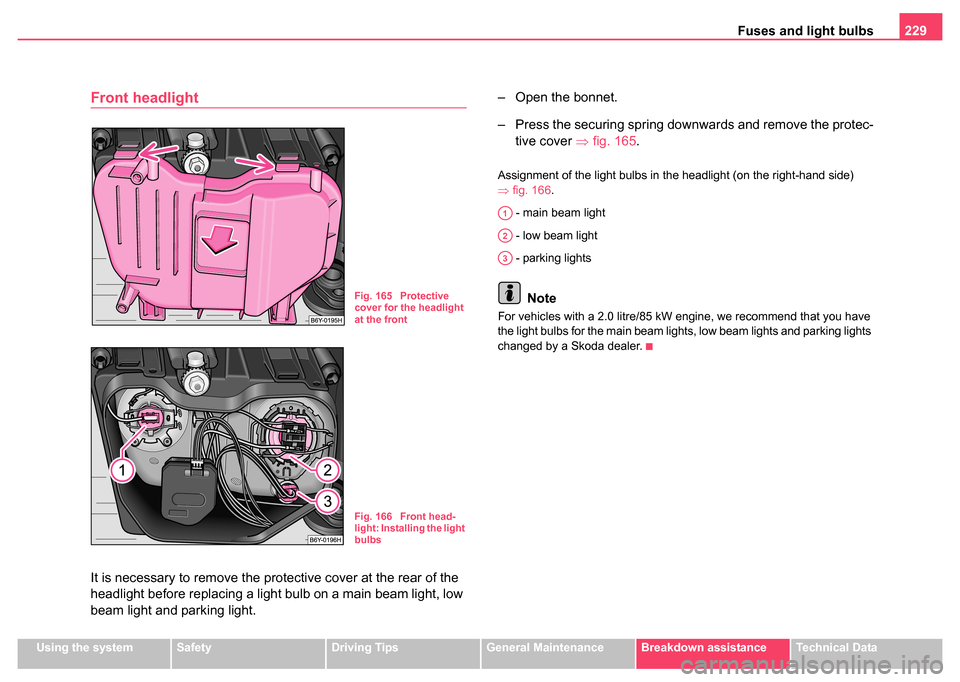
It is necessary to remove the protective cover at the rear of the
headlight before replacing a light bulb on a main beam light, low
beam light and parking light. – Open the bonnet.
– Press the securing spring downwards and remove the protec-
tive cover ⇒fig. 165 .
Assignment of the light bulbs in the headlight (on the right-hand side)
⇒fig. 166 .
- main beam light
- low beam light
- parking lights
Note
For vehicles with a 2.0 litre/85 kW engine, we recommend that you have
the light bulbs for the main beam lights, low beam lights and parking lights
changed by a Skoda dealer.
Fig. 165 Protective
cover for the headlight
at the front
Fig. 166 Front head-
light: Installing the light
bulbs
A1
A2
A3
Page 232 of 247
Fuses and light bulbs231
Using the systemSafetyDriving TipsGeneral MaintenanceBreakdown assistanceTechnical Data
– Insert the lamp holder with new light bulb into of the
headlight.
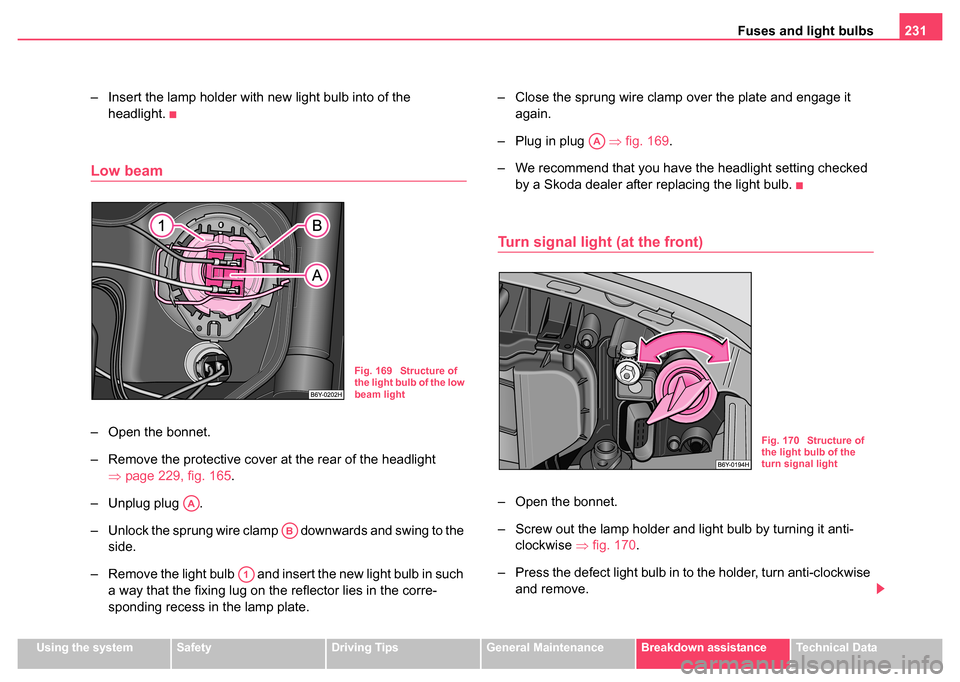
Low beam
– Open the bonnet.
– Remove the protective cover at the rear of the headlight ⇒page 229, fig. 165.
– Unplug plug .
– Unlock the sprung wire clamp downwards and swing to the side.
– Remove the light bulb and insert the new light bulb in such a way that the fixing lug on the reflector lies in the corre-
sponding recess in the lamp plate. – Close the sprung wire clamp over the plate and engage it
again.
– Plug in plug ⇒fig. 169 .
– We recommend that you have the headlight setting checked by a Skoda dealer after replacing the light bulb.
Turn signal light (at the front)
– Open the bonnet.
– Screw out the lamp holder and light bulb by turning it anti-clockwise ⇒fig. 170 .
– Press the defect light bulb in to the holder, turn anti-clockwise and remove.
Fig. 169 Structure of
the light bulb of the low
beam light
AA
AB
A1
AA
Fig. 170 Structure of
the light bulb of the
turn signal light
Page 234 of 247
Fuses and light bulbs233
Using the systemSafetyDriving TipsGeneral MaintenanceBreakdown assistanceTechnical Data
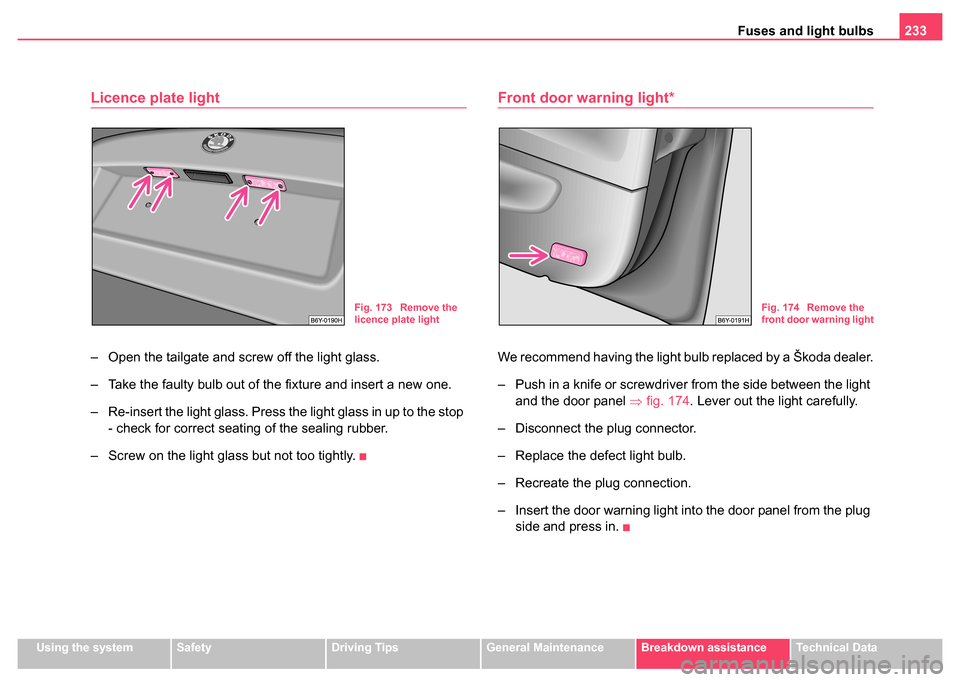
Licence plate light
– Open the tailgate and screw off the light glass.
– Take the faulty bulb out of the fixture and insert a new one.
– Re-insert the light glass. Press the light glass in up to the stop
- check for correct seating of the sealing rubber.
– Screw on the light glass but not too tightly.
Front door warning light*
We recommend having the light bulb replaced by a Škoda dealer.
– Push in a knife or screwdriver from the side between the light
and the door panel ⇒fig. 174 . Lever out the light carefully.
– Disconnect the plug connector.
– Replace the defect light bulb.
– Recreate the plug connection.
– Insert the door warning light into the door panel from the plug side and press in.
Fig. 173 Remove the
licence plate lightFig. 174 Remove the
front door warning light
Page 236 of 247
Fuses and light bulbs235
Using the systemSafetyDriving TipsGeneral MaintenanceBreakdown assistanceTechnical Data
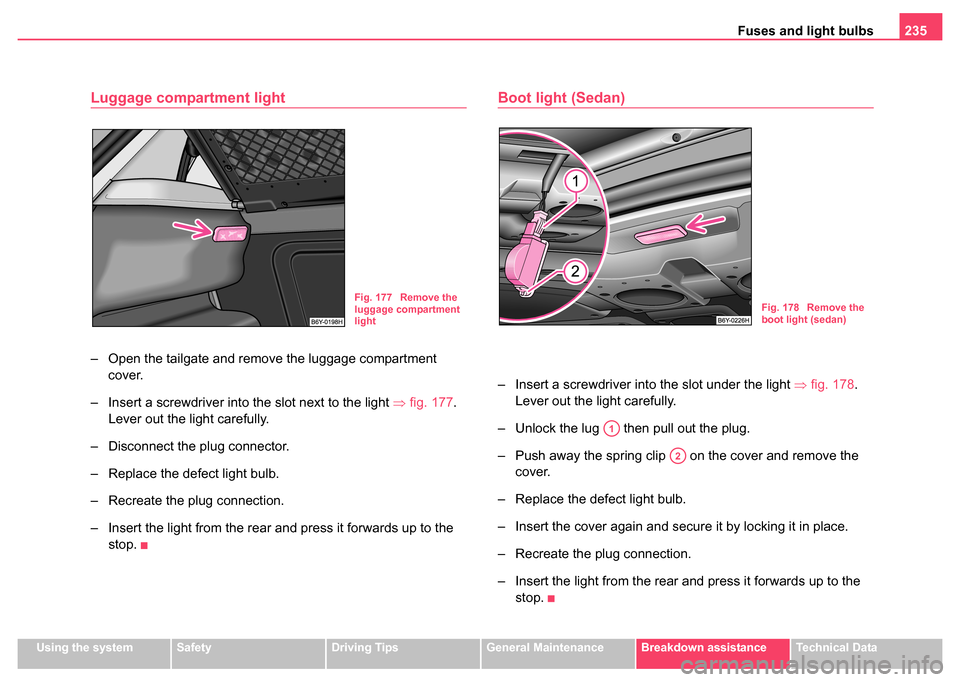
Luggage compartment light
– Open the tailgate and remove the luggage compartment
cover.
– Insert a screwdriver into the slot next to the light ⇒fig. 177 .
Lever out the light carefully.
– Disconnect the plug connector.
– Replace the defect light bulb.
– Recreate the plug connection.
– Insert the light from the rear and press it forwards up to the stop.
Boot light (Sedan)
– Insert a screwdriver into the slot under the light ⇒fig. 178.
Lever out the light carefully.
– Unlock the lug then pull out the plug.
– Push away the spring clip on the cover and remove the cover.
– Replace the defect light bulb.
– Insert the cover again and secure it by locking it in place.
– Recreate the plug connection.
– Insert the light from the rear and press it forwards up to the stop.
Fig. 177 Remove the
luggage compartment
lightFig. 178 Remove the
boot light (sedan)
A1
A2
Page 238 of 247

General237
Using the systemSafetyDriving TipsGeneral MaintenanceBreakdown assistanceTechnical Data
Technical Data
General
Identification data
Vehicle data sticker
The vehicle data sticker ⇒fig. 179 is located on the floor of the luggage
compartment and is also stated in the Service Schedule.
The vehicle data sticker contains the following data:
Vehicle identification number (VIN)
Vehicle type
Gearbox code, paint number, interior equipment number, engine
output, engine code
Partial description of the vehicle Vehicle identification number (VIN)
The vehicle identification number - VIN (vehicle body number) is stamped
into the engine compartment on the right hand shock absorber dome. This
number is also located on a sign on the lower left hand edge below the
windscreen.
Engine number
The engine number is stamped into the engine block.
Type plate (production plate)
The type plate is located in the engine compartment at the front on the left
hand shock absorber dome.
Homologation sign
The homologation sign is located on the lock carrier. Vehicles for certain
countries do not have an homologation sign.
Stickers on inside of fuel filler flap
The stickers are affixed to the inside of the fuel filler flap. The sticker
contains the following data:
•The prescribed types of fuel
•Tyre size
•Tyre pressure
Note
•You will find the technical data of your vehicle in the separate brochure
"Technical Data".
Fig. 179 Vehicle data
sticker
A1
A2
A3
A4