boot SKODA FABIA 2004 1.G / 6Y User Guide
[x] Cancel search | Manufacturer: SKODA, Model Year: 2004, Model line: FABIA, Model: SKODA FABIA 2004 1.G / 6YPages: 247
Page 61 of 247
Lights and Visibility
60
Front door warning light*
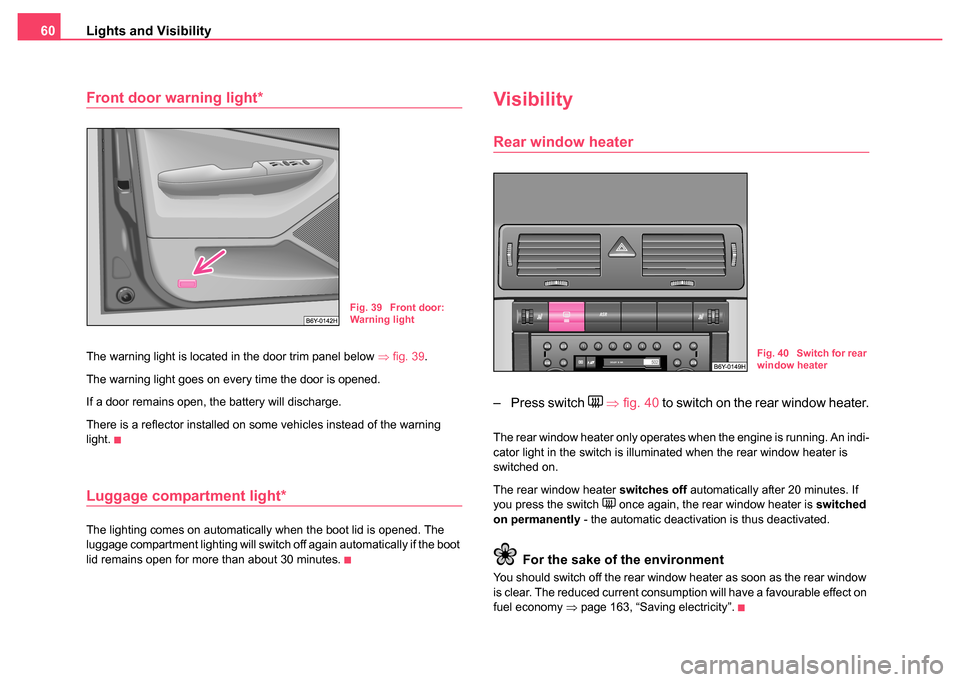
The warning light is located in the door trim panel below ⇒fig. 39 .
The warning light goes on every time the door is opened.
If a door remains open, the battery will discharge.
There is a reflector installed on some vehicles instead of the warning
light.
Luggage compartment light*
The lighting comes on automatically when the boot lid is opened. The
luggage compartment lighting will switch off again automatically if the boot
lid remains open for more than about 30 minutes.
Visibility
Rear window heater
– Press switch ⇒ fig. 40 to switch on the rear window heater.
The rear window heater only operates when the engine is running. An indi-
cator light in the switch is illuminated when the rear window heater is
switched on.
The rear window heater switches off automatically after 20 minutes. If
you press the switch
once again, the rear window heater is switched
on permanently - the automatic deactivation is thus deactivated.
For the sake of the environment
You should switch off the rear window heater as soon as the rear window
is clear. The reduced current consumption will have a favourable effect on
fuel economy ⇒page 163, “Saving electricity”.
Fig. 39 Front door:
Warning light
Fig. 40 Switch for rear
window heater
Page 74 of 247
Seats and Stowage73
Using the systemSafetyDriving TipsGeneral MaintenanceBreakdown assistanceTechnical Data
– Attach the items of luggage to the lashing eyes or the safety
net* ⇒page 74.
In the event of an accident, there is such a high kinetic energy which is
produced by small and light objects that they can cause severe injuries.
The magnitude of the kinetic energy depends on the speed at which the
vehicle is travelling and on the weight of the object. The speed at which
the vehicle is travelling is in this case the more significant factor.
Example: In the event of a frontal collision at a speed of 50 km/h, an unse-
cured object with a weight of 4.5 kg produces an energy, which corre-
sponds to 20 times its own weight. This means that it results in a weight
of approx. 90 kg. You can imagine the injuries that can occur, if this “bullet”
is flying through the interior compartment and hits an occupant.
WARNING
•Store the objects in the luggage compartment and attach them
to the lashing eyes.
•Loose objects in the passenger compartment can be thrown
forward during a sudden manoeuvre or in case of an accident and
can injure the occupants or other oncoming traffic. This risk is still
increased, if the objects which are flying around are hit by a
deployed airbag. In this case, the objects which are thrown back
can injure the occupants - hazard.
•Please note that the handling properties of your vehicle may be
affected when transporting heavy objects as a result of the
displacement of the centre of gravity. The speed and style of
driving must be adjusted accordingly.
•The items carried in the luggage compartment should be stored
in such a way that no objects are able to slip forward if there are any
sudden driving or braking manoeuvres undertaken - risk of injury!
•Never drive with the boot lid slightly ajar or even fully opened
otherwise exhaust gases may get into the interior of the vehicle -
risk of poisoning!
•On no account exceed the permissible axle loads and the
permissible gross weight of the vehicle - risk of accident!
•Never transport occupants in the luggage compartment.
Caution
Please ensure that the heating elements of the rear window heater are not
damaged as a result of objects sliding in this area.
Note
•Tyre pressure must be adjusted to the load ⇒page 200, fig. 146 .
•The air circulation in the interior of the car helps to prevent the
windows from misting up. Stale air is diverted via the outlet nozzles into
the lateral trim panels of the luggage compartment. Check for yourself that
the outlet nozzles are not covered.
WARNING (continued)
Page 77 of 247

Seats and Stowage
76
The luggage compartment cover*
You can use the luggage compartment cover behind the
head restraints for storing light and soft items.
The luggage compartment cover can be removed as required if
one must transport bulky goods.
– Unhook the support straps on the tailgate.
– Place the cover on the side supports.
– Pull the cover to the rear out of the front holders ⇒fig. 59 .
– Install again by pushing it forwards into the holders and hanging the support straps on the tailgate.
WARNING
No objects should be placed on the luggage compartment cover,
the vehicle occupants could be endangered if there is sudden
braking or the vehicle collides with something.
Caution
Please ensure that the heating elements of the rear window heater are not
damaged as a result of objects placed in this area.
Note
When opening the boot lid, lift the luggage compartment cover - risk that
objects placed in this area can slip forward!
Luggage compartment cover (Estate car)
Fig. 59 Removing the
luggage compartment
cover
Fig. 60 Luggage
compartment: The
luggage compartment
cover
Page 174 of 247
Care and cleaning173
Using the systemSafetyDriving TipsGeneral MaintenanceBreakdown assistanceTechnical Data
Caution
Never remove snow or ice from the windows with warm or hot water - risk
of formation of cracks in the glass!
The headlight lenses
Please do not use any aggressive cleaning or chemical solvent products
- risk of damage to the plastic lenses Please use soap and clean warm
water.
Caution
Never wipe the headlights dry and do not use any sharp objects for
cleaning the plastic lenses, this may result in damage to the protective
paintwork and consequently in formation of cracks on the headlight
lenses, e.g through effect of chemical products.
Door and window seals
The rubber seals on the doors, boot lid, bonnet, sliding roof and windows
remain supple and last longer if you treat them from time to time with a
rubber care product (e.g. silicone spray). You also avoid premature wear
of the seals and prevent leakages in this way. It is also easier to open the
doors. Rubber seals which are well cared for also do not stick together in
cold winter weather.
Locks
We recommend that you use the spray from Škoda original accessories
with regreasing and anticorrosive effect for de-icing locks.
Note
When washing your vehicle, ensure that as little water as possible gets
into the locks.
Wheels
Steel wheels
You should also thoroughly wash the wheels and wheel trims when giving
your vehicle its regular wash. This prevents any brake dust, dirt and road
salt from sticking to the wheel hubs. You can remove stubborn brake abra-
sion adhering to the wheels with an industrial cleaner. Touch up any
damage to the paintwork on the wheels before rust is able to form.
Light alloy wheels
Regular care of light alloy wheels is necessary in order to retain their deco-
rative appearance over long periods. It is particularly important to remove
any road salt and brake abrasion from light alloy wheels every two weeks,
otherwise the surface will suffer. Wash thoroughly and then treat the
wheels with a protective product for light alloy wheels which does not
contain any acidic components. You should provide the wheel hubs with a
hard wax layer every three months. You must not use any products which
cause abrasion when treating the wheel hubs. Any damage to the paint
layer on the wheel hubs must be touched up immediately.
We recommend using a preservative from Škoda genuine accessories
offered by your Škoda dealer.
Page 210 of 247

Breakdown assistance209
Using the systemSafetyDriving TipsGeneral MaintenanceBreakdown assistanceTechnical Data
Breakdown assistance
Breakdown assistance
First-aid box* and warning triangle*
The first-aid box is attached by a strap to the left-hand side of the luggage
compartment or can be housed in a special bag which is a Škoda original
accessory.
The warning triangle is stored in a textile bag. There is a velcro fastener
on the underside of the textile bag. The textile bag is fixed lengthwise (in
the direction of travel) on the floor behind the rear seats with the help of
the velcro fastener in such a way that it lies against the right-hand side of
the luggage compartment.
Individual parts of the equipment (the first-aid box, etc.) are stored on vehi-
cles which do not have a spare wheel by placing them in a plastic sleeve and fixing them to the floor of the luggage compartment using velcro
fasteners.
Room for the warning triangle and first-aid box on vehicles of the type
Estate car
is found in the well under the carpet of the luggage compart-
ment behind the spare wheel.
The warning triangle on vehicles of the type Sedan is located in the lower
part of the boot lid ⇒fig. 149 .
Other types have the warning triangle located in the well under the carpet
of the luggage compartment.
Note
Pay attention to the use-by-date of the contents of the first-aid box.
Fire extinguisher*
The fire extinguisher is attached with a strap and a holder to the boot lid.
Please read carefully the instructions which are attached to the fire
extinguisher.
The fire extinguisher must be checked by an authorised person or
company annually (please observe the differing national legal require-
ments).
Fig. 149 Placing of the
warning triangle in the
boot lid (on a sedan)
Page 227 of 247
Fuses and light bulbs
226
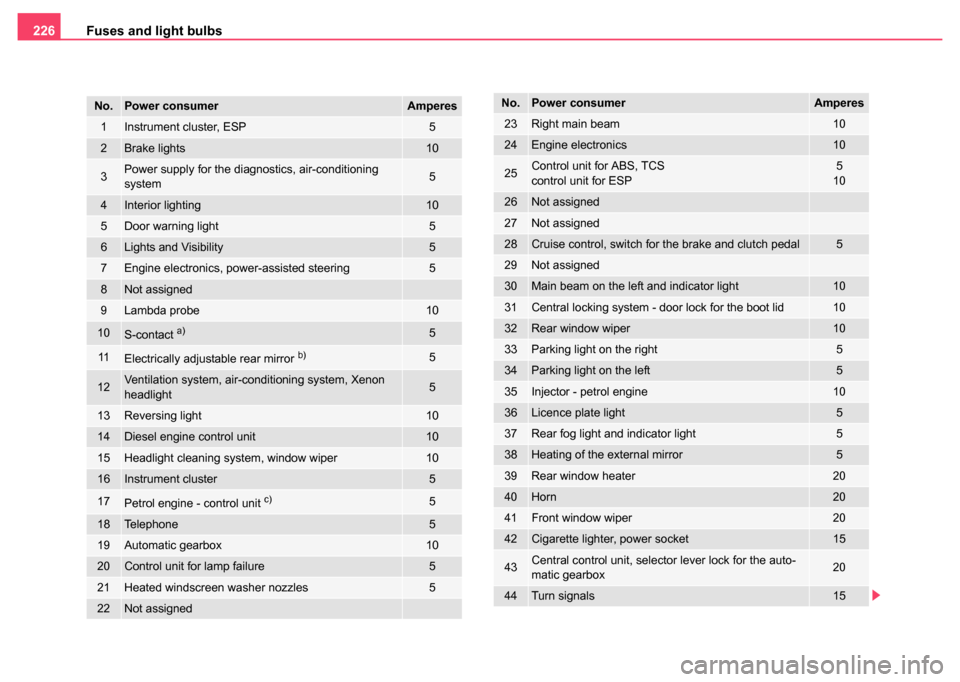
No.Power consumerAmperes
1Instrument cluster, ESP5
2Brake lights10
3Power supply for the diagnostics, air-conditioning
system5
4Interior lighting10
5Door warning light 5
6Lights and Visibility5
7Engine electronics, power-assisted steering5
8Not assigned
9Lambda probe10
10S-contact a)5
11Electrically adjustable rear mirror b)5
12Ventilation system, air-conditioning system, Xenon
headlight5
13Reversing light10
14Diesel engine control unit10
15Headlight cleaning system, window wiper10
16Instrument cluster5
17Petrol engine - control unit c)5
18Telephone5
19Automatic gearbox10
20Control unit for lamp failure5
21Heated windscreen washer nozzles5
22Not assigned
23Right main beam10
24Engine electronics10
25Control unit for ABS, TCS
control unit for ESP5
10
26Not assigned
27Not assigned
28Cruise control, switch for the brake and clutch pedal5
29Not assigned
30Main beam on the left and indicator light10
31Central locking system - door lock for the boot lid10
32Rear window wiper10
33Parking light on the right5
34Parking light on the left5
35Injector - petrol engine10
36Licence plate light5
37Rear fog light and indicator light5
38Heating of the external mirror5
39Rear window heater20
40Horn20
41Front window wiper20
42Cigarette lighter, power socket15
43Central control unit, selector lever lock for the auto-
matic gearbox20
44Turn signals15
No.Power consumerAmperes
Page 235 of 247
Fuses and light bulbs
234
Rear light unit
– Open the boot lid/luggage compartment door.
– Push the cover to the side carefully.
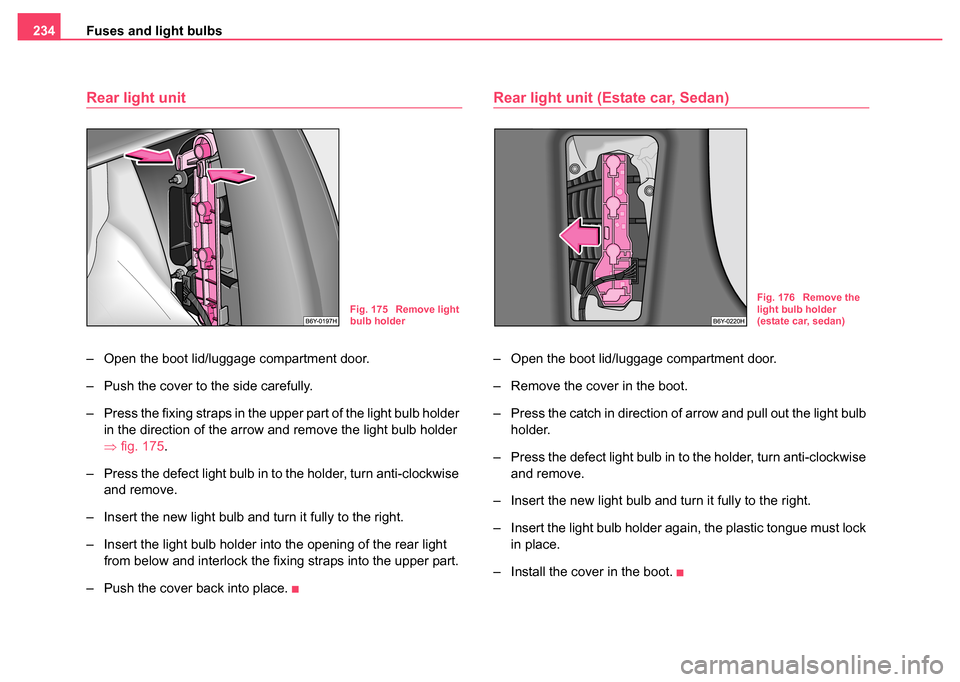
– Press the fixing straps in the upper part of the light bulb holder
in the direction of the arrow and remove the light bulb holder
⇒fig. 175 .
– Press the defect light bulb in to the holder, turn anti-clockwise and remove.
– Insert the new light bulb and turn it fully to the right.
– Insert the light bulb holder into the opening of the rear light from below and interlock the fixing straps into the upper part.
– Push the cover back into place.
Rear light unit (Estate car, Sedan)
– Open the boot lid/luggage compartment door.
– Remove the cover in the boot.
– Press the catch in direction of arrow and pull out the light bulb holder.
– Press the defect light bulb in to the holder, turn anti-clockwise and remove.
– Insert the new light bulb and turn it fully to the right.
– Insert the light bulb holder again, the plastic tongue must lock in place.
– Install the cover in the boot.
Fig. 175 Remove light
bulb holderFig. 176 Remove the
light bulb holder
(estate car, sedan)
Page 236 of 247
Fuses and light bulbs235
Using the systemSafetyDriving TipsGeneral MaintenanceBreakdown assistanceTechnical Data
Luggage compartment light
– Open the tailgate and remove the luggage compartment
cover.
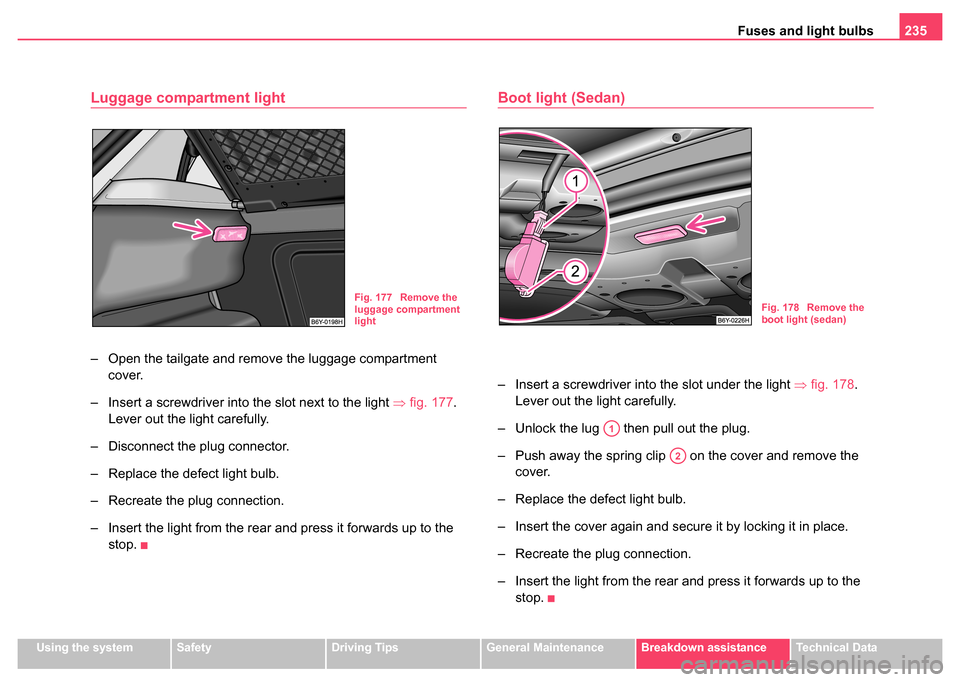
– Insert a screwdriver into the slot next to the light ⇒fig. 177 .
Lever out the light carefully.
– Disconnect the plug connector.
– Replace the defect light bulb.
– Recreate the plug connection.
– Insert the light from the rear and press it forwards up to the stop.
Boot light (Sedan)
– Insert a screwdriver into the slot under the light ⇒fig. 178.
Lever out the light carefully.
– Unlock the lug then pull out the plug.
– Push away the spring clip on the cover and remove the cover.
– Replace the defect light bulb.
– Insert the cover again and secure it by locking it in place.
– Recreate the plug connection.
– Insert the light from the rear and press it forwards up to the stop.
Fig. 177 Remove the
luggage compartment
lightFig. 178 Remove the
boot light (sedan)
A1
A2
Page 240 of 247
Index239
Index
A
Abroad . . . . . . . . . . . . . . . . . . . . . . . . . . . . . 164
ABS . . . . . . . . . . . . . . . . . . . . . . . . . . . . . . . 155
Warning light . . . . . . . . . . . . . . . . . . . . . . 34
Accessories . . . . . . . . . . . . . . . . . . . . . . . . . 206
Adjusting seats . . . . . . . . . . . . . . . . . . . 67, 119
Adjusting the steering wheel . . . . . . . . . . . . 100
Air outlet vents . . . . . . . . . . . . . . . . . . . . . . . . 98
Airbag . . . . . . . . . . . . . . . . . . . . . . . . . . . . . 130 Deployment . . . . . . . . . . . . . . . . . . . . . . 131
Front airbags . . . . . . . . . . . . . . . . . . . . . 132
Side airbags . . . . . . . . . . . . . . . . . . . . . . 134
Warning light . . . . . . . . . . . . . . . . . . . . . . 35
Airbag system . . . . . . . . . . . . . . . . . . . . . . . 130 Warning light . . . . . . . . . . . . . . . . . . . . . . 35
Airbags . . . . . . . . . . . . . . . . . . . . . . . . . . . . 130
Alarm . . . . . . . . . . . . . . . . . . . . . . . . . . . . . . . 48
An overview Cockpit . . . . . . . . . . . . . . . . . . . . . . . . . . . 11
Antilock Brake System . . . . . . . . . . . . . . . . 155
Antilock brake system - ABS Warning light . . . . . . . . . . . . . . . . . . . . . . 34
Anti-theft alarm system . . . . . . . . . . . . . . . . . 48
Armrest . . . . . . . . . . . . . . . . . . . . . . . . . . . . . 90
Ashtray . . . . . . . . . . . . . . . . . . . . . . . . . . . . . 83
Auto Check Control . . . . . . . . . . . . . . . . . . . . 23
Auto Computer . . . . . . . . . . . . . . . . . . . . . . . 17 Automatic gearbox . . . . . . . . . . . . . . . . . . . . 110
Emergency programme . . . . . . . . . . . . . 114
Kickdown . . . . . . . . . . . . . . . . . . . . . . . . 113
Automatic vehicle wash systems . . . . . . . . . 170
Avoiding damage to your vehicle . . . . . . . . . 164
B
Before setting off . . . . . . . . . . . . . . . . . . . . . 118
Belt tensioners . . . . . . . . . . . . . . . . . . . . . . . 129
Belts . . . . . . . . . . . . . . . . . . . . . . . . . . . . . . . 123
Biodiesel . . . . . . . . . . . . . . . . . . . . . . . . . . . 178
Bonnet . . . . . . . . . . . . . . . . . . . . . . . . . . . . . 182
Boot lid . . . . . . . . . . . . . . . . . . . . . . . . . . . . . . 44 Lighting . . . . . . . . . . . . . . . . . . . . . . . . . . . 60
Warning light . . . . . . . . . . . . . . . . . . . . . . 33
Brake Handbrake . . . . . . . . . . . . . . . . . . . . . . . 105
Brake booster . . . . . . . . . . . . . . . . . . . . . . . 155
Brake fluid . . . . . . . . . . . . . . . . . . . . . . . . . . 191
Brake pads Warning light . . . . . . . . . . . . . . . . . . . . . . 32
Brake system Warning light . . . . . . . . . . . . . . . . . . . . . . 35
Brakes . . . . . . . . . . . . . . . . . . . . . . . . . . . . . 154
Bulbs . . . . . . . . . . . . . . . . . . . . . . . . . . . . . . 227 Warning light . . . . . . . . . . . . . . . . . . . . . . 33 Button on the driver's door
Central locking system . . . . . . . . . . . . . . . 43
C
Car jack . . . . . . . . . . . . . . . . . . . . . . . . . . . . 210
Catalytic converter . . . . . . . . . . . . . . . . . . . . 158
Central locking system . . . . . . . . . . . . . . . . . . 40locking . . . . . . . . . . . . . . . . . . . . . . . . . . . 42
unlocking . . . . . . . . . . . . . . . . . . . . . . . . . 42
Changing a wheel . . . . . . . . . . . . . . . . . . . . 212
Changing the engine oil . . . . . . . . . . . . . . . . 188
Changing wheels around . . . . . . . . . . . . . . . 201
Charging the battery . . . . . . . . . . . . . . . . . . 196 Warning light . . . . . . . . . . . . . . . . . . . . . . . 29
Chassis number . . . . . . . . . . . . . . . . . . . . . . 237
Child safety . . . . . . . . . . . . . . . . . . . . . . . . . 140 Side airbags . . . . . . . . . . . . . . . . . . . . . . 143
Child safety locks . . . . . . . . . . . . . . . . . . . . . . 40
Child safety seats ISOFIX system . . . . . . . . . . . . . . . . . . . . 148
Child seat . . . . . . . . . . . . . . . . . . . . . . . . . . . 144 Classification into groups . . . . . . . . . . . . 144
on the front passenger seat . . . . . . . . . . 142
Safety instructions . . . . . . . . . . . . . . . . . 140
Children and safety . . . . . . . . . . . . . . . . . . . 140
Chrome parts . . . . . . . . . . . . . . . . . . . . . . . . 172
Cigarette lighter . . . . . . . . . . . . . . . . . . . . . . . 84