gearbox SKODA FABIA 2006 2.G / 5J Owner's Guide
[x] Cancel search | Manufacturer: SKODA, Model Year: 2006, Model line: FABIA, Model: SKODA FABIA 2006 2.G / 5JPages: 258, PDF Size: 44.86 MB
Page 177 of 258
Driving and the Environment176
Automatic gearbox
– Depress the accelerator pedal slowly. Do not depress it beyond
the kickdown position, however.
An effective way of achieving good fuel economy is to shift up early. You will consume more fuel if you drive at unnece ssarily high revolutions in any given gear.
The ⇒page 175, fig. 136 shows the ratio of fuel consumption to the speed of your vehicle for the individual gears. Fuel consumption in 1st gear is the highest and in 5th gear is the lowest.
Note
•The optimal engine speed should be obtained when accelerating, in order to avoid a high fuel consumption and resonance of the vehicle.
•Also use the information supplied by the multi-functional indicator* ⇒ page 17.
Avoiding full throttle
Driving more slowly means saving fuel.
Sensitive use of the accelerator will not only significantly reduce fuel consump- tion but also positively influence environmental pollution and wear of your vehicle.
You should avoid fully exploiting the top speed of your vehicle wherever possible. Fuel consumption, pollutant emissions and vehicle noises increase disproportionally at high speeds.
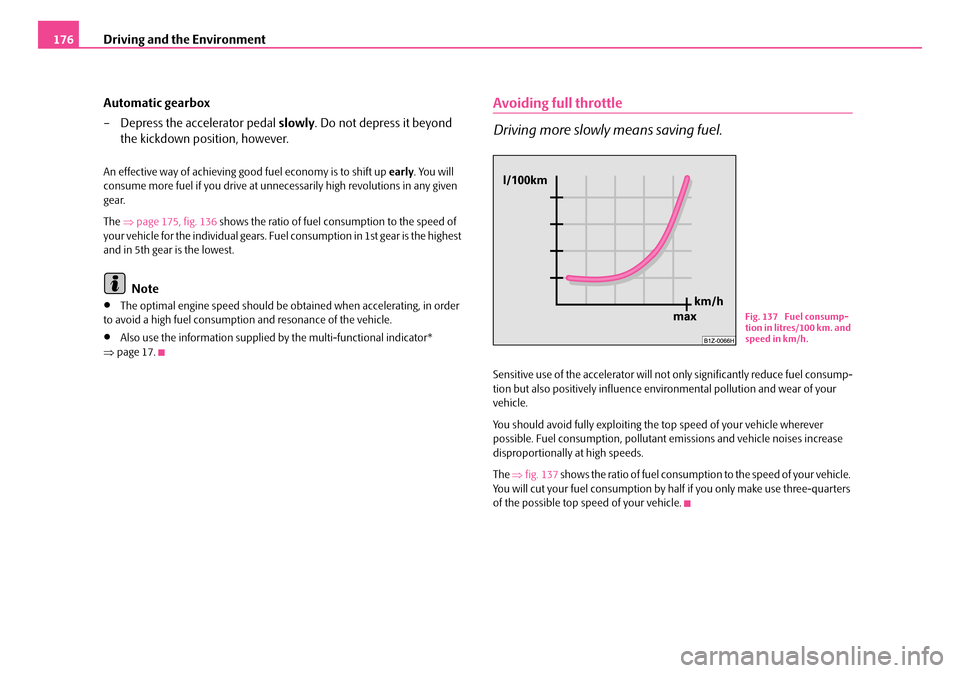
The ⇒fig. 137 shows the ratio of fuel consumption to the speed of your vehicle. You will cut your fuel consumption by half if you only make use three-quarters of the possible top speed of your vehicle.
Fig. 137 Fuel consump- tion in litres/100 km. and speed in km/h.
NKO A05Fabia 20.book Page 176 Tuesday, September 26, 2006 8:38 AM
Page 199 of 258
Inspecting and Replenishing198
Opening the bonnet
– Unlock the bonnet ⇒page 197, fig. 141.
– Ensure that the arms of the windscreen wipers are correctly in
place against the windscreen before opening the bonnet other-
wise damage could occur to the paintwork.
– Press the locking button ⇒page 197, fig. 142, the bonnet unlocks
itself.
– Grip the bonnet and lift it up.
– Take the bonnet support out of its holder and set it in the opening
designed for it ⇒page 197, fig. 143.
Closing the bonnet
– Lift the bonnet slightly and unhook the bonnet support. Press the
bonnet support into the holder designed to hold it.
– Allow the bonnet to drop from a height of about 30 cm into the lock
- bonnet do not press down on it!
WARNING
•Never open the bonnet if you see that steam or coolant is flowing out of the engine compartment - risk of scalding! Wait long enough until the steam or coolant has stopped escaping.
•For safety reasons, the bonnet must always be properly closed when driving. One should therefore check that the lock has in fact engaged properly after closing the bonnet.
•Stop your vehicle immediately whil e driving if you notice that the lock is not properly engaged and close the bonnet properly - risk of an accident!
Caution
•Before opening the bonnet, ensure that the arms of the windscreen wipers are correctly in place against the windscreen. Otherwise, there is a risk of damage to the paintwork.
Working in the engine compartment
Particular care is required when carrying out any work in the
engine compartment!
There is a risk of injuries, scalding, accidents and fire when working in the engine compartment, e.g. inspecting and replenishing oil and other fluids. For this reason, it is essential to comply with the warning instructions stated below and with the general appl icable rules of safety. The engine compartment of your car is a hazardous area ⇒.
WARNING
•Never open the bonnet if you see that steam or coolant is flowing out of the engine compartment - risk of scalding! Wait long enough until the steam or coolant has stopped escaping.
•Switch off the engine and pull out the ignition key.
•Apply the handbrake firmly.
•If your vehicle is fitted with a manual gearbox, move the gearshift lever into Neutral, or if it is fitted with automatic gearbox, move the selector lever into position P.
•Allow the engine to cool down.
•Keep children clear of the engine compartment.
•Do not touch any hot engine parts - risk of burns!
NKO A05Fabia 20.book Page 198 Tuesday, September 26, 2006 8:38 AM
Page 225 of 258
Breakdown assistance224
–Engage 1st gear or if your vehicle is fitted with an automatic
gearbox, position the selector lever into position P.
– If a trailer is coupled, uncouple it.
– Take the vehicle tool kit and the spare wheel ⇒page 222 out of
the luggage compartment.
WARNING
•If you find yourself in flowing traffic switch on the hazard warning lights system and place the warning tria ngle on the side of the road at the prescribed distance from your vehicl e while observing all national legal provisions. In this way you are protecting not only yourself but also other road users.
•Never start the engine with the vehi cle sitting on the raised jack - danger of suffering injury!
Caution
If you have to change a wheel on a slope first block the opposite wheel with a stone or similar object in order to secure the vehicle from unexpectedly rolling away.
Note
Comply with the national legal regulations.
Changing a wheel
Always change a wheel on a level surface as far as possible.
– Take off the full wheel trim* ⇒page 225 or the caps ⇒page 226.
– In the case of light alloy wheels remove the wheel trim cap
⇒ page 226.
– Slacken the wheel bolts ⇒page 227.
– Jack up the vehicle until the wheel to be changed is clear of the
ground ⇒page 227.
– Unscrew the wheel bolts and place them on a clean surface (cloth,
paper etc.).
– Take off the wheel.
– Fit on the spare wheel and tighten the wheel bolts slightly.
– Lower the car.
– Tighten the wheel bolts firmly, alternately and diagonally using the
wheel wrench ⇒page 227.
– Mount the full wheel trim/wh eel trim cap or the caps.
Note
•All bolts must be clean and must turn easily.
•You must never grease or oil the wheel bolts!
•When fitting on unidirectional tyres, ensure that the tyres rotate in the correct direction ⇒page 213.
Subsequent steps
After changing the wheel, you must perform the following steps.
NKO A05Fabia 20.book Page 224 Tuesday, September 26, 2006 8:38 AM
Page 232 of 258
Breakdown assistance231
Using the systemSafetyDriving TipsGeneral MaintenanceBreakdown assistanceTechnical Data
•Do not bend over the batteries - risk of caustic burns!
•The vent screws of the battery cells must be tightened firmly.
•Keep any sources of ignition (naked flame, smouldering cigarettes etc.) away from the battery - risk of an explosion!
Tow-starting and towing vehicle
General
Please pay attention to the following instructions if you are going to
use a tow rope:
Driver of the towing vehicle
– Do not drive off until the tow rope is taught.
– Release the clutch particularly gently when starting off.
Driver of the towed vehicle
– Switch the ignition on so that th e steering wheel is not blocked and
you can also operate the turn signal lights, the headlight flasher,
the windscreen wipers and windscreen washer system.
– Take the vehicle out of gear or move the selector lever into position
N if your vehicle is fitted with an automatic gearbox.
– Note that the brake servo unit and power steering only operate if
the engine is running. You will requ ire significantly greater physical
force to depress the brake pedal and to steer the vehicle if the
engine is not running.
– Ensure that the tow rope is always kept taught.
Tow rope or tow bar
A tow bar is safest way of towing a vehicle and also minimizes any shocks. You can use a tow rope only if a suitable tow bar is not available.
The tow rope must be elastic to protect the vehicle. Thus one should only use plastic fibre rope or a rope made out of a similarly elastic material.
Attach the tow rope or the tow bar only to the towing eyes provided for this purpose ⇒page 232, “Front towing eye” and ⇒page 233, “Rear towing eye”.
Driving style
Towing another vehicle requires a cert ain amount of practice. Both drivers should be familiar with the particular points about towing a vehicle. Unskilled drivers should not attempt to tow in another vehicle or to be towed in.
One should be constantly vigilant not to allow impermissibly high towing forces or jerky loadings. There is always a risk of excessive stresses and damage resulting at the points to which you a ttach the tow rope or tow bar when you attempt to tow a vehicle which is not standing on a paved road.
Caution
If the gearbox of yo ur vehicle no longer contains any oil because of a defect, your vehicle must only be towed in with the driven wheels raised clear of the ground, or on a special vehicle transporter or trailer.
WARNING (continued)
NKO A05Fabia 20.book Page 231 Tuesday, September 26, 2006 8:38 AM
Page 234 of 258
Breakdown assistance233
Using the systemSafetyDriving TipsGeneral MaintenanceBreakdown assistanceTechnical Data
Rear towing eye
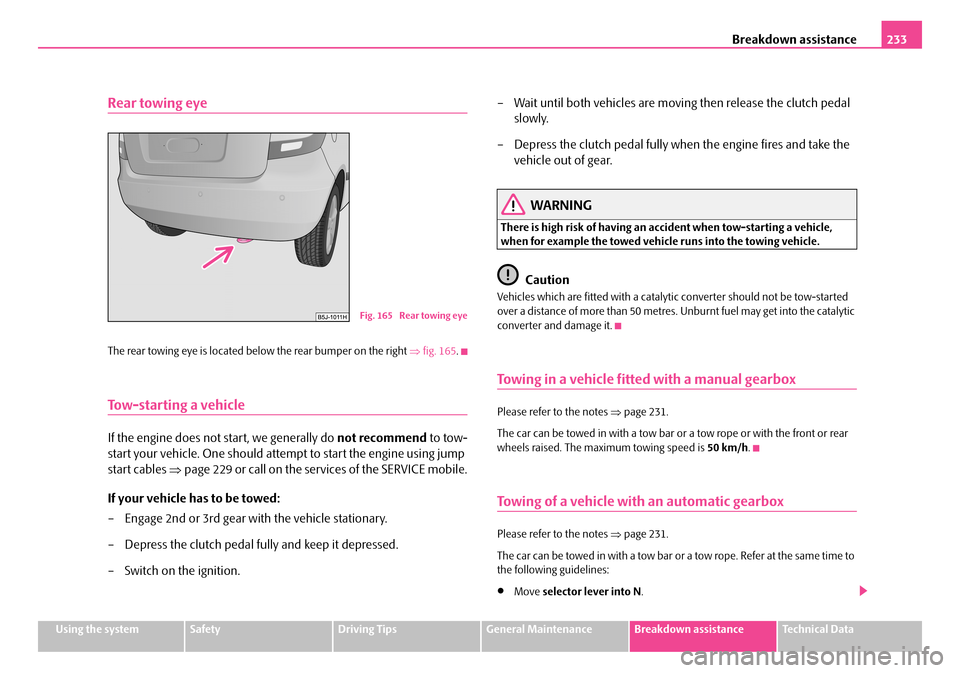
The rear towing eye is located below the rear bumper on the right ⇒fig. 165.
Tow-starting a vehicle
If the engine does not start, we generally do not recommend to tow-
start your vehicle. One should attempt to start the engine using jump
start cables ⇒page 229 or call on the services of the SERVICE mobile.
If your vehicle has to be towed:
– Engage 2nd or 3rd gear wi th the vehicle stationary.
– Depress the clutch pedal fully and keep it depressed.
– Switch on the ignition.
– Wait until both vehicles are movi ng then release the clutch pedal
slowly.
– Depress the clutch pedal fully when the engine fires and take the
vehicle out of gear.
WARNING
There is high risk of having an accident when tow-starting a vehicle, when for example the towed vehicl e runs into the towing vehicle.
Caution
Vehicles which are fitted with a catalytic converter should not be tow-started over a distance of more than 50 metres . Unburnt fuel may get into the catalytic converter and damage it.
Towing in a vehicle fitted with a manual gearbox
Please refer to the notes ⇒page 231.
The car can be towed in with a tow bar or a tow rope or with the front or rear wheels raised. The maximum towing speed is 50 km/h.
Towing of a vehicle with an automatic gearbox
Please refer to the notes ⇒page 231.
The car can be towed in with a tow bar or a tow rope. Refer at the same time to the following guidelines:
•Move selector lever into N.
Fig. 165 Rear towing eye
NKO A05Fabia 20.book Page 233 Tuesday, September 26, 2006 8:38 AM
Page 235 of 258
Breakdown assistance234
•The maximum towing speed is 50 km/h.
•The maximum permissible towing distance is 50 km. The gear oil pump does not operate when the engine is not running; the gearbox would not be adequately lubricated at higher spee ds and over longer towing distance.
Caution
If the vehicle is towed in by a recovery vehicle, it should only be towed in with the front wheels raised. If the vehicle is raised at rear, the automatic gearbox is damaged!
Note
The vehicle must be transported on a special vehicle or trailer if it is not possible to tow in the vehicle in the way described or if the towing distance is greater than 50 km.
NKO A05Fabia 20.book Page 234 Tuesday, September 26, 2006 8:38 AM
Page 237 of 258
Fuses and light bulbs236
Caution
•Never attempt to “repair” fuses and also do not replace them with a fuse of a higher amperage - risk of fire! This may also cause damage at another part of the electrical system.
•Have the electrical system checked as quickly as possible by a specialist garage if a newly inserted fuse blows again after a short time.
Note
We recommend that you have these fuse s replaced by a specialist garage.
Fuse assignment in the dash panel
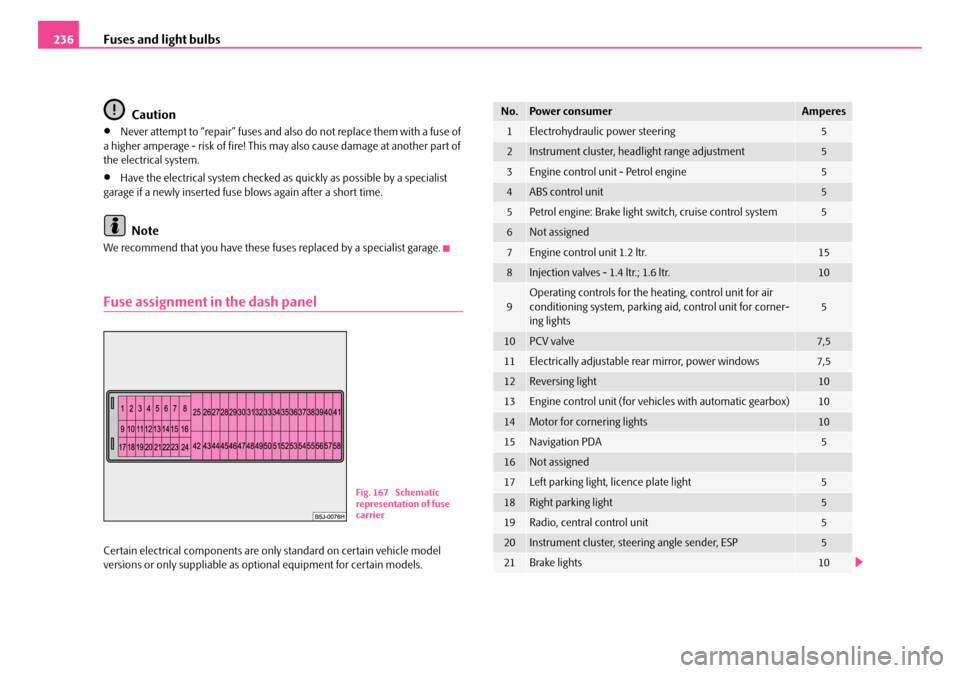
Certain electrical components are only standard on certain vehicle model versions or only suppliable as opti onal equipment for certain models.
Fig. 167 Schematic representation of fuse carrier
No.Power consumerAmperes
1Electrohydraulic power steering5
2Instrument cluster, headlight range adjustment5
3Engine control unit - Petrol engine5
4ABS control unit5
5Petrol engine: Brake light switch, cruise control system5
6Not assigned
7Engine control unit 1.2 ltr.15
8Injection valves - 1.4 ltr.; 1.6 ltr.10
9Operating controls for the he ating, control unit for air conditioning system, parking aid, control unit for corner- ing lights5
10PCV valve7,5
11Electrically adjustable re ar mirror, power windows7,5
12Reversing light10
13Engine control unit (for vehicles with automatic gearbox)10
14Motor for cornering lights10
15Navigation PDA5
16Not assigned
17Left parking light, licence plate light5
18Right parking light5
19Radio, central control unit5
20Instrument cluster, steering angle sender, ESP5
21Brake lights10
NKO A05Fabia 20.book Page 236 Tuesday, September 26, 2006 8:38 AM
Page 240 of 258
Fuses and light bulbs239
Using the systemSafetyDriving TipsGeneral MaintenanceBreakdown assistanceTechnical Data
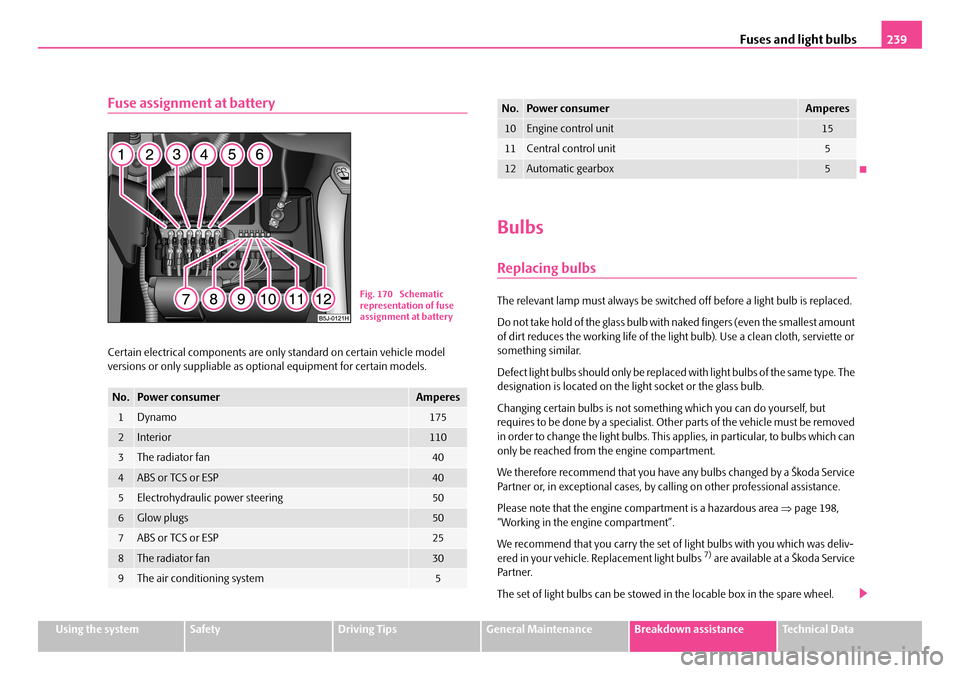
Fuse assignment at battery
Certain electrical components are only standard on certain vehicle model versions or only suppliable as op tional equipment for certain models.
Bulbs
Replacing bulbs
The relevant lamp must always be switched off before a light bulb is replaced.
Do not take hold of the glass bulb with naked fingers (even the smallest amount of dirt reduces the working life of the li ght bulb). Use a clean cloth, serviette or something similar.
Defect light bulbs should only be replaced with light bulbs of the same type. The designation is located on the light socket or the glass bulb.
Changing certain bulbs is not something which you can do yourself, but requires to be done by a specialist. Ot her parts of the vehicle must be removed in order to change the light bulbs. This applies, in particular, to bulbs which can only be reached from the engine compartment.
We therefore recommend that you have any bulbs changed by a Škoda Service Partner or, in exceptional cases, by ca lling on other professional assistance.
Please note that the engine compartment is a hazardous area ⇒page 198, “Working in the engine compartment”.
We recommend that you carry the set of light bulbs with you which was deliv- ered in your vehicle. Replacement light bulbs 7) are available at a Škoda Service Par tner.
The set of light bulbs can be stowed in the locable box in the spare wheel.
No.Power consumerAmperes
1Dynamo175
2Interior110
3The radiator fan40
4ABS or TCS or ESP40
5Electrohydraulic power steering50
6Glow plugs50
7ABS or TCS or ESP25
8The radiator fan30
9The air conditioning system5
Fig. 170 Schematic representation of fuse assignment at battery
10Engine control unit15
11Central control unit5
12Automatic gearbox5
No.Power consumerAmperes
NKO A05Fabia 20.book Page 239 Tuesday, September 26, 2006 8:38 AM
Page 248 of 258
General247
Using the systemSafetyDriving TipsGeneral MaintenanceBreakdown assistanceTechnical Data
Technical Data
General
Identification data
Vehicle data sticker
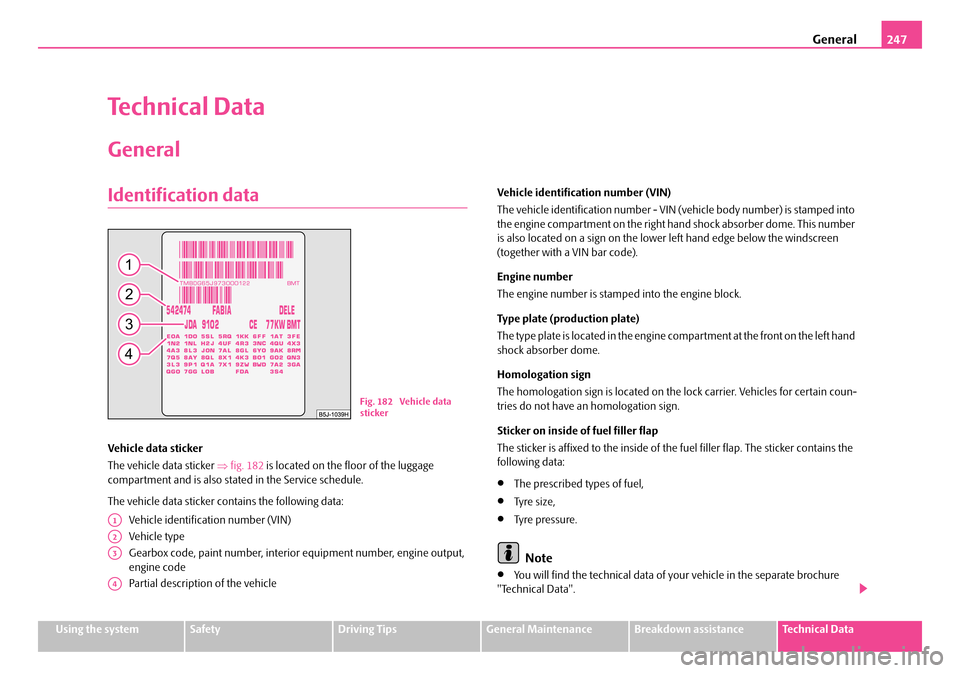
The vehicle data sticker ⇒fig. 182 is located on the floor of the luggage compartment and is also stated in the Service schedule.
The vehicle data sticker co ntains the following data:
Vehicle identification number (VIN)
Vehicle type
Gearbox code, paint number, interior equipment number, engine output, engine code
Partial description of the vehicle
Vehicle identification number (VIN)
The vehicle identification number - VIN (v ehicle body number) is stamped into the engine compartment on the right ha nd shock absorber dome. This number is also located on a sign on the lower left hand edge below the windscreen (together with a VIN bar code).
Engine number
The engine number is stampe d into the engine block.
Type plate (production plate)
The type plate is located in the engine co mpartment at the front on the left hand shock absorber dome.
Homologation sign
The homologation sign is located on the lock carrier. Vehicles for certain coun- tries do not have an homologation sign.
Sticker on inside of fuel filler flap
The sticker is affixed to the inside of the fuel filler flap. The sticker contains the following data:
•The prescribed types of fuel,
•Ty re s i z e ,
•Tyre pressure.
Note
•You will find the technical data of yo ur vehicle in the separate brochure "Technical Data".
Fig. 182 Vehicle data sticker
A1
A2
A3
A4
NKO A05Fabia 20.book Page 247 Tuesday, September 26, 2006 8:38 AM
Page 250 of 258
Index249
Index
A
Abroad . . . . . . . . . . . . . . . . . . . . . . . . . . . . . . . . . . . . . 179
ABS . . . . . . . . . . . . . . . . . . . . . . . . . . . . . . . . . . . . . . . . . 169
Warning light . . . . . . . . . . . . . . . . . . . . . . . . . . . . . 34
Accessories . . . . . . . . . . . . . . . . . . . . . . . . . . . . . . . . . 220
Adjusting seats . . . . . . . . . . . . . . . . . . . . . . . . . . . 70, 135
Adjusting the steering wheel . . . . . . . . . . . . . . . . . . 103
Air conditioning system . . . . . . . . . . . . . . . . . . . . . . . 94
Air outlet vents . . . . . . . . . . . . . . . . . . . . . . . . . . . . . . . 97
Airbag . . . . . . . . . . . . . . . . . . . . . . . . . . . . . . . . . . . . . . 144
Deployment . . . . . . . . . . . . . . . . . . . . . . . . . . . . . 145
Front airbag . . . . . . . . . . . . . . . . . . . . . . . . . . . . . 146
Head airbag . . . . . . . . . . . . . . . . . . . . . . . . . . . . . 150
Side airbag . . . . . . . . . . . . . . . . . . . . . . . . . . . . . . 148
Warning light . . . . . . . . . . . . . . . . . . . . . . . . . . . . . 35
Airbag system . . . . . . . . . . . . . . . . . . . . . . . . . . . . . . . 144
Warning light . . . . . . . . . . . . . . . . . . . . . . . . . . . . . 35
Alarm . . . . . . . . . . . . . . . . . . . . . . . . . . . . . . . . . . . . . . . . 48
Alternator
Warning light . . . . . . . . . . . . . . . . . . . . . . . . . . . . . 28
Antilock brake system . . . . . . . . . . . . . . . . . . . . . . . . 169
Antilock brake system - ABS
Warning light . . . . . . . . . . . . . . . . . . . . . . . . . . . . . 34
Anti-theft alarm system . . . . . . . . . . . . . . . . . . . . . . . 48
Ashtray . . . . . . . . . . . . . . . . . . . . . . . . . . . . . . . . . . . . . . 82
Auto Check Control . . . . . . . . . . . . . . . . . . . . . . . . . . . 23
Auto Computer . . . . . . . . . . . . . . . . . . . . . . . . . . . . . . . 17
Automatic gearbox . . . . . . . . . . . . . . . . . . . . . . . . . . 112
Emergency programme . . . . . . . . . . . . . . . . . . 116
Kickdown . . . . . . . . . . . . . . . . . . . . . . . . . . . . . . . 115
Tiptronic . . . . . . . . . . . . . . . . . . . . . . . . . . . . . . . . 116
Automatic vehicle wash systems . . . . . . . . . . . . . . 186
Automatic wiper/washer system . . . . . . . . . . . . . . . 64
Avoiding damage to your vehicle . . . . . . . . . . . . . 180
B
B rake booster . . . . . . . . . . . . . . . . . . . . . . . . . . . . . . 169
Battery . . . . . . . . . . . . . . . . . . . . . . . . . . . . . . . . . . 28, 207
change . . . . . . . . . . . . . . . . . . . . . . . . . . . . . . . . . . 211
Charge . . . . . . . . . . . . . . . . . . . . . . . . . . . . . . . . . . 210
Inspecting the electrolyte level . . . . . . . . . . . . 209
Operation in winter . . . . . . . . . . . . . . . . . . . . . . 209
Before setting off . . . . . . . . . . . . . . . . . . . . . . . . . . . . 134
Belt tensioner . . . . . . . . . . . . . . . . . . . . . . . . . . . . . . . 143
Belt tensioners . . . . . . . . . . . . . . . . . . . . . . . . . . . . . . 143
Belts . . . . . . . . . . . . . . . . . . . . . . . . . . . . . . . . . . . . . . . . 138
Biodiesel . . . . . . . . . . . . . . . . . . . . . . . . . . . . . . . . . . . . 193
Bluetooth™ . . . . . . . . . . . . . . . . . . . . . . . . . . . . . . . . . 128
Bonnet . . . . . . . . . . . . . . . . . . . . . . . . . . . . . . . . . . . . . 197
Brake
Handbrake . . . . . . . . . . . . . . . . . . . . . . . . . . . . . . 107
Brake booster . . . . . . . . . . . . . . . . . . . . . . . . . . . . . . . 169
Brake fluid . . . . . . . . . . . . . . . . . . . . . . . . . . . . . . . . . . 206
Brake pads
Warning light . . . . . . . . . . . . . . . . . . . . . . . . . . . . . 32
Brake system
Warning light . . . . . . . . . . . . . . . . . . . . . . . . . . . . . 34
Brakes . . . . . . . . . . . . . . . . . . . . . . . . . . . . . . . . . . . . . . 168
Bulbs . . . . . . . . . . . . . . . . . . . . . . . . . . . . . . . . . . . . . . . 239
Button on the driver's door
Central locking system . . . . . . . . . . . . . . . . . . . . 44
C
Car jack . . . . . . . . . . . . . . . . . . . . . . . . . . . . . . . . . . . . . 222
Car state . . . . . . . . . . . . . . . . . . . . . . . . . . . . . . . . . . . . . 23
Catalytic converter . . . . . . . . . . . . . . . . . . . . . . . . . . 174
CD changer . . . . . . . . . . . . . . . . . . . . . . . . . . . . . . . . . 131
Central locking system . . . . . . . . . . . . . . . . . . . . . . . . 41
lock . . . . . . . . . . . . . . . . . . . . . . . . . . . . . . . . . . . . . . 43
unlock . . . . . . . . . . . . . . . . . . . . . . . . . . . . . . . . . . . 43
Changing a wheel . . . . . . . . . . . . . . . . . . . . . . . . . . . 223
Changing the engine oil . . . . . . . . . . . . . . . . . . . . . . 202
Changing wheels around . . . . . . . . . . . . . . . . . . . . . 215
Charging the battery . . . . . . . . . . . . . . . . . . . . . . . . . 210
Warning light . . . . . . . . . . . . . . . . . . . . . . . . . . . . . 28
Check engine oil level . . . . . . . . . . . . . . . . . . . . . . . . 201
Child safety . . . . . . . . . . . . . . . . . . . . . . . . . . . . . . . . . 155
Side airbag . . . . . . . . . . . . . . . . . . . . . . . . . . . . . . 158
Child safety lock . . . . . . . . . . . . . . . . . . . . . . . . . . . . . . 41
NKO A05Fabia 20.book Page 249 Tuesday, September 26, 2006 8:38 AM