warning SKODA FABIA 2006 2.G / 5J Owner's Manual
[x] Cancel search | Manufacturer: SKODA, Model Year: 2006, Model line: FABIA, Model: SKODA FABIA 2006 2.G / 5JPages: 258, PDF Size: 44.86 MB
Page 6 of 258
Contents5
Contents
Layout of this Owner's Manual
(explanations). . . . . . . . . . . . . . . . . . . . . . . . . .
Using the system. . . . . . . . . . . . . . . . . . . . . .
Cockpit. . . . . . . . . . . . . . . . . . . . . . . . . . . . . . . . . . . . . . . . General view . . . . . . . . . . . . . . . . . . . . . . . . . . . . . . . . .
Instruments and Indicator/Warning Lights. . . General view of the instrument cluster . . . . . . . . . Engine revolutions counter . . . . . . . . . . . . . . . . . . . . Coolant temperature gauge* . . . . . . . . . . . . . . . . . . Fuel gauge* . . . . . . . . . . . . . . . . . . . . . . . . . . . . . . . . . . Counter for distance driven . . . . . . . . . . . . . . . . . . . Service Interval Display . . . . . . . . . . . . . . . . . . . . . . . Digital clock . . . . . . . . . . . . . . . . . . . . . . . . . . . . . . . . . . Multi-functional indicato r (onboard computer)* Information display* . . . . . . . . . . . . . . . . . . . . . . . . . . Auto Check Control . . . . . . . . . . . . . . . . . . . . . . . . . . . Warning lights . . . . . . . . . . . . . . . . . . . . . . . . . . . . . . . .
Unlocking and locking . . . . . . . . . . . . . . . . . . . . . . . . Key . . . . . . . . . . . . . . . . . . . . . . . . . . . . . . . . . . . . . . . . . . Locking . . . . . . . . . . . . . . . . . . . . . . . . . . . . . . . . . . . . . . Child safety lock . . . . . . . . . . . . . . . . . . . . . . . . . . . . . . Central locking system* . . . . . . . . . . . . . . . . . . . . . . . Remote control* . . . . . . . . . . . . . . . . . . . . . . . . . . . . . . Anti-theft alarm system* . . . . . . . . . . . . . . . . . . . . . . Interior monitor* and Towing protection* . . . Power windows* . . . . . . . . . . . . . . . . . . . . . . . . . . . . . Electric sliding/tilting roof* . . . . . . . . . . . . . . . . . . . .
Lights and Visibility . . . . . . . . . . . . . . . . . . . . . . . . . . . Lights . . . . . . . . . . . . . . . . . . . . . . . . . . . . . . . . . . . . . . . . Interior lighting . . . . . . . . . . . . . . . . . . . . . . . . . . . . . . .
Visibility . . . . . . . . . . . . . . . . . . . . . . . . . . . . . . . . . . . . . Windshield wiper and wash system . . . . . . . . . . . . Rear mirror . . . . . . . . . . . . . . . . . . . . . . . . . . . . . . . . . .
Seats and Stowage. . . . . . . . . . . . . . . . . . . . . . . . . . . . Front seats . . . . . . . . . . . . . . . . . . . . . . . . . . . . . . . . . . . Head restraints . . . . . . . . . . . . . . . . . . . . . . . . . . . . . . . Heating the front seats* . . . . . . . . . . . . . . . . . . . . . . . Rear seats . . . . . . . . . . . . . . . . . . . . . . . . . . . . . . . . . . . . Pedals . . . . . . . . . . . . . . . . . . . . . . . . . . . . . . . . . . . . . . . luggage compartment . . . . . . . . . . . . . . . . . . . . . . . . The roof rack* . . . . . . . . . . . . . . . . . . . . . . . . . . . . . . . . Front cup holder . . . . . . . . . . . . . . . . . . . . . . . . . . . . . Rear cup holder* . . . . . . . . . . . . . . . . . . . . . . . . . . . . . Note holder . . . . . . . . . . . . . . . . . . . . . . . . . . . . . . . . . . Ashtray* . . . . . . . . . . . . . . . . . . . . . . . . . . . . . . . . . . . . . Cigarette lighter* and power sockets* . . . . . . . . . . Storage compartments . . . . . . . . . . . . . . . . . . . . . . . .
Heating and air conditioning system. . . . . . . . . Heating . . . . . . . . . . . . . . . . . . . . . . . . . . . . . . . . . . . . . . Climatic (semi-automatic air conditioning system)* . . . . . . . . . . . . . . . . . . . . . . . . . . . . . . . . . . . . . Climatronic (automatic air conditioning)* . . . . . .
Starting-off and Driving. . . . . . . . . . . . . . . . . . . . . . . Setting steering wheel position* . . . . . . . . . . . . . . . Ignition lock . . . . . . . . . . . . . . . . . . . . . . . . . . . . . . . . . . Starting the engine . . . . . . . . . . . . . . . . . . . . . . . . . . . Switching off the engine . . . . . . . . . . . . . . . . . . . . . . . Shifting (manual gearbox) . . . . . . . . . . . . . . . . . . . . . Handbrake . . . . . . . . . . . . . . . . . . . . . . . . . . . . . . . . . . . Parking aid* . . . . . . . . . . . . . . . . . . . . . . . . . . . . . . . . . . Cruise control system (CCS)* . . . . . . . . . . . . . . . . . .
Automatic gearbox . . . . . . . . . . . . . . . . . . . . . . . . . . . 6-speed automatic gearbox* . . . . . . . . . . . . . . . . . .
Communication . . . . . . . . . . . . . . . . . . . . . . . . . . . . . . Operating the radio . . . . . . . . . . . . . . . . . . . . . . . . . . . Radio and mobile phone operation . . . . . . . . . . . . Universal telephone preinstallation with voice control* . . . . . . . . . . . . . . . . . . . . . . . . . . . . . . . . . . . . . Inserting the mobile phone and adapter . . . . . . . Mobile phone operation . . . . . . . . . . . . . . . . . . . . . . Voice commands . . . . . . . . . . . . . . . . . . . . . . . . . . . . . Enter PIN code . . . . . . . . . . . . . . . . . . . . . . . . . . . . . . . Select number . . . . . . . . . . . . . . . . . . . . . . . . . . . . . . . Repeat last call . . . . . . . . . . . . . . . . . . . . . . . . . . . . . . . Phone voice phonebook* . . . . . . . . . . . . . . . . . . . . . Bluetooth™* . . . . . . . . . . . . . . . . . . . . . . . . . . . . . . . . . Mobile phones and two-way radio systems . . . . . Input AUX-IN* . . . . . . . . . . . . . . . . . . . . . . . . . . . . . . . CD changer* . . . . . . . . . . . . . . . . . . . . . . . . . . . . . . . . .
Safety . . . . . . . . . . . . . . . . . . . . . . . . . . . . . . . . . . . . . .
Passive Safety . . . . . . . . . . . . . . . . . . . . . . . . . . . . . . . . . Basic information . . . . . . . . . . . . . . . . . . . . . . . . . . . . Correct seated position . . . . . . . . . . . . . . . . . . . . . . .
Seat belts. . . . . . . . . . . . . . . . . . . . . . . . . . . . . . . . . . . . . . Why seat belts? . . . . . . . . . . . . . . . . . . . . . . . . . . . . . . The physical principle of a frontal collision . . . . . Important safety information regarding the use of seat belts . . . . . . . . . . . . . . . . . . . . . . . . . . . . . . . . . . . . How are seat belts correctly fastened? . . . . . . . . . Belt tensioner . . . . . . . . . . . . . . . . . . . . . . . . . . . . . . . .
Airbag system. . . . . . . . . . . . . . . . . . . . . . . . . . . . . . . . . Description of the airbag system . . . . . . . . . . . . . . . Front airbags . . . . . . . . . . . . . . . . . . . . . . . . . . . . . . . . . Side airbags* . . . . . . . . . . . . . . . . . . . . . . . . . . . . . . . . .
8
9
11 11
13 13 14141415161717212326
38 38 4041414748495053
56 56 61
63 6467
69 69 717273757579818182828384
91 91
94 98
103 103 104105106107107108109
112 112
118 118 119
120 121122123124124125125128129130131
133
133 133 135
138 138 139
140 141143
144 144 146148
NKO A05Fabia 20.book Page 5 Tuesday, September 26, 2006 8:38 AM
Page 7 of 258
Contents6
Head airbags* . . . . . . . . . . . . . . . . . . . . . . . . . . . . . . . . Deactivating an airbag . . . . . . . . . . . . . . . . . . . . . . . .
Transporting children safely . . . . . . . . . . . . . . . . . . What you should know about transporting children! . . . . . . . . . . . . . . . . . . . . . . . . . . . . . . . . . . . . . Child seat . . . . . . . . . . . . . . . . . . . . . . . . . . . . . . . . . . . . Attaching a child seat using the “ISOFIX” system* Attaching child seat using the “Top Tether” system
Driving Tips. . . . . . . . . . . . . . . . . . . . . . . . . . . . . .
Intelligent Technology . . . . . . . . . . . . . . . . . . . . . . . . Electronic stability programme (ESP)* . . . . . . . . . . Brakes . . . . . . . . . . . . . . . . . . . . . . . . . . . . . . . . . . . . . . . Brake booster . . . . . . . . . . . . . . . . . . . . . . . . . . . . . . . . Antilock brake system (ABS)* . . . . . . . . . . . . . . . . . . Brake Assist* . . . . . . . . . . . . . . . . . . . . . . . . . . . . . . . . . Electrohydraulic power steering . . . . . . . . . . . . . . . Tyre inflation pressure-control system* . . . . . . . . .
Driving and the Environment. . . . . . . . . . . . . . . . . The first 1 500 kilometres and then afterwards . . Catalytic converter . . . . . . . . . . . . . . . . . . . . . . . . . . . . Driving in an economical and environmentally conscious manner . . . . . . . . . . . . . . . . . . . . . . . . . . . . Environmental compatibility . . . . . . . . . . . . . . . . . . . Motoring abroad . . . . . . . . . . . . . . . . . . . . . . . . . . . . . Avoiding damage to your vehicle . . . . . . . . . . . . . .
Towing a trailer. . . . . . . . . . . . . . . . . . . . . . . . . . . . . . . . Towing a trailer . . . . . . . . . . . . . . . . . . . . . . . . . . . . . . .
General Maintenance. . . . . . . . . . . . . . .
Taking care of your ve hicle and cleaning the vehicle . . . . . . . . . . . . . . . . . . . . . . . . . . . . . . . . . . . . . . . . General . . . . . . . . . . . . . . . . . . . . . . . . . . . . . . . . . . . . . . Care of the exterior of vehicle . . . . . . . . . . . . . . . . . Care of the interior of vehicle . . . . . . . . . . . . . . . . . .
Fuel . . . . . . . . . . . . . . . . . . . . . . . . . . . . . . . . . . . . . . . . . . . Petrol . . . . . . . . . . . . . . . . . . . . . . . . . . . . . . . . . . . . . . . . Diesel . . . . . . . . . . . . . . . . . . . . . . . . . . . . . . . . . . . . . . . Refuelling . . . . . . . . . . . . . . . . . . . . . . . . . . . . . . . . . . . .
Inspecting and Replenishing . . . . . . . . . . . . . . . . . Engine compartment . . . . . . . . . . . . . . . . . . . . . . . . . Engine oil . . . . . . . . . . . . . . . . . . . . . . . . . . . . . . . . . . . . Cooling system . . . . . . . . . . . . . . . . . . . . . . . . . . . . . . . Brake fluid . . . . . . . . . . . . . . . . . . . . . . . . . . . . . . . . . . . Battery . . . . . . . . . . . . . . . . . . . . . . . . . . . . . . . . . . . . . . Windshield washer system . . . . . . . . . . . . . . . . . . . .
Wheels and Tyres . . . . . . . . . . . . . . . . . . . . . . . . . . . . . Wheels . . . . . . . . . . . . . . . . . . . . . . . . . . . . . . . . . . . . . .
Accessories, changes and replacement of parts. . . . . . . . . . . . . . . . . . . . . . . . . . . . . . . . . . . . . . . . . . . Accessories and replacement parts . . . . . . . . . . . . Technical changes . . . . . . . . . . . . . . . . . . . . . . . . . . . .
Breakdown assistance . . . . . . . . . . . . .
Breakdown assistance . . . . . . . . . . . . . . . . . . . . . . . . First-aid box* and Warning triangle* . . . . . . . . . . . Fire extinguisher* . . . . . . . . . . . . . . . . . . . . . . . . . . . . Vehicle tool kit . . . . . . . . . . . . . . . . . . . . . . . . . . . . . . . Tyre repair kit* . . . . . . . . . . . . . . . . . . . . . . . . . . . . . . . Spare wheel* . . . . . . . . . . . . . . . . . . . . . . . . . . . . . . . . . Changing a wheel . . . . . . . . . . . . . . . . . . . . . . . . . . . . Jump-starting . . . . . . . . . . . . . . . . . . . . . . . . . . . . . . . . Tow-starting and towing vehicle . . . . . . . . . . . . . . .
Fuses and light bulbs . . . . . . . . . . . . . . . . . . . . . . . . . Electric fuses . . . . . . . . . . . . . . . . . . . . . . . . . . . . . . . . . Bulbs . . . . . . . . . . . . . . . . . . . . . . . . . . . . . . . . . . . . . . . .
Technical Data . . . . . . . . . . . . . . . . . . . . . . . . .
General . . . . . . . . . . . . . . . . . . . . . . . . . . . . . . . . . . . . . . . Identification data . . . . . . . . . . . . . . . . . . . . . . . . . . . .
Index . . . . . . . . . . . . . . . . . . . . . . . . . . . . . . . . . . . . . . .
150 152
155
155 159163164
165
165 165 168169169170170171
173 173 174
175 179179180
181 181
185
185 185 185191
193 193 193195
197 197 200203206207211
213 213
220 220 220
221
221 221 221222222223223229231
235 235 239
247
247 247
249
NKO A05Fabia 20.book Page 6 Tuesday, September 26, 2006 8:38 AM
Page 9 of 258
Layout of this Owner's Manual (explanations)8
Layout of this Owner's Manual (explanations)
The Owner's Manual has been systematically designed, in order to make it easy for you to find and absorb the information you require.
Chapters, table of contents and subject index
The text of the manual are divided into relatively short sections which are combined into easy-to-read chapters. The chapter you are reading at any particular moment is highlighted at the bottom right of the page.
The Table of contents is arranged according to the chapters and the detailed Subject index at the end of the Owner's Manual helps you to rapidly find the information you are looking for.
Sections
The majority of Sections apply to all models.
Since there is a wide range of different equipment and options available it is clearly unavoidable, despite dividing the contents into sections, that mention may be made of equipment which is not fitted to your vehicle.
Equipment which is marked * is only standard on certain vehicle model versions or only suppliable as opti onal equipment for certain models.
Brief information and instructions
Each section has a Heading.
This is followed by Brief information (in large italic lettering), which tells you the subject which is dealt with in this section.
Most of the illustrations are accompanied by an Instruction (in relatively large letters) which explains to you in a stra ightforward way the action you have to take. Work steps which have to be carried out are illustrated with a hyphen.
Notes
All four kinds of notes, which are used in the text, are always stated at the end of the respective section.
WARNING
The most important notes are marked with the heading Warning. These Warning notes draw your attention to a serious risk of accident or injury. While reading the text you will fr equently encounter a double arrow followed by a small warning symbol. This symbol is intended to draw your attention to a Warning note at the end of the section to which you must pay careful attention.
Caution
A Caution note draws your attention to the possibility of damage to your vehicle (e.g. damage to gearbox), or po ints out general risks of an accident.
For the sake of the environment
An Environmental note draws your attention to environmental protection aspects. This is where you will, for example, find tips aimed at reducing your fuel consumption.
Note
A normal Note draws your attention in a general way to important information.
Direction indications
All direction indications such as “left”, “right”, “front”, “rear” relate to the direc- tion of travel of the vehicle.
Measures
In some countries British measures can be given.
NKO A05Fabia 20.book Page 8 Tuesday, September 26, 2006 8:38 AM
Page 12 of 258
Cockpit11
Using the systemSafetyDriving TipsGeneral MaintenanceBreakdown assistanceTechnical Data
Cockpit
General view
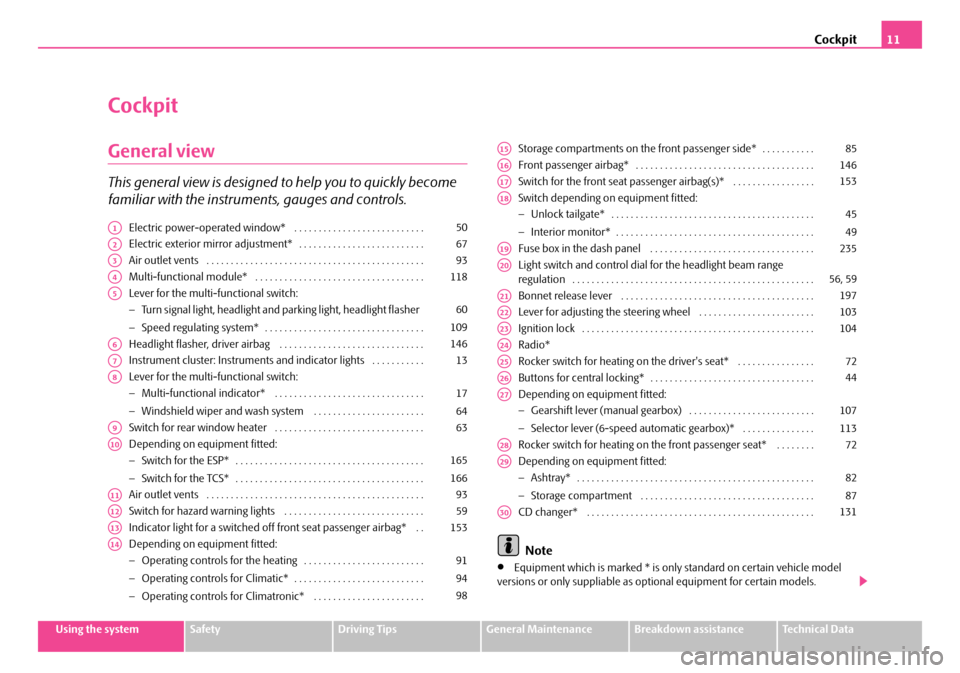
This general view is designed to help you to quickly become
familiar with the instruments, gauges and controls.
Electric power-operated window* . . . . . . . . . . . . . . . . . . . . . . . . . . .
Electric exterior mirror adjustment* . . . . . . . . . . . . . . . . . . . . . . . . . .
Air outlet vents . . . . . . . . . . . . . . . . . . . . . . . . . . . . . . . . . . . . . . . . . . . . .
Multi-functional module* . . . . . . . . . . . . . . . . . . . . . . . . . . . . . . . . . . .
Lever for the multi-functional switch:
− Turn signal light, headlight and parking light, headlight flasher
− Speed regulating system* . . . . . . . . . . . . . . . . . . . . . . . . . . . . . . . . .
Headlight flasher, driver airbag . . . . . . . . . . . . . . . . . . . . . . . . . . . . . .
Instrument cluster: Instruments and indicator lights . . . . . . . . . . .
Lever for the multi-functional switch:
− Multi-functional indicator* . . . . . . . . . . . . . . . . . . . . . . . . . . . . . . .
− Windshield wiper and wash system . . . . . . . . . . . . . . . . . . . . . . .
Switch for rear window heater . . . . . . . . . . . . . . . . . . . . . . . . . . . . . . .
Depending on equipment fitted:
− Switch for the ESP* . . . . . . . . . . . . . . . . . . . . . . . . . . . . . . . . . . . . . . .
− Switch for the TCS* . . . . . . . . . . . . . . . . . . . . . . . . . . . . . . . . . . . . . . .
Air outlet vents . . . . . . . . . . . . . . . . . . . . . . . . . . . . . . . . . . . . . . . . . . . . .
Switch for hazard warning lights . . . . . . . . . . . . . . . . . . . . . . . . . . . . .
Indicator light for a switched off front seat passenger airbag* . .
Depending on equipment fitted:
− Operating controls for the heating . . . . . . . . . . . . . . . . . . . . . . . . .
− Operating controls for Climatic* . . . . . . . . . . . . . . . . . . . . . . . . . . .
− Operating controls for Climatronic* . . . . . . . . . . . . . . . . . . . . . . .
Storage compartments on the front passenger side* . . . . . . . . . . .
Front passenger airbag* . . . . . . . . . . . . . . . . . . . . . . . . . . . . . . . . . . . . .
Switch for the front seat passenger airbag(s)* . . . . . . . . . . . . . . . . .
Switch depending on equipment fitted:
− Unlock tailgate* . . . . . . . . . . . . . . . . . . . . . . . . . . . . . . . . . . . . . . . . . .
− Interior monitor* . . . . . . . . . . . . . . . . . . . . . . . . . . . . . . . . . . . . . . . . .
Fuse box in the dash panel . . . . . . . . . . . . . . . . . . . . . . . . . . . . . . . . . .
Light switch and control dial for the headlight beam range regulation . . . . . . . . . . . . . . . . . . . . . . . . . . . . . . . . . . . . . . . . . . . . . . . . . .
Bonnet release lever . . . . . . . . . . . . . . . . . . . . . . . . . . . . . . . . . . . . . . . .
Lever for adjusting the steering wheel . . . . . . . . . . . . . . . . . . . . . . . .
Ignition lock . . . . . . . . . . . . . . . . . . . . . . . . . . . . . . . . . . . . . . . . . . . . . . . .
Radio*
Rocker switch for heating on the driver's seat* . . . . . . . . . . . . . . . .
Buttons for central locking* . . . . . . . . . . . . . . . . . . . . . . . . . . . . . . . . . .
Depending on equipment fitted:
− Gearshift lever (manual gearbox) . . . . . . . . . . . . . . . . . . . . . . . . . .
− Selector lever (6-speed automatic gearbox)* . . . . . . . . . . . . . . .
Rocker switch for heating on the front passenger seat* . . . . . . . .
Depending on equipment fitted:
− Ashtray* . . . . . . . . . . . . . . . . . . . . . . . . . . . . . . . . . . . . . . . . . . . . . . . . .
− Storage compartment . . . . . . . . . . . . . . . . . . . . . . . . . . . . . . . . . . . .
CD changer* . . . . . . . . . . . . . . . . . . . . . . . . . . . . . . . . . . . . . . . . . . . . . . .
Note
•Equipment which is marked * is only standard on certain vehicle model versions or only suppliable as opti onal equipment for certain models.
A150
A267
A393
A4118
A5
60
109
A6146
A713
A8
17
64
A963
A10
165
166
A1193
A1259
A13153
A14
91
94
98
A1585
A16146
A17153
A18
45
49
A19235
A2056, 59
A21197
A22103
A23104
A24
A2572
A2644
A27
107
113
A2872
A29
82
87
A30131
NKO A05Fabia 20.book Page 11 Tuesday, September 26, 2006 8:38 AM
Page 14 of 258
Instruments and Indicator/Warning Lights13
Using the systemSafetyDriving TipsGeneral MaintenanceBreakdown assistanceTechnical Data
Instruments and Indicator/Warning Lights
General view of the instrument cluster
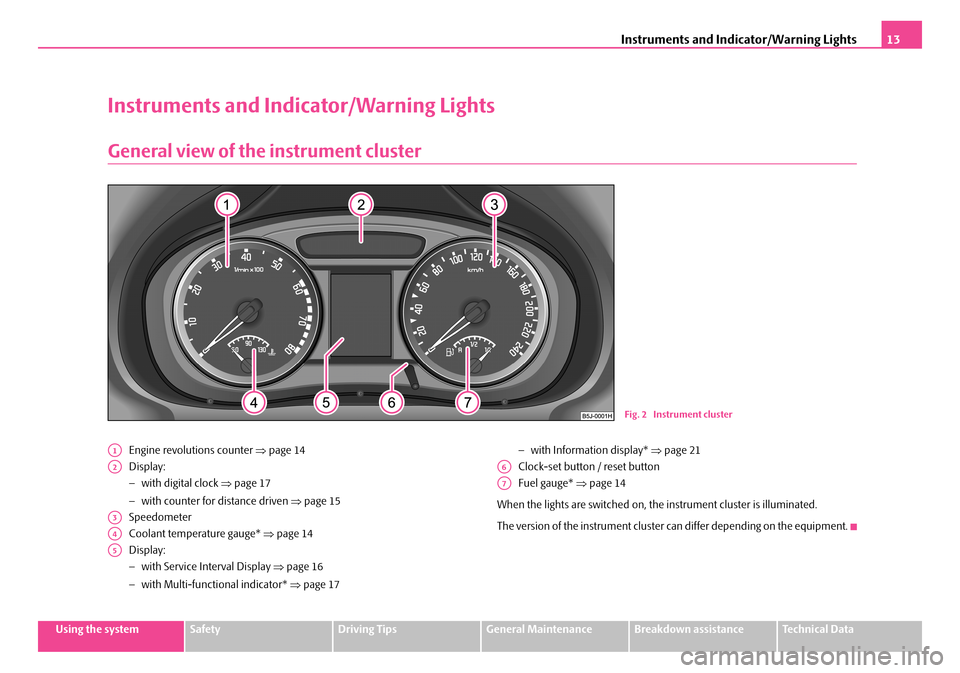
Engine revolutions counter ⇒page 14
Display:
− with digital clock ⇒page 17
− with counter for distance driven ⇒page 15
Speedometer
Coolant temperature gauge* ⇒page 14
Display:
− with Service Interval Display ⇒page 16
− with Multi-functional indicator* ⇒page 17
− with Information display* ⇒page 21
Clock-set button / reset button
Fuel gauge* ⇒page 14
When the lights are switched on, th e instrument cluster is illuminated.
The version of the instrument cluster can differ depending on the equipment.
Fig. 2 Instrument cluster
A1
A2
A3
A4
A5
A6
A7
NKO A05Fabia 20.book Page 13 Tuesday, September 26, 2006 8:38 AM
Page 15 of 258
Instruments and Indicator/Warning Lights14
Engine revolutions counter
The start of the red zone in the revolutions counter ⇒page 13, fig. 2 indi- cates the maximum permissible engine speed for all gears for an engine which has been run in and operating at a normal temperature. You should shift into the next higher gear before this red zone is reached, or move the selector lever into position D if your car is fitted with an automatic gearbox.
One should shift to the next lower gear at the latest when the engine is no longer running “smoothly”.
Avoid high engine speeds du ring the running-in period ⇒page 173.
Caution
The needle of the revolutions counter must on no account move into the red zone of the scale - risk of engine damage!
For the sake of the environment
Shifting up early helps yo u save fuel and reduce the operating noise of your vehicle.
Coolant temperature gauge*
The coolant temperature gauge ⇒page 13, fig. 2 operates only when the ignition is switched on.
Please pay attention to the following gu idelines regarding temperature ranges in order to avoid damage to the engine.
Cold range
If the pointer is in the left-hand area of the scale* it means that the engine has not yet reached its operating temperature. Avoid running at high engine speeds, at full throttle and at severe engine loads.
The operating range
The engine has reached its operating temp erature as soon as the pointer moves into the mid-range of the scale*. The pointer may also move further to the right at high engine loads and high outside temp eratures. This is not critical provided the warning symbol in the instrument cluster does not flash.
If the symbol in the instrument cluster flashes it means that either the coolant temperature is too high or the coolant level is too low. Please refer to the guidelines ⇒page 30, “Coolant temperature/coolant level ”.
WARNING
Pay attention to the warning notes ⇒page 198, “Working in the engine compartment” before opening the bonnet and inspecting the coolant level.
Caution
Additional headlights and other attached components in front of the fresh air inlet impair the cooling efficiency of th e coolant. There is then a risk of the engine overheating at hi gh outside temperatures and high engine loads!
Fuel gauge*
The fuel gauge ⇒page 13, fig. 2 only operates when the ignition is switched on.
A1
A4
A7
NKO A05Fabia 20.book Page 14 Tuesday, September 26, 2006 8:38 AM
Page 16 of 258
Instruments and Indicator/Warning Lights15
Using the systemSafetyDriving TipsGeneral MaintenanceBreakdown assistanceTechnical Data
The fuel tank has a capacity of ab out 55 litres. The warning symbol in the instrument cluster lights up when th e pointer reaches the reserve marking. There are now about 7 litres of fuel remaining in the tank. This symbol is a reminder for you, that you must refuel.
The following will be displayed in the information display*:
PLEASE REFUEL
A peep sounds as an additional warning signal.
Caution
Never run the fuel tank completely empty! An irregular fuel supply can result in poor ignition or misfiring. Unburnt fuel may get into the exhaust system and damage the catalytic converter.
Counter for distance driven
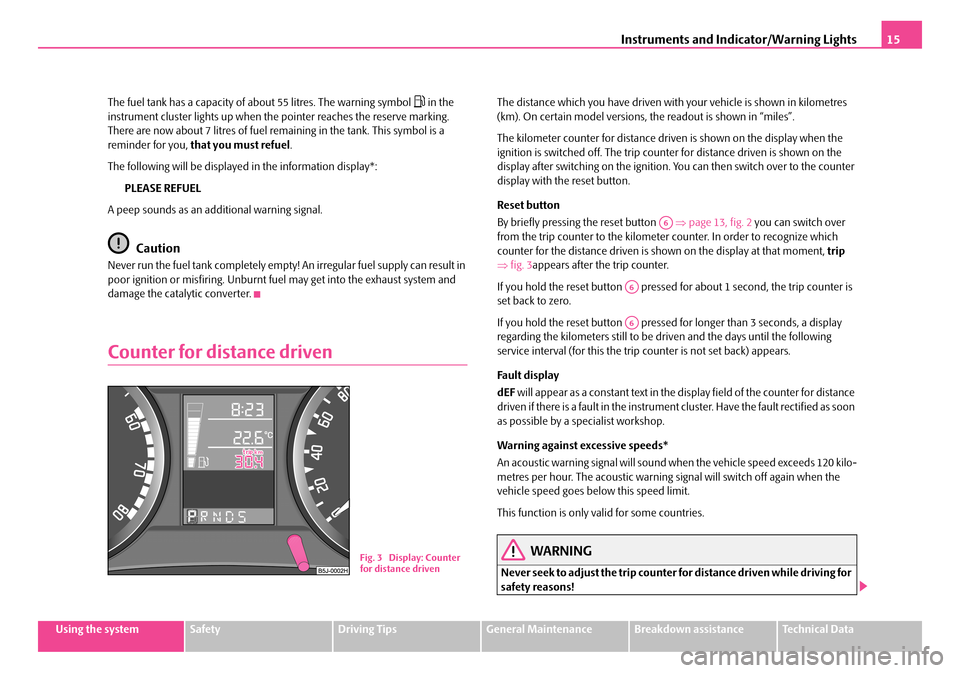
The distance which you have driven with your vehicle is shown in kilometres (km). On certain model versions, the readout is shown in “miles”.
The kilometer counter for distance driven is shown on the display when the ignition is switched off. The trip count er for distance driven is shown on the display after switching on the ignition. Yo u can then switch over to the counter display with the reset button.
Reset button
By briefly pressing the reset button ⇒page 13, fig. 2 you can switch over from the trip counter to the kilomete r counter. In order to recognize which counter for the distance driven is shown on the display at that moment, trip ⇒ fig. 3appears after the trip counter.
If you hold the reset button pressed fo r about 1 second, the trip counter is set back to zero.
If you hold the reset button pressed for longer than 3 seconds, a display regarding the kilometers still to be driven and the days until the following service interval (for this the trip counter is not set back) appears.
Fa u l t d i s p l a y
dEF will appear as a constant text in the display field of the counter for distance driven if there is a fault in the instrument cluster. Have the fault rectified as soon as possible by a specialist workshop.
Warning against excessive speeds*
An acoustic warning signal will sound wh en the vehicle speed exceeds 120 kilo- metres per hour. The acoustic warning si gnal will switch off again when the vehicle speed goes below this speed limit.
This function is only valid for some countries.
WARNING
Never seek to adjust the trip counter for distance driven while driving for safety reasons!
Fig. 3 Display: Counter for distance driven
A6
A6
A6
NKO A05Fabia 20.book Page 15 Tuesday, September 26, 2006 8:38 AM
Page 17 of 258
Instruments and Indicator/Warning Lights16
Note
On vehicles with information display both counters are shown simultaneously on the display.
Service Interval Display
Depending on the equipment installed in the vehicle, the text can differ slightly on the display.
Service Interval Display
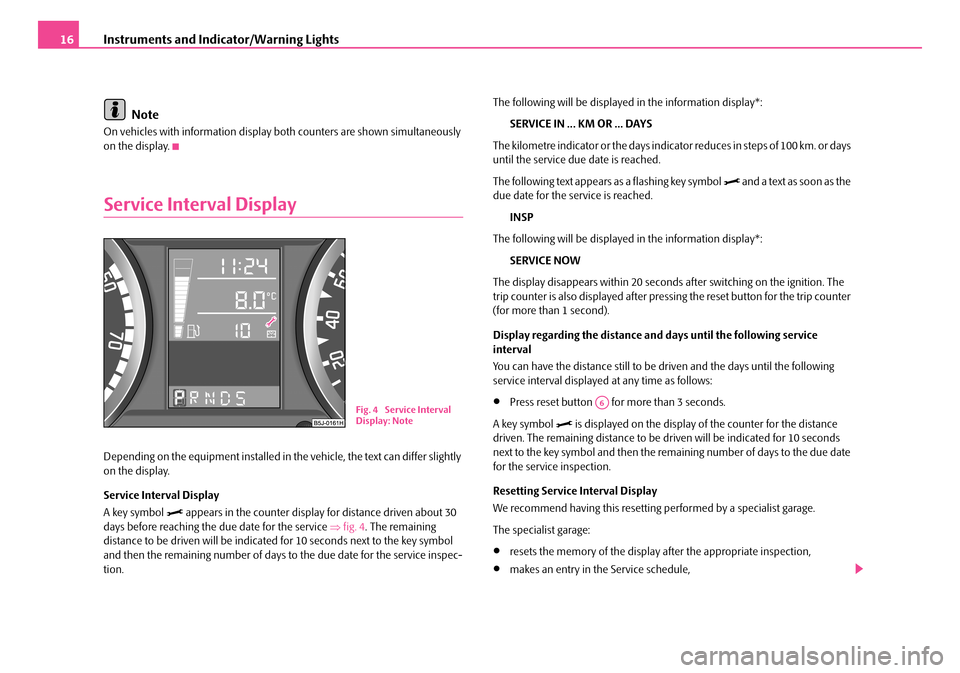
A key symbol appears in the counter display for distance driven about 30 days before reaching the due date for the service ⇒fig. 4. The remaining distance to be driven will be indicate d for 10 seconds next to the key symbol and then the remaining number of days to the due date for the service inspec- tion.
The following will be displayed in the information display*:
SERVICE IN ... KM OR ... DAYS
The kilometre indicator or the days indica tor reduces in steps of 100 km. or days until the service due date is reached.
The following text appears as a flashing key symbol and a text as soon as the due date for the service is reached.
INSP
The following will be displayed in the information display*:
SERVICE NOW
The display disappears within 20 seconds after switching on the ignition. The trip counter is also displayed after pres sing the reset button for the trip counter (for more than 1 second).
Display regarding the distance and days until the following service interval
You can have the distance still to be driven and the days until the following service interval displayed at any time as follows:
•Press reset button for more than 3 seconds.
A key symbol is displayed on the display of the counter for the distance driven. The remaining distance to be dr iven will be indicated for 10 seconds next to the key symbol and then the re maining number of days to the due date for the service inspection.
Resetting Service Interval Display
We recommend having this resetting performed by a specialist garage.
The specialist garage:
•resets the memory of the display after the appropriate inspection,
•makes an entry in the Service schedule,
Fig. 4 Service Interval Display: Note
A6
NKO A05Fabia 20.book Page 16 Tuesday, September 26, 2006 8:38 AM
Page 18 of 258
Instruments and Indicator/Warning Lights17
Using the systemSafetyDriving TipsGeneral MaintenanceBreakdown assistanceTechnical Data
•affix the sticker with the entry of the following service interval to the side of the dash panel on the driver's side.
The Service Interval Display can also be reset with the reset button as follows:
•Switch off the ignition, press the reset button of the trip counter for distance driven and hold it down.
•Switch the ignition on and release the reset button. Now turn the reset button to the right. The service interval display is reset.
Caution
We recommend that you do not reset th e Service Interval Display yourself otherwise this can result in the service interval display being incorrectly set, which may also result in problems with operation of your vehicle.
Note
•Never reset the display between service intervals otherwise this may result in incorrect readouts.
•information is retained in the Service Interval Display also after the battery of the vehicle is disconnected.
•it is necessary to re-code the Servic e Interval Display if a new instrument cluster is installed during repair work. Th is work is carried out by a specialist garage.
•The data displayed is the same after resetting the display with flexible service intervals (QG1) using the reset button as that for a vehicle with fixed service intervals (QG2). We therefore recommend having the Service Interval Display reset only by a Škoda Service Partner who is familiar with the procedure for resetting the display with a vehicle system tester.
•Please refer to the brochure Service schedule for extensive information about the service intervals.
Digital clock
A reset button is installed on the left below beside the speedometer
for adjusting the clock ⇒page 13, fig. 2.
Set hours
– Turn the reset button to the left.
Setting minutes
– Turn the reset button to the right.
WARNING
The clock should not be adjusted while driving for safety reasons but only when the vehicle is stationary.
Multi-functional indicator (onboard
computer)*
Introduction
The multi-functional indicator appears in the display ⇒page 18, fig. 5 or in the information display ⇒page 21, fig. 8 depending on the equipment fitted to your vehicle.
The multi-functional indicator offers you a range of useful information.
A6
NKO A05Fabia 20.book Page 17 Tuesday, September 26, 2006 8:38 AM
Page 19 of 258
Instruments and Indicator/Warning Lights18
Note
In certain national versions the displays appear in the Imperial system of measures.
Memory
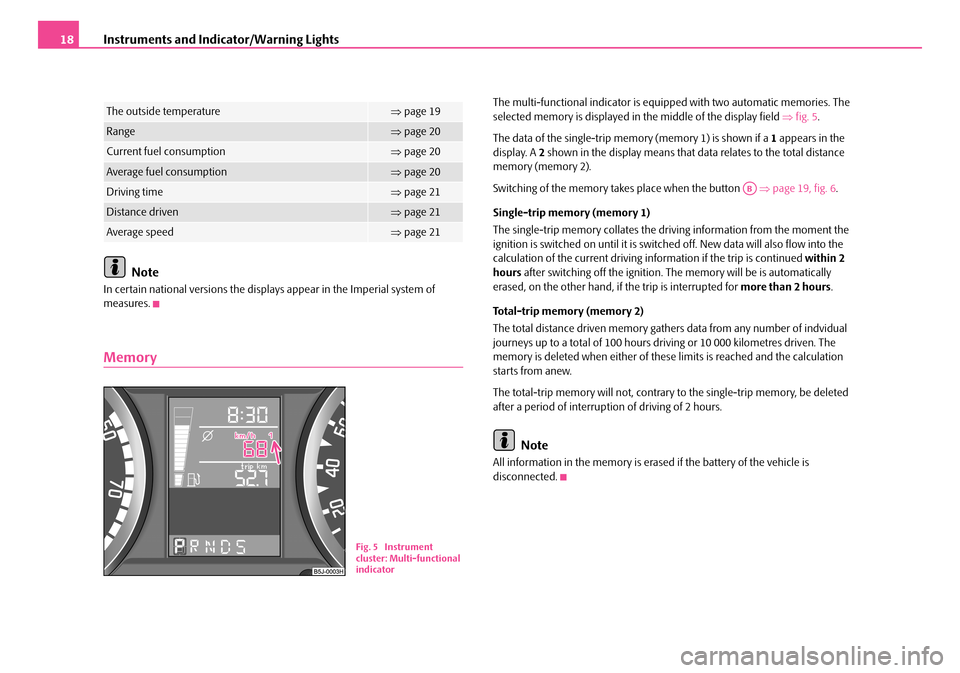
The multi-functional indicator is equi pped with two automatic memories. The selected memory is displayed in the middle of the display field ⇒fig. 5.
The data of the single-trip memory (memory 1) is shown if a 1 appears in the display. A 2 shown in the display means that data relates to the total distance memory (memory 2).
Switching of the memory takes place when the button ⇒page 19, fig. 6.
Single-trip memory (memory 1)
The single-trip memory collates the driving information from the moment the ignition is switched on until it is switch ed off. New data will also flow into the calculation of the current driving in formation if the trip is continued within 2 hours after switching off the ignition. The memory will be is automatically erased, on the other hand, if the trip is interrupted for more than 2 hours.
Total-trip memory (memory 2)
The total distance driven memory gathers data from any number of indvidual journeys up to a total of 100 hours driving or 10 000 kilometres driven. The memory is deleted when either of these limits is reached and the calculation starts from anew.
The total-trip memory will not, contrary to the single-trip memory, be deleted after a period of interrupti on of driving of 2 hours.
Note
All information in the memory is erased if the battery of the vehicle is disconnected.
The outside temperature⇒ page 19
Range⇒page 20
Current fuel consumption⇒page 20
Average fuel consumption⇒page 20
Driving time⇒page 21
Distance driven⇒page 21
Average speed⇒page 21
Fig. 5 Instrument cluster: Multi-functional indicator
AB
NKO A05Fabia 20.book Page 18 Tuesday, September 26, 2006 8:38 AM