engine SKODA FABIA 2007 1.G / 6Y Owner's Guide
[x] Cancel search | Manufacturer: SKODA, Model Year: 2007, Model line: FABIA, Model: SKODA FABIA 2007 1.G / 6YPages: 242, PDF Size: 48.29 MB
Page 52 of 242

Lights and Visibility51
Using the systemSafetyDriving TipsGeneral MaintenanceBreakdown assistanceTechnical Data
Visibility
Rear window heater
– Press switch ⇒fig. 42 to switch on the rear window heater.
The rear window heater only operates when the engine is running. An indicator light in the switch is illuminated when the rear window heater is switched on.
The rear window heater switches off automatically after 20 minutes. If you press the switch once again, the rear window heater is switched on permanently - the automatic deactivation is thus deactivated.
For the sake of the environment
You should switch off the rear window heater as soon as the rear window is clear. The reduced current consumption will have a favourable effect on fuel economy ⇒ page 155, “Saving electricity”.
Sun visors
Using the sun visors can contribu te to increasing road safety.
You can pull the sun visor for the driver or front passenger out of the fixture and swivel it toward the door in the direction of the arrow ⇒fig. 43.
A vanity mirror*, which is provided with a cover, is located in the sun visor on the front passenger side. Push the cover in direction of arrow .
WARNING
The sun visors must not be swivelled to the side windows into the deploy-ment area of the head airbags if any ob jects, such as ball-point pens etc. are attached to them. This might result in injuries to the occupants if the head airbag is deployed.
Fig. 42 Switch for rear window heater
Fig. 43 Sun visor: swivel-ling out
A1
A2
NKO A05F 20 MR08.book Page 51 Thursday, April 19, 2007 11:34 AM
Page 56 of 242

Lights and Visibility55
Using the systemSafetyDriving TipsGeneral MaintenanceBreakdown assistanceTechnical Data
Adjusting the left-hand exterior mirror*
– Turn the rotary knob to position . The movement of the mirror surface
is identical to the movement of the rotary knob.
Adjusting the right-hand exterior mirror*
– Turn the rotary knob to position . The movement of the mirror
surface is identical to the movement of the rotary knob.
The vehicle can also be equi pped with a second rear mirror*, which is attached above the inner main rear mirror. The second rear mirror* enables an extensive look into the area of the rear seats, e.g. to check on the seated passengers. You can adjust it in the horizontal as well as vertical direction regardless of the inner main rear mirror.
The exterior mirror heat er only operates when the engine is running.
WARNING
•Convex (curved outward) or a spherical exterior mirrors increase the vision field. They do, however, make objects appear smaller in the mirror. These mirrors are only of limited use, therefore, for estimating distances to the following vehicles.
•Use whenever possible the interior rear mirror, for estimating the distances to the following vehicles.
Note
•Do not touch the surfaces of the exterior mirrors if the exterior mirror heater is switched on.
•You can set the exterior mirrors by hand, if the power setting function fails at any time, by pressing on the edge of the mirror surface.
•Contact your specialist garage if a fault exists with the power setting of the exte-rior mirrors.
NKO A05F 20 MR08.book Page 55 Thursday, April 19, 2007 11:34 AM
Page 60 of 242

Seats and Stowage59
Using the systemSafetyDriving TipsGeneral MaintenanceBreakdown assistanceTechnical Data
Caution
•You should not kneel on the seats or otherwise apply pressure at specific points in order to avoid damaging the heating elements of the seat heaters.
•Do not clean the seats moist ⇒page 166.
Note
The seat heating should only be switched on when the engine is running. This has a significant effect of saving on the battery capacity.
Rear seats
Folding the rear seats forwards
To enlarge the luggage compartment, the rear seats can be folded
forwards or the rear seats can be removed ⇒page 60. The rear seats can
be folded forward individually on vehicles with divided rear seats*.
Folding the rear seats forwards
– Before folding the rear seats forward adjust the front seats in such a
way that they are not damaged when folding forward the rear seats.
– Pull up the rear seat in the direction of arrow ⇒fig. 52 and fold
forwards in direction of arrow .
– Unlock the rear seat backrest by pulling the securing knob and fold
it forward ⇒fig. 53.
– Pull the head restraints out of the seat backrest.
– The head restraints can be inserted into the relevant holes of the
folded forwards rear seats ⇒page 60, fig. 54.
– Fold the seat backrests forwards completely.
Folding the rear seats back into position
– Install the head restraint in the slightly lifted rear seat backrest.
Fig. 52 Folding the rear seat forwards
Fig. 53 Unlock the seat backrest
A1
A2
AA
NKO A05F 20 MR08.book Page 59 Thursday, April 19, 2007 11:34 AM
Page 69 of 242
Seats and Stowage68
WARNING
•Take care when using the cigarette lighter! Not paying proper attention or incorrect use the cigarette lighter in an uncontrolled manner may result in burns.
•The cigarette lighter and the power so cket also operates when the igni- tion is switched off or the ignition key withdrawn. This is why you should never leave children unattended in the vehicle!
Caution
Only use matching plugs, which fulfil s the DIN - ISO Standard 4165, to avoid damaging the power sockets.
Note
Connecting electrical components when the engine is not running will drain the battery of the vehicle - risk of battery draining!
Storage compartments
Overview
You will find the following storag e facilities in your vehicle:
WARNING
•Please do not place anything on top of the dash panel. Such objects might slide or fall down when driving (when accelerating or cornering) and may distract you from concentrating on the traffic situation - risk of acci- dent!
•Ensure that when driving no objects from the centre console of from other storage possibilities may get into the footwell of the driver. You would then no longer be able to apply the br akes, operate the clutch or accelerator - risk of accident!
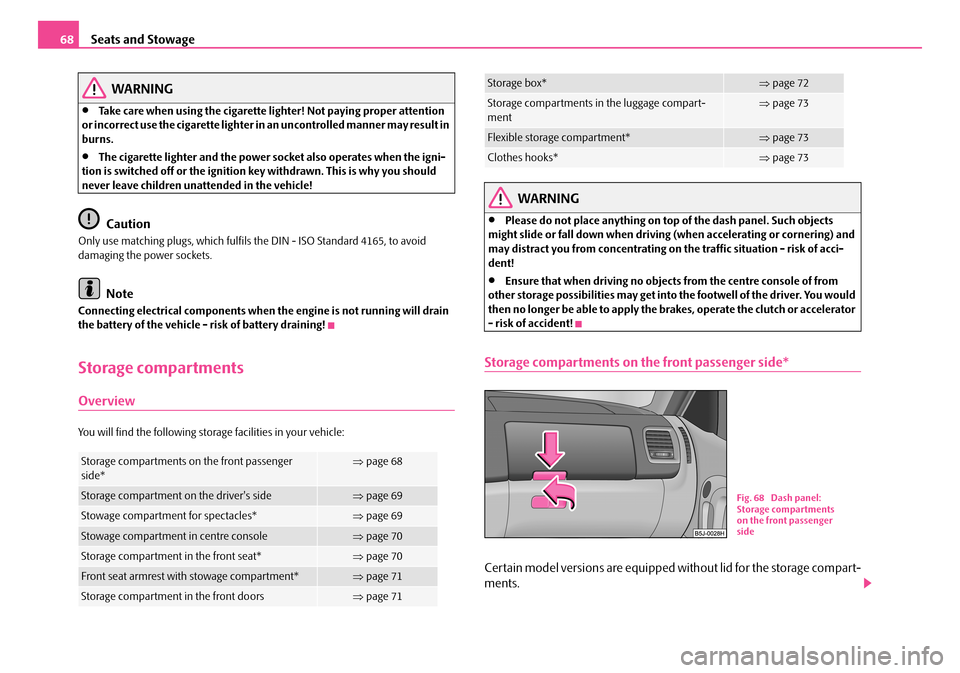
Storage compartments on the front passenger side*
Certain model versions are equipped without lid for the storage compart-
ments.
Storage compartments on the front passenger side*⇒ page 68
Storage compartment on the driver's side⇒page 69
Stowage compartment for spectacles*⇒page 69
Stowage compartment in centre console⇒page 70
Storage compartment in the front seat*⇒page 70
Front seat armrest with stowage compartment*⇒page 71
Storage compartment in the front doors⇒page 71
Storage box*⇒page 72
Storage compartments in the luggage compart- ment⇒ page 73
Flexible storage compartment*⇒page 73
Clothes hooks*⇒page 73
Fig. 68 Dash panel: Storage compartments on the front passenger side
NKO A05F 20 MR08.book Page 68 Thursday, April 19, 2007 11:34 AM
Page 76 of 242
Heating and air conditioning system75
Using the systemSafetyDriving TipsGeneral MaintenanceBreakdown assistanceTechnical Data
Heating and air conditioning system
Heating
Using the system
The heating system delivers air into the interior of the vehicle and
warms it as required.
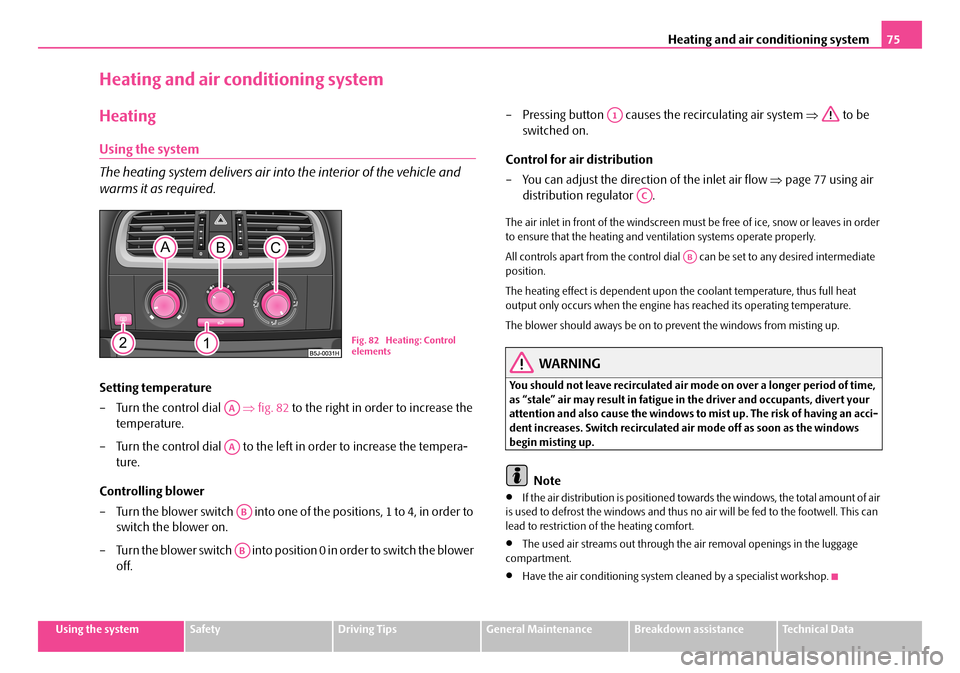
Setting temperature
– Turn the control dial ⇒fig. 82 to the right in order to increase the
temperature.
– Turn the control dial to the left in order to increase the tempera-
ture.
Controlling blower
– Turn the blower switch into one of the positions, 1 to 4, in order to
switch the blower on.
– Turn the blower switch into position 0 in order to switch the blower
off.
– Pressing button causes the recirculating air system ⇒ to be
switched on.
Control for air distribution
– You can adjust the direction of the inlet air flow ⇒page 77 using air
distribution regulator .
The air inlet in front of the windscreen must be free of ice, snow or leaves in order to ensure that the heating and ventilation systems operate properly.
All controls apart from the control dial can be set to any desired intermediate position.
The heating effect is dependent upon th e coolant temperature, thus full heat output only occurs when the engine has reached its operating temperature.
The blower should aways be on to prevent the windows from misting up.
WARNING
You should not leave recirculated air mode on over a longer period of time, as “stale” air may result in fatigue in the driver and occupants, divert your attention and also cause the windows to mist up. The risk of having an acci- dent increases. Switch recirculated air mode off as soon as the windows begin misting up.
Note
•If the air distribution is positioned towa rds the windows, the total amount of air is used to defrost the window s and thus no air will be fed to the footwell. This can lead to restriction of the heating comfort.
•The used air streams out through the air removal openings in the luggage compartment.
•Have the air conditioning system cleaned by a specialist workshop.
Fig. 82 Heating: Control elements
AA
AA
AB
AB
A1
AC
AB
NKO A05F 20 MR08.book Page 75 Thursday, April 19, 2007 11:34 AM
Page 78 of 242
Heating and air conditioning system77
Using the systemSafetyDriving TipsGeneral MaintenanceBreakdown assistanceTechnical Data
WARNING
You should not leave recirculated air mode on over a longer period of time, as “stale” air may result in fatigue in the driver and occupants, divert your attention and also cause the windows to mist up. The risk of having an acci- dent increases. Switch recirculated air mode off as soon as the windows begin misting up.
Air outlet vents
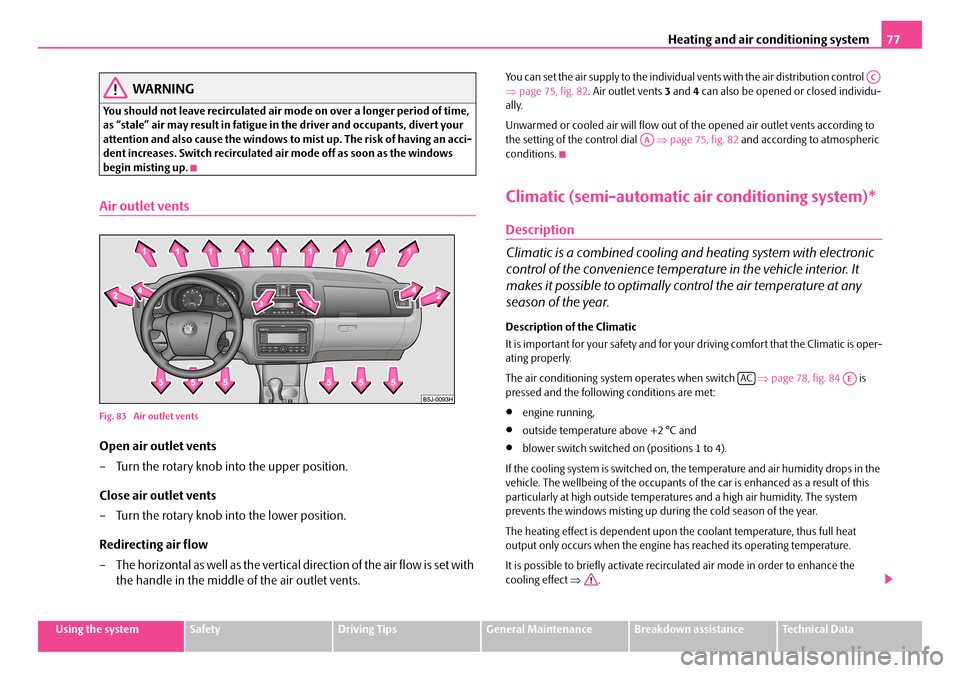
Fig. 83 Air outlet vents
Open air outlet vents
– Turn the rotary knob in to the upper position.
Close air outlet vents
– Turn the rotary knob into the lower position.
Redirecting air flow
– The horizontal as well as the vertical direction of the air flow is set with
the handle in the middle of the air outlet vents.
You can set the air supply to the individual vents with the air distribution control ⇒ page 75, fig. 82. Air outlet vents 3 and 4 can also be opened or closed individu- ally.
Unwarmed or cooled air will flow out of the opened air outlet vents according to the setting of the control dial ⇒page 75, fig. 82 and according to atmospheric conditions.
Climatic (semi-automatic air conditioning system)*
Description
Climatic is a combined cooling and heating system with electronic
control of the convenience temperat ure in the vehicle interior. It
makes it possible to optimally control the air temperature at any
season of the year.
Description of the Climatic
It is important for your safety and for your driving comfort that the Climatic is oper- ating properly.
The air conditioning system operates when switch ⇒page 78, fig. 84 is pressed and the following conditions are met:
•engine running,
•outside temperature above +2 °C and
•blower switch switched on (positions 1 to 4).
If the cooling system is switched on, th e temperature and air humidity drops in the vehicle. The wellbeing of the occupants of the car is enhanced as a result of this particularly at high outside temperatur es and a high air humidity. The system prevents the windows misting up during the cold season of the year.
The heating effect is dependent upon th e coolant temperature, thus full heat output only occurs when the engine has reached its operating temperature.
It is possible to briefly activate recirc ulated air mode in order to enhance the cooling effect ⇒.
AC
AA
ACAE
NKO A05F 20 MR08.book Page 77 Thursday, April 19, 2007 11:34 AM
Page 82 of 242
Heating and air conditioning system81
Using the systemSafetyDriving TipsGeneral MaintenanceBreakdown assistanceTechnical Data
Close air outlet vents
– Turn the rotary knob into the lower position.
Redirecting air flow
– The horizontal as well as the vertical direction of the air flow is set with
the handle in the middle of the air outlet vents.
You can set the air supply to the individual vents with the air distribution control ⇒ page 78, fig. 84. Air outlet vents 3 and 4 can also be opened or closed individu- ally:
Unwarmed or cooled air will flow out of th e air outlet vents according to the setting of control dial ⇒page 78, fig. 84 and the atmospheric conditions.
Using the air conditioning system economically
The compressor on the Climatic uses power from the engine when in cooling mode which will effect the fuel consumption.
It recommended to open the windows or th e doors of a vehicle for which the inte- rior has been strongly heated through the ef fect of direct sunlight in order to allow the heated air to escape.
The cooling system should not be switched on while travelling when the window is open.
The desired interior temperature can also be achieved without switching in the cooling system just by switching to fresh air mode.
For the sake of the environment
When you economize on fuel, you also reduce pollutant emissions.
Operational problems
If the cooling system does not operate at outside temperatures higher than +2 °C, there is a problem in the system. The reasons for this may be:
•The fuse of the Climatic is defective. Check the fuse, replace it if necessary ⇒ page 205.
•The cooling system has switched off automatically for a short time because the coolant temperature of the engine is too hot ⇒page 10.
If you are not able to rectify the operat ional problem yourself, or if the cooling capacity decreases, switch the cooling sy stem off. Contact a specialist garage.
If there is a fault at the Climatronic, all symbols on the display flash after switching on the ignition for 15 seconds. Contact a specialist garage.
Climatronic (automatic air conditioning)*
Description
The Climatronic system is a comb ination of an automatic heating,
fresh air and cooling system which provides optimal comfort for the
occupants of the car.
The Climatronic maintains a constant temper ature fully automatically, once it has been set. This is achieved by automa tically varying the temperature of the outflowing air, the blower stages and the ai r distribution. The system also takes into account sunlight which eliminates the n eed to alter the settings manually. The automatic mode ⇒page 83 ensures maximum wellbeing of the occupants at all times of the year.
Description of Climatronic system
The cooling operates only if the following conditions are met:
•engine running,
•outside temperature above +2 °C,
•the button is not pressed.
If the cooling system is switched on, th e temperature and air humidity drops in the vehicle. The wellbeing of the occupants of the car is enhanced as a result of this particularly at high outside temperatur es and a high air humidity. The system prevents the windows misting up during the cold season of the year.
AC
AA
ECON
NKO A05F 20 MR08.book Page 81 Thursday, April 19, 2007 11:34 AM
Page 83 of 242

Heating and air conditioning system82
The heating effect is dependent upon the coolant temperature, thus full heat output only occurs when the engine has reached its operating temperature.
It is possible to briefly activate recirc ulated air mode in order to enhance the cooling effect ⇒.
The air inlet in front of the windscreen must be free of ice, snow or leaves in order to ensure that the heating and cooling systems operate properly.
The AC compressor is switched off at a high coolant temperature in order to provide cooling at a high load of the engine.
After switching on the cooling Condensation from the evaporator of the air condi- tioning may drip down and form a puddle below the vehicle. This is quite normal and not an indication of a leak!
Recommended setting for all periods of the year:
•Set the temperature to 22 °C.
•Press the button ⇒fig. 86.
•Move the air outlet vents 3 and 4 so that the air flow is directed slightly upwards ⇒ page 85, fig. 87.
Switching over between degrees Celsius and degrees Fahrenheit
Press and hold the buttons and ⇒fig. 86. The information in the desired temperature measuring unit appears in the display.
WARNING
•For your own safety and that of other road users, ensure that all the windows are free of ice, snow and mistin g. Please familiarize yourself about how to correctly operate th e heating and ventilation systems, how to demist and defrost the windows, as well as with the cooling mode.
•You should not leave recirculated air mode on over a longer period of time, as “stale” air may result in fatigue in the driver and occupants, divert your attention and also cause the windows to mist up. The risk of having an accident increases. Switch recirculated air mode off as soon as the windows begin misting up.
Note
•If the cooling system has not been switched on for a lengthy period, odours may be produced at the evaporator because of deposits. Switch the cooling system on at least once a month for approximately 5 mi nutes at the highest blower stage - also during the cold season of the year - in order to remove such odours. Also open a window for a short time.
•We recommend that you do not smoke in the vehicle when the recirculating air mode is operating since the smoke which is drawn at the evaporator from the inte- rior of the vehicle forms deposits in the evaporator of the air conditioning system. This produces a permanent odour when th e air conditioning system is operating which can only be eliminated through co nsiderable effort and expense (replace- ment of compressor).
•The used air streams out through the air removal openings in the luggage compartment.
•Using the cooling economically ⇒page 81.
•Operational problems ⇒page 81.
Overview of the control elements
Fig. 86 Climatronic: Control elements
AUTO
ECONAUTO
NKO A05F 20 MR08.book Page 82 Thursday, April 19, 2007 11:34 AM
Page 88 of 242
Starting-off and Driving87
Using the systemSafetyDriving TipsGeneral MaintenanceBreakdown assistanceTechnical Data
Ignition lock
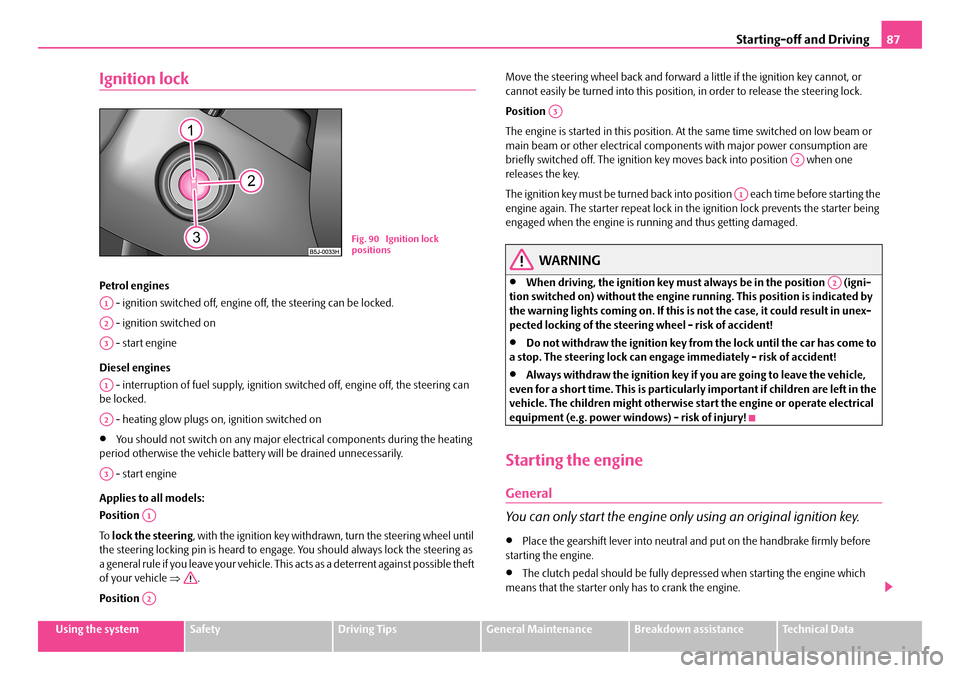
Petrol engines
- ignition switched off, engine off, the steering can be locked.
- ignition switched on
- start engine
Diesel engines
- interruption of fuel supply, ignition sw itched off, engine off, the steering can be locked.
- heating glow plugs on, ignition switched on
•You should not switch on any major elec trical components during the heating period otherwise the vehicle batter y will be drained unnecessarily.
- start engine
Applies to all models:
Position
To lock the steering, with the ignition key withdrawn, turn the steering wheel until the steering locking pin is heard to engage. You should always lock the steering as a general rule if you leave your vehicle. This acts as a deterrent against possible theft of your vehicle ⇒.
Position
Move the steering wheel back and forward a little if the ignition key cannot, or cannot easily be turned into this position, in order to release the steering lock.
Position
The engine is started in this position. At the same time switched on low beam or main beam or other electrical compon ents with major power consumption are briefly switched off. The ignition key moves back into position when one releases the key.
The ignition key must be turned back into position each time before starting the engine again. The starter repeat lock in th e ignition lock prevents the starter being engaged when the engine is ru nning and thus getting damaged.
WARNING
•When driving, the ignition key must always be in the position (igni- tion switched on) without the engine running. This position is indicated by the warning lights coming on. If this is not the case, it could result in unex- pected locking of the steering wheel - risk of accident!
•Do not withdraw the ignition key from the lock until the car has come to a stop. The steering lock can engage immediately - risk of accident!
•Always withdraw the ignition key if you are going to leave the vehicle, even for a short time. This is particularly important if children are left in the vehicle. The children migh t otherwise start the engine or operate electrical equipment (e.g. power windows) - risk of injury!
Starting the engine
General
You can only start the engine only using an original ignition key.
•Place the gearshift lever into neutral and put on the handbrake firmly before starting the engine.
•The clutch pedal should be fully depressed when starting the engine which means that the starter only has to crank the engine.
Fig. 90 Ignition lock positions
A1
A2
A3
A1
A2
A3
A1
A2
A3
A2
A1
A2
NKO A05F 20 MR08.book Page 87 Thursday, April 19, 2007 11:34 AM
Page 89 of 242
Starting-off and Driving88
•Let go of the key as soon as the engine starts otherwise there may be damage to the starter.
The engine running noises ma y louder at first be louder for a short time after starting the cold engine until oil pressure can be built up in the hydraulic valve clearance compensation. This is quite no rmal and is not an operating problem.
If the engine does not start ...
You can use the battery of anothe r vehicle as a jump-start aid ⇒page 200.
It is only possible to tow-start vehicles fitted with a manual gearbox. The tow- starting distance must not be more than 50 metres ⇒page 203.
WARNING
•Never run the engine in non ventilated or enclosed areas. The exhaust gases of the engine contain besides the odorless and colourless carbon monoxide a poisonous gas - hazard! Carbon monoxide can cause uncon- sciousness and death.
•Never leave your vehicle unattended with the engine running.
Caution
•The starter may only be operated (ignition key position ), if the engine is not running. If the starter is i mmediately operated after switching off the engine, the starter or the engine can be damaged.
•Avoid high engine revolutions, full throttl e and high engine loads as long as the engine has not yet reached its normal oper ating temperature - risk of damaging the engine!
•Vehicles which are fitted wi th an exhaust gas catalytic converter should not be tow-started over a distance of more than 50 metres.
For the sake of the environment
Never warm up the engine when the vehicle is standing. Drive off right away. When driving the engine reaches its operating temperature more rapidly and the pollutant emissions are lower.
Petrol engines
These engines are fitted with a starter system which selects the correct fuel/air mixture for every external air temperature.
•Do not operate accelerator befo re and when starting engine.
•Interrupt the attempt at starting after 10 seconds if the engine does not start right awayand wait for about 30 seconds before repeating the attempt.
•It is possible that the fuse on the electrical fuel pump is defect if the engine still does not start. Check the fuse and replace it if necessary ⇒page 205.
•If the engine does not start, contact the nearest specialist garage to obtain professional assistance.
It may be necessary, if the engine is very hot, to slightly depress the accelerator after the engine has started.
Diesel engines
Glow plug system
Diesel engines are equipped with a glow plug system, the preglow period being controlled automatically in line with the coolant temperature and outside temper- ature.
The preglow indicator light comes on after the igniti on has been switched on.
You should not switch on any major electrical components during the heating period otherwise the vehicle battery will be drained unnecessarily.
•You should start the engine immediately after the glow plug warning light has gone out.
•The glow plug warning light will come on for about one second if the engine is at a normal operating temperature or if th e outside temperature is above +5°C. This means that you can start the engine right away.
•Interrupt the attempt at starting after 10 seconds if the engine does not start right awayand wait for about 30 seconds before repeating the attempt.
•It is possible that the fuse on the dies el preglow system is defect if the engine still does not start. Check the fuse and replace it if necessary ⇒page 205.
A3
NKO A05F 20 MR08.book Page 88 Thursday, April 19, 2007 11:34 AM