stop start SKODA FABIA 2007 1.G / 6Y Owner's Manual
[x] Cancel search | Manufacturer: SKODA, Model Year: 2007, Model line: FABIA, Model: SKODA FABIA 2007 1.G / 6YPages: 242, PDF Size: 48.29 MB
Page 23 of 242

Instruments and Indicator/Warning Lights22
compartment, e.g. inspecting and replenishing oil and other fluids. It is also essential to observe all warnings âpage 173.
Note
â¢Arrangement of the indicator lights depends on the model and model version. The symbols shown in the following function al description are to be found as indi- cator lights in the instrument cluster.
â¢Operational faults are shown in the inst rument cluster as red symbols (priority 1 - danger) or yellow symbols (priority 2 - warning).
Turn signal system ï¬ï
Either the left ï¬ or right ï indicator light flashes depending on the position of the turn signal lever.
The indicator light flashes at twice its normal rate if a turn signal light fails. This does not apply when towing a trailer.
Switching off the hazard warning light system is switched on will cause all of the turn signal lights as well as both indicator lights to flash.
Further information about the turn signal system âpage 48.
Main beam ï¤
The indicator light ï¤ comes on when the main beam is selected or also when the headlight flasher is operated.
Further information about the main beam âpage 48.
Low beam ï¥
The indicator light ï¥ comes on when low beam is selected âpage 45.
Rear fog light ïª
The warning light ïª comes on when the rear fog lights are operating âpage 47.
Alternator ï¦
The warning light ï¦ comes on after the ignition has been switched on. It should go out after the engine has started.
If the warning light does not go out after the engine has started, or comes on when driving, drive to the nearest specialist garage. The vehicle battery will be discharged in this case so switch off all non-essential electrical components.
The following text will be displayed in the information display*:
ALTERNATOR WORKSHOP!
Caution
If the warning light ï¦ comes on when driving and in addition the warning light ï¯ (cooling system fault) also comes on in display, you must then stop the car imme- diately and switch the engine off - risk of engine damage!
Fog lights* ï¦
The warning light ï© comes on when the fog lights are operating âpage 46.
Cornering lights* ï¦
If the warning light ï¦ flashes for 1 minute while driving or after switching on the ignition and a warning signal sounds, a fault is confirmed.
Further information âpage 46.
WARNING (continued)
NKO A05F 20 MR08.book Page 22 Thursday, April 19, 2007 11:34 AM
Page 25 of 242

Instruments and Indicator/Warning Lights24
The indicator light ï¯ does not flash if a turn signal light on the trailer or on the vehicle is not operating.
Coolant temperature/coolant level ï¯
The warning light ï¯ comes on for a few seconds 1) when the ignition is switched on.
The coolant temperature is too high or the coolant level too low if the warning light ï¯ does not go out after the engine is started or flashes while driving.
3 peeps sound as an additional warning signal.
In this case stop and switch the engine off and check the coolant level; top up the coolant as necessary âpage 179, âReplenishing the coolantâ.
Do not continue your journey if for some reason it is not possible under the conditions prevailing to top up with coolant. Keep the engine switched off and obtain professional assistance from a specialist garage, otherwise it could lead to severe engine damage.
If the coolant is within the specified range, the increased temperature may be caused by an operating problem at the coolant fan. Check the fuse for the coolant fan, replace it if necessary âpage 208, âFuse assignment at batteryâ.
Do not continue driving if the warning light does not go off although the fluid is at the correct level and also the fuse of the fa n is in proper order. Contact a specialist garage to obtain assistance.
Please also refer to the additional instructions âpage 177, âCooling systemâ.
The following text will be displayed in the information display*:
STOP CHECK COOLANT OWNER'S MANUAL!
WARNING
â¢If you must stop for technical reasons, then park the vehicle at a safe distance from the traffic and switch off the engine and switch on the hazard warning light system âpage 48, âSwitch for hazard warning lights ï¾â.
â¢Pay attention to the following instructions âpage 173, âWorking in the engine compartmentâ before checking the coolant fluid level and opening the bonnet.
â¢Take care when opening the coolant expa nsion bottle. If the engine is hot, the cooling system is pressurized - risk of scalding. It is best to allow the engine to cool down before removing the cap.
â¢Do not touch the coolant fan! The coolant fan may switch on automati- cally even if the ignition is off.
Electronic immobiliser ï£
Data is compared between the ignition ke y and the control unit when switching on the ignition. The indicator light ï£ will light up for a few seconds when ignition key authorisation is confirmed.
The warning light will start flashing conti nuously if a non-authorised ignition key (for example the wrong ignition key) has been used. The engine cannot be started â page 31.
It is only possible to start the engine of your car with a Genuine Å koda key with the matching code.
Fuel reserve ï
The warning light ï comes on, if the fuel level is still about 7 litres.
A peep sounds as an additional warning signal.
The following text will be displayed in the information display*:
PLEASE REFUEL1)The warning light ï¯ on vehicles fitted with information display does not come on after switching the ignition on, but only if the coolant temperature is too high or the coolant levelis too low.
NKO A05F 20 MR08.book Page 24 Thursday, April 19, 2007 11:34 AM
Page 26 of 242
Instruments and Indicator/Warning Lights25
Using the systemSafetyDriving TipsGeneral MaintenanceBreakdown assistanceTechnical Data
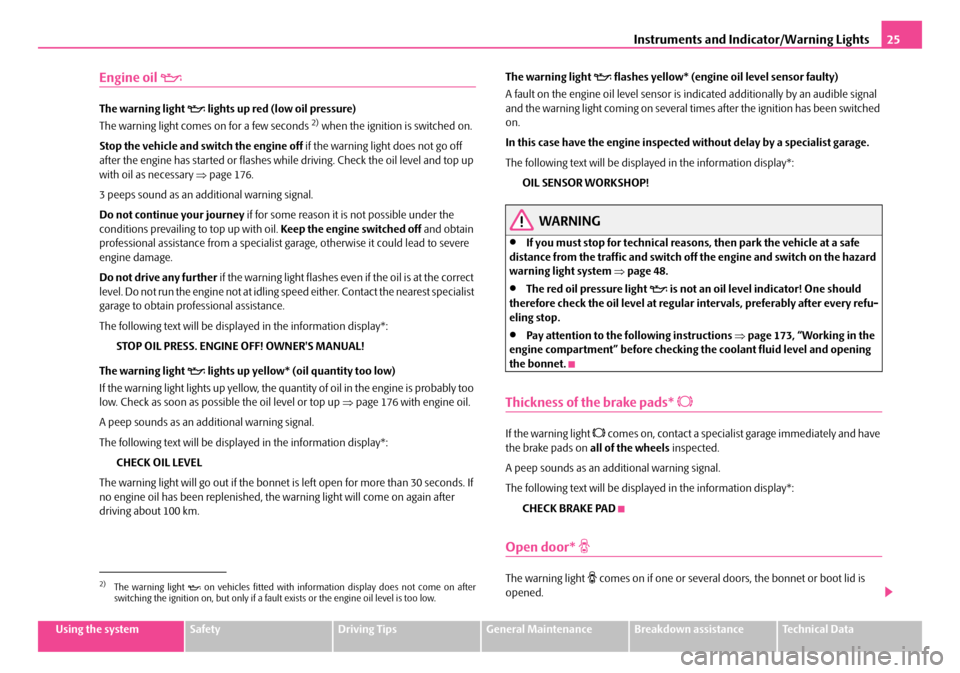
Engine oil ï¥
The warning light ï¥ lights up red (low oil pressure)
The warning light comes on for a few seconds 2) when the ignition is switched on.
Stop the vehicle and switch the engine off if the warning light does not go off after the engine has started or flashes while driving. Check the oil level and top up with oil as necessary âpage 176.
3 peeps sound as an additional warning signal.
Do not continue your journey if for some reason it is not possible under the conditions prevailing to top up with oil. Keep the engine switched off and obtain professional assistance from a specialist garage, otherwise it could lead to severe engine damage.
Do not drive any further if the warning light flashes even if the oil is at the correct level. Do not run the engine not at idling speed either. Contact the nearest specialist garage to obtain professional assistance.
The following text will be displayed in the information display*:
STOP OIL PRESS. ENGINE OFF! OWNER'S MANUAL!
The warning light ï¥ lights up yellow* (oil quantity too low)
If the warning light lights up yellow, the quan tity of oil in the engine is probably too low. Check as soon as possible the oil level or top up âpage 176 with engine oil.
A peep sounds as an addi tional warning signal.
The following text will be displayed in the information display*:
CHECK OIL LEVEL
The warning light will go out if the bonnet is left open for more than 30 seconds. If no engine oil has been replenished, the warning light will come on again after driving about 100 km.
The warning light ï¥ flashes yellow* (engine oil level sensor faulty)
A fault on the engine oil level sensor is in dicated additionally by an audible signal and the warning light coming on several ti mes after the ignition has been switched on.
In this case have the engine inspecte d without delay by a specialist garage.
The following text will be displayed in the information display*:
OIL SENSOR WORKSHOP!
WARNING
â¢If you must stop for technical reasons, then park the vehicle at a safe distance from the traffic and switch off the engine and switch on the hazard warning light system âpage 48.
â¢The red oil pressure light ï¥ is not an oil level indicator! One should therefore check the oil level at regular intervals, preferably after every refu- eling stop.
â¢Pay attention to the following instructions âpage 173, âWorking in the engine compartmentâ before checking the coolant fluid level and opening the bonnet.
Thickness of the brake pads* ï©
If the warning light ï© comes on, contact a specialist garage immediately and have the brake pads on all of the wheels inspected.
A peep sounds as an ad ditional warning signal.
The following text will be displayed in the information display*:
CHECK BRAKE PAD
Open door* ï®
The warning light ï® comes on if one or several doors, the bonnet or boot lid is opened.2)The warning light ï¥ on vehicles fitted with information display does not come on after switching the ignition on, but only if a fault exists or the engine oil level is too low.
NKO A05F 20 MR08.book Page 25 Thursday, April 19, 2007 11:34 AM
Page 27 of 242

Instruments and Indicator/Warning Lights26
The warning light comes on even when the ignition is switched off. The warning light goes out 5 minutes after switching off the ignition if one or several doors, the bonnet or boot lid is opened. The warning light goes out after closing the doors.
Windshield washer fluid level*ï»
The warning light ï¹ comes on when the ignition is switched on if there is insuffi- cient fluid in the windshield washer system. Top up with liquid âpage 185.
A peep sounds as an additional warning signal.
The following text will be displayed in the information display*:
REFILL WASHER LIQUID
Control system for exhaust ï¸
The warning light ï¸ comes on after the ignition has been switched on.
If the warning light does not go out after star ting the engine or it lights up or flashes when driving, a fault exists in an exhaus t relevant component. The engine manage- ment system selects an emergency programme which enables you to drive to the nearest specialist garage by adopting a gentle style of driving.
The following text will be displayed in the information display*:
EXHAUST WORKSHOP!
Traction control system (TCS) *ï¢
The warning light ï¢ comes on for a few seconds when the ignition is switched on.
The warning light comes on when driving when a control cycle is activated.
The warning light will come on and remains on if the TCS is switched off or if there is a fault in the system.
The fact that the TCS system operates together with the ABS means that the TCS warning light will also come on if the ABS system is not operating properly.
If the warning light ï¢ comes on immediately after starting the engine, the TCS system can be switched off for technical reasons. In this case, the TCS system can be switched on again by switching the igniti on on and off. If the warning light goes out, the TCS system is fully functional again.
Further information about the TCS âpage 144.
Note
If the battery has been disconnected and reconnected, the warning light ï¢ comes on after switching on the ignition. The warning light must go out after driving a short distance.
Tyre inflation pressure*ï
The warning light ï lights up, if there is a substantial drop in inflation pressure in one of the tyres. Reduce the speed and check or correct as soon as possible the inflation pressure in the tyres âpage 186.
A peep sounds as an additional warning signal.
If the warning light flashes, there is a system fault. Visit the nearest specialist garage and have the fault rectified.
Further information about tyre pressure-control system âpage 148.
WARNING
â¢When the warning light ï lights up, immediately reduce the speed and avoid sudden steering and brake mano euvres. Please stop the vehicle without delay at the nearest possible stop and inspect the tyres and their inflation pressures.
â¢Under certain circumstances (e.g. sporty style of driving, wintry or unpaved roads) the warning light ï can be delayed or does not light up at all.
â¢The tyre inflation pressure-control system does not take away the responsability from the driver for the correct tyre inflation pressure.
NKO A05F 20 MR08.book Page 26 Thursday, April 19, 2007 11:34 AM
Page 28 of 242
Instruments and Indicator/Warning Lights27
Using the systemSafetyDriving TipsGeneral MaintenanceBreakdown assistanceTechnical Data
Note
If the battery has been disconnected, the warning light ï comes on after switching on the ignition. The warning light must go out after driving a short distance.
Selector lever lock* ï« (automatic gearbox)
If the warning light ï« lights up, operate the brake pedal. This is necessary, in order to be able to move the selector lever out of the position P or N.
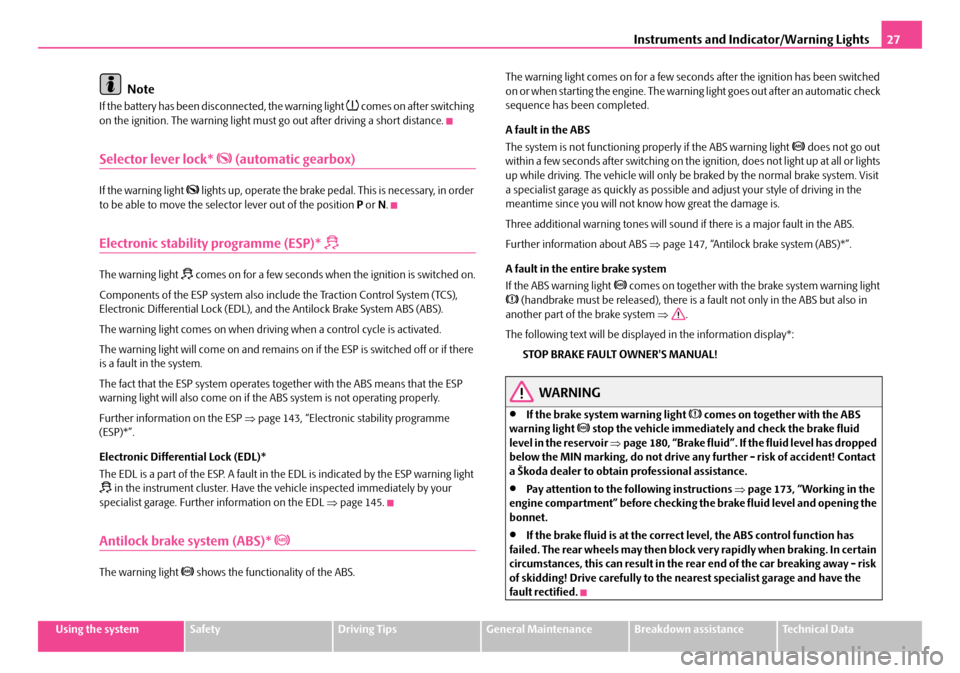
Electronic stability programme (ESP)*ï¢
The warning light ï¢ comes on for a few seconds when the ignition is switched on.
Components of the ESP system also include the Traction Control System (TCS), Electronic Differential Lock (EDL), an d the Antilock Brake System ABS (ABS).
The warning light comes on when drivin g when a control cycle is activated.
The warning light will come on and remains on if the ESP is switched off or if there is a fault in the system.
The fact that the ESP system operates together with the ABS means that the ESP warning light will also come on if the ABS system is not operating properly.
Further information on the ESP âpage 143, âElectronic stability programme (ESP)*â.
Electronic Differential Lock (EDL)*
The EDL is a part of the ESP. A fault in th e EDL is indicated by the ESP warning light ï¢ in the instrument cluster. Have the vehicle inspected immediately by your specialist garage. Further information on the EDL âpage 145.
Antilock brake system (ABS)* ïª
The warning light ïª shows the functionality of the ABS.
The warning light comes on for a few second s after the ignition has been switched on or when starting the engine. The warnin g light goes out after an automatic check sequence has been completed.
A fault in the ABS
The system is not functioning properly if the ABS warning light ïª does not go out within a few seconds after switching on the ig nition, does not light up at all or lights up while driving. The vehicle will only be braked by the normal brake system. Visit a specialist garage as quickly as possible and adjust your style of driving in the meantime since you will not know how great the damage is.
Three additional warning tones will sound if there is a major fault in the ABS.
Further information about ABS âpage 147, âAntilock brake system (ABS)*â.
A fault in the entire brake system
If the ABS warning light ïª comes on together with the brake system warning light ï¨ (handbrake must be released), there is a fault not only in the ABS but also in another part of the brake system â.
The following text will be displayed in the information display*:
STOP BRAKE FAULT OWNER'S MANUAL!
WARNING
â¢If the brake system warning light ï¨ comes on together with the ABS warning light ïª stop the vehicle immediately and check the brake fluid level in the reservoir âpage 180, âBrake fluidâ. If the fluid level has dropped below the MIN marking, do not drive any further - risk of accident! Contact a Å koda dealer to obtain professional assistance.
â¢Pay attention to the following instructions âpage 173, âWorking in the engine compartmentâ before checking the brake fluid level and opening the bonnet.
â¢If the brake fluid is at the correct level, the ABS control function has failed. The rear wheels may then block ve ry rapidly when braking. In certain circumstances, this can result in the rear end of the car breaking away - risk of skidding! Drive carefully to the ne arest specialist garage and have the fault rectified.
NKO A05F 20 MR08.book Page 27 Thursday, April 19, 2007 11:34 AM
Page 38 of 242

Unlocking and locking37
Using the systemSafetyDriving TipsGeneral MaintenanceBreakdown assistanceTechnical Data
â¢Do not press on the rear window when closing the boot lid, it could crack - risk of injury!
Note
â¢After closing the boot lid, it is automatically locked within 1 seconds and the anti-theft alarm system* is activated. This applies only if the vehicle was locked before closing the boot lid.
â¢The function of the hand grip above the licence plate is deactivated when starting off or as of a speed of more than 5 km/hour for vehicles with central locking. The function of the hand grip is activated again when the vehicle has stopped and a door is opened.
â¢Hold the boot lid when opening.
Emergency unlocking of the boot lid
If there is a fault in the central lo cking, you can open the boot lid as
follows:
â Fold one of the outer rear seats forwards.
â Move the operating lever A with the aid of a narrow object e.g. screw-
driver up to the stop in the direction of arrow; the boot lid is then
unlocked.
â Open the boot lid/luggage compartment door from outside.
Remote control*
Description
You can use the remote control:
â¢to unlock and lock the car,
â¢unlocking boot lid.
The transmitter with the battery is housed in the handle of the master key. The receiver is located in the interior of th e car. The operating range of the remote control is 10 metres but this range can be reduced if the batteries are weak.
The master key has a fold-open key bit whic h can be used for unlocking and locking the car manually and also for starting the engine.
If a lost key is replaced or if the receiv er unit has been repaired or a new unit installed, it is then necessary for a Å koda Service Partner to initialise the system. Only after this is it possible to again use the remote control.
Note
â¢The remote control is automatically deactivated when the ignition is switched on.
â¢The operation of the remote control may temporarily be affected by interfer- ence from transmitters close to the car and which operate in the same frequency range (e.g. mobile phone, TV transmitter).
â¢The battery must be replaced if the central locking or anti-theft alarm system does react to the remote control at less than 3 metres away. We recommend having the battery replaced by a Å koda Service Partner.
WARNING (continued)
Fig. 25 Emergency unlocking of the boot lid
NKO A05F 20 MR08.book Page 37 Thursday, April 19, 2007 11:34 AM
Page 88 of 242
Starting-off and Driving87
Using the systemSafetyDriving TipsGeneral MaintenanceBreakdown assistanceTechnical Data
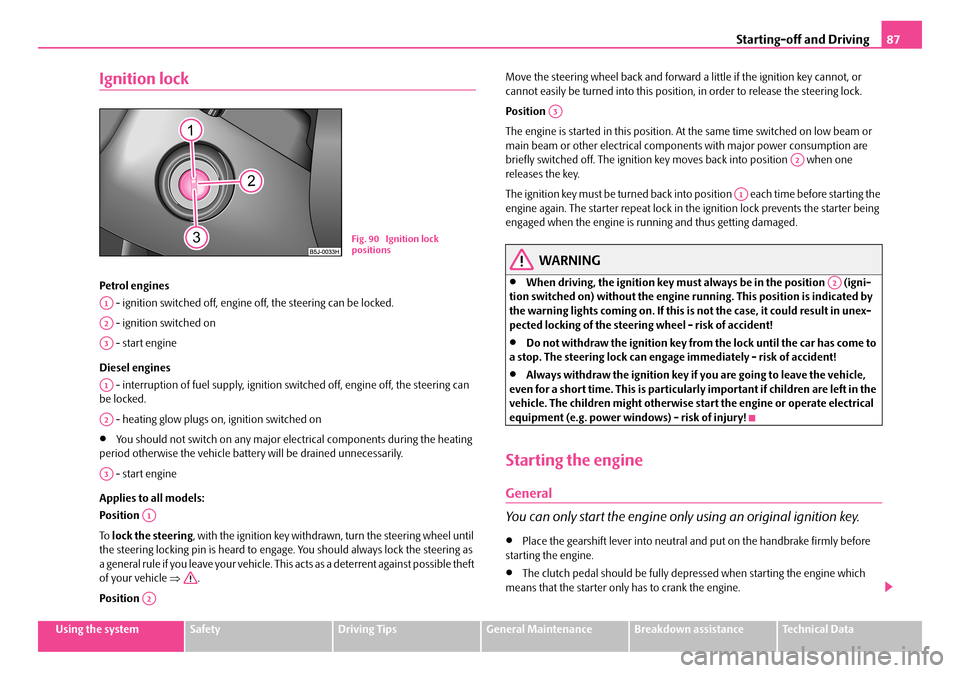
Ignition lock
Petrol engines
- ignition switched off, engine off, the steering can be locked.
- ignition switched on
- start engine
Diesel engines
- interruption of fuel supply, ignition sw itched off, engine off, the steering can be locked.
- heating glow plugs on, ignition switched on
â¢You should not switch on any major elec trical components during the heating period otherwise the vehicle batter y will be drained unnecessarily.
- start engine
Applies to all models:
Position
To lock the steering, with the ignition key withdrawn, turn the steering wheel until the steering locking pin is heard to engage. You should always lock the steering as a general rule if you leave your vehicle. This acts as a deterrent against possible theft of your vehicle â.
Position
Move the steering wheel back and forward a little if the ignition key cannot, or cannot easily be turned into this position, in order to release the steering lock.
Position
The engine is started in this position. At the same time switched on low beam or main beam or other electrical compon ents with major power consumption are briefly switched off. The ignition key moves back into position when one releases the key.
The ignition key must be turned back into position each time before starting the engine again. The starter repeat lock in th e ignition lock prevents the starter being engaged when the engine is ru nning and thus getting damaged.
WARNING
â¢When driving, the ignition key must always be in the position (igni- tion switched on) without the engine running. This position is indicated by the warning lights coming on. If this is not the case, it could result in unex- pected locking of the steering wheel - risk of accident!
â¢Do not withdraw the ignition key from the lock until the car has come to a stop. The steering lock can engage immediately - risk of accident!
â¢Always withdraw the ignition key if you are going to leave the vehicle, even for a short time. This is particularly important if children are left in the vehicle. The children migh t otherwise start the engine or operate electrical equipment (e.g. power windows) - risk of injury!
Starting the engine
General
You can only start the engine only using an original ignition key.
â¢Place the gearshift lever into neutral and put on the handbrake firmly before starting the engine.
â¢The clutch pedal should be fully depressed when starting the engine which means that the starter only has to crank the engine.
Fig. 90 Ignition lock positions
A1
A2
A3
A1
A2
A3
A1
A2
A3
A2
A1
A2
NKO A05F 20 MR08.book Page 87 Thursday, April 19, 2007 11:34 AM
Page 90 of 242
Starting-off and Driving89
Using the systemSafetyDriving TipsGeneral MaintenanceBreakdown assistanceTechnical Data
â¢Contact the nearest specialist garage to obtain professional assistance.
Starting the engine after fuel tank has run dry
It may take longer than normal to start the engine after refuelling if the fuel tank has run completely dry - up to one minute. This is because the fuel system must first of all be filled while the attempting to start the engine.
Switching off the engine
â The engine can be switched off by turning the ignition key from posi-
tion âpage 87, fig. 90 into position .
WARNING
â¢Never switch off the engine before the vehicle is stationary - risk of acci- dent!
â¢The brake booster only operates when the engine is running. Greater physical effort for braking is required when engine is switched off. Because if you do not stop as normal, this can cause an accident and severe injuries.
Caution
you should not switch the engine off right away at the end of your journey after the engine has been operated for a lengthy period at high loads but should be allowed it to run at idling speed for about 2 minutes . This prevents any accumulation of heat when the engine is switched off.
Note
â¢The radiator fan may continue running fo r a further 10 minutes or so after the engine and the ignition have been switched off. The coolant fan may, however, also switch on again after some time if the coolant temperature rises because of an accumulation of heat in the engine or if the engine is warm and the engine compartment is additionally heated by strong sunlight.
â¢This is why particular care is required when carrying out any work in the engine compartment âpage 173, âWorking in the engine compartmentâ.
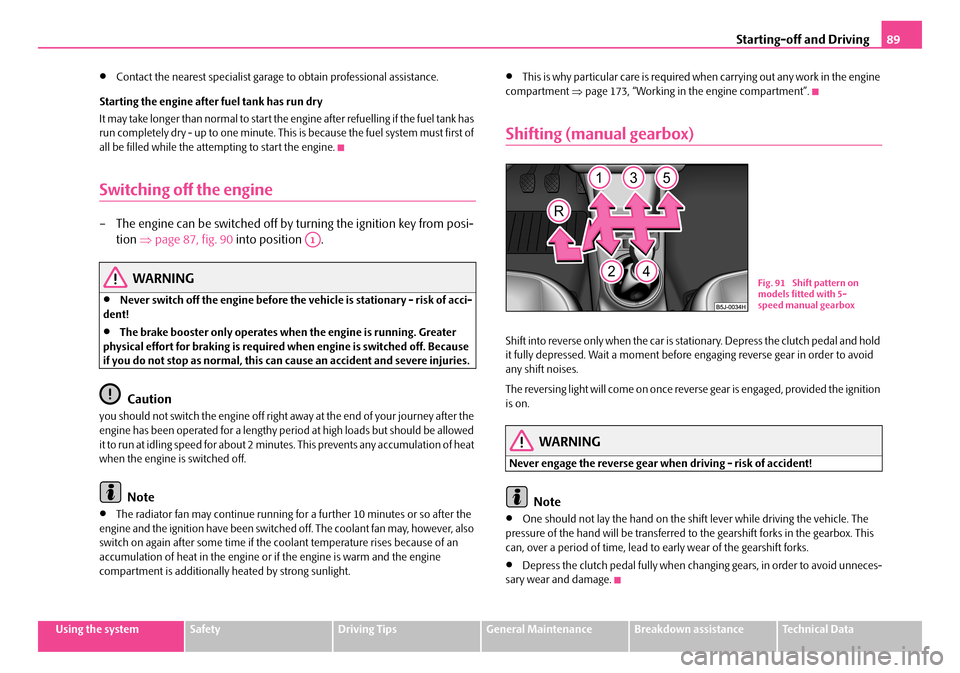
Shifting (manual gearbox)
Shift into reverse only when the car is stationary. Depress the clutch pedal and hold it fully depressed. Wait a moment before engaging reverse gear in order to avoid any shift noises.
The reversing light will come on once reverse gear is engaged, provided the ignition is on.
WARNING
Never engage the reverse gear when driving - risk of accident!
Note
â¢One should not lay the hand on the shift lever while driving the vehicle. The pressure of the hand will be transferred to the gearshift forks in the gearbox. This can, over a period of time, lead to early wear of the gearshift forks.
â¢Depress the clutch pedal fully when changing gears, in order to avoid unneces- sary wear and damage.
A1
Fig. 91 Shift pattern on models fitted with 5-speed manual gearbox
NKO A05F 20 MR08.book Page 89 Thursday, April 19, 2007 11:34 AM
Page 91 of 242

Starting-off and Driving90
Handbrake
Applying the handbrake
â Pull the handbrake lever up fully.
Releasing the handbrake
â Pull the handbrake lever up slightly and at the same time press in the
locking button âfig. 92.
â Hold the button pressed and push the handbrake lever down fully
â .
The handbrake warning light ï¨ lights up when the handbrake is applied, provided the ignition is on.
A warning signal sounds and the following text appears in the display* if you have inadvertently driven off with the handbrake applied:
HANDBRAKE ON
The handbrake warning is activated if you drive at a speed of more than 6 km/h for more than 3 seconds.
WARNING
â¢Please note that the handbrake must be fully released. A handbrake which is only partially released can re sult in the rear brakes overheating which will have a negative effect on the operation of the brake system - risk of accident! In addition this can result in premature wear of the rear brake pads.
â¢Never leave children unattended in the vehicle. The children might, for example, release the handbrake or take the vehicle out of gear. The vehicle might then move off - risk of accident!
Caution
After the car has come to a stop, always firs t of all apply the handbrake firmly before then additionally engaging a gear (manual gearbox) or moving the selector lever into position P (automatic gearbox).
Parking aid*
The parking aid provides a warning of obstacles behind the vehicle.
The audible parking aid determines the distance between the rear bumper and an obstacle located behind the vehicle with th e aid of ultrasound sensors. The sensors are integrated in the rear bumper.
Fig. 92 Centre console: Handbrake
Fig. 93 Parking aid: Range of sensors
NKO A05F 20 MR08.book Page 90 Thursday, April 19, 2007 11:34 AM
Page 95 of 242
Automatic gearbox94
Automatic gearbox
6-speed automatic gearbox*
Introduction
Your car is equipped with an electronically controlled 6-speed automatic gearbox. Shifting up and also down through the gears is performed automatically.
At the same time this is a conventional automatic gearbox. The maximum speed is reached in the 5th gear. The 6th gear se rves as an economic driving programme, which is intended to reduce the fuel consumption.
Information for driving with an automatic gearbox
Shifting up and down through the gears is performed automatically.
You can also, however, switch the gearbox over into the Tiptronic mode.
This mode makes it possible for you to also shift gears manually
â page 97.
Starting-off and Driving
â Depress the brake pedal and hold it depressed.
â Press the Shiftlock button (button in handle of the selector lever),
move the selector lever into the desired position, e.g. D âpage 95,
and then release the Shiftlock button.
â Wait a moment until the gearbox has shifted (a slight engagement
nudge can be felt).
â Release the brake pedal and depress the accelerator â.
Stopping for a short time
â The selector lever position N does not have to be selected when stop-
ping just for a short time, such as at a cross roads. It is sufficient to hold
the vehicle stationary using the foot brake. The engine can, however,
be allowed just to idle.
Parking
â Depress the brake pedal and hold it depressed.
â Apply the handbrake firmly.
â Press and Shiftlock button in the selector lever, move the selector
lever to P and then release the Shiftlock button.
The engine can only be started when the selector lever is in position P or N â page 87.
It is sufficient to engage selector lever position P when parking on a flat surface. When parking on a slope you should first apply the handbrake firmly and then move the selector lever into position P. This is to ensure that there is no excessive pressure acting on the lock mechanism and that it is easier to subsequently move the selector lever out of position P.
If the selector lever position N is selected by accident while driving it is first neces- sary to release pressure on the accelerato r pedal and wait for idling speed of the engine to be reached before engaging a drive position in the selector lever.
WARNING
â¢Do not depress the accelerator when changing the position of the selector lever if the car is stationary and the engine is running - risk of acci-dent!
â¢Never move the selector lever into position R or P when driving - risk of an accident!
NKO A05F 20 MR08.book Page 94 Thursday, April 19, 2007 11:34 AM