open bonnet SKODA FABIA 2008 2.G / 5J User Guide
[x] Cancel search | Manufacturer: SKODA, Model Year: 2008, Model line: FABIA, Model: SKODA FABIA 2008 2.G / 5JPages: 252, PDF Size: 40.88 MB
Page 173 of 252
Taking care of your vehicle and cleaning the vehicle172
Plastic parts
External plastic parts are cleaned by normal washing. Plastic parts and synthetic leather can also be treated with special solvent-free plastic cleaning agents if a damp cloth is not sufficient. Paint care products are not suitable for plastic parts.
Caution
Solvent-free cleaners attack the material and can damage it.
Windows
Only use a plastic ice scraper for removing snow and ice from the windows and mirrors. You should not move the ice scraper forward and backward but in one direction on the window which you are cleaning in order to avoid any damage to the surface of the glass.
You can best remove residues of rubber, oil, grease, wax or silicone by using a special window cleaner or a special silicone remover.
You should also clean the windows regularly from the inside.
Do not use window leathers which you have used to polish the vehicle body to dry off the windows. Residues of preservatives in the window leather can dirty the window and reduce visibility.
Do not affix any stickers over the inside of the rear window to avoid damage to the heating elements of the rear window heater.
We recommend using a preservative from Škoda genuine accessories offered by your Škoda dealer.
Caution
•Never remove snow or ice from the glass parts with warm or hot water - risk of formation of cracks in the glass!
•When removing snow or ice from the windows and mirror lenses make sure not to damage the paintwork of the vehicle.
The headlight lenses
Please do not use any aggressive cleaning or chemical solvent products - risk of damage to the plastic lenses Please use soap and clean warm water.
Caution
Never wipe the headlights dry and do not use any sharp objects for cleaning the plastic lenses, this may result in damage to the protective paintwork and conse-quently in formation of cracks on the headlight lenses, e.g through effect of chem-ical products.
Door and window seals
The rubber seals on the doors, boot lid, bonnet and windows remain supple and last longer if you treat them from time to time with a rubber care product (e.g. with a spray with silicone-free oil). You also avoid premature wear of the seals and prevent leakages in this way. It is also easier to open the doors. Rubber seals which are well cared for also do not stick together in cold winter weather.
Locks
We recommend that you use the spray from Škoda original accessories with regreasing and anticorrosive effect for de-icing locks.
Note
When washing your vehicle, ensure that as little water as possible gets into the locks.
NKO A05F 20.book Page 172 Wednesday, April 2, 2008 1:02 PM
Page 181 of 252
Inspecting and Replenishing180
Inspecting and Replenishing
Engine compartment
Bonnet remote release
Bonnet remote release
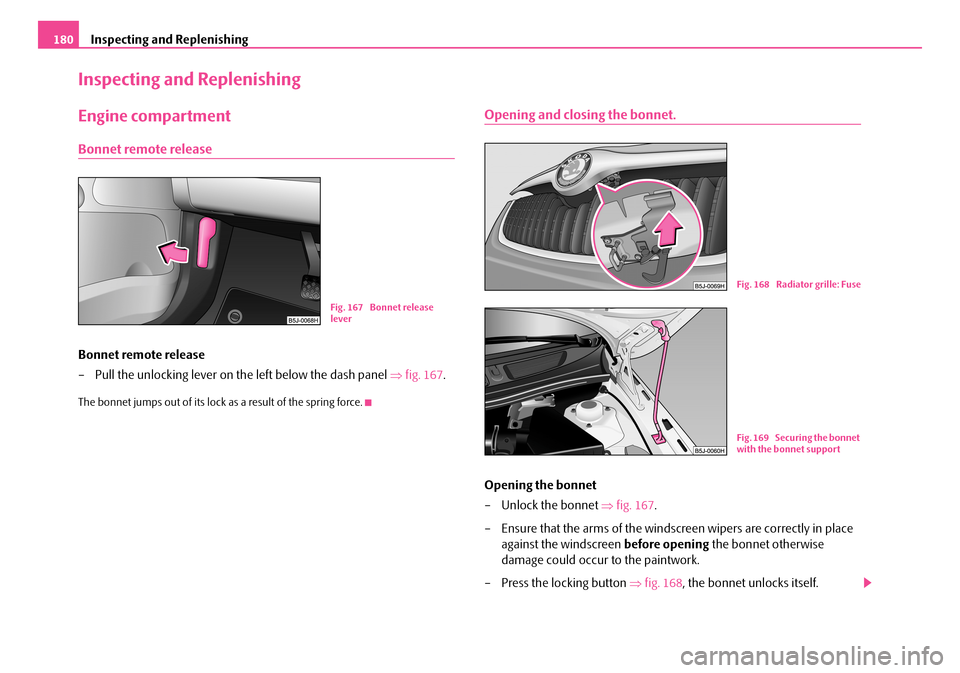
– Pull the unlocking lever on the left below the dash panel ⇒fig. 167.
The bonnet jumps out of its lock as a result of the spring force.
Opening and closing the bonnet.
Opening the bonnet
– Unlock the bonnet ⇒fig. 167.
– Ensure that the arms of the windscreen wipers are correctly in place
against the windscreen before opening the bonnet otherwise
damage could occur to the paintwork.
– Press the locking button ⇒fig. 168, the bonnet unlocks itself.
Fig. 167 Bonnet release lever
Fig. 168 Radiator grille: Fuse
Fig. 169 Securing the bonnet with the bonnet support
NKO A05F 20.book Page 180 Wednesday, April 2, 2008 1:02 PM
Page 182 of 252
Inspecting and Replenishing181
Using the systemSafetyDriving TipsGeneral MaintenanceBreakdown assistanceTechnical Data
– Grip the bonnet and lift it up.
– Take the bonnet support out of its holder and set it in the opening
designed for it ⇒page 180, fig. 169.
Closing the bonnet
– Lift the bonnet slightly and unhook the bonnet support. Press the
bonnet support into the holder designed to hold it.
– Allow the bonnet to drop from a height of about 30 cm into the lock -
bonnet do not press down on it!
WARNING
•Never open the bonnet if you see that steam or coolant is flowing out of the engine compartment - risk of scalding! Wait long enough until the steam or coolant has stopped escaping.
•For safety reasons, the bonnet must always be properly closed when driving. One should therefore check that the lock has in fact engaged prop-erly after closing the bonnet.
•Stop your vehicle immediately while driving if you notice that the lock is not properly engaged and close the bonnet properly - risk of an accident!
Caution
•Before opening the bonnet, ensure that the arms of the windscreen wipers are correctly in place against the windscreen. Otherwise, there is a risk of damage to the paintwork.
Working in the engine compartment
Particular care is required when carrying out any work in the engine
compartment!
There is a risk of injuries, scalding, accidents and fire when working in the engine compartment, e.g. inspecting and replenishing oil and other fluids. For
this reason, it is essential to comply with the warning instructions stated below and with the general applicable rules of safety. The engine compart-ment of your car is a hazardous area ⇒.
WARNING
•Never open the bonnet if you see that steam or coolant is flowing out of the engine compartment - risk of scalding! Wait long enough until the steam or coolant has stopped escaping.
•Switch off the engine and pull out the ignition key.
•Apply the handbrake firmly.
•If your vehicle is fitted with a manual gearbox, move the gearshift lever into Neutral, or if it is fitted with automatic gearbox, move the selector lever into position P.
•Allow the engine to cool down.
•Keep children clear of the engine compartment.
•Do not touch any hot engine parts - risk of burns!
•Never spill oil and other fluids over the hot engine. Such fluids (e.g. the antifreeze contained in the wash liquid) may ignite!
•Avoid short circuits in the electrical system - particularly on the battery.
•Never place your hand into the radiator fan as long as the engine is still warm. The fan might suddenly start running!
•Never open the cap of the coolant expansion bottle as long as the engine is still warm. The cooling system is pressurized!
•Cover over the cap of the coolant expansion reservoir with a large cloth when opening it as protection for your face, hands and arms from hot steam or hot coolant.
•Do not let objects, such as e.g cleaning cloth or tools lie in the engine compartment.
•If you wish to work under the vehicle, you must secure the vehicle from rolling away and support it with suitable supporting blocks: the car jack is not sufficient for this - risk of injury!
•In cases where it be necessary to carry out inspection work when the engine is running there is an additional risk from rotating parts (e.g. the V-
NKO A05F 20.book Page 181 Wednesday, April 2, 2008 1:02 PM
Page 185 of 252
Inspecting and Replenishing184
Check engine oil level
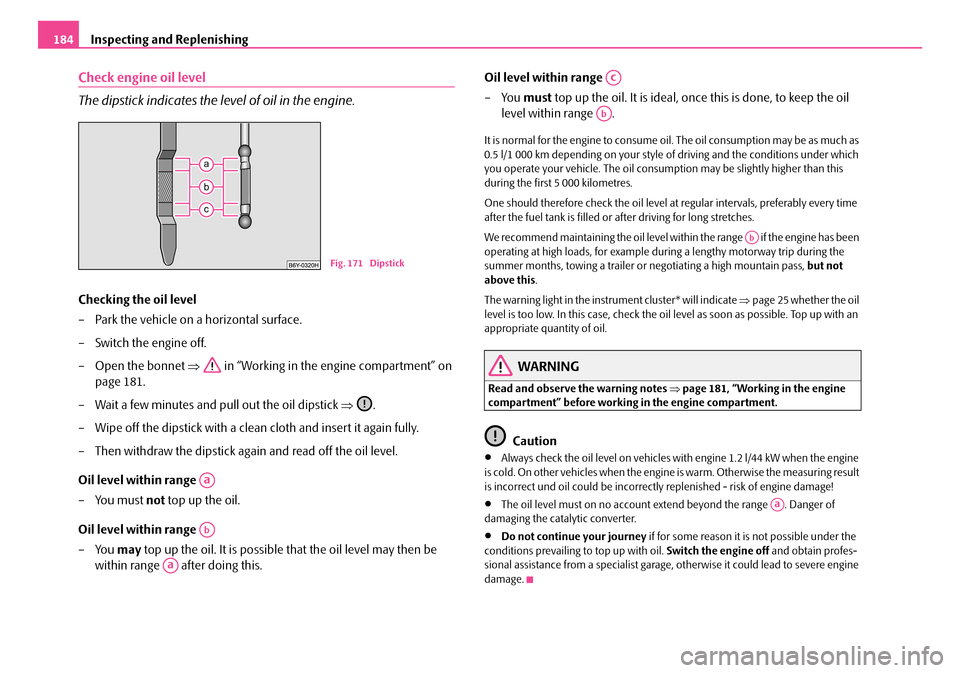
The dipstick indicates the level of oil in the engine.
Checking the oil level
– Park the vehicle on a horizontal surface.
– Switch the engine off.
– Open the bonnet ⇒ in “Working in the engine compartment” on
page 181.
– Wait a few minutes and pull out the oil dipstick ⇒.
– Wipe off the dipstick with a clean cloth and insert it again fully.
– Then withdraw the dipstick again and read off the oil level.
Oil level within range
–You must not top up the oil.
Oil level within range
–You may top up the oil. It is possible that the oil level may then be
within range after doing this.
Oil level within range
– You must top up the oil. It is ideal, once this is done, to keep the oil
level within range .
It is normal for the engine to consume oil. The oil consumption may be as much as 0.5 l/1 000 km depending on your style of driving and the conditions under which you operate your vehicle. The oil consumption may be slightly higher than this during the first 5 000 kilometres.
One should therefore check the oil level at regular intervals, preferably every time after the fuel tank is filled or after driving for long stretches.
We recommend maintaining the oil level within the range if the engine has been operating at high loads, for example during a lengthy motorway trip during the summer months, towing a trailer or negotiating a high mountain pass, but not above this.
The warning light in the instrument cluster* will indicate ⇒page 25 whether the oil level is too low. In this case, check the oil level as soon as possible. Top up with an appropriate quantity of oil.
WARNING
Read and observe the warning notes ⇒page 181, “Working in the engine compartment” before working in the engine compartment.
Caution
•Always check the oil level on vehicles with engine 1.2 l/44 kW when the engine is cold. On other vehicles when the engine is warm. Otherwise the measuring result is incorrect und oil could be incorrectly replenished - risk of engine damage!
•The oil level must on no account extend beyond the range . Danger of damaging the catalytic converter.
•Do not continue your journey if for some reason it is not possible under the conditions prevailing to top up with oil. Switch the engine off and obtain profes-sional assistance from a specialist garage, otherwise it could lead to severe engine damage.
Fig. 171 Dipstick
Aa
Ab
Aa
Ac
Ab
Ab
Aa
NKO A05F 20.book Page 184 Wednesday, April 2, 2008 1:02 PM
Page 187 of 252
Inspecting and Replenishing186
Cooling system
Coolant
The job of the coolant is to cool the engine.
The cooling system does not require any maintenance under normal operating conditions. The coolant consists of water with a concentration of coolant additive of 40 %. This mixture not only provides antifreeze protection down to -25°C but also protects the cooling and heating system from corrosion. It also prevents the formation of scale and significantly increases the boiling point of the coolant.
You must therefore not reduce the concentration of antifreeze agent in the coolant by adding water, also not during the summer months or in countries with a warm climate. The concentration of coolant additive in the coolant must be at least 40%.
You can increase the amount of antifreeze in the coolant if a higher concentration of antifreeze is necessary for climatic reasons but only up to 60% (antifreeze protection down to approx. -40°C). The antifreeze protection tails off above that concentration.
Vehicles exported to countries with a cold climate (e.g. Sweden, Norway, Finland) are already factory-filled with a coolant which offers antifreeze protection down to about -35°C. In these countries the concentration of coolant additive should be at least 50 %.
Coolant
The cooling system is factory-filled with coolant (purple in colour), which complies with the specification TL-VW 774 G.
We recommend that you use the antifreeze agent - G12 PLUS - PLUS (purple in colour).
We recommend that you contact your Škoda Service Partner if you have any ques-tions regarding the coolant or if you wish to fill up with a different coolant.
Your Škoda Service Partner can also supply you with the correct coolant additives.
Caution
•Other coolant additives may cause operational problems which, in partic-ular, involves significantly reducing the anticorrosion effect.
•Any faults or problems resulting from corrosion may cause a loss of coolant and, as a consequence of this, result in major engine damage.
Inspecting the coolant level
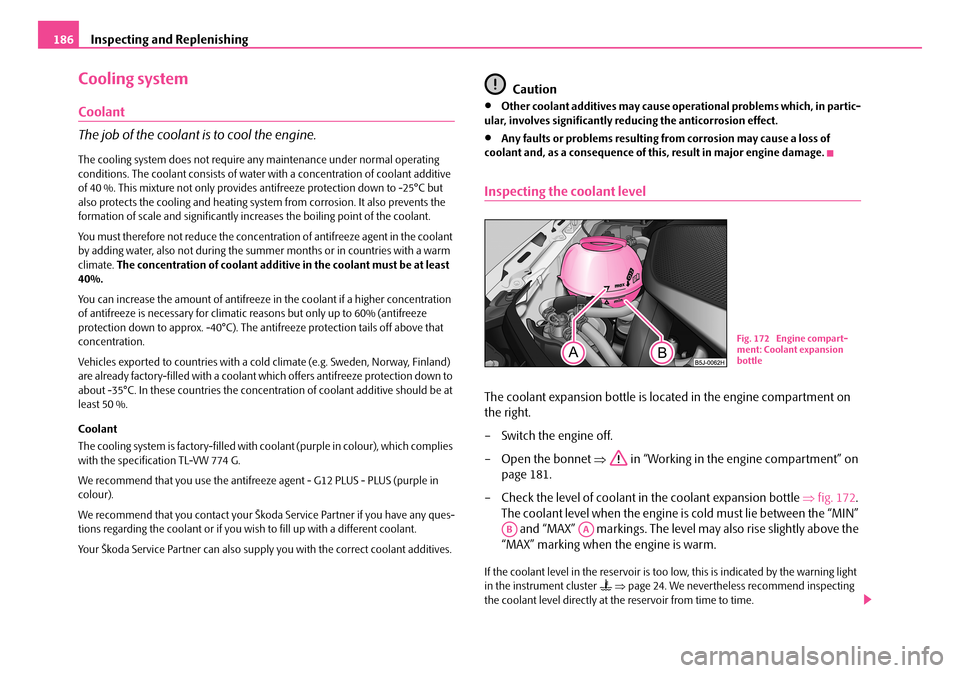
The coolant expansion bottle is located in the engine compartment on
the right.
– Switch the engine off.
– Open the bonnet ⇒ in “Working in the engine compartment” on
page 181.
– Check the level of coolant in the coolant expansion bottle ⇒fig. 172.
The coolant level when the engine is cold must lie between the “MIN”
and “MAX” markings. The level may also rise slightly above the
“MAX” marking when the engine is warm.
If the coolant level in the reservoir is too low, this is indicated by the warning light in the instrument cluster ⇒page 24. We nevertheless recommend inspecting the coolant level directly at the reservoir from time to time.
Fig. 172 Engine compart-ment: Coolant expansion bottle
ABAA
NKO A05F 20.book Page 186 Wednesday, April 2, 2008 1:02 PM
Page 189 of 252
Inspecting and Replenishing188
Radiator fan
The radiator fan may switch on suddenly.
The radiator fan is driven by an electric motor and controlled by a thermostat according to the coolant temperature.
The radiator fan may continue running for up to 10 minutes after the engine has been switched off - even if the ignition is also off. It may also switch on suddenly after a certain time, if
•the coolant temperature has risen because of an accumulation of heat or
•the warm engine compartment is heated up additionally by strong sunlight.
WARNING
You must therefore be aware when working in the engine compartment that the fan may switch on suddenly - risk of injury!
Brake fluid
Inspecting the brake fluid level
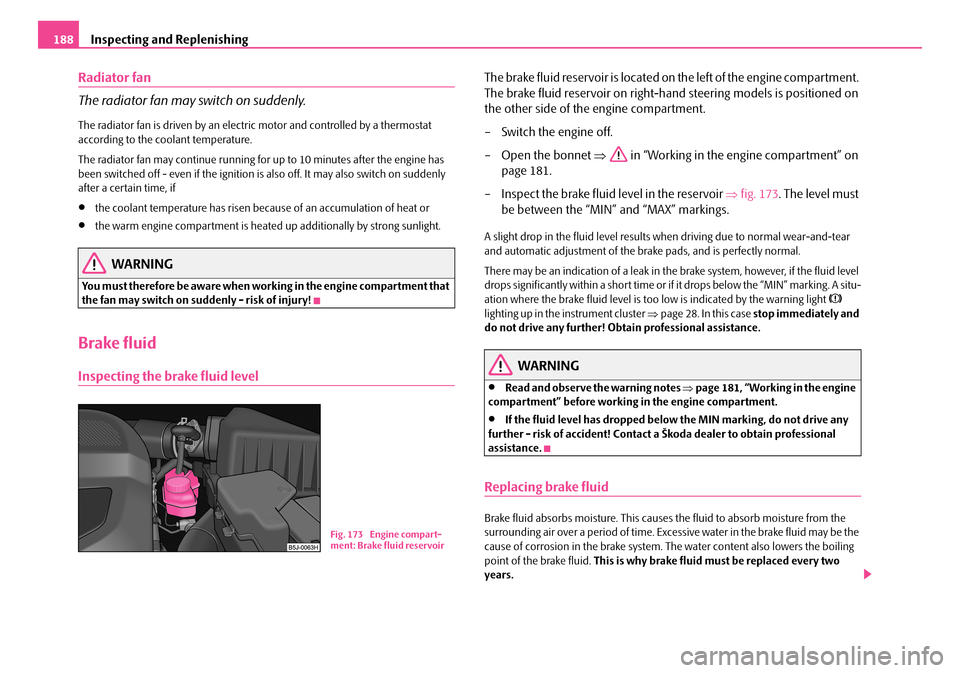
The brake fluid reservoir is located on the left of the engine compartment.
The brake fluid reservoir on right-hand steering models is positioned on
the other side of the engine compartment.
– Switch the engine off.
– Open the bonnet ⇒ in “Working in the engine compartment” on
page 181.
– Inspect the brake fluid level in the reservoir ⇒fig. 173. The level must
be between the “MIN” and “MAX” markings.
A slight drop in the fluid level results when driving due to normal wear-and-tear and automatic adjustment of the brake pads, and is perfectly normal.
There may be an indication of a leak in the brake system, however, if the fluid level drops significantly within a short time or if it drops below the “MIN” marking. A situ-ation where the brake fluid level is too low is indicated by the warning light lighting up in the instrument cluster ⇒page 28. In this case stop immediately and do not drive any further! Obtain professional assistance.
WARNING
•Read and observe the warning notes ⇒page 181, “Working in the engine compartment” before working in the engine compartment.
•If the fluid level has dropped below the MIN marking, do not drive any further - risk of accident! Contact a Škoda dealer to obtain professional assistance.
Replacing brake fluid
Brake fluid absorbs moisture. This causes the fluid to absorb moisture from the surrounding air over a period of time. Excessive water in the brake fluid may be the cause of corrosion in the brake system. The water content also lowers the boiling point of the brake fluid. This is why brake fluid must be replaced every two years.
Fig. 173 Engine compart-ment: Brake fluid reservoir
NKO A05F 20.book Page 188 Wednesday, April 2, 2008 1:02 PM
Page 219 of 252
Fuses and light bulbs218
WARNING
•Bulbs H7 and H4 are pressurised and may burst when changing the bulb - risk of injury!
•It is recommended to wear gloves and eye protection when changing a light bulb.
Note
This Owner's Manual only describes the replacement of bulbs where it is assumed that no major complications will arise. Other light bulbs should be changed by your specialist garage.
Front headlight
– Open the bonnet.
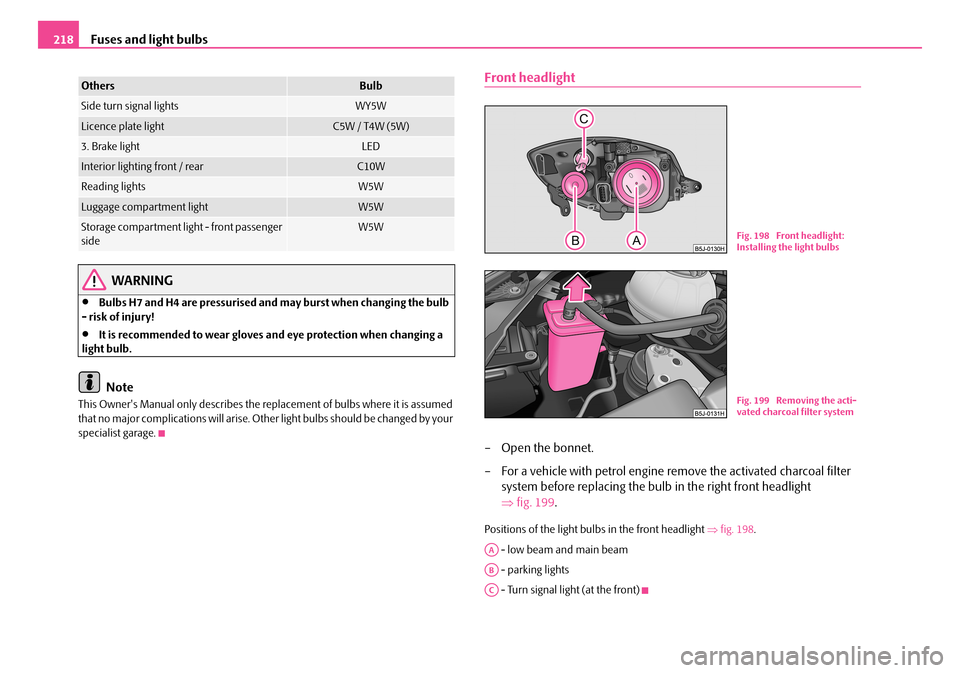
– For a vehicle with petrol engine remove the activated charcoal filter
system before replacing the bulb in the right front headlight
⇒fig. 199.
Positions of the light bulbs in the front headlight ⇒fig. 198.
- low beam and main beam
- parking lights
- Turn signal light (at the front)
OthersBulb
Side turn signal lightsWY5W
Licence plate lightC5W / T4W (5W)
3. Brake lightLED
Interior lighting front / rearC10W
Reading lightsW5W
Luggage compartment lightW5W
Storage compartment light - front passenger sideW5WFig. 198 Front headlight: Installing the light bulbs
Fig. 199 Removing the acti-vated charcoal filter system
AA
AB
AC
NKO A05F 20.book Page 218 Wednesday, April 2, 2008 1:02 PM
Page 220 of 252
Fuses and light bulbs219
Using the systemSafetyDriving TipsGeneral MaintenanceBreakdown assistanceTechnical Data
Switching on the low beam and main beam
– Open the bonnet.
– Remove the protective cap ⇒page 218, fig. 198.
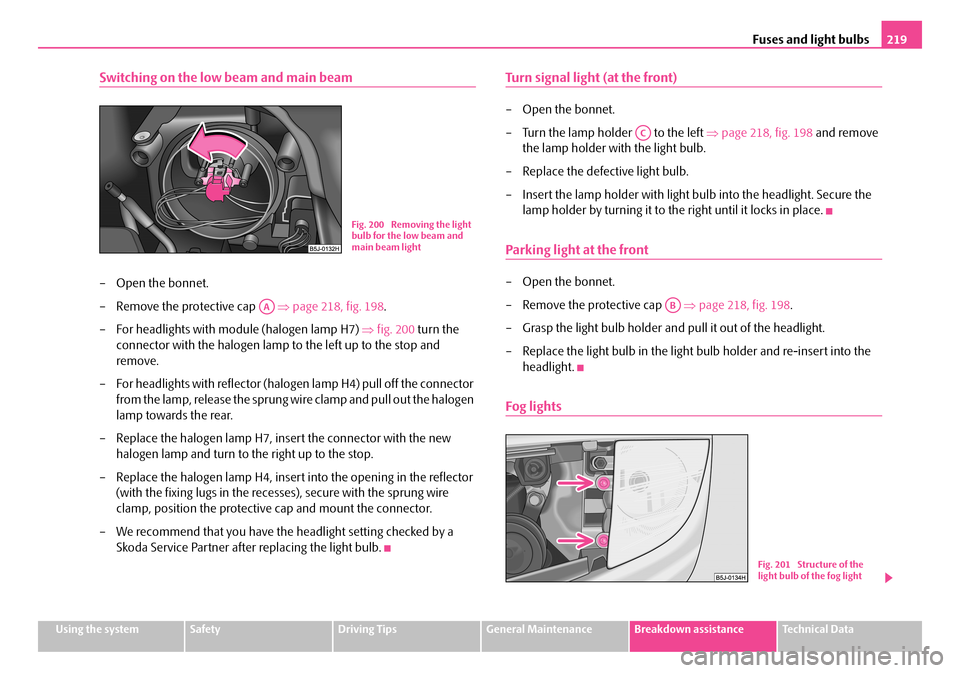
– For headlights with module (halogen lamp H7) ⇒fig. 200 turn the
connector with the halogen lamp to the left up to the stop and
remove.
– For headlights with reflector (halogen lamp H4) pull off the connector
from the lamp, release the sprung wire clamp and pull out the halogen
lamp towards the rear.
– Replace the halogen lamp H7, insert the connector with the new
halogen lamp and turn to the right up to the stop.
– Replace the halogen lamp H4, insert into the opening in the reflector
(with the fixing lugs in the recesses), secure with the sprung wire
clamp, position the protective cap and mount the connector.
– We recommend that you have the headlight setting checked by a
Skoda Service Partner after replacing the light bulb.
Turn signal light (at the front)
– Open the bonnet.
– Turn the lamp holder to the left ⇒page 218, fig. 198 and remove
the lamp holder with the light bulb.
– Replace the defective light bulb.
– Insert the lamp holder with light bulb into the headlight. Secure the
lamp holder by turning it to the right until it locks in place.
Parking light at the front
– Open the bonnet.
– Remove the protective cap ⇒page 218, fig. 198.
– Grasp the light bulb holder and pull it out of the headlight.
– Replace the light bulb in the light bulb holder and re-insert into the
headlight.
Fog lights
Fig. 200 Removing the light bulb for the low beam and main beam light
AA
AC
AB
Fig. 201 Structure of the light bulb of the fog light
NKO A05F 20.book Page 219 Wednesday, April 2, 2008 1:02 PM