heating SKODA FABIA 2008 2.G / 5J Owner's Guide
[x] Cancel search | Manufacturer: SKODA, Model Year: 2008, Model line: FABIA, Model: SKODA FABIA 2008 2.G / 5JPages: 252, PDF Size: 40.88 MB
Page 91 of 252
Heating and air conditioning system90
The heating effect is dependent upon the coolant temperature, thus full heat output only occurs when the engine has reached its operating temperature.
It is possible to briefly activate recirculated air mode in order to enhance the cooling effect ⇒.
The air inlet in front of the windscreen must be free of ice, snow or leaves in order to ensure that the heating and cooling systems operate properly.
The AC compressor is switched off at a high coolant temperature in order to provide cooling at a high load of the engine.
After switching on the cooling Condensation from the evaporator of the air condi-tioning may drip down and form a puddle below the vehicle. This is quite normal and not an indication of a leak!
Recommended setting for all periods of the year:
•Set the temperature to 22 °C.
•Press the button ⇒fig. 109.
•Move the air outlet vents 3 and 4 so that the air flow is directed slightly upwards ⇒page 93, fig. 110.
Switching over between degrees Celsius and degrees Fahrenheit
Press and hold the buttons and ⇒fig. 109. The information in the desired temperature measuring unit appears in the display.
WARNING
•For your own safety and that of other road users, ensure that all the windows are free of ice, snow and misting. Please familiarize yourself about how to correctly operate the heating and ventilation systems, how to demist and defrost the windows, as well as with the cooling mode.
•You should not leave recirculated air mode on over a longer period of time, as “stale” air may result in fatigue in the driver and occupants, divert your attention and also cause the windows to mist up. The risk of having an accident increases. Switch recirculated air mode off as soon as the windows begin misting up.
Note
•If the cooling system has not been switched on for a lengthy period, odours may be produced at the evaporator because of deposits. Switch the cooling system on at least once a month for approximately 5 minutes at the highest blower stage - also during the cold season of the year - in order to remove such odours. Also open a window for a short time.
•We recommend that you do not smoke in the vehicle when the recirculating air mode is operating since the smoke which is drawn at the evaporator from the inte-rior of the vehicle forms deposits in the evaporator of the air conditioning system. This produces a permanent odour when the air conditioning system is operating which can only be eliminated through considerable effort and expense (replace-ment of compressor).
•The used air streams out through the air removal openings in the luggage compartment.
•Using the cooling economically ⇒page 89.
•Operational problems ⇒page 89.
Overview of the control elements
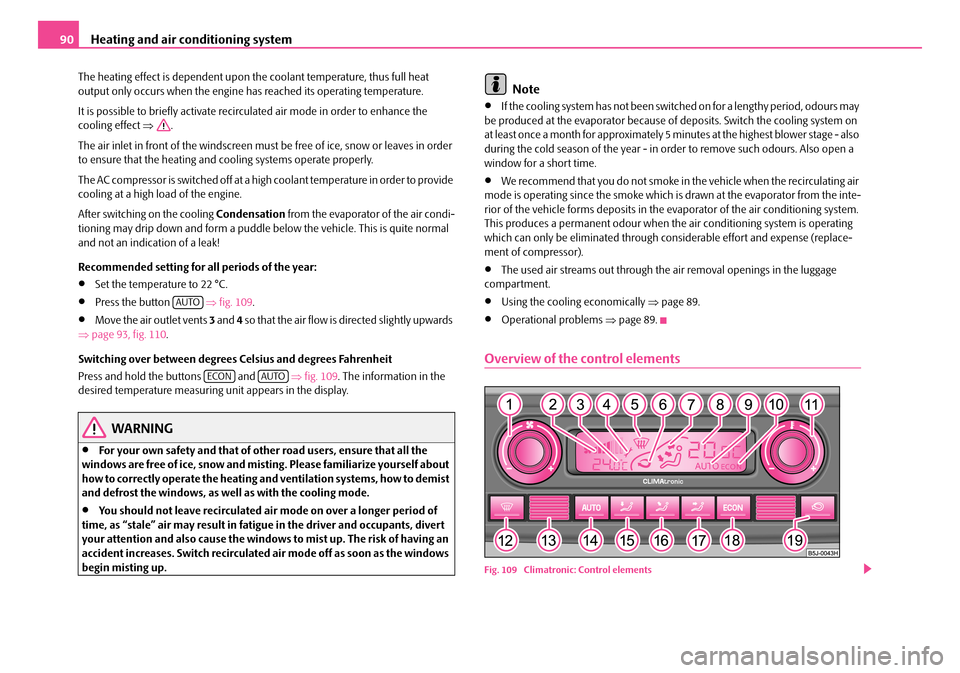
Fig. 109 Climatronic: Control elements
AUTO
ECONAUTO
NKO A05F 20.book Page 90 Wednesday, April 2, 2008 1:02 PM
Page 92 of 252

Heating and air conditioning system91
Using the systemSafetyDriving TipsGeneral MaintenanceBreakdown assistanceTechnical Data
Buttons / control dial
Setting the blower speed
The displays
Set blower speed
The outside temperature
Climatronic fault, have the vehicle inspected by a specialist garage
Air flow to the windows
Recirculated air mode
Air flow to the head, upper body and feet
Display of selected interior temperature, here: +20°C
Automatic mode
ECON mode
Buttons / control dial
Setting the interior temperature
Air flow to the windows
Automatic mode
Air flow in the footwell
Air flow to the upper body
Air flow to head
Button for switching off cooling system
Recirculated air mode
Note
The interior temperature sensor is located in the bottom part of the device. Do not glue or cover over the sensor, otherwise it could have an unfavourable effect on the Climatronic.
Automatic mode
The automatic mode is used in order to maintain a constant temper-
ature and to keep the windows in the interior of the car dry.
Switching automatic mode on
– Set a temperature between +18 °C and +29 °C.
– Move the air outlet vents 3 and 4 ⇒page 93, fig. 110 so that the air
flow is directed slightly upwards.
–Press the button , AUTO appears in the display.
The automatic mode is switched off by pressing the button for the air distribution or increasing or decreasing the blower speed. The temperature is nevertheless regulated.
ECON mode
The cooling system is switched off in the ECON mode - heating and
ventilation are regulated automatically.
Switching ECON mode on
–Press the button , ECON appears in the display.
– Set a temperature between +18 °C and +29 °C.
Recirculated air mode in ECON mode
–Press the button , AUTO appears in the display.
–Press the button , ECON appears in the display.
ECON mode operates only within the control temperature range from +18 °C up to +29 °C.
The ECON mode is switched off when pressing button or .
Please note that, in the ECON mode, the interior temperature cannot be lower than the outside temperature. The interior is not cooled and the air is not dehumidified.
A1
A2
A3
A4
A5
A6
A7
A8
A9
A10
A11
A12
A14
A15
A16
A17
A18
A19
A13
AUTO
ECON
ECON
NKO A05F 20.book Page 91 Wednesday, April 2, 2008 1:02 PM
Page 93 of 252
Heating and air conditioning system92
Please refer to the information regarding recirculated air mode ⇒page 92.
Defrosting windscreen
Defrosting windscreen - switching on
– Press the button ⇒page 90, fig. 109.
Defrosting windscreen - switching off
– Once again press the button or the button .
The temperature control is controlled automatically. More air flows out of the air outlet vents 1 and2.
Recirculated air mode
In recirculated air mode air is sucked out of the interior of the vehicle
and then fed back into the interior.
Recirculated air mode prevents polluted air outside the vehicle from
getting into the vehicle, for example when driving through a tunnel or
when standing in a traffic jam.
Switching recirculated air mode on
– Press button , the symbol appears on the display.
Switching recirculated air mode off
– Once again press the button or the button , the symbol or
the logo is no longer shown on the display.
WARNING
•You should not leave recirculated air mode on over a longer period of time, as “stale” air may result in fatigue in the driver and occupants, divert your attention and also cause the windows to mist up. The risk of having an
accident increases. Switch recirculated air mode off as soon as the windows begin misting up.
•After 15 minutes of constant recirculated air mode, the symbol flashes on the display of the Climatronic for 5 minutes. Immediately switch off the recirculated air mode.
Note
If the windscreen mists up, press the button . After the windscreen has been demisted, press the button .
Setting temperature
– You can set the desired interior temperature after switching on the
ignition with the control dial .
You can set the interior temperature between +18°C and +29 °C. The interior temperature is regulated automatically within this range. If you select a tempera-ture of less than +18 °C, “LO” is shown on the display. If you select a temperature above +29 °C, “HI” is shown on the display. In both limit positions the Climatronic operates at maximum cooling or heating capacity, respectively. The temperature is not controlled in this case.
Lengthy and uneven distribution of the air flow out of the vents (in particular at the leg area) and large differences in temperature, for example when getting out of the vehicle, can result in chills in sensitive persons.
Controlling blower
There are a total of seven blower stages available.
The Climatronic system controls the blower stages automatically in line
with the interior temperature. You can also, however, adapt the blower
stages manually to suit your particular needs.
AUTO
AUTO
WARNING (continued)
AUTO
A11
NKO A05F 20.book Page 92 Wednesday, April 2, 2008 1:02 PM
Page 94 of 252

Heating and air conditioning system93
Using the systemSafetyDriving TipsGeneral MaintenanceBreakdown assistanceTechnical Data
– Turn the control dial ⇒page 90, fig. 109 to the left (reduce blower
speed) or right (increase blower speed).
Switch off the blowers, the Climatronic is switched off and in the display shows OFF.
The set blower speed is displayed next to the control dial when the respective number of warning lights come on.
WARNING
•“Stale air” may result in fatigue in the driver and occupants, reduce attention levels and also cause the windows to mist up. The risk of having an accident increases.
•Do not switch the Climatronic system off for longer than necessary.
•Switch the Climatronic system on as soon as the windows mist up.
Air outlet vents
Fig. 110 Air outlet vents
Open air outlet vents
– Turn the rotary knob into the upper position.
Close air outlet vents
– Turn the rotary knob into the lower position.
Redirecting air flow
– The horizontal as well as the vertical direction of the air flow is set with
the handle in the middle of the air outlet vents.
You can control the air distribution to the air outlet vents via the buttons of the operating part of the Climatronic ⇒page 90. Air outlet vents 3 and 4 ⇒fig. 110 can also be opened or closed individually.
A1
A1
NKO A05F 20.book Page 93 Wednesday, April 2, 2008 1:02 PM
Page 96 of 252
Starting-off and Driving95
Using the systemSafetyDriving TipsGeneral MaintenanceBreakdown assistanceTechnical Data
Ignition lock
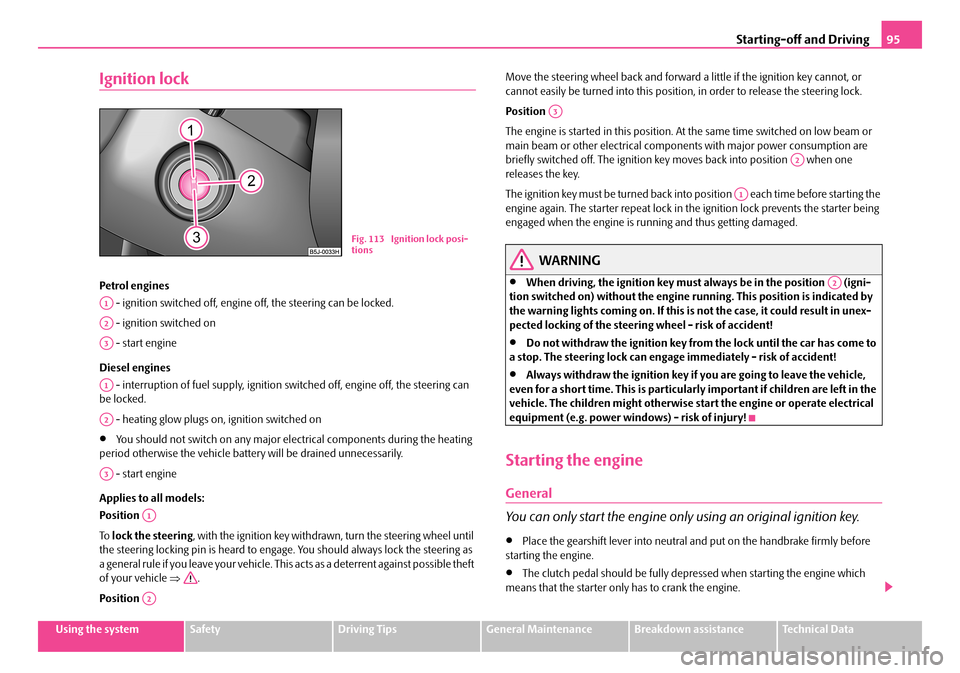
Petrol engines
- ignition switched off, engine off, the steering can be locked.
- ignition switched on
- start engine
Diesel engines
- interruption of fuel supply, ignition switched off, engine off, the steering can be locked.
- heating glow plugs on, ignition switched on
•You should not switch on any major electrical components during the heating period otherwise the vehicle battery will be drained unnecessarily.
- start engine
Applies to all models:
Position
To lock the steering, with the ignition key withdrawn, turn the steering wheel until the steering locking pin is heard to engage. You should always lock the steering as a general rule if you leave your vehicle. This acts as a deterrent against possible theft of your vehicle ⇒.
Position
Move the steering wheel back and forward a little if the ignition key cannot, or cannot easily be turned into this position, in order to release the steering lock.
Position
The engine is started in this position. At the same time switched on low beam or main beam or other electrical components with major power consumption are briefly switched off. The ignition key moves back into position when one releases the key.
The ignition key must be turned back into position each time before starting the engine again. The starter repeat lock in the ignition lock prevents the starter being engaged when the engine is running and thus getting damaged.
WARNING
•When driving, the ignition key must always be in the position (igni-tion switched on) without the engine running. This position is indicated by the warning lights coming on. If this is not the case, it could result in unex-pected locking of the steering wheel - risk of accident!
•Do not withdraw the ignition key from the lock until the car has come to a stop. The steering lock can engage immediately - risk of accident!
•Always withdraw the ignition key if you are going to leave the vehicle, even for a short time. This is particularly important if children are left in the vehicle. The children might otherwise start the engine or operate electrical equipment (e.g. power windows) - risk of injury!
Starting the engine
General
You can only start the engine only using an original ignition key.
•Place the gearshift lever into neutral and put on the handbrake firmly before starting the engine.
•The clutch pedal should be fully depressed when starting the engine which means that the starter only has to crank the engine.
Fig. 113 Ignition lock posi-tions
A1
A2
A3
A1
A2
A3
A1
A2
A3
A2
A1
A2
NKO A05F 20.book Page 95 Wednesday, April 2, 2008 1:02 PM
Page 97 of 252
Starting-off and Driving96
•Let go of the key as soon as the engine starts otherwise there may be damage to the starter.
The engine running noises may louder at first be louder for a short time after starting the cold engine until oil pressure can be built up in the hydraulic valve clearance compensation. This is quite normal and is not an operating problem.
If the engine does not start ...
You can use the battery of another vehicle as a jump-start aid ⇒page 208.
It is only possible to tow-start vehicles fitted with a manual gearbox. The tow-starting distance must not be more than 50 metres ⇒page 211.
WARNING
•Never run the engine in non ventilated or enclosed areas. The exhaust gases of the engine contain besides the odorless and colourless carbon monoxide a poisonous gas - hazard! Carbon monoxide can cause uncon-sciousness and death.
•Never leave your vehicle unattended with the engine running.
Caution
•The starter may only be operated (ignition key position ), if the engine is not running. If the starter is immediately operated after switching off the engine, the starter or the engine can be damaged.
•Avoid high engine revolutions, full throttle and high engine loads as long as the engine has not yet reached its normal operating temperature - risk of damaging the engine!
•Vehicles which are fitted with an exhaust gas catalytic converter should not be tow-started over a distance of more than 50 metres.
For the sake of the environment
Never warm up the engine when the vehicle is standing. Drive off right away. When driving the engine reaches its operating temperature more rapidly and the pollutant emissions are lower.
Petrol engines
These engines are fitted with a starter system which selects the correct fuel/air mixture for every external air temperature.
•Do not operate accelerator before and when starting engine.
•Interrupt the attempt at starting after 10 seconds if the engine does not start right awayand wait for about 30 seconds before repeating the attempt.
•It is possible that the fuse on the electrical fuel pump is defect if the engine still does not start. Check the fuse and replace it if necessary ⇒page 213.
•If the engine does not start, contact the nearest specialist garage to obtain professional assistance.
It may be necessary, if the engine is very hot, to slightly depress the accelerator after the engine has started.
Diesel engines
Glow plug system
Diesel engines are equipped with a glow plug system, the preglow period being controlled automatically in line with the coolant temperature and outside temper-ature.
The preglow indicator light comes on after the ignition has been switched on.
You should not switch on any major electrical components during the heating period otherwise the vehicle battery will be drained unnecessarily.
•You should start the engine immediately after the glow plug warning light has gone out.
•The glow plug warning light will come on for about one second if the engine is at a normal operating temperature or if the outside temperature is above +5°C. This means that you can start the engine right away.
•Interrupt the attempt at starting after 10 seconds if the engine does not start right awayand wait for about 30 seconds before repeating the attempt.
•It is possible that the fuse on the diesel preglow system is defect if the engine still does not start. Check the fuse and replace it if necessary ⇒page 213.
A3
NKO A05F 20.book Page 96 Wednesday, April 2, 2008 1:02 PM
Page 99 of 252
Starting-off and Driving98
Handbrake
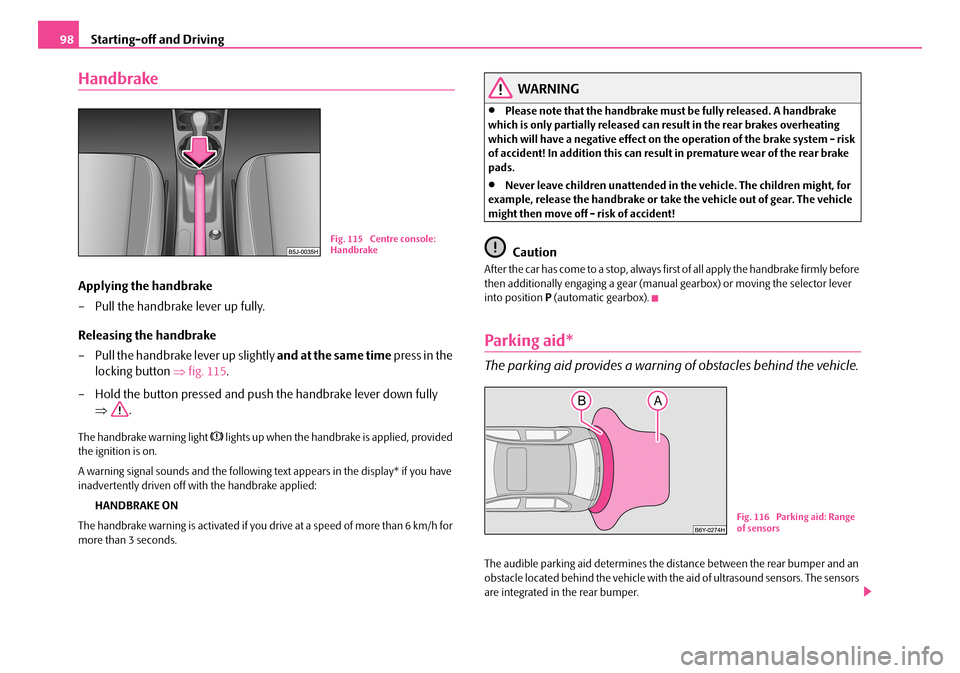
Applying the handbrake
– Pull the handbrake lever up fully.
Releasing the handbrake
– Pull the handbrake lever up slightly and at the same time press in the
locking button ⇒fig. 115.
– Hold the button pressed and push the handbrake lever down fully
⇒.
The handbrake warning light lights up when the handbrake is applied, provided the ignition is on.
A warning signal sounds and the following text appears in the display* if you have inadvertently driven off with the handbrake applied:
HANDBRAKE ON
The handbrake warning is activated if you drive at a speed of more than 6 km/h for more than 3 seconds.
WARNING
•Please note that the handbrake must be fully released. A handbrake which is only partially released can result in the rear brakes overheating which will have a negative effect on the operation of the brake system - risk of accident! In addition this can result in premature wear of the rear brake pads.
•Never leave children unattended in the vehicle. The children might, for example, release the handbrake or take the vehicle out of gear. The vehicle might then move off - risk of accident!
Caution
After the car has come to a stop, always first of all apply the handbrake firmly before then additionally engaging a gear (manual gearbox) or moving the selector lever into position P (automatic gearbox).
Parking aid*
The parking aid provides a warning of obstacles behind the vehicle.
The audible parking aid determines the distance between the rear bumper and an obstacle located behind the vehicle with the aid of ultrasound sensors. The sensors are integrated in the rear bumper.
Fig. 115 Centre console: Handbrake
Fig. 116 Parking aid: Range of sensors
NKO A05F 20.book Page 98 Wednesday, April 2, 2008 1:02 PM
Page 154 of 252
Intelligent Technology153
Using the systemSafetyDriving TipsGeneral MaintenanceBreakdown assistanceTechnical Data
The TCS should normally always be switched on. It may be good practice in certain exceptional cases, such as when you wish to have wheel slip, to switch off the system.
Examples:
•when driving with snow chains,
•when driving in deep snow or on a loose surface,
•when it is necessary to rock a car free when it has become stuck.
then you should switch on the TCS again.
WARNING
You should always adjust your style of driving to the conditions of the road surface and the traffic situation. The increased safety offered must not tempt you to take greater risks than otherwise - risk of an accident!
Note
•All four wheels must be fitted with the same tyres in order to achieve problem-free operation of the TCS. Differing rolling circumferences of the tyres can lead to an undesirable reduction in the engine output.
•Changes to vehicle (e.g. on engine, on the brakes, on chassis or other assign-ment of tyres and wheels) can influence the function of the TCS ⇒page 200, “Accessories, changes and replacement of parts”.
Electronic Differential Lock (EDL)*
The electronic differential lock prevents an individual wheel from
slipping.
Models fitted with ESP are equipped with electronic differential lock (EDL).
General
The EDL makes it much easier, and sometimes at all possible, to start off, accelerate and climb a steep hill when the conditions of the road surface are unfavourable.
Operating principle
The EDL is activated automatically, that is without any action on the part of the driver. It monitors the speeds of the driven wheels with the aid of the ABS sensors. Should only one drive wheel begin spinning on a slippery surface there will be an appreciable difference in the speed of the driven wheels. The EDL function brakes the slipping wheel and the differential transmits a greater driving force to the other driven wheel. This control process is also accompanied by noises.
Overheating of the brakes
The EDL switches off automatically if unusually severe stresses exist in order to avoid excessive heat generation in the disc brake on the wheel which is being braked. The vehicle can continue to be driven and has the same characteristics as a vehicle not fitted with EDL.
The EDL switches on again automatically as soon as the brake has cooled down.
WARNING
•Depress the accelerator carefully when accelerating on uniformly slip-pery road surfaces, such as ice and snow. The driven wheels might still spin despite the EDL and affect the stability of the vehicle - risk of an accident!
•You should always adapt your style of driving to the condition of road surface and to the traffic situation even when your vehicle is fitted with EDL. The increased safety offered must not tempt you to take greater risks than otherwise - risk of an accident!
Note
•If the ABS or TCS or ESP warning light comes on, this may also indicate a fault in the EDL. Please have the car inspected as soon as possible by a specialist garage.
•Changes to vehicle (e.g. on engine, on the brakes, on chassis or other assign-ment of tyres and wheels) can influence the function of the EDL ⇒page 200, “Accessories, changes and replacement of parts”.
NKO A05F 20.book Page 153 Wednesday, April 2, 2008 1:02 PM
Page 168 of 252
Towing a trailer167
Using the systemSafetyDriving TipsGeneral MaintenanceBreakdown assistanceTechnical Data
should be attached to folding arms. Adjust the mirrors so that they provide you with an adequate field of view to the rear.
Headlights
Before starting off with a hitched trailer, also check the setting of the headlights. Alter the setting as necessary with the aid of the headlight beam adjuster ⇒page 47.
Detachable ball head
The ball rod is detachable on vehicles with towing device and suppliable from Škoda original accessories. It is stowed together with separate fitting instructions in the spare wheel well in the luggage compartment of the vehicle.
Note
•We recommend that you also have your vehicle inspected between service intervals if you tow a trailer frequently.
•The handbrake on the towing vehicle must be put on when coupling and decoupling the trailer.
•Keep the mechanism of the ball head of the towing device clean and take proper care of it with a suitable preservative.
Driving Tips
Particular caution is required when towing a trailer.
– Do not, as far as possible, drive with your vehicle unladen and the
trailer laden.
– Do not make full use of the legal maximum speeds. This applies in
particular to downhill sections.
– Apply the brakes in good time.
– Keep a check on the coolant temperature gauge if the outside temper-
ature is high.
Distribution of weight
The distribution of the weight is very poor if your vehicle is unladen and the trailer is laden. Maintain a particularly low speed if you cannot avoid driving with this combination.
Driving speed
Do not drive faster than 80 km/hour for safety reasons. This also applies for coun-tries in which higher speeds are allowed.
The fact that the driving stability of the vehicle + trailer combination reduces with increasing speed means that the legally allowed speed should not be used when there are unfavourable road, weather or wind conditions, particularly near accident black spots.
You must always reduce your speed immediately as soon as you detect even just the slightest swaying of the trailer. On no account attempt to stop the trailer from “swaying” by accelerating.
Apply the brakes in good time! If the trailer is fitted with a trailer brake, apply the brakes gently at first and then brake firmly. This will avoid brake jolts resulting from the trailer wheels locking. Shift down gears in good time before negotiating a down-hill section to allow the engine to also act as a brake.
Engine overheating
Please keep a check on the coolant temperature gauge if you have to negotiate a lengthy slope in a low gear at a high engine speed when the outside temperature is very high ⇒page 10.
If the needle of the coolant temperature gauge moves into the right-hand area or even the red area of the scale, reduce your speed immediately. Stop and switch off the engine if the warning light in the instrument cluster begins flashing. Wait a few minutes and check the level of coolant in the coolant expansion bottle ⇒page 186, “Inspecting the coolant level”.
Please refer to the following guidelines ⇒page 24, “Coolant temperature/coolant level ”.
The coolant temperature can be reduced by switching on the heating.
Any increase in the cooling effect of the coolant fan through shifting down a gear and increasing the engine speed is not possible since the fan speed is independent
NKO A05F 20.book Page 167 Wednesday, April 2, 2008 1:02 PM
Page 173 of 252
Taking care of your vehicle and cleaning the vehicle172
Plastic parts
External plastic parts are cleaned by normal washing. Plastic parts and synthetic leather can also be treated with special solvent-free plastic cleaning agents if a damp cloth is not sufficient. Paint care products are not suitable for plastic parts.
Caution
Solvent-free cleaners attack the material and can damage it.
Windows
Only use a plastic ice scraper for removing snow and ice from the windows and mirrors. You should not move the ice scraper forward and backward but in one direction on the window which you are cleaning in order to avoid any damage to the surface of the glass.
You can best remove residues of rubber, oil, grease, wax or silicone by using a special window cleaner or a special silicone remover.
You should also clean the windows regularly from the inside.
Do not use window leathers which you have used to polish the vehicle body to dry off the windows. Residues of preservatives in the window leather can dirty the window and reduce visibility.
Do not affix any stickers over the inside of the rear window to avoid damage to the heating elements of the rear window heater.
We recommend using a preservative from Škoda genuine accessories offered by your Škoda dealer.
Caution
•Never remove snow or ice from the glass parts with warm or hot water - risk of formation of cracks in the glass!
•When removing snow or ice from the windows and mirror lenses make sure not to damage the paintwork of the vehicle.
The headlight lenses
Please do not use any aggressive cleaning or chemical solvent products - risk of damage to the plastic lenses Please use soap and clean warm water.
Caution
Never wipe the headlights dry and do not use any sharp objects for cleaning the plastic lenses, this may result in damage to the protective paintwork and conse-quently in formation of cracks on the headlight lenses, e.g through effect of chem-ical products.
Door and window seals
The rubber seals on the doors, boot lid, bonnet and windows remain supple and last longer if you treat them from time to time with a rubber care product (e.g. with a spray with silicone-free oil). You also avoid premature wear of the seals and prevent leakages in this way. It is also easier to open the doors. Rubber seals which are well cared for also do not stick together in cold winter weather.
Locks
We recommend that you use the spray from Škoda original accessories with regreasing and anticorrosive effect for de-icing locks.
Note
When washing your vehicle, ensure that as little water as possible gets into the locks.
NKO A05F 20.book Page 172 Wednesday, April 2, 2008 1:02 PM