window SKODA FABIA 2008 2.G / 5J Service Manual
[x] Cancel search | Manufacturer: SKODA, Model Year: 2008, Model line: FABIA, Model: SKODA FABIA 2008 2.G / 5JPages: 252, PDF Size: 40.88 MB
Page 139 of 252
Airbag system138
Head airbags*
Description of the head airbags
The head airbag together with the side airbag offers enhanced occu-
pant protection in the event of a side collision.
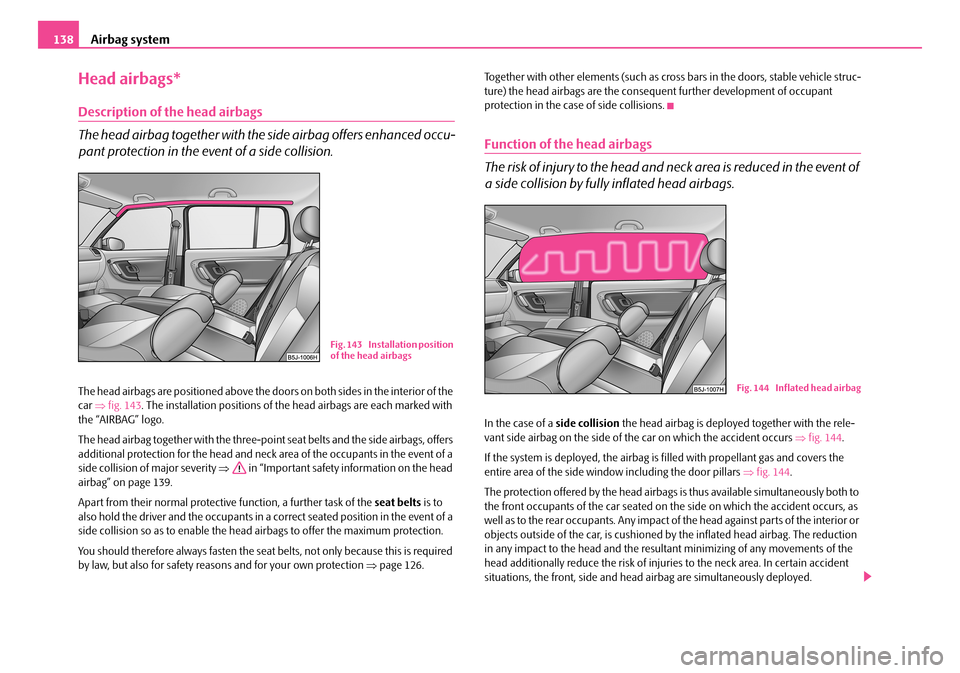
The head airbags are positioned above the doors on both sides in the interior of the car ⇒fig. 143. The installation positions of the head airbags are each marked with the “AIRBAG” logo.
The head airbag together with the three-point seat belts and the side airbags, offers additional protection for the head and neck area of the occupants in the event of a side collision of major severity ⇒ in “Important safety information on the head airbag” on page 139.
Apart from their normal protective function, a further task of the seat belts is to also hold the driver and the occupants in a correct seated position in the event of a side collision so as to enable the head airbags to offer the maximum protection.
You should therefore always fasten the seat belts, not only because this is required by law, but also for safety reasons and for your own protection ⇒page 126.
Together with other elements (such as cross bars in the doors, stable vehicle struc-ture) the head airbags are the consequent further development of occupant protection in the case of side collisions.
Function of the head airbags
The risk of injury to the head and neck area is reduced in the event of
a side collision by fully inflated head airbags.
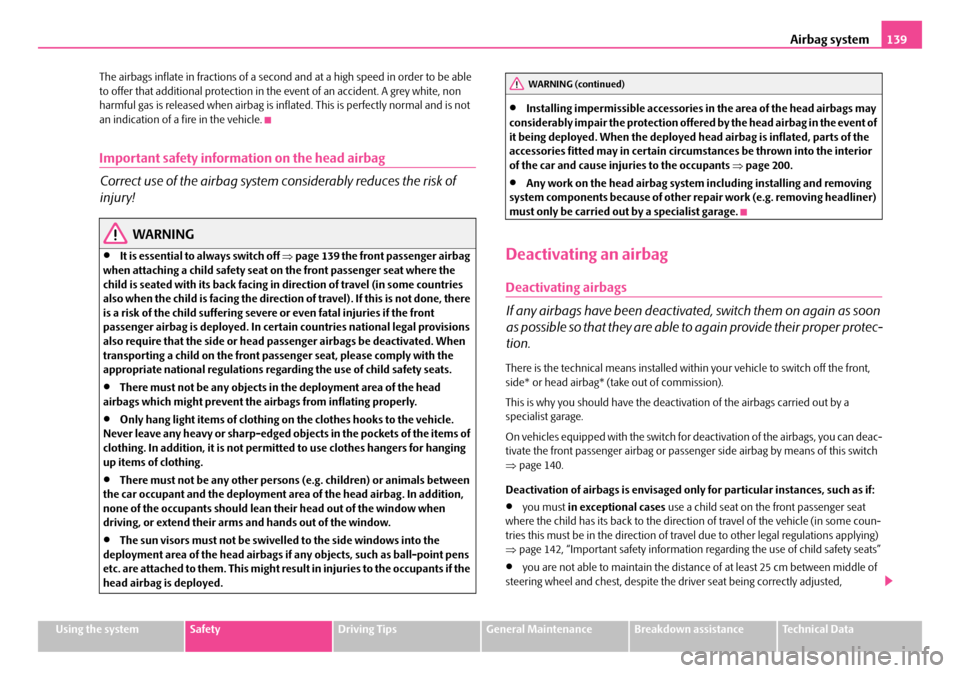
In the case of a side collision the head airbag is deployed together with the rele-vant side airbag on the side of the car on which the accident occurs ⇒fig. 144.
If the system is deployed, the airbag is filled with propellant gas and covers the entire area of the side window including the door pillars ⇒fig. 144.
The protection offered by the head airbags is thus available simultaneously both to the front occupants of the car seated on the side on which the accident occurs, as well as to the rear occupants. Any impact of the head against par ts of the interior or objects outside of the car, is cushioned by the inflated head airbag. The reduction in any impact to the head and the resultant minimizing of any movements of the head additionally reduce the risk of injuries to the neck area. In certain accident situations, the front, side and head airbag are simultaneously deployed.
Fig. 143 Installation position of the head airbags
Fig. 144 Inflated head airbag
NKO A05F 20.book Page 138 Wednesday, April 2, 2008 1:02 PM
Page 140 of 252
Airbag system139
Using the systemSafetyDriving TipsGeneral MaintenanceBreakdown assistanceTechnical Data
The airbags inflate in fractions of a second and at a high speed in order to be able to offer that additional protection in the event of an accident. A grey white, non harmful gas is released when airbag is inflated. This is perfectly normal and is not an indication of a fire in the vehicle.
Important safety information on the head airbag
Correct use of the airbag system considerably reduces the risk of
injury!
WARNING
•It is essential to always switch off ⇒page 139 the front passenger airbag when attaching a child safety seat on the front passenger seat where the child is seated with its back facing in direction of travel (in some countries also when the child is facing the direction of travel). If this is not done, there is a risk of the child suffering severe or even fatal injuries if the front passenger airbag is deployed. In certain countries national legal provisions also require that the side or head passenger airbags be deactivated. When transporting a child on the front passenger seat, please comply with the appropriate national regulations regarding the use of child safety seats.
•There must not be any objects in the deployment area of the head airbags which might prevent the airbags from inflating properly.
•Only hang light items of clothing on the clothes hooks to the vehicle. Never leave any heavy or sharp-edged objects in the pockets of the items of clothing. In addition, it is not permitted to use clothes hangers for hanging up items of clothing.
•There must not be any other persons (e.g. children) or animals between the car occupant and the deployment area of the head airbag. In addition, none of the occupants should lean their head out of the window when driving, or extend their arms and hands out of the window.
•The sun visors must not be swivelled to the side windows into the deployment area of the head airbags if any objects, such as ball-point pens etc. are attached to them. This might result in injuries to the occupants if the head airbag is deployed.
•Installing impermissible accessories in the area of the head airbags may considerably impair the protection offered by the head airbag in the event of it being deployed. When the deployed head airbag is inflated, parts of the accessories fitted may in certain circumstances be thrown into the interior of the car and cause injuries to the occupants ⇒page 200.
•Any work on the head airbag system including installing and removing system components because of other repair work (e.g. removing headliner) must only be carried out by a specialist garage.
Deactivating an airbag
Deactivating airbags
If any airbags have been deactivated, switch them on again as soon
as possible so that they are able to again provide their proper protec-
tion.
There is the technical means installed within your vehicle to switch off the front, side* or head airbag* (take out of commission).
This is why you should have the deactivation of the airbags carried out by a specialist garage.
On vehicles equipped with the switch for deactivation of the airbags, you can deac-tivate the front passenger airbag or passenger side airbag by means of this switch ⇒page 140.
Deactivation of airbags is envisaged only for particular instances, such as if:
•you must in exceptional cases use a child seat on the front passenger seat where the child has its back to the direction of travel of the vehicle (in some coun-tries this must be in the direction of travel due to other legal regulations applying) ⇒page 142, “Important safety information regarding the use of child safety seats”
•you are not able to maintain the distance of at least 25 cm between middle of steering wheel and chest, despite the driver seat being correctly adjusted,
WARNING (continued)
NKO A05F 20.book Page 139 Wednesday, April 2, 2008 1:02 PM
Page 171 of 252
Taking care of your vehicle and cleaning the vehicle170
Automatic vehicle wash systems
The paintwork of the vehicle is sufficiently resistant that the vehicle can be washed normally in automatic vehicle wash plants without any problem. The actual stress to which the paintwork is subjected, however, depends primarily on the design of the vehicle wash system, the filtering of the water and the type of washing and care products used. If the paintwork of your vehicle appears mat after being washed or even has scratches, point this out to the operator of the vehicle wash plant. Use a different vehicle wash plant, if necessary.
There are no particular points to note before washing your vehicle in such a plant other than the usual precautionary measures (closing windows, moving any factory-fitted aerials down flat against the bodywork, etc.).
If you have any particular attach e d p a r t s f i t te d t o y o u r c a r - s u ch a s s p o i l e r, ro o f ra ck system, two-way radio aerial - it is best to first of all consult the operator of the car wash plant.
It is important to degrease the lips of the windscreen wiper rubbers after passing through the automatic vehicle wash system.
Caution
Do not screw the swivelling down roof aerial tight before washing the vehicle in an automatic vehicle wash system - risk of damage!
Washing vehicle by hand
It is important to first soften the dirt with plenty of water and rinse it off as thor-oughly as possible before washing your vehicle by hand.
One should then clean the vehicle using a soft washing sponge, washing glove or a washing brush and only slight pressure. Work from the top to the bottom - beginning with the roof. Only place slight pressure on the vehicle paintwork during cleaning Only use a car shampoo for stubborn dirt.
Wash out the sponge or washing glove thoroughly at short intervals.
Clean wheels, door sills and similar parts last. Use a second sponge for such areas.
Rinse off the vehicle well after giving it a wash and dry it off using a chamois leather.
WARNING
•The ignition should always be switched off when you wash your vehicle - risk of accident!
•Protect your hands and arms from sharp-edged metal parts when you are cleaning the underfloor, the inside of the wheel housings or the wheel trims - risk of cuts.
Caution
•Do not wash your vehicle in bright sunlight - risk of paint damage.
•Ensure that the jet of water is not aimed directly at the locks or at the door and panel joints if you spray your vehicle in winter down with a hose - risk of freezing.
•Do not use any insect sponges, rough kitchen sponges or similar cleaning prod-ucts - risk of damage to the surface of paintwork.
For the sake of the environment
Only wash your vehicle at washing bays specifically reserved for this purpose. This ensures that no water which may be contaminated by oil flows into the sewage system. It is not even permitted to wash your vehicle in certain areas except at such specific washing bays.
Washing with a high-pressure cleaner
When you wash your vehicle with a high-pressure cleaner, it is essential to comply with the instructions for use of the cleaning equipment. This applies in particular to the pressure used and to the spraying distance. Maintain a sufficiently large distance to soft materials such as rubber hoses or insulation material.
On no account use circular spray nozzles or so-called dirt cutters!
NKO A05F 20.book Page 170 Wednesday, April 2, 2008 1:02 PM
Page 172 of 252
Taking care of your vehicle and cleaning the vehicle171
Using the systemSafetyDriving TipsGeneral MaintenanceBreakdown assistanceTechnical Data
WARNING
It is particularly important that you do not clean tyres with circular spray jets. Damage may occur even at a relatively large spraying distance and if sprayed only for a short time.
Caution
The water containing wax must be no hotter than 60°C, otherwise the vehicle can be damaged.
Wax treatment
Good wax treatment is an effective way of protecting the paintwork from harmful environmental influences and minor mechanical damage.
The vehicle must be treated with a high-quality hard wax polish at the latest, when no more drops form on the clean paintwork.
A new layer of a high-quality hard wax polish can be applied to the clean bodywork after it has dried thoroughly. Even if you use a wax preserver regularly we still recommend that you treat the paintwork of the vehicle at least twice a year with hard wax.
Caution
Never apply wax to the windows.
Polishing
Polishing is only necessary if the paintwork of your vehicle has become unattractive and if it is no longer possible to achieve a gloss with wax preservers.
You must treat the paintwork with a wax preserver if the polish you use does not contain any preserving elements ⇒page 171, “Wax treatment”.
We recommend using a preservative from Škoda genuine accessories offered by your Škoda dealer.
Caution
•You must not treat mat painted parts or plastic with polishing products or hard wax.
•Do not polish the paintwork of the vehicle in a dusty environment, otherwise the paintwork can be scratched.
Chrome parts
First clean the chrome parts with a damp clotch and then polish them with a soft, dry cloth. If it does not prove to be adequate, use a chrome care product from Škoda original accessories.
Caution
Do not polish the chrome parts in a dusty environment, otherwise they can be scratched.
Paint damage
Slight damage to paintwork such as scratches, scuffs or traces of chip damage must be treated immediately before any corrosion can result. You can of course have this work carried out by a Škoda Service Partner.
Škoda Service Partners have a range of matching touch-up pens or spray cans available in the colour of your vehicle.
The paint number of the original paintwork of your vehicle is indicated on the vehicle data sticker ⇒page 223.
Any corrosion which has already have formed must be removed thoroughly. Apply a corrosion protection primer and then the paint to the affected point. You can of course have this work carried out by a Škoda Service Partner.
NKO A05F 20.book Page 171 Wednesday, April 2, 2008 1:02 PM
Page 173 of 252
Taking care of your vehicle and cleaning the vehicle172
Plastic parts
External plastic parts are cleaned by normal washing. Plastic parts and synthetic leather can also be treated with special solvent-free plastic cleaning agents if a damp cloth is not sufficient. Paint care products are not suitable for plastic parts.
Caution
Solvent-free cleaners attack the material and can damage it.
Windows
Only use a plastic ice scraper for removing snow and ice from the windows and mirrors. You should not move the ice scraper forward and backward but in one direction on the window which you are cleaning in order to avoid any damage to the surface of the glass.
You can best remove residues of rubber, oil, grease, wax or silicone by using a special window cleaner or a special silicone remover.
You should also clean the windows regularly from the inside.
Do not use window leathers which you have used to polish the vehicle body to dry off the windows. Residues of preservatives in the window leather can dirty the window and reduce visibility.
Do not affix any stickers over the inside of the rear window to avoid damage to the heating elements of the rear window heater.
We recommend using a preservative from Škoda genuine accessories offered by your Škoda dealer.
Caution
•Never remove snow or ice from the glass parts with warm or hot water - risk of formation of cracks in the glass!
•When removing snow or ice from the windows and mirror lenses make sure not to damage the paintwork of the vehicle.
The headlight lenses
Please do not use any aggressive cleaning or chemical solvent products - risk of damage to the plastic lenses Please use soap and clean warm water.
Caution
Never wipe the headlights dry and do not use any sharp objects for cleaning the plastic lenses, this may result in damage to the protective paintwork and conse-quently in formation of cracks on the headlight lenses, e.g through effect of chem-ical products.
Door and window seals
The rubber seals on the doors, boot lid, bonnet and windows remain supple and last longer if you treat them from time to time with a rubber care product (e.g. with a spray with silicone-free oil). You also avoid premature wear of the seals and prevent leakages in this way. It is also easier to open the doors. Rubber seals which are well cared for also do not stick together in cold winter weather.
Locks
We recommend that you use the spray from Škoda original accessories with regreasing and anticorrosive effect for de-icing locks.
Note
When washing your vehicle, ensure that as little water as possible gets into the locks.
NKO A05F 20.book Page 172 Wednesday, April 2, 2008 1:02 PM
Page 193 of 252
Inspecting and Replenishing192
– When charging is completed: switch the charger off and unplug the
mains cable from the power socket.
– Only then should you disconnect the terminal clamps of the charger.
– Reconnect the cables to the battery (first of all “positive”, then “nega-
tive”).
It is not normally necessary to disconnect the cables of the battery if you recharge the battery using low amperages (as for example from a mini-charger). Please also refer to the instructions from the charger manufacturer.
A charging current of 0.1 of the total battery capacity (or lower) is that which should be used until full charging is achieved.
It is, however, necessary to disconnect both cables before charging the battery with high amperages, so-called “quick-charging”.
“Quick-charging” a battery is dangerous ⇒ in “Working on the battery” on page 189. It requires a special charger and appropriate knowledge. We therefore recommend that you have your battery quick-charged only by your Škoda Service Par tner.
A discharged battery may already freeze at temperatures just below 0°C ⇒. We recommend that you no longer use a battery which has thawed out because the casing of the battery may be cracked through the formation of ice and this would allow battery electrolyte to flow out.
The vent plugs of the battery should not be opened for charging.
WARNING
Never charge a frozen or thawed battery - risk of explosion and caustic burns! Replace a frozen battery.
Disconnecting and reconnecting the battery
On disconnecting and reconnecting the battery the following functions are initially deactivated or are no longer able to operate fault-free.
We recommend having the vehicle checked by a Škoda Service Partner to ensure full functionality of all electrical systems.
Replacing the battery
You should only replace a battery with a new battery of the same capacity, voltage (12 V), amperage and of the same size. Škoda Service Partners have a range of suit-able batteries available.
We recommend that you only have an old battery disposed of by your Škoda Service Partner since it does require special disposal.
For the sake of the environment
Batteries contain poisonous substances such as sulphuric acid and lead. They must be disposed of in accordance with local environmental protection regulations and on no account as domestic waste.
OperationOperating measure
Electrical power window (operational faults)⇒page 42
Enter radio code numbersee Radio Operating Instructions
Set hours⇒page 13
Data in the multi-functional indicator* are deleted.⇒page 13
NKO A05F 20.book Page 192 Wednesday, April 2, 2008 1:02 PM
Page 194 of 252
Inspecting and Replenishing193
Using the systemSafetyDriving TipsGeneral MaintenanceBreakdown assistanceTechnical Data
Windshield washer system
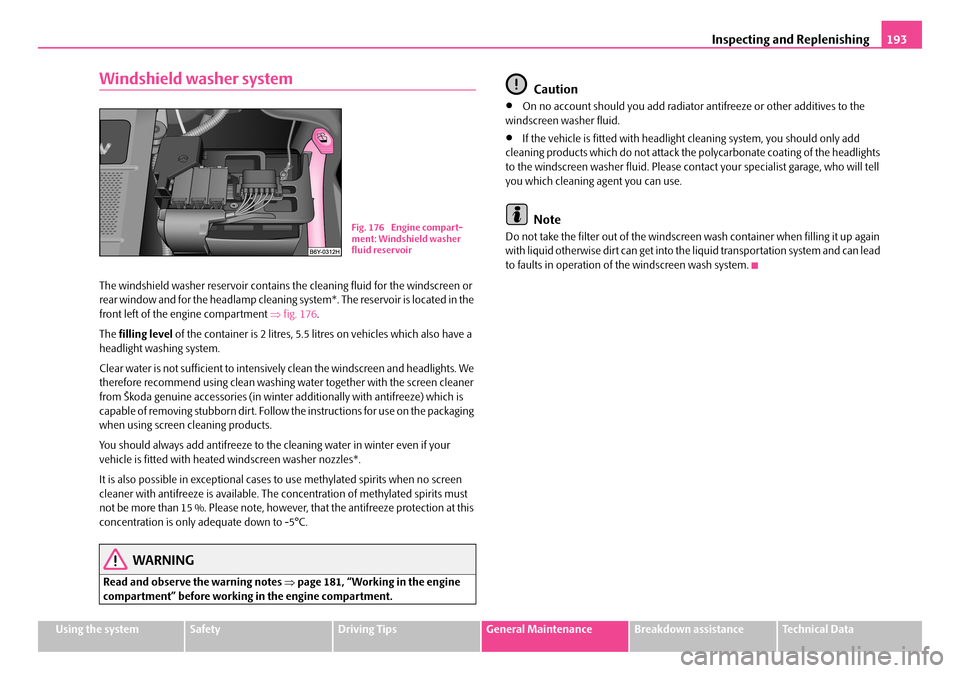
The windshield washer reservoir contains the cleaning fluid for the windscreen or rear window and for the headlamp cleaning system*. The reservoir is located in the front left of the engine compartment ⇒fig. 176.
The filling level of the container is 2 litres, 5.5 litres on vehicles which also have a headlight washing system.
Clear water is not sufficient to intensively clean the windscreen and headlights. We therefore recommend using clean washing water together with the screen cleaner from Škoda genuine accessories (in winter additionally with antifreeze) which is capable of removing stubborn dirt. Follow the instructions for use on the packaging when using screen cleaning products.
You should always add antifreeze to the cleaning water in winter even if your vehicle is fitted with heated windscreen washer nozzles*.
It is also possible in exceptional cases to use methylated spirits when no screen cleaner with antifreeze is available. The concentration of methylated spirits must not be more than 15 %. Please note, however, that the antifreeze protection at this concentration is only adequate down to -5°C.
WARNING
Read and observe the warning notes ⇒page 181, “Working in the engine compartment” before working in the engine compartment.
Caution
•On no account should you add radiator antifreeze or other additives to the windscreen washer fluid.
•If the vehicle is fitted with headlight cleaning system, you should only add cleaning products which do not attack the polycarbonate coating of the headlights to the windscreen washer fluid. Please contact your specialist garage, who will tell you which cleaning agent you can use.
Note
Do not take the filter out of the windscreen wash container when filling it up again with liquid otherwise dirt can get into the liquid transportation system and can lead to faults in operation of the windscreen wash system.
Fig. 176 Engine compart-ment: Windshield washer fluid reservoir
NKO A05F 20.book Page 193 Wednesday, April 2, 2008 1:02 PM
Page 215 of 252
Fuses and light bulbs214
Note
We recommend that you have these fuses replaced by a specialist garage.
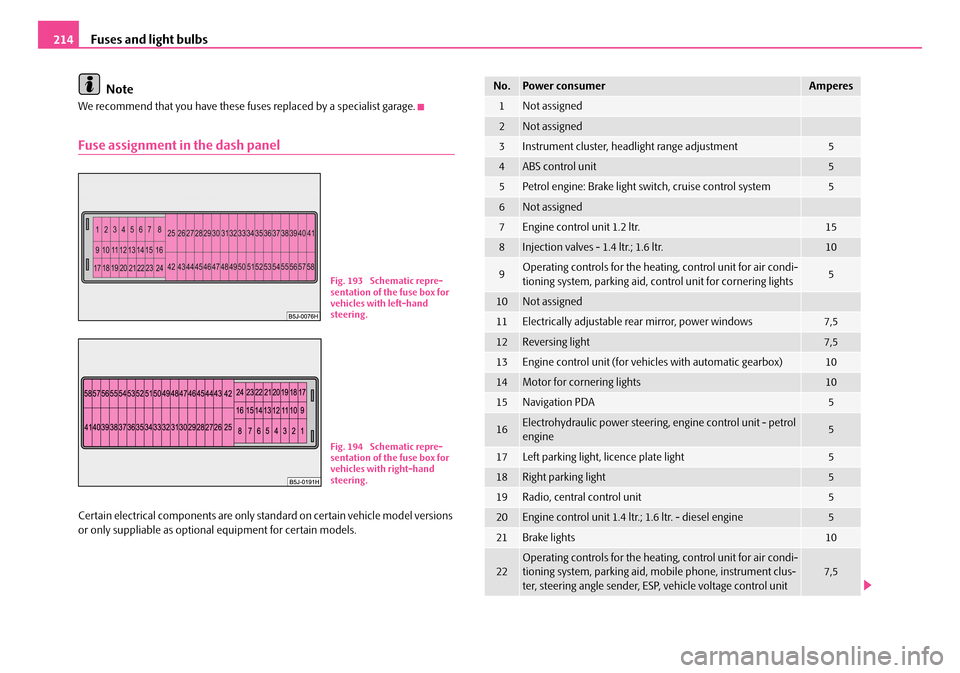
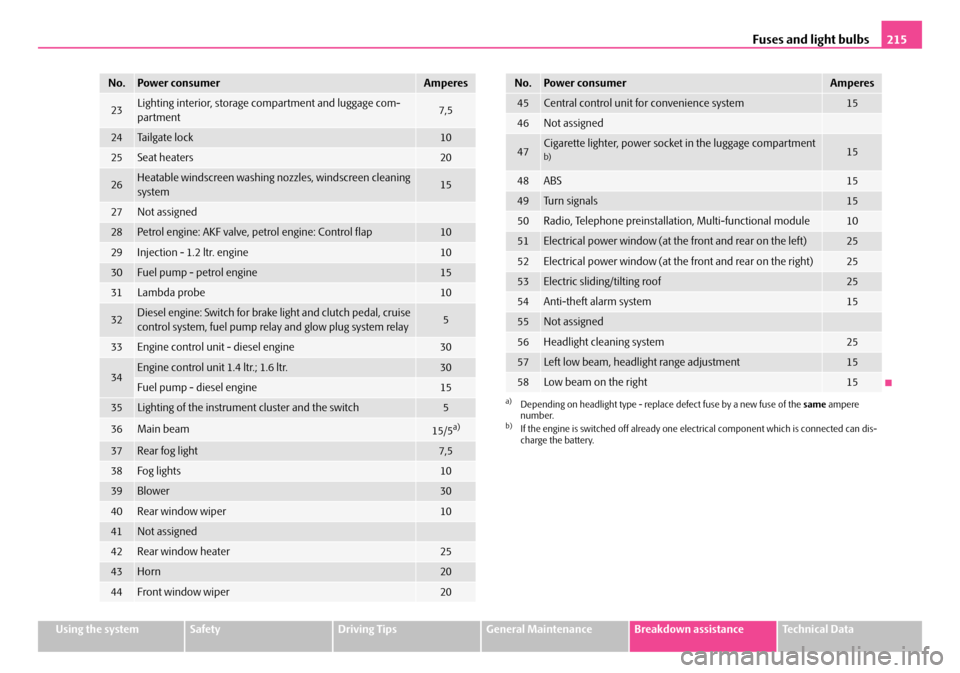
Fuse assignment in the dash panel
Certain electrical components are only standard on certain vehicle model versions or only suppliable as optional equipment for certain models.
Fig. 193 Schematic repre-sentation of the fuse box for vehicles with left-hand steering.
Fig. 194 Schematic repre-sentation of the fuse box for vehicles with right-hand steering.
No.Power consumerAmperes
1Not assigned
2Not assigned
3Instrument cluster, headlight range adjustment5
4ABS control unit5
5Petrol engine: Brake light switch, cruise control system5
6Not assigned
7Engine control unit 1.2 ltr.15
8Injection valves - 1.4 ltr.; 1.6 ltr.10
9Operating controls for the heating, control unit for air condi-tioning system, parking aid, control unit for cornering lights5
10Not assigned
11Electrically adjustable rear mirror, power windows7,5
12Reversing light7,5
13Engine control unit (for vehicles with automatic gearbox)10
14Motor for cornering lights10
15Navigation PDA5
16Electrohydraulic power steering, engine control unit - petrol engine5
17Left parking light, licence plate light5
18Right parking light5
19Radio, central control unit5
20Engine control unit 1.4 ltr.; 1.6 ltr. - diesel engine5
21Brake lights10
22Operating controls for the heating, control unit for air condi-tioning system, parking aid, mobile phone, instrument clus-ter, steering angle sender, ESP, vehicle voltage control unit7,5
NKO A05F 20.book Page 214 Wednesday, April 2, 2008 1:02 PM
Page 216 of 252
Fuses and light bulbs215
Using the systemSafetyDriving TipsGeneral MaintenanceBreakdown assistanceTechnical Data
23Lighting interior, storage compartment and luggage com-partment7,5
24Tailgate lock10
25Seat heaters20
26Heatable windscreen washing nozzles, windscreen cleaning system15
27Not assigned
28Petrol engine: AKF valve, petrol engine: Control flap10
29Injection - 1.2 ltr. engine10
30Fuel pump - petrol engine15
31Lambda probe10
32Diesel engine: Switch for brake light and clutch pedal, cruise control system, fuel pump relay and glow plug system relay5
33Engine control unit - diesel engine30
34Engine control unit 1.4 ltr.; 1.6 ltr.30
Fuel pump - diesel engine15
35Lighting of the instrument cluster and the switch5
36Main beam15/5a)
37Rear fog light7,5
38Fog lights10
39Blower30
40Rear window wiper10
41Not assigned
42Rear window heater25
43Horn20
44Front window wiper20
No.Power consumerAmperes
45Central control unit for convenience system15
46Not assigned
47Cigarette lighter, power socket in the luggage compartment b)15
48ABS15
49Turn signals15
50Radio, Telephone preinstallation, Multi-functional module10
51Electrical power window (at the front and rear on the left)25
52Electrical power window (at the front and rear on the right)25
53Electric sliding/tilting roof25
54Anti-theft alarm system15
55Not assigned
56Headlight cleaning system25
57Left low beam, headlight range adjustment15
58Low beam on the right15
a)Depending on headlight type - replace defect fuse by a new fuse of the same ampere number.b)If the engine is switched off already one electrical component which is connected can dis-charge the battery.
No.Power consumerAmperes
NKO A05F 20.book Page 215 Wednesday, April 2, 2008 1:02 PM
Page 245 of 252
Index244
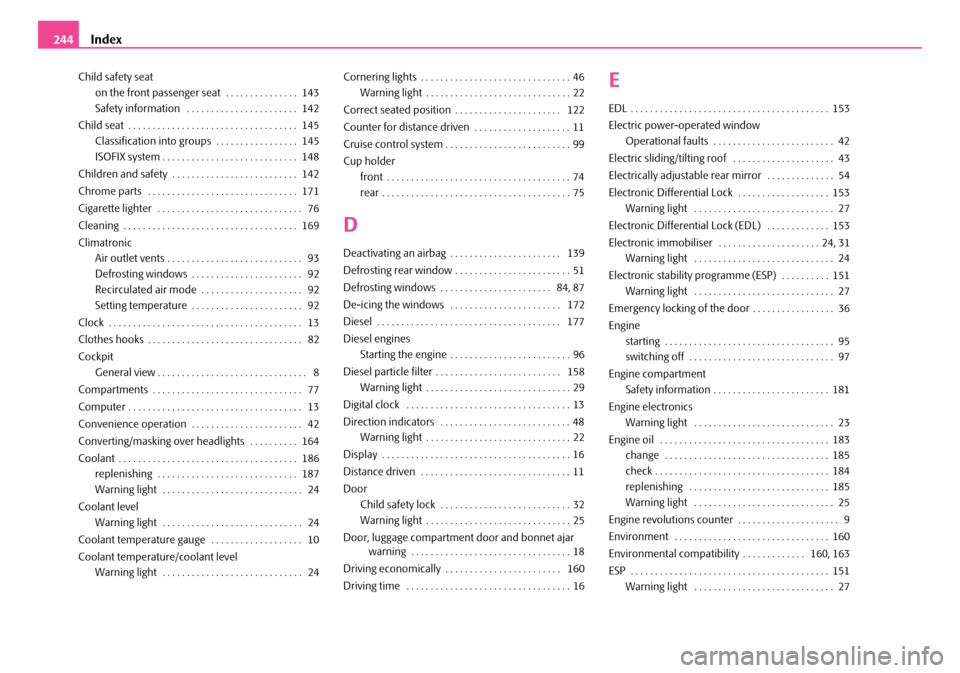
Child safety seat
on the front passenger seat . . . . . . . . . . . . . . . 143
Safety information . . . . . . . . . . . . . . . . . . . . . . . 142
Child seat . . . . . . . . . . . . . . . . . . . . . . . . . . . . . . . . . . . 145
Classification into groups . . . . . . . . . . . . . . . . . 145
ISOFIX system . . . . . . . . . . . . . . . . . . . . . . . . . . . . 148
Children and safety . . . . . . . . . . . . . . . . . . . . . . . . . . 142
Chrome parts . . . . . . . . . . . . . . . . . . . . . . . . . . . . . . . 171
Cigarette lighter . . . . . . . . . . . . . . . . . . . . . . . . . . . . . . 76
Cleaning . . . . . . . . . . . . . . . . . . . . . . . . . . . . . . . . . . . . 169
Climatronic
Air outlet vents . . . . . . . . . . . . . . . . . . . . . . . . . . . . 93
Defrosting windows . . . . . . . . . . . . . . . . . . . . . . . 92
Recirculated air mode . . . . . . . . . . . . . . . . . . . . . 92
Setting temperature . . . . . . . . . . . . . . . . . . . . . . . 92
Clock . . . . . . . . . . . . . . . . . . . . . . . . . . . . . . . . . . . . . . . . 13
Clothes hooks . . . . . . . . . . . . . . . . . . . . . . . . . . . . . . . . 82
Cockpit
General view . . . . . . . . . . . . . . . . . . . . . . . . . . . . . . . 8
Compartments . . . . . . . . . . . . . . . . . . . . . . . . . . . . . . . 77
Computer . . . . . . . . . . . . . . . . . . . . . . . . . . . . . . . . . . . . 13
Convenience operation . . . . . . . . . . . . . . . . . . . . . . . 42
Converting/masking over headlights . . . . . . . . . . 164
Coolant . . . . . . . . . . . . . . . . . . . . . . . . . . . . . . . . . . . . . 186
replenishing . . . . . . . . . . . . . . . . . . . . . . . . . . . . . 187
Warning light . . . . . . . . . . . . . . . . . . . . . . . . . . . . . 24
Coolant level
Warning light . . . . . . . . . . . . . . . . . . . . . . . . . . . . . 24
Coolant temperature gauge . . . . . . . . . . . . . . . . . . . 10
Coolant temperature/coolant level
Warning light . . . . . . . . . . . . . . . . . . . . . . . . . . . . . 24
Cornering lights . . . . . . . . . . . . . . . . . . . . . . . . . . . . . . . 46
Warning light . . . . . . . . . . . . . . . . . . . . . . . . . . . . . . 22
Correct seated position . . . . . . . . . . . . . . . . . . . . . . 122
Counter for distance driven . . . . . . . . . . . . . . . . . . . . 11
Cruise control system . . . . . . . . . . . . . . . . . . . . . . . . . . 99
Cup holder
front . . . . . . . . . . . . . . . . . . . . . . . . . . . . . . . . . . . . . . 74
rear . . . . . . . . . . . . . . . . . . . . . . . . . . . . . . . . . . . . . . . 75
D
Deactivating an airbag . . . . . . . . . . . . . . . . . . . . . . . 139
Defrosting rear window . . . . . . . . . . . . . . . . . . . . . . . . 51
Defrosting windows . . . . . . . . . . . . . . . . . . . . . . . 84, 87
De-icing the windows . . . . . . . . . . . . . . . . . . . . . . . 172
Diesel . . . . . . . . . . . . . . . . . . . . . . . . . . . . . . . . . . . . . . 177
Diesel engines
Starting the engine . . . . . . . . . . . . . . . . . . . . . . . . . 96
Diesel particle filter . . . . . . . . . . . . . . . . . . . . . . . . . . 158
Warning light . . . . . . . . . . . . . . . . . . . . . . . . . . . . . . 29
Digital clock . . . . . . . . . . . . . . . . . . . . . . . . . . . . . . . . . . 13
Direction indicators . . . . . . . . . . . . . . . . . . . . . . . . . . . 48
Warning light . . . . . . . . . . . . . . . . . . . . . . . . . . . . . . 22
Display . . . . . . . . . . . . . . . . . . . . . . . . . . . . . . . . . . . . . . . 16
Distance driven . . . . . . . . . . . . . . . . . . . . . . . . . . . . . . . 11
Door
Child safety lock . . . . . . . . . . . . . . . . . . . . . . . . . . . 32
Warning light . . . . . . . . . . . . . . . . . . . . . . . . . . . . . . 25
Door, luggage compartment door and bonnet ajar warning . . . . . . . . . . . . . . . . . . . . . . . . . . . . . . . . . 18
Driving economically . . . . . . . . . . . . . . . . . . . . . . . . 160
Driving time . . . . . . . . . . . . . . . . . . . . . . . . . . . . . . . . . . 16
E
EDL . . . . . . . . . . . . . . . . . . . . . . . . . . . . . . . . . . . . . . . . . 153
Electric power-operated window
Operational faults . . . . . . . . . . . . . . . . . . . . . . . . . 42
Electric sliding/tilting roof . . . . . . . . . . . . . . . . . . . . . 43
Electrically adjustable rear mirror . . . . . . . . . . . . . . 54
Electronic Differential Lock . . . . . . . . . . . . . . . . . . . 153
Warning light . . . . . . . . . . . . . . . . . . . . . . . . . . . . . 27
Electronic Differential Lock (EDL) . . . . . . . . . . . . . 153
Electronic immobiliser . . . . . . . . . . . . . . . . . . . . . 24, 31
Warning light . . . . . . . . . . . . . . . . . . . . . . . . . . . . . 24
Electronic stability programme (ESP) . . . . . . . . . . 151
Warning light . . . . . . . . . . . . . . . . . . . . . . . . . . . . . 27
Emergency locking of the door . . . . . . . . . . . . . . . . . 36
Engine
starting . . . . . . . . . . . . . . . . . . . . . . . . . . . . . . . . . . . 95
switching off . . . . . . . . . . . . . . . . . . . . . . . . . . . . . . 97
Engine compartment
Safety information . . . . . . . . . . . . . . . . . . . . . . . . 181
Engine electronics
Warning light . . . . . . . . . . . . . . . . . . . . . . . . . . . . . 23
Engine oil . . . . . . . . . . . . . . . . . . . . . . . . . . . . . . . . . . . 183
change . . . . . . . . . . . . . . . . . . . . . . . . . . . . . . . . . . 185
check . . . . . . . . . . . . . . . . . . . . . . . . . . . . . . . . . . . . 184
replenishing . . . . . . . . . . . . . . . . . . . . . . . . . . . . . 185
Warning light . . . . . . . . . . . . . . . . . . . . . . . . . . . . . 25
Engine revolutions counter . . . . . . . . . . . . . . . . . . . . . 9
Environment . . . . . . . . . . . . . . . . . . . . . . . . . . . . . . . . 160
Environmental compatibility . . . . . . . . . . . . . 160, 163
ESP . . . . . . . . . . . . . . . . . . . . . . . . . . . . . . . . . . . . . . . . . 151
Warning light . . . . . . . . . . . . . . . . . . . . . . . . . . . . . 27
NKO A05F 20.book Page 244 Wednesday, April 2, 2008 1:02 PM