heating SKODA FABIA 2012 2.G / 5J Owner's Guide
[x] Cancel search | Manufacturer: SKODA, Model Year: 2012, Model line: FABIA, Model: SKODA FABIA 2012 2.G / 5JPages: 196, PDF Size: 4.83 MB
Page 83 of 196
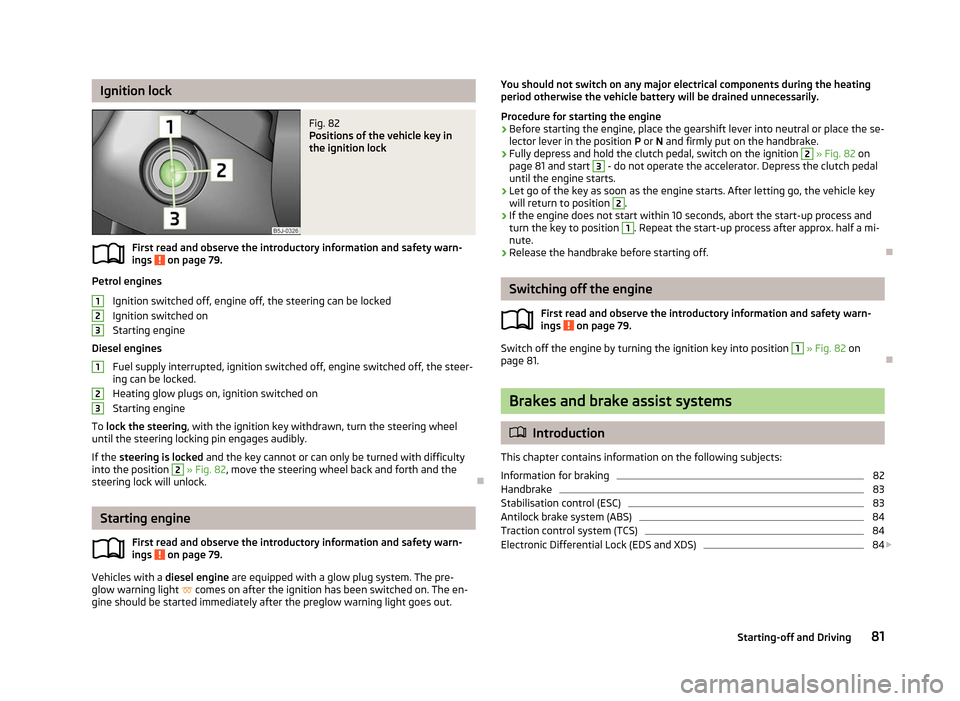
Ignition lock
Fig. 82
Positions of the vehicle key in
the ignition lock
First read and observe the introductory information and safety warn-
ings on page 79.
Petrol engines
Ignition switched off, engine off, the steering can be locked
Ignition switched on
Starting engine
Diesel engines Fuel supply interrupted, ignition switched off, engine switched off, the steer-
ing can be locked.
Heating glow plugs on, ignition switched on
Starting engine
To lock the steering , with the ignition key withdrawn, turn the steering wheel
until the steering locking pin engages audibly.
If the steering is locked and the key cannot or can only be turned with difficulty
into the position 2
» Fig. 82, move the steering wheel back and forth and the
steering lock will unlock. ÐStarting engine
First read and observe the introductory information and safety warn-
ings on page 79.
Vehicles with a diesel engine are equipped with a glow plug system. The pre-
glow warning light comes on after the ignition has been switched on. The en-
gine should be started immediately after the preglow warning light goes out.
ä 1
2
3
1
2
3
ä You should not switch on any major electrical components during the heating
period otherwise the vehicle battery will be drained unnecessarily.
Procedure for starting the engine
› Before starting the engine, place the gearshift lever into neutral or place the se-
lector lever in the position P or N and firmly put on the handbrake.
› Fully depress and hold the clutch pedal, switch on the ignition 2
» Fig. 82 on
page 81 and start 3
- do not operate the accelerator. Depress the clutch pedal
until the engine starts.
› Let go of the key as soon as the engine starts. After letting go, the vehicle key
will return to position 2
.
› If the engine does not start within 10
seconds, abort the start-up process and
turn the key to position 1
. Repeat the start-up process after approx. half a mi-
nute.
› Release the handbrake before starting off. Ð Switching off the engine
First read and observe the introductory information and safety warn-
ings on page 79.
Switch off the engine by turning the ignition key into position 1
» Fig. 82
on
page 81. Ð Brakes and brake assist systems
ä
Introduction
This chapter contains information on the following subjects:
Information for braking 82
Handbrake 83
Stabilisation control (ESC) 83
Antilock brake system (ABS) 84
Traction control system (TCS) 84
Electronic Differential Lock (EDS and XDS) 84
£
ä
81
Starting-off and Driving
Page 84 of 196
WARNING
■ The brake booster only operates when the engine is running. Greater physi-
cal effort for braking is required when the engine is switched off - risk of acci-
dent!
■ Depress the clutch pedal when stopping or braking a vehicle with a petrol
engine and manual transmission in the low rev range. If you fail to do so, the
functionality of the brake booster can be impaired - risk of accident!
■ If a front spoiler, full wheel trim, etc. is mounted retrospectively, it must be
ensured that the air supply to the front wheel brakes is not reduced. Other-
wise, the functionality of the brake system could be impaired - risk of acci-
dent! ■ Please note that the handbrake must be fully released. A handbrake which
is only partially released can result in the rear brakes overheating, which can
have a negative effect on the operation of the brake system - risk of accident!
■ Never leave children unattended in the vehicle. The children might, for ex-
ample, release the handbrake or take the vehicle out of gear. The vehicle
might then move off - risk of accident!
■ A lack of fuel can cause irregular engine running or cause the engine to shut
down. The brake assist systems would then be without function - risk of acci-
dent! ■ Adjust the speed and driving style to the current visibility, weather, road and
traffic conditions. The increased safety offered by the brake assist systems
must not tempt you to take greater risks than otherwise - risk of an accident!
■ The normal braking system is still fully functional if there is an ABS fault.
Visit a ŠKODA specialist garage immediately and adjust your style of driving
according to the damage to the ABS as you will not know how great the dam-
age is and the limitation it is placing on the braking efficiency. CAUTION
■ Observe the recommendations on the new brake pads » page 121.
■ Never let the brakes slip with light pressure on the pedal if braking is not neces-
sary. This causes the brakes to overheat and can also result in a longer braking
distance and excessive wear. ■ All four wheels must be fitted with the same tyres approved by the manufactur-
er to ensure the brake assist systems operate correctly. Note
■ If the brakes are applied in full and the control unit for the braking system con-
siders the situation to be dangerous for the following traffic, the brake light
flashes automatically. After the speed was reduced below around 10
km/h or the
vehicle was stopped, the brake light stops flashing and the hazard warning light
system switches on. The hazard warning light system is switched off automatical-
ly after accelerating or driving off again. ■ Before negotiating a steep downhill section, reduce the speed, shift down into
the next lower gear (manual gearbox) or select a lower drive position (automatic
gearbox). As a result, the braking effect of the engine will be used, reducing the
load on the brakes. Any additional braking should be completed intermittently,
not continuously. ■ Changes to the vehicle (e.g. to the engine, brakes, chassis or another combina-
tion of tyres and wheels) can influence the functionality of the brake assist sys-
tems »
page 157, Accessories, changes and replacement of parts .
■ If a fault occurs in the ABS system, the ESC, ASR and EDL and XDS also do not
work. A warning light » page 21 comes on if a fault occurs in the ABS system. Ð Information for braking
First read and observe the introductory information and safety warn-
ings on page 81.
Wear-and-tear
The wear of the brake pads is dependent on the operating conditions and driving
style. The brake pads wear more quickly if a lot of journeys are completed in
towns and over short distances or if a very sporty style of driving is adopted. If
operated under severe conditions, the thickness of the brake pads must be
checked by a ŠKODA specialist garage before the next service appointment.
Wet roads or road salt
The performance of the brakes can be delayed as the brake discs and brake pads
may be moist or have a coating of ice or layer of salt on them in winter. The
brakes are cleaned and dried by applying the brakes several times.
Corrosion
Corrosion on the brake discs and dirt on the bake pads occur if the vehicle has
been parked for a long period and if you do not make much use of the braking
system. If the brake system is not used much or if there is corrosion on the sur-
face, we recommend cleaning the brake discs by firmly applying the brakes from a
fairly high speed. £
ä
82 Using the system
Page 92 of 196
Automatic gearbox
Automatic gearbox
ä
Introduction
This chapter contains information on the following subjects:
Introductory information 90
Starting-off and driving 91
Selector lever positions 91
Manual shifting of gears (Tiptronic) 92
Selector lever lock 93
Kickdown function 93
Dynamic shift programme 93
Emergency programme 94
Selector lever-emergency unlocking 94
WARNING
■ Do not depress the accelerator if changing the position of the selector lever
when the vehicle is stationary and the engine is running - risk of accident!
■ Never move the selector lever into position R or P when driving - risk of an
accident!
■ When the engine is running and the vehicle is stationary, it is necessary to
hold the car with the brake pedal in all the positions of the selector lever (ex-
cept P and N) since the power transmission is never completely interrupted,
also not when the engine is idling - the vehicle creeps.
■ The selector lever must be placed into position P and the handbrake firmly
applied before the bonnet can be opened and work on the running engine can
be completed - risk of accident! The safety guidelines must always be ob-
served » page 138, Engine compartment . WARNING (Continued)
■ If stopping on a hill (downhill gradient), never try to maintain the vehicle sta-
tionary with the gear engaged by means of the
“accelerator pedal”, i.e. by let-
ting the clutch slip. This can lead to overheating of the clutch. If there is a risk
of overheating of the clutch due to overload, the clutch is opened automati-
cally and the vehicle rolls backward - risk of accident!
■ If you have to stop on a slope, depress and hold the brake pedal to prevent
the vehicle from rolling back.
■ On a smooth or slippery road surface using the kickdown function can cause
the driven wheels to spin - risk of skidding! CAUTION
■ The double clutch on the automatic gearbox DSG is equipped with an overload
protection. If the uphill function is used when the vehicle is stationary or driving
slowly uphill, the thermal stress on the clutches is increased. ■ If the clutch system overheats, the symbol is shown in the information dis-
play along with the message Gearbox overheated. Stop! Owner's man.! appears.
An audible signal sounds as a warning signal. Stop the vehicle, switch off the en-
gine, and wait until the symbol disappears - risk of gearbox damage! You can
continue your journey as soon as the symbol disappears. Ð Introductory information
First read and observe the introductory information and safety warn-
ings on page 90.
Shifting up and down through the gears is performed automatically. The gearbox
can also be switched to
Tiptronic mode. This mode makes it possible for you to
also shift gears manually » page 92.
The engine can only be started when the selector lever is in position P or N . If
the selector lever is not in the P or N positions when locking the steering, switch-
ing the ignition on or off or when leaving the engine on, the following message
will appear in the Information display Move selector lever to position P/N! or, in
the instrument cluster display: P/N
.
At temperatures below -10 °C the engine can only be started in the selector lever
position P 1)
. £
ä
1)
Applies to DSG.
90 Using the system
Page 130 of 196
Immediately reduce your speed as soon as even the slightest swaying of the trail-
er is detected. Never attempt to stop the trailer from “swaying” by accelerating.
Brakes
Apply the brakes in good time! If the trailer is fitted with a trailer brake, apply the
brakes gently at first, then brake firmly. This will avoid brake jolts resulting from
the trailer wheels locking. On downhill sections shift down a gear in good time to
also use the engine as a brake.
Trailer is connected to the anti-theft alarm system.
› If the vehicle is factory-fitted with an anti-theft alarm system and a towing de-
vice.
› If the trailer is electrically connected to the towing vehicle by means of the trail-
er socket.
› If the electrical system of the vehicle and trailer is fully functional.
› If the vehicle is locked with the car key and the anti-theft alarm system is acti-
vated.
When the vehicle is locked, the alarm is activated as soon as the electrical con-
nection to the trailer is interrupted.
Always deactivate the anti-theft alarm system before a trailer is connected/dis-
connected. Otherwise, the anti-theft alarm system could accidentally be trig-
gered » page 31 , Anti-theft alarm system .
Engine overheating
If the needle for the coolant temperature gauge moves into the right-hand area
or the red area of the scale, the speed must be reduced immediately. Stop and
switch off the engine if the warning light in the instrument cluster starts to
flash. Wait a few minutes and check the level of coolant in the coolant expansion
bottle » page 143, Checking the coolant level .
The following guidelines must be observed » page 19, Coolant temperature/cool-
ant level .
The coolant temperature can be reduced by switching on the heating. WARNING
■ Adapt your speed to the conditions of the road surface and to the traffic sit-
uation.
■ Improper or incorrectly connected electric cables can energise the trailer and
cause functional faults to the vehicle's entire electrical system as well as acci-
dents and severe injuries.
■ Any work on the electrical system must be carried out only by ŠKODA spe-
cialist garages.
■ Never directly connect the trailer's electrical system with the electrical con-
nections for the tail lights or other current sources. CAUTION
■ Avoid abrupt and sudden driving/braking manoeuvres.
■ When the ball rod is removed, the mounting shaft must be sealed with an ap-
propriate cover. This prevents foreign matter from penetrating into the mounting
shaft. See the fitting instructions for the towing device. Note
■ We recommend that you also have your vehicle inspected between service in-
tervals if you tow a trailer frequently. ■ The handbrake on the towing vehicle must be put on when coupling and decou-
pling the trailer.
■ For technical reasons, trailers with rear LED lights cannot be connected to the
anti-theft alarm system. Ð
128 Driving Tips
Page 131 of 196
General Maintenance
Taking care of and cleaning the vehicle
Taking care of your vehicle
ä
Introduction
This chapter contains information on the following subjects:
Washing the vehicle 130
Automatic car wash systems 130
Washing by hand 130
Washing with a high-pressure cleaner 130
Preserving and polishing the vehicle paintwork 131
Chrome parts 131
Paint damage 131
Plastic parts 131
De-icing windows and exterior mirrors 132
Radio reception and aerial 132
Headlight lenses 132
Rubber seals 132
Door lock cylinders 132
Wheels 133
Underbody protection 133
Protection of hollow spaces 133
Artificial leather and materials 134
Fabric covers on electrically heated seats 134
Natural leather 134
Seat belts 135
Regular and proper care help to retain the efficiency and value of your vehicle. It
may also be one of the requirements for the acceptance of warranty claims relat-
ing to corrosion damage and paint defects on the bodywork.
We recommend using care products from
ŠKODA Original Accessories that are
available from ŠKODA Service Partners. The instructions for use on the package
must be observed. WARNING
■ Care products may be harmful to your health if not used according to the in-
structions.
■ Always store care products in a safe place, out of the reach of children - risk
of poisoning! ■ When washing your vehicle in the winter: Water and ice in the brake system
can affect the braking efficiency - risk of accident! ■ Only wash the vehicle when the ignition is switched off - risk of accident!
■ Protect your hands and arms from sharp-edged metal parts when cleaning
the underfloor, the inside of the wheel housings or the wheel trims - risk of
cuts!
■ Air fresheners and scents can be hazardous to heath when the temperature
inside the vehicle is high. CAUTION
■ Be sure to check clothing for colourfastness to avoid any damage or visible
stains on the material (leather), panels and textiles.
■ Cleaners containing solvents can damage the material being cleaned.
■ Do not wash your vehicle in bright sunlight - risk of paint damage.
■ If washing the vehicle in the winter using a hose or high-pressure cleaner, en-
sure that the jet of water is not aimed directly at the locking cylinders or the
door/panel joints - risk of freezing!
■ Do not use any insect sponges, rough kitchen sponges or similar cleaning prod-
ucts - risk of damaging the surface of paintwork.
■ Do not stick any stickers on the inside of the rear windows, the rear side win-
dows and in the vicinity of the heating elements on the windscreen or near the
window aerial. These may get damaged. With regard to the antenna, they may in-
terfere with the radio or navigation system.
■ Do not clean the inside of the windows with sharp-edged objects or corrosive
and acidic cleaning agents - risk of damaging the heating elements or window
aerial.
■ Do not attach scents and air fresheners to the dashboard - risk of damage to
the dashboard.
■ To avoid damaging the parking aid sensors while cleaning with high-pressure
cleaners or steam jets, the sensors must only be directly sprayed for short periods
while a minimum distance of 10
cm must be observed.
■ Do not clean the roof trim with a brush - risk of damage to the trim surface. £
129
Taking care of and cleaning the vehicle
Page 136 of 196
Artificial leather and materials
First read and observe the introductory information and safety warn-
ings on page 129.
The artificial leather can be cleaned using a damp cloth. If this does not prove to
be adequate, these parts can only be treated with special
solvent-free plastic
cleaning and care products .
Clean upholstery cover materials and cloth trims on doors, boot cover, etc. using
specific cleaning agents, e.g., dry foam. Use a soft sponge, brush, or commercially
available microfibre cloth. Use a cloth and a specific cleaning agent to clean the
roof trim.
Some clothing materials, such as dark denim, do, in part, not have sufficient col-
our fastness. This can cause damage or clearly visible discolouration to seat cov-
ers (fabric or leather) even when used correctly. This particularly applies to light
seat covers (fabric or leather). This is not a defect in the seat cover, but poor col-
our fastness of the clothing textiles. ÐFabric covers on electrically heated seats
First read and observe the introductory information and safety warn-
ings on page 129.
Do not clean the seat covers
using moisture as this can damage the seat heating
system.
Use a specific cleaning agent such as dry foam or similar to clean the covers. ÐNatural leather
First read and observe the introductory information and safety warn-
ings on page 129.
Depending on the amount of wear-and-tear, the leather should be cleaned on a
regular basis.
Normal cleaning
Clean soiled areas of the leather with slightly moistened cotton or woollen cloth.
ä
ä
ä
Severe soiling
Ensure that the leather is not soaked through at any point and that no water gets
into the stitching of the seams.
Dry off the leather with a soft, dry cloth.
Removing stains
Remove fresh water-based stains (e.g., coffee, tea, juices, blood) with an absorb-
ent cloth or household cleaning paper. A specific cleaning agent is required for
dried-on stains.
Remove fresh grease-based stains (e.g. butter, mayonnaise, chocolate, etc.) with
an absorbent cloth, household cleaning paper, or use a suitable cleaner if the
stain has not yet penetrated into the surface.
Use a grease solvent for grease stains which have dried in .
Remove specific stains (e.g. ball-point pens, marker pen, nail varnish, dispersion
paint, shoe polish, etc.) with a special stain remover suitable for leather.
Leather care
Treat the leather roughly every six months with a suitable leather care product.
Apply only a small amount of the cleaning and care product.
Dry off the leather with a soft, dry cloth. CAUTION
■ Avoid leaving the vehicle for lengthy periods in bright sunlight to avoid the
leather from bleaching. If the vehicle is parked in the open for lengthy periods,
protect the leather from direct sunlight by covering it.
■ Sharp-edged objects on items of clothing such as zip fasteners, rivets, sharp-
edged belts, jewellery and pendants may leave permanent scratches or signs of
rubbing on the surface.
■ The use of a mechanical steering wheel lock may damage the leather surface of
the steering wheel. Note
■ Use a care cream with light blocker and impregnation effect on a regular basis
and each time after cleaning. The cream nourishes the leather, allows it to
breathe and keeps it supple and also provides moisture. It also creates surface
protection. ■ Clean the leather every 2 to 3 months, remove any fresh stains as they occur. £
134 General Maintenance
Page 138 of 196
Inspecting and replenishing
Fuel
ä
Introduction
This chapter contains information on the following subjects:
Refuelling 136
Unleaded petrol 137
Diesel fuel 138
The correct type of fuel for your vehicle and the tyre size and inflation pressure
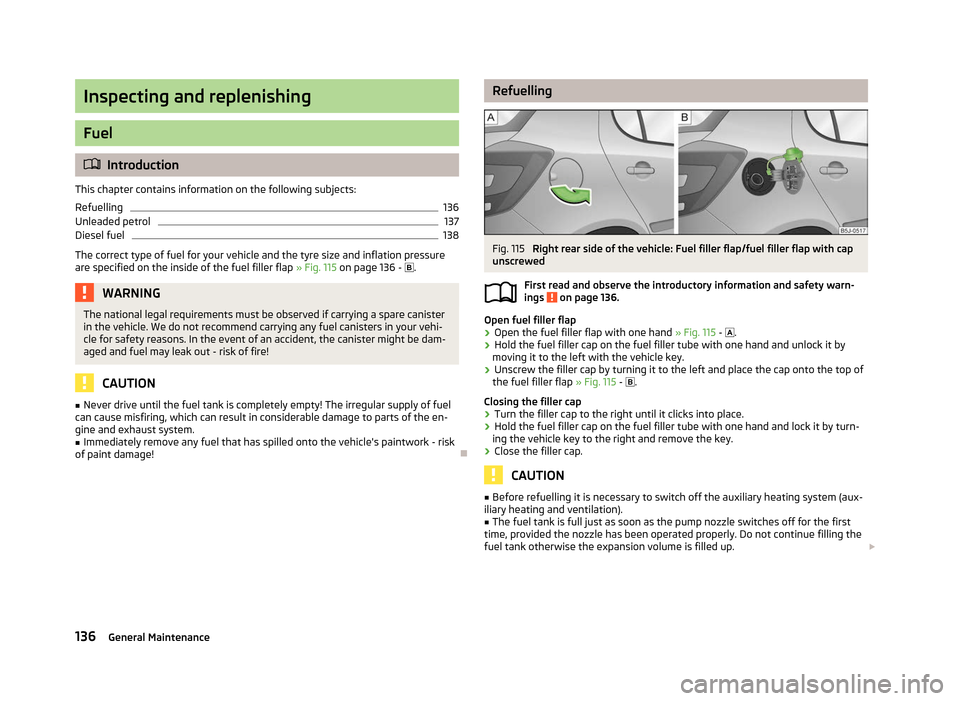
are specified on the inside of the fuel filler flap » Fig. 115 on page 136 - . WARNING
The national legal requirements must be observed if carrying a spare canister
in the vehicle. We do not recommend carrying any fuel canisters in your vehi-
cle for safety reasons. In the event of an accident, the canister might be dam-
aged and fuel may leak out - risk of fire! CAUTION
■ Never drive until the fuel tank is completely empty! The irregular supply of fuel
can cause misfiring, which can result in considerable damage to parts of the en-
gine and exhaust system. ■ Immediately remove any fuel that has spilled onto the vehicle's paintwork - risk
of paint damage! Ð Refuelling
Fig. 115
Right rear side of the vehicle: Fuel filler flap/fuel filler flap with cap
unscrewed
First read and observe the introductory information and safety warn-
ings on page 136.
Open fuel filler flap
› Open the fuel filler flap with one hand
» Fig. 115 - .
› Hold the fuel filler cap on the fuel filler tube with one hand and unlock it by
moving it to the left with the vehicle key.
› Unscrew the filler cap by turning it to the left and place the cap onto the top of
the fuel filler flap » Fig. 115 - .
Closing the filler cap
› Turn the filler cap to the right until it clicks into place.
› Hold the fuel filler cap on the fuel filler tube with one hand and lock it by turn-
ing the vehicle key to the right and remove the key.
› Close the filler cap. CAUTION
■ Before refuelling it is necessary to switch off the auxiliary heating system (aux-
iliary heating and ventilation).
■ The fuel tank is full just as soon as the pump nozzle switches off for the first
time, provided the nozzle has been operated properly. Do not continue filling the
fuel tank otherwise the expansion volume is filled up. £
ä
136 General Maintenance
Page 140 of 196
Diesel fuel
First read and observe the introductory information and safety warn-
ings on page 136.
Your vehicle can only be operated with
diesel fuel, which complies with the
standard EN
590 (standard DIN 51628 in Germany, standard ÖNORM C 1590 in
Austria, GOST R 52368-2005/EN 590:2004 in Russia).
Operation in winter - Winter-grade diesel fuel
In the winter, only use diesel fuel, which complies with the standard EN 590
(standard DIN 51628 in Germany, standard ÖNORM C 1590 in Austria,
GOST R 52368-2005/EN 590:2004 in Russia). “Winter-grade diesel fuel” will still
operate properly even at a temperature of -20 °C.
It is often the case in countries with different climatic conditions that diesel fuels
available have a different temperature characteristic. The ŠKODA Service Partners
and filling stations in the relevant country will be able to provide you with infor-
mation regarding the diesel fuels available.
Preheating fuel
The vehicle is fitted with a fuel filter preheating system. This secures operation of
a vehicle using diesel fuel down to an environmental temperature of -25 °C.
Fuel additives
Fuel additives, so-called “flow improvers” (petrol and similar products) must not
be added to the diesel fuel. CAUTION
■ Just filling the tank once with diesel fuel that does not comply with the stand-
ard, can cause severe damage to parts of the engine, the fuel and exhaust sys-
tem!
■ If a different fuel other than diesel fuel, which complies to the above mentioned
standards (e.g. petrol) is used by mistake do not start the engine or switch on the
ignition! Extensive damage to engine parts can occur! We recommend that the
fuel system is cleaned by a
ŠKODA Service Partner.
■ Water which has collected in the fuel filter can cause engine faults.
■ Your vehicle is not adapted for use of biofuel (RME), therefore this fuel must not
be refuelled and driven. The use of biofuel (RME) can cause considerable damage
to parts of the engine or fuel system. Ð
ä Engine compartment
ä
Introduction
This chapter contains information on the following subjects:
Opening and closing the bonnet 140
Engine compartment overview 140
Checking the engine oil level 141
Replenishing the engine oil 141
Changing engine oil 142
Coolant 142
Checking the coolant level 143
Replenishing the coolant 143
Radiator fan 144
Checking the brake fluid 144
Changing the brake fluid 144
Windscreen washer system 145
There is a risk of injuries, scalding, accidents and fire when working in the en-
gine compartment, e.g. inspecting and replenishing oil and other fluids. For this
reason, it is essential to comply with the warning instructions stated below and
with the general applicable rules of safety. The vehicle's engine compartment is
a hazardous area . WARNING
■ Never open the bonnet if you can see steam or coolant flowing out of the
engine compartment - risk of scalding! Wait until the steam or coolant has
stopped escaping.
■ Turn off the engine and withdraw the ignition key.
■ If the vehicle is fitted with a manual gearbox, move the gearshift lever into
Neutral, or if the vehicle is fitted with an automatic gearbox, move the selec-
tor lever into position P .
■ Firmly apply the handbrake.
■ Allow the engine to cool.
■ For safety reasons, the bonnet must always be properly closed when driving.
This is why after closing the bonnet, the lock must always be checked to en-
sure it has engaged properly. £
138 General Maintenance
Page 144 of 196
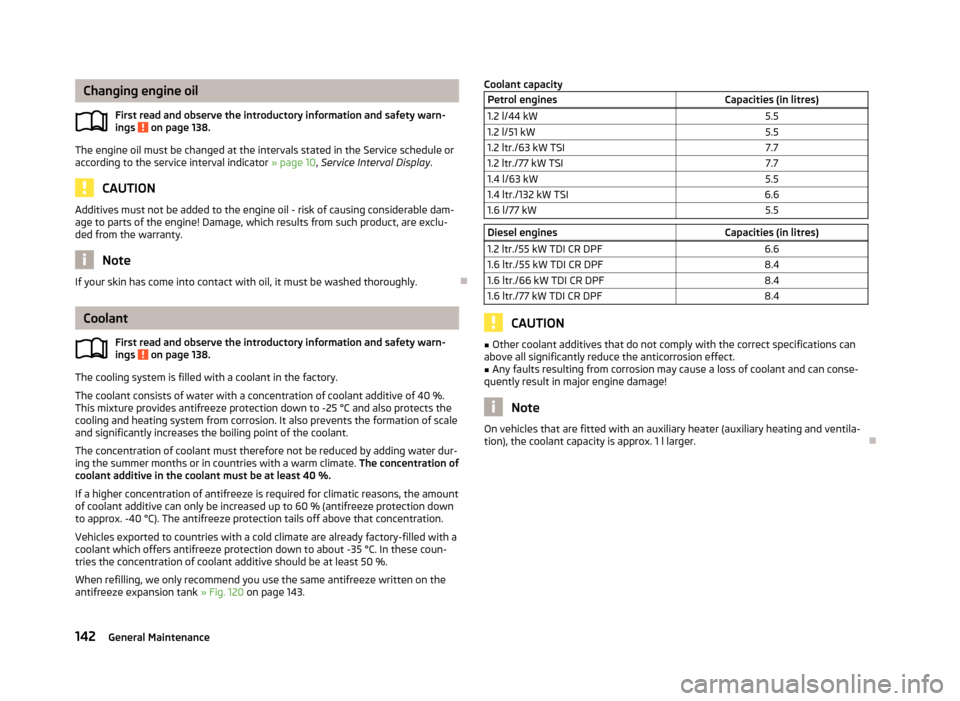
Changing engine oil
First read and observe the introductory information and safety warn-
ings on page 138.
The engine oil must be changed at the intervals stated in the Service schedule or
according to the service interval indicator
» page 10, Service Interval Display.CAUTION
Additives must not be added to the engine oil - risk of causing considerable dam-
age to parts of the engine! Damage, which results from such product, are exclu-
ded from the warranty. Note
If your skin has come into contact with oil, it must be washed thoroughly. ÐCoolant
First read and observe the introductory information and safety warn-
ings on page 138.
The cooling system is filled with a coolant in the factory.
The coolant consists of water with a concentration of coolant additive of 40 %.
This mixture provides antifreeze protection down to -25
°C and also protects the
cooling and heating system from corrosion. It also prevents the formation of scale
and significantly increases the boiling point of the coolant.
The concentration of coolant must therefore not be reduced by adding water dur-
ing the summer months or in countries with a warm climate. The concentration of
coolant additive in the coolant must be at least 40 %.
If a higher concentration of antifreeze is required for climatic reasons, the amount
of coolant additive can only be increased up to 60 % (antifreeze protection down
to approx. -40 °C). The antifreeze protection tails off above that concentration.
Vehicles exported to countries with a cold climate are already factory-filled with a
coolant which offers antifreeze protection down to about -35 °C. In these coun-
tries the concentration of coolant additive should be at least 50 %.
When refilling, we only recommend you use the same antifreeze written on the
antifreeze expansion tank » Fig. 120 on page 143.
ä
ä
Coolant capacity
Petrol engines Capacities (in litres)
1.2 l/44 kW 5.5
1.2 l/51 kW 5.5
1.2 ltr./63 kW TSI 7.7
1.2 ltr./77 kW TSI 7.7
1.4 l/63 kW 5.5
1.4 ltr./132 kW TSI 6.6
1.6 l/77 kW 5.5 Diesel engines
Capacities (in litres)
1.2 ltr./55 kW TDI CR DPF 6.6
1.6 ltr./55 kW TDI CR DPF 8.4
1.6 ltr./66 kW TDI CR DPF 8.4
1.6 ltr./77 kW TDI CR DPF 8.4 CAUTION
■ Other coolant additives that do not comply with the correct specifications can
above all significantly reduce the anticorrosion effect.
■ Any faults resulting from corrosion may cause a loss of coolant and can conse-
quently result in major engine damage! Note
On vehicles that are fitted with an auxiliary heater (auxiliary heating and ventila-
tion), the coolant capacity is approx. 1 l larger. Ð
142 General Maintenance
Page 166 of 196

›
Use the valve remover 1
to unscrew the valve core and place it on a clean sur-
face (rag, paper, etc.). ÐSealing and inflating tyres
First read and observe the introductory information and safety warn-
ings on page 162.
Sealing
›
Forcefully shake the tyre inflator bottle 10
» Fig. 137
on page 163 several times.
› Firmly screw the inflation hose 3
onto the tyre inflator bottle 10
in a clockwise
direction. The film on the cap is pierced automatically.
› Remove the plug from the inflation hose 3
and plug the open end fully onto
the tyre valve.
› Hold the bottle 10
with the bottom facing upwards and fill all of the sealing
agent from the tyre inflator bottle into the tyre.
› Remove the empty tyre inflator bottle from the valve.
› Screw the valve core back into the tyre valve using the valve remover 1
.
Inflating
› Screw the tyre inflation hose 5
» Fig. 137
on page 163 of the air compressor
firmly onto the tyre valve.
› Check that the air release valve 7
is closed.
› Start the engine and run it in idle.
› Plug the connector 9
into 12 Volt socket »
page 65, 12-volt power socket.
› Switch on the air compressor with the ON and OFF switch 8
.
› Allow the air compressor to run until a pressure of 2.0 - 2.5 bar is achieved.
Maximum run time of 8 minutes » !
› Switch off the air compressor.
› If you cannot reach an air pressure of 2.0 – 2.5 bar, unscrew the tyre inflation
hose 5
from the tyre valve.
› Drive the vehicle 10 metres forwards or backwards to allow the sealing agent to
“distribute” in the tyre.
› Firmly screw the tyre inflation hose 5
back onto the tyre valve and repeat the
inflation process.
› If you cannot reach the required tyre inflation pressure here either, this means
the tyre has sustained too much damage. You cannot seal with tyre with the
breakdown kit » .
› Switch off the air compressor.
› Remove the tyre inflation hose 5
from the tyre valve.
Once a tyre inflation pressure of 2.0
– 2.5 bar is achieved, continue the journey at
a maximum speed of 80 km/h (50 mph). ä
Check the tyre inflation pressure after driving for 10 minutes
» page 164. WARNING
■ During inflation, the tyre inflation hose and air compressor may get hot- risk
of injury!
■ Do not place the hot tyre inflation hose or hot air compressor on flammable
materials - risk of fire!
■ If you cannot inflate the tyre to at least 2.0 bar, this means the damage sus-
tained was too serious. The sealing agent cannot be used to seal the tyre.
Do not drive the vehicle. Get professional assistance! CAUTION
Switch off the air compressor after running 8 minutes at the latest - danger of
overheating! Allow the air compressor to cool a few minutes before switching it
on again. Ð Check after driving for 10 minutes
First read and observe the introductory information and safety warn-
ings on page 162.
Check the tyre inflation pressure after driving for 10 minutes!
If the tyre inflation pressure is 1.3 bar or less:
›
Do not drive the vehicle! You cannot properly seal with tyre with the break-
down kit.
› Get professional assistance.
If the tyre inflation pressure is 1.3 bar or more:
› Adjust the tyre inflation pressure to the correct value (see inside of fuel filler
cap).
› Continue driving carefully to the nearest ŠKODA specialist garage at a maxi-
mum speed of 80 km/h (50 mph). Ð
ä
164 Do-it-yourself