oil dipstick SKODA FABIA 2012 2.G / 5J Owner's Manual
[x] Cancel search | Manufacturer: SKODA, Model Year: 2012, Model line: FABIA, Model: SKODA FABIA 2012 2.G / 5JPages: 196, PDF Size: 4.83 MB
Page 142 of 196

Opening and closing the bonnet
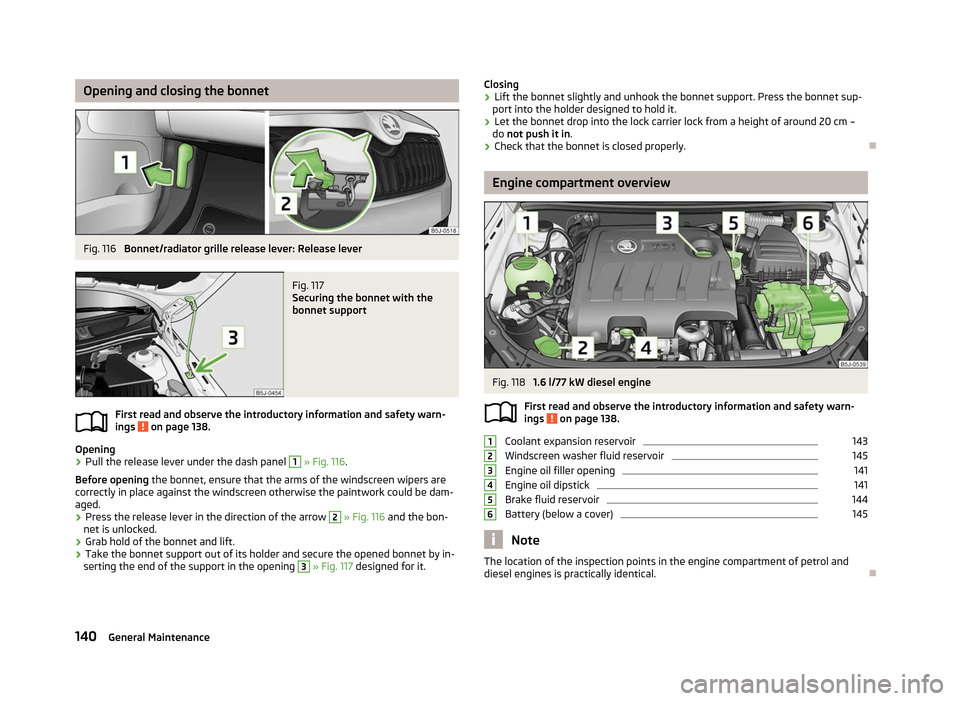
Fig. 116
Bonnet/radiator grille release lever: Release lever Fig. 117
Securing the bonnet with the
bonnet support
First read and observe the introductory information and safety warn-
ings on page 138.
Opening
›
Pull the release lever under the dash panel 1
» Fig. 116.
Before opening the bonnet, ensure that the arms of the windscreen wipers are
correctly in place against the windscreen otherwise the paintwork could be dam-
aged.
› Press the release lever in the direction of the arrow 2
» Fig. 116 and the bon-
net is unlocked.
› Grab hold of the bonnet and lift.
› Take the bonnet support out of its holder and secure the opened bonnet by in-
serting the end of the support in the opening 3
» Fig. 117
designed for it.
ä Closing
› Lift the bonnet slightly and unhook the bonnet support. Press the bonnet sup-
port into the holder designed to hold it.
› Let the bonnet drop into the lock carrier lock from a height of around 20 cm –
do not push it in .
› Check that the bonnet is closed properly. Ð Engine compartment overview
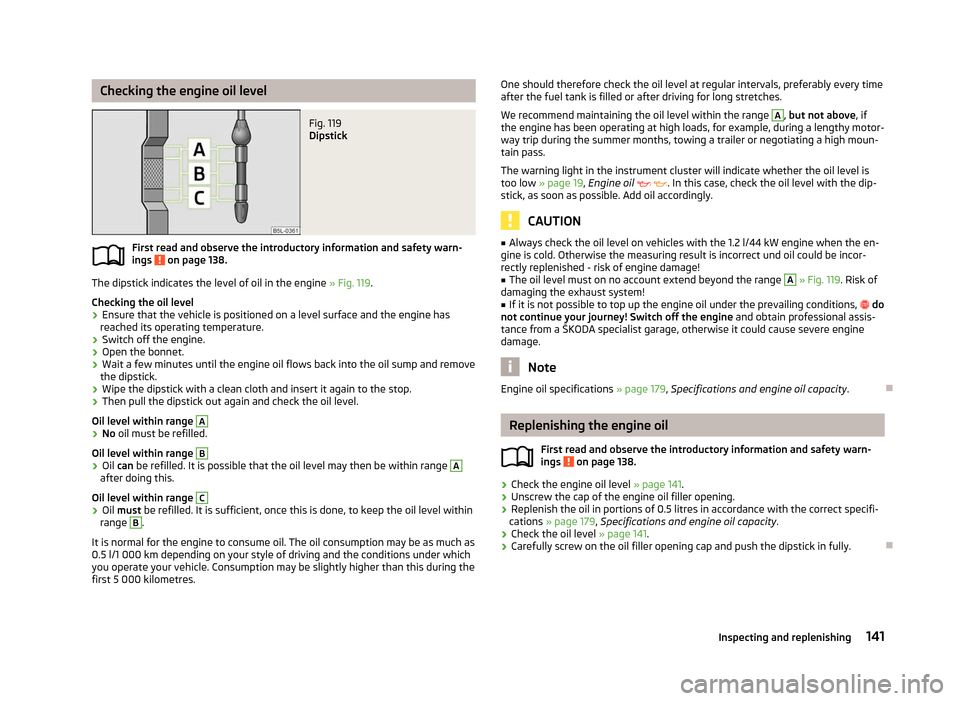
Fig. 118
1.6 l/77 kW diesel engine
First read and observe the introductory information and safety warn-
ings on page 138.
Coolant expansion reservoir 143
Windscreen washer fluid reservoir 145
Engine oil filler opening 141
Engine oil dipstick 141
Brake fluid reservoir 144
Battery (below a cover) 145
Note
The location of the inspection points in the engine compartment of petrol and
diesel engines is practically identical. Ð
ä 1
2
3
4
5
6
140
General Maintenance
Page 143 of 196

Checking the engine oil level
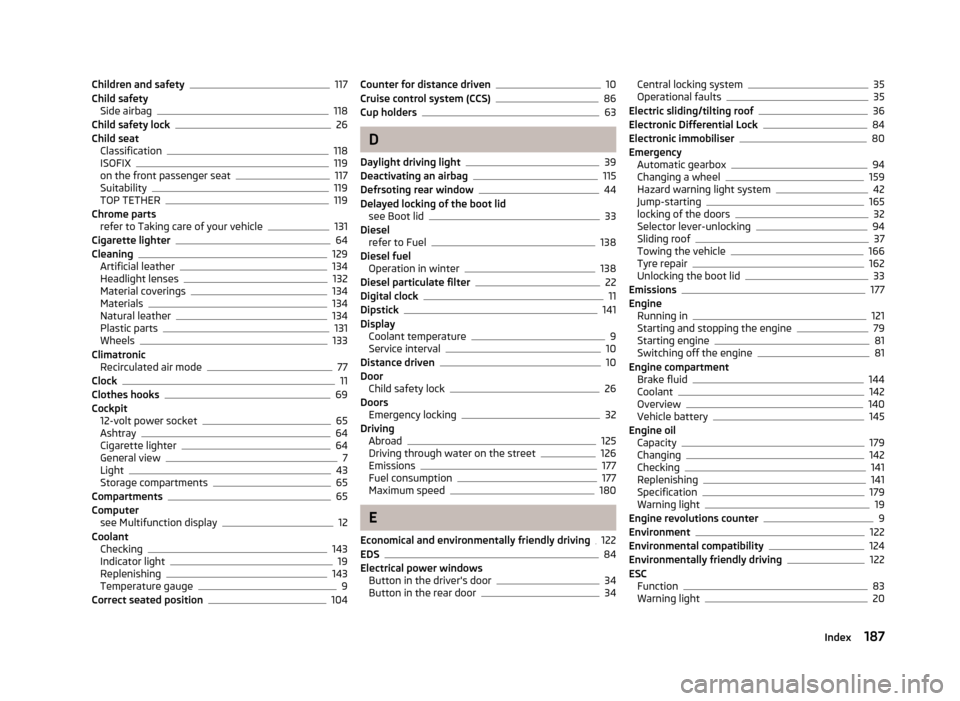
Fig. 119
Dipstick
First read and observe the introductory information and safety warn-
ings on page 138.
The dipstick indicates the level of oil in the engine
» Fig. 119.
Checking the oil level
› Ensure that the vehicle is positioned on a level surface and the engine has
reached its operating temperature.
› Switch off the engine.
› Open the bonnet.
› Wait a few minutes until the engine oil flows back into the oil sump and remove
the dipstick.
› Wipe the dipstick with a clean cloth and insert it again to the stop.
› Then pull the dipstick out again and check the oil level.
Oil level within range A
›
No oil must be refilled.
Oil level within range B
›
Oil can
be refilled. It is possible that the oil level may then be within range A
after doing this.
Oil level within range C
›
Oil must be refilled. It is sufficient, once this is done, to keep the oil level within
range B
.
It is normal for the engine to consume oil. The oil consumption may be as much as
0.5 l/1 000
km depending on your style of driving and the conditions under which
you operate your vehicle. Consumption may be slightly higher than this during the
first 5 000 kilometres. ä
One should therefore check the oil level at regular intervals, preferably every time
after the fuel tank is filled or after driving for long stretches.
We recommend maintaining the oil level within the range A
, but not above
, if
the engine has been operating at high loads, for example, during a lengthy motor-
way trip during the summer months, towing a trailer or negotiating a high moun-
tain pass.
The warning light in the instrument cluster will indicate whether the oil level is
too low » page 19 , Engine oil . In this case, check the oil level with the dip-
stick, as soon as possible. Add oil accordingly. CAUTION
■ Always check the oil level on vehicles with the 1.2
l/44 kW engine when the en-
gine is cold. Otherwise the measuring result is incorrect und oil could be incor-
rectly replenished - risk of engine damage!
■ The oil level must on no account extend beyond the range A
» Fig. 119. Risk of
damaging the exhaust system!
■ If it is not possible to top up the engine oil under the prevailing conditions, do
not continue your journey! Switch off the engine and obtain professional assis-
tance from a ŠKODA specialist garage, otherwise it could cause severe engine
damage. Note
Engine oil specifications » page 179, Specifications and engine oil capacity .Ð Replenishing the engine oil
First read and observe the introductory information and safety warn-
ings on page 138.
›
Check the engine oil level
» page 141.
› Unscrew the cap of the engine oil filler opening.
› Replenish the oil in portions of 0.5 litres in accordance with the correct specifi-
cations » page 179, Specifications and engine oil capacity .
› Check the oil level
» page 141.
› Carefully screw on the oil filler opening cap and push the dipstick in fully. Ð
ä
141
Inspecting and replenishing
Page 189 of 196

Children and safety 117
Child safety Side airbag 118
Child safety lock 26
Child seat Classification 118
ISOFIX 119
on the front passenger seat 117
Suitability 119
TOP TETHER 119
Chrome parts refer to Taking care of your vehicle 131
Cigarette lighter 64
Cleaning 129
Artificial leather 134
Headlight lenses 132
Material coverings 134
Materials 134
Natural leather 134
Plastic parts 131
Wheels 133
Climatronic Recirculated air mode 77
Clock 11
Clothes hooks 69
Cockpit 12-volt power socket 65
Ashtray 64
Cigarette lighter 64
General view 7
Light 43
Storage compartments 65
Compartments 65
Computer see Multifunction display 12
Coolant Checking 143
Indicator light 19
Replenishing 143
Temperature gauge 9
Correct seated position 104Counter for distance driven 10
Cruise control system (CCS) 86
Cup holders 63
D
Daylight driving light 39
Deactivating an airbag 115
Defrsoting rear window 44
Delayed locking of the boot lid see Boot lid 33
Diesel refer to Fuel 138
Diesel fuel Operation in winter 138
Diesel particulate filter 22
Digital clock 11
Dipstick 141
Display Coolant temperature 9
Service interval 10
Distance driven 10
Door Child safety lock 26
Doors Emergency locking 32
Driving Abroad 125
Driving through water on the street 126
Emissions 177
Fuel consumption 177
Maximum speed 180
E
Economical and environmentally friendly driving 122
EDS 84
Electrical power windows Button in the driver's door 34
Button in the rear door 34Central locking system 35
Operational faults 35
Electric sliding/tilting roof 36
Electronic Differential Lock 84
Electronic immobiliser 80
Emergency Automatic gearbox 94
Changing a wheel 159
Hazard warning light system 42
Jump-starting 165
locking of the doors 32
Selector lever-unlocking 94
Sliding roof 37
Towing the vehicle 166
Tyre repair 162
Unlocking the boot lid 33
Emissions 177
Engine Running in 121
Starting and stopping the engine 79
Starting engine 81
Switching off the engine 81
Engine compartment Brake fluid 144
Coolant 142
Overview 140
Vehicle battery 145
Engine oil Capacity 179
Changing 142
Checking 141
Replenishing 141
Specification 179
Warning light 19
Engine revolutions counter 9
Environment 122
Environmental compatibility 124
Environmentally friendly driving 122
ESC Function 83
Warning light 20
187
Index