ABS SKODA FABIA 2013 2.G / 5J User Guide
[x] Cancel search | Manufacturer: SKODA, Model Year: 2013, Model line: FABIA, Model: SKODA FABIA 2013 2.G / 5JPages: 223, PDF Size: 12.77 MB
Page 131 of 223
Seat belts
Wearing seat belts
Introduction
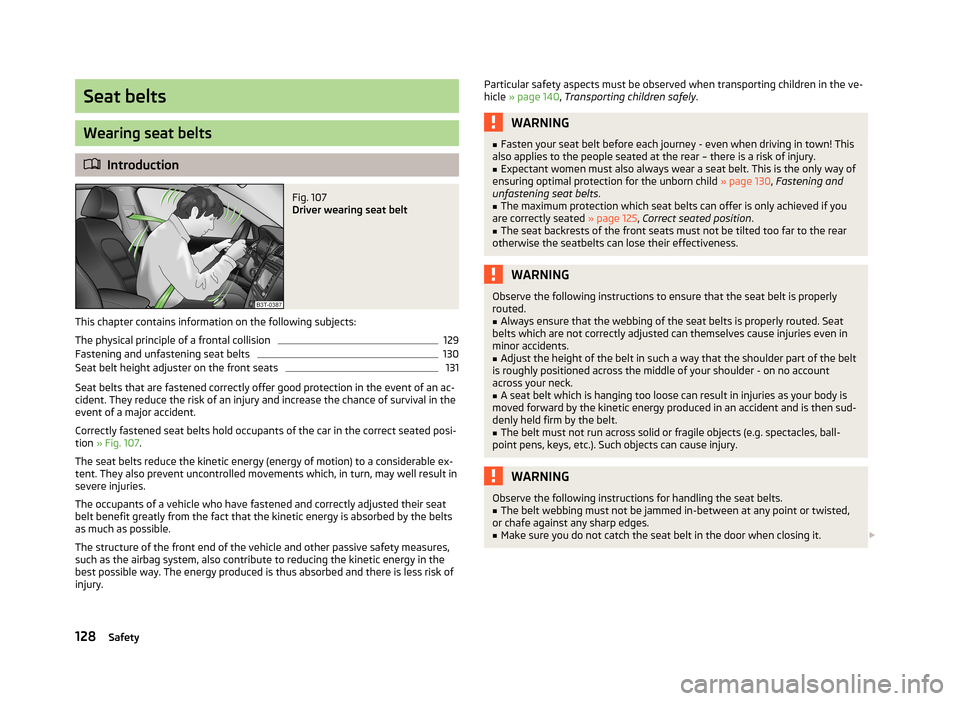
Fig. 107
Driver wearing seat belt
This chapter contains information on the following subjects:
The physical principle of a frontal collision
129
Fastening and unfastening seat belts
130
Seat belt height adjuster on the front seats
131
Seat belts that are fastened correctly offer good protection in the event of an ac-
cident. They reduce the risk of an injury and increase the chance of survival in the
event of a major accident.
Correctly fastened seat belts hold occupants of the car in the correct seated posi-
tion » Fig. 107 .
The seat belts reduce the kinetic energy (energy of motion) to a considerable ex-
tent. They also prevent uncontrolled movements which, in turn, may well result in
severe injuries.
The occupants of a vehicle who have fastened and correctly adjusted their seat belt benefit greatly from the fact that the kinetic energy is absorbed by the belts
as much as possible.
The structure of the front end of the vehicle and other passive safety measures,
such as the airbag system, also contribute to reducing the kinetic energy in the
best possible way. The energy produced is thus absorbed and there is less risk of injury.
Particular safety aspects must be observed when transporting children in the ve-
hicle » page 140 , Transporting children safely .WARNING■
Fasten your seat belt before each journey - even when driving in town! This
also applies to the people seated at the rear – there is a risk of injury.■
Expectant women must also always wear a seat belt. This is the only way of
ensuring optimal protection for the unborn child » page 130, Fastening and
unfastening seat belts .
■
The maximum protection which seat belts can offer is only achieved if you
are correctly seated » page 125, Correct seated position .
■
The seat backrests of the front seats must not be tilted too far to the rear
otherwise the seatbelts can lose their effectiveness.
WARNINGObserve the following instructions to ensure that the seat belt is properly
routed.■
Always ensure that the webbing of the seat belts is properly routed. Seat
belts which are not correctly adjusted can themselves cause injuries even in minor accidents.
■
Adjust the height of the belt in such a way that the shoulder part of the belt
is roughly positioned across the middle of your shoulder - on no account across your neck.
■
A seat belt which is hanging too loose can result in injuries as your body is
moved forward by the kinetic energy produced in an accident and is then sud-
denly held firm by the belt.
■
The belt must not run across solid or fragile objects (e.g. spectacles, ball-
point pens, keys, etc.). Such objects can cause injury.
WARNINGObserve the following instructions for handling the seat belts.■The belt webbing must not be jammed in-between at any point or twisted,
or chafe against any sharp edges.■
Make sure you do not catch the seat belt in the door when closing it.
128Safety
Page 132 of 223
WARNINGObserve the following instructions for the proper use of the seat belts.■Never use a seatbelt to secure two persons (not even children). Nor may the
seat belt be placed over a child who is sitting on the lap of another passenger.■
The lock tongue should only be inserted into the lock which is the correct
one for your seat. Wrong use of the safety belt will reduce its capacity to pro-
tect and the risk of injury increases.
■
The slot of the belt tongue must not be blocked otherwise the belt tongue
will not lock in place properly.
■
Many layers of clothing and loose clothing (e. g. a winter coat over a jacket)
do not allow you to be correctly seated and impairs proper operation of the
seat belts.
■
It is prohibited to use clamps or other objects to adjust seat belts (e. g. for
shortening the belts for smaller persons).
■
The seat belts for the rear seats can only fulfil their function reliably when
the seat backrests are correctly locked into position » page 56.
WARNINGObserve the following instructions for proper use of the seat belts.■The belt webbing must always be kept clean. Soiled belts may impair proper
operation of the inertia reel » page 157, Seat belts .■
The seat belts must not be removed or changed in any way. Do not attempt
to repair the seat belts yourself.
■
Check the condition of all the seat belts on a regular basis. If any damage to
the seat belts, seat belt connections, inertia reel or the lock is detected, the
seat belt concerned must be replaced by a specialist garage.
■
Damaged seat belts which have been subjected to stress in an accident and
were therefore stretched, must be replaced - this is best done by a specialist
garage. The anchorage points of the belts must also be inspected. The an-
chorage points for the belts should also be checked.
Note
The national legal requirements must be observed when using seat belts.
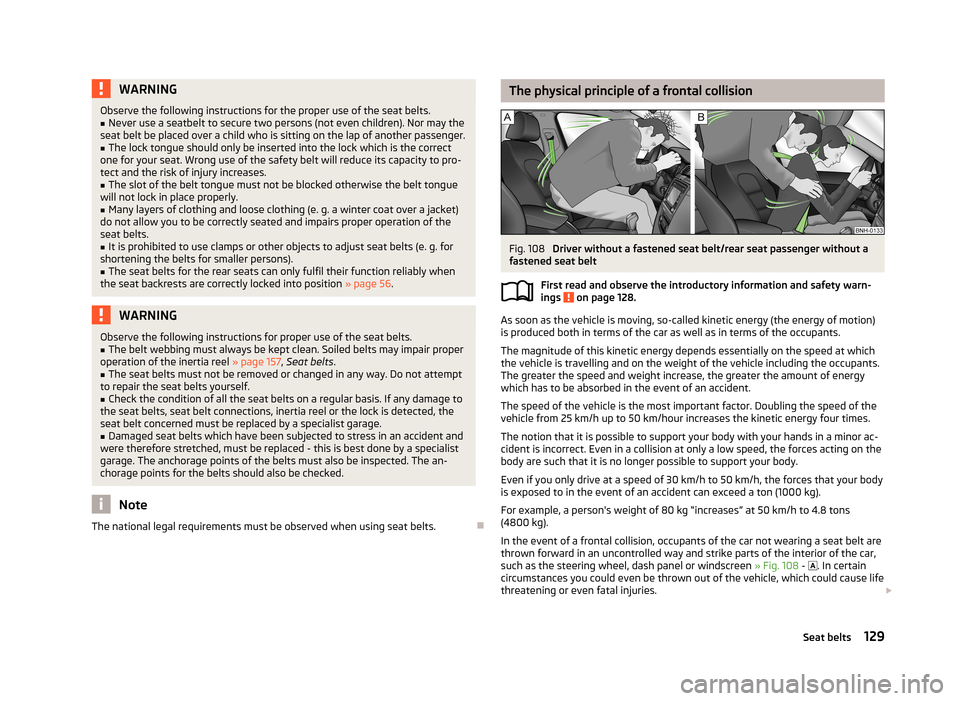
The physical principle of a frontal collisionFig. 108
Driver without a fastened seat belt/rear seat passenger without a
fastened seat belt
First read and observe the introductory information and safety warn-ings
on page 128.
As soon as the vehicle is moving, so-called kinetic energy (the energy of motion)
is produced both in terms of the car as well as in terms of the occupants.
The magnitude of this kinetic energy depends essentially on the speed at which
the vehicle is travelling and on the weight of the vehicle including the occupants.
The greater the speed and weight increase, the greater the amount of energy
which has to be absorbed in the event of an accident.
The speed of the vehicle is the most important factor. Doubling the speed of the
vehicle from 25 km/h up to 50 km/hour increases the kinetic energy four times.
The notion that it is possible to support your body with your hands in a minor ac-cident is incorrect. Even in a collision at only a low speed, the forces acting on thebody are such that it is no longer possible to support your body.
Even if you only drive at a speed of 30 km/h to 50 km/h, the forces that your body is exposed to in the event of an accident can exceed a ton (1000 kg).
For example, a person's weight of 80 kg “increases” at 50 km/h to 4.8 tons
(4800 kg).
In the event of a frontal collision, occupants of the car not wearing a seat belt are
thrown forward in an uncontrolled way and strike parts of the interior of the car,
such as the steering wheel, dash panel or windscreen » Fig. 108 -
. In certain
circumstances you could even be thrown out of the vehicle, which could cause life threatening or even fatal injuries.
129Seat belts
Page 172 of 223
A slight drop in the fluid level results in operation due to normal wear and tear
and the automatic adjustment of the brake pads.
There may be an indication of a leak in the brake system, however, if the fluid lev-
el drops significantly within a short time or if it drops below the “MIN” marking.
If the brake fluid level is too low, this is indicated by the warning light lighting
up in the instrument cluster » page 20, Brake system .
Changing
First read and observe the introductory information and safety warn-ings
on page 168.
Brake fluid absorbs moisture. Over time it therefore absorbs moisture from the
environment.
Excessive water in the brake fluid may be the cause of corrosion in the brake sys-
tem.
The water content lowers the boiling point of the brake fluid.
The brake fluid must comply with the following standards or specifications: › VW 50114;
› FMVSS 116 DOT4.
Vehicle battery
Introduction
This chapter contains information on the following subjects:
Open cover
170
Checking the electrolyte level
171
Operation in winter
171
Charging
171
Disconnecting or reconnecting
172
Replacing
172
Automatic load deactivation
172Warning symbols on the vehicle batterySymbolMeaningAlways wear eye protection.Battery acid is severely caustic. Always wear gloves and eye protec- tion.Keep fire, sparks, open flames and lit cigarettes well clear of the ve-
hicle battery.When charging the vehicle battery, a highly explosive gas mixture is
produced.Keep children away from the vehicle battery.WARNINGThere is a risk of injuries, poisoning, chemical burns, explosions or fire when
carrying out any work on the battery and on the electrical system. It is essen-
tial to comply with the generally applicable rules of safety as well as the warn- ing instructions outlined below.■
Keep children away from the vehicle battery.
■
Do not tilt the battery otherwise battery electrolyte may flow out of the bat-
tery vent openings. Protect your eyes by wearing safety glasses or a face
shield – there is a risk of being blinded.
■
Always wear protective gloves, eye and skin protection when handling the
vehicle battery.
■
The battery acid is strongly corrosive and must, therefore, be handled with
the greatest of care.
■
Corrosive fumes in the air irritate the air passages and lead to conjunctivitis
and inflammation of the air passages in the lungs.
■
Battery acid corrodes dental enamel and creates deep wounds on contact
with the skin which take a long time to heal. Repeated contact with diluted
acids causes skin diseases (inflammations, ulcers, slin cracks).
■
If any battery electrolyte comes into contact with your eyes, rinse the eyes
immediately with clear water for several minutes - consult a doctor immedi-
ately.
■
Splashes of acid on your skin or clothes should be neutralised as soon as
possible using soap suds and then rinsed with plenty of water. Seek immedi-
ate medical assistance if you swallow battery acid.
169Inspecting and replenishing
Page 176 of 223
Wheels
Tyres and rims
Introduction
This chapter contains information on the following subjects:
Tyre service life
174
New tyres
175
Unidirectional tyres
176
Tyre pressure monitor
176
Spare wheel
177
Full wheel trim
178
Wheel bolts
178
Hubcaps
178
Wheel bolts
179WARNING■ National legal requirements must be observed for the use of tyres.■Observe the national legal regulations relating to the use of snow chains
and the maximum vehicle speed with snow chains.WARNINGThe following instructions for the use of tyres must be observed.■During the first 500 km, new tyres do not offer optimum grip and appropri-
ate care should therefore be taken when driving – there is the risk of an acci-
dent.■
On all four wheels, use only radial tyres of the same type, size (rolling cir-
cumference) and the same tread pattern.
■
For safety reasons, do no replace tyres individually.
■
Never exceed the maximum permissible load bearing capacity of the tyres
fitted – there is the risk of an accident.
■
Never exceed the maximum permissible speed of the tyres fitted – there is
the risk of an accident.
WARNING (Continued)■ Incorrect wheel alignment at the front or rear impairs handling – there is the
risk of an accident.■
Unusual vibrations or pulling of the vehicle to one side could be a sign of
tyre damage. If there is any doubt that a wheel is damaged, immediately re-
duce your speed and stop! If no external damage is evident, drive slowly and
carefully to the nearest specialist garage to have the vehicle checked.
■
Only use those tyres or wheel rims which have been approved by ŠKODA for
your model of vehicle. Failure to observe this instruction will adversely affect
the road safety of your vehicle – there is the risk of an accident.
WARNINGObserve the following information regarding tyre damage and wear.■Never use tyres if you do not know anything about the condition and age.■
Never drive with damaged tyres – there is the risk of an accident.
■
Immediately replace damaged wheel rims or tyres.
■
You must have your tyres replaced with new ones at the latest when the
wear indicators have been worn down.
■
Worn tyres do not provide the necessary grip particularly at high speeds on
wet roads. “Aquaplaning” (uncontrolled movements of the vehicle – “swim- ming” on a wet road surface) could be the result.
WARNINGObserve the following information regarding the tyre pressure.■The tyre control display does not absolve the driver of the responsibility to
ensure the correct tyre inflation pressure. Check the tyre pressure at regular
intervals.■
Pressures that are too low or too high impair handling – there is the risk of
an accident.
■
If the pressure is too low, the tyre must overcome a greater rolling resist-
ance. This will heat the tyre up, especially at higher speeds. This can result in tread separation and a tyre blowout.
173Wheels
Page 177 of 223
WARNINGObserve the following information regarding the wheel bolts.■The wheel bolts must be clean and must turn easily. Never apply grease or
oil.■
The specified tightening torque of the wheel bolts for steel and light alloy
wheels is 120 Nm.
■
If the wheel bolts are insufficiently tightened, the rim can come loose when
the car is moving – there is the risk of an accident. A tightening torque which
is too high can damage the bolts and threads and this can result in permanent
deformation of the contact surfaces on the rim.
■
The wheel can loosen when the car is moving if the wheel bolts are not han-
dled correctly – there is the risk of an accident.
WARNINGObserve the following information regarding the spare wheel.■Only use the spare wheel while absolutely necessary.■
Never drive with more than one spare wheel fitted.
■
The snow chains cannot be used on the spare wheel.
CAUTION
■ If a spare wheel is used that is not identical to the fitted tyres, the following
must be observed » page 177, Spare wheel .■
Protect the tyres from contact with oil, grease and fuel.
■
Replace lost dust caps.
■
If, in the event of a puncture, it is necessary to fit a spare wheel with a tyre
without a dedicated running direction or the opposite running direction, drive carefully as the optimum characteristics of the tyre are no longer applicable in
this situation.
For the sake of the environment
Tyres which are insufficiently inflated increase your fuel consumption.
Note
■ We recommend that any work on the wheels or tyres is carried out by a special-
ist garage.■
We recommend that you use wheel rims, tyres, full wheel trims and snow chains
from ŠKODA Original Accessories.
Tyre service lifeFig. 132
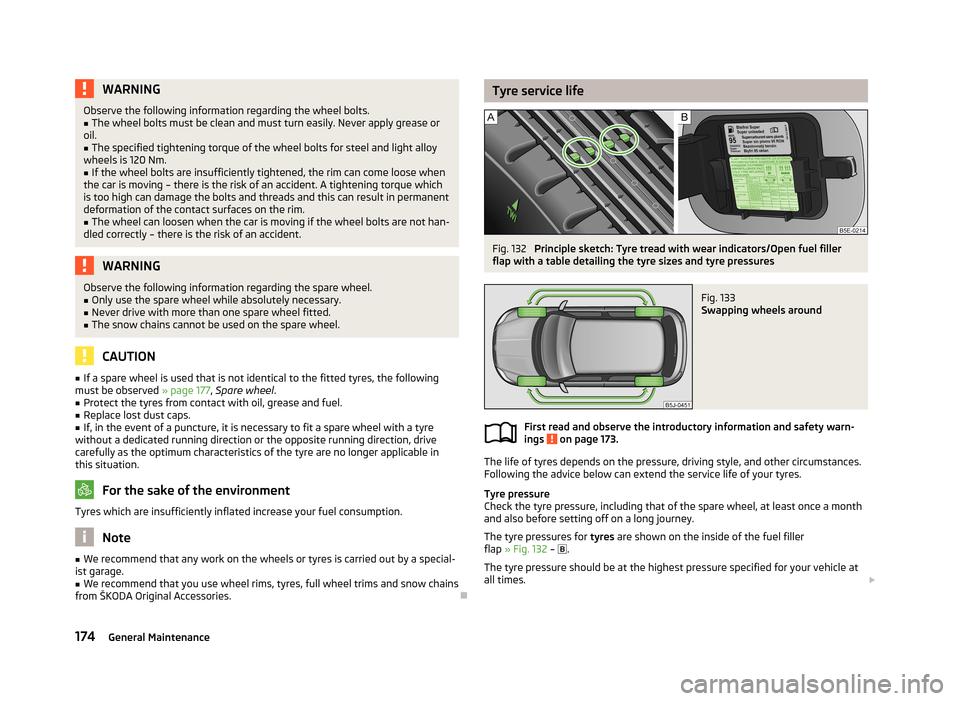
Principle sketch: Tyre tread with wear indicators/Open fuel filler
flap with a table detailing the tyre sizes and tyre pressures
Fig. 133
Swapping wheels around
First read and observe the introductory information and safety warn-
ings on page 173.
The life of tyres depends on the pressure, driving style, and other circumstances.
Following the advice below can extend the service life of your tyres.
Tyre pressure
Check the tyre pressure, including that of the spare wheel, at least once a month and also before setting off on a long journey.
The tyre pressures for tyres are shown on the inside of the fuel filler
flap » Fig. 132 –
.
The tyre pressure should be at the highest pressure specified for your vehicle at
all times.
174General Maintenance
Page 196 of 223
Fuses in the dash panelFig. 150
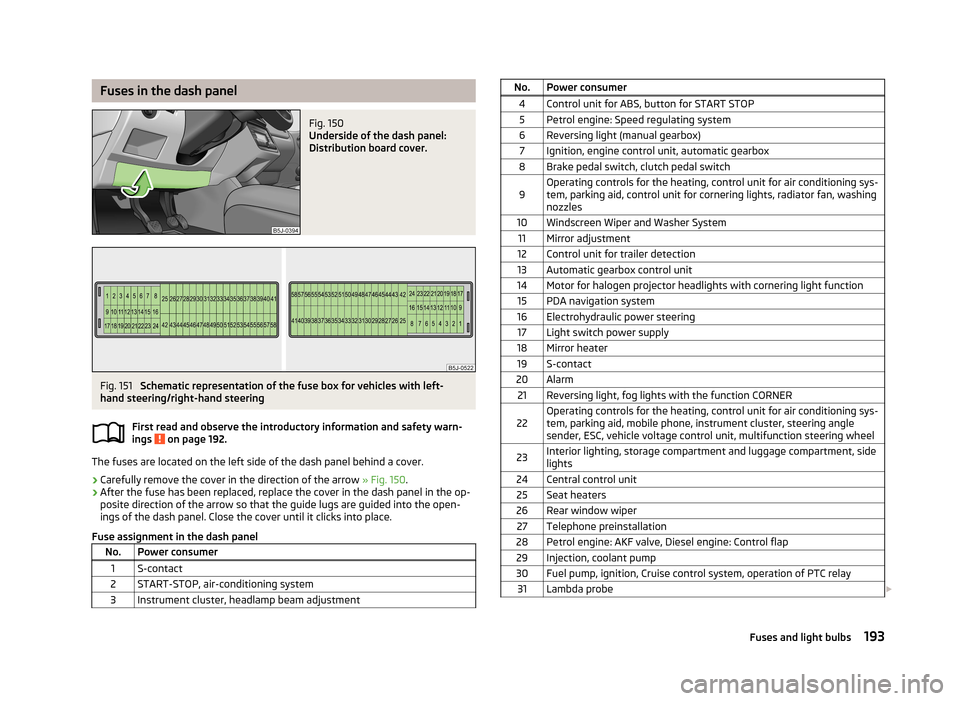
Underside of the dash panel:
Distribution board cover.
Fig. 151
Schematic representation of the fuse box for vehicles with left-
hand steering/right-hand steering
First read and observe the introductory information and safety warn-
ings
on page 192.
The fuses are located on the left side of the dash panel behind a cover.
› Carefully remove the cover in the direction of the arrow
» Fig. 150.
› After the fuse has been replaced, replace the cover in the dash panel in the op-
posite direction of the arrow so that the guide lugs are guided into the open- ings of the dash panel. Close the cover until it clicks into place.
Fuse assignment in the dash panel
No.Power consumer1S-contact2START-STOP, air-conditioning system3Instrument cluster, headlamp beam adjustmentNo.Power consumer4Control unit for ABS, button for START STOP5Petrol engine: Speed regulating system6Reversing light (manual gearbox)7Ignition, engine control unit, automatic gearbox8Brake pedal switch, clutch pedal switch9Operating controls for the heating, control unit for air conditioning sys-
tem, parking aid, control unit for cornering lights, radiator fan, washing nozzles10Windscreen Wiper and Washer System11Mirror adjustment12Control unit for trailer detection13Automatic gearbox control unit14Motor for halogen projector headlights with cornering light function15PDA navigation system16Electrohydraulic power steering17Light switch power supply18Mirror heater19S-contact20Alarm21Reversing light, fog lights with the function CORNER22Operating controls for the heating, control unit for air conditioning sys-
tem, parking aid, mobile phone, instrument cluster, steering angle
sender, ESC, vehicle voltage control unit, multifunction steering wheel23Interior lighting, storage compartment and luggage compartment, side
lights24Central control unit25Seat heaters26Rear window wiper27Telephone preinstallation28Petrol engine: AKF valve, Diesel engine: Control flap29Injection, coolant pump30Fuel pump, ignition, Cruise control system, operation of PTC relay31Lambda probe 193Fuses and light bulbs
Page 197 of 223
No.Power consumer32High pressure fuel pump, pressure valve33Engine control unit34Engine control unit, vacuum pump35Daytime running lights/radio for vehicles with START-STOP36Main beam37Rear fog light, DC/DC converter START-STOP38Fog lights39Air blower for heating40-41Not assigned42Rear window heater43Horn44Windscreen wipers45Central control unit for convenience system46Engine control unit, fuel pump47Cigarette lighter, power socket in the luggage compartment48ABS, START-STOP (DC/DC) converter ESP49Turn signal lights, brake lights50START-STOP (DC/DC) transformer, radio51Electrical power window (front and rear) - left side52Electrical power window (front and rear) - right side53Parking light = left side, electrical sliding/tilting roof54START-STOP (instrument cluster), alarm55Automatic gearbox control unit56Headlight cleaning system, parking light - right side57Left low beam, headlight range adjustment58Low beam on the right
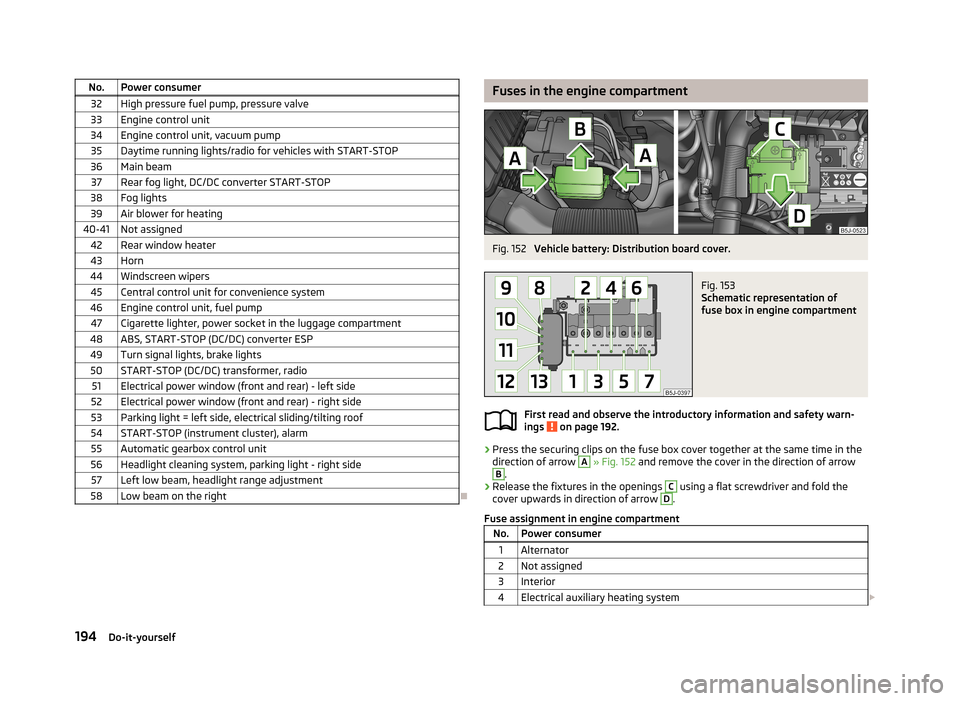
Fuses in the engine compartmentFig. 152
Vehicle battery: Distribution board cover.
Fig. 153
Schematic representation of
fuse box in engine compartment
First read and observe the introductory information and safety warn-
ings on page 192.
› Press the securing clips on the fuse box cover together at the same time in the
direction of arrow
A
» Fig. 152 and remove the cover in the direction of arrow
B
.
› Release the fixtures in the openings
C
using a flat screwdriver and fold the
cover upwards in direction of arrow
D
.
Fuse assignment in engine compartment
No.Power consumer1Alternator2Not assigned3Interior4Electrical auxiliary heating system 194Do-it-yourself
Page 198 of 223
No.Power consumer5Interior6Glow plugs, radiator fan7Electrohydraulic power steering8ABS or TCS or ESC9Radiator fan10Automatic gearbox11ABS or TCS or ESC12Central control unit13Electrical auxiliary heating system
Note
Fuses 1-7 are replaced by a specialist garage.
Bulbs
Introduction
This chapter contains information on the following subjects:
Headlights
196
Changing the low beam and high beam bulb (halogen headlights)
196
Changing the low beam and high beam bulb (halogen projector headlights)
197
Changing the high beam bulb (halogen projector headlights)
197
Changing the front turn signal bulb
197
Changing the front parking light bulb
197
Foglights and daytime running lights
198
Fabia Scout, Fabia RS foglights
198
Changing the licence plate light bulb
199
Rear light
199
Some manual skills are required to change a bulb. For this reason, if uncertain, we recommend that bulbs are replaced by a specialist garage or other expert help is
sought.
› Switch off the ignition and all of the lights before replacing a bulb.
› Faulty bulbs must only be replaced with the same type of bulbs. The designa-
tion is located on the light socket or the glass bulb.
› A stowage compartment for replacement bulbs is located in a plastic box in the
spare wheel or underneath the floor covering in the boot.WARNING■ Accidents can be caused if the road in front of the vehicle is not sufficiently
illuminated and the vehicle cannot or can only be seen with difficulty by other
road users.■
Always read and observe the warnings before completing any work in the
engine compartment » page 160, Engine compartment .
■
Bulbs H7 and H4 are pressurised and may burst when changed - there is a
risk of injury. We therefore recommended wearing gloves and safety glasses when changing a bulb.
CAUTION
■ Do not take hold of the glass bulb with naked fingers (even the smallest
amount of dirt reduces the working life of the light bulb). Use a clean cloth, nap-
kin, or similar.■
When removing and installing the number plate light and tail light make sure
that the paintwork of the vehicle and the tail light are not damaged.
Note
■ This Owner's Manual only describes the replacement of bulbs where it is possi-
ble to replace the bulbs on your own without any complications arising. Other light bulbs should be changed by your specialist garage.■
We recommend that you always carry a box of replacement bulbs in the vehicle.
Replacement bulbs can be purchased from ŠKODAOriginal Accessories.
■
We recommend that the headlight settings are checked by a specialist garage
after a main beam or low beam bulb has been replaced.
■
Visit a specialist garage if an LED is faulty.
195Fuses and light bulbs
Page 207 of 223
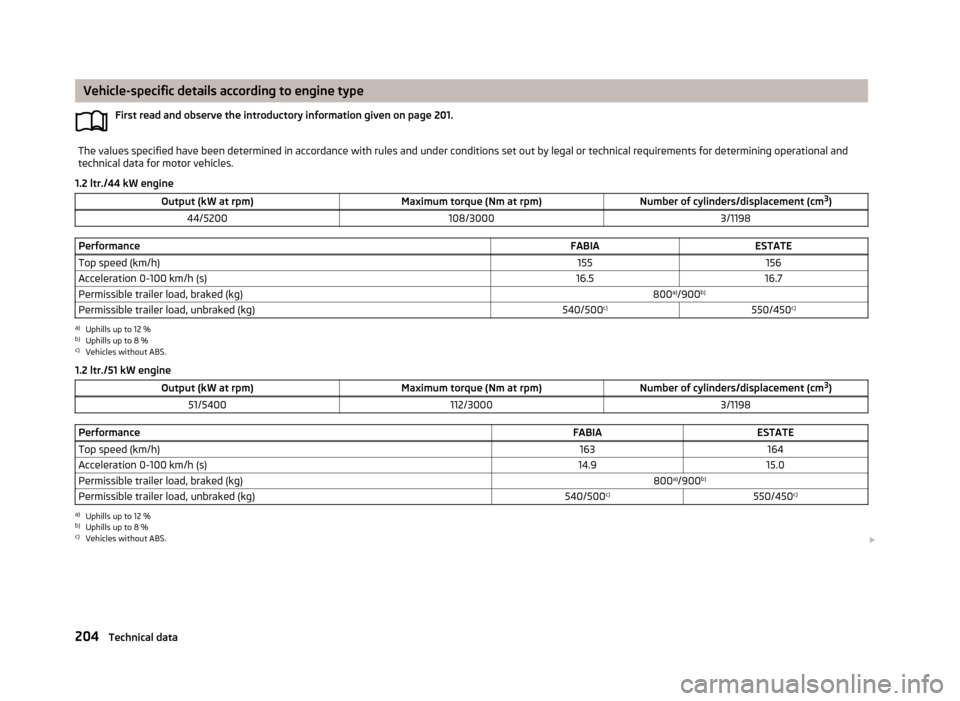
Vehicle-specific details according to engine typeFirst read and observe the introductory information given on page 201.The values specified have been determined in accordance with rules and under conditions set out by legal or technical requirements for determining operational andtechnical data for motor vehicles.
1.2 ltr./44 kW engine
Output (kW at rpm)Maximum torque (Nm at rpm)Number of cylinders/displacement (cm 3
)44/5200108/30003/1198PerformanceFABIAESTATETop speed (km/h)155156Acceleration 0-100 km/h (s)16.516.7Permissible trailer load, braked (kg)800 a)
/900 b)Permissible trailer load, unbraked (kg)540/500 c)550/450c)a)
Uphills up to 12 %
b)
Uphills up to 8 %
c)
Vehicles without ABS.
1.2 ltr./51 kW engine
Output (kW at rpm)Maximum torque (Nm at rpm)Number of cylinders/displacement (cm 3
)51/5400112/30003/1198PerformanceFABIAESTATETop speed (km/h)163164Acceleration 0-100 km/h (s)14.915.0Permissible trailer load, braked (kg)800 a)
/900 b)Permissible trailer load, unbraked (kg)540/500 c)550/450c)a)
Uphills up to 12 %
b)
Uphills up to 8 %
c)
Vehicles without ABS.
204Technical data
Page 208 of 223
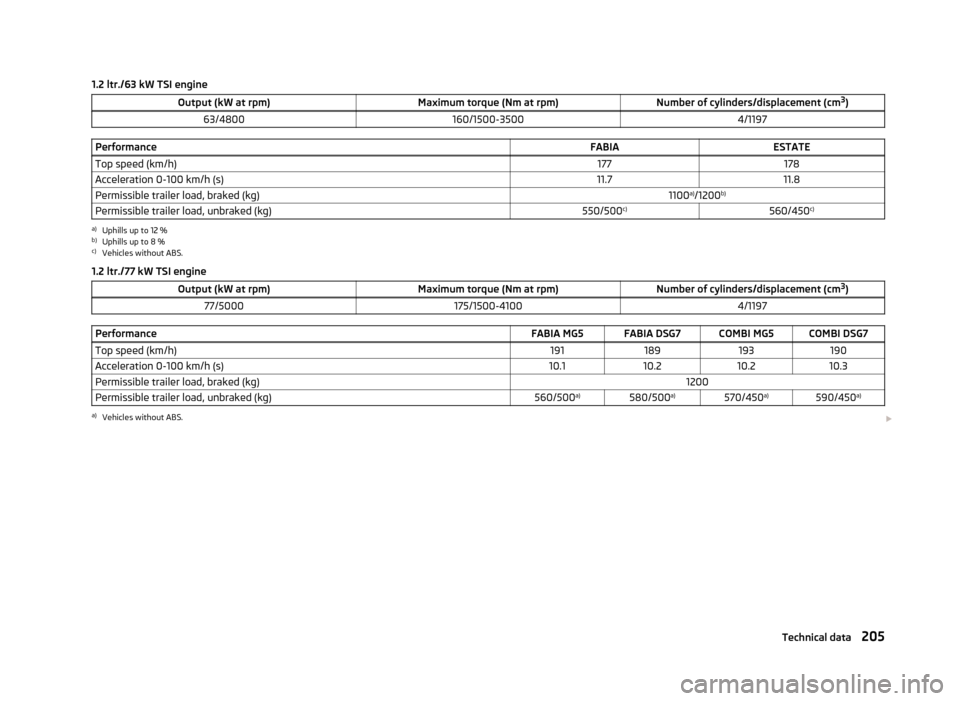
1.2 ltr./63 kW TSI engineOutput (kW at rpm)Maximum torque (Nm at rpm)Number of cylinders/displacement (cm3
)63/4800160/1500-35004/1197PerformanceFABIAESTATETop speed (km/h)177178Acceleration 0-100 km/h (s)11.711.8Permissible trailer load, braked (kg)1100 a)
/1200 b)Permissible trailer load, unbraked (kg)550/500 c)560/450 c)a)
Uphills up to 12 %
b)
Uphills up to 8 %
c)
Vehicles without ABS.
1.2 ltr./77 kW TSI engine
Output (kW at rpm)Maximum torque (Nm at rpm)Number of cylinders/displacement (cm 3
)77/5000175/1500-41004/1197PerformanceFABIA MG5FABIA DSG7COMBI MG5COMBI DSG7Top speed (km/h)191189193190Acceleration 0-100 km/h (s)10.110.210.210.3Permissible trailer load, braked (kg)1200Permissible trailer load, unbraked (kg)560/500 a)580/500 a)570/450a)590/450 a)a)
Vehicles without ABS.
205Technical data