air conditioning SKODA FABIA 2013 2.G / 5J User Guide
[x] Cancel search | Manufacturer: SKODA, Model Year: 2013, Model line: FABIA, Model: SKODA FABIA 2013 2.G / 5JPages: 223, PDF Size: 12.77 MB
Page 86 of 223
WARNINGNever leave recirculated air mode on over a longer period, as “stale air” can
cause fatigue in the driver and the passengers, reduce attention levels and al- so cause the windows to mist up. The risk of having an accident increases.Switch off recirculated air mode as soon as the windows start to mist up.
Climatronic (automatic air conditioning system)
Introduction
This chapter contains information on the following subjects:
Control elements
83
Automatic mode
84
Setting the temperature
84
Recirculated air mode
84
Controlling the blower
85
Defrosting windscreen
85
Climatronic in automatic mode ensures the best-possible setting of the tempera-
ture of the outflowing air, the blower stage and air distribution.
The system also takes sunlight into account, which eliminates the need to alterthe settings manually.
The cooling system operates only if the following conditions are met. The cooling system is switched on » page 83.
The engine is running.
The outside temperature is above approximately +2 °C.
If the coolant temperature is too high, the cooling system is switched off to en- sure that the engine cools down.
Note
We recommend that you have Climatronic cleaned by a specialist garage once ev-
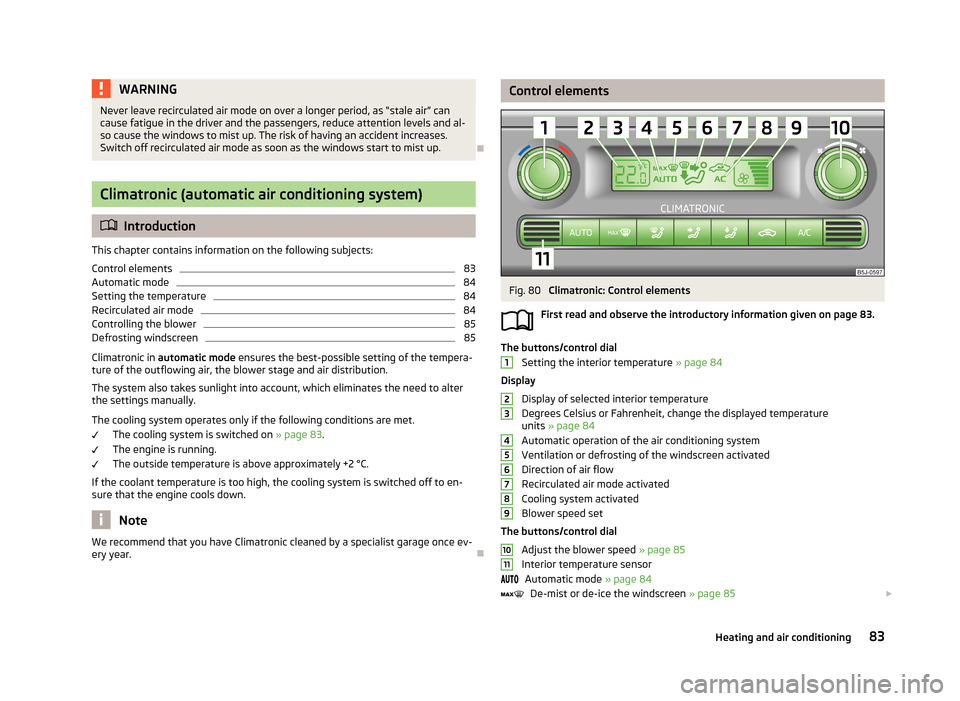
ery year.Control elementsFig. 80
Climatronic: Control elements
First read and observe the introductory information given on page 83.
The buttons/control dial Setting the interior temperature » page 84
Display
Display of selected interior temperature
Degrees Celsius or Fahrenheit, change the displayed temperature units » page 84
Automatic operation of the air conditioning system Ventilation or defrosting of the windscreen activated
Direction of air flow
Recirculated air mode activated
Cooling system activated
Blower speed set
The buttons/control dial Adjust the blower speed » page 85
Interior temperature sensor Automatic mode » page 84
De-mist or de-ice the windscreen » page 85
123456789101183Heating and air conditioning
Page 88 of 223
NoteIf recirculated air mode is switched on for around 15 minutes, the symbol will
begin to flash in the display as a sign that the recirculated air mode is switched on long-term. If the recirculated air mode is not switched off, the symbol flashes for
around 5 minutes.
Controlling the blower
First read and observe the introductory information given on page 83.
The Climatronic system controls the blower stages automatically in line with the
interior temperature. However, the blower level can be manually adjusted to suit your particular needs.
›
Turn control dial
10
» Fig. 80 on page 83 to the left or to the right to increase or
decrease the blower speed.
If the blower is switched off, the Climatronic system is switched off.
The blower speed set is indicated by displaying the corresponding number of seg- ments in icon
9
» Fig. 80 on page 83 in the display.
WARNING■
“Stale air” may result in fatigue in the driver and occupants, reduce attention
levels and also cause the windows to mist up. The risk of having an accident
increases.■
Do not switch off the Climatronic system for longer than necessary.
■
Switch on the Climatronic system as soon as the windows mist up.
Defrosting windscreen
First read and observe the introductory information given on page 83.
Switching on
›
Press the
button » Fig. 80 on page 83.
Switching off
›
Press the
button » Fig. 80 on page 83 again or press the
button.
More air flows out of the air outlet vents 1 and 2 » Fig. 77 on page 77. The temper-
ature control is controlled automatically.
85Heating and air conditioning
Page 111 of 223
›Minimum fuel leakage during accidents.
› Reduced noise.
Choice of materials › Extensive use of recyclable material.
› Air conditioning filled with CFC-free refrigerant.
› No cadmium.
› No asbestos.
› Reduction in the “vaporisation” of plastics.
Manufacture › Solvent-free cavity protection.
› Solvent-free protection of the vehicle for transportation from the production
plant to the customer.
› The use of solvent-free adhesives.
› No CFCs used in the production process.
› Without use of mercury.
› Use of water-soluble paints.
Trade-in and recycling of old cars
ŠKODA meets the requirements of the brand and its products with regard to pro- tecting the environment and the preserving resources. All new ŠKODA vehicles
can be utilized up to 95 % and always 1)
be returned.
In a lot of countries sufficient trade-in networks have been created, where you
can trade-in your vehicle. After you trade-in your vehicle, you will receive a confir-
mation stating the recycling in accordance with environmental regulations.
Note
Detailed information about the trade-in and recycling of end-of-life cars is availa-
ble from a specialist garage.
Avoiding damage to your vehicle
Introduction
This chapter contains information on the following subjects:
General information
108
Driving through water on streets
109
General information
First read and observe the introductory information given on page 108.
Pay attention to low-slung parts of the vehicle, such as the spoiler and exhaust,particularly in the following situations.
› When driving on poorly maintained roads and tracks.
› When driving over kerb stones.
› When driving on steep ramps, etc.
Particular attention is necessary for vehicle with a sports suspension and when then vehicle is fully laden.
1)
Subject to fulfilment of the national legal requirements.
108Driving
Page 120 of 223
›The engine has not yet reached the minimum temperature for the START STOP
mode.
› The temperature inside the vehicle has not reached the desired temperature
set in the air-conditioning system/heating.
› The external temperature is very low/high.
› Intensive windscreen deicing (Climatronic) or windscreen deicing/ventilation is
switched on at the maximum air temperature setting (manual air conditioning
system).
› The parking aid is activated.
› The charge state of the vehicle battery is too low.
› The stationary vehicle is on a steep hill or a steep slope.
› The idling speed is too high.
› The steering angle is too great (manoeuvring).
The
warning symbol appears in the instrument cluster display.
The automatic start procedure runs again During the STOP phase, the engine fires up without any active driver intervention,
e.g. in the following situations.
› The vehicle has begun to roll, e.g. on a slope.
› The difference between the temperature setting of the air-conditioning sys-
tem/heating and the temperature of the interior is too great.
› Intensive windscreen deicing (Climatronic) or windscreen deicing/ventilation is
switched on at the maximum air temperature setting (manual air conditioning
system).
› The brake pedal was pressed several times (the pressure in the braking system
is too low).
› The charge state of the vehicle battery is too low.
› The current consumption is too high.
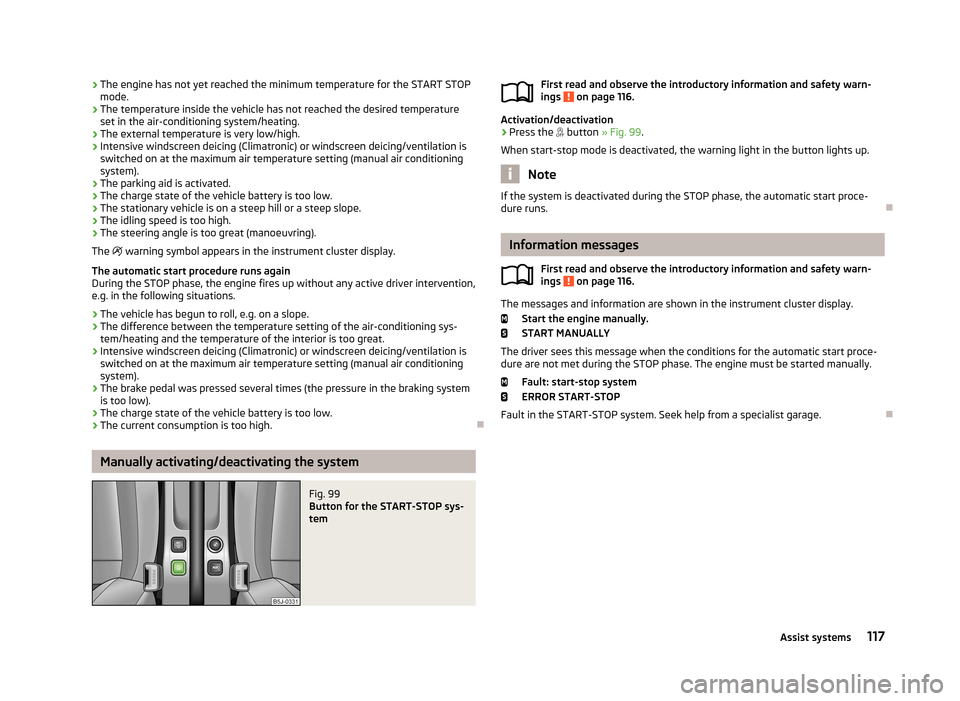
Manually activating/deactivating the system
Fig. 99
Button for the START-STOP sys-
tem
First read and observe the introductory information and safety warn-
ings on page 116.
Activation/deactivation
›
Press the button » Fig. 99 .
When start-stop mode is deactivated, the warning light in the button lights up.
Note
If the system is deactivated during the STOP phase, the automatic start proce-
dure runs.
Information messages
First read and observe the introductory information and safety warn-
ings
on page 116.
The messages and information are shown in the instrument cluster display.
Start the engine manually.START MANUALLY
The driver sees this message when the conditions for the automatic start proce- dure are not met during the STOP phase. The engine must be started manually.
Fault: start-stop system
ERROR START-STOP
Fault in the START-STOP system. Seek help from a specialist garage.
117Assist systems
Page 196 of 223
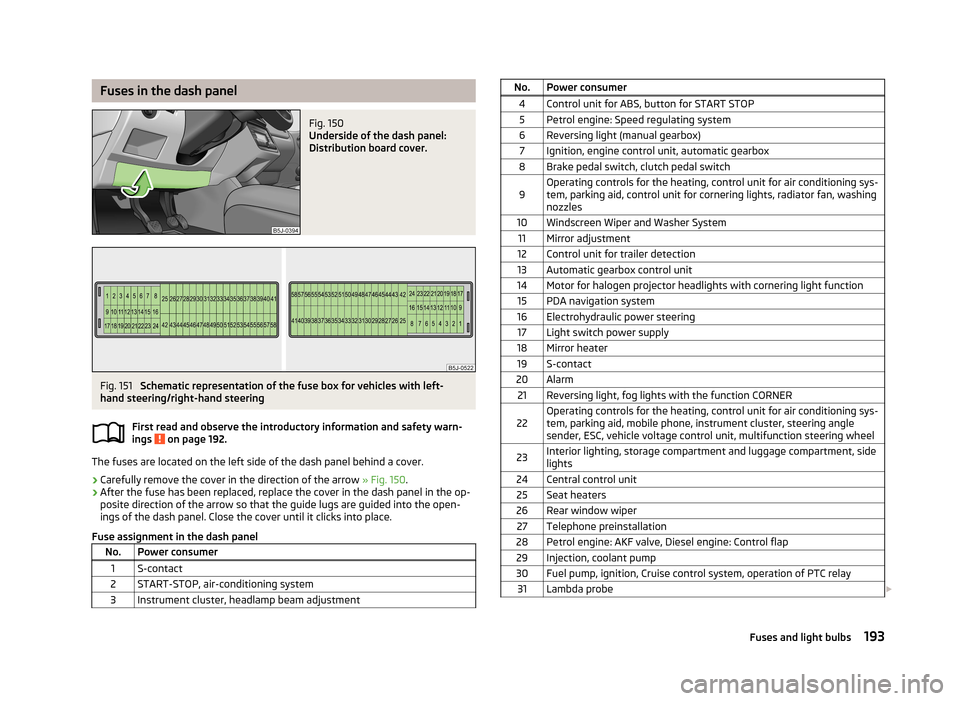
Fuses in the dash panelFig. 150
Underside of the dash panel:
Distribution board cover.
Fig. 151
Schematic representation of the fuse box for vehicles with left-
hand steering/right-hand steering
First read and observe the introductory information and safety warn-
ings
on page 192.
The fuses are located on the left side of the dash panel behind a cover.
› Carefully remove the cover in the direction of the arrow
» Fig. 150.
› After the fuse has been replaced, replace the cover in the dash panel in the op-
posite direction of the arrow so that the guide lugs are guided into the open- ings of the dash panel. Close the cover until it clicks into place.
Fuse assignment in the dash panel
No.Power consumer1S-contact2START-STOP, air-conditioning system3Instrument cluster, headlamp beam adjustmentNo.Power consumer4Control unit for ABS, button for START STOP5Petrol engine: Speed regulating system6Reversing light (manual gearbox)7Ignition, engine control unit, automatic gearbox8Brake pedal switch, clutch pedal switch9Operating controls for the heating, control unit for air conditioning sys-
tem, parking aid, control unit for cornering lights, radiator fan, washing nozzles10Windscreen Wiper and Washer System11Mirror adjustment12Control unit for trailer detection13Automatic gearbox control unit14Motor for halogen projector headlights with cornering light function15PDA navigation system16Electrohydraulic power steering17Light switch power supply18Mirror heater19S-contact20Alarm21Reversing light, fog lights with the function CORNER22Operating controls for the heating, control unit for air conditioning sys-
tem, parking aid, mobile phone, instrument cluster, steering angle
sender, ESC, vehicle voltage control unit, multifunction steering wheel23Interior lighting, storage compartment and luggage compartment, side
lights24Central control unit25Seat heaters26Rear window wiper27Telephone preinstallation28Petrol engine: AKF valve, Diesel engine: Control flap29Injection, coolant pump30Fuel pump, ignition, Cruise control system, operation of PTC relay31Lambda probe 193Fuses and light bulbs
Page 204 of 223
Technical data
Technical data
Vehicle data
Introduction
This chapter contains information on the following subjects:
Vehicle identification data
201
Dimensions
202
Vehicle-specific details according to engine type
204
The details given in the vehicle's technical documentation always take prece-
dence over the details in the Owner's Manual.
The listed performance values were determined without performance-reducing
equipment, e.g. air conditioning system.
Vehicle identification data
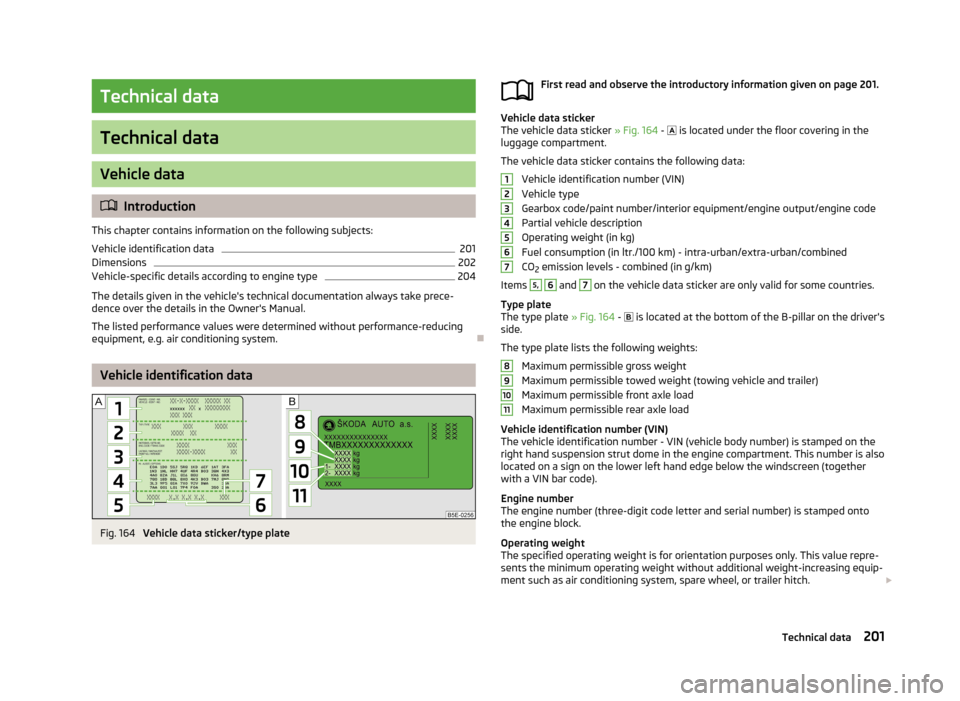
Fig. 164
Vehicle data sticker/type plate
First read and observe the introductory information given on page 201.
Vehicle data sticker
The vehicle data sticker » Fig. 164 - is located under the floor covering in the
luggage compartment.
The vehicle data sticker contains the following data: Vehicle identification number (VIN)
Vehicle type
Gearbox code/paint number/interior equipment/engine output/engine code Partial vehicle description
Operating weight (in kg)
Fuel consumption (in ltr./100 km) - intra-urban/extra-urban/combined
CO 2 emission levels - combined (in g/km)
Items
5,
6
and
7
on the vehicle data sticker are only valid for some countries.
Type plate
The type plate » Fig. 164 -
is located at the bottom of the B-pillar on the driver's
side.
The type plate lists the following weights:
Maximum permissible gross weight
Maximum permissible towed weight (towing vehicle and trailer)
Maximum permissible front axle load
Maximum permissible rear axle load
Vehicle identification number (VIN)
The vehicle identification number - VIN (vehicle body number) is stamped on the
right hand suspension strut dome in the engine compartment. This number is also
located on a sign on the lower left hand edge below the windscreen (together
with a VIN bar code).
Engine number
The engine number (three-digit code letter and serial number) is stamped onto
the engine block.
Operating weight
The specified operating weight is for orientation purposes only. This value repre- sents the minimum operating weight without additional weight-increasing equip-ment such as air conditioning system, spare wheel, or trailer hitch.
1234567891011201Technical data
Page 213 of 223
Index
A
Abroad Driving abroad
109
Unleaded petrol109
ABS112
warning light24
Accessories147
Adjusting Exterior mirrors
53
Head restraints57
Steering wheel95
Adjusting the seats125
Adjustment Headlight beam
44
Seats55
Adjustments and technical changes Spoiler
149
Adjustments and technical modifications Airbags
149
Aerial151
See windows153
Airbag133
Adjustments and impairment of the airbag sys- tem
149
Deactivating138
Deployment133
Front airbag135
Head airbag137
Side airbag136
Switching off the front passenger airbag138
Airbag system133
Air conditioning Operation
81
Air conditioning system Air outlets
77
Climatronic83
Manual air conditioning system80
Air outlets77
Alarm35
Anti-theft alarm system35
Operation36
Trailer123
Antilock Braking System112
Armrest75
Ashtray69
ASR112
warning light23
Assist systems ABS
24, 112
ASR23, 112
Cruise control system114
EDS and XDS112
ESC23, 111
Parking aid113
START-STOP116
Auto Check Control19
Automatic gearbox Selector lever-emergency unlocking
103
Starting-off and driving102
Tiptronic102
Automatic load deactivation172
Automatic transmission100
Kickdown102
Malfunction103
Selector lever lock101
Using the selector lever101
AUX94
Avoiding damage to the vehicle Driving through water
109
Avoiding damage to your vehicle108
B
Ball head Check fitting
120
Fitting119
Ready position119
Removing120
Belts128
Belt tensioners131
Bicycle carrier65
Bonnet Closing
162
Opening162
Boot Cover
61
Emergency unlocking38
Fastening elements59
Fixing nets60
Folding hooks60
see Boot lid37
Unlocking the boot lid38
Boot lid37
Automatic locking37
Brake assist111
Brake booster99
Brake fluid168
Changing169
Checking168
Display messages20
Brakes Brake booster
99
Brake fluid168
Handbrake99
Indicator light20
Running in104
Braking Information for braking
98
Breakdown kit186
Bulbs Changing
195
In the rear light199
Button in the driver's door Electrical power windows
38
C
Car care
145
Washing150
210Index
Page 216 of 223
H
Handbrake
99
Hazard warning light system47
Head airbag137
Headlight cleaning system Headlight cleaning system
52
Headlights196
Driving abroad110
Headlight cleaning system52
Head restraint57
Storing in the seat squabs58
Heating Deicing the windows
79
Exterior mirrors53
Operating78
Operation79
Rear window50
Recirculated air mode80
Seats55
Heating and air conditioning77
Hill hold control111
Horn9
I
Ignition
97
Ignition lock97
Immobilizer97
Individual settings locking
32
unlocking32
Inertia reel131
Instrument cluster10
Overview10
Interior monitor36
ISOFIX143
J
Jack
181
Jacking points Raise vehicle
184
Jump-starting187, 188
L
Light Beam adjustment
44
Cockpit48
Headlight flash45
Lights43
Cockpit48, 49
Daylight running44
Fog lights46
Foglights with the CORNER function46
Halogen projector headlights with cornering light
function
45
Hazard warning light system47
Low beam lights43
Main beam lights45
Parking lights43, 47
Rear fog light46
Replacing bulbs195
Switching on and off43
Tourist lights46
Turn signals45
warning lights20
Loads201
Lock Central locking system
33
Locking Emergency locking
31
Remote control34
without central locking30
Locking and unlocking from the inside33
Low beam lights43
Luggage compartment Class N1 vehicles59
Lighting49
Retractable luggage compartment cover (Fabia Estate)
62
Variable loading floor62
M
Main beam
45
Maintenance107
Decorative films153
Manual air conditioning Recirculated air mode
82
Manual gear changing see Gear changing
100
Materials defect liability5
MAXI DOT Main menu
18
see MAXI DOT display18
Settings18
MAXI DOT display18
Maximum speed204
MDI94
Mirror Exterior mirrors
53
Manually dimmed rear-view mirror53
Vanity50
Mobile phone86
Connecting to the hands-free system89
Modes of the automatic transmission101
Modifications147
Modifications and technical changes Service
148
Multifunction display Functions
13
Memory14
Operation14
Multimedia92
213Index
Page 217 of 223
N
N1
59
Net partition64
Behind the front seats65
Behind the rear seats64
Removing and refitting the housing65
O
Oil see Engine oil
165
Oil pressure Display messages
21
Onboard computer see Multifunction display
13
Operation in winter Diesel fuel
160
Vehicle battery171
Outside temperature15
Overview Engine compartment
163
warning lights20
P
Paintwork See Caring for paintwork
152
Parking Parking aid
113
Parking lights43
Part replacement147
Passive safety Before every journey
124
Driving safety125
Safety equipment124
Passive Safety124
Pedals100
Footmats100
Petrol refer to Fuel159
Polishing the paintwork See Vehicle care
152
Power steering95
Power window force limiter39
R
Radiator fan
163
Radio reception See windows
153
Raise vehicle184
Rear-view mirror Exterior mirrors
53
Manually dimmed rear-view mirror53
Rear fog light46
Rear window - Heating50
Recirculated air mode Manual air conditioning
82
Recommended gear13
Refuelling158
Fuel158
Remote control34
Synchronisation process35
Remote control key Replacing the battery
29
Repairs and technical alterations147
Replacing Vehicle battery
172
Windscreen wiper blades52
Replenishing Coolant
168
Engine oil166
Windscreen washer fluid163
Rims173
Roof luggage rack Attachment points
68
Roof rack system67
Roof load68
Running-in the first 1500 km103
Running in Brake pads
104
Engine104
Tyres104
S
SAFE see Safe securing
32
SAFELOCK see Safe securing
32
Safe securing32
Safety124
Child safety140
Child safety seats140
Correct seated position125
Head restraints57
ISOFIX143
TOP TETHER144
Save electricity104
Seals Vehicle care
153
Seat Adjusting
55
Seat belt warning light
21
Seat belt height adjuster131
Seat belts128
Belt tensioners131
Cleaning157
fastening and unfastening130
Height adjustment131
Seatbelts Inertia reels
131
Seat belts The physical principle of a frontal collision
129
Seats folding forward
56
Head restraints57
214Index
Page 218 of 223
Heating55
Removing the seats57
Seats and storage54
see Automatic gearbox Manual gear shifting on the multifunction steer- ing wheel
102
Selector lever see Using the selector lever
101
Service148
Service display16
Service intervals145
Setting Heating
79
Manual air conditioning system82
Manually dimmed rear-view mirror53
Setting the clock Clock
12
Shifting gears Driving and saving energy
105
Side airbag136
Sliding/tilting roof40
Comfort operation41
Emergency operation42
Opening and raising41
Operation41
Sliding/tilting sunroof Closing
41
Snow chains179
Spare wheel177
Speedometer11
Speed symbol see Wheels
176
Spoiler149
Stalk Main beam
45
Turn signals45
START-STOP116
Manually activating/deactivating the system117
Operating conditions for the system116
Starting/shutting down the engine116
Starting and stopping the engine96
Starting engine Jump-starting
187
Starting the engine97
Jump-starting188
START STOP Information messages
117
Jump-starting189
Steering force assistance95
Steering wheel95
Storage72
Storage Compartment Lighting
49
Storage compartments72
Sun visors50
Switching lights on and off43
Switching off the engine98
Synthetic leather156
T
Tailgate
37
Taking care of the vehicle Natural leather
155
Seat belts157
Taking care of your vehicle Automatic car wash system
151
Chrome parts153
Cleaning the wheels154
Door lock cylinders154
Headlight lenses154
High-pressure cleaner151
Plastic parts152
Washing by hand150
Wash system151
Technical data201
Telephone86
Temporary spare wheel177
Tiptronic102
Tools181
TOP TETHER144
Tourist lights46
Towing189
Towing a trailer118
Towing device Description
118
Drawbar load118
Use and care121
Towing eye Front
190
Rear190
Towing protection36
Traction Control System (ASR)112
Trailer118, 121
Loading121
Towing a trailer122
Transport Boot
58
Roof rack system67
Transporting children safely140
Turn signals45
Two-way radio systems86
Type plate201
Tyre load-bearing capacity see Wheels
175
Tyre pressure monitor Setting
176
Tyre repair Check pressure
187
Preparations186
Sealing and inflating the tyre186
Tyres173
New175
Pressure174
See Wheels175
Sizes174
Wear indicator174
215Index