check oil SKODA FABIA 2013 2.G / 5J User Guide
[x] Cancel search | Manufacturer: SKODA, Model Year: 2013, Model line: FABIA, Model: SKODA FABIA 2013 2.G / 5JPages: 223, PDF Size: 12.77 MB
Page 168 of 223
Diesel enginesa)SpecificationCapacity1.2 litres/55 kW TDI CR DPFVW 507 004.31.6 litres/55 kW TDI CR DPFVW 507 004.31.6 litres/66 kW TDI CR DPFVW 507 004.31.6 litres/77 kW TDI CR DPFVW 507 004.3a)
Engine oil VW 505 01 can optionally be used in diesel engines
without a DPF.
Specifications and capacity (in l) for vehicles with fixed service intervals
Petrol enginesSpecificationCapacity1.2 litres/44 kWVW 501 01, VW 502 002.81.2 litres/51 kWVW 501 01, VW 502 002.81.4 litres/63 kWVW 501 01, VW 502 003.21.6 litres/77 kWVW 501 01, VW 502 003.61.4 litres/132 kW TSIVW 502 003.61.2 litres/63 kW TSIVW 502 003.91.2 litres/77 kW TSIVW 502 003.9
If the oils specified above are not available, oils according to ACEA A2 or ACEA A3
can be used once for refilling.
Diesel engines a)SpecificationCapacity1.2 litres/55 kW TDI CR DPFVW 507 004.31.6 litres/55 kW TDI CR DPFVW 507 004.31.6 litres/66 kW TDI CR DPFVW 507 004.31.6 litres/77 kW TDI CR DPFVW 507 004.3a)
Engine oil VW 505 01 can optionally be used in diesel engines
without DPF
If the oils specified above are not available, oils according to ACEA B3 or ACEA B4
can be used once for refilling.
CAUTION
Only the above-mentioned oils can be used on vehicles with flexible service inter- vals. We recommend always refilling with oil of the same specification since this
will maintain the properties of the oil. In exceptional cases, a maximum of 0.5 l ofspecification VW 502 00 (only for petrol engines) or specification VW 505 01 (only
for diesel engines) engine oil can be used to refill once. Other engine oils must not be used - there is risk of engine damage.
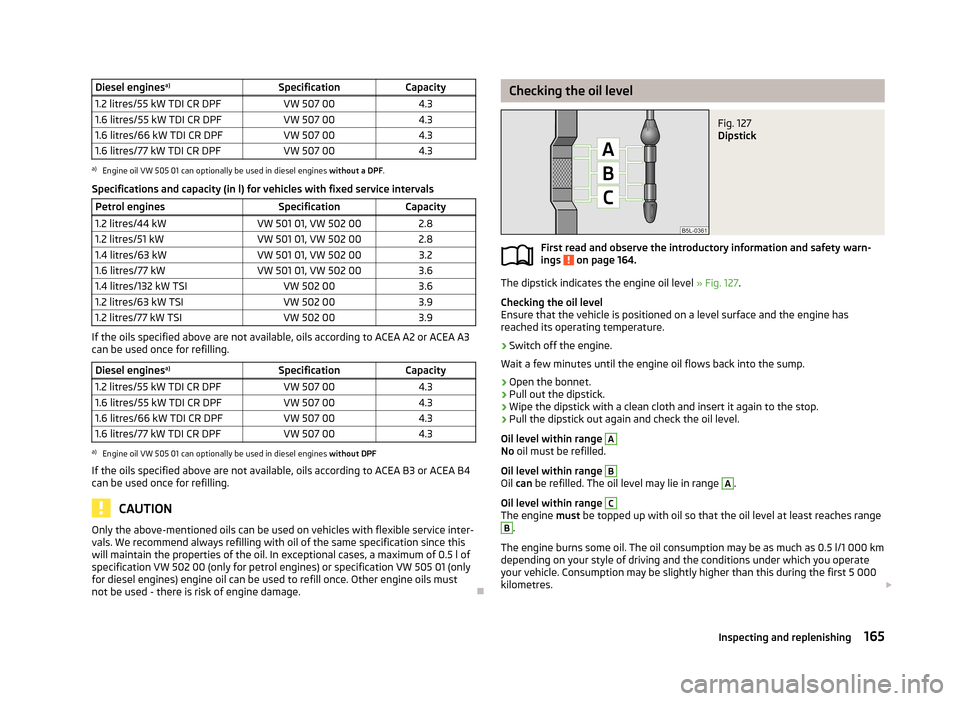
Checking the oil levelFig. 127
Dipstick
First read and observe the introductory information and safety warn-
ings on page 164.
The dipstick indicates the engine oil level » Fig. 127.
Checking the oil level
Ensure that the vehicle is positioned on a level surface and the engine has reached its operating temperature.
›
Switch off the engine.
Wait a few minutes until the engine oil flows back into the sump.
›
Open the bonnet.
›
Pull out the dipstick.
›
Wipe the dipstick with a clean cloth and insert it again to the stop.
›
Pull the dipstick out again and check the oil level.
Oil level within range
A
No oil must be refilled.
Oil level within range
B
Oil can be refilled. The oil level may lie in range
A
.
Oil level within range
C
The engine must be topped up with oil so that the oil level at least reaches range
B
.
The engine burns some oil. The oil consumption may be as much as 0.5 l/1 000 km depending on your style of driving and the conditions under which you operate
your vehicle. Consumption may be slightly higher than this during the first 5 000
kilometres.
165Inspecting and replenishing
Page 169 of 223
The oil level must be checked at regular intervals. We recommend it be checked
after each time you refuel or prior to making a long journey.
We recommend maintaining the oil level within the range A
, but not above , if
the engine has been operating at high loads, for example, during a lengthy motor-
way trip during the summer months, towing a trailer or negotiating a high moun- tain pass.
The warning light in the instrument cluster will indicate whether the oil level is too low » page 21 , Engine oil . Check the oil level using the dipstick as soon
as possible. Add oil accordingly.
CAUTION
■ Always check the oil level on vehicles with the 1.2 l/44 kW engine when the en-
gine is cold. Otherwise the measuring result is incorrect und oil could be incor-
rectly replenished - risk of engine damage!■
The oil level must never be above the
A
range » Fig. 127 – there is a risk of
damaging the exhaust system.
Note
Engine oil specifications » page 164.
Replenishing
First read and observe the introductory information and safety warn-
ings
on page 164.
›
Check the oil level » page 165.
›
Unscrew the cap of the engine oil filler opening.
›
Replenish the oil in portions of 0.5 litres in accordance with the correct specifi-
cations » page 164 .
›
Check the oil level » page 165.
›
Carefully screw on the oil filler opening cap and push the dipstick in fully.
Changing
First read and observe the introductory information and safety warn-ings
on page 164.
The engine oil must be changed at specified service intervals » page 145 or ac-
cording to the service interval display » page 16, Service Interval Display .
Coolant
Introduction
This chapter contains information on the following subjects:
Capacity
167
Checking the coolant level
167
Replenishing
168
The coolant consists of water with a concentration of coolant additive. This mix-
ture guarantees antifreeze protection, protects the cooling/heater system
against corrosion and prevents the formation of scale.
Vehicles exported to countries with a mild climate are already factory-filled with
a coolant which offers antifreeze protection down to about -25 ℃. In these coun-
tries the concentration of coolant additive should be at least 40 %.
Vehicles exported to countries with a cold climate are already factory-filled with a
coolant which offers antifreeze protection down to about -35 °C. In these coun-
tries the concentration of coolant additive should be at least 50 %.
If a higher concentration of antifreeze is required for climatic reasons, the amount
of coolant additive can only be increased up to a maximum of 60 % (antifreeze
protection down to approx. -40 °C).
When refilling, only use the same antifreeze identified on the coolant expansion vessel » Fig. 128 on page 167.
166General Maintenance
Page 172 of 223
A slight drop in the fluid level results in operation due to normal wear and tear
and the automatic adjustment of the brake pads.
There may be an indication of a leak in the brake system, however, if the fluid lev-
el drops significantly within a short time or if it drops below the “MIN” marking.
If the brake fluid level is too low, this is indicated by the warning light lighting
up in the instrument cluster » page 20, Brake system .
Changing
First read and observe the introductory information and safety warn-ings
on page 168.
Brake fluid absorbs moisture. Over time it therefore absorbs moisture from the
environment.
Excessive water in the brake fluid may be the cause of corrosion in the brake sys-
tem.
The water content lowers the boiling point of the brake fluid.
The brake fluid must comply with the following standards or specifications: › VW 50114;
› FMVSS 116 DOT4.
Vehicle battery
Introduction
This chapter contains information on the following subjects:
Open cover
170
Checking the electrolyte level
171
Operation in winter
171
Charging
171
Disconnecting or reconnecting
172
Replacing
172
Automatic load deactivation
172Warning symbols on the vehicle batterySymbolMeaningAlways wear eye protection.Battery acid is severely caustic. Always wear gloves and eye protec- tion.Keep fire, sparks, open flames and lit cigarettes well clear of the ve-
hicle battery.When charging the vehicle battery, a highly explosive gas mixture is
produced.Keep children away from the vehicle battery.WARNINGThere is a risk of injuries, poisoning, chemical burns, explosions or fire when
carrying out any work on the battery and on the electrical system. It is essen-
tial to comply with the generally applicable rules of safety as well as the warn- ing instructions outlined below.■
Keep children away from the vehicle battery.
■
Do not tilt the battery otherwise battery electrolyte may flow out of the bat-
tery vent openings. Protect your eyes by wearing safety glasses or a face
shield – there is a risk of being blinded.
■
Always wear protective gloves, eye and skin protection when handling the
vehicle battery.
■
The battery acid is strongly corrosive and must, therefore, be handled with
the greatest of care.
■
Corrosive fumes in the air irritate the air passages and lead to conjunctivitis
and inflammation of the air passages in the lungs.
■
Battery acid corrodes dental enamel and creates deep wounds on contact
with the skin which take a long time to heal. Repeated contact with diluted
acids causes skin diseases (inflammations, ulcers, slin cracks).
■
If any battery electrolyte comes into contact with your eyes, rinse the eyes
immediately with clear water for several minutes - consult a doctor immedi-
ately.
■
Splashes of acid on your skin or clothes should be neutralised as soon as
possible using soap suds and then rinsed with plenty of water. Seek immedi-
ate medical assistance if you swallow battery acid.
169Inspecting and replenishing
Page 177 of 223
WARNINGObserve the following information regarding the wheel bolts.■The wheel bolts must be clean and must turn easily. Never apply grease or
oil.■
The specified tightening torque of the wheel bolts for steel and light alloy
wheels is 120 Nm.
■
If the wheel bolts are insufficiently tightened, the rim can come loose when
the car is moving – there is the risk of an accident. A tightening torque which
is too high can damage the bolts and threads and this can result in permanent
deformation of the contact surfaces on the rim.
■
The wheel can loosen when the car is moving if the wheel bolts are not han-
dled correctly – there is the risk of an accident.
WARNINGObserve the following information regarding the spare wheel.■Only use the spare wheel while absolutely necessary.■
Never drive with more than one spare wheel fitted.
■
The snow chains cannot be used on the spare wheel.
CAUTION
■ If a spare wheel is used that is not identical to the fitted tyres, the following
must be observed » page 177, Spare wheel .■
Protect the tyres from contact with oil, grease and fuel.
■
Replace lost dust caps.
■
If, in the event of a puncture, it is necessary to fit a spare wheel with a tyre
without a dedicated running direction or the opposite running direction, drive carefully as the optimum characteristics of the tyre are no longer applicable in
this situation.
For the sake of the environment
Tyres which are insufficiently inflated increase your fuel consumption.
Note
■ We recommend that any work on the wheels or tyres is carried out by a special-
ist garage.■
We recommend that you use wheel rims, tyres, full wheel trims and snow chains
from ŠKODA Original Accessories.
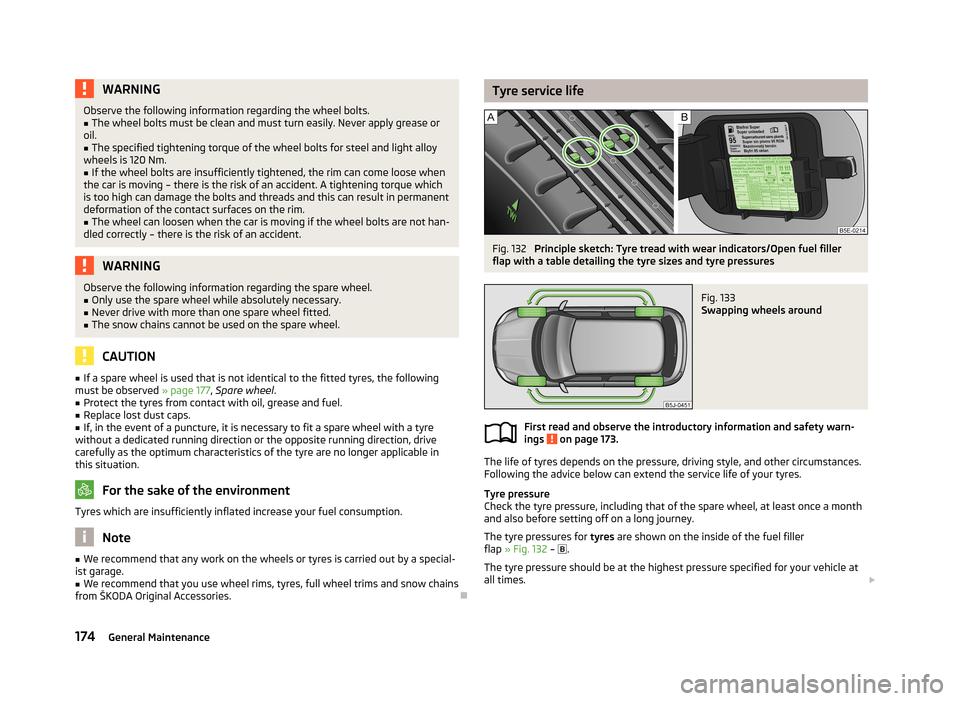
Tyre service lifeFig. 132
Principle sketch: Tyre tread with wear indicators/Open fuel filler
flap with a table detailing the tyre sizes and tyre pressures
Fig. 133
Swapping wheels around
First read and observe the introductory information and safety warn-
ings on page 173.
The life of tyres depends on the pressure, driving style, and other circumstances.
Following the advice below can extend the service life of your tyres.
Tyre pressure
Check the tyre pressure, including that of the spare wheel, at least once a month and also before setting off on a long journey.
The tyre pressures for tyres are shown on the inside of the fuel filler
flap » Fig. 132 –
.
The tyre pressure should be at the highest pressure specified for your vehicle at
all times.
174General Maintenance
Page 213 of 223
Index
A
Abroad Driving abroad
109
Unleaded petrol109
ABS112
warning light24
Accessories147
Adjusting Exterior mirrors
53
Head restraints57
Steering wheel95
Adjusting the seats125
Adjustment Headlight beam
44
Seats55
Adjustments and technical changes Spoiler
149
Adjustments and technical modifications Airbags
149
Aerial151
See windows153
Airbag133
Adjustments and impairment of the airbag sys- tem
149
Deactivating138
Deployment133
Front airbag135
Head airbag137
Side airbag136
Switching off the front passenger airbag138
Airbag system133
Air conditioning Operation
81
Air conditioning system Air outlets
77
Climatronic83
Manual air conditioning system80
Air outlets77
Alarm35
Anti-theft alarm system35
Operation36
Trailer123
Antilock Braking System112
Armrest75
Ashtray69
ASR112
warning light23
Assist systems ABS
24, 112
ASR23, 112
Cruise control system114
EDS and XDS112
ESC23, 111
Parking aid113
START-STOP116
Auto Check Control19
Automatic gearbox Selector lever-emergency unlocking
103
Starting-off and driving102
Tiptronic102
Automatic load deactivation172
Automatic transmission100
Kickdown102
Malfunction103
Selector lever lock101
Using the selector lever101
AUX94
Avoiding damage to the vehicle Driving through water
109
Avoiding damage to your vehicle108
B
Ball head Check fitting
120
Fitting119
Ready position119
Removing120
Belts128
Belt tensioners131
Bicycle carrier65
Bonnet Closing
162
Opening162
Boot Cover
61
Emergency unlocking38
Fastening elements59
Fixing nets60
Folding hooks60
see Boot lid37
Unlocking the boot lid38
Boot lid37
Automatic locking37
Brake assist111
Brake booster99
Brake fluid168
Changing169
Checking168
Display messages20
Brakes Brake booster
99
Brake fluid168
Handbrake99
Indicator light20
Running in104
Braking Information for braking
98
Breakdown kit186
Bulbs Changing
195
In the rear light199
Button in the driver's door Electrical power windows
38
C
Car care
145
Washing150
210Index
Page 214 of 223
Car computersee Multifunction display13
Caring for paintwork152
Car park ticket holder71
Carrier67
Central locking button33
Central locking system31
lock33
unlock33
Changing Brake fluid
169
Bulbs195
Bulbs in the rear light199
Engine oil166
Foglight bulb (Scout, RS)198
Foglights and daytime running lights bulbs198
Front parking light bulb197
Front turn signal bulb197
Fuses192
Fuses in the dash panel193
Fuses in the engine compartment194
High beam bulb - halogen projector headlights197
Licence plate light bulb199
Low beam and high beam bulb - halogen head-
lights
196
Low beam and high beam bulb - halogen projec-
tor headlights
197
Wheels181
Changing a wheel Preparation
182
Removing and fitting a wheel182
Subsequent steps183
Charging a vehicle battery171
Check Fit ball head properly
120
Checking Battery electrolyte level
171
Brake fluid168
Coolant level167
Engine oil165
Oil level165
Windscreen washer fluid163
Children and safety140
Child safety Side airbag
142
Child safety lock29
Child safety seat Use of child safety seats
142
Child seat Classification
142
ISOFIX143
on the front passenger seat141
TOP TETHER144
Use of ISOFIX child seats143
Chrome parts refer to Taking care of your vehicle
153
Cigarette lighter70
Cleaning145
Alcantara156
Covers on electrically heated seats157
Fabrics156
Headlight lenses154
Natural leather155
Plastic parts152
Synthetic leather156
Wheels154
Climatronic83
Automatic mode84
Control elements83
Controlling the blower85
Defrosting windscreen85
Recirculated air mode84
Setting the temperature84
Clock12
Clothes hook71
Cockpit 12-volt power outlet
70
Ashtray69
Cigarette lighter70
General view9
Lighting48
Storage compartments72
Compartments72
Computer see Multifunction display
13
Convenience turn signal45
Coolant166
Checking167
Display messages22
Replenishing168
Warning light22
Coolant temperature gauge display
11
Correct seated position125
Driver126
Front passenger126
Notes126
Rear seats126
Counter for distance driven12
Cruise control system114
Cupholders69
D
DAY LIGHT see Daylight running lights
44
Daylight running lights44
De-icing rear window50
Deactivating airbags138
Decorative films153
Delayed locking of the boot lid see Boot lid
37
Diesel refer to Fuel
160
Diesel fuel Operation in winter
160
Diesel particulate filter25
display messages25
Digital clock12
Dipstick165
211Index
Page 215 of 223
DisplayService interval16
Distance driven12
Door Child safety lock
29
Closing30
Door open warning light21
Opening30
Doors Emergency locking
31
Driving Abroad
109
Driving through water on streets109
Emissions201
Fuel consumption201
Maximum speed204
Driving economically Economical gear changing
105
Driving through water109
E
Economical and environmentally friendly driving 104
Economical driving Anticipation in driving
105
Ballast107
Driving at full throttle106
Idling106
Regular maintenance107
Saving energy107
Short distances106
Tyre pressure106
EDS112
Electrical power windows Button in the driver's door
38, 39
Button in the rear door39
Central locking system40
Electric power windows Operational faults
40
Electric sliding/tilting roof40
Electronic Differential Lock112
Electronic immobilizer97
Emergency Changing a wheel
181
Hazard warning light system47
Jump-starting187, 188
locking of the doors31
Selector lever-unlocking103
Sliding/tilting roof42
Towing the vehicle189
Towing the vehicle using the tow hitch190
Tyre repair185
Unlocking the boot lid38
Emergency equipment Fire extinguisher
180
First aid kit180
Jack181
Vehicle tool kit181
Warning triangle180
Emissions201
Engine Running in
104
Starting and stopping the engine96
Starting the engine97
Switching off the engine98
Engine compartment160
Brake fluid168
Coolant167
Overview163
Vehicle battery169
Engine oil164
Capacity164
Changing166
Checking165
Replenishing166
Specifications164
Warning light21
Engine revolutions counter11
Environment104
Environmental compatibility107
Environmentally friendly driving104
ESC Function111
warning light23
F
Films
153
Fire extinguisher180
First aid kit180
Flashers45
Fog lights46
Footmats100
see Footmats100
Front airbag135
Front seats54
Fuel158
Diesel160
Fuel gauge11
gauge11
refer to Fuel158
Refuelling158
Unleaded petrol159
Fuel consumption104
Fuses Assignment
192
Changing192
Colour coding192
G
Gear Recommended gear
13
Gearbox Display messages
19
Gear changing Gear stick
100
General view Cockpit
9
Glow plug system Warning light
24
GSM86
212Index
Page 218 of 223
Heating55
Removing the seats57
Seats and storage54
see Automatic gearbox Manual gear shifting on the multifunction steer- ing wheel
102
Selector lever see Using the selector lever
101
Service148
Service display16
Service intervals145
Setting Heating
79
Manual air conditioning system82
Manually dimmed rear-view mirror53
Setting the clock Clock
12
Shifting gears Driving and saving energy
105
Side airbag136
Sliding/tilting roof40
Comfort operation41
Emergency operation42
Opening and raising41
Operation41
Sliding/tilting sunroof Closing
41
Snow chains179
Spare wheel177
Speedometer11
Speed symbol see Wheels
176
Spoiler149
Stalk Main beam
45
Turn signals45
START-STOP116
Manually activating/deactivating the system117
Operating conditions for the system116
Starting/shutting down the engine116
Starting and stopping the engine96
Starting engine Jump-starting
187
Starting the engine97
Jump-starting188
START STOP Information messages
117
Jump-starting189
Steering force assistance95
Steering wheel95
Storage72
Storage Compartment Lighting
49
Storage compartments72
Sun visors50
Switching lights on and off43
Switching off the engine98
Synthetic leather156
T
Tailgate
37
Taking care of the vehicle Natural leather
155
Seat belts157
Taking care of your vehicle Automatic car wash system
151
Chrome parts153
Cleaning the wheels154
Door lock cylinders154
Headlight lenses154
High-pressure cleaner151
Plastic parts152
Washing by hand150
Wash system151
Technical data201
Telephone86
Temporary spare wheel177
Tiptronic102
Tools181
TOP TETHER144
Tourist lights46
Towing189
Towing a trailer118
Towing device Description
118
Drawbar load118
Use and care121
Towing eye Front
190
Rear190
Towing protection36
Traction Control System (ASR)112
Trailer118, 121
Loading121
Towing a trailer122
Transport Boot
58
Roof rack system67
Transporting children safely140
Turn signals45
Two-way radio systems86
Type plate201
Tyre load-bearing capacity see Wheels
175
Tyre pressure monitor Setting
176
Tyre repair Check pressure
187
Preparations186
Sealing and inflating the tyre186
Tyres173
New175
Pressure174
See Wheels175
Sizes174
Wear indicator174
215Index