service SKODA FABIA 2013 2.G / 5J Owner's Guide
[x] Cancel search | Manufacturer: SKODA, Model Year: 2013, Model line: FABIA, Model: SKODA FABIA 2013 2.G / 5JPages: 223, PDF Size: 12.77 MB
Page 171 of 223
If the coolant level in the coolant expansion tank is too low, this is indicated by
the warning light lighting up in the instrument cluster » page 22, Coolant .
We still recommend inspecting the coolant level directly at the reservoir from
time to time.
Loss of coolant
A loss of coolant is first and foremost an indication of a leak in the system. Do
not merely top up the coolant. Have the cooling system checked by a specialist
garage.
Replenishing
First read and observe the introductory information and safety warn-
ings
on page 166.
Only top up with new coolant.
›
Switch off the engine.
›
Allow the engine to cool.
›
Place a cloth over the cap of the coolant expansion tank and carefully unscrew
the cap.
›
Replenish the coolant.
›
Turn the cap until it clicks into place.
Do not use an alternative additive if the specified coolant is not available in an emergency. In this case, just use water and have the correct mixing ratio of waterand the coolant additive restored by a specialist garage as soon as possible.
Do not fill the coolant above the mark
A
(max.) » Fig. 128 on page 167. Excess
coolant heats up and then is forced out of the cooling system through the pres-
sure relief valve in the cap.
Brake fluid
Introduction
This chapter contains information on the following subjects:
Level check
168
Changing
169WARNING■ The engine compartment of your car is a hazardous area. While working in
the engine compartment, be sure to observe the following warn- ings » page 160 .■
Do not continue your journey if the fluid level has fallen below the MIN
marking » Fig. 129 on page 168 - there is a risk of an accident. Seek help from
a specialist garage.
■
Do not use used brake fluid - the function of the brake system may be im-
paired – there is the risk of an accident.
CAUTION
Brake fluid damages the paintwork of the vehicle.
Note
The brake fluid is changed as part of a prescribed inspection service.
Level check
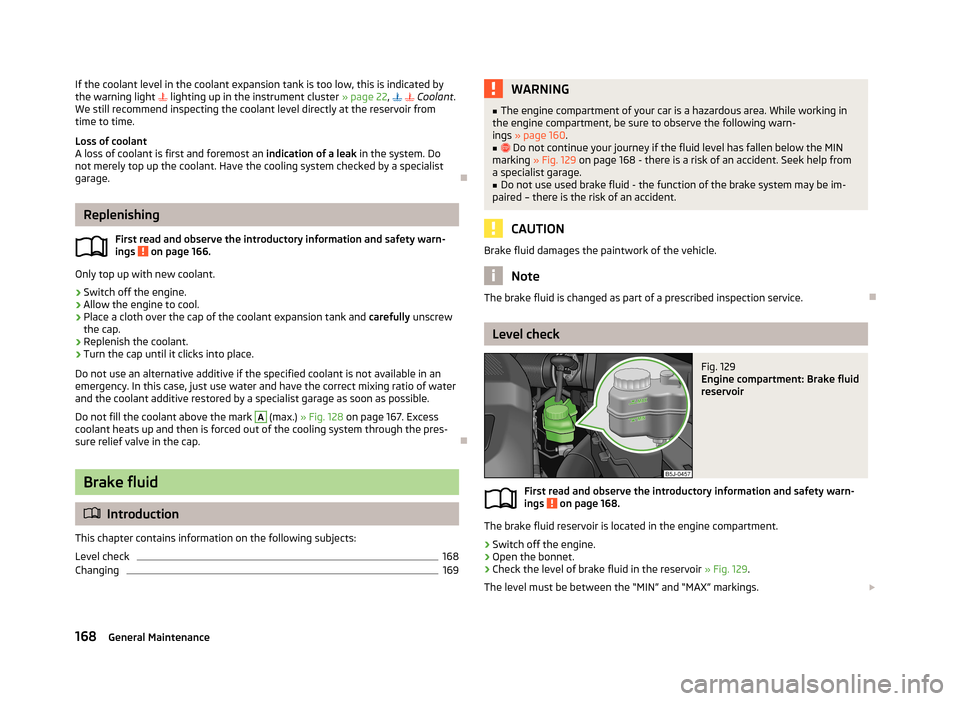
Fig. 129
Engine compartment: Brake fluid
reservoir
First read and observe the introductory information and safety warn-
ings on page 168.
The brake fluid reservoir is located in the engine compartment.
›
Switch off the engine.
›
Open the bonnet.
›
Check the level of brake fluid in the reservoir » Fig. 129.
The level must be between the “MIN” and “MAX” markings.
168General Maintenance
Page 174 of 223
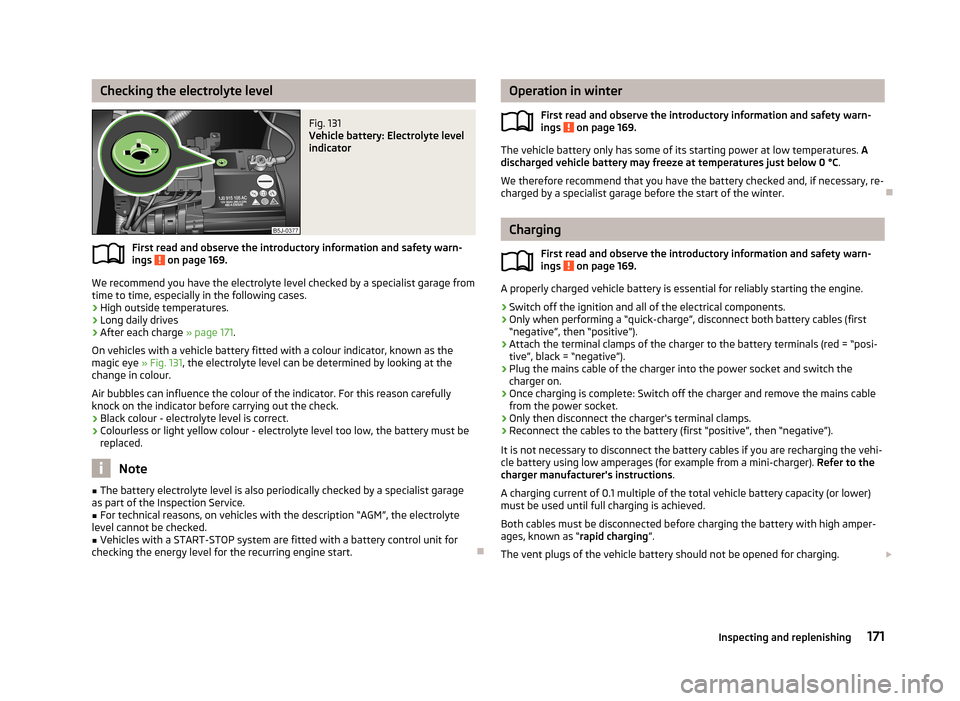
Checking the electrolyte levelFig. 131
Vehicle battery: Electrolyte level
indicator
First read and observe the introductory information and safety warn-
ings on page 169.
We recommend you have the electrolyte level checked by a specialist garage from time to time, especially in the following cases.
› High outside temperatures.
› Long daily drives
› After each charge
» page 171.
On vehicles with a vehicle battery fitted with a colour indicator, known as the
magic eye » Fig. 131, the electrolyte level can be determined by looking at the
change in colour.
Air bubbles can influence the colour of the indicator. For this reason carefully
knock on the indicator before carrying out the check.
› Black colour - electrolyte level is correct.
› Colourless or light yellow colour - electrolyte level too low, the battery must be
replaced.
Note
■ The battery electrolyte level is also periodically checked by a specialist garage
as part of the Inspection Service.■
For technical reasons, on vehicles with the description “AGM”, the electrolyte
level cannot be checked.
■
Vehicles with a START-STOP system are fitted with a battery control unit for
checking the energy level for the recurring engine start.
Operation in winter
First read and observe the introductory information and safety warn-
ings
on page 169.
The vehicle battery only has some of its starting power at low temperatures. A
discharged vehicle battery may freeze at temperatures just below 0 °C .
We therefore recommend that you have the battery checked and, if necessary, re-
charged by a specialist garage before the start of the winter.
Charging
First read and observe the introductory information and safety warn-ings
on page 169.
A properly charged vehicle battery is essential for reliably starting the engine.
›
Switch off the ignition and all of the electrical components.
›
Only when performing a “quick-charge”, disconnect both battery cables (first
“negative”, then “positive”).
›
Attach the terminal clamps of the charger to the battery terminals (red = “posi-
tive”, black = “negative”).
›
Plug the mains cable of the charger into the power socket and switch thecharger on.
›
Once charging is complete: Switch off the charger and remove the mains cable
from the power socket.
›
Only then disconnect the charger's terminal clamps.
›
Reconnect the cables to the battery (first “positive”, then “negative”).
It is not necessary to disconnect the battery cables if you are recharging the vehi-
cle battery using low amperages (for example from a mini-charger). Refer to the
charger manufacturer's instructions .
A charging current of 0.1 multiple of the total vehicle battery capacity (or lower)
must be used until full charging is achieved.
Both cables must be disconnected before charging the battery with high amper-
ages, known as “ rapid charging”.
The vent plugs of the vehicle battery should not be opened for charging.
171Inspecting and replenishing
Page 176 of 223
Wheels
Tyres and rims
Introduction
This chapter contains information on the following subjects:
Tyre service life
174
New tyres
175
Unidirectional tyres
176
Tyre pressure monitor
176
Spare wheel
177
Full wheel trim
178
Wheel bolts
178
Hubcaps
178
Wheel bolts
179WARNING■ National legal requirements must be observed for the use of tyres.■Observe the national legal regulations relating to the use of snow chains
and the maximum vehicle speed with snow chains.WARNINGThe following instructions for the use of tyres must be observed.■During the first 500 km, new tyres do not offer optimum grip and appropri-
ate care should therefore be taken when driving – there is the risk of an acci-
dent.■
On all four wheels, use only radial tyres of the same type, size (rolling cir-
cumference) and the same tread pattern.
■
For safety reasons, do no replace tyres individually.
■
Never exceed the maximum permissible load bearing capacity of the tyres
fitted – there is the risk of an accident.
■
Never exceed the maximum permissible speed of the tyres fitted – there is
the risk of an accident.
WARNING (Continued)■ Incorrect wheel alignment at the front or rear impairs handling – there is the
risk of an accident.■
Unusual vibrations or pulling of the vehicle to one side could be a sign of
tyre damage. If there is any doubt that a wheel is damaged, immediately re-
duce your speed and stop! If no external damage is evident, drive slowly and
carefully to the nearest specialist garage to have the vehicle checked.
■
Only use those tyres or wheel rims which have been approved by ŠKODA for
your model of vehicle. Failure to observe this instruction will adversely affect
the road safety of your vehicle – there is the risk of an accident.
WARNINGObserve the following information regarding tyre damage and wear.■Never use tyres if you do not know anything about the condition and age.■
Never drive with damaged tyres – there is the risk of an accident.
■
Immediately replace damaged wheel rims or tyres.
■
You must have your tyres replaced with new ones at the latest when the
wear indicators have been worn down.
■
Worn tyres do not provide the necessary grip particularly at high speeds on
wet roads. “Aquaplaning” (uncontrolled movements of the vehicle – “swim- ming” on a wet road surface) could be the result.
WARNINGObserve the following information regarding the tyre pressure.■The tyre control display does not absolve the driver of the responsibility to
ensure the correct tyre inflation pressure. Check the tyre pressure at regular
intervals.■
Pressures that are too low or too high impair handling – there is the risk of
an accident.
■
If the pressure is too low, the tyre must overcome a greater rolling resist-
ance. This will heat the tyre up, especially at higher speeds. This can result in tread separation and a tyre blowout.
173Wheels
Page 177 of 223
WARNINGObserve the following information regarding the wheel bolts.■The wheel bolts must be clean and must turn easily. Never apply grease or
oil.■
The specified tightening torque of the wheel bolts for steel and light alloy
wheels is 120 Nm.
■
If the wheel bolts are insufficiently tightened, the rim can come loose when
the car is moving – there is the risk of an accident. A tightening torque which
is too high can damage the bolts and threads and this can result in permanent
deformation of the contact surfaces on the rim.
■
The wheel can loosen when the car is moving if the wheel bolts are not han-
dled correctly – there is the risk of an accident.
WARNINGObserve the following information regarding the spare wheel.■Only use the spare wheel while absolutely necessary.■
Never drive with more than one spare wheel fitted.
■
The snow chains cannot be used on the spare wheel.
CAUTION
■ If a spare wheel is used that is not identical to the fitted tyres, the following
must be observed » page 177, Spare wheel .■
Protect the tyres from contact with oil, grease and fuel.
■
Replace lost dust caps.
■
If, in the event of a puncture, it is necessary to fit a spare wheel with a tyre
without a dedicated running direction or the opposite running direction, drive carefully as the optimum characteristics of the tyre are no longer applicable in
this situation.
For the sake of the environment
Tyres which are insufficiently inflated increase your fuel consumption.
Note
■ We recommend that any work on the wheels or tyres is carried out by a special-
ist garage.■
We recommend that you use wheel rims, tyres, full wheel trims and snow chains
from ŠKODA Original Accessories.
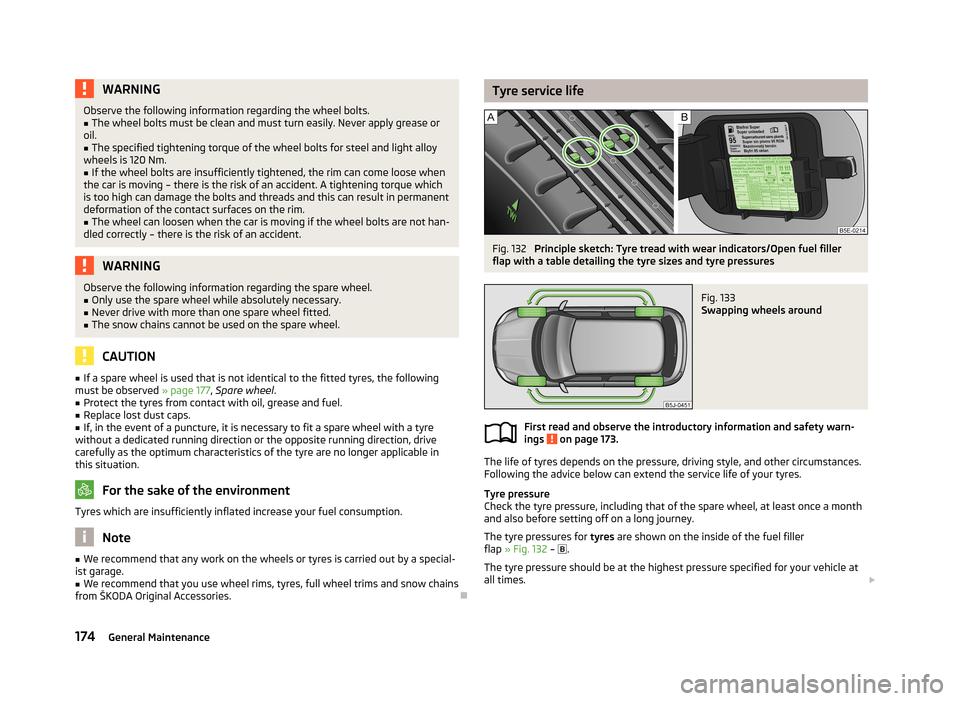
Tyre service lifeFig. 132
Principle sketch: Tyre tread with wear indicators/Open fuel filler
flap with a table detailing the tyre sizes and tyre pressures
Fig. 133
Swapping wheels around
First read and observe the introductory information and safety warn-
ings on page 173.
The life of tyres depends on the pressure, driving style, and other circumstances.
Following the advice below can extend the service life of your tyres.
Tyre pressure
Check the tyre pressure, including that of the spare wheel, at least once a month and also before setting off on a long journey.
The tyre pressures for tyres are shown on the inside of the fuel filler
flap » Fig. 132 –
.
The tyre pressure should be at the highest pressure specified for your vehicle at
all times.
174General Maintenance
Page 215 of 223
DisplayService interval16
Distance driven12
Door Child safety lock
29
Closing30
Door open warning light21
Opening30
Doors Emergency locking
31
Driving Abroad
109
Driving through water on streets109
Emissions201
Fuel consumption201
Maximum speed204
Driving economically Economical gear changing
105
Driving through water109
E
Economical and environmentally friendly driving 104
Economical driving Anticipation in driving
105
Ballast107
Driving at full throttle106
Idling106
Regular maintenance107
Saving energy107
Short distances106
Tyre pressure106
EDS112
Electrical power windows Button in the driver's door
38, 39
Button in the rear door39
Central locking system40
Electric power windows Operational faults
40
Electric sliding/tilting roof40
Electronic Differential Lock112
Electronic immobilizer97
Emergency Changing a wheel
181
Hazard warning light system47
Jump-starting187, 188
locking of the doors31
Selector lever-unlocking103
Sliding/tilting roof42
Towing the vehicle189
Towing the vehicle using the tow hitch190
Tyre repair185
Unlocking the boot lid38
Emergency equipment Fire extinguisher
180
First aid kit180
Jack181
Vehicle tool kit181
Warning triangle180
Emissions201
Engine Running in
104
Starting and stopping the engine96
Starting the engine97
Switching off the engine98
Engine compartment160
Brake fluid168
Coolant167
Overview163
Vehicle battery169
Engine oil164
Capacity164
Changing166
Checking165
Replenishing166
Specifications164
Warning light21
Engine revolutions counter11
Environment104
Environmental compatibility107
Environmentally friendly driving104
ESC Function111
warning light23
F
Films
153
Fire extinguisher180
First aid kit180
Flashers45
Fog lights46
Footmats100
see Footmats100
Front airbag135
Front seats54
Fuel158
Diesel160
Fuel gauge11
gauge11
refer to Fuel158
Refuelling158
Unleaded petrol159
Fuel consumption104
Fuses Assignment
192
Changing192
Colour coding192
G
Gear Recommended gear
13
Gearbox Display messages
19
Gear changing Gear stick
100
General view Cockpit
9
Glow plug system Warning light
24
GSM86
212Index
Page 216 of 223
H
Handbrake
99
Hazard warning light system47
Head airbag137
Headlight cleaning system Headlight cleaning system
52
Headlights196
Driving abroad110
Headlight cleaning system52
Head restraint57
Storing in the seat squabs58
Heating Deicing the windows
79
Exterior mirrors53
Operating78
Operation79
Rear window50
Recirculated air mode80
Seats55
Heating and air conditioning77
Hill hold control111
Horn9
I
Ignition
97
Ignition lock97
Immobilizer97
Individual settings locking
32
unlocking32
Inertia reel131
Instrument cluster10
Overview10
Interior monitor36
ISOFIX143
J
Jack
181
Jacking points Raise vehicle
184
Jump-starting187, 188
L
Light Beam adjustment
44
Cockpit48
Headlight flash45
Lights43
Cockpit48, 49
Daylight running44
Fog lights46
Foglights with the CORNER function46
Halogen projector headlights with cornering light
function
45
Hazard warning light system47
Low beam lights43
Main beam lights45
Parking lights43, 47
Rear fog light46
Replacing bulbs195
Switching on and off43
Tourist lights46
Turn signals45
warning lights20
Loads201
Lock Central locking system
33
Locking Emergency locking
31
Remote control34
without central locking30
Locking and unlocking from the inside33
Low beam lights43
Luggage compartment Class N1 vehicles59
Lighting49
Retractable luggage compartment cover (Fabia Estate)
62
Variable loading floor62
M
Main beam
45
Maintenance107
Decorative films153
Manual air conditioning Recirculated air mode
82
Manual gear changing see Gear changing
100
Materials defect liability5
MAXI DOT Main menu
18
see MAXI DOT display18
Settings18
MAXI DOT display18
Maximum speed204
MDI94
Mirror Exterior mirrors
53
Manually dimmed rear-view mirror53
Vanity50
Mobile phone86
Connecting to the hands-free system89
Modes of the automatic transmission101
Modifications147
Modifications and technical changes Service
148
Multifunction display Functions
13
Memory14
Operation14
Multimedia92
213Index
Page 218 of 223
Heating55
Removing the seats57
Seats and storage54
see Automatic gearbox Manual gear shifting on the multifunction steer- ing wheel
102
Selector lever see Using the selector lever
101
Service148
Service display16
Service intervals145
Setting Heating
79
Manual air conditioning system82
Manually dimmed rear-view mirror53
Setting the clock Clock
12
Shifting gears Driving and saving energy
105
Side airbag136
Sliding/tilting roof40
Comfort operation41
Emergency operation42
Opening and raising41
Operation41
Sliding/tilting sunroof Closing
41
Snow chains179
Spare wheel177
Speedometer11
Speed symbol see Wheels
176
Spoiler149
Stalk Main beam
45
Turn signals45
START-STOP116
Manually activating/deactivating the system117
Operating conditions for the system116
Starting/shutting down the engine116
Starting and stopping the engine96
Starting engine Jump-starting
187
Starting the engine97
Jump-starting188
START STOP Information messages
117
Jump-starting189
Steering force assistance95
Steering wheel95
Storage72
Storage Compartment Lighting
49
Storage compartments72
Sun visors50
Switching lights on and off43
Switching off the engine98
Synthetic leather156
T
Tailgate
37
Taking care of the vehicle Natural leather
155
Seat belts157
Taking care of your vehicle Automatic car wash system
151
Chrome parts153
Cleaning the wheels154
Door lock cylinders154
Headlight lenses154
High-pressure cleaner151
Plastic parts152
Washing by hand150
Wash system151
Technical data201
Telephone86
Temporary spare wheel177
Tiptronic102
Tools181
TOP TETHER144
Tourist lights46
Towing189
Towing a trailer118
Towing device Description
118
Drawbar load118
Use and care121
Towing eye Front
190
Rear190
Towing protection36
Traction Control System (ASR)112
Trailer118, 121
Loading121
Towing a trailer122
Transport Boot
58
Roof rack system67
Transporting children safely140
Turn signals45
Two-way radio systems86
Type plate201
Tyre load-bearing capacity see Wheels
175
Tyre pressure monitor Setting
176
Tyre repair Check pressure
187
Preparations186
Sealing and inflating the tyre186
Tyres173
New175
Pressure174
See Wheels175
Sizes174
Wear indicator174
215Index
Page 219 of 223
U
Underbody protection
154
Underbody waxing154
Unleaded petrol109
unlock Central locking system
33
Unlocking Remote control
34
without central locking30
Unlocking and locking28
USB94
Useful equipment69
12-volt power outlet70
Ashtray69
Car park ticket holder71
Cigarette lighter70
Clothes hood71
Cupholders69
Using the selector lever101
V
Variable loading floor
62
Dividing the luggage compartment62
Removing and refitting63
Vehicle battery Automatic load deactivation
172
Charging171
Checking the electrolyte level171
Cover170
Disconnecting and reconnecting172
Operation in winter171
Replacing172
Safety instructions169
Vehicle care Alcantara
156
Care of the interior155
Decorative films153
Fabrics156
Polishing152
Rubber seals153
Seat covers157
Synthetic leather156
Underbody waxing154
Vehicle exterior care151
Waxing152
Vehicle data sticker201
Vehicle dimensions202
Vehicle identification number (VIN)201
Vehicle key28
Vehicle status see Auto Check Control
19
Vehicle tool kit181
Visors50
W
Warning lights
20
Warning symbols see warning lights
20
Warning triangle180
Warranty5
Washing145
Automatic car wash system151
by hand150
Chrome parts153
High-pressure cleaner151
Water Driving through
109
Waxing See Vehicle care
152
Weights201
Wheel bolts Anti-theft wheel bolt
184
Caps178
Loosening and tightening183
Wheels Bolts
179
Changing181
Full trim178
General information173
Load index175
Snow chains179
Spare wheel177
Speed symbol176
Storing wheels174
Swapping wheels around174
Temporary spare wheel177
Tyre pressure174
Tyre service life174
Tyre wear indicator174
Unidirectional tyres176
Wheel sizes174
Winter tyres179
Wheels and tyres Hubcaps
178
Window convenience operation40
Windows153
Deicing153
See Electrical power windows38
Window wipers Replacing the rear window wiper blade
52
Windscreen Deicing
153
Windscreen washer fluid Checking
163
Replenishing163
Warning light26
Winter163
Windscreen washer system163
Windscreen wash system Windscreen washer
51
Windscreen wiper Operate
51
Replacing the windscreen wiper blades52
Windscreen wipers Cleaning the windscreen wiper blades
52
Windscreen washer fluid163
Winter Deicing windows
153
216Index