automatic transmission SKODA FABIA 2014 2.G / 5J Owner's Manual
[x] Cancel search | Manufacturer: SKODA, Model Year: 2014, Model line: FABIA, Model: SKODA FABIA 2014 2.G / 5JPages: 197, PDF Size: 13.56 MB
Page 5 of 197
Table of Contents
Abbreviations
Safety
Passive Safety
6
General information
6
Correct and safe seated position
7
Seat belts
10
Wearing seat belts
10
Inertia reel and belt pretensioners
13
Airbag system
14
Description of the airbag system
14
Airbag overview
15
Deactivating airbags
17
Transporting children safely
19
Child seat
19
Fastening systems
22
Using the system
Cockpit
25
Overview
24
Instruments and Indicator Lights
26
Instrument cluster
26
Multifunction display (MFD)
29
Service Interval Display
32
MAXI DOT display
33
Warning lights
35
Unlocking and locking
42
Unlocking and locking
42
Central locking system
45
Remote control
48
Anti-theft alarm system
49
Tailgate
50Electrical power windows51Electric sliding/tilting roof53
Lights and visibility
55
Lights
55
Interior lights
59
Visibility
61
Windscreen wipers and washers
61
Rear window
63
Seats and storage
65
Front seats
65
Rear seats
66
Head restraints
67
Boot
68
Variable loading floor in the luggage
compartment (Fabia Estate)
72
Net partition (Fabia Estate)
73
Bicycle carrier in the luggage compartment
75
Roof rack system
76
Useful equipment
77
Storage compartments
80
Heating and air conditioning
84
Heating, ventilation, cooling
84
Heating
86
Air conditioning system (manual air
conditioning system)
87
Climatronic (automatic air conditioning
system)
90
Communication and multimedia
92
Universal telephone preinstallation GSM II
92
Voice control
97
Multimedia
98
Driving
Starting-off and Driving
101
Starting and stopping the engine
101
Brakes
102Manual gear shifting and pedals104Automatic transmission105
Running in
108
Economical driving and respect the
environment
109
Avoiding damage to your vehicle
112
Driving abroad
113
Assist systems
114
Brake assist systems
114
Parking aid
116
Cruise control system
117
START-STOP
118
Towing a trailer
120
Towing device
120
Trailer
124
General Maintenance
Car care
126
Services, modifications and technical
alterations
126
Washing the car
128
Vehicle exterior care
129
Care of the interior
132
Inspecting and replenishing
135
Fuel
135
Engine compartment
138
Engine oil
141
Coolant
143
Brake fluid
145
Vehicle battery
145
Wheels
149
Tyres and rims
149
Winter use
1563Table of Contents
Page 94 of 197
The blower speed set is indicated by displaying the corresponding number of
segments in icon 9 » Fig. 97 on page 90 in the display.WARNING■
“Stale air” may result in fatigue in the driver and occupants, reduce atten-
tion levels and also cause the windows to mist up. The risk of having an ac-
cident increases.■
Do not switch off the Climatronic system for longer than necessary.
■
Switch on the Climatronic system as soon as the windows mist up.
Defrosting windscreen
Switching on
›
Press the button
» Fig. 97 on page 90 .
Switching off
›
Press the button
» Fig. 97 on page 90 again or press the
button.
More air flows out of the air outlet vents 1 and 2 » Fig. 94 on page 85 . The
temperature control is controlled automatically.
Communication and multimedia
Universal telephone preinstallation GSM II
Introduction
This chapter contains information on the following subjects:
Mobile phones and two-way radio systems
92
Introductory information
93
Phone Phonebook
93
Operating the phone on the multifunction steering wheel
94
Inserting the mobile phone and adapter
94
Managing telephone calls with the help of the adapter
95
Connecting the mobile phone to the hands-free system
95
Symbols in the MAXI DOT display
96
Telephone operation in the MAXI DOT display
96
Mobile phones and two-way radio systems
ŠKODA permits the operation of mobile phones and two-way radio systems
with a professionally installed external aerial and a maximum transmission
power of up to 10 watts.
Please consult a ŠKODA Partner for information about the possibility of instal- ling and operating mobile phones and two-way radio systems with a transmis-
sion power of more than 10 W.
Operating mobile phones or two-way radio systems may interfere with the
functionality of the electronic systems in your vehicle.
The possible reasons for this are.
› no external aerial.
› external aerial incorrectly installed.
› transmission power greater than 10 watts.
WARNING■
Concentrate fully at all times on your driving! As the driver, you are fully
responsible for the operation of your vehicle.■
Only use the device in a way that you are in full control of your vehicle in
every traffic situation – there is the risk of accidents!
92Using the system
Page 105 of 197
WARNING■Greater physical effort is required for braking when the engine is switch-
ed off – there is the risk of an accident.■
The clutch pedal must be depressed when braking on a vehicle with man-
ual transmission, when the vehicle is in gear and at low revs. If you fail to
do so, the functionality of the brake servo can be impaired – there is the
risk of an accident.
■
If a front spoiler, full wheel trim, etc. is mounted retrospectively, it must
be ensured that the air supply to the front wheel brakes is not reduced.
The front brakes may overheat, which can have a negative impact on the
functioning of the braking system – there is a risk of an accident.
■
When leaving the vehicle, never leave persons who might, for example,
release the handbrake or take the vehicle out of gear unattended in the ve-
hicle. The vehicle might then move off – there is the risk of an accident.
CAUTION
■ Observe the recommendations on the new brake pads » page 109.■Never let the brakes slip with light pressure on the pedal if braking is not
necessary. This causes the brakes to overheat and can also result in a longer
braking distance and excessive wear.
Information for braking
Read and observe
and on page 103 first.
If the brakes are applied in full and the control unit for the braking system con-siders the situation to be dangerous for the following traffic, the brake light
flashes automatically.
After the speed was reduced below around 10 km/h or the vehicle was stop-
ped, the brake light stops flashing and the hazard warning light system
switches on. The hazard warning light system is switched off automatically af- ter accelerating or driving off again.
Before travelling a long distance down a steep gradient, reduce speed and
shift into the next lowest gear. As a result, the braking effect of the engine will
be used, reducing the load on the brakes. Any additional braking should be
completed intermittently, not continuously.
Wear-and-tear
The wear of the brake pads is dependent on the operating conditions and driv- ing style.
The brake pads wear more quickly if a lot of journeys are completed in towns and over short distances or if a very sporty style of driving is adopted.
Under these severe conditions , the thickness of the brake pads must also be
checked by a specialist garage between services.
Wet roads or road salt
The performance of the brakes can be delayed as the brake discs and brake
pads may be moist or have a coating of ice or layer of salt on them in winter.
The brakes are cleaned and dried by applying the brakes several times.
Corrosion
Corrosion on the brake discs and dirt on the bake pads occur if the vehicle has
been parked for a long period and if you do not make much use of the braking
system. The brakes are cleaned and dried by applying the brakes several times.
Faults in the brake surface
If it is found that the braking distance has suddenly become longer and that
the brake pedal can be depressed further, the brake system may be faulty.
Visit a specialist garage immediately and adjust your style of driving appropri-
ately as you will not know how great the damage is.
Low brake fluid level
An insufficient level of brake fluid may result in problems in the brake system.
The level of the brake fluid is monitored electronically » page 36,
Brake sys-
tem .
Brake booster
The brake booster increases the pressure generated with the brake pedal. The
brake booster only operates when the engine is running.103Starting-off and Driving
Page 107 of 197
In the driver's footwell, only a footmat, which is attached to the two corre-
sponding attachment points, may be used.
Only use factory-supplied footmats or footmats from the range of ŠKODAOrigi-
nal Accessories, which are fitted to two attachment points.WARNINGNo objects are allowed in the driver's footwell – there is a risk of obstruct-
ing or restriction pedal operation.
Automatic transmission
Introduction
This chapter contains information on the following subjects:
Modes and use of selector lever
105
Manual gear shifting (Tiptronic)
106
Starting-off and driving
107
Malfunction
107
Selector lever-emergency unlocking
108WARNING■ Do not depress the accelerator if the forward driving mode is changed
when the vehicle is halted and the engine is running – there is a risk of an
accident.■
Never shift the selector lever to R or P modes when driving – there is a
risk of an accident.
■
The vehicle must be held on the brake pedal in D, S or R modes if the ve-
hicle is halted and the engine is running. Even when the engine is idling,
power transmission is never completely interrupted – the vehicle will creep.
CAUTION■ If the selector lever is shifted to N while the vehicle is being driven you must
lift off the accelerator pedal and you will need to wait until the engine has
reached its idling speed before shifting the selector lever to a forward driving
mode again.■
At temperatures below -10 °C, the engine can only be started in selector lev-
er position P.
■
Never try to hold the vehicle using the accelerator pedal when stopping on a
hill – this may lead to transmission damage.
Note
The ignition key can only be withdrawn once the ignition has been switched
off if the selector lever is in the P position 1)
.
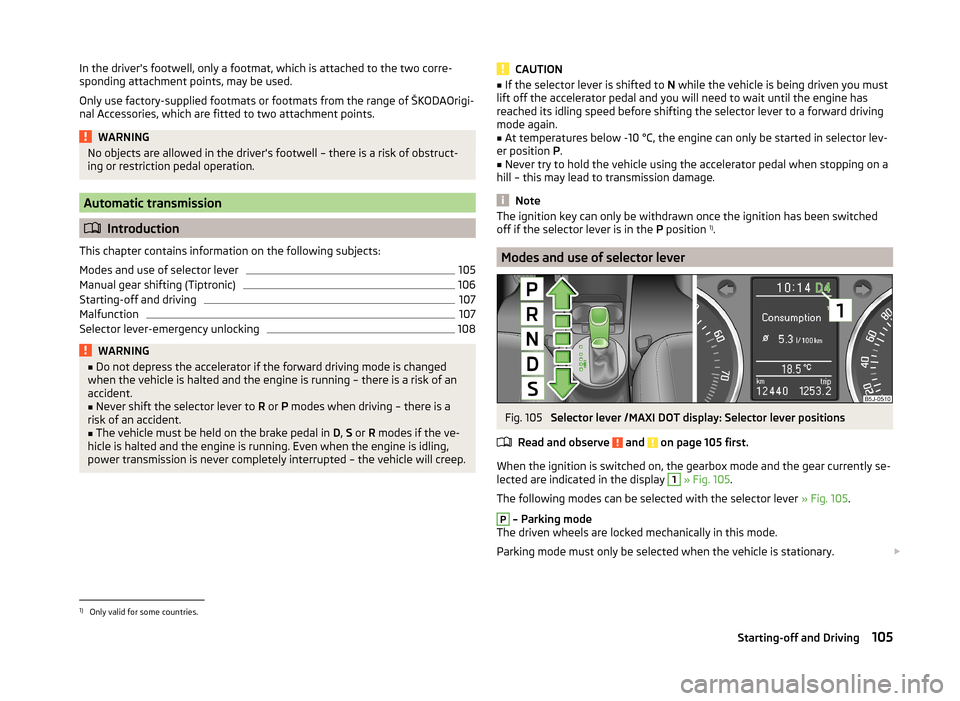
Modes and use of selector lever
Fig. 105
Selector lever /MAXI DOT display: Selector lever positions
Read and observe
and on page 105 first.
When the ignition is switched on, the gearbox mode and the gear currently se- lected are indicated in the display
1
» Fig. 105 .
The following modes can be selected with the selector lever » Fig. 105.
P
– Parking mode
The driven wheels are locked mechanically in this mode.
Parking mode must only be selected when the vehicle is stationary.
1)
Only valid for some countries.
105Starting-off and Driving
Page 108 of 197
R - Reverse gear
Reverse gear can only be engaged when the vehicle is stationary and the en-
gine is at idling speed.
Depress the brake pedal and simultaneously press the shiftlock in the selector
lever grip before shifting to R from P or N.N
- Neutral
Power transmission to the drive wheels is interrupted in this mode.
D
- Mode for forwards travel (normal programme)
In mode D, the forward gears are automatically changed according to the en-
gine load, accelerator pedal actuation and driving speed.
S
- Mode for forwards travel (sports programme)
In mode S, the forward gears are shifted automatically up and down at higher
engine speeds than in mode D.
The shiftlock on the selector lever grip must be pressed when moving the se-
lector lever out of D mode into S mode.
Releasing selector lever from P or N modes (selector lever lock)
The selector lever is locked in the P and N modes to prevent the forwards trav-
el mode from being selected accidentally and setting the vehicle in motion.
The warning light lights up in the instrument cluster
» page 42.
The selector lever is released by depressing the brake pedal while simultane-
ously pressing the locking button in the selection lever grip.
The selector lever is not locked when shifted quickly through N (e.g. from R to
D ). This, for example, helps to rock out a vehicle that is stuck, e.g. in a bank of
snow. The selector lever lock will engage if the lever is in position N for more
than approximately 2 seconds without the brake pedal being depressed.
The selector lever is locked only when the vehicle is stationary and at speeds
up to 5 km/h.
Note
If you want to move the selector lever from mode P to mode D or vice versa,
move the selector lever quickly. This prevents modes R or N from being selec-
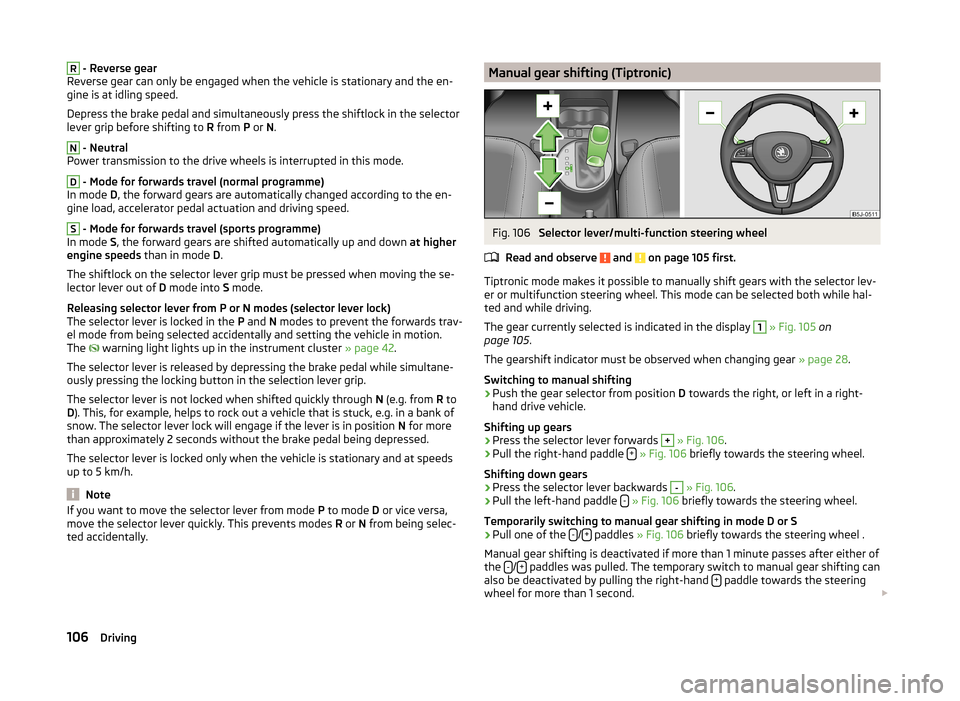
ted accidentally.Manual gear shifting (Tiptronic)Fig. 106
Selector lever/multi-function steering wheel
Read and observe
and on page 105 first.
Tiptronic mode makes it possible to manually shift gears with the selector lev-
er or multifunction steering wheel. This mode can be selected both while hal-
ted and while driving.
The gear currently selected is indicated in the display
1
» Fig. 105 on
page 105 .
The gearshift indicator must be observed when changing gear » page 28.
Switching to manual shifting
›
Push the gear selector from position D towards the right, or left in a right-
hand drive vehicle.
Shifting up gears
›
Press the selector lever forwards
+
» Fig. 106 .
›
Pull the right-hand paddle +
» Fig. 106 briefly towards the steering wheel.
Shifting down gears
›
Press the selector lever backwards
-
» Fig. 106 .
›
Pull the left-hand paddle -
» Fig. 106 briefly towards the steering wheel.
Temporarily switching to manual gear shifting in mode D or S
›
Pull one of the -/+ paddles
» Fig. 106 briefly towards the steering wheel .
Manual gear shifting is deactivated if more than 1 minute passes after either of
the -
/+ paddles was pulled. The temporary switch to manual gear shifting can
also be deactivated by pulling the right-hand + paddle towards the steering
wheel for more than 1 second.
106Driving
Page 109 of 197
When accelerating, the gearbox automatically shifts up into the higher gear
just before the maximum permissible engine speed is reached.
If a lower gear is selected, the gearbox does not shift down until there is no risk of the engine overrevving.
Note
It may be advantageous to use manual gear shifting when driving downhill, for
example. Shifting to a lower gear reduces the load on the brakes and hence
brake wear » page 103, Information for braking .
Starting-off and driving
Read and observe
and on page 105 first.
Starting off
›
Start the engine.
›
Firmly depress and hold the brake pedal.
›
Press and hold the shiftlock button on the selector lever grip.
›
Move the selector lever into the desired position » page 105 and then release
the lock button.
›
Release the brake pedal and accelerate.
Stop
›
Fully depress and hold the brake pedal and bring the vehicle to a stop.
›
Keep holding the brake pedal until driving is resumed.
The selector lever position N does not have to be selected when stopping for a
short time, such as at a cross roads.
Parking
›
Fully depress and hold the brake pedal and bring the vehicle to a stop.
›
Firmly apply the handbrake.
›
Press and hold the shiftlock button on the selector lever grip.
›
Move the selector lever to the P position and then release the shiftlock but-
ton.
Kickdown
The kickdown function allows you to achieve maximum acceleration by your vehicle while driving.
When the accelerator pedal is fully depressed, the kickdown function is activa-
ted in any forward driving mode.
The gearbox shifts down one or more gears depending on the vehicle speed
and engine speed, and the vehicle accelerates.
The gearbox does not shift up into the highest gear until the engine has
reached its maximum revolutions for this gear range.WARNINGRapid acceleration, particularly on slippery roads, can lead to loss of control
of the vehicle – there is a risk of an accident.
Malfunction
Read and observe
and on page 105 first.
Emergency programme
The transmission switches to the emergency programme if there is a fault in
the automatic gearbox system.
Indications of an activated emergency programme include the following:
› Only certain gears are selected.
› Reverse gear
R cannot be used.
› Shifting gears in Tiptronic mode is not possible.
Gearbox overheating
The gearbox may, for example, become too hot due to frequent repeated
starting or stop-and-go traffic. Overheating is indicated by the warning
light » page 34 ,
Clutches of the automatic DSG gearbox are too hot
.
Note
Visit a specialist workshop if the gearbox has switched to the emergency pro-
gramme.107Starting-off and Driving
Page 110 of 197
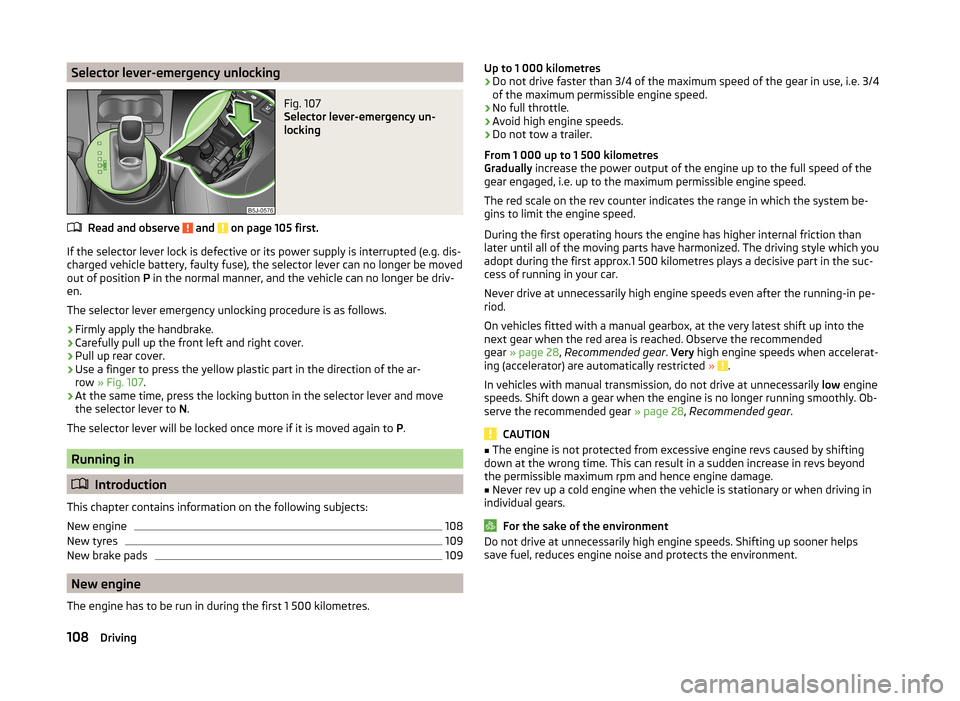
Selector lever-emergency unlockingFig. 107
Selector lever-emergency un-
locking
Read and observe and on page 105 first.
If the selector lever lock is defective or its power supply is interrupted (e.g. dis-
charged vehicle battery, faulty fuse), the selector lever can no longer be moved
out of position P in the normal manner, and the vehicle can no longer be driv-
en.
The selector lever emergency unlocking procedure is as follows.
›
Firmly apply the handbrake.
›
Carefully pull up the front left and right cover.
›
Pull up rear cover.
›
Use a finger to press the yellow plastic part in the direction of the ar-
row » Fig. 107 .
›
At the same time, press the locking button in the selector lever and move
the selector lever to N.
The selector lever will be locked once more if it is moved again to P.
Running in
Introduction
This chapter contains information on the following subjects:
New engine
108
New tyres
109
New brake pads
109
New engine
The engine has to be run in during the first 1 500 kilometres.
Up to 1 000 kilometres›Do not drive faster than 3/4 of the maximum speed of the gear in use, i.e. 3/4
of the maximum permissible engine speed.›
No full throttle.
›
Avoid high engine speeds.
›
Do not tow a trailer.
From 1 000 up to 1 500 kilometres
Gradually increase the power output of the engine up to the full speed of the
gear engaged, i.e. up to the maximum permissible engine speed.
The red scale on the rev counter indicates the range in which the system be-
gins to limit the engine speed.
During the first operating hours the engine has higher internal friction than
later until all of the moving parts have harmonized. The driving style which you
adopt during the first approx.1 500 kilometres plays a decisive part in the suc-
cess of running in your car.
Never drive at unnecessarily high engine speeds even after the running-in pe-
riod.
On vehicles fitted with a manual gearbox, at the very latest shift up into the
next gear when the red area is reached. Observe the recommended
gear » page 28 , Recommended gear . Very high engine speeds when accelerat-
ing (accelerator) are automatically restricted »
.
In vehicles with manual transmission, do not drive at unnecessarily low engine
speeds. Shift down a gear when the engine is no longer running smoothly. Ob-
serve the recommended gear » page 28, Recommended gear .
CAUTION
■
The engine is not protected from excessive engine revs caused by shifting
down at the wrong time. This can result in a sudden increase in revs beyond
the permissible maximum rpm and hence engine damage.■
Never rev up a cold engine when the vehicle is stationary or when driving in
individual gears.
For the sake of the environment
Do not drive at unnecessarily high engine speeds. Shifting up sooner helps
save fuel, reduces engine noise and protects the environment.108Driving
Page 168 of 197
Negative cable - colour coding in the majority of cases is black.
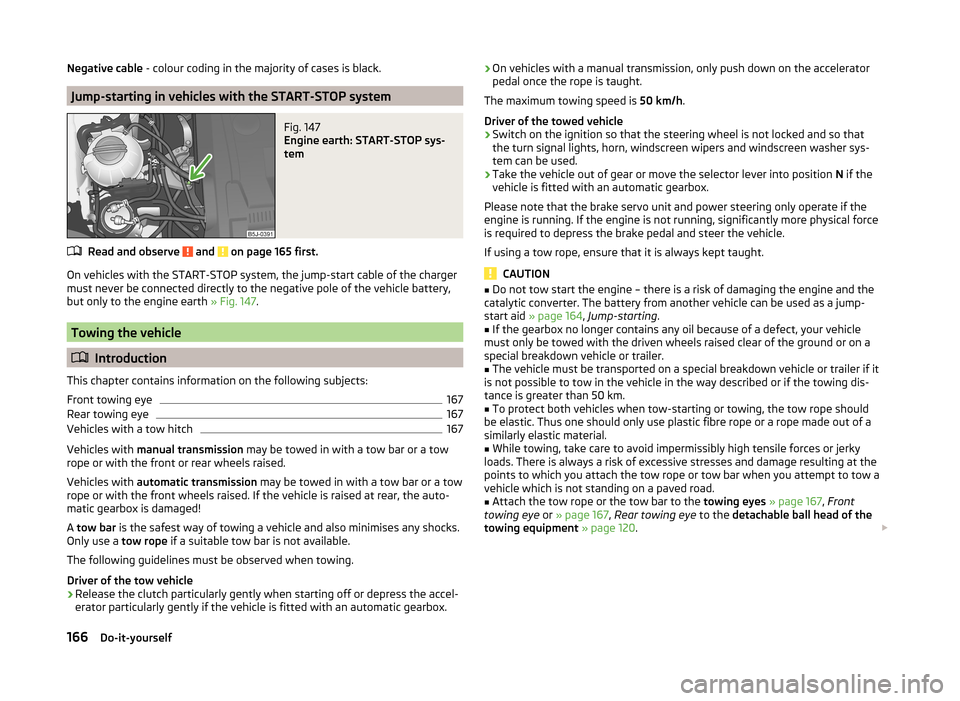
Jump-starting in vehicles with the START-STOP system
Fig. 147
Engine earth: START-STOP sys-
tem
Read and observe and on page 165 first.
On vehicles with the START-STOP system, the jump-start cable of the charger
must never be connected directly to the negative pole of the vehicle battery,
but only to the engine earth » Fig. 147.
Towing the vehicle
Introduction
This chapter contains information on the following subjects:
Front towing eye
167
Rear towing eye
167
Vehicles with a tow hitch
167
Vehicles with manual transmission may be towed in with a tow bar or a tow
rope or with the front or rear wheels raised.
Vehicles with automatic transmission may be towed in with a tow bar or a tow
rope or with the front wheels raised. If the vehicle is raised at rear, the auto-
matic gearbox is damaged!
A tow bar is the safest way of towing a vehicle and also minimises any shocks.
Only use a tow rope if a suitable tow bar is not available.
The following guidelines must be observed when towing.
Driver of the tow vehicle
›
Release the clutch particularly gently when starting off or depress the accel-
erator particularly gently if the vehicle is fitted with an automatic gearbox.
› On vehicles with a manual transmission, only push down on the accelerator
pedal once the rope is taught.
The maximum towing speed is 50 km/h.
Driver of the towed vehicle›
Switch on the ignition so that the steering wheel is not locked and so that
the turn signal lights, horn, windscreen wipers and windscreen washer sys-
tem can be used.
›
Take the vehicle out of gear or move the selector lever into position N if the
vehicle is fitted with an automatic gearbox.
Please note that the brake servo unit and power steering only operate if the
engine is running. If the engine is not running, significantly more physical force
is required to depress the brake pedal and steer the vehicle.
If using a tow rope, ensure that it is always kept taught.
CAUTION
■ Do not tow start the engine – there is a risk of damaging the engine and the
catalytic converter. The battery from another vehicle can be used as a jump-
start aid » page 164 , Jump-starting .■
If the gearbox no longer contains any oil because of a defect, your vehicle
must only be towed with the driven wheels raised clear of the ground or on a
special breakdown vehicle or trailer.
■
The vehicle must be transported on a special breakdown vehicle or trailer if it
is not possible to tow in the vehicle in the way described or if the towing dis-
tance is greater than 50 km.
■
To protect both vehicles when tow-starting or towing, the tow rope should
be elastic. Thus one should only use plastic fibre rope or a rope made out of a
similarly elastic material.
■
While towing, take care to avoid impermissibly high tensile forces or jerky
loads. There is always a risk of excessive stresses and damage resulting at the
points to which you attach the tow rope or tow bar when you attempt to tow a
vehicle which is not standing on a paved road.
■
Attach the tow rope or the tow bar to the towing eyes » page 167 , Front
towing eye or » page 167 , Rear towing eye to the detachable ball head of the
towing equipment » page 120 .
166Do-it-yourself
Page 187 of 197
Index
A
Abroad Driving abroad
113
Unleaded petrol113
ABS115
warning light38
Accessories126
Adjusting Belt height
13
Exterior mirrors64
Head restraints68
Steering wheel8
Adjusting the seats7
Adjustment Headlight beam
56
Seats65
Adjustments and technical changes Spoiler
127
Adjustments and technical modifications Airbags
127
Aerial129
See windows131
Airbag14
Adjustments and impairment of the airbag sys- tem
127
Deactivating18
Deployment14
Front airbag15
Head airbag17
Side airbag16
Switching off the front passenger airbag18
Airbag system14
Air conditioning Operation
88
Air conditioning system Air outlets85
Climatronic90
Manual air conditioning system87
Air outlets85
Alarm49
Anti-theft alarm system49
Operation49
Trailer125
Antilock Braking System115
Armrest83
Ashtray78
ASR115
warning light38
Assist systems ABS
38, 115
ASR38, 115
Cruise control system117
EDS and XDS115
ESC38, 114
Parking aid116
START-STOP118
Auto Check Control34
Automatic gearbox Selector lever-emergency unlocking
108
Starting-off and driving107
Tiptronic106
Automatic load deactivation149
Automatic transmission105
Kickdown107
Malfunction107
Selector lever lock106
Using the selector lever105
AUX99
Avoiding damage to the vehicle Driving through water
112
Avoiding damage to your vehicle112
B
Back-up wheel
155
Ball head Check fitting
122
Fitting122
Ready position121
Removing123
Belts10
Belt tensioners13
Bicycle carrier75
Bonnet Closing
139
Opening139
Boot Cover
70
Emergency unlocking51
Fastening elements69
Fixing nets70
Folding hooks70
see Boot lid50
Unlocking the boot lid51
Boot lid50
automatic locking51
Brake assist114
Brake booster103
Brake fluid145
Changing145
Checking145
Display messages36
Brakes Brake booster
103
Brake fluid145
Handbrake104
Indicator light36
Running in109
Braking Information for braking
103
Breakdown kit163
185Index
Page 191 of 197
Maximum speed179
MDI99
Mirror Exterior mirrors
64
Manually dimmed rear-view mirror64
Vanity61
Mobile phone92
Connecting to the hands-free system95
Modes of the automatic transmission105
Modifications126
Multifunction display Functions
29
Memory29
Operation30
Multimedia98
N
N1
69
nameplate176
Net partition73
Behind the front seats74
Behind the rear seats73
Removing and refitting the housing74
O
Oil see Engine oil
142
Oil pressure Display messages
36
Onboard computer see Multifunction display
29
Operating weight176
Operation in winter Diesel fuel
137
Vehicle battery147
Outside temperature30
Overview Engine compartment
140
warning lights35
P
Paintwork See Caring for paintwork
130
Parking Parking aid
116
Parking lights56
Part replacement126
Passive safety Before every journey
6
Driving safety6
Safety equipment6
Passive Safety6
Payload176
Pedals104
Footmats104
Petrol refer to Fuel
136
Polishing the paintwork See Vehicle care
130
Power window force limiter53
R
Radiator fan
140
Radio reception See windows
131
Raise vehicle161
Rear-view mirror Exterior mirrors
64
Manually dimmed rear-view mirror64
Rear fog light58
Rear window - Heating61
Recirculated air mode Manual air conditioning
89
Recommended gear28
Refuelling136
Fuel136
Remote control48
Synchronisation process49
Remote control key Replacing the battery43
Repairs and technical alterations126
Replacing Vehicle battery
148
Windscreen wiper blades63
Replenishing Coolant
144
Engine oil143
Windscreen washer fluid140
Rims149
Roof luggage rack Attachment points
77
Roof rack system76
Roof load77
Running-in the first 1500 km
108
Running in Brake pads
109
Engine108
Tyres109
S
SAFE see Safe securing
46
SAFELOCK see Safe securing
46
Safe securing46
Safety6
Child safety19
Child safety seats19
Correct seated position7
Head restraints68
ISOFIX22
TOP TETHER23
Save electricity109
Seals Vehicle care
130
189Index