sport mode SKODA FABIA 2014 2.G / 5J Owner's Manual
[x] Cancel search | Manufacturer: SKODA, Model Year: 2014, Model line: FABIA, Model: SKODA FABIA 2014 2.G / 5JPages: 197, PDF Size: 13.56 MB
Page 4 of 197

Terms used
The on-board literature contains the following terms relating to the service
work for your vehicle.
› “Specialist garage” - a workshop that carries out specialist service tasks for
ŠKODA vehicles A specialist garage can be a ŠKODA partner, a ŠKODA service partner or an independent workshop.
› “ŠKODA service partner” - A workshop that has been contractually author-
ized by the manufacturer ŠKODA AUTO a.s. or its sales partner to perform
service tasks on ŠKODA vehicles and to sell ŠKODA Genuine Parts.
› “ŠKODA partner” - A company that has been authorized by the manufacturer
ŠKODA AUTO a.s. or its sales partner to sell new ŠKODA vehicles and, when
applicable, to service them using ŠKODA Genuine Parts and sell ŠKODA Gen-
uine Parts.
Owner's Manual
These operating instructions apply to all body variants of the vehicle and all
related models.
The manual describes all possible equipment variants without identifying
them as special equipment, model variants or market-dependent equipment.
Consequently, this vehicle does not necessarily contain all of the equipment
components described in this Owner's Manual.
The scope of equipment of your vehicle relates to your purchase contract for
the vehicle. More information is available from the ŠKODA Partner from whom
you bought the vehicle.
The illustrations can differ in minor details from your vehicle; they are only in-
tended for general information.
Supplementary Information (applies to Russia)
The full type approval number of the means of transport is indicated in the
registration documents.
Page 79 of 197

WARNING■The items being transported on the roof rack must be reliably attached –
there is the risk of an accident.■
Always secure the load with appropriate and undamaged lashing straps
or tensioning straps.
■
Distribute the load evenly over the roof rack system.
■
The handling properties of your vehicle change when you transport heavy
or bulky items on the roof rack system as a result of the centre of gravity
being shifted and the greater area exposed to the wind – there is the risk
of an accident. The style of driving and speed must therefore be adapted to
the current circumstances.
■
Avoid abrupt and sudden driving/braking manoeuvres.
■
Adjust the speed and driving style to the visibility, weather, road and traf-
fic conditions.
■
The permissible roof load, permissible axle loads and gross permissible
weight of the vehicle must not be exceeded under any circumstances –
there is the risk of an accident.
CAUTION
■ Only roof racks from the ŠKODA Original Accessories range should be used.■The fitting instructions supplied with the roof luggage rack system must be
observed when handling roof racks.■
On models fitted with a power sliding/tilting roof, ensure that the opened
sliding/tilting roof does not strike any items of luggage transported on the
roof.
■
Ensure that the boot lid does not hit the roof load when opened.
■
The height of the vehicle changes after mounting a roof luggage rack system
and the load that is secured to it. Compare the vehicle height with available
clearances, such as underpasses and garage doors.
■
Always remove the roof luggage rack system before entering an automated
car wash.
■
Ensure the roof aerial is not impaired by the secured load.
For the sake of the environment
The increased aerodynamic drag results in a higher fuel consumption.
Note
If the vehicle is not factory-equipped with a roof rack, it can be purchased from
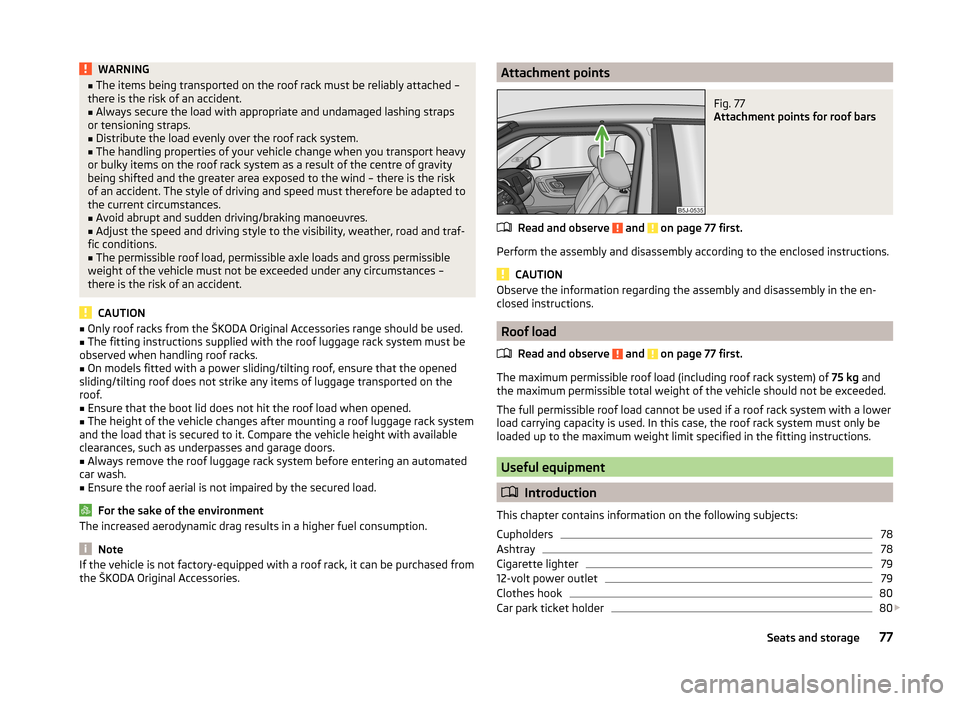
the ŠKODA Original Accessories.Attachment pointsFig. 77
Attachment points for roof bars
Read and observe and on page 77 first.
Perform the assembly and disassembly according to the enclosed instructions.
CAUTION
Observe the information regarding the assembly and disassembly in the en-
closed instructions.
Roof load
Read and observe
and on page 77 first.
The maximum permissible roof load (including roof rack system) of 75 kg and
the maximum permissible total weight of the vehicle should not be exceeded.
The full permissible roof load cannot be used if a roof rack system with a lower
load carrying capacity is used. In this case, the roof rack system must only be
loaded up to the maximum weight limit specified in the fitting instructions.
Useful equipment
Introduction
This chapter contains information on the following subjects:
Cupholders
78
Ashtray
78
Cigarette lighter
79
12-volt power outlet
79
Clothes hook
80
Car park ticket holder
80
77Seats and storage
Page 95 of 197

WARNING (Continued)■The national regulations for using a mobile phone in a vehicle must be
observed.■
If a mobile phone or a two-way radio system is operated in a vehicle with-
out an external aerial or an external aerial which has been installed incor-
rectly, this can increase the strength of the electromagnetic field inside the
vehicle.
■
Two-way radio systems, mobile phones or mounts must not be installed
on airbag covers or within the immediate deployment range of the airbags.
■
Never leave a mobile phone on a seat, on the dash panel or in another
area, from which it can be thrown during a sudden braking manoeuvre, an
accident or a collision - risk of injury.
■
The Bluetooth ®
function must be switched off by a specialist workshop
before the vehicle is transported by air.
Note
■ We recommend that mobile phones and two-way radio systems be installed
in the a vehicle by a specialist workshop.■
Not all mobile phones that enable Bluetooth ®
communication are compatible
with the universal telephone preinstallation GSM II. You can ask a ŠKODA Part-
ner whether your telephone is compatible with the GSM II universal telephone
fitting.
■
The range of the Bluetooth ®
connection to the hands-free system is restric-
ted to the vehicle interior. The range is dependent on local factors, e.g. obsta-
cles between the devices and mutual interferences with other devices. If your
mobile phone is in a jacket pocket, for example, this can lead to difficulties
when establishing a connection with the hands-free-system or transferring
data.
Introductory information
The universal telephone preinstallation GSM II (hands-free system) includes a
convenience mode for the mobile phone via voice control, the multifunction
steering wheel, the adapter, radio or the navigation system.
The universal telephone preinstallation GSM II comprises the following func-
tions.
› Phone Phonebook
» page 93.
› Convenience operation of the telephone via the multifunction steering
wheel » page 94 .
›Managing telephone calls via the adapter
» page 95.
› Telephone operation in the MAXI DOT display
» page 96.
› Voice control of the telephone
» page 97.
› Music playback from the telephone or other multimedia units
» page 98.
All communication between a mobile phone and your vehicle's hands-free sys-
tem is established with the help of Bluetooth ®
technology. The adapter serves
only for charging the telephone and for transmitting the signal to the vehicle's
external aerial.
Note
The following guidelines must be observed » page 92, Mobile phones and two-
way radio systems .
Phone Phonebook
A phone phonebook is part of the hands-free system. This phone phonebook
can be used depending on the type of mobile phone.
After the first connection of the telephone, the system begins to load the
phone book from the phone and the SIM card into the memory of the control
unit.
Each time the telephone has established a new connection with the hands-
free system, an update of the relevant phone book is performed. The updating
can take a few minutes. During this time the phone book, which was stored af-
ter the last update was completed, is available. Newly stored telephone num-
bers are only shown after the updating has ended.
The update is interrupted if a telephone event (e.g. incoming or outgoing call,
voice control dialogue) occurs during the updating procedure. After the tele-
phone event has ended, the updating starts anew.
The internal phonebook provides 2 500 free memory locations. Each contact can contain up to 4 numbers.
If the number of contacts loaded exceeds 2 500, the phone book is not com-
plete.
93Communication and multimedia
Page 108 of 197

R - Reverse gear
Reverse gear can only be engaged when the vehicle is stationary and the en-
gine is at idling speed.
Depress the brake pedal and simultaneously press the shiftlock in the selector
lever grip before shifting to R from P or N.N
- Neutral
Power transmission to the drive wheels is interrupted in this mode.
D
- Mode for forwards travel (normal programme)
In mode D, the forward gears are automatically changed according to the en-
gine load, accelerator pedal actuation and driving speed.
S
- Mode for forwards travel (sports programme)
In mode S, the forward gears are shifted automatically up and down at higher
engine speeds than in mode D.
The shiftlock on the selector lever grip must be pressed when moving the se-
lector lever out of D mode into S mode.
Releasing selector lever from P or N modes (selector lever lock)
The selector lever is locked in the P and N modes to prevent the forwards trav-
el mode from being selected accidentally and setting the vehicle in motion.
The warning light lights up in the instrument cluster
» page 42.
The selector lever is released by depressing the brake pedal while simultane-
ously pressing the locking button in the selection lever grip.
The selector lever is not locked when shifted quickly through N (e.g. from R to
D ). This, for example, helps to rock out a vehicle that is stuck, e.g. in a bank of
snow. The selector lever lock will engage if the lever is in position N for more
than approximately 2 seconds without the brake pedal being depressed.
The selector lever is locked only when the vehicle is stationary and at speeds
up to 5 km/h.
Note
If you want to move the selector lever from mode P to mode D or vice versa,
move the selector lever quickly. This prevents modes R or N from being selec-
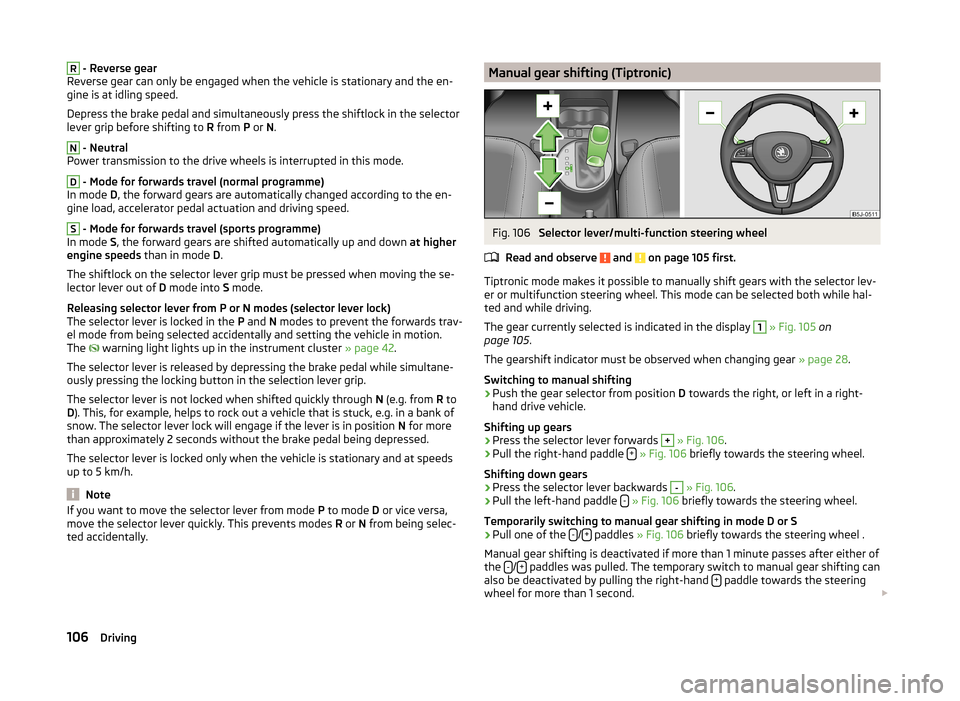
ted accidentally.Manual gear shifting (Tiptronic)Fig. 106
Selector lever/multi-function steering wheel
Read and observe
and on page 105 first.
Tiptronic mode makes it possible to manually shift gears with the selector lev-
er or multifunction steering wheel. This mode can be selected both while hal-
ted and while driving.
The gear currently selected is indicated in the display
1
» Fig. 105 on
page 105 .
The gearshift indicator must be observed when changing gear » page 28.
Switching to manual shifting
›
Push the gear selector from position D towards the right, or left in a right-
hand drive vehicle.
Shifting up gears
›
Press the selector lever forwards
+
» Fig. 106 .
›
Pull the right-hand paddle +
» Fig. 106 briefly towards the steering wheel.
Shifting down gears
›
Press the selector lever backwards
-
» Fig. 106 .
›
Pull the left-hand paddle -
» Fig. 106 briefly towards the steering wheel.
Temporarily switching to manual gear shifting in mode D or S
›
Pull one of the -/+ paddles
» Fig. 106 briefly towards the steering wheel .
Manual gear shifting is deactivated if more than 1 minute passes after either of
the -
/+ paddles was pulled. The temporary switch to manual gear shifting can
also be deactivated by pulling the right-hand + paddle towards the steering
wheel for more than 1 second.
106Driving