SKODA FABIA 2015 3.G / NJ Owner's Manual
Manufacturer: SKODA, Model Year: 2015, Model line: FABIA, Model: SKODA FABIA 2015 3.G / NJPages: 220, PDF Size: 32.46 MB
Page 141 of 220
WARNING■No modifications of any kind must be made to parts of the airbag system.■Any work on the airbag system including the installation and removal of
system components due to other repair work (e.g. removal of the steering
wheel) must only be carried out by a specialist garage.■
Never make any changes to the front bumper or the bodywork.
■
It is prohibited to manipulate individual parts of the airbag system, as this
might result in the airbag being deployed.
■
The protective function of the airbag system is sufficient for only one ac-
cident. The airbag system must then be replaced if the airbag has been de-
ployed.
WARNINGThe airbag system operates using pressure sensors located in the front
doors. For this reason, no adjustments may be carried out to the doors or
door panels (e.g. installation of additional loudspeakers). Resulting damage
can have a negative impact on the function of the airbag system. Any work
on the front doors and their door panels must be carried out by a specialist
garage. The following guidelines must be observed.■
Never drive with inner door panels removed.
■
Never drive if parts of the inner door panel have been removed and the
resulting openings have not been properly sealed.
■
Never drive if the loudspeakers in the doors have been removed, unless
the loudspeaker openings have been properly sealed.
■
Always make sure that the openings are covered or filled if additional
loudspeakers or other equipment parts have been installed in the inner
door panels.
Acceptance and recycling of used vehicles
Read and observe
on page 136 first.
ŠKODA meets the requirements of the brand and its products with regard to
protecting the environment and the preserving resources. All new ŠKODA ve-
hicles are 95% recyclable.
Note
Detailed information about the trade-in and recycling of end-of-life cars is
available from a specialist garage.Washing vehicle
Introduction
This chapter contains information on the following subjects:
Washing by hand
139
Automatic car wash systems
140
Washing with a high-pressure cleaner
140
The best protection for your vehicle against harmful environmental influences
is frequent washing.
The longer insect residues, bird droppings, road salt and other aggressive de-
posits remain adhering to your vehicle, the more detrimental their destructive
effect can be. High temperatures, such as those caused by intensive sun's
rays, accentuate this caustic effect.
It is essential to also thoroughly clean the underside of the vehicle at the end
of the winter.
WARNINGWashing your vehicle in the winter: Water and ice in the brake system can
affect the braking efficiency – there is the risk of an accident.
CAUTION
The temperature of the water used for cleaning must not exceed 60 °C – there
is a risk of damaging the vehicle.
For the sake of the environment
Only wash the vehicle at washing bays intended for this purpose.
Washing by hand
Read and observe
and on page 139 first.
Soften the dirt with plenty of water and rinse as much as you can of this off.
Clean the vehicle with a soft sponge, a washing glove or a washing brush.
Work from the top to the bottom - starting with the roof.
For stubborn dirt, agents specifically intended for this purpose are to be used.
Wash out the sponge or washing glove thoroughly at short intervals.
139Care and maintenance
Page 142 of 220
Clean wheels, door sills and similar parts last. Use a second sponge for such
areas.
Give the vehicle a good rinse after washing it and dry it off using a chamois
leather.WARNINGProtect your hands and arms from sharp-edged metal parts when cleaning
the underfloor or the inside of the wheel housings or the wheel trims – risk
of cuts!
CAUTION
■ Only apply slight pressure when cleaning the vehicle's paintwork.■Do not wash your vehicle in bright sunlight – there is a risk of paint damage.
Automatic car wash systems
Read and observe
and on page 139 first.
The usual precautionary measures must be taken before washing the vehicle
in an automatic car wash system (e.g. closing the windows including the slid-
ing/tilting roof, etc.).
If your vehicle is fitted with any particular attached parts, such as a spoiler,
roof rack system etc., it is best to consult the operator of the car wash system
beforehand.
The lips of the windscreen wiper rubbers must be cleaned and degreased with
cleaning agents especially formulated for the task after an automatic wash
with wax.
CAUTION
■ Before driving through a car wash fold in the exterior mirrors - there is a risk
of damage.■
For vehicles with roof antenna the antenna rod should be unscrewed before
driving through a car wash - there is a risk of damage.
Washing with a high-pressure cleaner
Read and observe
and on page 139 first.
When washing the vehicle with a high-pressure cleaner, the instructions for
use of the equipment must be observed. This applies in particular to the pres-
sure used and to the spraying distance .
Maintain a sufficiently large distance to the parking aid sensors and soft mate-
rials such as rubber hoses or insulation material.
CAUTION
■ The films may not be washed with any high-pressure cleaners - there is risk
of damage » page 141.■
Do not aim the water jet directly at the lock cylinders or the door or opening
joints when washing the vehicle in the winter – there is a risk of freezing.
■
The sensors of the parking aid can be sprayed only for a short time and there
must be a minimum distance of 10 cm - there is a risk of damage.
Cleaning vehicle exterior
Introduction
This chapter contains information on the following subjects:
Vehicle paint work
141
Foils
141
Plastic parts
142
Rubber seals
142
Chrome and anodized parts
142
Windows and external mirrors
142
Headlight glasses
143
Door closing cylinder
143
Cavity protection
143
Jack
143
Wheels
143
Towing device and mounting recess
144
Under-body protection
144
Wiper blades
144
We recommend using care products from ŠKODA Original Accessories that are
available from ŠKODA Partners. The instructions for use on the package must
be observed.
140General Maintenance
Page 143 of 220
WARNING■Care products may be harmful to your health if not used according to the
instructions.■
Always keep the automobile care products safe from people who are not
completely independent, e.g. children - there is a danger of poisoning!
■
Protect your hands and arms from sharp-edged metal parts when clean-
ing the underfloor, the inside of the wheel housings or the wheel trims –
risk of cuts!
CAUTION
■ Do not use any insect sponges, kitchen scrubbers or similar cleaning prod-
ucts – there is a risk of damaging the paintwork finish.■
Cleaners containing solvents can damage the material being cleaned.
Note
Because of the special tools and knowledge required, and to avoid any poten-
tial problems with the cleaning and care of the exterior of your vehicle, we rec-
ommend that cleaning and care of your vehicle be carried out by a ŠKODA
Service Partner.
Vehicle paint work
Read and observe
and on page 141 first.
Preserving the vehicle paintwork
Thorough wax treatment is an effective way of protecting the paintwork from
harmful environmental influences.
The vehicle must be treated with a high-quality hard wax polish at the latest,
when no more drops form on the clean paintwork.
A new layer of a high-quality hard wax polish can be applied to the clean body- work after it has dried thoroughly.
Even if you use a wax preserver regularly we still recommend that you treat
the paintwork of the vehicle at least twice a year with hard wax.
Polishing
Polishing is necessary if the vehicle's paintwork has become unattractive and
if it is no longer possible to achieve a gloss with wax preservatives.
If the polish does not contain any preserving elements, the paint must be trea- ted with a preservative afterwards.
CAUTION■ Paint damage is to be repaired immediately.■Never apply wax to the windows.■
Mat painted or plastic parts must not be treated with polishing products or
hard waxes.
■
Do not polish the paintwork in a dusty environment - there is a risk of
scratching the paintwork.
■
Do not apply polish to door seals or window guides.
■
If possible, do not apply any polish to body surfaces that come into contact
with door seals and window guides.
Foils
Read and observe
and on page 141 first.
Cleaning
Films (e.g. Roof, decorative, protective films, etc.) must be cleaned more care-
fully than the vehicle paint.
The films may not be washed with any high-pressure cleaners.
Only wash the films with a soft cloth, mild soap solution and clean, warm wa-
ter.
Service life
Environmental influences (e.g. sunlight, humidity, air pollution, rockfall) affect
the life of the films.
The sunlight may also affect the depth of the film colour.
The films age and become brittle, which is normal; this shall not be considered
a fault.
CAUTION
■ Never use aggressive cleaning agents or chemical solvents for the glued sur-
faces with films - there is a danger of film damage.■
Never use dirty cloths or chemical solvents for the glued surfaces with films -
there is a danger of damaging the film.
■
No ice scrapers should be used in the winter months to remove ice and snow
from the areas to which films have been applied. Do not remove frozen snow
or ice using other objects - there is a risk of damage to the film.
■
Do not polish the films - there is risk of damage!
■
When transporting a load on the roof rack (e.g. roof box, etc.), there is an in-
creased risk of film damage (e.g. due to rockfall from the secured load).
141Care and maintenance
Page 144 of 220
Plastic partsRead and observe
and on page 141 first.
Clean plastic parts with a damp cloth.
If this method does not clean plastic parts completely, use a specific plastic
care product.
CAUTION
Do not use polish on plastic parts.
Rubber seals
Read and observe
and on page 141 first.
All door seals and window guides are factory-treated with a colourless mattvarnish layer against a freezing to painted body parts and against road noise.
CAUTION
■ Do not treat the door seals or window guides with any cleaning agent.■An additional treatment of the seals can attack their protective coating and
road noise may be generated.
Chrome and anodized parts
Read and observe
and on page 141 first.
First clean the chrome parts and anodized parts with a damp cloth and thenpolish them with a soft, dry cloth.
If this method does not completely clean the parts, use cleaning products spe-
cially designed for this purpose.
CAUTION
■ Do not polish the chrome parts and anodized parts in a dusty environment -
risk of surface scratches.■
Never use aggressive cleaning agents or chemical solvents for these parts -
there is risk of damage.
Windows and external mirrorsFig. 163
Fuel filler flap: Remove ice scra-
per
Read and observe and on page 141 first.
Removing snow and ice
Use a plastic ice scraper for removing snow and ice from the windows and mir-
rors.
The ice scraper can be found on the inside of the fuel filler flap.
›
Open the fuel filler flap.
›
Slide out the ice scraper in the direction of the arrow » Fig. 163.
Cleaning windows
Clean the windows regularly with clean water, inside and out.
Dry the glass surfaces with a clean chamois leather or a cloth intended for this
purpose.
CAUTION
Instructions for removing snow and ice■The ice scraper should not be moved forward and backward but in one direc-
tion to avoid any damage to the surface of the glass.■
Snow or ice that is contaminated with coarse dirt such as fine gravel, sand,
and salt must not be removed from the window glass and mirrors – risk of
damage to the surface of the windows and mirrors.
■
Never remove snow or ice from glass parts using warm or hot water – there
is a risk of cracking in glass.
■
Make sure that when removing snow and ice from the windows, the labels
attached to the vehicle by the factory are not damaged.
142General Maintenance
Page 145 of 220
CAUTIONInformation for cleaning windows■Do not clean the inside of the windows with sharp-edged objects or corro-
sive and acidic cleaning agents – there is a risk of damaging the heating ele-
ments or window aerial.■
When drying the windows after washing the vehicle, do not use window
leathers that have been used to polish the bodywork. Residues of preserva-
tives in the chamois leather can smear the windows and reduce visibility.
Headlight glasses
Read and observe
and on page 141 first.
Clean the plastic headlight lenses with clean, warm water and soap.
CAUTION
■The headlights are never to be wiped dry - there is a risk of damaging the
protective lacquer and the headlight glass subsequently developing cracks.■
Do not use sharp objects to clean the glasses - there is a risk of damaging
the protective lacquer and the headlight glasses subsequently developing
cracks.
■
Do not use any aggressive cleaning or chemical solvent products to clean the
headlights – risk of damaging the headlight lenses.
Door closing cylinder
Read and observe
and on page 141 first.
Specific products must be used for de-icing door lock cylinders.
CAUTION
Make sure that as little water as possible gets into the locking cylinder when
washing the vehicle - there is a risk of freezing the lock cylinder!
Cavity protection
Read and observe
and on page 141 first.
All the cavities of your vehicle which are at risk from corrosion are protectedfor life by a layer of protective wax applied in the factory.
Wax protection does not require to be inspected or re-treated.
If any small amount of wax flow out of the cavities at high temperatures, these
must be removed with a plastic scraper and the stains cleaned using a petrole-
um cleaner.WARNINGSafety regulations should be observed when using petroleum cleaner to re-
move wax – there is a risk of fire.
Jack
Read and observe
and on page 141 first.
The jack is maintenance-free.
If necessary, the moving parts of the jack should be lubricated with a suitable lubricant.
Wheels
Read and observe
and on page 141 first.
Wheel rims
Also thoroughly wash the wheel rims when washing the vehicle on a regular basis.
Regularly remove salt and brake dust otherwise the rim material will be at-
tacked.
Light alloy wheels
After washing thoroughly and treat the wheel rims with a protective product
for light alloy wheels.
For the treatment of wheel rims do not use products which may cause damage
to the paint on the rims.
CAUTION
■ Damage to the paint layer on the wheel rims must be touched up immediate-
ly.■
Severe layers of dirt on the wheels can also result in wheel imbalance. This
may show itself in the form of a wheel vibration which is transmitted to the
steering wheel which, in certain circumstances, can cause premature wear of
the steering. This means it is necessary to remove the dirt.
143Care and maintenance
Page 146 of 220
Towing device and mounting recessRead and observe
and on page 141 first.
Close the mounting recess with the cap to prevent any ingress of dirt.
In the event of dirt, clean the inner surfaces of the mounting recess and treat with a suitable preservative.
Before hitching a trailer check the ball head and apply a suitable grease where
necessary.
Fit the protective cap when stowing away the ball head to protect the luggage
compartment against dirt.
CAUTION
Apply grease to the inner part of the mounting recess. Make sure you do not
remove any grease.
Under-body protection
Read and observe
and on page 141 first.
The underside of your vehicle is already permanently protected by the factory
against chemical and mechanical influences.
It is not possible to guarantee that the protective coating will not suffer any
damage as the vehicle is driven.
We recommend that you have the protective coating under the body and on
the chassis inspected - preferably before the beginning and at the end of the
cold season.
WARNINGNever use additional underbody protection or anti-corrosion agents for ex-
haust pipes, catalytic converters, diesel particle filters or heat shields.
These substances could ignite when the engine reaches its operating tem-
perature - there is a risk of fire.Wiper blades
Read and observe
and on page 141 first.
Clean the wiper blades regularly with a glass cleaner. The wiper blades shouldbe cleaned with a sponge or cloth if they are heavily soiled by insect residues,
for example.
The wiper blades can become soiled with wax residues after washing in auto-
matic vehicle wash systems for example.
Interior care
Introduction
This chapter contains information on the following subjects:
Natural leather
145
Artificial leather, materials and Alcantara ®
145
Seat covers
146
Safety belts
146
We recommend using care products from ŠKODA Original Accessories that are
available from ŠKODA Partners. The instructions for use on the package must
be observed.
WARNING■ Care products may be harmful to your health if not used according to the
instructions.■
Always keep the automobile care products safe from people who are not
completely independent, e.g. children - there is a danger of poisoning!
■
Air fresheners and scents can be hazardous to heath when the tempera-
ture inside the vehicle is high.
CAUTION
■ Be sure to check clothing for colourfastness to avoid any damage or visible
stains on the material (leather), panels and textiles.■
Remove fresh stains such as those from ball-point pens, ink, lipstick, shoe
polish, etc., from the material (leather), panels and textiles as quickly as possi-
ble.
■
Do not attach scents and air fresheners to the dashboard – risk of damage to
the dash panel.
144General Maintenance
Page 147 of 220
■Do not attach any stickers to the filaments or glass antenna - there is risk of
damage.■
Do not clean the headlining with a brush – risk of damage to the lining sur-
face.
■
Cleaners containing solvents can damage the material being cleaned.
■
Apply only a small amount of the cleaning and care product.
Note
Because of the special tools and knowledge required, and to avoid any poten-
tial problems with the cleaning and care of the interior of your vehicle, we rec-
ommend that cleaning and care of the interior of your vehicle be carried out by
a ŠKODA Service Partner.
Natural leather
Read and observe
and on page 144 first.
The leather needs, depending on the strain placed on it, regular cleaning and
maintenance.
Dust and dirt in pores and creases cause abrasions on the surface and lead to
premature brittling of the leather surface. Therefore, they must be removed
regularly at short intervals with a cloth or vacuum cleaner.
Clean soiled leather surfaces with a cotton or woollen cloth lightly moistened
with water and then dry with a clean dry cloth »
.
Clean more severely soiled areas with a cloth soaked in a mild soap solution (2
tablespoons of natural soap to 1 litre of water).
To remove stains , use a cleaning agent specially designed for this purpose.
Treat the leather periodically with a suitable leather protector and use a skin
care cream with light blocker and impregnation after each cleaning.
CAUTION
■ Ensure that the leather is not soaked through at any point during cleaning
and that no water gets into the stitching of the seams. The leather would then
become brittle and cracked.■
Avoid leaving the vehicle for lengthy periods in bright sunlight to avoid the
leather from bleaching. If the vehicle is parked in the open for lengthy periods,
protect the leather from direct sunlight by covering it.
■
The use of an additional mechanical steering wheel lock may damage the
leather surface of the steering wheel.
■ Some clothing materials, such as dark denim, do not have sufficient colour
fastness. This can cause damage or clearly visible discolouration to seat covers
even when treated correctly. This is particularly true for light-coloured uphols-
tery. This is not a defect in the seat cover, but poor colour fastness of the
clothing textiles.■
Sharp-edged objects on items of clothing such as zip fasteners, rivets, sharp-
edged belts etc. may leave permanent scratches or signs of rubbing on the
surface or damage these. Damage of this nature cannot later be recognized as
a justified complaint.
Note
During the life of the vehicle, minor visible changes can occur on the leather
parts of the covers (e. g wrinkles or creases as a result of the stress of the cov-
ers).
Artificial leather, materials and Alcantara ®
Read and observe
and on page 144 first.
Synthetic leather
Clean the synthetic leather with a damp cloth.
If the synthetic leather does not come completely clean with this method, a
mild soap solution or specific cleaning agent must be used.
Fabrics
Clean upholstery cover materials and cloth trims on doors, boot cover, etc. us-
ing specific cleaning agents, e.g., dry foam.
Use a soft sponge, brush, or commercially available microfibre cloth.
Use a cloth and special detergent to clean the headlining.
Remove pilling and residues on upholstery with a brush.
Remove stubborn hair with a “cleaning glove”.
Alcantara ®
Dust and dirt in pores, creases and seams may chafe and damage the surface.
Therefore, they must be removed regularly at short intervals with a cloth or
vacuum cleaner.
Minor changes in colour caused by use are normal.
145Care and maintenance
Page 148 of 220
CAUTION■For Alcantara ®
seat covers, do not use any solvents, floor wax, shoe cream,
stain remover, leather cleaners or similar agents.■
Avoid leaving the vehicle in bright sunlight for long periods of time in order
to stop the artificial leather, materials or Alcantara ®
from bleaching. During ex-
tended periods of standing outdoors, protect artificial leather, fabrics or Alcan-
tara ®
by covering.
■
Some clothing materials, such as dark denim, do not have sufficient colour
fastness. This can cause damage or clearly visible discolouration to seat covers
even when treated correctly. This is particularly true for light-coloured uphols-
tery. This is not a defect in the seat cover, but poor colour fastness of the
clothing textiles.
Seat covers
Read and observe
and on page 144 first.
Electrically heated seats
Use a specific cleaning agent such as dry foam or similar to clean the covers.
»
.
Seats without seat heating
Thoroughly vacuum the seat covers with a vacuum cleaner before cleaning.
Clean the seat covers with a damp cloth or cleaning agents particularly formu-
lated for them.
Compressed areas created on the fabrics by everyday use can be removed by
brushing against the nap with a lightly moistened brush.
Always treat all parts of the upholstery so that no visible boundaries are cre-
ated. Then leave the seat to dry completely.
CAUTION
■ Do not clean the covers of electrically heated seats either with water or with
other liquids - there is a risk of damaging the seat heating system.■
Regularly vacuum dust from the seat covers using a vacuum cleaner.
■
Electrically heated seats must not be dried after cleaning by switching on the
heater.
■
Do not sit on wet seats - there is a risk of stretching the upholstery.
■
Always clean the seats “from seam to seam”.
Safety belts
Read and observe
and on page 144 first.
Wash dirty seat belts with a mild, soapy solution.
Remove dirt with a soft brush.
WARNING■ The seat belts must not be removed for cleaning.■Never clean the seat belts chemically as chemical cleaning products could
destroy the fabric.■
The seat belts must not be allowed to come into contact with corrosive
liquids (such as acids etc.).
■
Inertia reel belts must be completely dried before being rolled up.
146General Maintenance
Page 149 of 220
Inspecting and replenishing
Fuel
Introduction
This chapter contains information on the following subjects:
Refuelling with petrol and diesel
147
Lead-free petrol
148
Diesel fuel
149
The correct fuel grades for your vehicle are specified on the inside of the fuel
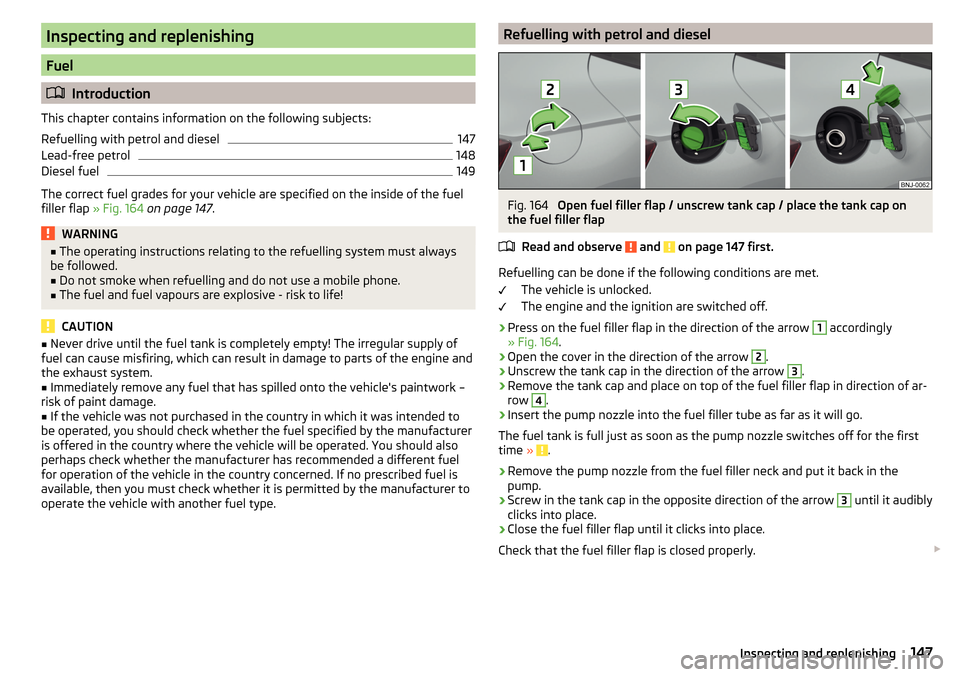
filler flap » Fig. 164 on page 147 .
WARNING■
The operating instructions relating to the refuelling system must always
be followed.■
Do not smoke when refuelling and do not use a mobile phone.
■
The fuel and fuel vapours are explosive - risk to life!
CAUTION
■ Never drive until the fuel tank is completely empty! The irregular supply of
fuel can cause misfiring, which can result in damage to parts of the engine and
the exhaust system.■
Immediately remove any fuel that has spilled onto the vehicle's paintwork –
risk of paint damage.
■
If the vehicle was not purchased in the country in which it was intended to
be operated, you should check whether the fuel specified by the manufacturer
is offered in the country where the vehicle will be operated. You should also
perhaps check whether the manufacturer has recommended a different fuel
for operation of the vehicle in the country concerned. If no prescribed fuel is
available, then you must check whether it is permitted by the manufacturer to
operate the vehicle with another fuel type.
Refuelling with petrol and dieselFig. 164
Open fuel filler flap / unscrew tank cap / place the tank cap on
the fuel filler flap
Read and observe
and on page 147 first.
Refuelling can be done if the following conditions are met. The vehicle is unlocked.
The engine and the ignition are switched off.
›
Press on the fuel filler flap in the direction of the arrow
1
accordingly
» Fig. 164 .
›
Open the cover in the direction of the arrow
2
.
›
Unscrew the tank cap in the direction of the arrow
3
.
›
Remove the tank cap and place on top of the fuel filler flap in direction of ar-
row
4
.
›
Insert the pump nozzle into the fuel filler tube as far as it will go.
The fuel tank is full just as soon as the pump nozzle switches off for the first
time »
.
›
Remove the pump nozzle from the fuel filler neck and put it back in the
pump.
›
Screw in the tank cap in the opposite direction of the arrow
3
until it audibly
clicks into place.
›
Close the fuel filler flap until it clicks into place.
Check that the fuel filler flap is closed properly.
147Inspecting and replenishing
Page 150 of 220
WARNINGInstructions for filling the reserve canister■Never fill the reserve can inside the vehicle.■
Never place the reserve can on the vehicle.
■
Always place the reserve can on the floor.
■
We do not recommend carrying any fuel canisters in your vehicle for safe-
ty reasons. In the event of an accident this could be damaged and fuel
could escape – there is a risk of fire.
CAUTION
■ The fuel tank is full just as soon as the pump nozzle switches off for the first
time, provided the nozzle has been operated properly. Do not continue refuel-
ling.■
Be careful when filling diesel fuel from the spare canister and then do this
slowly and cautiously – danger of contaminating the body.
Note
The fuel tank has a capacity of about 45 litres, including a reserve of approx.
7 litres .
Lead-free petrol
The correct fuel grades for your vehicle are specified on the inside of the fuel
filler flap.
Read and observe
and on page 147 first.
The vehicle can only be operated with unleaded petrol in compliance with the
EN 228 1)
standard.
All petrol engines can be operated using petrol with a maximum of 10% bioe-
thanol (E10).
Unleaded petrol 95/91 or 92 or 93 RON/ROZ
We recommend using unleaded fuel with an octane rating of 95 RON. Unlea-
ded petrol with the octane ratings 91, 92 or 93 RON can also be used, but may
result in a slight loss in performance and slightly increased fuel consumption.
Unleaded petrol min. 95 RON / ROZ
Use unleaded fuel with an octane rating of 95 RON or higher.
In an emergency , petrol with the octane ratings 91, 92 and/or 93 RON can also
be used, but may result in a slight loss in performance and slightly increased
fuel consumption and exhaust emissions. Continue driving at medium engine
speeds and minimum engine load »
.
Refuel using petrol of the prescribed octane number as soon as possible.
Fuel additives
Unleaded petrol complying with EN 228 1)
meets all the conditions for a
smooth-running engine. We therefore recommend that no fuel additives are
used. This can result in considerable damage to parts of the engine or the ex-
haust system.
CAUTION
■ Even one filling of the tank with petrol that does not meet the standards can
lead to serious damage to parts of the exhaust system!■
If a fuel other than unleaded fuel which complies to the above mentioned
standards (e.g. leaded petrol) is put in the tank by mistake, do not start the en-
gine or switch on the ignition. Extensive damage to engine parts can occur.
CAUTION
■ If petrol with a lower octane number than the one prescribed is used do not
drive with a high engine speed. A high engine load can severely damage en-
gine components.■
Even in the event of an emergency, petrol of a lower octane number than 91
RON must not be used, otherwise the engine can be severely damaged.
CAUTION
In no case may fuel additives with metal components be used, especially not
with manganese and iron content. Risk of causing considerable damage to
parts of the engine or exhaust system.
CAUTION
Do not use fuels with metal components, such as LRP (lead replacement
petrol) may be used. Risk of causing considerable damage to parts of the en-
gine or exhaust system. 1)
In Germany also DIN 51626-1 or E10 for unleaded petrol with octane rating 95 or 91 or DIN 51626-2 or E5
for unleaded petrol with octane rating 95.
148General Maintenance