fuel pressure SKODA FABIA 2016 3.G / NJ Owner's Manual
[x] Cancel search | Manufacturer: SKODA, Model Year: 2016, Model line: FABIA, Model: SKODA FABIA 2016 3.G / NJPages: 196, PDF Size: 31.86 MB
Page 4 of 196
Table of Contents
Materials defect liability and ŠKODA warranty
for new cars4
On-board literature
6
Notes
7
Structure of the Owner's Manual and further
information
8
Abbreviations
Safety
Passive Safety
10
General information
10
Correct and safe seated position
10
Seat belts
13
Wearing seat belts
13
Inertia reel and belt pre-tensioners
15
Airbag system
16
Description of the airbag system
16
Airbag deactivation
18
Transporting children safely
20
Child seat
20
Fastening systems
23
Operation
cockpit
26
Overview
25
Instruments and warning lights
27
Instrument cluster
27
Warning lights
28
Information system
36
Driver information system
36
Operation of the information system
38Driving data (Multifunction display)38MAXI DOT display40
Service interval display
41
SmartGate
42
Unlocking and opening
44
Unlocking and locking
44
Anti-theft alarm system
49
Tailgate
50
window operation
50
Lights and visibility
53
Lights
53
Interior lighting
57
Visibility
58
Windscreen wipers and washers
59
Rear view mirror
61
Seats and headrests
62
Front seats
62
Rear seats
63
Headrests
64
Front seat heater
65
Useful features
66
Interior fittings
66
Tablet holder
73
Transport of cargo
75
Luggage compartment and transporting
objects
75
Variable loading floor in the luggage
compartment
81
Bicycle carrier in the luggage compartment
82
Transportation on the roof rack
84
Heating and ventilation
85
Heating, manual air conditioning system,
Climatronic
85Driving
Starting-off and driving90
Starting and stopping the engine
90
START-STOPsystem
92
Brakes and Parking
93
Manual gear shifting and pedals
95
Automatic transmission
96
Running in and economical driving
98
Avoiding damage to your vehicle
99
Assist systems
100
General information
100
Braking and stabilisation systems
101
Parking aid (ParkPilot)
103
Reversing camera
105
Cruise Control System
107
Speed limiter
108
Adaptive Cruise Control (ACC)
110
Front Assist
114
Fatigue detection
116
Tyre pressure monitoring
117
Towing device and trailer
119
Hitch
119
Using hitch
123
General Maintenance
Care and maintenance
127
Service work, adjustments and technical
alterations
127
Service intervals
129
Cleaning and care
131
Inspecting and replenishing
135
Fuel
135
Engine compartment
137
Engine oil
139
Coolant
1402Table of Contents
Page 30 of 196
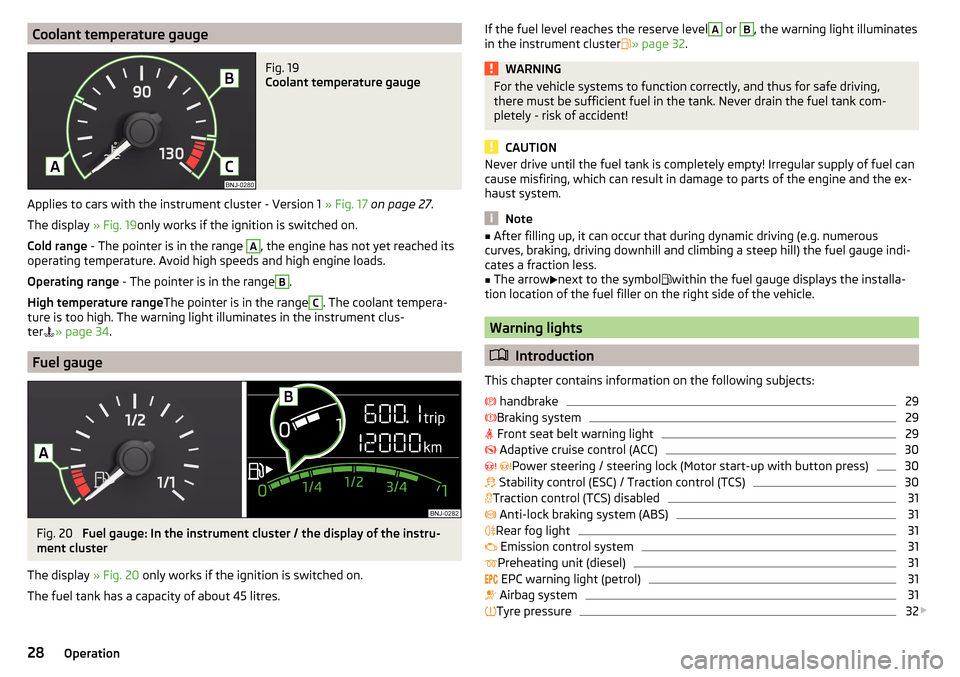
Coolant temperature gaugeFig. 19
Coolant temperature gauge
Applies to cars with the instrument cluster - Version 1 » Fig. 17 on page 27 .
The display » Fig. 19only works if the ignition is switched on.
Cold range - The pointer is in the range
A
, the engine has not yet reached its
operating temperature. Avoid high speeds and high engine loads.
Operating range - The pointer is in the range
B
.
High temperature range The pointer is in the range
C
. The coolant tempera-
ture is too high. The warning light illuminates in the instrument clus-
ter » page 34
.
Fuel gauge
Fig. 20
Fuel gauge: In the instrument cluster / the display of the instru-
ment cluster
The display » Fig. 20 only works if the ignition is switched on.
The fuel tank has a capacity of about 45 litres.
If the fuel level reaches the reserve levelA or B, the warning light illuminates
in the instrument cluster » page 32 .WARNINGFor the vehicle systems to function correctly, and thus for safe driving,
there must be sufficient fuel in the tank. Never drain the fuel tank com-
pletely - risk of accident!
CAUTION
Never drive until the fuel tank is completely empty! Irregular supply of fuel can
cause misfiring, which can result in damage to parts of the engine and the ex-
haust system.
Note
■ After filling up, it can occur that during dynamic driving (e.g. numerous
curves, braking, driving downhill and climbing a steep hill) the fuel gauge indi-
cates a fraction less.■
The arrow
next to the symbol
within the fuel gauge displays the installa-
tion location of the fuel filler on the right side of the vehicle.
Warning lights
Introduction
This chapter contains information on the following subjects:
handbrake
29
Braking system
29
Front seat belt warning light
29
Adaptive cruise control (ACC)
30
Power steering / steering lock (Motor start-up with button press)
30
Stability control (ESC) / Traction control (TCS)
30
Traction control (TCS) disabled
31
Anti-lock braking system (ABS)
31
Rear fog light
31
Emission control system
31
Preheating unit (diesel)
31
EPC warning light (petrol)
31
Airbag system
31
Tyre pressure
32
28Operation
Page 31 of 196
Fuel reserve32 Turn signal system32
Trailer turn signal lights
33
Fog lights
33
Speed regulating system / speed limiter
33
Brake pedal (automatic gearbox)
33
Main beam
33
Automatic gearbox
33
Rear seat belt warning light
33
Generator
34
Coolant
34
Engine oil pressure
34
Engine oil level
34
Lamp failure
35
Diesel particle filter (diesel)
35
Windscreen washer fluid level
35
START-STOPsystem
35
Display a low temperature
35
Adaptive cruise control (ACC)
36
Distance warning (Front Assist)
36
Advance warning / Emergency braking (Front Assist)
36
Service
36
The warning lights in the instrument cluster indicate certain functions or
faults.
Some warning lights can be accompanied by acoustic signals and messages in
the display of the instrument cluster.
After switching on the ignition, some warning lights light up briefly as a func-
tion test. If the tested systems are OK, the corresponding warning lights go
out a few seconds after switching on the ignition or after starting the engine.
The warning lights are at the following locations in the instrument clus-
ter » Fig. 17 on page 27 or» Fig. 18 on page 27 .
▶ Engine revolutions counter
1
▶Display
2
▶Speedometer
3
▶Bar with warning lights
4Warning lights in the display
Depending on the importance the warning light (danger) or (warning) illumi-
nates along with some of the warning lights in the bar with the warning lights.WARNING■ Ignoring illuminated indicator lights and related messages or instructions
in the instrument cluster display may lead to serious personal injury or
damage to the vehicle.■
If you have to stop for technical reasons, then park the vehicle at a safe
distance from the traffic, switch off the engine and activate the hazard
warning lights system » page 56. Place the warning triangle at the pre-
scribed distance.
■
The engine compartment of your car is a hazardous area. While working in
the engine compartment, be sure to observe the following warnings
» page 137 , Engine compartment .
handbrake
Read and observe
on page 29 first.
lights up – the hand brake has been applied.
An acoustic signal will sound if you drive the vehicle above 5 km/h while the
handbrake is still on.
▶ Release the handbrake.
Braking system
Read and observe
on page 29 first.
illuminates – the brake fluid level in the brake system is too low.
▶ Park the vehicle, stop driving!
Seek help from a specialist garage.
WARNINGA fault to the braking system can increase the vehicle’s braking distance -
There is a risk of an accident!
Front seat belt warning light
Read and observe
on page 29 first.
lights up - the driver or front passenger has not fastened their seat belt.
29Instruments and warning lights
Page 34 of 196
▶Seek help from a specialist garage.
The front passenger airbag has been disabled with the key switch
Illuminates for around 4 seconds after the ignition has been switched on.
One of the airbags or a belt tensioner has been disabled by the diagnostic
tool
lights up for approximately 4 seconds after the ignition is switched on and
then flashes for approximately 12 seconds.Airbag/ belt tensioner deactivated.AIRBAG/ BELT TENSIONER OFFWARNINGIf a fault in the airbag system occurs, there is a risk of the system not being
triggered in the event of an accident! Therefore, this must be checked im-
mediately by a specialized garage.
Tyre pressure
Read and observe
on page 29 first.
Change of tyre pressure values
lights up - there was a pressure change in one of the tyres.
An audible signal sounds as a warning. ▶ Immediately reduce speed and avoid sudden steering and braking manoeu-
vres.
▶ Stop the vehicle, turn the ignition off and check the tyres and their inflation
pressure » page 146 .
▶ Correct the tyre pressure, if necessary or replace the affected wheel
» page 151 or use the repair kit » page 154.
▶ Save the tyre pressure values in the system » page 117.
System fault
flashes for approximately 1 minute and remains lit – there may be a fault in
the tyre pressure monitoring system.
▶ Stop the vehicle, turn the ignition off and start the engine again.
If the warning light flashes again after the engine has started, there is a
system error.
▶ You can drive on, exercising appropriate caution. Seek assistance from a spe-
cialist garage immediately.
Disconnecting the vehicle battery
If the vehicle's battery has been disconnected and reconnected, the indicator
light
comes on after switching on the ignition.
The warning light should go out after driving a short distance.
If, after a short drive, the indicator light does not go out, there is a system er- ror.
▶ You can drive on, exercising appropriate caution. Seek assistance from a spe-
cialist garage immediately.
Other incidents
The following reasons can also apply if the warning light
is illuminated.
▶ The vehicle is loaded on one side. Distribute the load evenly.
▶ The wheels of one axle are loaded more heavily (e.g. when towing a trailer or
when driving uphill or downhill).
▶ Snow chains are fitted.
▶ A wheel has been changed.
CAUTION
Under certain circumstances (e.g. sporty style of driving, wintry or unpaved
roads) the warning light in the instrument cluster can be delayed or does
not light up at all.
Fuel reserve
Read and observe
on page 29 first.
illuminates – the fuel level in the fuel tank is at the reserve level (approxi-
mately 7 litres).
An audible signal sounds as a warning. ▶ Please refuel » page 135.
Note
The text in the display goes out after refuelling and driving a short distance.
Turn signal system
Read and observe
on page 29 first.
flashes – the left turn signal is turned on.
flashes – the right turn signal is turned on.
32Operation
Page 97 of 196
›Bring the vehicle to a stop and depress the brake pedal.›Firmly apply the handbrake.›
For vehicles with
Automatic transmission , place the selector lever in the P
position.
›
Switch off the engine.
›
For vehicles with Manual transmission , select first gear or Reverse gear R .
›
Release the brake pedal.
WARNING■
The parts of the exhaust system can become very hot. Therefore, never
stop the vehicle in places where the underside of your vehicle could come
into contact with flammable materials (e.g. dry grass, leaves, spilled fuel
etc.) There is a risk of a fire and could result in severe injuries!■
When leaving the vehicle never leave people unattended in the car who
could, for example, lock the vehicle or release the brake - The is a risk of
accidents and injury!
Manual gear shifting and pedals
Introduction
This chapter contains information on the following subjects:
Manual gear changing
95
Pedals
95
Manual gear changing
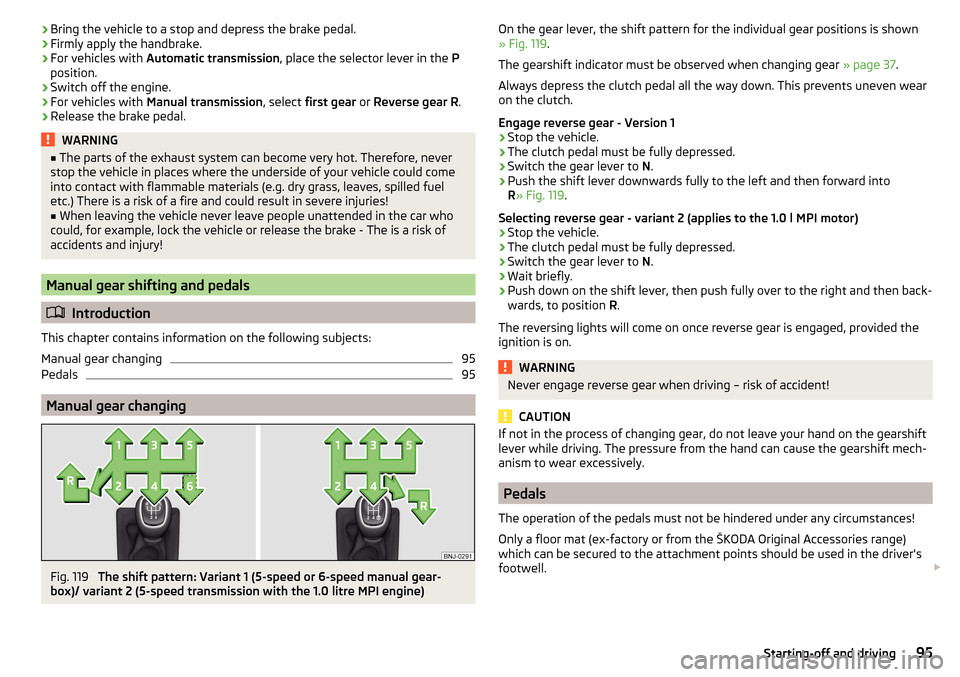
Fig. 119
The shift pattern: Variant 1 (5-speed or 6-speed manual gear-
box)/ variant 2 (5-speed transmission with the 1.0 litre MPI engine)
On the gear lever, the shift pattern for the individual gear positions is shown » Fig. 119 .
The gearshift indicator must be observed when changing gear » page 37.
Always depress the clutch pedal all the way down. This prevents uneven wear
on the clutch.
Engage reverse gear - Version 1›
Stop the vehicle.
›
The clutch pedal must be fully depressed.
›
Switch the gear lever to N.
›
Push the shift lever downwards fully to the left and then forward into
R » Fig. 119 .
Selecting reverse gear - variant 2 (applies to the 1.0 l MPI motor)
›
Stop the vehicle.
›
The clutch pedal must be fully depressed.
›
Switch the gear lever to N.
›
Wait briefly.
›
Push down on the shift lever, then push fully over to the right and then back-
wards, to position R.
The reversing lights will come on once reverse gear is engaged, provided the
ignition is on.
WARNINGNever engage reverse gear when driving – risk of accident!
CAUTION
If not in the process of changing gear, do not leave your hand on the gearshift
lever while driving. The pressure from the hand can cause the gearshift mech-
anism to wear excessively.
Pedals
The operation of the pedals must not be hindered under any circumstances!
Only a floor mat (ex-factory or from the ŠKODA Original Accessories range)
which can be secured to the attachment points should be used in the driver's
footwell.
95Starting-off and driving
Page 100 of 196
Starting-off and drivingRead and observe
and on page 96 first.
Moving off and pausing temporarily
›
Firmly depress and hold the brake pedal.
›
Start the engine.
›
Press the locking button and move the selector lever to the desired position
» page 96 .
›
Release the brake pedal and accelerate.
The selector lever position N does not have to be selected when stopping for a
short time (e.g. at a crossroads). However, the brake pedal should be de-
pressed, in order to prevent the vehicle from rolling.
Accelerating at maximum speed during the journey (kickdown function)
If the accelerator pedal is depressed while the vehicle is in forward drive mode,
the kick-down function is turned on.
The gear change is adjusted accordingly to achieve maximum acceleration.
WARNINGRapid acceleration ( e.g. on slippery roads) can lead to a loss of control over
the vehicle – There is a risk of accident!
Running in and economical driving
Introduction
This chapter contains information on the following subjects:
Running in the engine
98
Tips on economical driving
98
DriveGreen function
98
Running in the engine
During the first 1 500 km, the driving style is decisive for successful the run-
ning in process is.
During the first 1 000 km , the engine should not be charged with more than
3/4 of the maximum permitted engine revs and without the trailer.
From about 1 000 to 1 500 km the engine can be pushed up to the maximum
permitted engine speed.
Tips on economical driving
Fuel consumption depends on the driving style, road and weather conditions,
and similar such factors.
For an economical driving style, the following instructions must be observed. ▶ Avoid unnecessary acceleration and braking.
▶ Observe the recommended gear » page 37.
▶ Avoid full throttle and high speeds.
▶ Reduce idling.
▶ Avoid short distances.
▶ Ensure the correct tyre inflation pressure is maintained » page 146.
▶ Avoid unnecessary ballast.
▶ Remove the roof rack before driving if it is not needed.
▶ Only turn on electrical consumers (e.g. seat heating) for as long as necessary.
▶ Briefly ventilate before turning on the cooling system, do not use the cooling
system with the windows open.
▶ Do not leave windows open at high speeds.
DriveGreen function
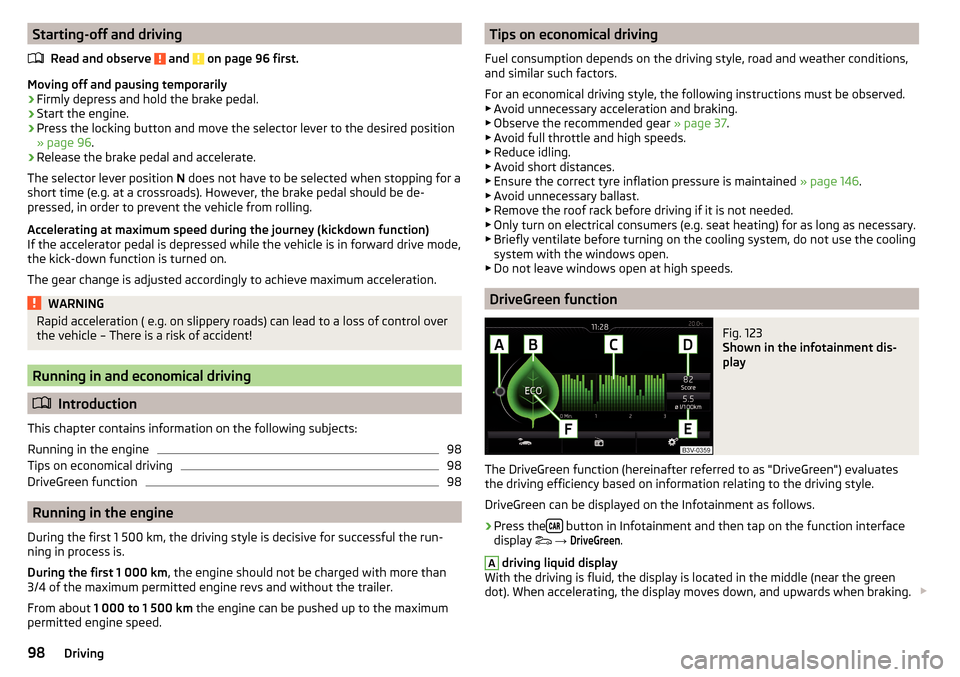
Fig. 123
Shown in the infotainment dis-
play
The DriveGreen function (hereinafter referred to as "DriveGreen") evaluates
the driving efficiency based on information relating to the driving style.
DriveGreen can be displayed on the Infotainment as follows.
›
Press the button in Infotainment and then tap on the function interface
display
→
DriveGreen
.
A
driving liquid display
With the driving is fluid, the display is located in the middle (near the green
dot). When accelerating, the display moves down, and upwards when braking.
98Driving
Page 131 of 196
WARNING■No changes may be made to airbag system components, the front bump-
er and the bodywork.■
Any work on the airbag system including the installation and removal of
system components due to other repair work (e.g. removal of the steering
wheel) must only be carried out by a specialist garage.
■
Do not manipulate individual parts of the airbag system, as this might re-
sult in the airbag being deployed.
■
If the airbag has been deployed, the airbag system must be replaced.
WARNINGThe airbag system operates using pressure sensors located in the front
doors. For this reason, no adjustments may be carried out to the doors or
door panels (e.g. installation of additional loudspeakers). Resulting damage
can impair the functioning of the airbag system - risk of accidents and fatal
injuries! The following guidelines must therefore be observed.■
Any work on the front doors and their door panels must be carried out by
a specialist garage.
■
Never drive the vehicle with the inner door panels removed or with open-
ings in the panelling.
Acceptance and recycling of used vehicles
Read and observe
on page 127 first.
All new ŠKODA vehicles are 95% recyclable.
Service intervals
Introduction
This chapter contains information on the following subjects:
Overview of service intervals
130
Fixed service intervals QI1 - QI4
130
Variable service interval QI6
130
Digital Service Plan
131
The service interval display in the display of the instrument cluster will remind
you to carry out every service stipulated by the manufacturer at the right time
in order to prevent you from forgetting any » page 41.
The completion of services can be verified through the printed verification
from the digital service schedule and the respective receipts.
The specified service intervals are tailored to normal operating conditions.
In the case of aggravated operating conditions, it will be necessary to have
some service work carried out before the date of the next regular service or
between the specified service intervals. This applies mainly to the cleaning or
the replacement of the air filter insert in regions with heavy dust pollution as
well as checking and replacing the toothed belt, but also to vehicles with die-
sel particle filters, which can put greater strain on the engine oil.
The following is taken to mean aggravated operating conditions: ▶ Fuel containing sulphur.
▶ Frequent short trips.
▶ Longer periods of engine idling (e.g. taxis).
▶ Operation in areas with heavy dust pollution.
▶ Frequent trailer operation.
▶ Predominantly stop-and-go traffic as is e.g. often the case in city driving.
▶ Operation predominantly during winter.
You will be told at the specialist garage whether the operating conditions of your vehicle may make it necessary for service work to be carried out between
the normal service intervals.
Different service charges may apply according to the particular scope of work
required, the vehicle type and specification, and your vehicle’s condition.
Note
■ The customer is responsible for covering the cost of all services including
changing or replenishing the oil, even during the warranty period, unless sta-
ted otherwise in the ŠKODA AUTO warranty terms or other agreements.■
You will be informed about the service checks and actions at each service by
the specialist garage.
129Care and maintenance
Page 134 of 196
Automatic Car Washes
The usual precautionary measures must be taken before washing the vehicle
(e.g. closing the windows and the tilt/slide roof etc.).
If your vehicle is fitted with any particular attached parts (e.g. spoiler, roof rack system, two-way radio aerial etc.), it is best to consult the operator of the car
wash system beforehand.
After an automatic wash with wax treatment, the wiper blades should be
cleaned with cleaning agents specially designed for the purpose, and then de-
greased.
Pressure Washers
When washing the vehicle with a high-pressure cleaner, the instructions for
use of the equipment must be observed. This particularly applies to instruc-
tions regarding the pressure and spraying distance from the vehicle surface.WARNING■
Washing your vehicle in the winter: Water and ice in the brake system can
affect the braking efficiency – there is the risk of an accident.■
Take care when cleaning the underbody or the inside of the wheel wells -
there is a risk of injury from sharp metal parts!
CAUTION
■ Do not wash the vehicle in direct sunlight, do not exert pressure on the body
while washing. The temperature of the washing water should be no more than
60 °C max. - otherwise there is a risk of damaging the vehicle paint.■
Before driving through a car wash fold in the exterior mirrors - There is a risk
of damage.
■
For vehicles with a roof antenna, the antenna rod should be unscrewed be-
fore driving through a car wash - there is a risk of damage.
CAUTION
Washing the vehicle with high-pressure cleaners■Films should not be washed with any high-pressure cleaners - risk of dam-
age.■
Do not aim the water jet directly at the lock cylinders or the door or opening
joints when washing the vehicle in the winter – there is a risk of freezing.
■
Hold a large spraying distance to the rear camera lens, to plastic parts (e.g.
Roof racks, spoilers, protective strips and the like), as well as soft materials
such as rubber hoses or insulation material.
■
The sensors of the parking aid can be sprayed only for a short time and there
must be a minimum distance of 10 cm - there is a risk of damage.
Exterior car care
Read and observe
and on page 131 first.
Vehicle compo- nentsCircumstancesRemedy
Paint
Spilled fuelClear water, cloth, (clean as soon as
possible)No water drop-
lets form on the
paintUse hard wax preserve (at least twice a
year), apply wax to clean and dry bodyPaint has gone
mattUse polish, then wax (if the polish does
not contain any preservative ingredi-
ents)Plastic partsSoilingClear water, cloth / sponge, possibly
cleaners provided for this purposeChrome
and anodised
partsSoilingclear water, cloth, possibly cleaners
provided for this purpose, clean then
polish with a soft dry clothFilmsSoilingSoft sponge and mild soap solution a)Windows
and door mirrorsSoilingWash with clean water and dry with a
wipe specifically for that purposeHead / tail lightsSoilingSoft sponge and mild soap solution a)
Reversing cameraSoilingWash with clean water and dry with a
soft clothSnow/iceHand brush / de-icerDoor lock cylin-
dersSnow/iceDe-icing fluid specifically for that pur-
poseWipers / wiper
bladesSoilingWindscreen cleaner, sponge or clothWheelsSoilingClear water, then apply appropriate
substancea)
Mild soap solution = 2 tablespoons of natural soap to 1 litre of lukewarm water.
The jack is maintenance-free. If necessary, the moving parts of the jack should
be lubricated with a suitable lubricant.
The towing device is maintenance-free. Coat the ball head of the towing de-
vice with a suitable grease whenever necessary.
132General Maintenance
Page 135 of 196
Protection of cavities
All the cavities of your vehicle which are at risk from corrosion are protected by
a layer of long-lasting protective wax applied in the factory.
If any small amount of wax flow out of the cavities at high temperatures, these
must be removed with a plastic scraper and the stains cleaned using a petrole-
um cleaner.
Underbody
The underside of your vehicle is already permanently protected by the factory
against chemical and mechanical influences.
We recommend having the protective coating — preferably before the begin-
ning of winter and at the end of winter.
Product life of the films
Environmental influences (e.g. sunlight, humidity, air pollution, rockfall) affect
the life of the films. The films age and become brittle, which is normal; this
shall not be considered a fault.
The sunlight may also affect the depth of the film colour.
When transporting a load on the roof rack (e.g. roof box, etc.), there is an in- creased risk of film damage (e.g. due to rockfall from the secured load).
CAUTION
■ Vehicle paint
■ Repair damaged areas as soon as possible.
■ Matt-painted parts should not be treated with polishes or hard waxes.
■ Do not polish in a dusty environment - risk of paint scratches.
■ Do not apply polish to door seals or window guides.■
Plastic parts
■ Do not use paint polish.
■
Chromed and anodised parts
■ Do not polish in a dusty environment - risk of surface scratches.
■
Films
The following instructions must be observed, otherwise there is a risk of film
damage.
■ Do not use dirty cloths or sponges for cleaning.
■ Do not use a scraper or other means to remove ice and snow.
■ Do not polish the films
■ Do not use a high pressure cleaner on the films.
■
Rubber seals
■ Do not treat the door seals and window guides deal with anything - the
protective varnish coating could be damaged.
■ Windows and door mirrors
■ Do not clean the insides of the windows/mirrors with sharp objects - risk of
damage to the filaments or the antenna. ■ Do not use a cloth which has been used to polish the body - this could dirty
the window and impair visibility.■
Head / tail lights
■ Do not wipe head/tail lamps dry, do not use any sharp objects - risk of dam-
age to the protective coating and cracks forming on the headlamp glass cov-
ers.
■
Reversing camera
The following instructions must be observed, otherwise there is a risk of
camera damage.
■ Do not remove snow / ice with warm / hot water.
■ To wash, never use a pressure washer or steam jet.
■ For cleaning, do not use abrasive cleaners.
■
Door lock cylinders
■ Make sure that as little water as possible gets into the locking cylinder
when washing the vehicle - there is a risk of freezing the lock cylinder!
■
Wheels
■ Heavy soiling of the wheels can affect the balance of the wheels - the re-
sult can be a vibration, which can cause premature wear of the steering.
Removing ice and snow from the windows
Fig. 164
Installation location of the ice
scraper, removing the scraper
Read and observe and on page 131 first.
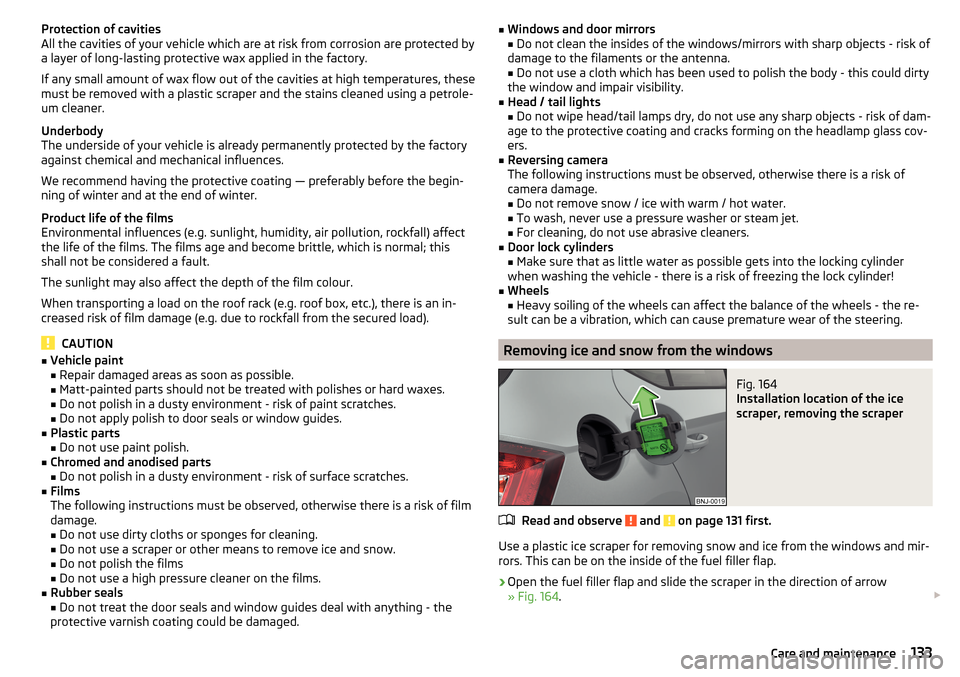
Use a plastic ice scraper for removing snow and ice from the windows and mir-
rors. This can be on the inside of the fuel filler flap.
›
Open the fuel filler flap and slide the scraper in the direction of arrow
» Fig. 164 .
133Care and maintenance
Page 147 of 196
Wheels
Wheels and tyres
Introduction
This chapter contains information on the following subjects:
Advice on tyre/wheel usage
145
Tyre pressure
146
Tyre wear and wheel change
146
Spare wheel
147
Spare wheel
147
Tyre marking
147
Advice on tyre/wheel usage
During the first 500 km, new tyres do not offer optimum grip; appropriate care
should therefore be taken when driving.
Tyres with the deeper profiles should always be fitted to the front wheels.
Rims and wheel bolts are matched to each other in terms of design. We rec-
ommend that you use rims and wheel bolts from ŠKODA Original Accessories.
Wheels and tyres should always be stored in a cool, dry and dark place. The
tyres themselves should be stored vertically.
Tyre life
Tyres age losing their original characteristics, even if they are not used. We
recommend that you do not use tyres that are more than 6 years old.
The manufacturing date is indicated on the tyre sidewall (possibly on the in-
side ). For example, DOT ... 10 16... means, for example, that the tyre was manu-
factured in the 10. week of 2016.
Tyre damage
We recommend checking your tyres and wheel rims for damage (punctures,
cuts, splits and bulges etc.) on a regular basis.
Remove any foreign objects in the tyre’s profile immediately (e.g. small stones).
Foreign bodies which have penetrated into the tyre (e.g. screws or nails)
should not be removed and help should be sought from a specialist garage.
Fitting new tyres
Only fit approved radial tyres of the same type, size (rolling circumference) and
the same tread pattern on one axle on all four wheels.
When mounting new tyres the tyres have to be replaced axle by axle.
Unidirectional tyres
The direction of rotation of the tyres is marked by arrows on the wall of the
tyre .
The specified running direction must be strictly adhered to, otherwise the fol-
lowing tyre characteristics may be degraded. ▶ Driving stability.
▶ Traction.
▶ Tyre noise and tyre wear.WARNING■Never use tyres if you do not know anything about their condition and
age - risk of accidents.■
Never drive with damaged tyres – there is the risk of an accident.
CAUTION
■ The tyres must be protected from contact with substances (e.g. oil, grease
and fuel) which could damage them. If the tyres with these substances come
into contact, then we recommend that you check this in a specialist workshop.■
Do not use rims with ground or polished surfaces in winter conditions - there
is a risk of rim damage (e.g through salt spreading).
Note
■ We recommend that any work on the wheels or tyres be carried out by a spe-
cialist garage.■
We recommend that you use tyres, snow chains and full wheel trims from
ŠKODA Original Accessories.
145Wheels