headlight bulb SKODA FABIA 2016 3.G / NJ Owner's Manual
[x] Cancel search | Manufacturer: SKODA, Model Year: 2016, Model line: FABIA, Model: SKODA FABIA 2016 3.G / NJPages: 196, PDF Size: 31.86 MB
Page 35 of 196
If there is a fault in the turn signal system, the warning light flashes at twice
its normal rate (does not apply when towing).
When the hazard warning light system is switched on, this will cause all of the turn signal lights as well as both warning lights to flash.
Trailer turn signal lights
Read and observe
on page 29 first.
flashes – the trailer turn signal lights are switched on.
If a trailer is hitched and the warning light
is not flashing, one of the trailer
turn signal lights has failed.
▶ Check the trailer bulbs.
Fog lights
Read and observe
on page 29 first.
illuminates – the fog lights are switched on.
Speed regulating system / speed limiter
Read and observe
on page 29 first.
illuminates - the vehicle speed is limited by the speed regulating system
and/or the adaptive cruise control or by the speed limiter.
flashes – the speed set with the speed limiter has been exceeded.
Brake pedal (automatic gearbox)
Read and observe
on page 29 first.
lights up – apply the brake.
Main beam
Read and observe
on page 29 first.
lights up – the main beam or the headlight flasher is switched on.
Automatic gearbox
Read and observe
on page 29 first.
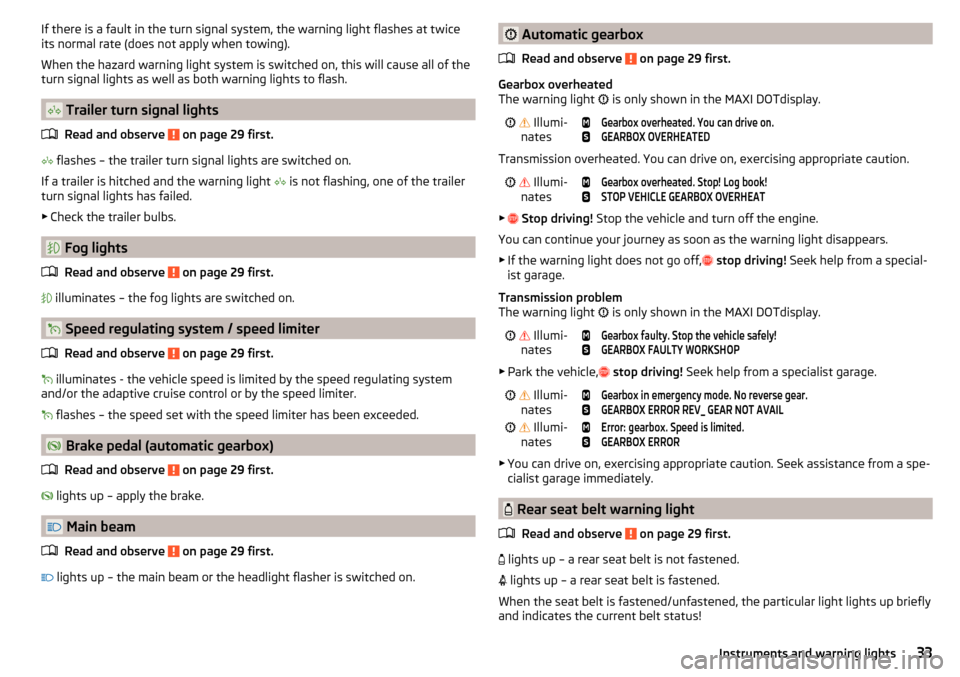
Gearbox overheated
The warning light
is only shown in the MAXI DOTdisplay.
Illumi-
nates
Gearbox overheated. You can drive on.GEARBOX OVERHEATED
Transmission overheated. You can drive on, exercising appropriate caution.
Illumi-
nates
Gearbox overheated. Stop! Log book!STOP VEHICLE GEARBOX OVERHEAT
▶
Stop driving! Stop the vehicle and turn off the engine.
You can continue your journey as soon as the warning light disappears.
▶ If the warning light does not go off,
stop driving! Seek help from a special-
ist garage.
Transmission problem
The warning light is only shown in the MAXI DOTdisplay.
Illumi-
nates
Gearbox faulty. Stop the vehicle safely!GEARBOX FAULTY WORKSHOP
▶ Park the vehicle,
stop driving! Seek help from a specialist garage.
Illumi-
nates
Gearbox in emergency mode. No reverse gear.GEARBOX ERROR REV_ GEAR NOT AVAIL Illumi-
nates
Error: gearbox. Speed is limited.GEARBOX ERROR
▶ You can drive on, exercising appropriate caution. Seek assistance from a spe-
cialist garage immediately.
Rear seat belt warning light
Read and observe
on page 29 first.
lights up – a rear seat belt is not fastened.
lights up – a rear seat belt is fastened.
When the seat belt is fastened/unfastened, the particular light lights up briefly
and indicates the current belt status!
33Instruments and warning lights
Page 165 of 196
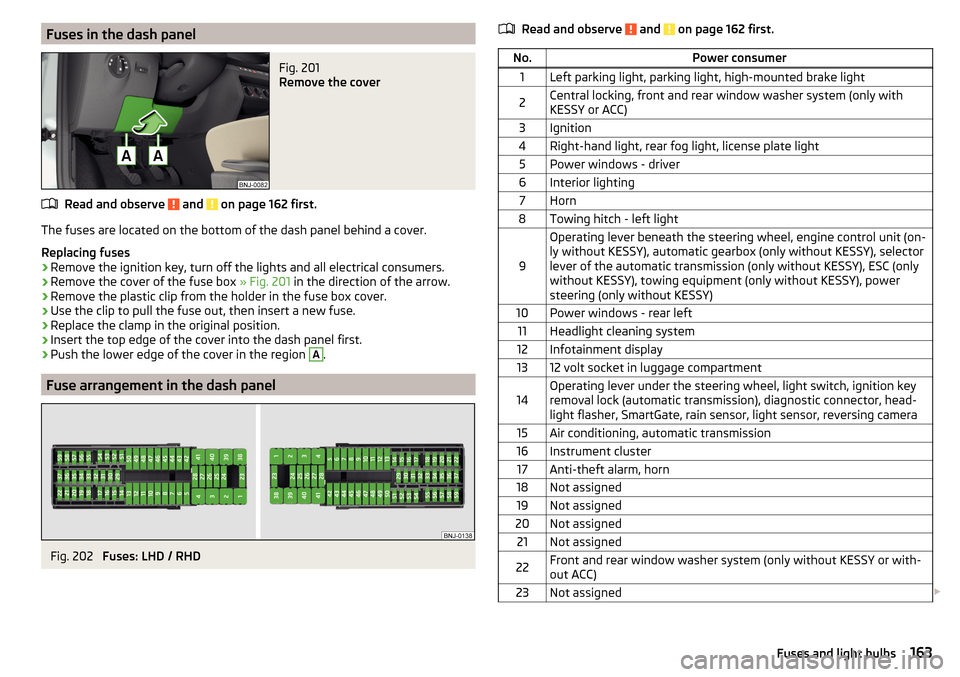
Fuses in the dash panelFig. 201
Remove the cover
Read and observe and on page 162 first.
The fuses are located on the bottom of the dash panel behind a cover.
Replacing fuses
›
Remove the ignition key, turn off the lights and all electrical consumers.
›
Remove the cover of the fuse box » Fig. 201 in the direction of the arrow.
›
Remove the plastic clip from the holder in the fuse box cover.
›
Use the clip to pull the fuse out, then insert a new fuse.
›
Replace the clamp in the original position.
›
Insert the top edge of the cover into the dash panel first.
›
Push the lower edge of the cover in the region
A
.
Fuse arrangement in the dash panel
Fig. 202
Fuses: LHD / RHD
Read and observe and on page 162 first.No.Power consumer1Left parking light, parking light, high-mounted brake light2Central locking, front and rear window washer system (only with
KESSY or ACC)3Ignition4Right-hand light, rear fog light, license plate light5Power windows - driver6Interior lighting7Horn8Towing hitch - left light
9
Operating lever beneath the steering wheel, engine control unit (on-
ly without KESSY), automatic gearbox (only without KESSY), selector
lever of the automatic transmission (only without KESSY), ESC (only
without KESSY), towing equipment (only without KESSY), power
steering (only without KESSY)10Power windows - rear left11Headlight cleaning system12Infotainment display1312 volt socket in luggage compartment14Operating lever under the steering wheel, light switch, ignition key
removal lock (automatic transmission), diagnostic connector, head-
light flasher, SmartGate, rain sensor, light sensor, reversing camera15Air conditioning, automatic transmission16Instrument cluster17Anti-theft alarm, horn18Not assigned19Not assigned20Not assigned21Not assigned22Front and rear window washer system (only without KESSY or with-
out ACC)23Not assigned 163Fuses and light bulbs
Page 167 of 196
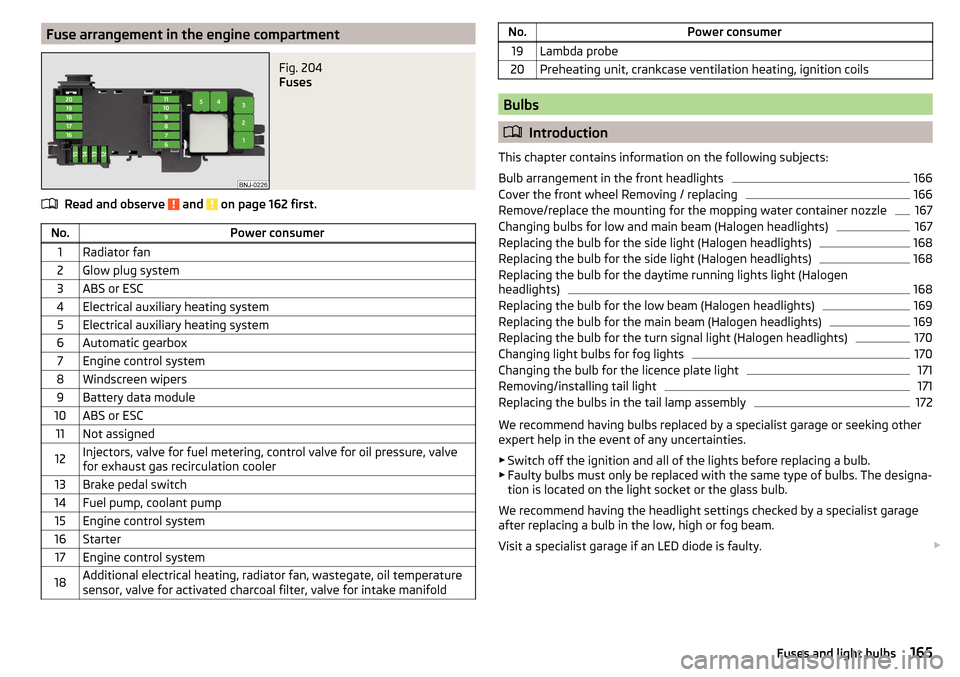
Fuse arrangement in the engine compartmentFig. 204
Fuses
Read and observe and on page 162 first.
No.Power consumer1Radiator fan2Glow plug system3ABS or ESC4Electrical auxiliary heating system5Electrical auxiliary heating system6Automatic gearbox7Engine control system8Windscreen wipers9Battery data module10ABS or ESC11Not assigned12Injectors, valve for fuel metering, control valve for oil pressure, valve
for exhaust gas recirculation cooler13Brake pedal switch14Fuel pump, coolant pump15Engine control system16Starter17Engine control system18Additional electrical heating, radiator fan, wastegate, oil temperature
sensor, valve for activated charcoal filter, valve for intake manifoldNo.Power consumer19Lambda probe20Preheating unit, crankcase ventilation heating, ignition coils
Bulbs
Introduction
This chapter contains information on the following subjects:
Bulb arrangement in the front headlights
166
Cover the front wheel Removing / replacing
166
Remove/replace the mounting for the mopping water container nozzle
167
Changing bulbs for low and main beam (Halogen headlights)
167
Replacing the bulb for the side light (Halogen headlights)
168
Replacing the bulb for the side light (Halogen headlights)
168
Replacing the bulb for the daytime running lights light (Halogen
headlights)
168
Replacing the bulb for the low beam (Halogen headlights)
169
Replacing the bulb for the main beam (Halogen headlights)
169
Replacing the bulb for the turn signal light (Halogen headlights)
170
Changing light bulbs for fog lights
170
Changing the bulb for the licence plate light
171
Removing/installing tail light
171
Replacing the bulbs in the tail lamp assembly
172
We recommend having bulbs replaced by a specialist garage or seeking other
expert help in the event of any uncertainties.
▶ Switch off the ignition and all of the lights before replacing a bulb.
▶ Faulty bulbs must only be replaced with the same type of bulbs. The designa-
tion is located on the light socket or the glass bulb.
We recommend having the headlight settings checked by a specialist garage after replacing a bulb in the low, high or fog beam.
Visit a specialist garage if an LED diode is faulty.
165Fuses and light bulbs
Page 168 of 196
WARNING■Always read and observe the warnings before completing any work in the
engine compartment » page 137.■
Accidents can be caused if the road in front of the vehicle is not suffi-
ciently illuminated and the vehicle cannot or can only be seen with difficul-
ty by other road users.
■
Bulbs H8, H7 and H4 are pressurised and may burst when changed - there
is a risk of injury! We therefore recommended wearing gloves and safety
glasses when changing a bulb.
CAUTION
■ Do not take hold of the glass bulb with naked fingers (even the smallest
amount of dirt reduces the working life of the light bulb). Use a clean cloth,
napkin, or similar.■
The cap of the filament bulb must always be seated correctly in the head-
light, otherwise this may allow water and debris to enter the headlight - risk of
damage to the headlights.
Note
■ This Owner's Manual only describes the replacement of bulbs where it is pos-
sible to replace the bulbs on your own without any complications arising. Other
light bulbs should be changed by your specialist garage.■
We recommend that you always carry a box of replacement bulbs in the vehi-
cle.
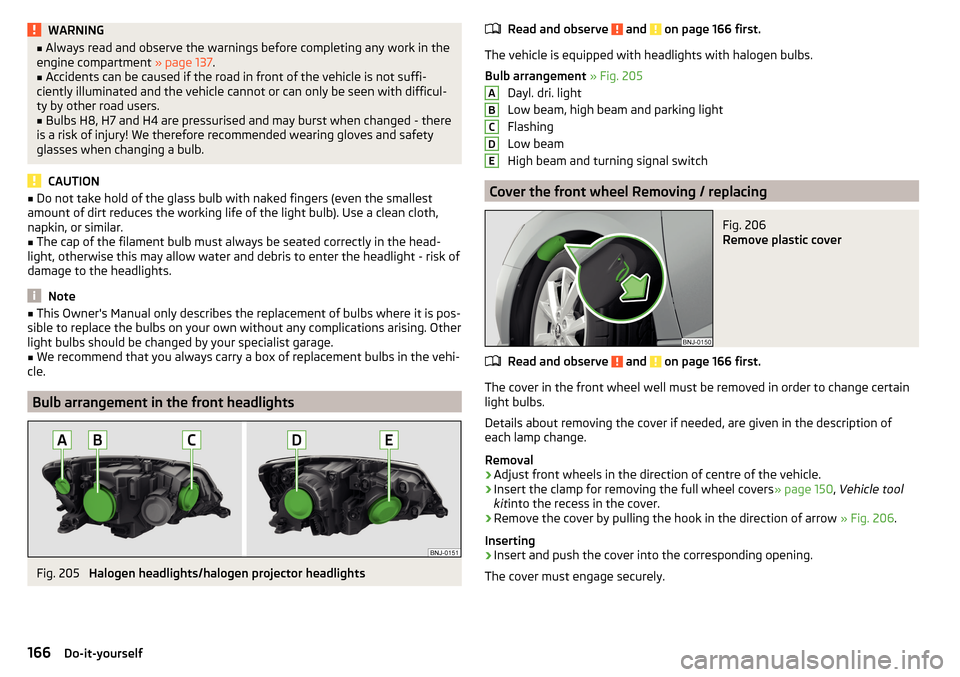
Bulb arrangement in the front headlights
Fig. 205
Halogen headlights/halogen projector headlights
Read and observe and on page 166 first.
The vehicle is equipped with headlights with halogen bulbs.
Bulb arrangement » Fig. 205
Dayl. dri. light
Low beam, high beam and parking light
Flashing
Low beam
High beam and turning signal switch
Cover the front wheel Removing / replacing
Fig. 206
Remove plastic cover
Read and observe and on page 166 first.
The cover in the front wheel well must be removed in order to change certain
light bulbs.
Details about removing the cover if needed, are given in the description of
each lamp change.
Removal
›
Adjust front wheels in the direction of centre of the vehicle.
›
Insert the clamp for removing the full wheel covers » page 150, Vehicle tool
kit into the recess in the cover.
›
Remove the cover by pulling the hook in the direction of arrow » Fig. 206.
Inserting
›
Insert and push the cover into the corresponding opening.
The cover must engage securely.
ABCDE166Do-it-yourself
Page 169 of 196
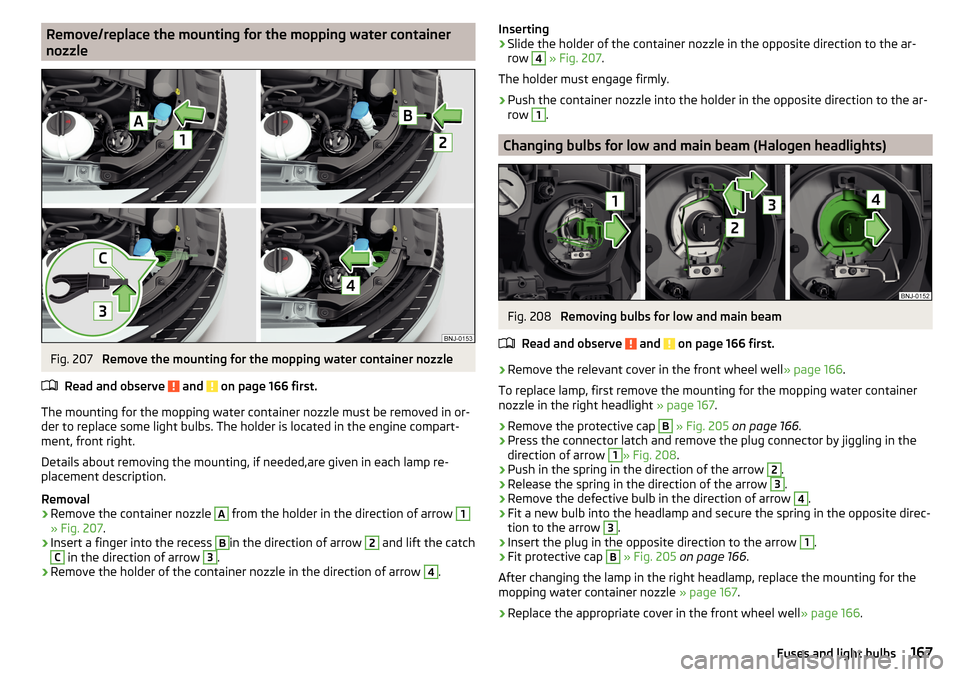
Remove/replace the mounting for the mopping water containernozzleFig. 207
Remove the mounting for the mopping water container nozzle
Read and observe
and on page 166 first.
The mounting for the mopping water container nozzle must be removed in or-
der to replace some light bulbs. The holder is located in the engine compart-
ment, front right.
Details about removing the mounting, if needed,are given in each lamp re-
placement description.
Removal
›
Remove the container nozzle
A
from the holder in the direction of arrow
1
» Fig. 207 .
›
Insert a finger into the recess
B
in the direction of arrow
2
and lift the catch
C
in the direction of arrow
3
.
›
Remove the holder of the container nozzle in the direction of arrow
4
.
Inserting›Slide the holder of the container nozzle in the opposite direction to the ar-
row 4
» Fig. 207 .
The holder must engage firmly.
›
Push the container nozzle into the holder in the opposite direction to the ar-
row
1
.
Changing bulbs for low and main beam (Halogen headlights)
Fig. 208
Removing bulbs for low and main beam
Read and observe
and on page 166 first.
›
Remove the relevant cover in the front wheel well » page 166.
To replace lamp, first remove the mounting for the mopping water container
nozzle in the right headlight » page 167.
›
Remove the protective cap
B
» Fig. 205 on page 166 .
›
Press the connector latch and remove the plug connector by jiggling in the
direction of arrow
1
» Fig. 208 .
›
Push in the spring in the direction of the arrow
2
.
›
Release the spring in the direction of the arrow
3
.
›
Remove the defective bulb in the direction of arrow
4
.
›
Fit a new bulb into the headlamp and secure the spring in the opposite direc-
tion to the arrow
3
.
›
Insert the plug in the opposite direction to the arrow
1
.
›
Fit protective cap
B
» Fig. 205 on page 166 .
After changing the lamp in the right headlamp, replace the mounting for the
mopping water container nozzle » page 167.
›
Replace the appropriate cover in the front wheel well » page 166.
167Fuses and light bulbs
Page 170 of 196
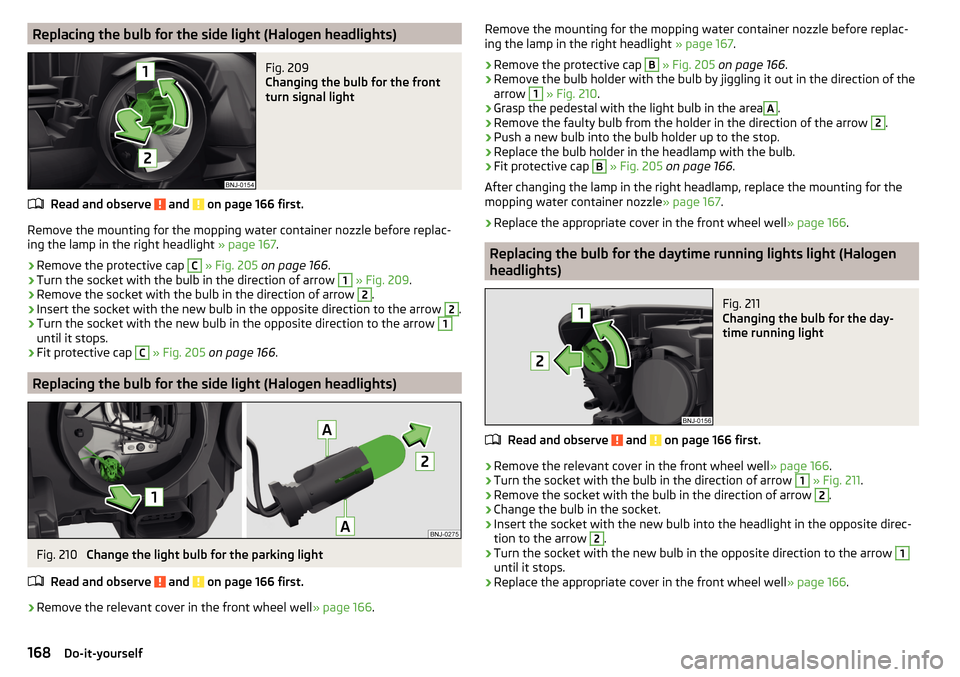
Replacing the bulb for the side light (Halogen headlights)Fig. 209
Changing the bulb for the front
turn signal light
Read and observe and on page 166 first.
Remove the mounting for the mopping water container nozzle before replac-
ing the lamp in the right headlight » page 167.
›
Remove the protective cap
C
» Fig. 205 on page 166 .
›
Turn the socket with the bulb in the direction of arrow
1
» Fig. 209 .
›
Remove the socket with the bulb in the direction of arrow
2
.
›
Insert the socket with the new bulb in the opposite direction to the arrow
2
.
›
Turn the socket with the new bulb in the opposite direction to the arrow
1
until it stops.
›
Fit protective cap
C
» Fig. 205 on page 166 .
Replacing the bulb for the side light (Halogen headlights)
Fig. 210
Change the light bulb for the parking light
Read and observe
and on page 166 first.
›
Remove the relevant cover in the front wheel well » page 166.
Remove the mounting for the mopping water container nozzle before replac-
ing the lamp in the right headlight » page 167.›
Remove the protective cap
B
» Fig. 205 on page 166 .
›
Remove the bulb holder with the bulb by jiggling it out in the direction of the
arrow
1
» Fig. 210 .
›
Grasp the pedestal with the light bulb in the area
A
.
›
Remove the faulty bulb from the holder in the direction of the arrow
2
.
›
Push a new bulb into the bulb holder up to the stop.
›
Replace the bulb holder in the headlamp with the bulb.
›
Fit protective cap
B
» Fig. 205 on page 166 .
After changing the lamp in the right headlamp, replace the mounting for the
mopping water container nozzle » page 167.
›
Replace the appropriate cover in the front wheel well » page 166.
Replacing the bulb for the daytime running lights light (Halogen
headlights)
Fig. 211
Changing the bulb for the day-
time running light
Read and observe and on page 166 first.
›
Remove the relevant cover in the front wheel well » page 166.
›
Turn the socket with the bulb in the direction of arrow
1
» Fig. 211 .
›
Remove the socket with the bulb in the direction of arrow
2
.
›
Change the bulb in the socket.
›
Insert the socket with the new bulb into the headlight in the opposite direc-
tion to the arrow
2
.
›
Turn the socket with the new bulb in the opposite direction to the arrow
1
until it stops.
›
Replace the appropriate cover in the front wheel well » page 166.
168Do-it-yourself
Page 171 of 196
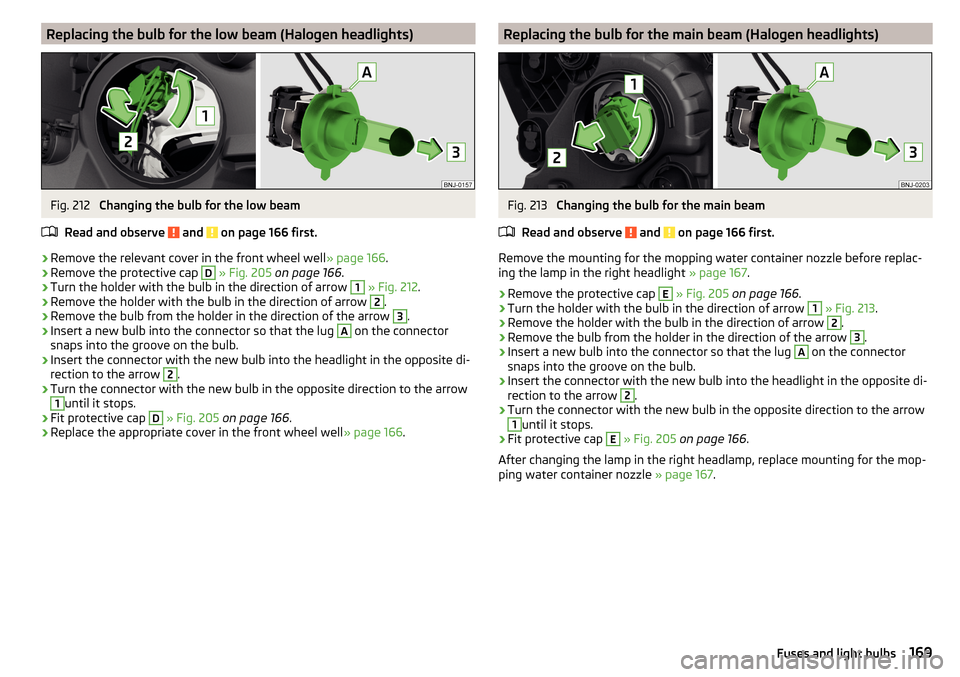
Replacing the bulb for the low beam (Halogen headlights)Fig. 212
Changing the bulb for the low beam
Read and observe
and on page 166 first.
›
Remove the relevant cover in the front wheel well » page 166.
›
Remove the protective cap
D
» Fig. 205 on page 166 .
›
Turn the holder with the bulb in the direction of arrow
1
» Fig. 212 .
›
Remove the holder with the bulb in the direction of arrow
2
.
›
Remove the bulb from the holder in the direction of the arrow
3
.
›
Insert a new bulb into the connector so that the lug
A
on the connector
snaps into the groove on the bulb.
›
Insert the connector with the new bulb into the headlight in the opposite di-
rection to the arrow
2
.
›
Turn the connector with the new bulb in the opposite direction to the arrow
1
until it stops.
›
Fit protective cap
D
» Fig. 205 on page 166 .
›
Replace the appropriate cover in the front wheel well » page 166.
Replacing the bulb for the main beam (Halogen headlights)Fig. 213
Changing the bulb for the main beam
Read and observe
and on page 166 first.
Remove the mounting for the mopping water container nozzle before replac-
ing the lamp in the right headlight » page 167.
›
Remove the protective cap
E
» Fig. 205 on page 166 .
›
Turn the holder with the bulb in the direction of arrow
1
» Fig. 213 .
›
Remove the holder with the bulb in the direction of arrow
2
.
›
Remove the bulb from the holder in the direction of the arrow
3
.
›
Insert a new bulb into the connector so that the lug
A
on the connector
snaps into the groove on the bulb.
›
Insert the connector with the new bulb into the headlight in the opposite di-
rection to the arrow
2
.
›
Turn the connector with the new bulb in the opposite direction to the arrow
1
until it stops.
›
Fit protective cap
E
» Fig. 205 on page 166 .
After changing the lamp in the right headlamp, replace mounting for the mop-
ping water container nozzle » page 167.
169Fuses and light bulbs
Page 172 of 196
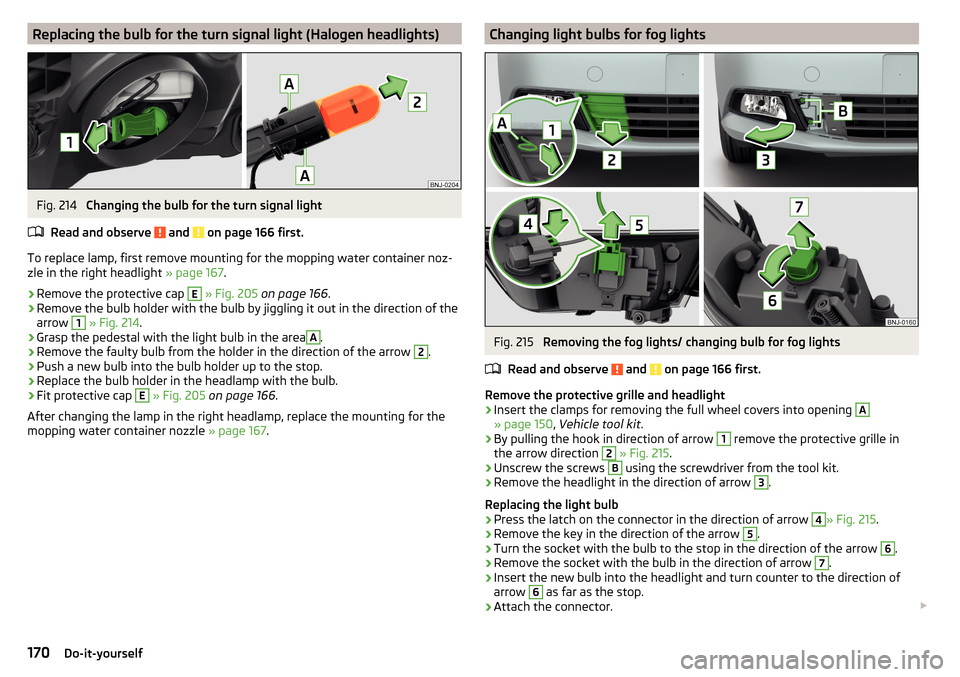
Replacing the bulb for the turn signal light (Halogen headlights)Fig. 214
Changing the bulb for the turn signal light
Read and observe
and on page 166 first.
To replace lamp, first remove mounting for the mopping water container noz-
zle in the right headlight » page 167.
›
Remove the protective cap
E
» Fig. 205 on page 166 .
›
Remove the bulb holder with the bulb by jiggling it out in the direction of the
arrow
1
» Fig. 214 .
›
Grasp the pedestal with the light bulb in the area
A
.
›
Remove the faulty bulb from the holder in the direction of the arrow
2
.
›
Push a new bulb into the bulb holder up to the stop.
›
Replace the bulb holder in the headlamp with the bulb.
›
Fit protective cap
E
» Fig. 205 on page 166 .
After changing the lamp in the right headlamp, replace the mounting for the
mopping water container nozzle » page 167.
Changing light bulbs for fog lightsFig. 215
Removing the fog lights/ changing bulb for fog lights
Read and observe
and on page 166 first.
Remove the protective grille and headlight
›
Insert the clamps for removing the full wheel covers into opening
A
» page 150 , Vehicle tool kit .
›
By pulling the hook in direction of arrow
1
remove the protective grille in
the arrow direction
2
» Fig. 215 .
›
Unscrew the screws
B
using the screwdriver from the tool kit.
›
Remove the headlight in the direction of arrow
3
.
Replacing the light bulb
›
Press the latch on the connector in the direction of arrow
4
» Fig. 215 .
›
Remove the key in the direction of the arrow
5
.
›
Turn the socket with the bulb to the stop in the direction of the arrow
6
.
›
Remove the socket with the bulb in the direction of arrow
7
.
›
Insert the new bulb into the headlight and turn counter to the direction of
arrow
6
as far as the stop.
›
Attach the connector.
170Do-it-yourself
Page 173 of 196
Refit the headlight and grille›Replace the fog light by inserting it in the opposite direction of the arrow 3
» Fig. 215 and tightening.
›
Insert the guard and push it gently until it locks into place.
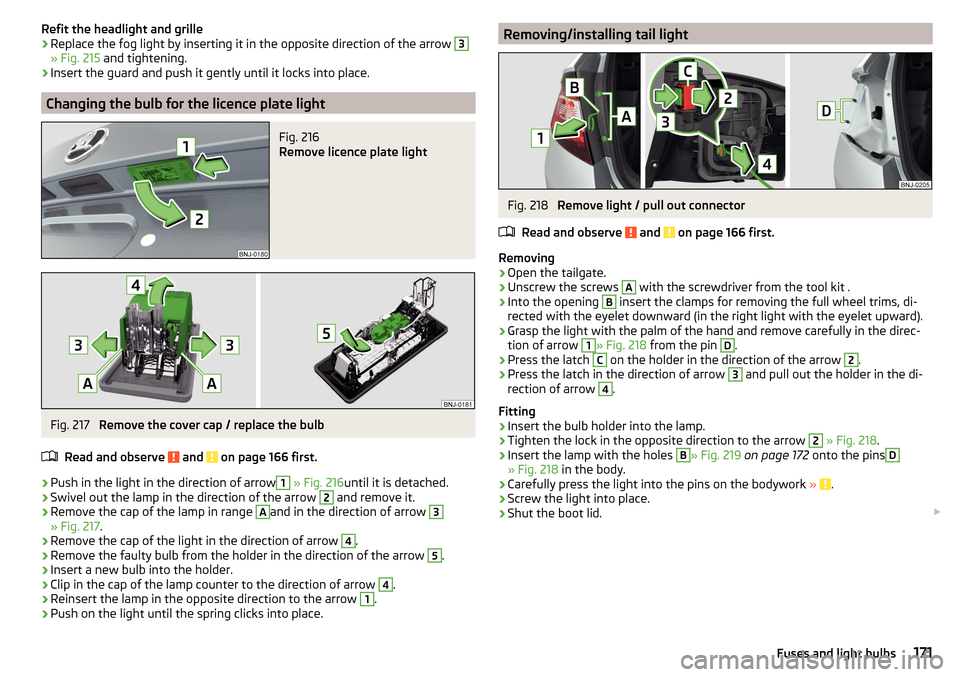
Changing the bulb for the licence plate light
Fig. 216
Remove licence plate light
Fig. 217
Remove the cover cap / replace the bulb
Read and observe
and on page 166 first.
›
Push in the light in the direction of arrow
1
» Fig. 216 until it is detached.
›
Swivel out the lamp in the direction of the arrow
2
and remove it.
›
Remove the cap of the lamp in range
A
and in the direction of arrow
3
» Fig. 217.
›
Remove the cap of the light in the direction of arrow
4
.
›
Remove the faulty bulb from the holder in the direction of the arrow
5
.
›
Insert a new bulb into the holder.
›
Clip in the cap of the lamp counter to the direction of arrow
4
.
›
Reinsert the lamp in the opposite direction to the arrow
1
.
›
Push on the light until the spring clicks into place.
Removing/installing tail lightFig. 218
Remove light / pull out connector
Read and observe
and on page 166 first.
Removing
›
Open the tailgate.
›
Unscrew the screws
A
with the screwdriver from the tool kit .
›
Into the opening
B
insert the clamps for removing the full wheel trims, di-
rected with the eyelet downward (in the right light with the eyelet upward).
›
Grasp the light with the palm of the hand and remove carefully in the direc-
tion of arrow
1
» Fig. 218 from the pin
D
.
›
Press the latch
C
on the holder in the direction of the arrow
2
.
›
Press the latch in the direction of arrow
3
and pull out the holder in the di-
rection of arrow
4
.
Fitting
›
Insert the bulb holder into the lamp.
›
Tighten the lock in the opposite direction to the arrow
2
» Fig. 218 .
›
Insert the lamp with the holes
B
» Fig. 219 on page 172 onto the pins
D
» Fig. 218 in the body.
›
Carefully press the light into the pins on the bodywork » .
›
Screw the light into place.
›
Shut the boot lid.
171Fuses and light bulbs
Page 188 of 196
Operation of the information system38
Speed regulating system109
Windscreen wipers60
light Flash
54
Fog lights/rear fog light55
Light COMING HOME / LEAVING HOME
56
Replacing bulbs165
Turn signal/main beam54
Lighting Interior lighting
57
Luggage compartment75
Lights53
Abroad57
Automatic driving light control55
Cockpit57
Daylight running54
Dipped beam53
Fog lights with the CORNER function56
Hazard warning light system56
Headlight cleaning system60
Headlight range control53
Parking lights53, 56
Switching on and off53
Warning lights28
Load175
Lock Individual settings
47
Locking Central locking button
46
in case of emergency160
KESSY46
Key45
Remote control45
Lock steering lock90
Luggage compartment75
Cover78
Fastening elements76
Fixing nets76
Flexible storage compartment80
Lighting75
Net partition79
Storage compartments under the floor80
unlock manually160
Unlock the boot lid160
Variable loading floor81
Luggage compartment cover78
Other positions78
Roll-up cover79
Luggage Storage bike carriers
82
Roll-up cover79
Storage compartments77
M
Main beam
54
Warning light33
Manual air conditioning Controls
86
Recirculated air mode88
Manual gear changing see Gear changing
95
Materials defect liability4
MAXI DOT See MAXI DOT display
40
MAXI DOT display assist systems menu item
41
Audio menu item40
Main menu40
Navigation menu item40
Operation38
telephone menu item41
Maximum speed178
MCB103
Mechanical window lifter open/close
51
Mechanical windows50
Media AUX67
See Owner´s Manual -Infotainment6
USB67
Memory39
Mirror61
Vanity59
mobility warranty5
Modes of the automatic transmission96
Modifications and technical alterations127
MSR101
Multi collision brake (MCB)103
Multifunction display Data
39
Functions38
Memory39
Multifunction pocket77
Multifunction steering wheel38
Multimedia holder70
N
N1
80
Nameplate173
Navigation S Owner´s Manual -Infotainment
6
Net partition79
Nets76
O
oil see Engine oil
140
Oil Information messages
34
Oil changing Engine oil
139
Onboard computer see multifunction display
38
Operating weight174
186Index