light SKODA KODIAQ 2016 1.G Owner's Manual
[x] Cancel search | Manufacturer: SKODA, Model Year: 2016, Model line: KODIAQ, Model: SKODA KODIAQ 2016 1.GPages: 344, PDF Size: 58.96 MB
Page 274 of 344
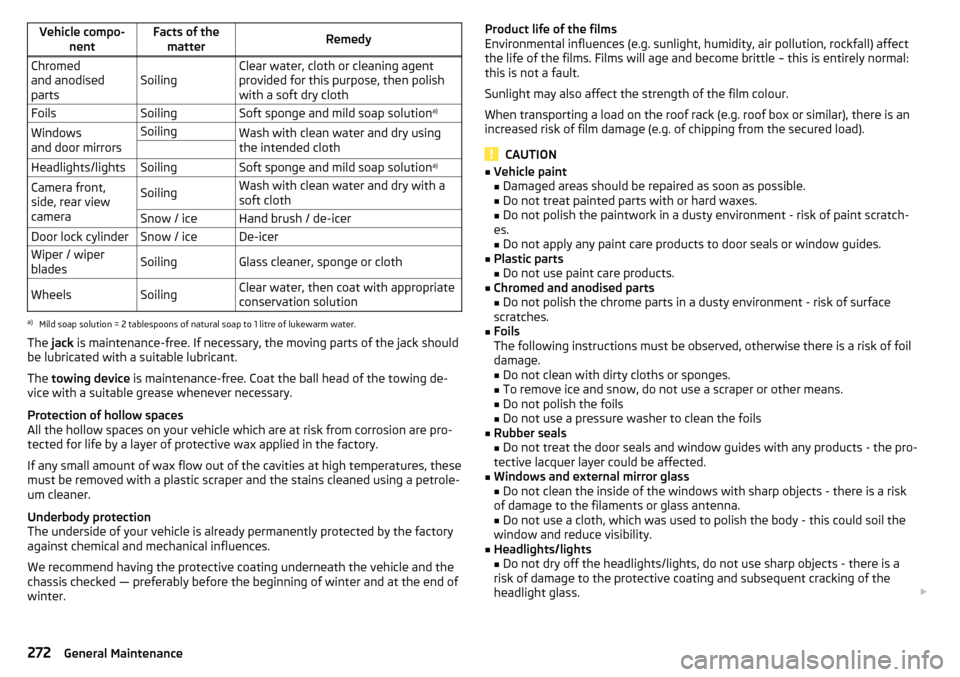
Vehicle compo-nentFacts of thematterRemedyChromed
and anodised
partsSoilingClear water, cloth or cleaning agent
provided for this purpose, then polish
with a soft dry clothFoilsSoilingSoft sponge and mild soap solution a)Windows
and door mirrorsSoilingWash with clean water and dry using
the intended cloth Headlights/lightsSoilingSoft sponge and mild soap solution a)Camera front,
side, rear view
cameraSoilingWash with clean water and dry with a
soft clothSnow / iceHand brush / de-icerDoor lock cylinderSnow / iceDe-icerWiper / wiper
bladesSoilingGlass cleaner, sponge or clothWheelsSoilingClear water, then coat with appropriate
conservation solutiona)
Mild soap solution = 2 tablespoons of natural soap to 1 litre of lukewarm water.
The jack is maintenance-free. If necessary, the moving parts of the jack should
be lubricated with a suitable lubricant.
The towing device is maintenance-free. Coat the ball head of the towing de-
vice with a suitable grease whenever necessary.
Protection of hollow spaces
All the hollow spaces on your vehicle which are at risk from corrosion are pro-
tected for life by a layer of protective wax applied in the factory.
If any small amount of wax flow out of the cavities at high temperatures, these
must be removed with a plastic scraper and the stains cleaned using a petrole-
um cleaner.
Underbody protection
The underside of your vehicle is already permanently protected by the factory
against chemical and mechanical influences.
We recommend having the protective coating underneath the vehicle and the
chassis checked — preferably before the beginning of winter and at the end of winter.
Product life of the films
Environmental influences (e.g. sunlight, humidity, air pollution, rockfall) affect
the life of the films. Films will age and become brittle – this is entirely normal:
this is not a fault.
Sunlight may also affect the strength of the film colour.
When transporting a load on the roof rack (e.g. roof box or similar), there is an
increased risk of film damage (e.g. of chipping from the secured load).
CAUTION
■ Vehicle paint
■ Damaged areas should be repaired as soon as possible.
■ Do not treat painted parts with or hard waxes.
■ Do not polish the paintwork in a dusty environment - risk of paint scratch-
es. ■ Do not apply any paint care products to door seals or window guides.■
Plastic parts
■ Do not use paint care products.
■
Chromed and anodised parts
■ Do not polish the chrome parts in a dusty environment - risk of surface
scratches.
■
Foils
The following instructions must be observed, otherwise there is a risk of foil
damage.
■ Do not clean with dirty cloths or sponges.
■ To remove ice and snow, do not use a scraper or other means.
■ Do not polish the foils
■ Do not use a pressure washer to clean the foils
■
Rubber seals
■ Do not treat the door seals and window guides with any products - the pro-
tective lacquer layer could be affected.
■
Windows and external mirror glass
■ Do not clean the inside of the windows with sharp objects - there is a risk
of damage to the filaments or glass antenna. ■ Do not use a cloth, which was used to polish the body - this could soil the
window and reduce visibility.
■
Headlights/lights ■ Do not dry off the headlights/lights, do not use sharp objects - there is a
risk of damage to the protective coating and subsequent cracking of the
headlight glass.
272General Maintenance
Page 275 of 344

■Front, side and rear view cameras
The following instructions must be observed, otherwise there is a risk of
camera damage.
■ Do not remove snow / ice with warm / hot water.
■ To wash, never use a pressure washer or steam jet.
■ For cleaning, do not use abrasive cleaners.■
Door lock cylinder
■ Make sure that as little water as possible gets into the locking cylinder
when washing the vehicle - there is a risk of freezing the lock cylinder!
■
Wheels ■ Heavy contamination of the wheels can affect the balance of the wheels -
this can result in vibrations and, under some circumstances, can cause pre-
mature wear of the steering wheel.
Remove ice and snow from the windows
Fig. 324
Installation location of the ice
scraper, removing the scraper
Read and observe and on page 270 first.
Use a plastic ice scraper for removing snow and ice from the windows and mir-
rors. This can be on the inside of the fuel filler flap.
›
Open the fuel filler flap and slide the scraper in the direction of arrow
» Fig. 324 .
CAUTION
■
Move the scraper in one direction only, otherwise there is a risk of damage to
the glass surface.■
Do not remove snow / ice on the surface that is soiled (e.g. pea gravel, sand,
road salt) - there is a risk of damaging the surface.
■
Remove snow / ice carefully, otherwise there is a risk of damaging the labels
that have been fitted by the factory.
Caring for the interior
Read and observe
and on page 270 first.
Vehicle compo- nentFacts of thematterRemedy
Natural leather /
Faux leather /
Alcantara ®
/
Material
Dust, surface
contaminationVacuum cleanerPollution (fresh)Water, slightly damp cotton / wool
cloth, if necessary, mild soap solution a)
,
then wipe with a soft clothStubborn stainsSpecially prepared detergentCare (natural
leather)Treat the leather periodically with a
suitable leather protector and use a
care cream with light blocker and im-
pregnation after each cleaning.Care (Alcan-
tara ®
/ fabric)Remove stubborn hairs using a “clean-
ing glove”
Remove pills from materials with a
brushPlastic partsSoilingWater, slightly damp cloth or sponge, or
cleaning agent provided for this pur-
poseWindowsSoilingWash with clean water and dry using
the intended clothCovers of electri-
cally heated seatsSoilingSpecially provided cleaning agentSeat belts » Soilingsoft cloth and mild soap solution a)a)
Mild soap solution = 2 tablespoons of natural soap to 1 litre of lukewarm water.
WARNING■
Never clean the seat belts chemically as chemical cleaning products could
destroy the fabric.■
Air fresheners and scents can be hazardous to heath when the tempera-
ture inside the vehicle is high.
273Care and maintenance
Page 276 of 344
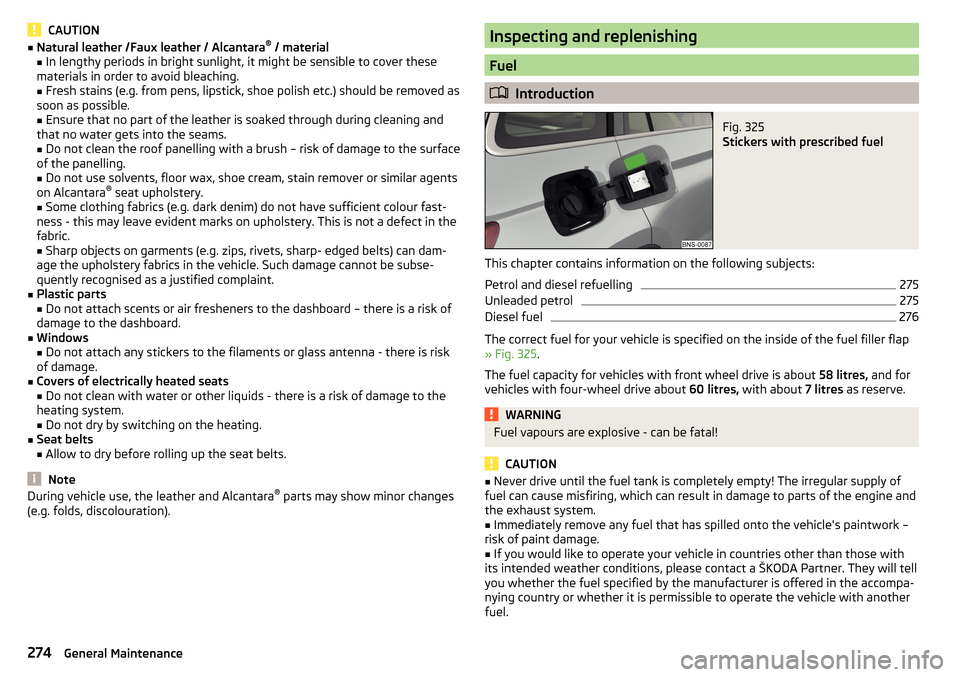
CAUTION■Natural leather /Faux leather / Alcantara ®
/ material
■ In lengthy periods in bright sunlight, it might be sensible to cover these
materials in order to avoid bleaching. ■ Fresh stains (e.g. from pens, lipstick, shoe polish etc.) should be removed as
soon as possible.
■ Ensure that no part of the leather is soaked through during cleaning and
that no water gets into the seams.
■ Do not clean the roof panelling with a brush – risk of damage to the surface
of the panelling.
■ Do not use solvents, floor wax, shoe cream, stain remover or similar agents
on Alcantara ®
seat upholstery.
■ Some clothing fabrics (e.g. dark denim) do not have sufficient colour fast-
ness - this may leave evident marks on upholstery. This is not a defect in the
fabric.
■ Sharp objects on garments (e.g. zips, rivets, sharp- edged belts) can dam-
age the upholstery fabrics in the vehicle. Such damage cannot be subse-
quently recognised as a justified complaint.■
Plastic parts ■ Do not attach scents or air fresheners to the dashboard – there is a risk of
damage to the dashboard.
■
Windows
■ Do not attach any stickers to the filaments or glass antenna - there is risk
of damage.
■
Covers of electrically heated seats
■ Do not clean with water or other liquids - there is a risk of damage to the
heating system.
■ Do not dry by switching on the heating.
■
Seat belts
■ Allow to dry before rolling up the seat belts.
Note
During vehicle use, the leather and Alcantara ®
parts may show minor changes
(e.g. folds, discolouration).Inspecting and replenishing
Fuel
Introduction
Fig. 325
Stickers with prescribed fuel
This chapter contains information on the following subjects:
Petrol and diesel refuelling
275
Unleaded petrol
275
Diesel fuel
276
The correct fuel for your vehicle is specified on the inside of the fuel filler flap
» Fig. 325 .
The fuel capacity for vehicles with front wheel drive is about 58 litres, and for
vehicles with four-wheel drive about 60 litres, with about 7 litres as reserve.
WARNINGFuel vapours are explosive - can be fatal!
CAUTION
■
Never drive until the fuel tank is completely empty! The irregular supply of
fuel can cause misfiring, which can result in damage to parts of the engine and
the exhaust system.■
Immediately remove any fuel that has spilled onto the vehicle's paintwork –
risk of paint damage.
■
If you would like to operate your vehicle in countries other than those with
its intended weather conditions, please contact a ŠKODA Partner. They will tell
you whether the fuel specified by the manufacturer is offered in the accompa-
nying country or whether it is permissible to operate the vehicle with another
fuel.
274General Maintenance
Page 277 of 344
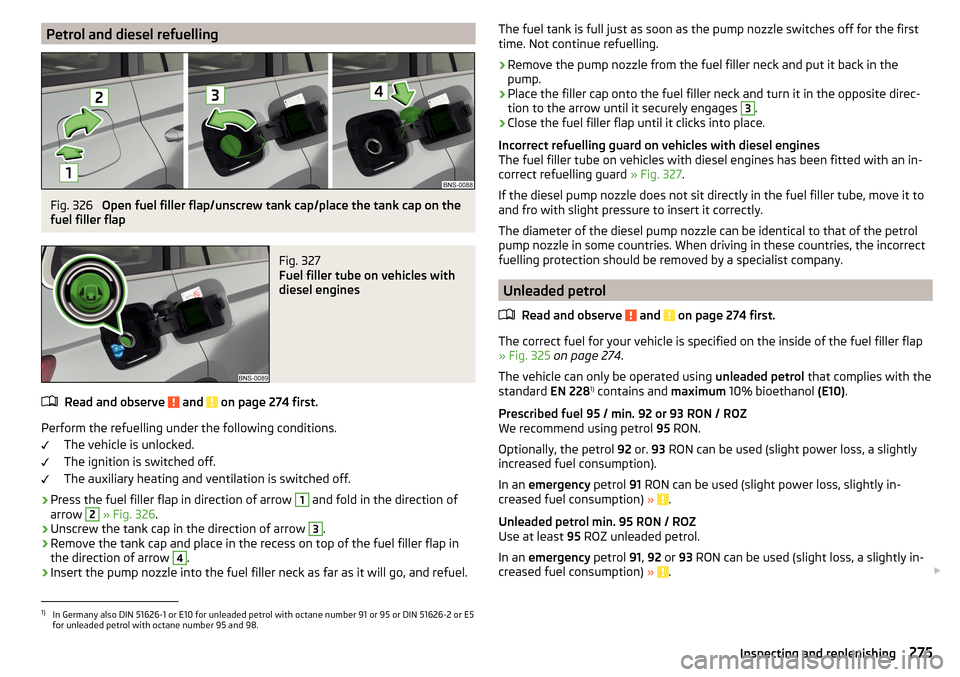
Petrol and diesel refuellingFig. 326
Open fuel filler flap/unscrew tank cap/place the tank cap on the
fuel filler flap
Fig. 327
Fuel filler tube on vehicles with
diesel engines
Read and observe and on page 274 first.
Perform the refuelling under the following conditions.
The vehicle is unlocked.
The ignition is switched off.
The auxiliary heating and ventilation is switched off.
›
Press the fuel filler flap in direction of arrow
1
and fold in the direction of
arrow
2
» Fig. 326 .
›
Unscrew the tank cap in the direction of arrow
3
.
›
Remove the tank cap and place in the recess on top of the fuel filler flap in
the direction of arrow
4
.
›
Insert the pump nozzle into the fuel filler neck as far as it will go, and refuel.
The fuel tank is full just as soon as the pump nozzle switches off for the first
time. Not continue refuelling.›
Remove the pump nozzle from the fuel filler neck and put it back in the
pump.
›
Place the filler cap onto the fuel filler neck and turn it in the opposite direc-
tion to the arrow until it securely engages
3
.
›
Close the fuel filler flap until it clicks into place.
Incorrect refuelling guard on vehicles with diesel engines
The fuel filler tube on vehicles with diesel engines has been fitted with an in-
correct refuelling guard » Fig. 327.
If the diesel pump nozzle does not sit directly in the fuel filler tube, move it to
and fro with slight pressure to insert it correctly.
The diameter of the diesel pump nozzle can be identical to that of the petrol
pump nozzle in some countries. When driving in these countries, the incorrect
fuelling protection should be removed by a specialist company.
Unleaded petrol
Read and observe
and on page 274 first.
The correct fuel for your vehicle is specified on the inside of the fuel filler flap
» Fig. 325 on page 274 .
The vehicle can only be operated using unleaded petrol that complies with the
standard EN 2281)
contains and maximum 10% bioethanol (E10).
Prescribed fuel 95 / min. 92 or 93 RON / ROZ
We recommend using petrol 95 RON.
Optionally, the petrol 92 or. 93 RON can be used (slight power loss, a slightly
increased fuel consumption).
In an emergency petrol 91 RON can be used (slight power loss, slightly in-
creased fuel consumption) »
.
Unleaded petrol min. 95 RON / ROZ
Use at least 95 ROZ unleaded petrol.
In an emergency petrol 91, 92 or 93 RON can be used (slight loss, a slightly in-
creased fuel consumption) »
.
1)
In Germany also DIN 51626-1 or E10 for unleaded petrol with octane number 91 or 95 or DIN 51626-2 or E5
for unleaded petrol with octane number 95 and 98.
275Inspecting and replenishing
Page 278 of 344

Prescribed petrol 98/(95) RON / ROZ
We recommend using petrol 98 RON.
Optionally, petrol 95 RON can be used (slight power loss, a slightly increased
fuel consumption).
In an emergency petrol 91, 92 or 93 RON can be used (slight loss, a slightly in-
creased fuel consumption) »
.
CAUTION
The following instructions must be observed, otherwise there is a risk of en-
gine damage and damage to the exhaust system.■
If gasoline is used which is lower than the prescribed octane number, then
continue driving at medium engine speeds and minimum engine load. Refuel
using petrol of the prescribed octane number as soon as possible.
■
Petrol with a lower Octane count than 91 should not even be used in an
emergency!
■
If a fuel other than unleaded fuel which complies to the above mentioned
standards (e.g. leaded petrol) is put in the tank by mistake, do not start the en-
gine or switch on the ignition.
CAUTION
Petrol additives (additives)■Unleaded petrol in accordance with the EN 228 standard 1)
meets all the con-
ditions for a smooth-running engine. Therefore, we recommend that you do
not add any fuel additives to the petrol - there is a risk of engine damage or
damage to the exhaust system.■
The following additives and auxiliary products may not be used - there is a
risk of engine damage or damage to the exhaust system! ■ Additives with metal components (metallic additives), in particular with
manganese and iron content. ■ Fuels with metallic content (e.g. LRP - lead replacement petrol).
Note■ Unleaded petrol that has a higher octane number than that required by the
engine can be used without limitations.■
The use of petrol with an octane rating higher than 95 RON in does not re-
sult in either a noticeable increase in power nor lower fuel consumption in ve-
hicles for which unleaded petrol 95/min 92 or 93 RON is specified.
■
On vehicles using prescribed petrol of min. 95 RON, the use of petrol with a
higher octane number than 95 RON can increase the power and reduce fuel
consumption.
Diesel fuel
Read and observe
and on page 274 first.
The correct fuel for your vehicle is specified on the inside of the fuel filler flap
» Fig. 325 on page 274 .
The vehicle can only be operated using diesel fuel that complies with the
standard EN 5902)
and contains a maximum 7% biodiesel (B7)3)
.
Operating under different weather conditions
Use only diesel in accordance with the current or expected weather conditions.
Ask the petrol station personnel whether the diesel fuel offered corresponds
to these conditions.
CAUTION
The following instructions must be observed, otherwise there is a risk of en-
gine damage and damage to the exhaust system.■
If a different fuel other than diesel fuel, which complies to the above men-
tioned standards (e.g. petrol) is put into the tank, do not start the engine or
switch on the ignition!
■
The biofuel RME must not be used!
1)
In Germany also DIN 51626-1 or E10 for unleaded petrol with octane number 91 or 95 or DIN 51626-2 or E5
for unleaded petrol with octane number 95 and 98.
2)
In Germany DIN 51628, in Austria ÖNORM C 1590, in Russia GOST R 52368-2005 / EN 590: 2004, in India
IS 1460 / Bharat IV or in an emergency IS 1460 / Bharat III.
3)
In Germany according to the DIN 52638 standard, in Austria ÖNORM C 1590, in France EN 590.
276General Maintenance
Page 281 of 344
CAUTIONRefill only operating fluids of the correct specification - danger of damaging
the vehicle!
Note
■ Fluids with the proper specifications can be purchased from the ŠKODA Origi-
nal Accessories or from the ŠKODA Genuine Parts ranges.■
We recommend you have the battery replaced by a specialist garage.
Open the bonnet and close
Fig. 329
Opening the bonnet
Read and observe
and on page 278 first.
Open flap
›
Make sure that the windscreen wiper arms are not folded away from the
windscreen - there is a risk of damage to the bonnet.
›
Open the driver's door and pull the unlocking lever below the dashboard in
the direction of arrow
1
» Fig. 329 .
›
Press the release lever in the direction of the arrow
2
and the bonnet is un-
locked.
›
Hold the bonnet and lift up until it is held open by the pressurised gas spring.
Close the bonnet lid
›
Pull the bonnet lid down far enough to overcome the force of the pressur-
ised gas spring.
›
From around 20 cm, lightly push the bonnet lid closed until it securely engag-
es.
If the bonnet lid is not properly closed, the display of the instrument cluster
will show this.
WARNING■ Never drive if the bonnet is open - could cause an accident!■Make sure that when closing the engine compartment lid, no body parts
are crushed - there is danger of injury!
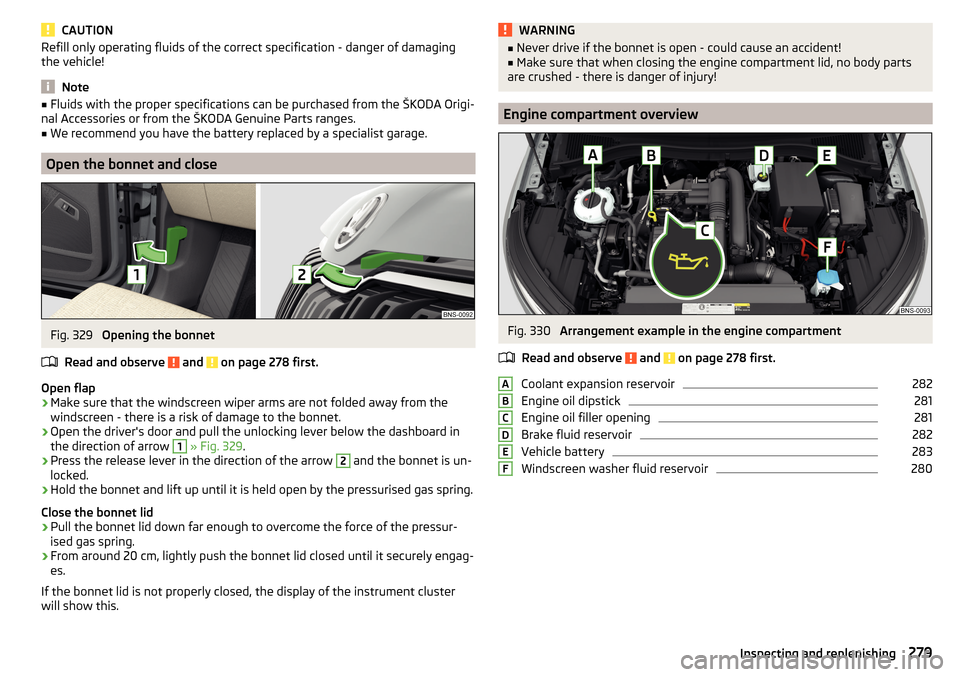
Engine compartment overview
Fig. 330
Arrangement example in the engine compartment
Read and observe
and on page 278 first.
Coolant expansion reservoir
282
Engine oil dipstick
281
Engine oil filler opening
281
Brake fluid reservoir
282
Vehicle battery
283
Windscreen washer fluid reservoir
280ABCDEF279Inspecting and replenishing
Page 282 of 344
Windscreen washer fluidFig. 331
Windscreen washer fluid reser-
voir
Read and observe and on page 278 first.
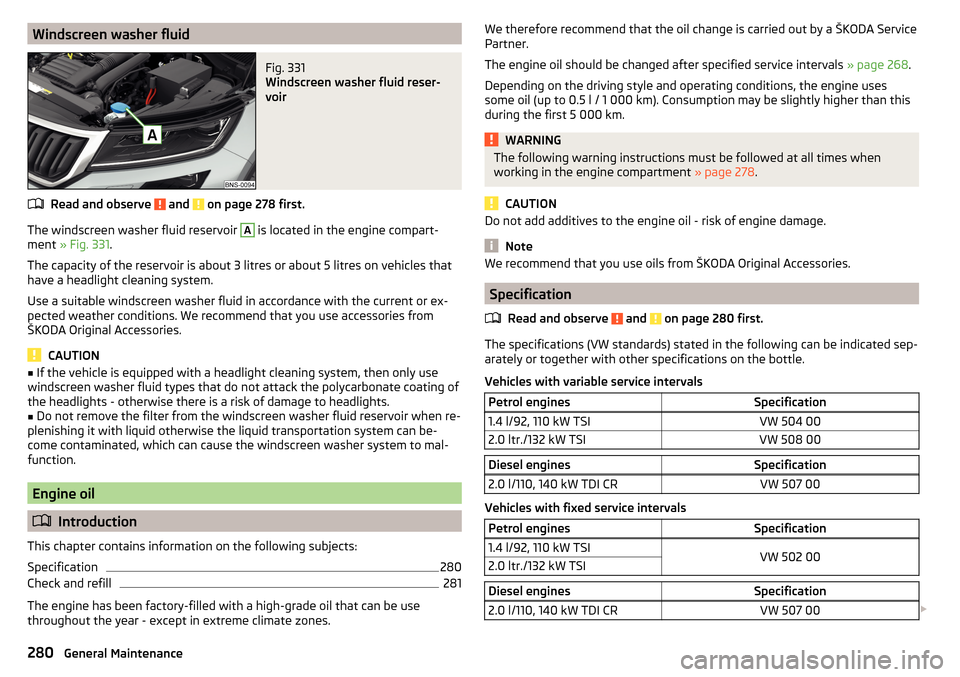
The windscreen washer fluid reservoir
A
is located in the engine compart-
ment » Fig. 331 .
The capacity of the reservoir is about 3 litres or about 5 litres on vehicles that
have a headlight cleaning system.
Use a suitable windscreen washer fluid in accordance with the current or ex-
pected weather conditions. We recommend that you use accessories from
ŠKODA Original Accessories.
CAUTION
■ If the vehicle is equipped with a headlight cleaning system, then only use
windscreen washer fluid types that do not attack the polycarbonate coating of
the headlights - otherwise there is a risk of damage to headlights.■
Do not remove the filter from the windscreen washer fluid reservoir when re-
plenishing it with liquid otherwise the liquid transportation system can be-
come contaminated, which can cause the windscreen washer system to mal-
function.
Engine oil
Introduction
This chapter contains information on the following subjects:
Specification
280
Check and refill
281
The engine has been factory-filled with a high-grade oil that can be use
throughout the year - except in extreme climate zones.
We therefore recommend that the oil change is carried out by a ŠKODA Service
Partner.
The engine oil should be changed after specified service intervals » page 268.
Depending on the driving style and operating conditions, the engine uses
some oil (up to 0.5 l / 1 000 km). Consumption may be slightly higher than this
during the first 5 000 km.WARNINGThe following warning instructions must be followed at all times when
working in the engine compartment » page 278.
CAUTION
Do not add additives to the engine oil - risk of engine damage.
Note
We recommend that you use oils from ŠKODA Original Accessories.
Specification
Read and observe
and on page 280 first.
The specifications (VW standards) stated in the following can be indicated sep-arately or together with other specifications on the bottle.
Vehicles with variable service intervals
Petrol enginesSpecification1.4 l/92, 110 kW TSIVW 504 002.0 ltr./132 kW TSIVW 508 00Diesel enginesSpecification2.0 l/110, 140 kW TDI CRVW 507 00
Vehicles with fixed service intervals
Petrol enginesSpecification1.4 l/92, 110 kW TSIVW 502 002.0 ltr./132 kW TSIDiesel enginesSpecification2.0 l/110, 140 kW TDI CRVW 507 00 280General Maintenance
Page 283 of 344
Engine oil VW 505 01 can optionally be used in diesel engines without a DPF.
CAUTION
■
If no prescribed engine oil is available, then max. 0.5 l oil of the following
specifications can be refilled. ■Petrol engines: ACEA A3/ACEA B4 or API SN, (API SM);
■ Diesel engines: ACEA C3 or API CJ-4.
Check and refill
Fig. 332
Dipstick variants
Read and observe
and on page 280 first.
Check the oil under the following conditions and refill. The vehicle is standing on a horizontal surface.
The engine operating temperature is reached.
The engine is turned off.
Checking the level
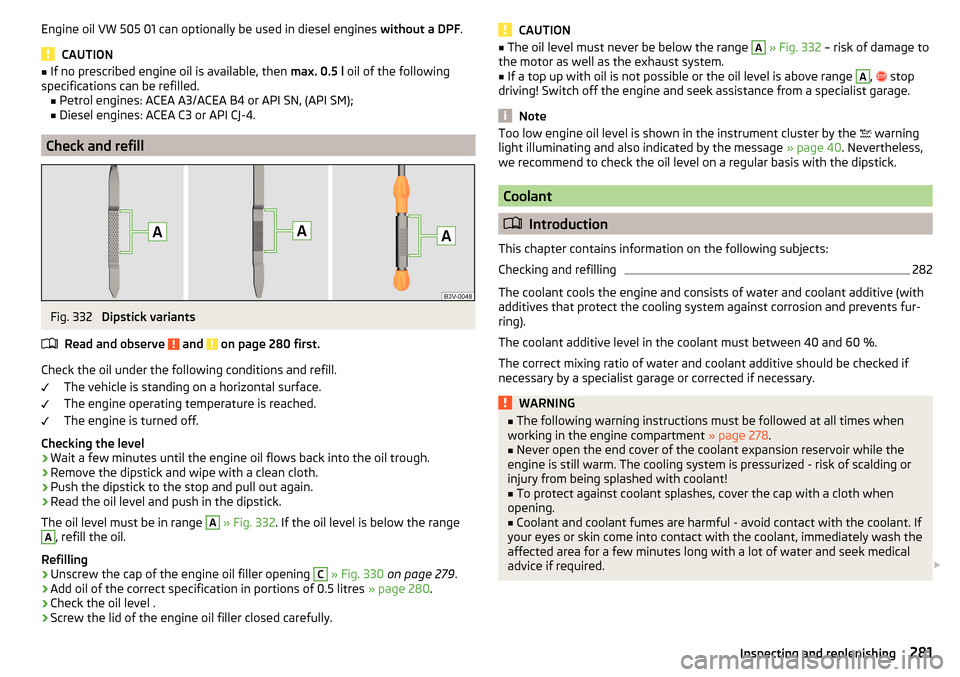
›
Wait a few minutes until the engine oil flows back into the oil trough.
›
Remove the dipstick and wipe with a clean cloth.
›
Push the dipstick to the stop and pull out again.
›
Read the oil level and push in the dipstick.
The oil level must be in range
A
» Fig. 332 . If the oil level is below the range
A
, refill the oil.
Refilling
›
Unscrew the cap of the engine oil filler opening
C
» Fig. 330 on page 279 .
›
Add oil of the correct specification in portions of 0.5 litres » page 280.
›
Check the oil level .
›
Screw the lid of the engine oil filler closed carefully.
CAUTION■
The oil level must never be below the range A » Fig. 332 – risk of damage to
the motor as well as the exhaust system.■
If a top up with oil is not possible or the oil level is above range
A
,
stop
driving! Switch off the engine and seek assistance from a specialist garage.
Note
Too low engine oil level is shown in the instrument cluster by the warning
light illuminating and also indicated by the message » page 40. Nevertheless,
we recommend to check the oil level on a regular basis with the dipstick.
Coolant
Introduction
This chapter contains information on the following subjects:
Checking and refilling
282
The coolant cools the engine and consists of water and coolant additive (with
additives that protect the cooling system against corrosion and prevents fur-
ring).
The coolant additive level in the coolant must between 40 and 60 %.
The correct mixing ratio of water and coolant additive should be checked if
necessary by a specialist garage or corrected if necessary.
WARNING■ The following warning instructions must be followed at all times when
working in the engine compartment » page 278.■
Never open the end cover of the coolant expansion reservoir while the
engine is still warm. The cooling system is pressurized - risk of scalding or
injury from being splashed with coolant!
■
To protect against coolant splashes, cover the cap with a cloth when
opening.
■
Coolant and coolant fumes are harmful - avoid contact with the coolant. If
your eyes or skin come into contact with the coolant, immediately wash the
affected area for a few minutes long with a lot of water and seek medical
advice if required.
281Inspecting and replenishing
Page 284 of 344
CAUTIONDo not cover the radiator or fit any parts (e.g. auxiliary lights) in front of the air
intakes - there is a risk of the engine overheating.
Checking and refilling
Fig. 333
Coolant expansion reservoir
Read and observe and on page 281 first.
Check the coolant under the following conditions and refill.
The vehicle is on a horizontal surface.
The engine is not warm (if the engine is warm, the test results could be
inaccurate).
The engine is turned off.
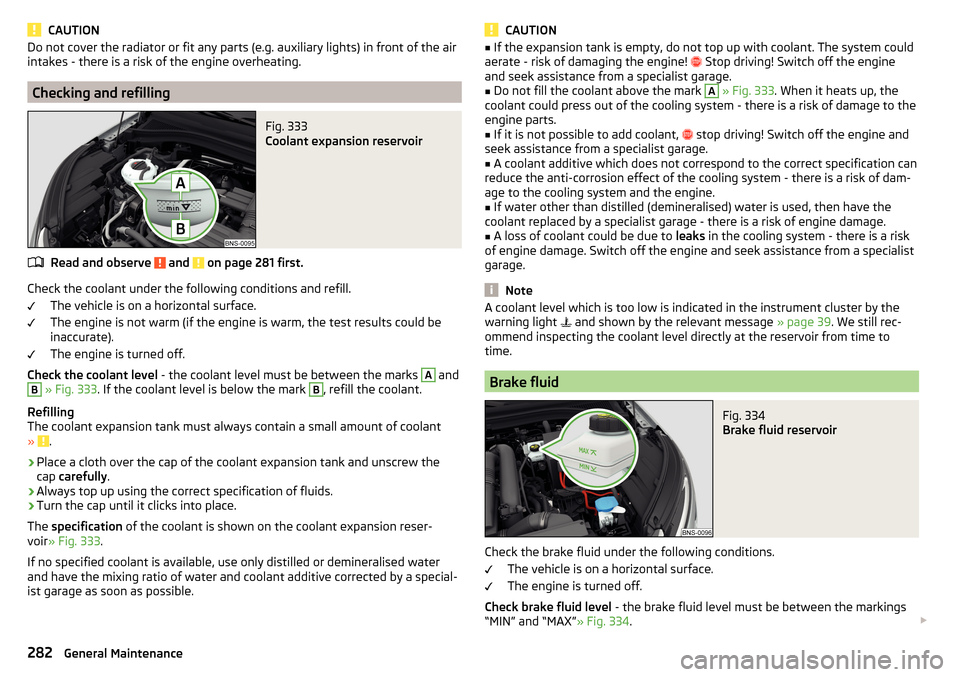
Check the coolant level - the coolant level must be between the marks
A
and
B
» Fig. 333 . If the coolant level is below the mark
B
, refill the coolant.
Refilling
The coolant expansion tank must always contain a small amount of coolant
»
.
›
Place a cloth over the cap of the coolant expansion tank and unscrew the
cap carefully .
›
Always top up using the correct specification of fluids.
›
Turn the cap until it clicks into place.
The specification of the coolant is shown on the coolant expansion reser-
voir » Fig. 333 .
If no specified coolant is available, use only distilled or demineralised water
and have the mixing ratio of water and coolant additive corrected by a special-
ist garage as soon as possible.
CAUTION■ If the expansion tank is empty, do not top up with coolant. The system could
aerate - risk of damaging the engine! Stop driving! Switch off the engine
and seek assistance from a specialist garage.■
Do not fill the coolant above the mark
A
» Fig. 333 . When it heats up, the
coolant could press out of the cooling system - there is a risk of damage to the
engine parts.
■
If it is not possible to add coolant,
stop driving! Switch off the engine and
seek assistance from a specialist garage.
■
A coolant additive which does not correspond to the correct specification can
reduce the anti-corrosion effect of the cooling system - there is a risk of dam-
age to the cooling system and the engine.
■
If water other than distilled (demineralised) water is used, then have the
coolant replaced by a specialist garage - there is a risk of engine damage.
■
A loss of coolant could be due to leaks in the cooling system - there is a risk
of engine damage. Switch off the engine and seek assistance from a specialist
garage.
Note
A coolant level which is too low is indicated in the instrument cluster by the
warning light and shown by the relevant message » page 39. We still rec-
ommend inspecting the coolant level directly at the reservoir from time to
time.
Brake fluid
Fig. 334
Brake fluid reservoir
Check the brake fluid under the following conditions.
The vehicle is on a horizontal surface.
The engine is turned off.
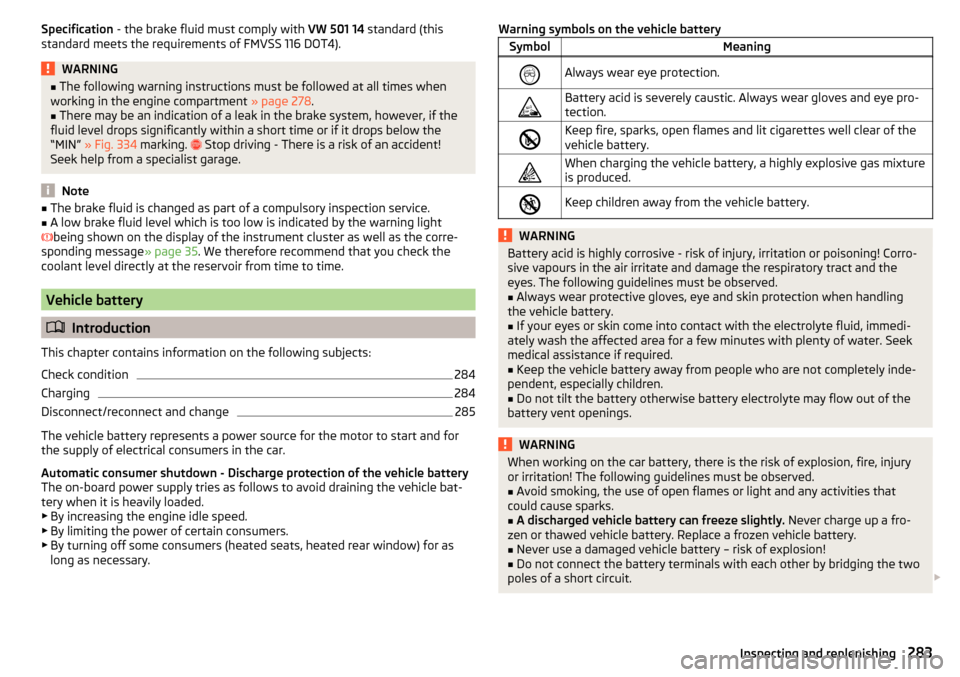
Check brake fluid level - the brake fluid level must be between the markings
“MIN” and “MAX” » Fig. 334.
282General Maintenance
Page 285 of 344
Specification - the brake fluid must comply with VW 501 14 standard (this
standard meets the requirements of FMVSS 116 DOT4).WARNING■ The following warning instructions must be followed at all times when
working in the engine compartment » page 278.■
There may be an indication of a leak in the brake system, however, if the
fluid level drops significantly within a short time or if it drops below the
“MIN” » Fig. 334 marking.
Stop driving - There is a risk of an accident!
Seek help from a specialist garage.
Note
■ The brake fluid is changed as part of a compulsory inspection service.■A low brake fluid level which is too low is indicated by the warning light
being shown on the display of the instrument cluster as well as the corre-
sponding message » page 35. We therefore recommend that you check the
coolant level directly at the reservoir from time to time.
Vehicle battery
Introduction
This chapter contains information on the following subjects:
Check condition
284
Charging
284
Disconnect/reconnect and change
285
The vehicle battery represents a power source for the motor to start and for the supply of electrical consumers in the car.
Automatic consumer shutdown - Discharge protection of the vehicle battery
The on-board power supply tries as follows to avoid draining the vehicle bat-
tery when it is heavily loaded.
▶ By increasing the engine idle speed.
▶ By limiting the power of certain consumers.
▶ By turning off some consumers (heated seats, heated rear window) for as
long as necessary.
Warning symbols on the vehicle batterySymbolMeaningAlways wear eye protection.Battery acid is severely caustic. Always wear gloves and eye pro-
tection.Keep fire, sparks, open flames and lit cigarettes well clear of the
vehicle battery.When charging the vehicle battery, a highly explosive gas mixture
is produced.Keep children away from the vehicle battery.WARNINGBattery acid is highly corrosive - risk of injury, irritation or poisoning! Corro-
sive vapours in the air irritate and damage the respiratory tract and the
eyes. The following guidelines must be observed.■
Always wear protective gloves, eye and skin protection when handling
the vehicle battery.
■
If your eyes or skin come into contact with the electrolyte fluid, immedi-
ately wash the affected area for a few minutes with plenty of water. Seek
medical assistance if required.
■
Keep the vehicle battery away from people who are not completely inde-
pendent, especially children.
■
Do not tilt the battery otherwise battery electrolyte may flow out of the
battery vent openings.
WARNINGWhen working on the car battery, there is the risk of explosion, fire, injury
or irritation! The following guidelines must be observed.■
Avoid smoking, the use of open flames or light and any activities that
could cause sparks.
■
A discharged vehicle battery can freeze slightly. Never charge up a fro-
zen or thawed vehicle battery. Replace a frozen vehicle battery.
■
Never use a damaged vehicle battery – risk of explosion!
■
Do not connect the battery terminals with each other by bridging the two
poles of a short circuit.
283Inspecting and replenishing