tow SKODA KODIAQ 2016 1.G User Guide
[x] Cancel search | Manufacturer: SKODA, Model Year: 2016, Model line: KODIAQ, Model: SKODA KODIAQ 2016 1.GPages: 344, PDF Size: 58.96 MB
Page 75 of 344
Buttons for the heating (depending on vehicle equipment) » Fig. 62
Switch on/off the rear window heater
Switching the windscreen heater on/off
When the heating is switched on, a light illuminates inside or below the but-
ton.
The heating automatically switches off after ten minutes.
If the engine is switched off when the heating is on and turned back on again
within 10 minutes, the heating is continued.
Note
■ If the on-board voltage decreases, the heating switches off automatically
» page 283 , Automatic consumer shutdown - Discharge protection of the vehi-
cle battery .■
If the lighting inside or below the button flashes, the heater will not work be-
cause of the low charge of the battery.
■
If the Climatronic recognises that the windshield could fog up, the windshield
heating is automatically switched on. This function can be activated / deactiva-
ted on the Climatronic control panel menu
→
.
Front sun visor
Fig. 63
Fold down flap / flip up flap / make-up mirror and parking permit
holder
Read and observe
on page 72 first.
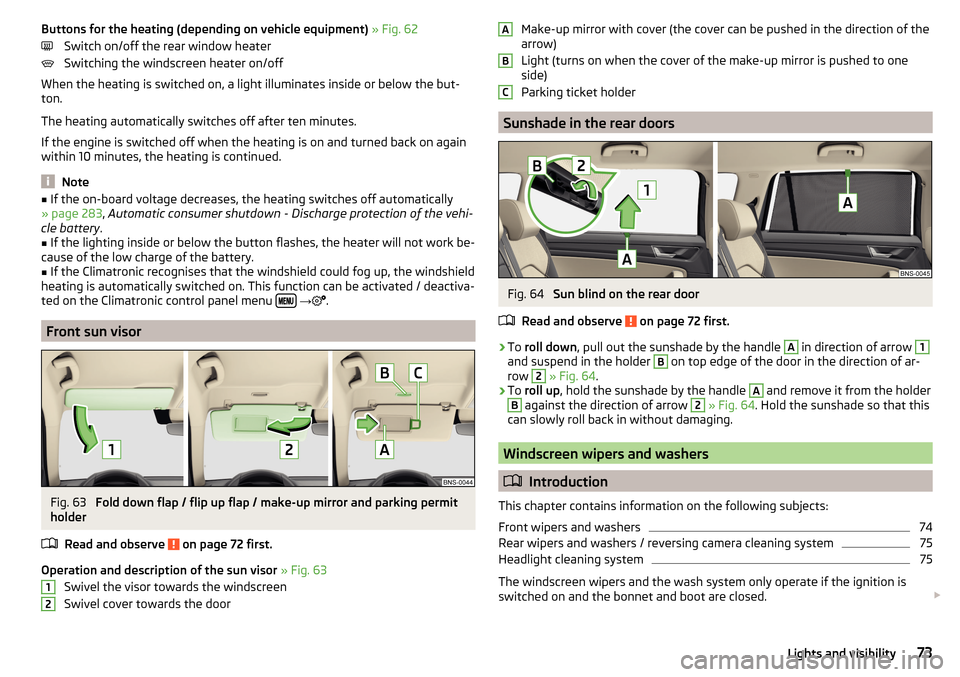
Operation and description of the sun visor » Fig. 63
Swivel the visor towards the windscreen
Swivel cover towards the door
12Make-up mirror with cover (the cover can be pushed in the direction of the
arrow)
Light (turns on when the cover of the make-up mirror is pushed to one
side)
Parking ticket holder
Sunshade in the rear doors
Fig. 64
Sun blind on the rear door
Read and observe
on page 72 first.
›
To roll down , pull out the sunshade by the handle
A
in direction of arrow
1
and suspend in the holder
B
on top edge of the door in the direction of ar-
row
2
» Fig. 64 .
›
To roll up , hold the sunshade by the handle
A
and remove it from the holder
B
against the direction of arrow
2
» Fig. 64 . Hold the sunshade so that this
can slowly roll back in without damaging.
Windscreen wipers and washers
Introduction
This chapter contains information on the following subjects:
Front wipers and washers
74
Rear wipers and washers / reversing camera cleaning system
75
Headlight cleaning system
75
The windscreen wipers and the wash system only operate if the ignition is
switched on and the bonnet and boot are closed.
ABC73Lights and visibility
Page 79 of 344
Setting the mirror surfaces synchronously
This function allows the simultaneous adjustment of the two mirror areas. The
function can be activated / deactivated in the Infotainment menu
→
→
Mirrors and wipers
.
›
Turn the knob for the mirror control to the position for the driver mirror ad-
justment.
›
Adjust the mirror areas to the desired position.
Manual folding mirrors
The mirror can be manually folded towards the side windows. To put it back to
its original position, it should be folded back from the side window until it au-
dibly clicks into place.
Automatic folding in/back of both mirrors
The exterior mirrors are automatically collapsed after locking the vehicle in the park position. After unlocking the vehicle, the mirrors are folded back to the
driving position »
.
This function can be activated / deactivated in the Infotainment menu
→
→
Mirrors and wipers
.
Mirror with automatic dimming
The exterior mirror dimming is controlled together with the automatic rear-
view mirror dimming » page 76.
Memory function for mirror (vehicles with electrically adjustable driver's
seat)
It is possible to save the current setting of the exterior mirror when saving the
driver's seat position with » page 79, Memory Function of the electrically ad-
justable seat or » page 79 , Memory function of the remote control key .
Tilting the mirror area of the front passenger mirror (vehicles with
electrically adjustable driver's seat)
The front passenger mirror area can be tilted to the stored position to improve
the view to the curb when reversing.
Operating conditions. The function is activated in the Infotainment menu
→
→
Mirrors andwipers
.
The setting of the mirror area has been previously stored » page 79,
Memory Function of the electrically adjustable seat or. » page 79 , Memo-
ry function of the remote control key .
The reverse gear is engaged.
The knob for the mirror control is in the position for the passenger mirror
adjustment.
The mirror area returns to its initial position after the rotary knob is set to an-
other position or if the speed is greater than 15 km/h.WARNINGDo not touch the exterior mirror surfaces, if the exterior mirror heating is
switched on - hazard of burning.
CAUTION
■ Never manually fold in/out the electrically folding exterior mirrors - there is a
risk of damage to the mirror!■
When the mirror is swung by external influences (due to impact during ma-
noeuvring, for example), then first fold-in the mirror by turning the knob and
wait for a loud clapping noise.
Note
The setting of the mirror functions is stored in Infotainment (depending on the
Infotainment type) in the active user account personalisation » page 50.77Lights and visibility
Page 89 of 344
Switching steering wheel heating on/off using Infotainment›To switch on / off press the button on the Climatronic → Tap on the
function surface
on the Infotainment screen. When the heating is switched
on, the symbol in the function surfaceA
is orange » Fig. 91.
Heated steering wheel, along with the driver's seat heating
›
To activate / deactivate the heated steering wheel with the driver's seat
heating, press the button
on the Climatronic, then tap the function sur-
face
→
Link seat/steering wheel heating
in the Infotainment screen.
›
To switch on / off the heated steering wheel, press the button for the driver
seat heating.
Setting the heat output of the steering wheel heater
›
Press the button on the Climatronic, then tap the function surface
→
intensity
on the Infotainment screen.
›
Select one of the three heating levels (this remains stored even after switch-
ing off the engine).
The selected heat output of the heated steering wheel is shown (number of
segments) on the Infotainment screen
B
» Fig. 91 .
Note
■
The heated steering wheel only works when the engine is running.■If the on-board voltage decreases, the heated steering wheel switches off
automatically.Practical features
Interior equipment
Introduction
This chapter contains information on the following subjects:
Parking ticket holder
88
Storage compartment on the driver's side
88
stowage compartments in the doors
89
Storage compartment in the front centre console
89
Phonebox
89
USB and AUX inputs
90
Cup holders
90
Waste container
91
Storage compartment under the front arm rest
92
Storage net in the front centre console
92
Glasses compartment
92
Storage compartment on the front passenger side
93
Storage compartment under the passenger seat
93
Storage compartments for umbrella
94
Clothes hook
94
Storage pockets on the backs of the front seats
94
Folding table on the front seat rest
95
Storage compartment in the rear centre console
95
Removable through-loading bag
95
Blanket
96WARNING■ Do not place anything on the dashboard. These objects might slide or fall
down when driving and may distract you from concentrating on the traffic –
risk of accident!■
Make sure that while driving no objects can enter the driver's footwell -
cause an accident!
■
Do not carry any objects on the front passenger seat except objects de-
signed for this purpose (e.g. child seats) – risk of accident!
87Practical features
Page 91 of 344
stowage compartments in the doorsFig. 94
Storage compartmen: in the front door/in the rear door
Read and observe
and on page 87 first.
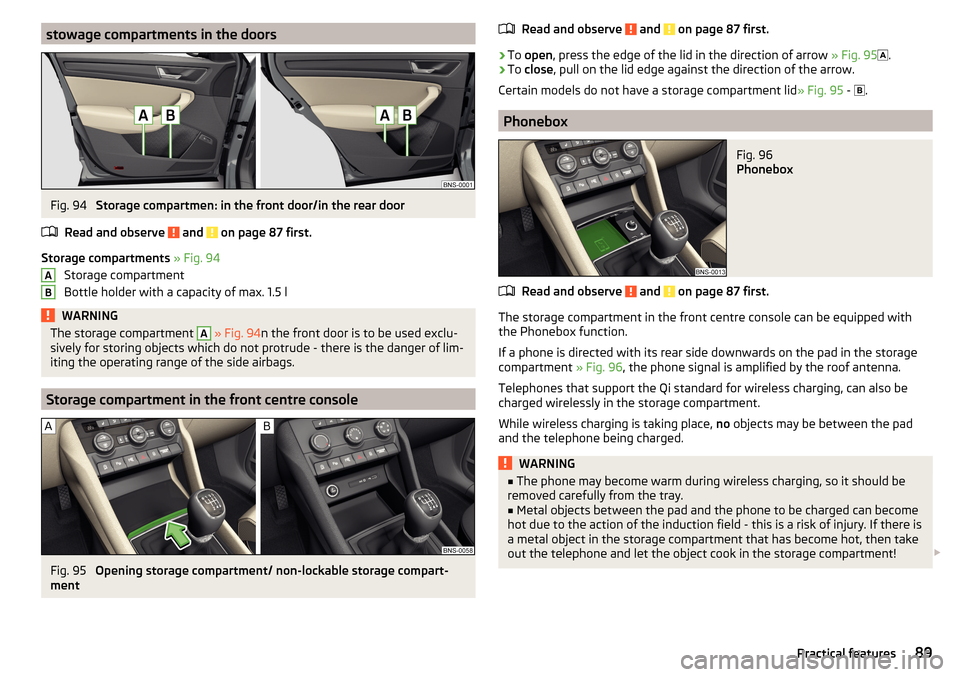
Storage compartments » Fig. 94
Storage compartment
Bottle holder with a capacity of max. 1.5 l
WARNINGThe storage compartment A » Fig. 94 n the front door is to be used exclu-
sively for storing objects which do not protrude - there is the danger of lim-
iting the operating range of the side airbags.
Storage compartment in the front centre console
Fig. 95
Opening storage compartment/ non-lockable storage compart-
ment
ABRead and observe and on page 87 first.›
To open , press the edge of the lid in the direction of arrow » Fig. 95
.
›
To close , pull on the lid edge against the direction of the arrow.
Certain models do not have a storage compartment lid » Fig. 95 -
.
Phonebox
Fig. 96
Phonebox
Read and observe and on page 87 first.
The storage compartment in the front centre console can be equipped with
the Phonebox function.
If a phone is directed with its rear side downwards on the pad in the storage
compartment » Fig. 96, the phone signal is amplified by the roof antenna.
Telephones that support the Qi standard for wireless charging, can also be
charged wirelessly in the storage compartment.
While wireless charging is taking place, no objects may be between the pad
and the telephone being charged.
WARNING■ The phone may become warm during wireless charging, so it should be
removed carefully from the tray.■
Metal objects between the pad and the phone to be charged can become
hot due to the action of the induction field - this is a risk of injury. If there is
a metal object in the storage compartment that has become hot, then take
out the telephone and let the object cook in the storage compartment!
89Practical features
Page 97 of 344
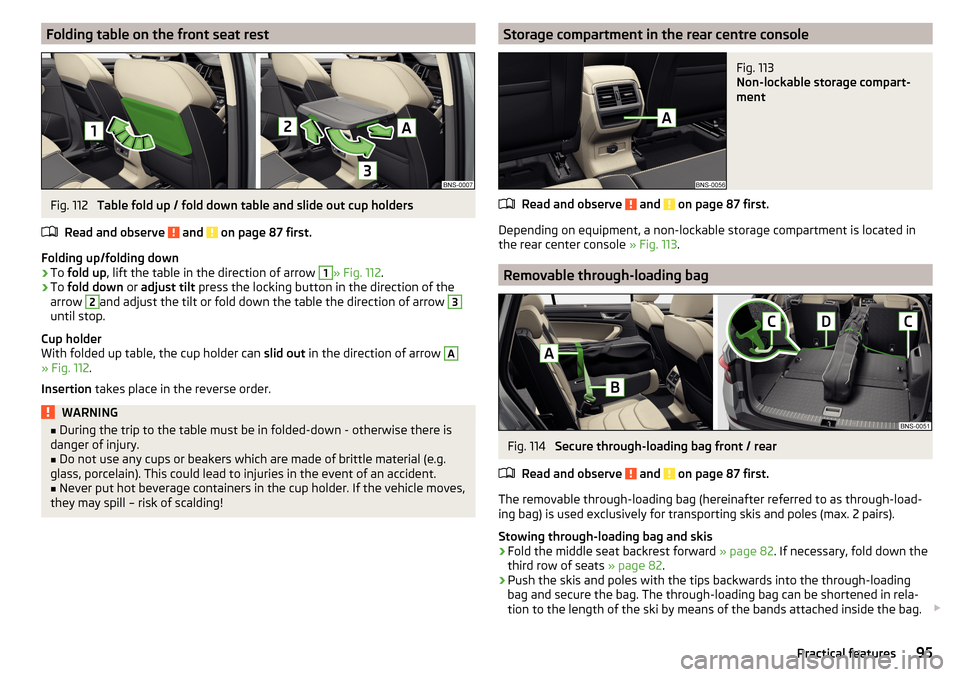
Folding table on the front seat restFig. 112
Table fold up / fold down table and slide out cup holders
Read and observe
and on page 87 first.
Folding up/folding down
›
To fold up , lift the table in the direction of arrow
1
» Fig. 112 .
›
To fold down or adjust tilt press the locking button in the direction of the
arrow
2
and adjust the tilt or fold down the table the direction of arrow
3
until stop.
Cup holder
With folded up table, the cup holder can slid out in the direction of arrow
A
» Fig. 112 .
Insertion takes place in the reverse order.
WARNING■
During the trip to the table must be in folded-down - otherwise there is
danger of injury.■
Do not use any cups or beakers which are made of brittle material (e.g.
glass, porcelain). This could lead to injuries in the event of an accident.
■
Never put hot beverage containers in the cup holder. If the vehicle moves,
they may spill – risk of scalding!
Storage compartment in the rear centre consoleFig. 113
Non-lockable storage compart-
ment
Read and observe and on page 87 first.
Depending on equipment, a non-lockable storage compartment is located in
the rear center console » Fig. 113.
Removable through-loading bag
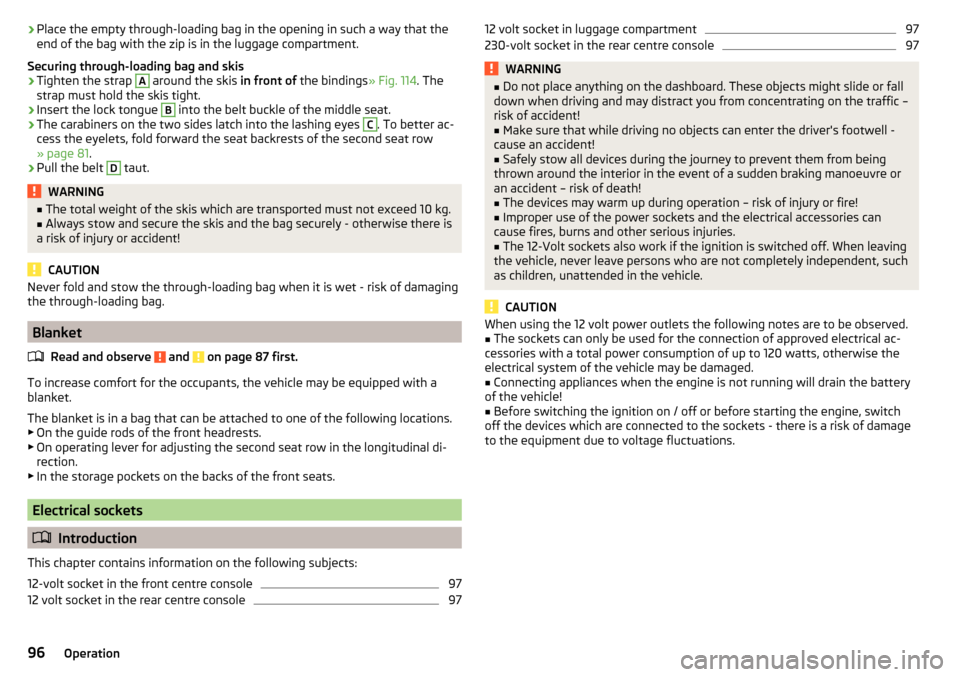
Fig. 114
Secure through-loading bag front / rear
Read and observe
and on page 87 first.
The removable through-loading bag (hereinafter referred to as through-load-
ing bag) is used exclusively for transporting skis and poles (max. 2 pairs).
Stowing through-loading bag and skis
›
Fold the middle seat backrest forward » page 82. If necessary, fold down the
third row of seats » page 82.
›
Push the skis and poles with the tips backwards into the through-loading
bag and secure the bag. The through-loading bag can be shortened in rela-
tion to the length of the ski by means of the bands attached inside the bag.
95Practical features
Page 98 of 344
›Place the empty through-loading bag in the opening in such a way that the
end of the bag with the zip is in the luggage compartment.
Securing through-loading bag and skis›
Tighten the strap
A
around the skis in front of the bindings » Fig. 114. The
strap must hold the skis tight.
›
Insert the lock tongue
B
into the belt buckle of the middle seat.
›
The carabiners on the two sides latch into the lashing eyes
C
. To better ac-
cess the eyelets, fold forward the seat backrests of the second seat row
» page 81 .
›
Pull the belt
D
taut.
WARNING■
The total weight of the skis which are transported must not exceed 10 kg.■Always stow and secure the skis and the bag securely - otherwise there is
a risk of injury or accident!
CAUTION
Never fold and stow the through-loading bag when it is wet - risk of damaging
the through-loading bag.
Blanket
Read and observe
and on page 87 first.
To increase comfort for the occupants, the vehicle may be equipped with a
blanket.
The blanket is in a bag that can be attached to one of the following locations.
▶ On the guide rods of the front headrests.
▶ On operating lever for adjusting the second seat row in the longitudinal di-
rection.
▶ In the storage pockets on the backs of the front seats.
Electrical sockets
Introduction
This chapter contains information on the following subjects:
12-volt socket in the front centre console
97
12 volt socket in the rear centre console
9712 volt socket in luggage compartment97230-volt socket in the rear centre console97WARNING■ Do not place anything on the dashboard. These objects might slide or fall
down when driving and may distract you from concentrating on the traffic –
risk of accident!■
Make sure that while driving no objects can enter the driver's footwell -
cause an accident!
■
Safely stow all devices during the journey to prevent them from being
thrown around the interior in the event of a sudden braking manoeuvre or
an accident – risk of death!
■
The devices may warm up during operation – risk of injury or fire!
■
Improper use of the power sockets and the electrical accessories can
cause fires, burns and other serious injuries.
■
The 12-Volt sockets also work if the ignition is switched off. When leaving
the vehicle, never leave persons who are not completely independent, such
as children, unattended in the vehicle.
CAUTION
When using the 12 volt power outlets the following notes are to be observed.■The sockets can only be used for the connection of approved electrical ac-
cessories with a total power consumption of up to 120 watts, otherwise the
electrical system of the vehicle may be damaged.■
Connecting appliances when the engine is not running will drain the battery
of the vehicle!
■
Before switching the ignition on / off or before starting the engine, switch
off the devices which are connected to the sockets - there is a risk of damage
to the equipment due to voltage fluctuations.
96Operation
Page 105 of 344
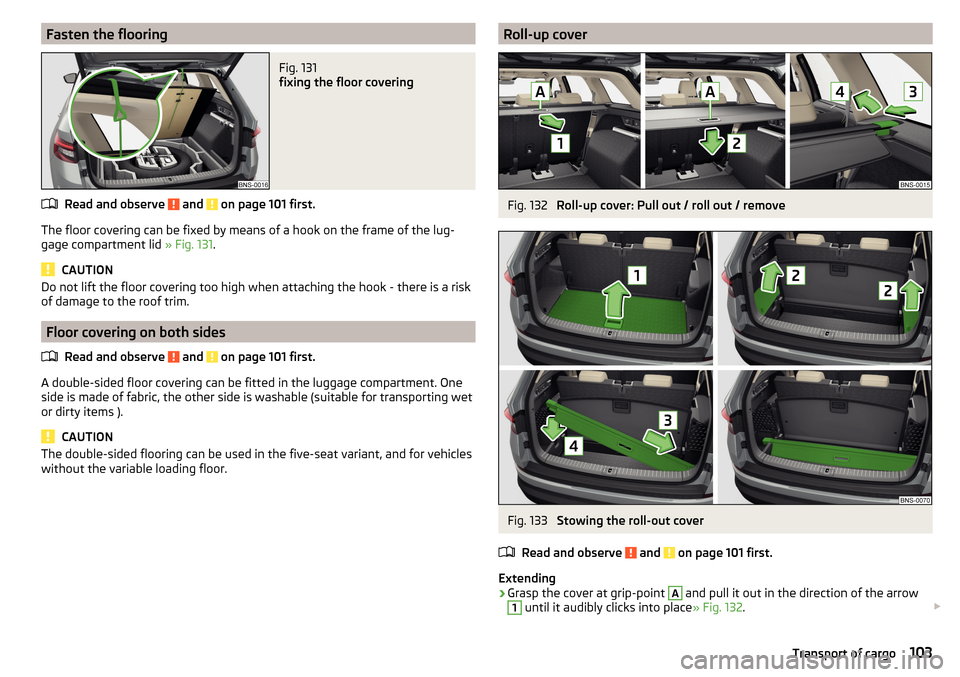
Fasten the flooringFig. 131
fixing the floor covering
Read and observe and on page 101 first.
The floor covering can be fixed by means of a hook on the frame of the lug-
gage compartment lid » Fig. 131.
CAUTION
Do not lift the floor covering too high when attaching the hook - there is a risk
of damage to the roof trim.
Floor covering on both sides
Read and observe
and on page 101 first.
A double-sided floor covering can be fitted in the luggage compartment. Oneside is made of fabric, the other side is washable (suitable for transporting wet
or dirty items ).
CAUTION
The double-sided flooring can be used in the five-seat variant, and for vehicles
without the variable loading floor.Roll-up coverFig. 132
Roll-up cover: Pull out / roll out / remove
Fig. 133
Stowing the roll-out cover
Read and observe
and on page 101 first.
Extending
›
Grasp the cover at grip-point
A
and pull it out in the direction of the arrow
1
until it audibly clicks into place » Fig. 132.
103Transport of cargo
Page 106 of 344
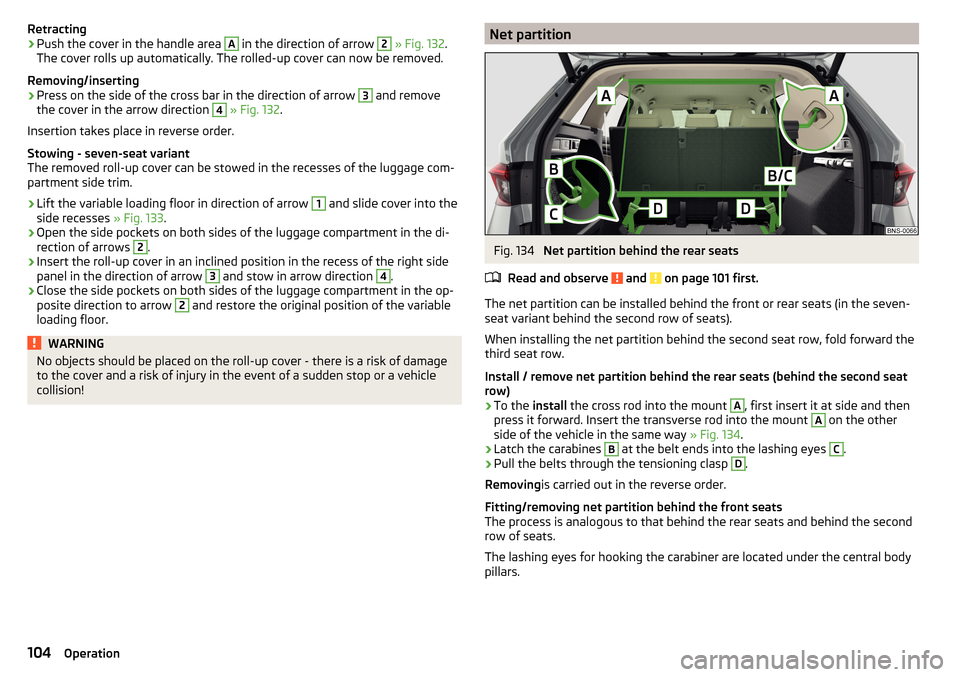
Retracting›Push the cover in the handle area A in the direction of arrow 2 » Fig. 132 .
The cover rolls up automatically. The rolled-up cover can now be removed.
Removing/inserting›
Press on the side of the cross bar in the direction of arrow
3
and remove
the cover in the arrow direction
4
» Fig. 132 .
Insertion takes place in reverse order.
Stowing - seven-seat variant
The removed roll-up cover can be stowed in the recesses of the luggage com-
partment side trim.
›
Lift the variable loading floor in direction of arrow
1
and slide cover into the
side recesses » Fig. 133.
›
Open the side pockets on both sides of the luggage compartment in the di-
rection of arrows
2
.
›
Insert the roll-up cover in an inclined position in the recess of the right side
panel in the direction of arrow
3
and stow in arrow direction
4
.
›
Close the side pockets on both sides of the luggage compartment in the op-
posite direction to arrow
2
and restore the original position of the variable
loading floor.
WARNINGNo objects should be placed on the roll-up cover - there is a risk of damage
to the cover and a risk of injury in the event of a sudden stop or a vehicle
collision!Net partitionFig. 134
Net partition behind the rear seats
Read and observe
and on page 101 first.
The net partition can be installed behind the front or rear seats (in the seven-
seat variant behind the second row of seats).
When installing the net partition behind the second seat row, fold forward the third seat row.
Install / remove net partition behind the rear seats (behind the second seat
row)
›
To the install the cross rod into the mount
A
, first insert it at side and then
press it forward. Insert the transverse rod into the mount
A
on the other
side of the vehicle in the same way » Fig. 134.
›
Latch the carabines
B
at the belt ends into the lashing eyes
C
.
›
Pull the belts through the tensioning clasp
D
.
Removing is carried out in the reverse order.
Fitting/removing net partition behind the front seats
The process is analogous to that behind the rear seats and behind the second row of seats.
The lashing eyes for hooking the carabiner are located under the central body
pillars.
104Operation
Page 107 of 344
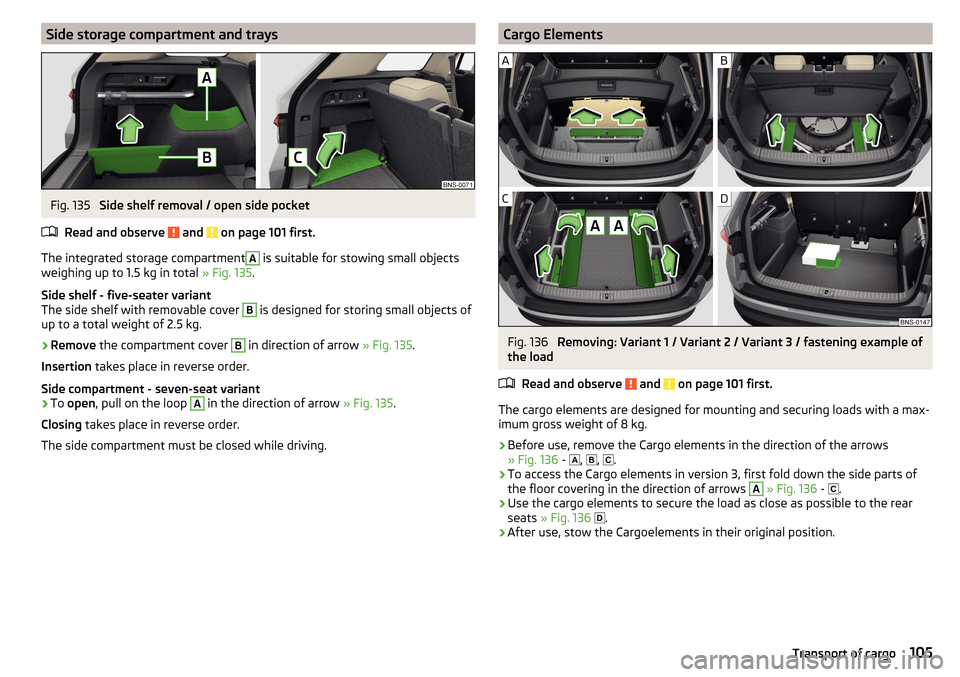
Side storage compartment and traysFig. 135
Side shelf removal / open side pocket
Read and observe
and on page 101 first.
The integrated storage compartment
A
is suitable for stowing small objects
weighing up to 1.5 kg in total » Fig. 135.
Side shelf - five-seater variant
The side shelf with removable cover
B
is designed for storing small objects of
up to a total weight of 2.5 kg.
›
Remove the compartment cover
B
in direction of arrow » Fig. 135.
Insertion takes place in reverse order.
Side compartment - seven-seat variant
›
To open , pull on the loop
A
in the direction of arrow » Fig. 135.
Closing takes place in reverse order.
The side compartment must be closed while driving.
Cargo ElementsFig. 136
Removing: Variant 1 / Variant 2 / Variant 3 / fastening example of
the load
Read and observe
and on page 101 first.
The cargo elements are designed for mounting and securing loads with a max-imum gross weight of 8 kg.
›
Before use, remove the Cargo elements in the direction of the arrows
» Fig. 136 -
,
,
.
›
To access the Cargo elements in version 3, first fold down the side parts of
the floor covering in the direction of arrows
A
» Fig. 136 -
.
›
Use the cargo elements to secure the load as close as possible to the rear
seats » Fig. 136
.
›
After use, stow the Cargoelements in their original position.
105Transport of cargo
Page 133 of 344
■Touchscreen tone - Switch on/off audible tone when touching the screen
■No navigation sound during call
- Switching on / off the nav. announcements dur-
ing a telephone call (not applicable to Infotainment Bolero)
Display settings
›
Press the button, then tap on the function surface
Tap →
Screen
.
■
Switch off screen (in 10 seconds)
- Enable / disable the automatic power off func-
tion
■
Brightness:
- Adjusts the brightness of the screen
■
Touchscreen tone
- Switch on/off audible tone when touching the screen
■
Menu button tone
- Turn on / off the acoustic signal by pressing a button next
to the screen
■
Animation when finger near screen
- Turn the proximity sensors on/off (When the
function is on, e.g. Navigation will be shown in the main menu when moving a
finger towards the bottom bar with the function surfaces on the screen)
■
Show clock in standby mode
- Time and date displayed on the screen when the
ignition is switched on and Infotainment is switched off
Time and date settings
›
Press the button, then tap on the function surface
→
Time and date
.
■
Clock time Source:
- Settings of the clock time source: manual / GPS (applies to
the infotainment Columbus, Amundsen)
■
Time:
- Time Settings
■
Summer time
- Switches the summer time on/off
■
Automatic summertime
- Turn on / off the automatic switch to daylight saving
time
■
Time zone:
- Choice of time zone
■
Time Format:
- Specify the time format
■
Date:
- Date Settings
■
Date format:
- Setting the date format
Setting the Infotainment language
›
Press the button, then tap on the function surface
→
Language
.
›
Select the Infotainment language.
In some languages, after selecting the function surface
Female
and
Male
are dis-
played for the choice of voice prompts for Infotainment.
Note■ When a language is selected which does not support voice control, Infotain-
ment will indicate this with a message on the screen.■
The messages are generated by Infotainment. Flawless clarity (e.g. road or
city name) cannot always be guaranteed.
Additional keypad language settings
›
Press the button, then tap on the function surface
→
Additional keypadlanguages
.
In this menu, a keyboard language set can be added to allow the entering of
characters other than those in the currently selected language (function sur-
face ).
Unit settings
›
Press the button, then tap on the function surface
→
Units
.
■
Distance:
- Distance units
■
Speed:
- Speed units
■
Temperature:
- Temperature units
■
Volume:
- Volume units
■
Consumption:
- Consumption units
■
Pressure:
- Printing units for tyre pressure
Setting data transfer
An active data transfer allows data transfer between Infotainment and the ex-
ternal device (e.g. MirrorLink® application) or the operation of some Infotain-
ment functions using the application of the external device (e.g. ŠKODA Media
Command).
›
Press the button, then tap on the function surface
→
Mobile device datatransfer
.
■
Activate data transfer for ŠKODA apps
- Turning data transfer on and off
■
Use apps to operate::
- Setting Infotainment operation via the applications of the
external device (applies to Infotainment Columbus, Amundsen) ■
Deactivate
- Deactivation of Infotainment operation via an external device
■
Confirm
- Infotainment operation with required confirmation
■
Allow
- Infotainment operation without required confirmation
131Infotainment settings - Columbus, Amundsen, Bolero