key SKODA KODIAQ 2016 1.G Owner's Guide
[x] Cancel search | Manufacturer: SKODA, Model Year: 2016, Model line: KODIAQ, Model: SKODA KODIAQ 2016 1.GPages: 344, PDF Size: 58.96 MB
Page 64 of 344
WARNING■Always close the window carefully and controlled. Otherwise, you may
cause considerable crushing injuries to yourself or fellow passengers.■
The system is fitted with a force limiter » page 63. If there is an obstacle
(e.g. If a body part gets trapped), the closing process is stopped and the
window goes down by several centimetres. However, the windows should
be closed carefully – risk of injury.
CAUTION
■ Keep the windows clean to ensure the correct functionality of the electric
power windows.■
Always close the windows before disconnecting the battery.
Note
If the windows are opened, dust and other dirt can get into the vehicle and the
wind noise is more at certain speeds.
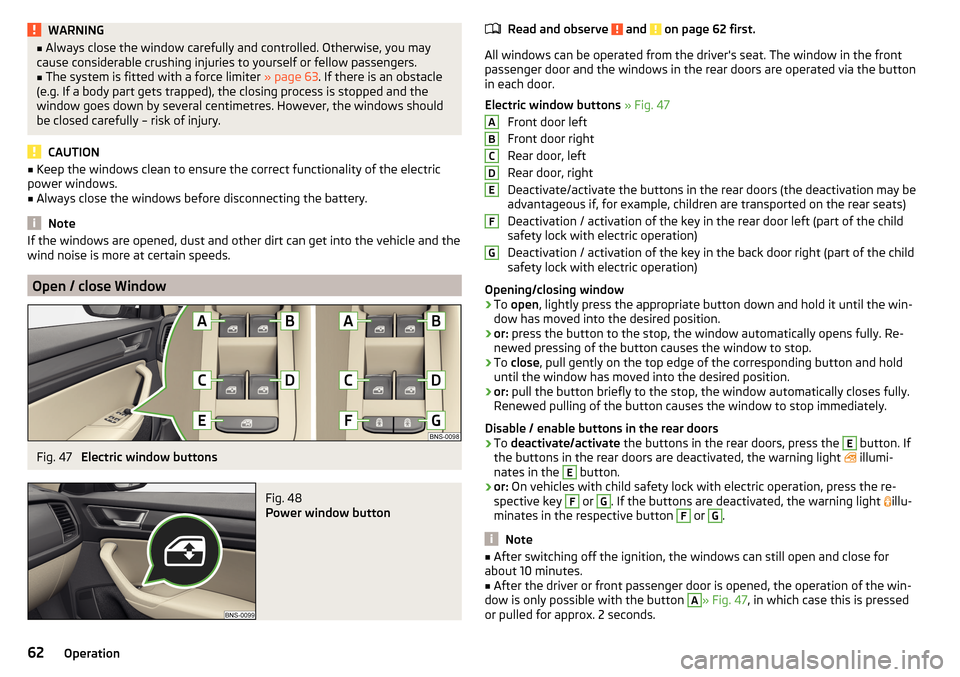
Open / close Window
Fig. 47
Electric window buttons
Fig. 48
Power window button
Read and observe and on page 62 first.
All windows can be operated from the driver's seat. The window in the front
passenger door and the windows in the rear doors are operated via the button
in each door.
Electric window buttons » Fig. 47
Front door left
Front door right
Rear door, left
Rear door, right
Deactivate/activate the buttons in the rear doors (the deactivation may be
advantageous if, for example, children are transported on the rear seats)
Deactivation / activation of the key in the rear door left (part of the child
safety lock with electric operation)
Deactivation / activation of the key in the back door right (part of the child
safety lock with electric operation)
Opening/closing window
›
To open , lightly press the appropriate button down and hold it until the win-
dow has moved into the desired position.
›
or: press the button to the stop, the window automatically opens fully. Re-
newed pressing of the button causes the window to stop.
›
To close , pull gently on the top edge of the corresponding button and hold
until the window has moved into the desired position.
›
or: pull the button briefly to the stop, the window automatically closes fully.
Renewed pulling of the button causes the window to stop immediately.
Disable / enable buttons in the rear doors
›
To deactivate/activate the buttons in the rear doors, press the
E
button. If
the buttons in the rear doors are deactivated, the warning light illumi-
nates in the
E
button.
›
or: On vehicles with child safety lock with electric operation, press the re-
spective key
F
or
G
. If the buttons are deactivated, the warning light illu-
minates in the respective button
F
or
G
.
Note
■ After switching off the ignition, the windows can still open and close for
about 10 minutes.■
After the driver or front passenger door is opened, the operation of the win-
dow is only possible with the button
A
» Fig. 47 , in which case this is pressed
or pulled for approx. 2 seconds.
ABCDEFG62Operation
Page 65 of 344
Force limiterRead and observe
and on page 62 first.
The electrical power windows are fitted with a force limiter.
If there is an obstacle, the closing process is stopped and the window goes
down by several centimetres.
If the obstacle prevents the window from being closed during the next 10 sec-
onds, the closing process is interrupted once again and the window goes down
by several centimetres.
If you attempt to close the window again within 10 seconds of the window be-
ing moved down for the second time, even though the obstacle was not yet
been removed, the closing process is only stopped. During this time it is not
possible to automatically close the window. The force limiter is still switched
on.
The force limiter is only not operational if you attempt to close the window
again within the next 10 seconds – the window will now close with full force!
If you wait longer than 10 seconds, the force limiter is switched on again.
Window convenience operation
Read and observe
and on page 62 first.
The convenience operation for the window offers the option to open/close all
the windows at once (or only the window in the driver's door). The function of
convenience operation can be individually adjusted in the Infotainment menu
→
→
Opening and closing
.
Opening
›
Press and hold the button on the key.
›
or:
Switch off the ignition, open the driver's door and hold the key
A
until it
stops in the open position » Fig. 47 on page 62 .
Closing
›
Press and hold the button on the key.
›
or:
Switch off the ignition, open the driver's door and hold the key
A
until it
stops in the closed position » Fig. 47 on page 62 .
›
In the KESSY system, hold your finger on the sensor on the outside of the
door handle of the front door » Fig. 36 on page 53 .
The convenience operation will only function correctly if all the windows auto-
matically open/close properly.
Convenience opening or closing the window using the key in the driver's door
locking cylinder is only possible within 45 seconds of locking the vehicle.
The movement of the window is stopped immediately when the respective
button is released.
Note
The settings for the window convenience operation are stored (depending on
the Infotainment type) in the active user account personalisation » page 50.
Malfunctions
Read and observe
and on page 62 first.
Repeatedly opening and closing the window can cause the window mecha-
nism to overheat and become temporarily blocked. You will be able to operate
the window again as soon as the operating mechanisms has cooled down.
After disconnecting the vehicle battery, automatic opening / closing of the
window can be deactivated. In this case, the system must be activated as fol-
lows.
Activate window operation
›
Switch-on the ignition.
›
Pull the top edge of the button and close the window.
›
Release the button.
›
Pull up the respective button and hold for 1 second.
Panoramic tilt / slide sunroof
Introduction
This chapter contains information on the following subjects:
Operation
64
Force limiter
64
Activate operation of the sliding/tilting roof
64
Electrically operated sunblind
65
Activating operation of the sunshade
65
63Unlocking and opening
Page 68 of 344
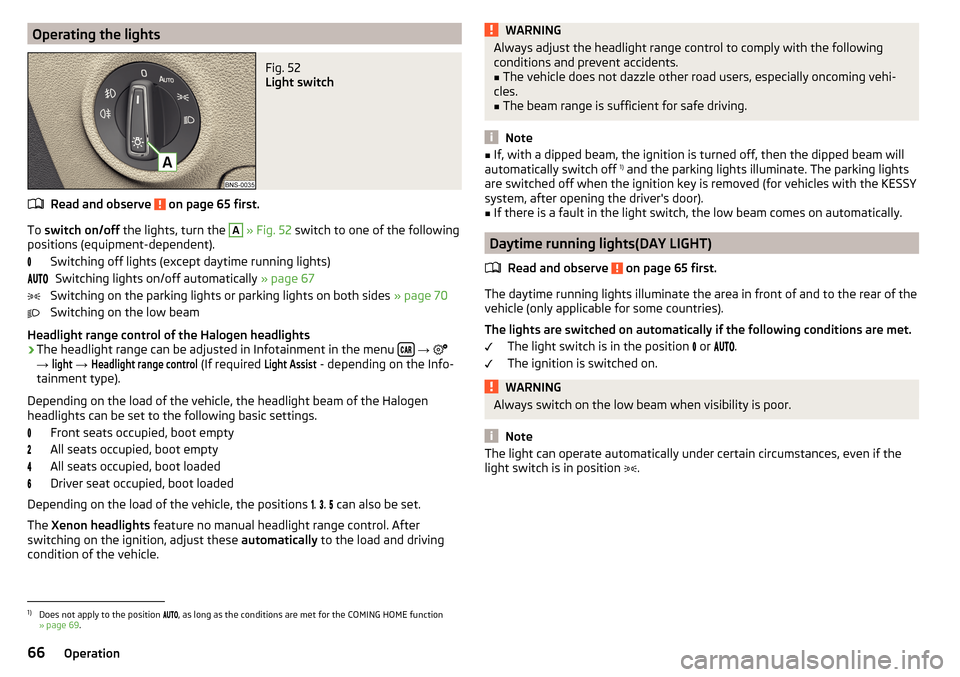
Operating the lightsFig. 52
Light switch
Read and observe on page 65 first.
To switch on/off the lights, turn the
A
» Fig. 52 switch to one of the following
positions (equipment-dependent).
Switching off lights (except daytime running lights)Switching lights on/off automatically » page 67
Switching on the parking lights or parking lights on both sides » page 70
Switching on the low beam
Headlight range control of the Halogen headlights
›
The headlight range can be adjusted in Infotainment in the menu
→
→
light
→
Headlight range control
(If required
Light Assist
- depending on the Info-
tainment type).
Depending on the load of the vehicle, the headlight beam of the Halogen
headlights can be set to the following basic settings.
Front seats occupied, boot empty
All seats occupied, boot empty
All seats occupied, boot loaded
Driver seat occupied, boot loaded
Depending on the load of the vehicle, the positions .
.
can also be set.
The Xenon headlights feature no manual headlight range control. After
switching on the ignition, adjust these automatically to the load and driving
condition of the vehicle.
WARNINGAlways adjust the headlight range control to comply with the following
conditions and prevent accidents.■
The vehicle does not dazzle other road users, especially oncoming vehi-
cles.
■
The beam range is sufficient for safe driving.
Note
■ If, with a dipped beam, the ignition is turned off, then the dipped beam will
automatically switch off 1)
and the parking lights illuminate. The parking lights
are switched off when the ignition key is removed (for vehicles with the KESSY
system, after opening the driver's door).■
If there is a fault in the light switch, the low beam comes on automatically.
Daytime running lights(DAY LIGHT)
Read and observe
on page 65 first.
The daytime running lights illuminate the area in front of and to the rear of thevehicle (only applicable for some countries).
The lights are switched on automatically if the following conditions are met. The light switch is in the position
or
.
The ignition is switched on.
WARNINGAlways switch on the low beam when visibility is poor.
Note
The light can operate automatically under certain circumstances, even if the
light switch is in position .1)
Does not apply to the position , as long as the conditions are met for the COMING HOME function
» page 69 .
66Operation
Page 72 of 344
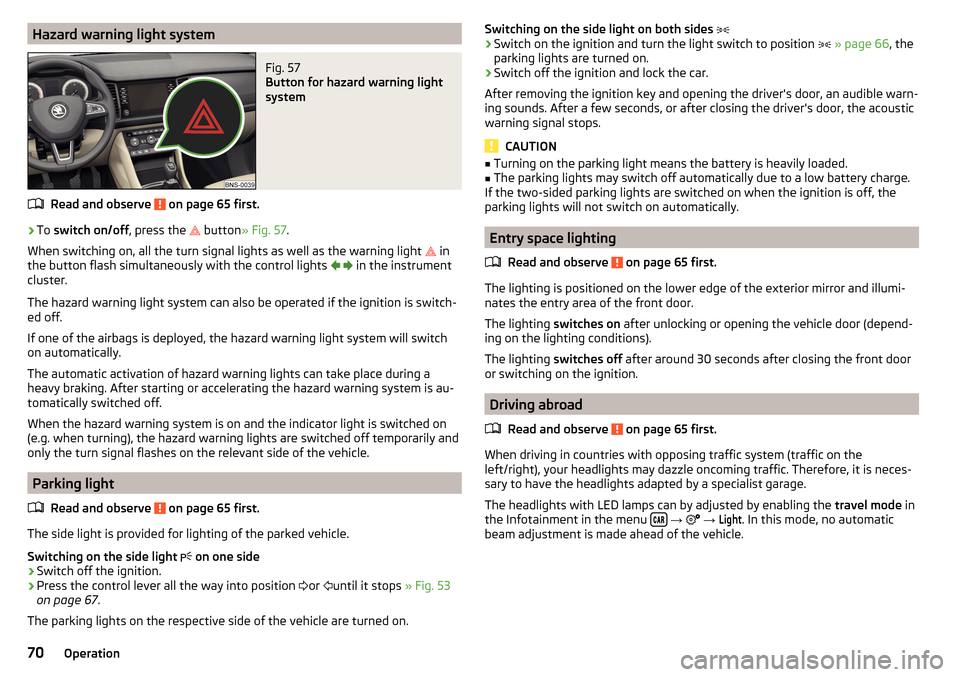
Hazard warning light systemFig. 57
Button for hazard warning light
system
Read and observe on page 65 first.
›
To switch on/off , press the
button
» Fig. 57 .
When switching on, all the turn signal lights as well as the warning light in
the button flash simultaneously with the control lights
in the instrument
cluster.
The hazard warning light system can also be operated if the ignition is switch-
ed off.
If one of the airbags is deployed, the hazard warning light system will switch
on automatically.
The automatic activation of hazard warning lights can take place during a
heavy braking. After starting or accelerating the hazard warning system is au-
tomatically switched off.
When the hazard warning system is on and the indicator light is switched on
(e.g. when turning), the hazard warning lights are switched off temporarily and
only the turn signal flashes on the relevant side of the vehicle.
Parking light
Read and observe
on page 65 first.
The side light is provided for lighting of the parked vehicle.
Switching on the side light on one side
›
Switch off the ignition.
›
Press the control lever all the way into position
or
until it stops
» Fig. 53
on page 67 .
The parking lights on the respective side of the vehicle are turned on.
Switching on the side light on both sides ›Switch on the ignition and turn the light switch to position » page 66 , the
parking lights are turned on.›
Switch off the ignition and lock the car.
After removing the ignition key and opening the driver's door, an audible warn-
ing sounds. After a few seconds, or after closing the driver's door, the acoustic
warning signal stops.
CAUTION
■ Turning on the parking light means the battery is heavily loaded.■The parking lights may switch off automatically due to a low battery charge.
If the two-sided parking lights are switched on when the ignition is off, the
parking lights will not switch on automatically.
Entry space lighting
Read and observe
on page 65 first.
The lighting is positioned on the lower edge of the exterior mirror and illumi-nates the entry area of the front door.
The lighting switches on after unlocking or opening the vehicle door (depend-
ing on the lighting conditions).
The lighting switches off after around 30 seconds after closing the front door
or switching on the ignition.
Driving abroad
Read and observe
on page 65 first.
When driving in countries with opposing traffic system (traffic on the
left/right), your headlights may dazzle oncoming traffic. Therefore, it is neces-
sary to have the headlights adapted by a specialist garage.
The headlights with LED lamps can by adjusted by enabling the travel mode in
the Infotainment in the menu
→
→
Light
. In this mode, no automatic
beam adjustment is made ahead of the vehicle.
70Operation
Page 73 of 344
Interior lighting
Introduction
This chapter contains information on the following subjects:
Operation of the lights of the front seats
71
Interior light, rear
71
Ambient lighting
72
The inner lighting also works if the ignition is switched off. With the ignition
switched off, the lights will automatically switch off after approximately after
10 minutes.
Operation of the lights of the front seats
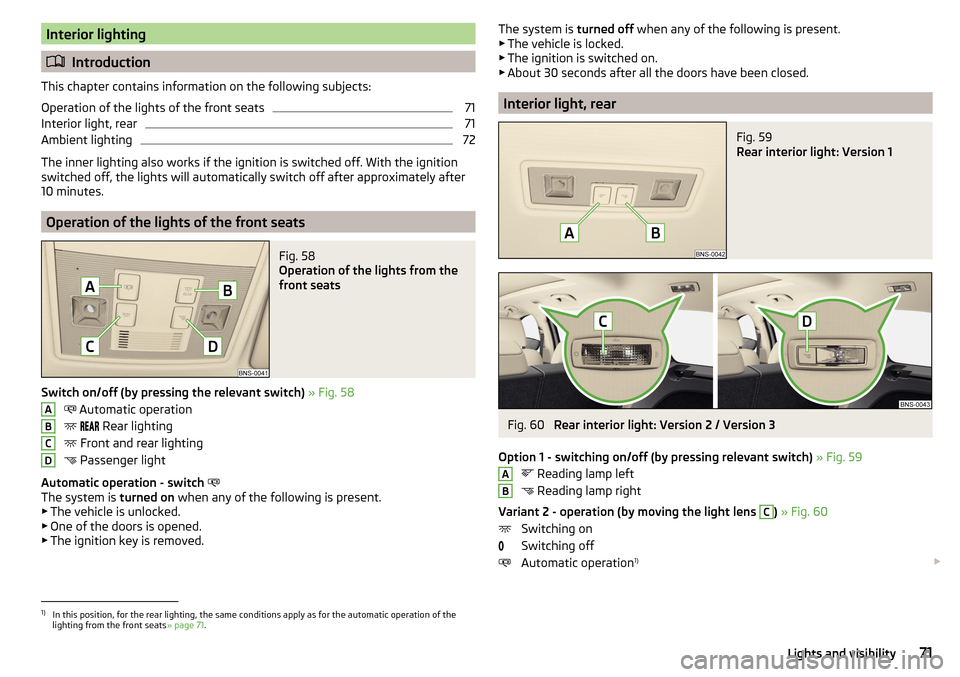
Fig. 58
Operation of the lights from the
front seats
Switch on/off (by pressing the relevant switch) » Fig. 58
Automatic operation
Rear lighting
Front and rear lighting
Passenger light
Automatic operation - switch
The system is turned on when any of the following is present.
▶ The vehicle is unlocked.
▶ One of the doors is opened.
▶ The ignition key is removed.
ABCDThe system is turned off when any of the following is present.
▶ The vehicle is locked.
▶ The ignition is switched on.
▶ About 30 seconds after all the doors have been closed.
Interior light, rear
Fig. 59
Rear interior light: Version 1
Fig. 60
Rear interior light: Version 2 / Version 3
Option 1 - switching on/off (by pressing relevant switch) » Fig. 59
Reading lamp left
Reading lamp right
Variant 2 - operation (by moving the light lens
C
) » Fig. 60
Switching on
Switching off
Automatic operation 1)
AB1)
In this position, for the rear lighting, the same conditions apply as for the automatic operation of the
lighting from the front seats » page 71.
71Lights and visibility
Page 79 of 344
Setting the mirror surfaces synchronously
This function allows the simultaneous adjustment of the two mirror areas. The
function can be activated / deactivated in the Infotainment menu
→
→
Mirrors and wipers
.
›
Turn the knob for the mirror control to the position for the driver mirror ad-
justment.
›
Adjust the mirror areas to the desired position.
Manual folding mirrors
The mirror can be manually folded towards the side windows. To put it back to
its original position, it should be folded back from the side window until it au-
dibly clicks into place.
Automatic folding in/back of both mirrors
The exterior mirrors are automatically collapsed after locking the vehicle in the park position. After unlocking the vehicle, the mirrors are folded back to the
driving position »
.
This function can be activated / deactivated in the Infotainment menu
→
→
Mirrors and wipers
.
Mirror with automatic dimming
The exterior mirror dimming is controlled together with the automatic rear-
view mirror dimming » page 76.
Memory function for mirror (vehicles with electrically adjustable driver's
seat)
It is possible to save the current setting of the exterior mirror when saving the
driver's seat position with » page 79, Memory Function of the electrically ad-
justable seat or » page 79 , Memory function of the remote control key .
Tilting the mirror area of the front passenger mirror (vehicles with
electrically adjustable driver's seat)
The front passenger mirror area can be tilted to the stored position to improve
the view to the curb when reversing.
Operating conditions. The function is activated in the Infotainment menu
→
→
Mirrors andwipers
.
The setting of the mirror area has been previously stored » page 79,
Memory Function of the electrically adjustable seat or. » page 79 , Memo-
ry function of the remote control key .
The reverse gear is engaged.
The knob for the mirror control is in the position for the passenger mirror
adjustment.
The mirror area returns to its initial position after the rotary knob is set to an-
other position or if the speed is greater than 15 km/h.WARNINGDo not touch the exterior mirror surfaces, if the exterior mirror heating is
switched on - hazard of burning.
CAUTION
■ Never manually fold in/out the electrically folding exterior mirrors - there is a
risk of damage to the mirror!■
When the mirror is swung by external influences (due to impact during ma-
noeuvring, for example), then first fold-in the mirror by turning the knob and
wait for a loud clapping noise.
Note
The setting of the mirror functions is stored in Infotainment (depending on the
Infotainment type) in the active user account personalisation » page 50.77Lights and visibility
Page 80 of 344
Seats and head restraints
Front seats
Introduction
This chapter contains information on the following subjects:
Manual adjustment
78
Electrical adjustment
78
Memory Function of the electrically adjustable seat
79
Memory function of the remote control key
79
Folding front passenger seat
80
Armrest setting
80WARNING■ Only adjust the driver's seat when the vehicle is stationary – risk of acci-
dent!■
Caution when adjusting the seat! You may suffer injuries or bruises as a
result of adjusting the seat without paying proper attention.
Manual adjustment
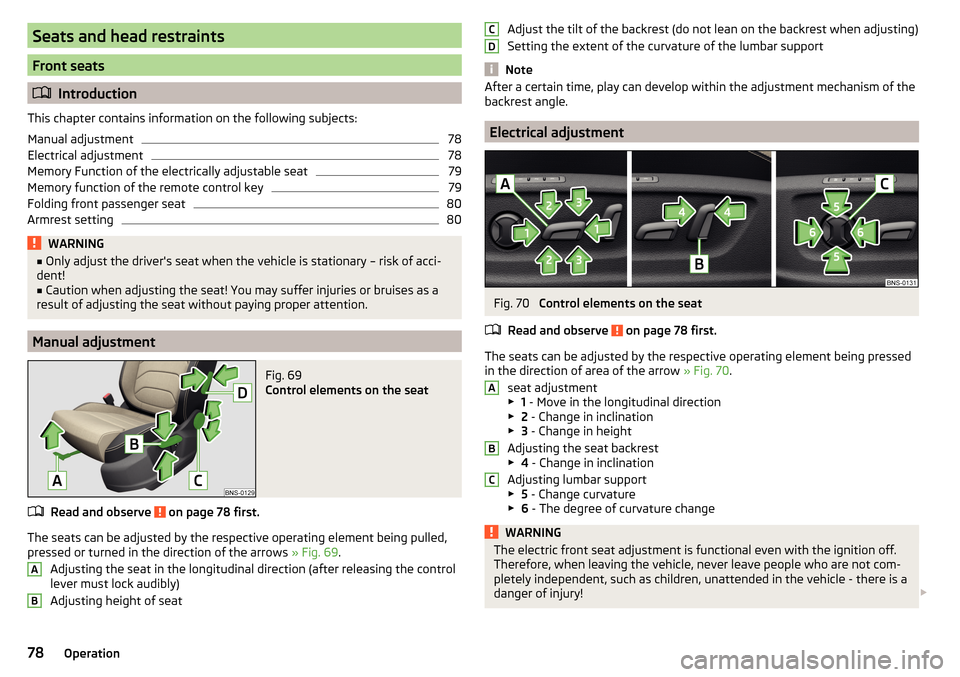
Fig. 69
Control elements on the seat
Read and observe on page 78 first.
The seats can be adjusted by the respective operating element being pulled,
pressed or turned in the direction of the arrows » Fig. 69.
Adjusting the seat in the longitudinal direction (after releasing the control
lever must lock audibly)
Adjusting height of seat
ABAdjust the tilt of the backrest (do not lean on the backrest when adjusting)
Setting the extent of the curvature of the lumbar support
Note
After a certain time, play can develop within the adjustment mechanism of the
backrest angle.
Electrical adjustment
Fig. 70
Control elements on the seat
Read and observe
on page 78 first.
The seats can be adjusted by the respective operating element being pressed in the direction of area of the arrow » Fig. 70.
seat adjustment
▶ 1 - Move in the longitudinal direction
▶ 2 - Change in inclination
▶ 3 - Change in height
Adjusting the seat backrest
▶ 4 - Change in inclination
Adjusting lumbar support
▶ 5 - Change curvature
▶ 6 - The degree of curvature change
WARNINGThe electric front seat adjustment is functional even with the ignition off.
Therefore, when leaving the vehicle, never leave people who are not com-
pletely independent, such as children, unattended in the vehicle - there is a
danger of injury! CDABC78Operation
Page 81 of 344
Note■If the inclination angle of the seat backrest relative to the seat surface is
greater than approx. 110°, then it is not possible for safety reasons to save this
setting in the memory of the electrically adjustable seats or the remote control
key.■
On vehicles with personalisation, the driver's seat setting is stored in the ac-
tive user account personalisation » page 50.
Memory Function of the electrically adjustable seat
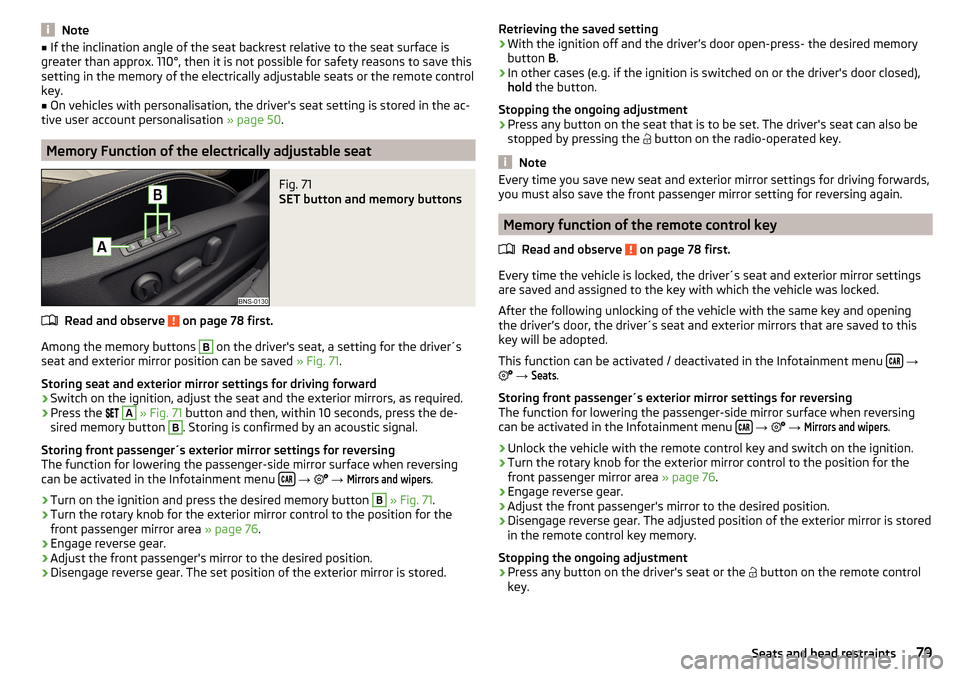
Fig. 71
SET button and memory buttons
Read and observe on page 78 first.
Among the memory buttons
B
on the driver's seat, a setting for the driver´s
seat and exterior mirror position can be saved » Fig. 71.
Storing seat and exterior mirror settings for driving forward
›
Switch on the ignition, adjust the seat and the exterior mirrors, as required.
›
Press the
A
» Fig. 71 button and then, within 10 seconds, press the de-
sired memory button
B
. Storing is confirmed by an acoustic signal.
Storing front passenger´s exterior mirror settings for reversing
The function for lowering the passenger-side mirror surface when reversing can be activated in the Infotainment menu
→
→
Mirrors and wipers
.
›
Turn on the ignition and press the desired memory button
B
» Fig. 71 .
›
Turn the rotary knob for the exterior mirror control to the position for the
front passenger mirror area » page 76.
›
Engage reverse gear.
›
Adjust the front passenger's mirror to the desired position.
›
Disengage reverse gear. The set position of the exterior mirror is stored.
Retrieving the saved setting›With the ignition off and the driver’s door open-press- the desired memory
button B.›
In other cases (e.g. if the ignition is switched on or the driver's door closed),
hold the button.
Stopping the ongoing adjustment
›
Press any button on the seat that is to be set. The driver's seat can also be
stopped by pressing the
button on the radio-operated key.
Note
Every time you save new seat and exterior mirror settings for driving forwards,
you must also save the front passenger mirror setting for reversing again.
Memory function of the remote control key
Read and observe
on page 78 first.
Every time the vehicle is locked, the driver´s seat and exterior mirror settingsare saved and assigned to the key with which the vehicle was locked.
After the following unlocking of the vehicle with the same key and opening
the driver’s door, the driver´s seat and exterior mirrors that are saved to this
key will be adopted.
This function can be activated / deactivated in the Infotainment menu
→
→
Seats
.
Storing front passenger´s exterior mirror settings for reversing
The function for lowering the passenger-side mirror surface when reversing
can be activated in the Infotainment menu
→
→
Mirrors and wipers
.
›
Unlock the vehicle with the remote control key and switch on the ignition.
›
Turn the rotary knob for the exterior mirror control to the position for the
front passenger mirror area » page 76.
›
Engage reverse gear.
›
Adjust the front passenger's mirror to the desired position.
›
Disengage reverse gear. The adjusted position of the exterior mirror is stored
in the remote control key memory.
Stopping the ongoing adjustment
›
Press any button on the driver's seat or the button on the remote control
key.
79Seats and head restraints
Page 87 of 344
Seat heating and ventilation
Introduction
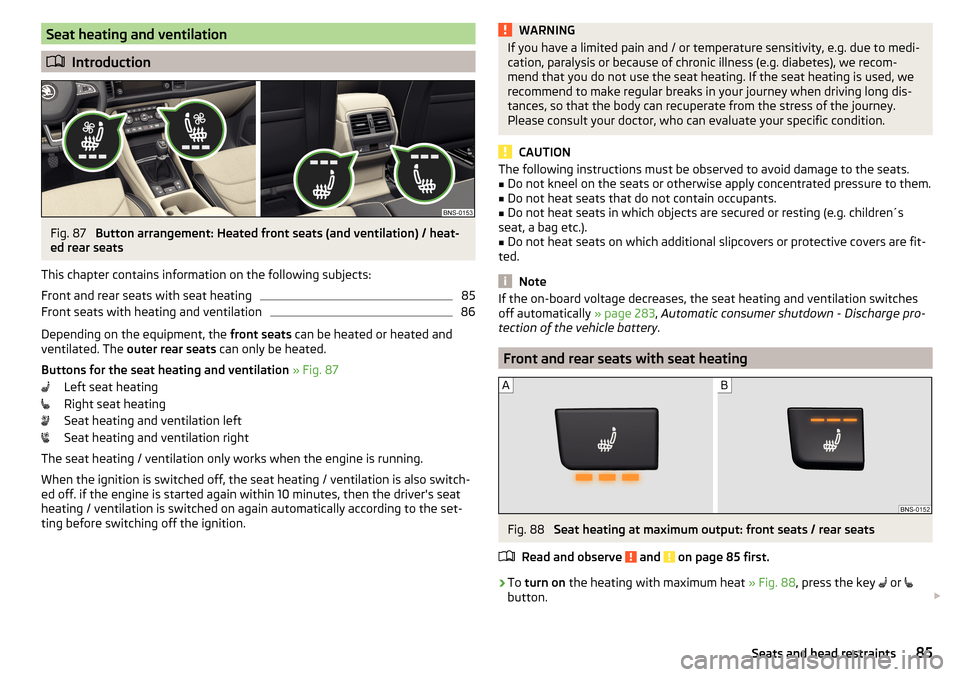
Fig. 87
Button arrangement: Heated front seats (and ventilation) / heat-
ed rear seats
This chapter contains information on the following subjects:
Front and rear seats with seat heating
85
Front seats with heating and ventilation
86
Depending on the equipment, the front seats can be heated or heated and
ventilated. The outer rear seats can only be heated.
Buttons for the seat heating and ventilation » Fig. 87
Left seat heating
Right seat heating
Seat heating and ventilation left
Seat heating and ventilation right
The seat heating / ventilation only works when the engine is running. When the ignition is switched off, the seat heating / ventilation is also switch-ed off. if the engine is started again within 10 minutes, then the driver's seat
heating / ventilation is switched on again automatically according to the set-
ting before switching off the ignition.
WARNINGIf you have a limited pain and / or temperature sensitivity, e.g. due to medi-
cation, paralysis or because of chronic illness (e.g. diabetes), we recom-
mend that you do not use the seat heating. If the seat heating is used, we
recommend to make regular breaks in your journey when driving long dis-
tances, so that the body can recuperate from the stress of the journey.
Please consult your doctor, who can evaluate your specific condition.
CAUTION
The following instructions must be observed to avoid damage to the seats.■Do not kneel on the seats or otherwise apply concentrated pressure to them.■
Do not heat seats that do not contain occupants.
■
Do not heat seats in which objects are secured or resting (e.g. children´s
seat, a bag etc.).
■
Do not heat seats on which additional slipcovers or protective covers are fit-
ted.
Note
If the on-board voltage decreases, the seat heating and ventilation switches
off automatically » page 283, Automatic consumer shutdown - Discharge pro-
tection of the vehicle battery .
Front and rear seats with seat heating
Fig. 88
Seat heating at maximum output: front seats / rear seats
Read and observe
and on page 85 first.
›
To turn on the heating with maximum heat » Fig. 88, press the key
or
button.
85Seats and head restraints
Page 94 of 344
Closing takes place in reverse order.
Replace bags›
Remove the waste container from the slot.
›
Press the two locking lugs on the frame in the direction of arrow
1
» Fig. 102 .
›
Pull the bag together with the frame downwards in the direction of arrow
2
.
›
Remove the bag from the frame.
›
Pull the new bag through the frame and pull it over the bag frame in the di-
rection of arrow
3
.
›
Insert the bag containing the frame in the direction of arrow
4
into the con-
tainer body, so that the two lugs engage audibly with the frame.
Note
We recommend that you use 20 x 30 cm bags.
Storage compartment under the front arm rest
Fig. 103
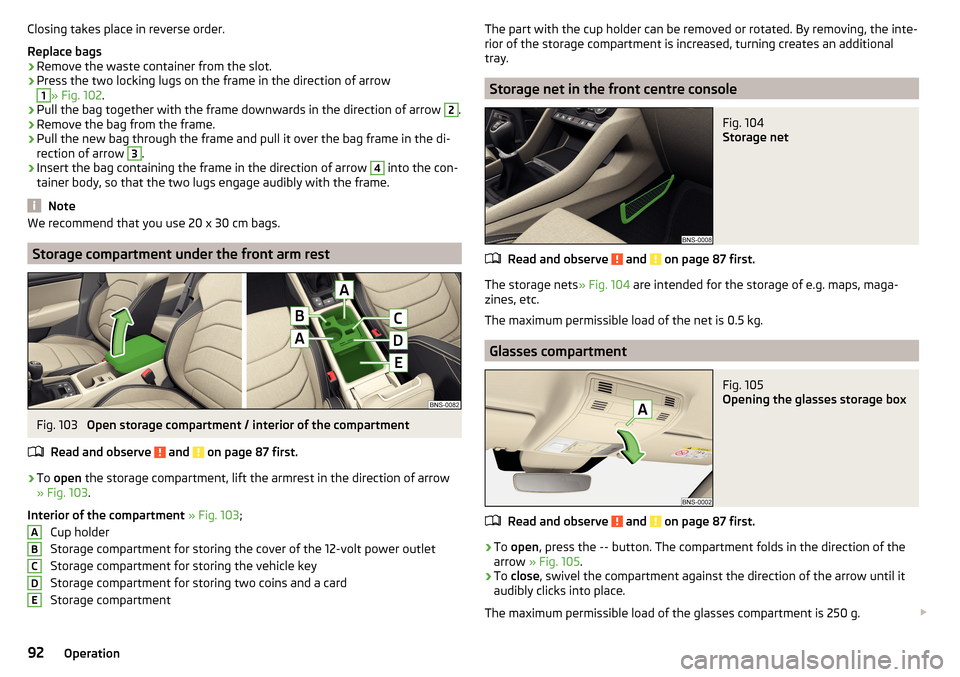
Open storage compartment / interior of the compartment
Read and observe
and on page 87 first.
›
To open the storage compartment, lift the armrest in the direction of arrow
» Fig. 103 .
Interior of the compartment » Fig. 103 ;
Cup holder
Storage compartment for storing the cover of the 12-volt power outlet
Storage compartment for storing the vehicle key
Storage compartment for storing two coins and a card
Storage compartment
ABCDEThe part with the cup holder can be removed or rotated. By removing, the inte-
rior of the storage compartment is increased, turning creates an additional
tray.
Storage net in the front centre console
Fig. 104
Storage net
Read and observe and on page 87 first.
The storage nets » Fig. 104 are intended for the storage of e.g. maps, maga-
zines, etc.
The maximum permissible load of the net is 0.5 kg.
Glasses compartment
Fig. 105
Opening the glasses storage box
Read and observe and on page 87 first.
›
To open , press the
--
button. The compartment folds in the direction of the
arrow » Fig. 105 .
›
To close , swivel the compartment against the direction of the arrow until it
audibly clicks into place.
The maximum permissible load of the glasses compartment is 250 g.
92Operation