infotainment SKODA KODIAQ 2016 1.G Owner's Guide
[x] Cancel search | Manufacturer: SKODA, Model Year: 2016, Model line: KODIAQ, Model: SKODA KODIAQ 2016 1.GPages: 344, PDF Size: 58.96 MB
Page 79 of 344
Setting the mirror surfaces synchronously
This function allows the simultaneous adjustment of the two mirror areas. The
function can be activated / deactivated in the Infotainment menu
→
→
Mirrors and wipers
.
›
Turn the knob for the mirror control to the position for the driver mirror ad-
justment.
›
Adjust the mirror areas to the desired position.
Manual folding mirrors
The mirror can be manually folded towards the side windows. To put it back to
its original position, it should be folded back from the side window until it au-
dibly clicks into place.
Automatic folding in/back of both mirrors
The exterior mirrors are automatically collapsed after locking the vehicle in the park position. After unlocking the vehicle, the mirrors are folded back to the
driving position »
.
This function can be activated / deactivated in the Infotainment menu
→
→
Mirrors and wipers
.
Mirror with automatic dimming
The exterior mirror dimming is controlled together with the automatic rear-
view mirror dimming » page 76.
Memory function for mirror (vehicles with electrically adjustable driver's
seat)
It is possible to save the current setting of the exterior mirror when saving the
driver's seat position with » page 79, Memory Function of the electrically ad-
justable seat or » page 79 , Memory function of the remote control key .
Tilting the mirror area of the front passenger mirror (vehicles with
electrically adjustable driver's seat)
The front passenger mirror area can be tilted to the stored position to improve
the view to the curb when reversing.
Operating conditions. The function is activated in the Infotainment menu
→
→
Mirrors andwipers
.
The setting of the mirror area has been previously stored » page 79,
Memory Function of the electrically adjustable seat or. » page 79 , Memo-
ry function of the remote control key .
The reverse gear is engaged.
The knob for the mirror control is in the position for the passenger mirror
adjustment.
The mirror area returns to its initial position after the rotary knob is set to an-
other position or if the speed is greater than 15 km/h.WARNINGDo not touch the exterior mirror surfaces, if the exterior mirror heating is
switched on - hazard of burning.
CAUTION
■ Never manually fold in/out the electrically folding exterior mirrors - there is a
risk of damage to the mirror!■
When the mirror is swung by external influences (due to impact during ma-
noeuvring, for example), then first fold-in the mirror by turning the knob and
wait for a loud clapping noise.
Note
The setting of the mirror functions is stored in Infotainment (depending on the
Infotainment type) in the active user account personalisation » page 50.77Lights and visibility
Page 81 of 344
Note■If the inclination angle of the seat backrest relative to the seat surface is
greater than approx. 110°, then it is not possible for safety reasons to save this
setting in the memory of the electrically adjustable seats or the remote control
key.■
On vehicles with personalisation, the driver's seat setting is stored in the ac-
tive user account personalisation » page 50.
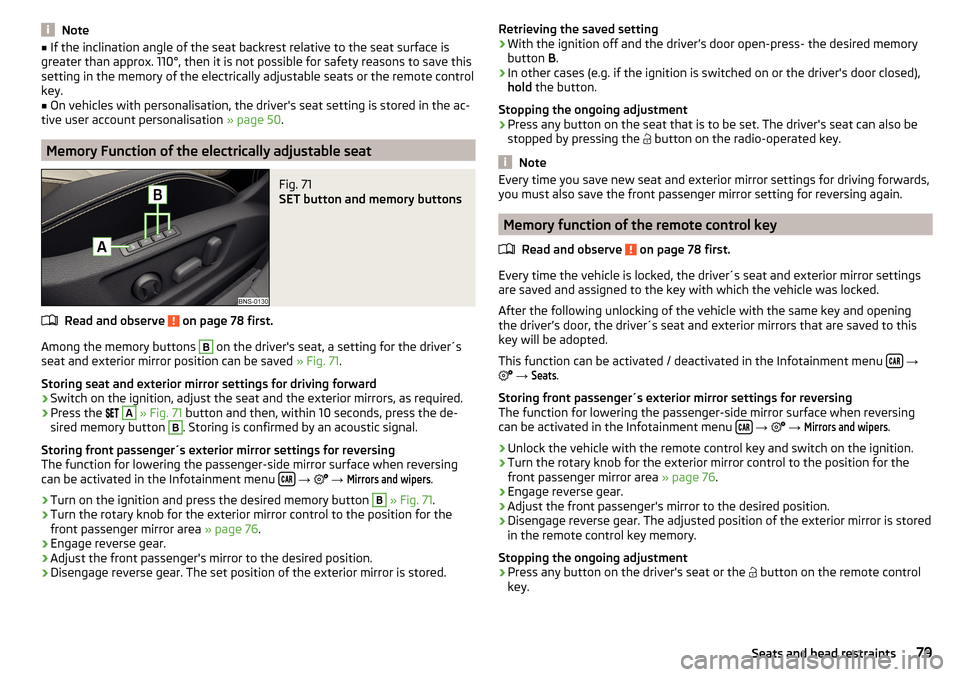
Memory Function of the electrically adjustable seat
Fig. 71
SET button and memory buttons
Read and observe on page 78 first.
Among the memory buttons
B
on the driver's seat, a setting for the driver´s
seat and exterior mirror position can be saved » Fig. 71.
Storing seat and exterior mirror settings for driving forward
›
Switch on the ignition, adjust the seat and the exterior mirrors, as required.
›
Press the
A
» Fig. 71 button and then, within 10 seconds, press the de-
sired memory button
B
. Storing is confirmed by an acoustic signal.
Storing front passenger´s exterior mirror settings for reversing
The function for lowering the passenger-side mirror surface when reversing can be activated in the Infotainment menu
→
→
Mirrors and wipers
.
›
Turn on the ignition and press the desired memory button
B
» Fig. 71 .
›
Turn the rotary knob for the exterior mirror control to the position for the
front passenger mirror area » page 76.
›
Engage reverse gear.
›
Adjust the front passenger's mirror to the desired position.
›
Disengage reverse gear. The set position of the exterior mirror is stored.
Retrieving the saved setting›With the ignition off and the driver’s door open-press- the desired memory
button B.›
In other cases (e.g. if the ignition is switched on or the driver's door closed),
hold the button.
Stopping the ongoing adjustment
›
Press any button on the seat that is to be set. The driver's seat can also be
stopped by pressing the
button on the radio-operated key.
Note
Every time you save new seat and exterior mirror settings for driving forwards,
you must also save the front passenger mirror setting for reversing again.
Memory function of the remote control key
Read and observe
on page 78 first.
Every time the vehicle is locked, the driver´s seat and exterior mirror settingsare saved and assigned to the key with which the vehicle was locked.
After the following unlocking of the vehicle with the same key and opening
the driver’s door, the driver´s seat and exterior mirrors that are saved to this
key will be adopted.
This function can be activated / deactivated in the Infotainment menu
→
→
Seats
.
Storing front passenger´s exterior mirror settings for reversing
The function for lowering the passenger-side mirror surface when reversing
can be activated in the Infotainment menu
→
→
Mirrors and wipers
.
›
Unlock the vehicle with the remote control key and switch on the ignition.
›
Turn the rotary knob for the exterior mirror control to the position for the
front passenger mirror area » page 76.
›
Engage reverse gear.
›
Adjust the front passenger's mirror to the desired position.
›
Disengage reverse gear. The adjusted position of the exterior mirror is stored
in the remote control key memory.
Stopping the ongoing adjustment
›
Press any button on the driver's seat or the button on the remote control
key.
79Seats and head restraints
Page 88 of 344
With repeated pressing of the button, the level is down-regulated until it
switches off . The level of the seat heating is indicated by the number of illu-
minated warning lights underneath / in the button.
Increasing in heating power of the rear seat heating can be locked / unlocked .
To do this, press button
on the Climatronic → Tap the function surfaces
/
on the Infotainment screen (applies to vehicles with Climatronic controls
in the rear). In the locked heating power increase, the heating power can only
be adjusted down to turn off.
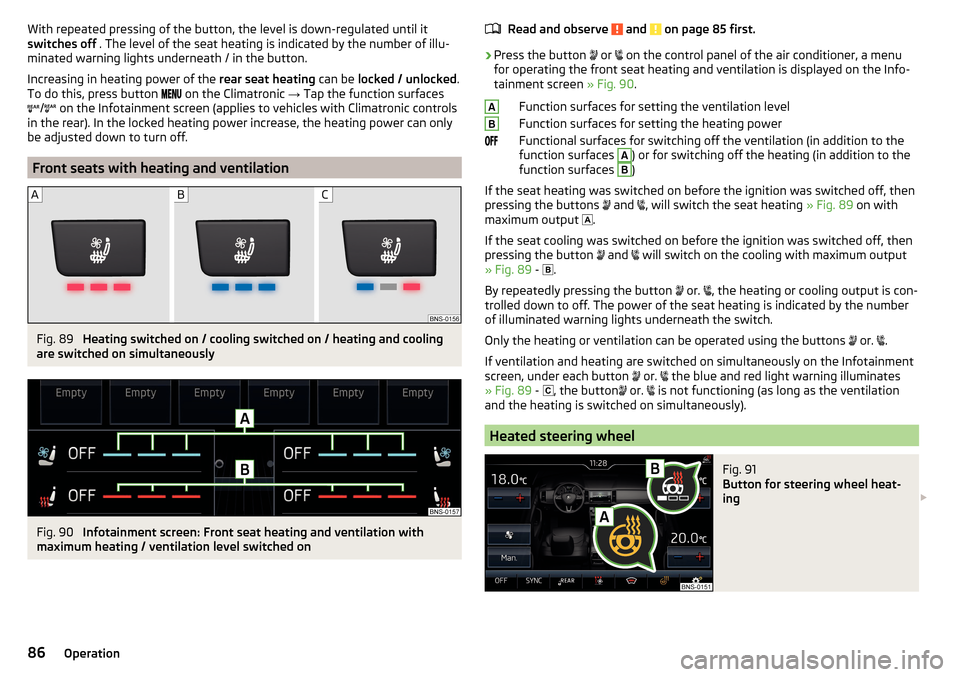
Front seats with heating and ventilation
Fig. 89
Heating switched on / cooling switched on / heating and cooling
are switched on simultaneously
Fig. 90
Infotainment screen: Front seat heating and ventilation with
maximum heating / ventilation level switched on
Read and observe and on page 85 first.›
Press the button
or
on the control panel of the air conditioner, a menu
for operating the front seat heating and ventilation is displayed on the Info-
tainment screen » Fig. 90.
Function surfaces for setting the ventilation level
Function surfaces for setting the heating power
Functional surfaces for switching off the ventilation (in addition to the
function surfaces
A
) or for switching off the heating (in addition to the
function surfaces
B
)
If the seat heating was switched on before the ignition was switched off, then
pressing the buttons and
, will switch the seat heating
» Fig. 89 on with
maximum output .
If the seat cooling was switched on before the ignition was switched off, then
pressing the button and
will switch on the cooling with maximum output
» Fig. 89 -
.
By repeatedly pressing the button or.
, the heating or cooling output is con-
trolled down to off. The power of the seat heating is indicated by the number
of illuminated warning lights underneath the switch.
Only the heating or ventilation can be operated using the buttons or.
.
If ventilation and heating are switched on simultaneously on the Infotainment
screen, under each button or.
the blue and red light warning illuminates
» Fig. 89 -
, the button
or.
is not functioning (as long as the ventilation
and the heating is switched on simultaneously).
Heated steering wheel
Fig. 91
Button for steering wheel heat-
ing
AB86Operation
Page 89 of 344
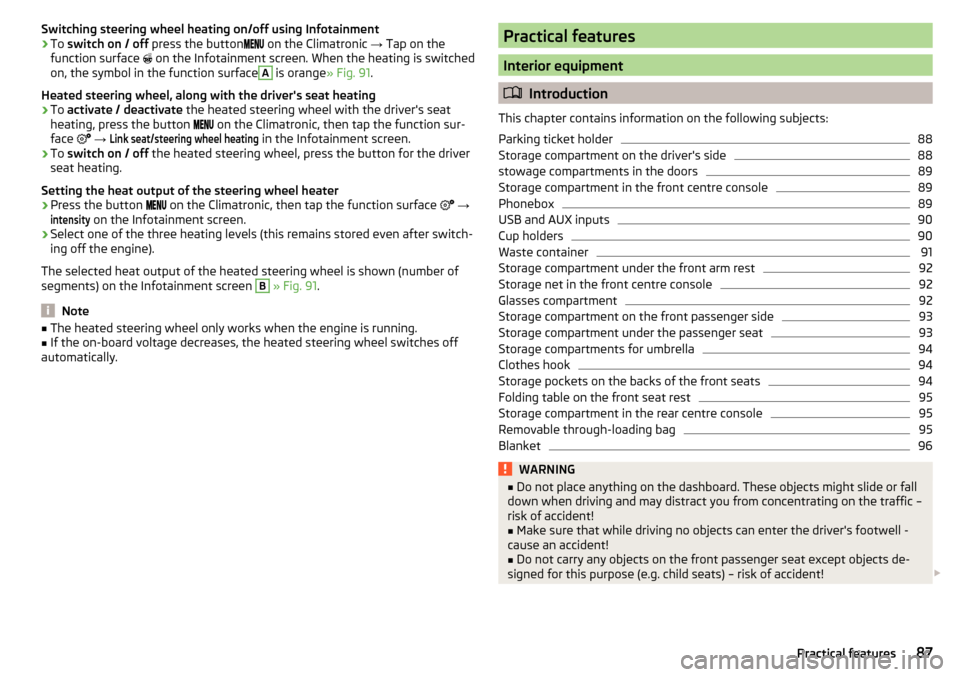
Switching steering wheel heating on/off using Infotainment›To switch on / off press the button on the Climatronic → Tap on the
function surface
on the Infotainment screen. When the heating is switched
on, the symbol in the function surfaceA
is orange » Fig. 91.
Heated steering wheel, along with the driver's seat heating
›
To activate / deactivate the heated steering wheel with the driver's seat
heating, press the button
on the Climatronic, then tap the function sur-
face
→
Link seat/steering wheel heating
in the Infotainment screen.
›
To switch on / off the heated steering wheel, press the button for the driver
seat heating.
Setting the heat output of the steering wheel heater
›
Press the button on the Climatronic, then tap the function surface
→
intensity
on the Infotainment screen.
›
Select one of the three heating levels (this remains stored even after switch-
ing off the engine).
The selected heat output of the heated steering wheel is shown (number of
segments) on the Infotainment screen
B
» Fig. 91 .
Note
■
The heated steering wheel only works when the engine is running.■If the on-board voltage decreases, the heated steering wheel switches off
automatically.Practical features
Interior equipment
Introduction
This chapter contains information on the following subjects:
Parking ticket holder
88
Storage compartment on the driver's side
88
stowage compartments in the doors
89
Storage compartment in the front centre console
89
Phonebox
89
USB and AUX inputs
90
Cup holders
90
Waste container
91
Storage compartment under the front arm rest
92
Storage net in the front centre console
92
Glasses compartment
92
Storage compartment on the front passenger side
93
Storage compartment under the passenger seat
93
Storage compartments for umbrella
94
Clothes hook
94
Storage pockets on the backs of the front seats
94
Folding table on the front seat rest
95
Storage compartment in the rear centre console
95
Removable through-loading bag
95
Blanket
96WARNING■ Do not place anything on the dashboard. These objects might slide or fall
down when driving and may distract you from concentrating on the traffic –
risk of accident!■
Make sure that while driving no objects can enter the driver's footwell -
cause an accident!
■
Do not carry any objects on the front passenger seat except objects de-
signed for this purpose (e.g. child seats) – risk of accident!
87Practical features
Page 92 of 344
CAUTION■Metal objects between the pad and the phone to be charged can become hot
due to the action of the induction field - this is a risk of damage to the tele-
phone.■
With some phones, the charging process can be interrupted or the phone can
switch off due to heating up.
■
Do not insert any electronic or magnetic storage media (e.g. SD cards, USB
sticks, cards with magnetic strips or chips) between the pad and the phone to
be charged- there is a risk of data loss and damage to these data carriers.
■
If a message appears in the Infotainment screen that the phone cannot be
charged, then proceed as follows. ■Check that there is no object between the support and the phone to be
charged. If this is the case, then take out the object and the phone. Place the
phone centrally on the phone symbol on the pad again.
■ Check if the position of the phone to be charged has not changed during
the journey. If this is the case, then take out the phone and put it back cen-
trally on the phone symbol on the pad.
Note
■ At the start of the wireless charging, the appropriate message appears on
the Infotainment screen.■
For the optimum phone signal strength and uninterrupted wireless charging,
we recommend position the phone in the storage compartment without the
protective sleeve, if possible.
■
Place a max. 160x80 mm phone in the storage compartment.
USB and AUX inputs
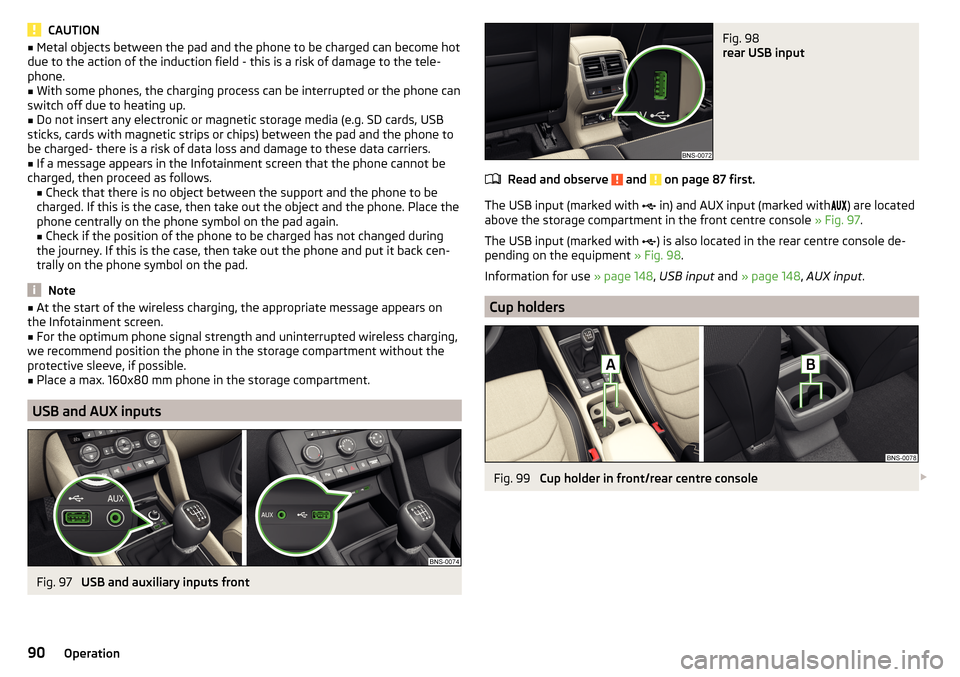
Fig. 97
USB and auxiliary inputs front
Fig. 98
rear USB input
Read and observe and on page 87 first.
The USB input (marked with in) and AUX input (marked with
) are located
above the storage compartment in the front centre console » Fig. 97.
The USB input (marked with ) is also located in the rear centre console de-
pending on the equipment » Fig. 98.
Information for use » page 148, USB input and » page 148 , AUX input .
Cup holders
Fig. 99
Cup holder in front/rear centre console
90Operation
Page 111 of 344
WARNINGFor road safety when transporting cargo on the roof rack, observe the fol-
lowing instructions.■
Always distribute the load on the roof rack evenly and secure properly us-
ing suitable lashing straps or tensioning straps.
■
When transporting heavy objects or objects which take up a large area on
the roof rack system, the handling of the car may change as a result of the
displacement of the centre of gravity. The style of driving and speed must
therefore be adapted to the current circumstances.
■
The permissible roof load, permissible axle loads and permissible total ve-
hicle weight must not be exceeded under any circumstances – risk of acci-
dent!
CAUTION
■ Make sure that the sliding / tilting roof or the boot lid does not collide with
the roof load when opened.■
Ensure the roof aerial is not impaired by the load being transported.
Note
We recommend that you use a roof rack from ŠKODA Original Accessories.Heating and ventilation
Heating, manual air conditioning system, Climatronic
Introduction
This chapter contains information on the following subjects:
Heating and manual air conditioning
110
Climatronic (automatic air conditioning)
110
Operate Climatronic in Infotainment
112
Climatronic - automatic operation
112
Air distribution control
113
Air outlet vents
113
The heating heats and ventilates the vehicle interior. The air conditioning sys-
tem also cools and dehumidifies the vehicle interior.
The heating effect is dependent upon the coolant temperature, thus full heat
output only occurs when the engine has reached its operating temperature.
The cooling system works under the following conditions. The cooling system is switched on.
The engine is running.
The outside temperature is below 2 ° C.
The blower is switched on.
Fogging is prevented when the cooling system is switched on.
To increase the efficiency of the cooling system, recirculation mode can be
swtiched on briefly » page 113.
Health protection
To reduce health risks (e.g. common colds), the following instructions for the
use of the cooling system are to be observed. ▶ The difference between the indoor temperature and the outdoor air temper-
ature should not be greater than about 5 ° C.
▶ The cooling system should be turned off about 10 minutes before the end of
the journey.
▶ Once a year, the air conditioning should be disinfected by a specialist garage.
109Heating and ventilation
Page 113 of 344
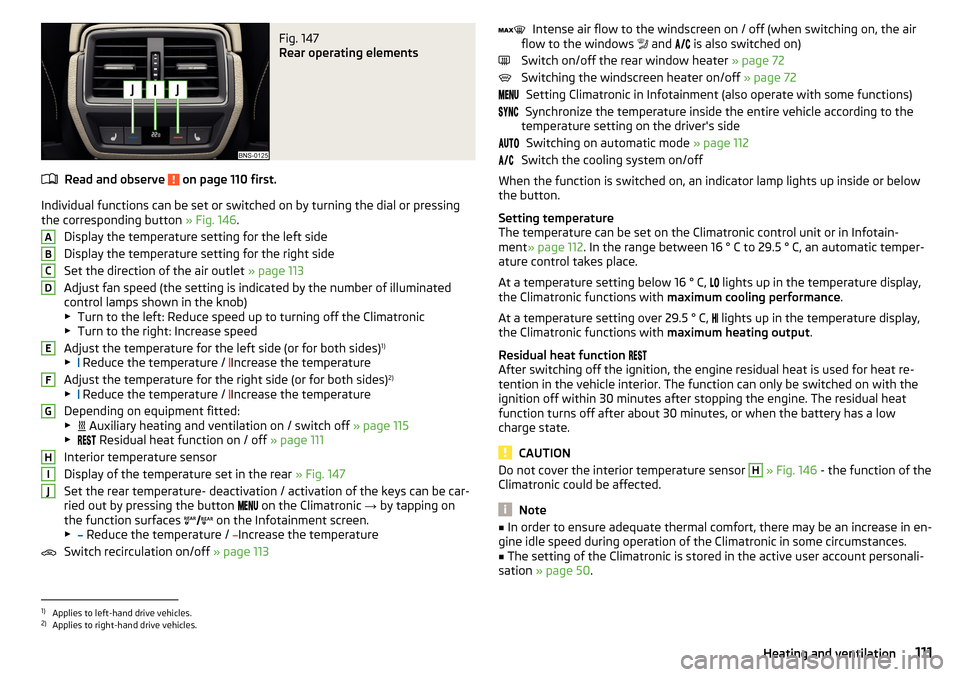
Fig. 147
Rear operating elements
Read and observe on page 110 first.
Individual functions can be set or switched on by turning the dial or pressingthe corresponding button » Fig. 146.
Display the temperature setting for the left side
Display the temperature setting for the right side
Set the direction of the air outlet » page 113
Adjust fan speed (the setting is indicated by the number of illuminated
control lamps shown in the knob)
▶ Turn to the left: Reduce speed up to turning off the Climatronic
▶ Turn to the right: Increase speed
Adjust the temperature for the left side (or for both sides) 1)
▶ Reduce the temperature /
Increase the temperature
Adjust the temperature for the right side (or for both sides) 2)
▶ Reduce the temperature /
Increase the temperature
Depending on equipment fitted:
▶ Auxiliary heating and ventilation on / switch off
» page 115
▶ Residual heat function on / off
» page 111
Interior temperature sensor
Display of the temperature set in the rear » Fig. 147
Set the rear temperature- deactivation / activation of the keys can be car-
ried out by pressing the button on the Climatronic
→ by tapping on
the function surfaces on the Infotainment screen.
▶ Reduce the temperature /
Increase the temperature
Switch recirculation on/off » page 113
ABCDEFGHIJIntense air flow to the windscreen on / off (when switching on, the air
flow to the windows and is also switched on)
Switch on/off the rear window heater » page 72
Switching the windscreen heater on/off » page 72
Setting Climatronic in Infotainment (also operate with some functions)
Synchronize the temperature inside the entire vehicle according to the
temperature setting on the driver's side
Switching on automatic mode » page 112
Switch the cooling system on/off
When the function is switched on, an indicator lamp lights up inside or below the button.
Setting temperature
The temperature can be set on the Climatronic control unit or in Infotain-
ment » page 112 . In the range between 16 ° C to 29.5 ° C, an automatic temper-
ature control takes place.
At a temperature setting below 16 ° C, lights up in the temperature display,
the Climatronic functions with maximum cooling performance .
At a temperature setting over 29.5 ° C, lights up in the temperature display,
the Climatronic functions with maximum heating output.
Residual heat function
After switching off the ignition, the engine residual heat is used for heat re-
tention in the vehicle interior. The function can only be switched on with the
ignition off within 30 minutes after stopping the engine. The residual heat
function turns off after about 30 minutes, or when the battery has a low
charge state.
CAUTION
Do not cover the interior temperature sensor H » Fig. 146 - the function of the
Climatronic could be affected.
Note
■ In order to ensure adequate thermal comfort, there may be an increase in en-
gine idle speed during operation of the Climatronic in some circumstances.■
The setting of the Climatronic is stored in the active user account personali-
sation » page 50 .
1)
Applies to left-hand drive vehicles.
2)
Applies to right-hand drive vehicles.
111Heating and ventilation
Page 114 of 344
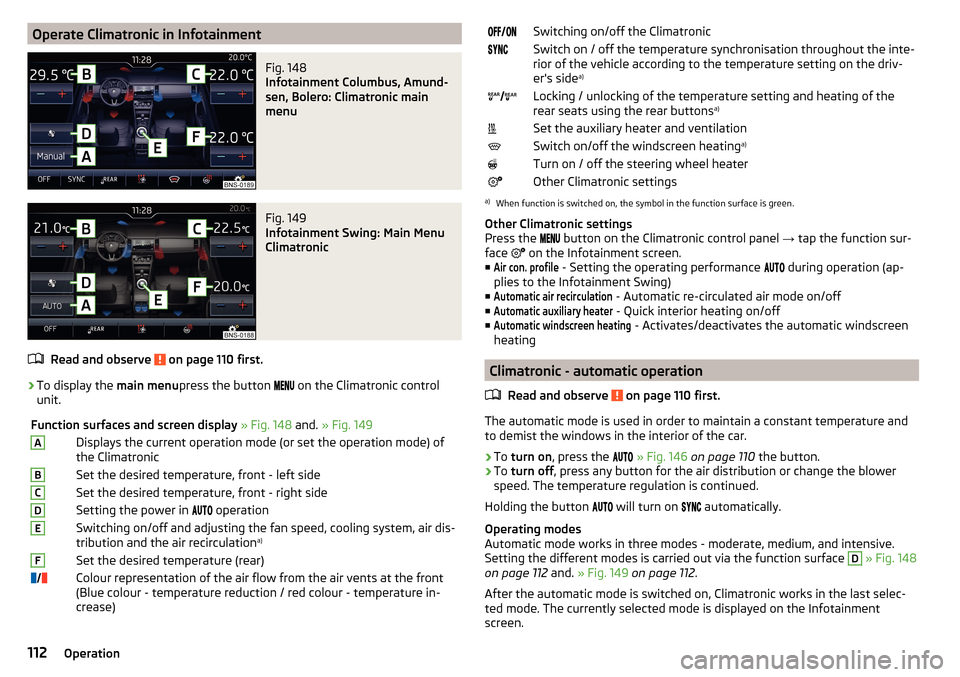
Operate Climatronic in InfotainmentFig. 148
Infotainment Columbus, Amund-
sen, Bolero: Climatronic main
menu
Fig. 149
Infotainment Swing: Main Menu
Climatronic
Read and observe on page 110 first.
›
To display the main menupress the button
on the Climatronic control
unit.
Function surfaces and screen display » Fig. 148 and. » Fig. 149ADisplays the current operation mode (or set the operation mode) of
the ClimatronicBSet the desired temperature, front - left sideCSet the desired temperature, front - right sideDSetting the power in operationESwitching on/off and adjusting the fan speed, cooling system, air dis-
tribution and the air recirculation a)FSet the desired temperature (rear)
Colour representation of the air flow from the air vents at the front
(Blue colour - temperature reduction / red colour - temperature in-
crease)Switching on/off the ClimatronicSwitch on / off the temperature synchronisation throughout the inte-
rior of the vehicle according to the temperature setting on the driv-
er's side a)
Locking / unlocking of the temperature setting and heating of the
rear seats using the rear buttons a)Set the auxiliary heater and ventilationSwitch on/off the windscreen heating
a)Turn on / off the steering wheel heaterOther Climatronic settingsa)
When function is switched on, the symbol in the function surface is green.
Other Climatronic settings
Press the button on the Climatronic control panel
→ tap the function sur-
face on the Infotainment screen.
■
Air con. profile
- Setting the operating performance during operation (ap-
plies to the Infotainment Swing)
■
Automatic air recirculation
- Automatic re-circulated air mode on/off
■
Automatic auxiliary heater
- Quick interior heating on/off
■
Automatic windscreen heating
- Activates/deactivates the automatic windscreen
heating
Climatronic - automatic operation
Read and observe
on page 110 first.
The automatic mode is used in order to maintain a constant temperature andto demist the windows in the interior of the car.
›
To turn on , press the
» Fig. 146 on page 110 the button.
›
To turn off , press any button for the air distribution or change the blower
speed. The temperature regulation is continued.
Holding the button will turn on
automatically.
Operating modes
Automatic mode works in three modes - moderate, medium, and intensive.
Setting the different modes is carried out via the function surface
D
» Fig. 148
on page 112 and. » Fig. 149 on page 112 .
After the automatic mode is switched on, Climatronic works in the last selec-
ted mode. The currently selected mode is displayed on the Infotainment
screen.
112Operation
Page 116 of 344
The setting of the airflow direction is carried out by moving the adjustment el-
ement A » Fig. 150 or » Fig. 151 in the desired direction.
Opening›
Turn the regulator
B
» Fig. 150 downwards.
›
Turn the regulator
C
» Fig. 151 upwards.
Closing
›
Turn the regulator
B
» Fig. 150 downwards.
›
Turn the regulator
C
» Fig. 151 downwards.
Depending on the setting of the air distribution, the air stream comes out of
the following air vents.
Set the direction of the air outletAir vents » Fig. 150 and » Fig. 1511, 2 , 41, 2 , 4 , 5 , 73 , 4 , 64 , 5 , 73 , 4 , 5 , 6 , 7
CAUTION
Do not cover the air vents - the air distribution could be compromised.
Auxiliary heating (auxiliary heating and ventilation)
Introduction
This chapter contains information on the following subjects:
Power on / off
115
Operation in Infotainment
115
Radio remote control
116
The auxiliary heating heats the vehicle interior as well as the engine. For heat-
ing, fuel is consumed from the fuel tank.
The auxiliary ventilation enables fresh air to flow into the vehicle interior with
the engine switched off, whereby the interior temperature is effectively de-
creased (e.g. with the vehicle parked in the sun).
The auxiliary heating (auxiliary heating and ventilation) (referred to just as aux- iliary heating in the following) ensures the heating / ventilation depending on
the setting of the air conditioning and the air outlet vents before switching off
the ignition.WARNING■ The auxiliary heating must never be operated in closed rooms (e.g. garag-
es) – risk of poisoning!■
The auxiliary heating must not be allowed to run during refuelling – risk
of fire.
■
The exhaust pipe of the auxiliary heating is located on the underside of
the vehicle. If you want to use the auxiliary heating, do not park the car in
places where the exhaust fumes can come into contact with flammable
materials such as dry grass, undergrowth, leaves, spilled fuel etc. - risk of
fire.
CAUTION
The air inlet in front of the windscreen must be free (e.g. of ice, snow or
leaves) to ensure that the auxiliary heating operates properly.
Note
■ The auxiliary heating only switches the blower on, if it has achieved a coolant
temperature of approx. 50 °C.■
In the engine compartment, water vapour may form during the operation of
the heater.
114Operation
Page 117 of 344
Power on / offFig. 152
Button for switching on / off (Climatronic / manual air condition-
ing)
Read and observe
and on page 114 first.
Functional requirements of the auxiliary heating. The charge state of the vehicle battery is sufficient.
The fuel supply is adequate (the warning light is not illuminated in the
instrument cluster).
Manual on / off ▶ Using the button on the operating part of the air conditioning
» Fig. 152.
▶ Using the (switch on) /
(switch off) button on the remote control opera-
tion.
Automatic on / off ▶ Via an automatically programmed and activated pre-set time in Infotainment.
▶ According to the environmental conditions.
Switching off the auxiliary heating takes place automatically when there is a
lack of fuel (warning light in the instrument cluster lights up).
After switching off the system, the coolant pump and the auxiliary heating will
continue running a little while longer in order to burn the remaining fuel in the
heating.
Setting automatic on / off
Climatronic: On the Climatronic, press the button
→ Tap the function sur-
face in the Infotainment screen. There will be a display of the last set oper-
ating mode with the option to change this.
Manual air conditioning: On Infotainment, press the button
→ Tap the
function surface .
Then follow the instructions on the Infotainment screen.
When automatic switching on is activated, the warning light in the
symbol
button lights up for about 10 seconds after the ignition is turned off » Fig. 152.
Operation in Infotainment
Fig. 153
Main menu/set preset time
Read and observe
and on page 114 first.
Call up the main menu
›
On the Climatronic, press the button
→ Tap the function surface
in the
Infotainment screen.
Or vehicles with manual air conditioning:
›
On Infotainment, press the button
→ Tap the function surface
.
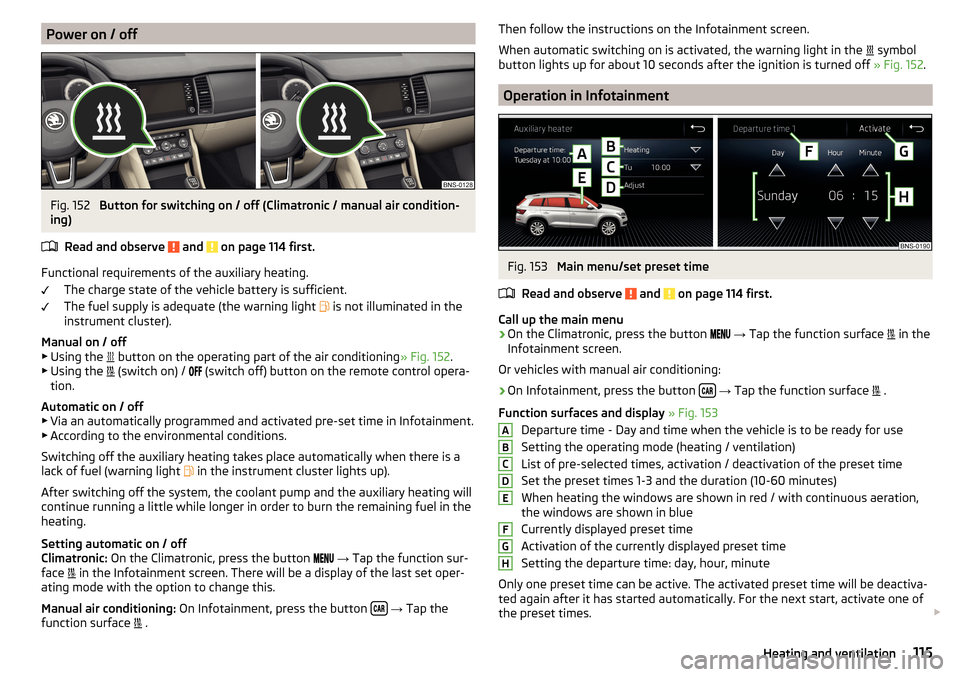
Function surfaces and display » Fig. 153
Departure time - Day and time when the vehicle is to be ready for use
Setting the operating mode (heating / ventilation)
List of pre-selected times, activation / deactivation of the preset time Set the preset times 1-3 and the duration (10-60 minutes)
When heating the windows are shown in red / with continuous aeration,
the windows are shown in blue
Currently displayed preset time
Activation of the currently displayed preset time
Setting the departure time: day, hour, minute
Only one preset time can be active. The activated preset time will be deactiva-
ted again after it has started automatically. For the next start, activate one of
the preset times.
ABCDEFGH115Heating and ventilation