seat SKODA KODIAQ 2016 1.G Owner's Guide
[x] Cancel search | Manufacturer: SKODA, Model Year: 2016, Model line: KODIAQ, Model: SKODA KODIAQ 2016 1.GPages: 344, PDF Size: 58.96 MB
Page 74 of 344
Option 3 - switching on/off (by pressing relevant switch) » Fig. 60
Reading lamp left
Reading lamp right
The rear lighting (variants 1 and 3) is controlled together with the automatic
operation of the lighting from the front seats. ▶ When the front interior lighting is switched on, the rear interior lighting also
turns on automatically.
▶ When the front interior lighting is switched off, the rear interior lighting can
be turned on/off as required.
Ambient lighting
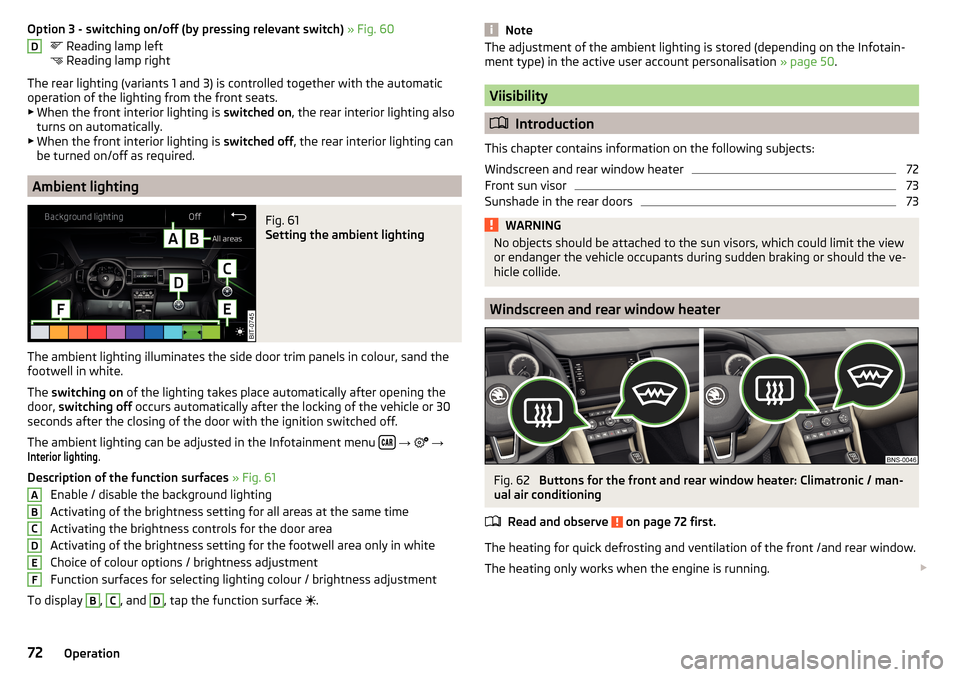
Fig. 61
Setting the ambient lighting
The ambient lighting illuminates the side door trim panels in colour, sand the
footwell in white.
The switching on of the lighting takes place automatically after opening the
door, switching off occurs automatically after the locking of the vehicle or 30
seconds after the closing of the door with the ignition switched off.
The ambient lighting can be adjusted in the Infotainment menu
→
→
Interior lighting
.
Description of the function surfaces » Fig. 61
Enable / disable the background lighting
Activating of the brightness setting for all areas at the same time
Activating the brightness controls for the door area
Activating of the brightness setting for the footwell area only in white
Choice of colour options / brightness adjustment
Function surfaces for selecting lighting colour / brightness adjustment
To display
B
,
C
, and
D
, tap the function surface .
DABCDEFNoteThe adjustment of the ambient lighting is stored (depending on the Infotain-
ment type) in the active user account personalisation » page 50.
Viisibility
Introduction
This chapter contains information on the following subjects:
Windscreen and rear window heater
72
Front sun visor
73
Sunshade in the rear doors
73WARNINGNo objects should be attached to the sun visors, which could limit the view
or endanger the vehicle occupants during sudden braking or should the ve-
hicle collide.
Windscreen and rear window heater
Fig. 62
Buttons for the front and rear window heater: Climatronic / man-
ual air conditioning
Read and observe
on page 72 first.
The heating for quick defrosting and ventilation of the front /and rear window.
The heating only works when the engine is running.
72Operation
Page 79 of 344
Setting the mirror surfaces synchronously
This function allows the simultaneous adjustment of the two mirror areas. The
function can be activated / deactivated in the Infotainment menu
→
→
Mirrors and wipers
.
›
Turn the knob for the mirror control to the position for the driver mirror ad-
justment.
›
Adjust the mirror areas to the desired position.
Manual folding mirrors
The mirror can be manually folded towards the side windows. To put it back to
its original position, it should be folded back from the side window until it au-
dibly clicks into place.
Automatic folding in/back of both mirrors
The exterior mirrors are automatically collapsed after locking the vehicle in the park position. After unlocking the vehicle, the mirrors are folded back to the
driving position »
.
This function can be activated / deactivated in the Infotainment menu
→
→
Mirrors and wipers
.
Mirror with automatic dimming
The exterior mirror dimming is controlled together with the automatic rear-
view mirror dimming » page 76.
Memory function for mirror (vehicles with electrically adjustable driver's
seat)
It is possible to save the current setting of the exterior mirror when saving the
driver's seat position with » page 79, Memory Function of the electrically ad-
justable seat or » page 79 , Memory function of the remote control key .
Tilting the mirror area of the front passenger mirror (vehicles with
electrically adjustable driver's seat)
The front passenger mirror area can be tilted to the stored position to improve
the view to the curb when reversing.
Operating conditions. The function is activated in the Infotainment menu
→
→
Mirrors andwipers
.
The setting of the mirror area has been previously stored » page 79,
Memory Function of the electrically adjustable seat or. » page 79 , Memo-
ry function of the remote control key .
The reverse gear is engaged.
The knob for the mirror control is in the position for the passenger mirror
adjustment.
The mirror area returns to its initial position after the rotary knob is set to an-
other position or if the speed is greater than 15 km/h.WARNINGDo not touch the exterior mirror surfaces, if the exterior mirror heating is
switched on - hazard of burning.
CAUTION
■ Never manually fold in/out the electrically folding exterior mirrors - there is a
risk of damage to the mirror!■
When the mirror is swung by external influences (due to impact during ma-
noeuvring, for example), then first fold-in the mirror by turning the knob and
wait for a loud clapping noise.
Note
The setting of the mirror functions is stored in Infotainment (depending on the
Infotainment type) in the active user account personalisation » page 50.77Lights and visibility
Page 80 of 344
Seats and head restraints
Front seats
Introduction
This chapter contains information on the following subjects:
Manual adjustment
78
Electrical adjustment
78
Memory Function of the electrically adjustable seat
79
Memory function of the remote control key
79
Folding front passenger seat
80
Armrest setting
80WARNING■ Only adjust the driver's seat when the vehicle is stationary – risk of acci-
dent!■
Caution when adjusting the seat! You may suffer injuries or bruises as a
result of adjusting the seat without paying proper attention.
Manual adjustment
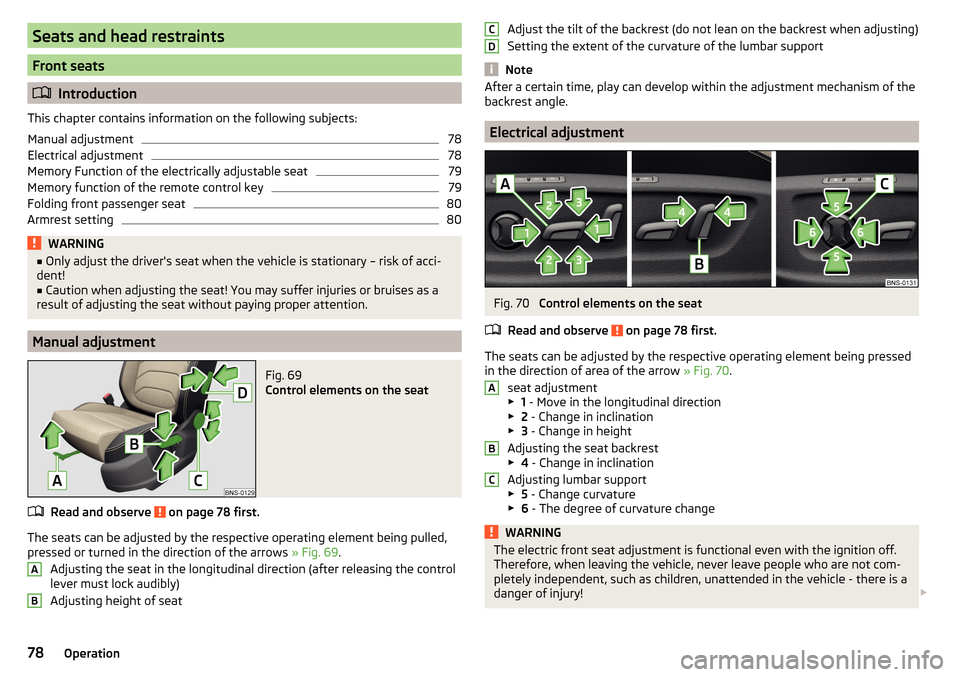
Fig. 69
Control elements on the seat
Read and observe on page 78 first.
The seats can be adjusted by the respective operating element being pulled,
pressed or turned in the direction of the arrows » Fig. 69.
Adjusting the seat in the longitudinal direction (after releasing the control
lever must lock audibly)
Adjusting height of seat
ABAdjust the tilt of the backrest (do not lean on the backrest when adjusting)
Setting the extent of the curvature of the lumbar support
Note
After a certain time, play can develop within the adjustment mechanism of the
backrest angle.
Electrical adjustment
Fig. 70
Control elements on the seat
Read and observe
on page 78 first.
The seats can be adjusted by the respective operating element being pressed in the direction of area of the arrow » Fig. 70.
seat adjustment
▶ 1 - Move in the longitudinal direction
▶ 2 - Change in inclination
▶ 3 - Change in height
Adjusting the seat backrest
▶ 4 - Change in inclination
Adjusting lumbar support
▶ 5 - Change curvature
▶ 6 - The degree of curvature change
WARNINGThe electric front seat adjustment is functional even with the ignition off.
Therefore, when leaving the vehicle, never leave people who are not com-
pletely independent, such as children, unattended in the vehicle - there is a
danger of injury! CDABC78Operation
Page 81 of 344
Note■If the inclination angle of the seat backrest relative to the seat surface is
greater than approx. 110°, then it is not possible for safety reasons to save this
setting in the memory of the electrically adjustable seats or the remote control
key.■
On vehicles with personalisation, the driver's seat setting is stored in the ac-
tive user account personalisation » page 50.
Memory Function of the electrically adjustable seat
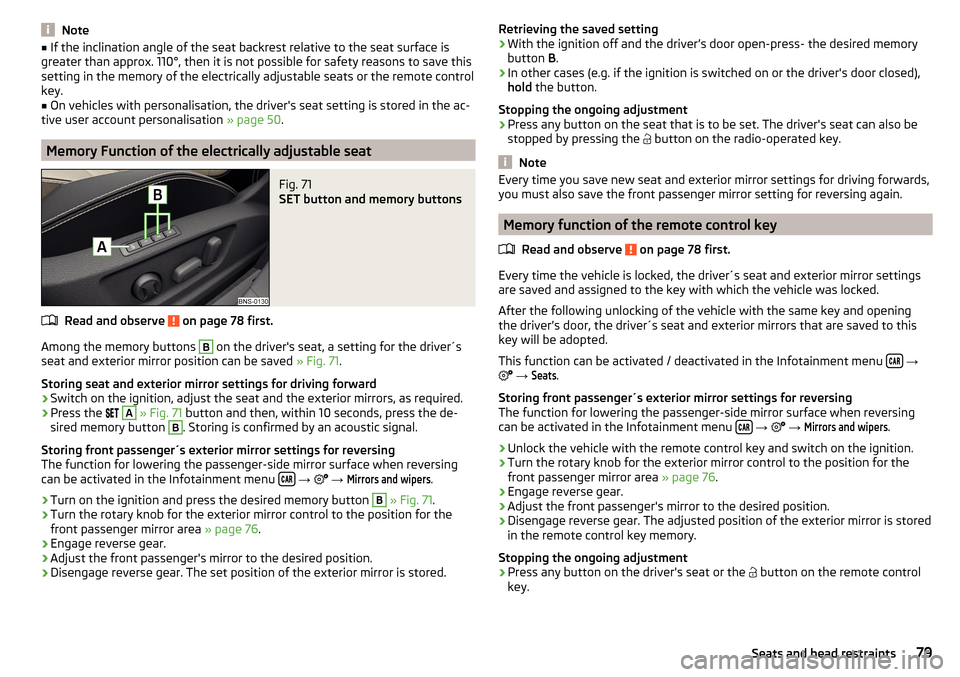
Fig. 71
SET button and memory buttons
Read and observe on page 78 first.
Among the memory buttons
B
on the driver's seat, a setting for the driver´s
seat and exterior mirror position can be saved » Fig. 71.
Storing seat and exterior mirror settings for driving forward
›
Switch on the ignition, adjust the seat and the exterior mirrors, as required.
›
Press the
A
» Fig. 71 button and then, within 10 seconds, press the de-
sired memory button
B
. Storing is confirmed by an acoustic signal.
Storing front passenger´s exterior mirror settings for reversing
The function for lowering the passenger-side mirror surface when reversing can be activated in the Infotainment menu
→
→
Mirrors and wipers
.
›
Turn on the ignition and press the desired memory button
B
» Fig. 71 .
›
Turn the rotary knob for the exterior mirror control to the position for the
front passenger mirror area » page 76.
›
Engage reverse gear.
›
Adjust the front passenger's mirror to the desired position.
›
Disengage reverse gear. The set position of the exterior mirror is stored.
Retrieving the saved setting›With the ignition off and the driver’s door open-press- the desired memory
button B.›
In other cases (e.g. if the ignition is switched on or the driver's door closed),
hold the button.
Stopping the ongoing adjustment
›
Press any button on the seat that is to be set. The driver's seat can also be
stopped by pressing the
button on the radio-operated key.
Note
Every time you save new seat and exterior mirror settings for driving forwards,
you must also save the front passenger mirror setting for reversing again.
Memory function of the remote control key
Read and observe
on page 78 first.
Every time the vehicle is locked, the driver´s seat and exterior mirror settingsare saved and assigned to the key with which the vehicle was locked.
After the following unlocking of the vehicle with the same key and opening
the driver’s door, the driver´s seat and exterior mirrors that are saved to this
key will be adopted.
This function can be activated / deactivated in the Infotainment menu
→
→
Seats
.
Storing front passenger´s exterior mirror settings for reversing
The function for lowering the passenger-side mirror surface when reversing
can be activated in the Infotainment menu
→
→
Mirrors and wipers
.
›
Unlock the vehicle with the remote control key and switch on the ignition.
›
Turn the rotary knob for the exterior mirror control to the position for the
front passenger mirror area » page 76.
›
Engage reverse gear.
›
Adjust the front passenger's mirror to the desired position.
›
Disengage reverse gear. The adjusted position of the exterior mirror is stored
in the remote control key memory.
Stopping the ongoing adjustment
›
Press any button on the driver's seat or the button on the remote control
key.
79Seats and head restraints
Page 82 of 344
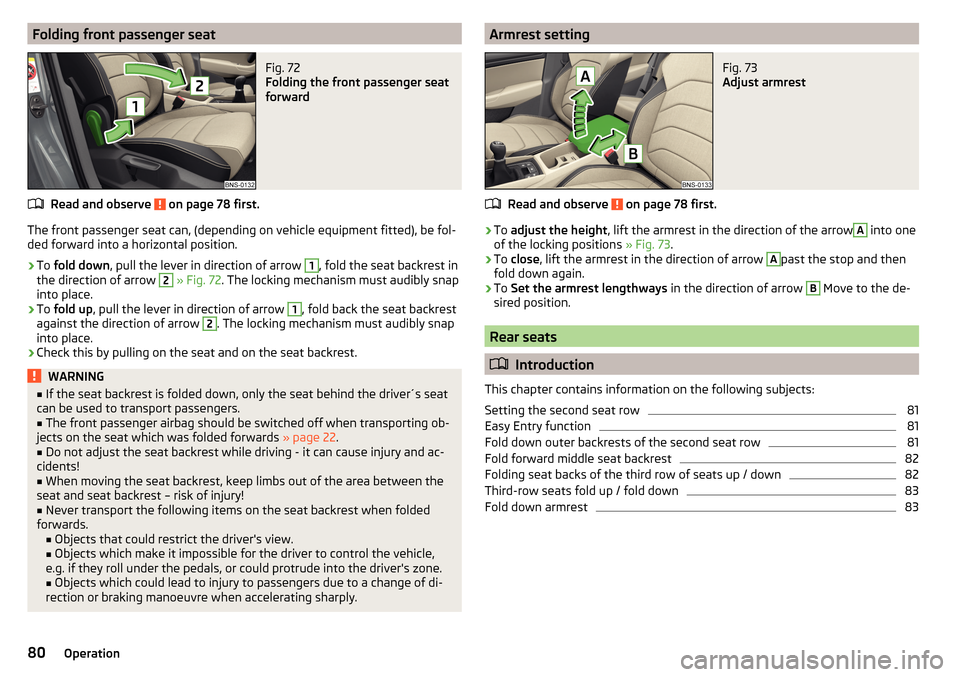
Folding front passenger seatFig. 72
Folding the front passenger seat
forward
Read and observe on page 78 first.
The front passenger seat can, (depending on vehicle equipment fitted), be fol- ded forward into a horizontal position.
›
To fold down , pull the lever in direction of arrow
1
, fold the seat backrest in
the direction of arrow
2
» Fig. 72 . The locking mechanism must audibly snap
into place.
›
To fold up , pull the lever in direction of arrow
1
, fold back the seat backrest
against the direction of arrow
2
. The locking mechanism must audibly snap
into place.
›
Check this by pulling on the seat and on the seat backrest.
WARNING■ If the seat backrest is folded down, only the seat behind the driver´s seat
can be used to transport passengers.■
The front passenger airbag should be switched off when transporting ob-
jects on the seat which was folded forwards » page 22.
■
Do not adjust the seat backrest while driving - it can cause injury and ac-
cidents!
■
When moving the seat backrest, keep limbs out of the area between the
seat and seat backrest – risk of injury!
■
Never transport the following items on the seat backrest when folded
forwards. ■ Objects that could restrict the driver's view.
■ Objects which make it impossible for the driver to control the vehicle,
e.g. if they roll under the pedals, or could protrude into the driver's zone. ■ Objects which could lead to injury to passengers due to a change of di-
rection or braking manoeuvre when accelerating sharply.
Armrest settingFig. 73
Adjust armrest
Read and observe on page 78 first.
›
To adjust the height , lift the armrest in the direction of the arrow
A
into one
of the locking positions » Fig. 73.
›
To close , lift the armrest in the direction of arrow
A
past the stop and then
fold down again.
›
To Set the armrest lengthways in the direction of arrow
B
Move to the de-
sired position.
Rear seats
Introduction
This chapter contains information on the following subjects:
Setting the second seat row
81
Easy Entry function
81
Fold down outer backrests of the second seat row
81
Fold forward middle seat backrest
82
Folding seat backs of the third row of seats up / down
82
Third-row seats fold up / fold down
83
Fold down armrest
8380Operation
Page 83 of 344

Setting the second seat rowFig. 74
Setting the second seat row
Fig. 75
Adjusting the seat backrest
Move in the longitudinal direction
›
Pull lever
A
in the direction of arrow
1
and move the seat to the desired po-
sition in the direction of arrow
2
» Fig. 74 . After releasing the control lever
the latch must engage audibly.
Adjusting the angle of the seat backrest
›
Pull on the eyelet in the direction of arrow
1
» Fig. 75 and press the seat
backrest in direction of arrow
2
. The locking mechanism must audibly snap
into place.
›
To adjust the seat backrest to upright position, pull on the eyelet in the di-
rection of arrow
1
and hold the arm in the forward movement until the lock
clicks.
Easy Entry functionFig. 76
Easy Entry function
The Easy Entry function provides the access to the third seat row of the seat-
seat version
Fold and slide the seat forward
›
Pull the unlock handle in the direction of arrow
1
» Fig. 76 .
›
Fold the seat forwards and slide the seat in the direction of arrow
2
.
An reach the third seat row easier, the seat belt to the strap can be fastened
to the tab
A
on the interior trim of the rear body pillar.
Fold back seat
›
Adjust the seat longitudinally and fold back the backrest.
›
Check this by pulling on the seat and on the seat backrest.
Fold down outer backrests of the second seat row
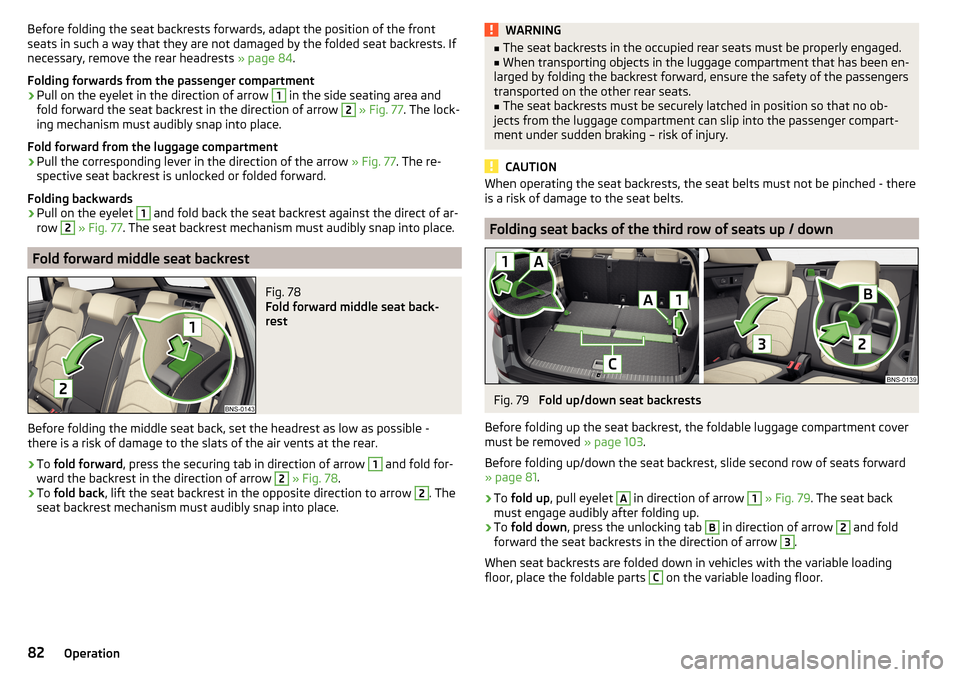
Fig. 77
Fold forward from the passenger compartment / from the luggage
compartment
81Seats and head restraints
Page 84 of 344
Before folding the seat backrests forwards, adapt the position of the front
seats in such a way that they are not damaged by the folded seat backrests. If
necessary, remove the rear headrests » page 84.
Folding forwards from the passenger compartment›
Pull on the eyelet in the direction of arrow
1
in the side seating area and
fold forward the seat backrest in the direction of arrow
2
» Fig. 77 . The lock-
ing mechanism must audibly snap into place.
Fold forward from the luggage compartment
›
Pull the corresponding lever in the direction of the arrow » Fig. 77. The re-
spective seat backrest is unlocked or folded forward.
Folding backwards
›
Pull on the eyelet
1
and fold back the seat backrest against the direct of ar-
row
2
» Fig. 77 . The seat backrest mechanism must audibly snap into place.
Fold forward middle seat backrest
Fig. 78
Fold forward middle seat back-
rest
Before folding the middle seat back, set the headrest as low as possible -
there is a risk of damage to the slats of the air vents at the rear.
›
To fold forward , press the securing tab in direction of arrow
1
and fold for-
ward the backrest in the direction of arrow
2
» Fig. 78 .
›
To fold back , lift the seat backrest in the opposite direction to arrow
2
. The
seat backrest mechanism must audibly snap into place.
WARNING■ The seat backrests in the occupied rear seats must be properly engaged.■When transporting objects in the luggage compartment that has been en-
larged by folding the backrest forward, ensure the safety of the passengers
transported on the other rear seats.■
The seat backrests must be securely latched in position so that no ob-
jects from the luggage compartment can slip into the passenger compart-
ment under sudden braking – risk of injury.
CAUTION
When operating the seat backrests, the seat belts must not be pinched - there
is a risk of damage to the seat belts.
Folding seat backs of the third row of seats up / down
Fig. 79
Fold up/down seat backrests
Before folding up the seat backrest, the foldable luggage compartment cover
must be removed » page 103.
Before folding up/down the seat backrest, slide second row of seats forward
» page 81 .
›
To fold up , pull eyelet
A
in direction of arrow
1
» Fig. 79 . The seat back
must engage audibly after folding up.
›
To fold down , press the unlocking tab
B
in direction of arrow
2
and fold
forward the seat backrests in the direction of arrow
3
.
When seat backrests are folded down in vehicles with the variable loading
floor, place the foldable parts
C
on the variable loading floor.
82Operation
Page 85 of 344
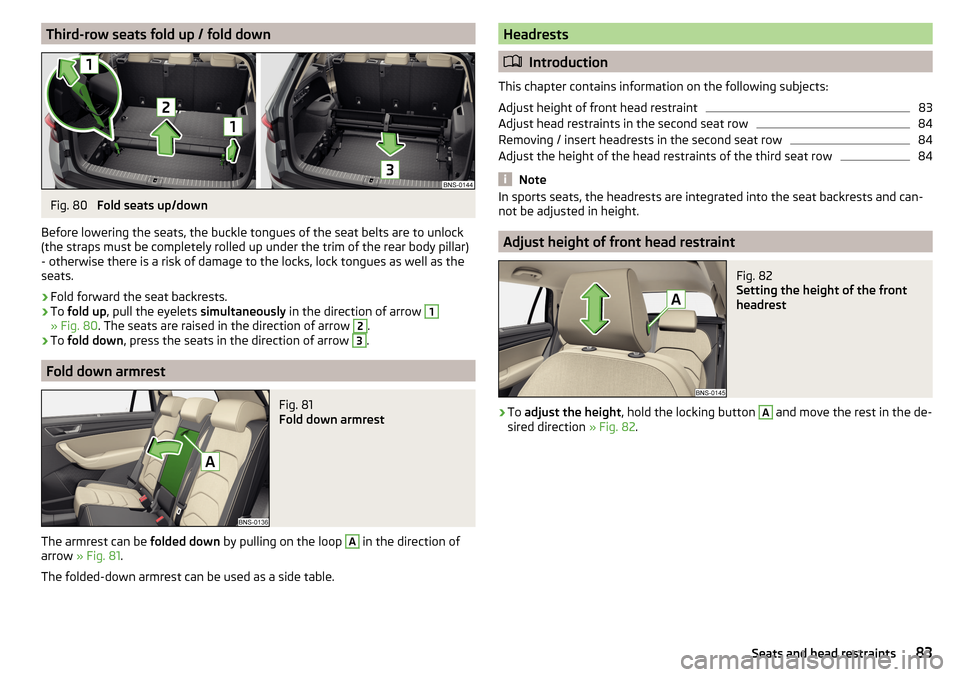
Third-row seats fold up / fold downFig. 80
Fold seats up/down
Before lowering the seats, the buckle tongues of the seat belts are to unlock
(the straps must be completely rolled up under the trim of the rear body pillar)
- otherwise there is a risk of damage to the locks, lock tongues as well as the
seats.
›
Fold forward the seat backrests.
›
To fold up , pull the eyelets simultaneously in the direction of arrow
1
» Fig. 80. The seats are raised in the direction of arrow
2
.
›
To fold down , press the seats in the direction of arrow
3
.
Fold down armrest
Fig. 81
Fold down armrest
The armrest can be folded down by pulling on the loop
A
in the direction of
arrow » Fig. 81 .
The folded-down armrest can be used as a side table.
Headrests
Introduction
This chapter contains information on the following subjects:
Adjust height of front head restraint
83
Adjust head restraints in the second seat row
84
Removing / insert headrests in the second seat row
84
Adjust the height of the head restraints of the third seat row
84
Note
In sports seats, the headrests are integrated into the seat backrests and can-
not be adjusted in height.
Adjust height of front head restraint
Fig. 82
Setting the height of the front
headrest
›
To adjust the height , hold the locking button
A
and move the rest in the de-
sired direction » Fig. 82.
83Seats and head restraints
Page 86 of 344
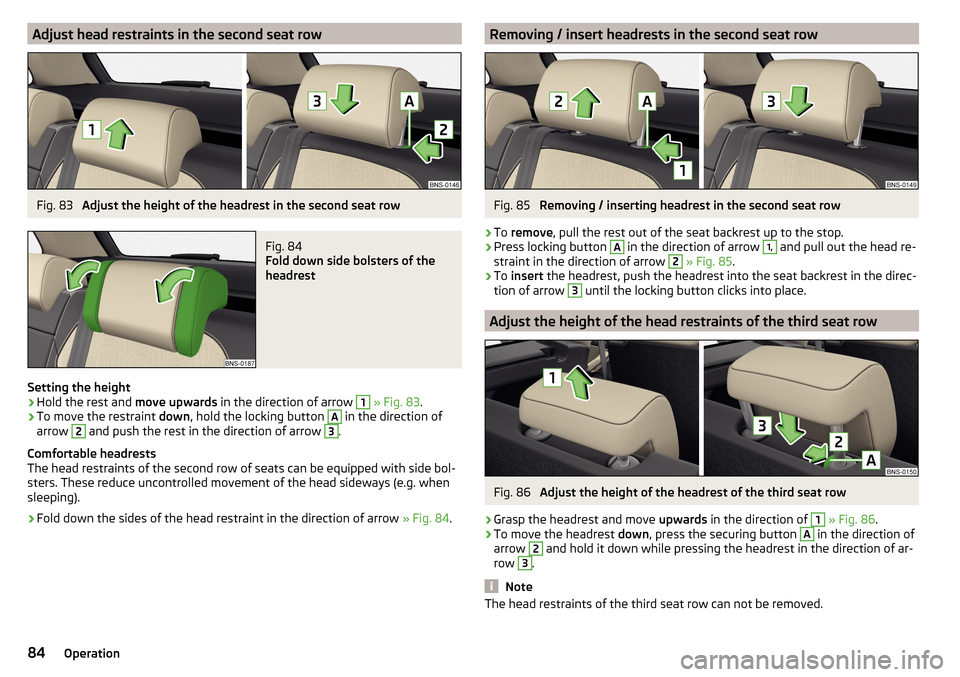
Adjust head restraints in the second seat rowFig. 83
Adjust the height of the headrest in the second seat row
Fig. 84
Fold down side bolsters of the
headrest
Setting the height
›
Hold the rest and move upwards in the direction of arrow
1
» Fig. 83 .
›
To move the restraint down, hold the locking button
A
in the direction of
arrow
2
and push the rest in the direction of arrow
3
.
Comfortable headrests
The head restraints of the second row of seats can be equipped with side bol-
sters. These reduce uncontrolled movement of the head sideways (e.g. when
sleeping).
›
Fold down the sides of the head restraint in the direction of arrow » Fig. 84.
Removing / insert headrests in the second seat rowFig. 85
Removing / inserting headrest in the second seat row
›
To remove , pull the rest out of the seat backrest up to the stop.
›
Press locking button
A
in the direction of arrow
1,
and pull out the head re-
straint in the direction of arrow
2
» Fig. 85 .
›
To insert the headrest, push the headrest into the seat backrest in the direc-
tion of arrow
3
until the locking button clicks into place.
Adjust the height of the head restraints of the third seat row
Fig. 86
Adjust the height of the headrest of the third seat row
›
Grasp the headrest and move upwards in the direction of
1
» Fig. 86 .
›
To move the headrest down, press the securing button
A
in the direction of
arrow
2
and hold it down while pressing the headrest in the direction of ar-
row
3
.
Note
The head restraints of the third seat row can not be removed.84Operation
Page 87 of 344
Seat heating and ventilation
Introduction
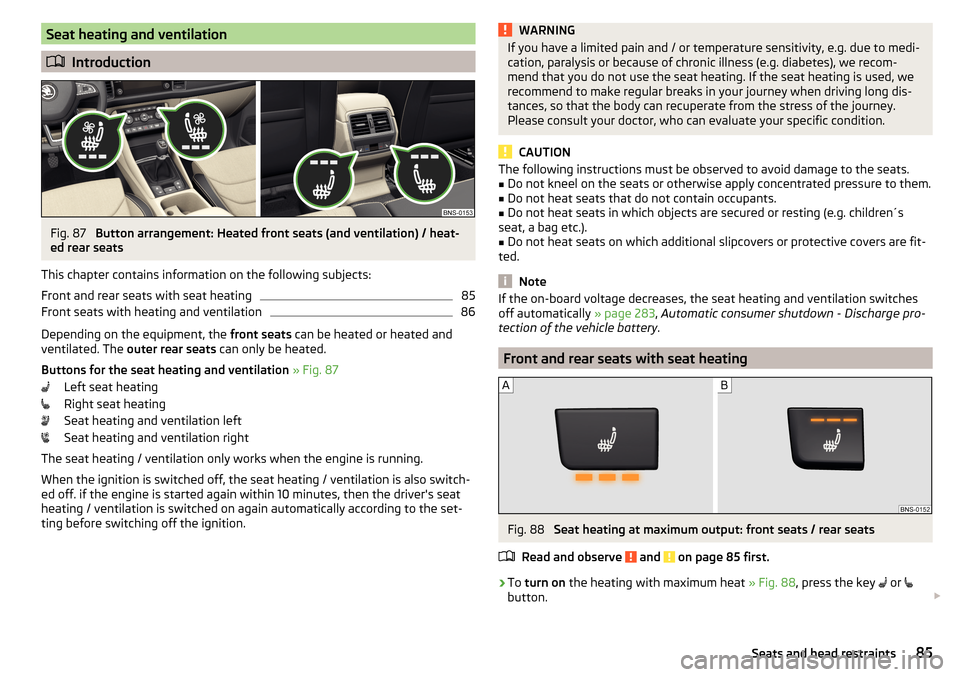
Fig. 87
Button arrangement: Heated front seats (and ventilation) / heat-
ed rear seats
This chapter contains information on the following subjects:
Front and rear seats with seat heating
85
Front seats with heating and ventilation
86
Depending on the equipment, the front seats can be heated or heated and
ventilated. The outer rear seats can only be heated.
Buttons for the seat heating and ventilation » Fig. 87
Left seat heating
Right seat heating
Seat heating and ventilation left
Seat heating and ventilation right
The seat heating / ventilation only works when the engine is running. When the ignition is switched off, the seat heating / ventilation is also switch-ed off. if the engine is started again within 10 minutes, then the driver's seat
heating / ventilation is switched on again automatically according to the set-
ting before switching off the ignition.
WARNINGIf you have a limited pain and / or temperature sensitivity, e.g. due to medi-
cation, paralysis or because of chronic illness (e.g. diabetes), we recom-
mend that you do not use the seat heating. If the seat heating is used, we
recommend to make regular breaks in your journey when driving long dis-
tances, so that the body can recuperate from the stress of the journey.
Please consult your doctor, who can evaluate your specific condition.
CAUTION
The following instructions must be observed to avoid damage to the seats.■Do not kneel on the seats or otherwise apply concentrated pressure to them.■
Do not heat seats that do not contain occupants.
■
Do not heat seats in which objects are secured or resting (e.g. children´s
seat, a bag etc.).
■
Do not heat seats on which additional slipcovers or protective covers are fit-
ted.
Note
If the on-board voltage decreases, the seat heating and ventilation switches
off automatically » page 283, Automatic consumer shutdown - Discharge pro-
tection of the vehicle battery .
Front and rear seats with seat heating
Fig. 88
Seat heating at maximum output: front seats / rear seats
Read and observe
and on page 85 first.
›
To turn on the heating with maximum heat » Fig. 88, press the key
or
button.
85Seats and head restraints