fog light SKODA KODIAQ 2016 1.G Owner's Manual
[x] Cancel search | Manufacturer: SKODA, Model Year: 2016, Model line: KODIAQ, Model: SKODA KODIAQ 2016 1.GPages: 344, PDF Size: 58.96 MB
Page 35 of 344
High temperature range - The pointer is in the range C. The coolant tempera-
ture is too high. The warning light illuminates in the instrument clus-
ter » page 39 .
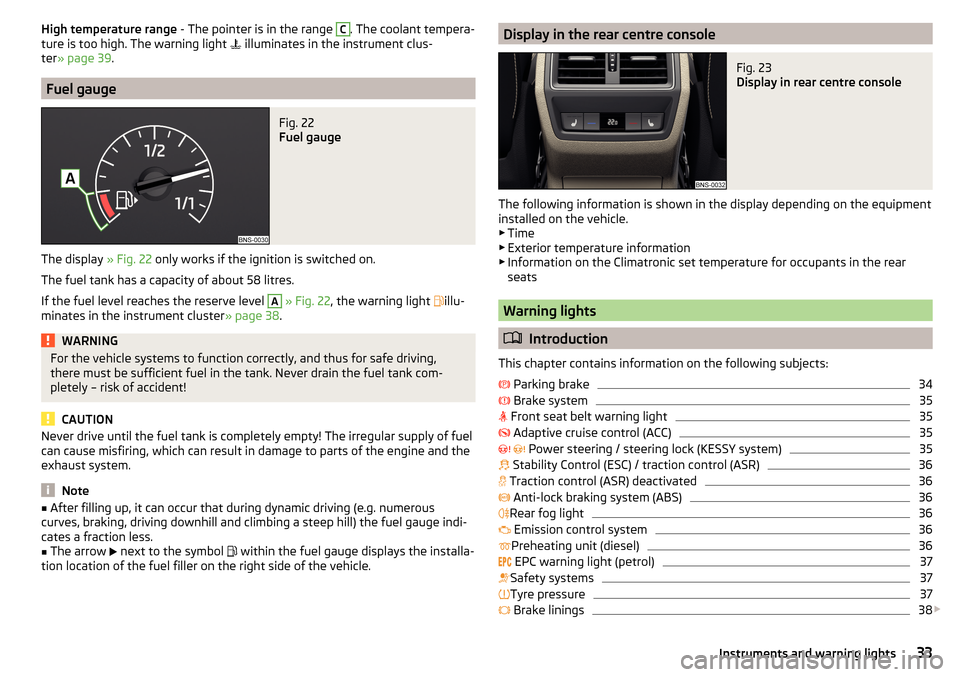
Fuel gauge
Fig. 22
Fuel gauge
The display » Fig. 22 only works if the ignition is switched on.
The fuel tank has a capacity of about 58 litres.
If the fuel level reaches the reserve level
A
» Fig. 22 , the warning light
illu-
minates in the instrument cluster » page 38.
WARNINGFor the vehicle systems to function correctly, and thus for safe driving,
there must be sufficient fuel in the tank. Never drain the fuel tank com-
pletely – risk of accident!
CAUTION
Never drive until the fuel tank is completely empty! The irregular supply of fuel
can cause misfiring, which can result in damage to parts of the engine and the
exhaust system.
Note
■ After filling up, it can occur that during dynamic driving (e.g. numerous
curves, braking, driving downhill and climbing a steep hill) the fuel gauge indi-
cates a fraction less.■
The arrow
next to the symbol
within the fuel gauge displays the installa-
tion location of the fuel filler on the right side of the vehicle.
Display in the rear centre consoleFig. 23
Display in rear centre console
The following information is shown in the display depending on the equipment
installed on the vehicle.
▶ Time
▶ Exterior temperature information
▶ Information on the Climatronic set temperature for occupants in the rear
seats
Warning lights
Introduction
This chapter contains information on the following subjects:
Parking brake
34
Brake system
35
Front seat belt warning light
35
Adaptive cruise control (ACC)
35
Power steering / steering lock (KESSY system)
35
Stability Control (ESC) / traction control (ASR)
36
Traction control (ASR) deactivated
36
Anti-lock braking system (ABS)
36
Rear fog light
36
Emission control system
36
Preheating unit (diesel)
36
EPC warning light (petrol)
37
Safety systems
37
Tyre pressure
37
Brake linings
38
33Instruments and warning lights
Page 36 of 344
Fuel reserve38 Lane Departure Warning (Lane Assist)38
Turn signal system
38
Trailer turn signal lights
38
Fog lights
38
Speed regulating system / speed limiter
38
Brake pedal (automatic gearbox)
38
Auto Hold function
39
Main beam
39
Automatic gearbox
39
Rear seat belt warning light
39
Generator
39
Coolant
39
Engine oil pressure
40
Engine oil level
40
AdBlue ®
(diesel engine)
40
Lamp failure
41
Diesel particle filter (diesel)
41
Windscreen washer fluid level
41
High-beam assistant
41
START-STOPsystem
41
Display of a low temperature
42
Water in the fuel filter (diesel engine)
42
Adaptive Cruise Control (ACC)
42
Front Assist
42
Front assist
42
Economy mode
42
OFF ROAD mode
42
Adaptive Chassis Control (DCC)
42
Service
43
The warning lights in the instrument cluster indicate certain functions or
faults.
Some warning lights can be accompanied by acoustic signals and messages in
the display of the instrument cluster.
After switching on the ignition, some warning lights light up briefly as a func-
tion test. If the tested systems are OK, the corresponding warning lights go
out a few seconds after switching on the ignition or after starting the engine.
The warning lights are located at the following positions in the instrument
cluster » Fig. 20 on page 32 .
▶ Engine revolutions counter 1
▶Display
2
▶Speedometer
3
▶Bar with warning lights
5
Warning lights in the display
Depending on the importance the warning light
(danger) or
(warning) illu-
minate along with some of the warning lights in the list with the warning
lights.
Depending on vehicle equipment some warning lights can be displayed in col-
our on the display. For example. the coolant warning lamp may be represented
as follows.
▶ - Segment display / monochromatic (“black and white”) MAXI DOT display
▶ - Coloured MAXI DOT display
WARNING■
Ignoring illuminated warning lights and related messages or instructions
in the display of the instrument cluster may lead to serious personal injury
or damage to the vehicle.■
If you have to stop for technical reasons, then park the vehicle at a safe
distance from the traffic, switch off the engine and switch on the hazard
warning lights » page 70. Place the warning triangle at the prescribed dis-
tance.
■
The engine compartment of your car is a hazardous area. While working in
the engine compartment, be sure to observe the following warnings
» page 278 .
Parking brake
Read and observe
on page 34 first.
illuminates - the parking brake is switched on.
Parking brake error
Illumi-
nates
Error: electronic parking brakePARKING BRAKE FAILURE
▶ Seek help from a specialist garage.
34Operation
Page 38 of 344
▶You can drive on, exercising appropriate caution. Seek assistance from a spe-
cialist garage immediately.
Stability Control (ESC) / traction control (ASR)
Read and observe
on page 34 first.
flashes – the ESC or TCS is currently active.
lights up – there is an ESC or TCS fault.
▶ You can drive on, exercising appropriate caution. Seek assistance from a spe-
cialist garage immediately.
If the warning light comes on after starting the engine, the TCS may be
switched off for technical reasons. ▶ Switch the ignition off and on again.
If the warning light does not illuminate after you switch the engine back on,
the TCS is fully functional again.
Disconnecting the vehicle battery
If the vehicle's battery has been disconnected and reconnected, the indicator
light comes on after switching on the ignition.
The warning light should go out after driving a short distance.
If, after a short drive, the indicator light does not go out, there is a system er- ror.
▶ You can drive on, exercising appropriate caution. Seek assistance from a spe-
cialist garage immediately.
For more information on the ESC system » page 216 or TCS system
» page 217 .
Traction control (ASR) deactivated
Read and observe
on page 34 first.
illuminates – the TCS system is disabled.
Anti-lock braking system (ABS)
Read and observe
on page 34 first.
lights up – there is an ABS fault.
The vehicle will only be braked by the normal brake system without the ABS.
▶ You can drive on, exercising appropriate caution. Seek assistance from a spe-
cialist garage immediately.WARNING■ If the warning light lights up at the same time as warning light
» page 35 , Brake system , do not continue your journey! Seek help
from a specialist garage.■
A fault to the ABS system or the braking system can increase the vehi-
cle's braking distance – risk of accident!
Rear fog light
Read and observe
on page 34 first.
lights up – the rear fog light is switched on.
Emission control system
Read and observe
on page 34 first.
lights up – there is a fault in the emission control system. The system
makes it possible to drive on in emergency mode - there may be a noticeable
reduction in engine performance.
▶ You can drive on, exercising appropriate caution. Seek assistance from a spe-
cialist garage immediately.
Preheating unit (diesel)
Read and observe
on page 34 first.
flashes – there is a fault in the engine management system. The system
makes possible operation emergency mode - there may be a noticeable reduc-
tion in engine performance.
There is a fault in the glow plug system if the warning light does not come
on or illuminates continuously.
▶ You can drive on, exercising appropriate caution. Seek assistance from a spe-
cialist garage immediately.
36Operation
Page 40 of 344
Other incidents
The illumination of the warning light can have the following reasons.
▶ The vehicle is loaded on one side. Distribute the load evenly.
▶ The wheels of one axle are loaded more heavily (e.g. when towing a trailer or
when driving uphill or downhill).
▶ Snow chains are mounted.
▶ A wheel has been changed.
CAUTION
Under certain circumstances (e.g. sporty style of driving, wintry or unpaved
roads) the warning light can be delayed or does not light up at all.
Brake linings
Read and observe
on page 34 first.
illuminates - the brake pads are worn.
▶ You can drive on, exercising appropriate caution. Seek assistance from a spe-
cialist garage immediately.
Fuel reserve
Read and observe
on page 34 first.
illuminates – the fuel level in the fuel tank is at the reserve level (approxi-
mately 6 litres).
An audible signal sounds as a warning. ▶ Please refuel » page 275.
Note
The text in the display goes out after refuelling and driving a short distance.
Lane Departure Warning (Lane Assist)
Read and observe
on page 34 first.
The warning lights
indicates the state of the Lane Assist system.
More information about the Lane Assist System » page 254.
Turn signal system
Read and observe
on page 34 first.
flashes – the left turn signal is turned on.
flashes – the right turn signal is turned on.
If there is a fault in the turn signal system, the warning light flashes at twice
its normal rate (does not apply when towing).
When the hazard warning light system is switched on, this will cause all of the turn signal lights as well as both warning lights to flash.
Trailer turn signal lights
Read and observe
on page 34 first.
flashes – the trailer turn signal lights are switched on.
If a trailer is hitched and the warning light is not flashing, one of the trailer
turn signal lights has failed.
▶ Check the trailer bulbs.
Fog lights
Read and observe
on page 34 first.
illuminates – the fog lights are switched on.
Speed regulating system / speed limiter
Read and observe
on page 34 first.
illuminates - the vehicle speed is limited by the speed regulating system or
the adaptive cruise control or by the speed limiter.
flashes – the speed set with the speed limiter has been exceeded.
Brake pedal (automatic gearbox)
Read and observe
on page 34 first.
lights up – apply the brake.
38Operation
Page 67 of 344
The sliding/tilting roof opens/closes again after around 10 seconds.›
Release the lever.
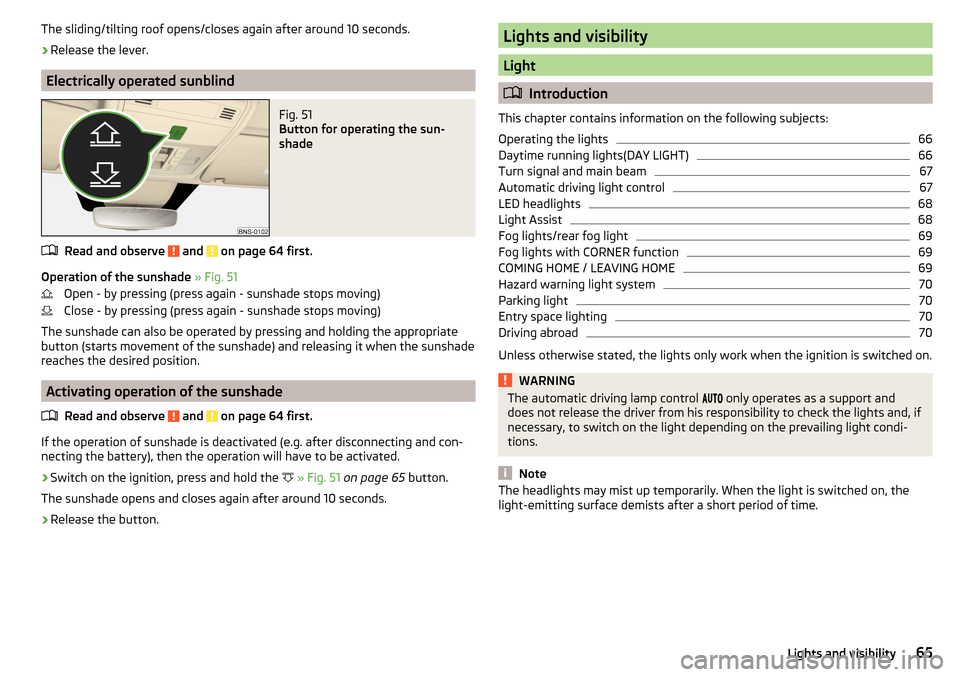
Electrically operated sunblind
Fig. 51
Button for operating the sun-
shade
Read and observe and on page 64 first.
Operation of the sunshade » Fig. 51
Open - by pressing (press again - sunshade stops moving)
Close - by pressing (press again - sunshade stops moving)
The sunshade can also be operated by pressing and holding the appropriate
button (starts movement of the sunshade) and releasing it when the sunshade
reaches the desired position.
Activating operation of the sunshade
Read and observe
and on page 64 first.
If the operation of sunshade is deactivated (e.g. after disconnecting and con-
necting the battery), then the operation will have to be activated.
›
Switch on the ignition, press and hold the
» Fig. 51 on page 65 button.
The sunshade opens and closes again after around 10 seconds.
›
Release the button.
Lights and visibility
Light
Introduction
This chapter contains information on the following subjects:
Operating the lights
66
Daytime running lights(DAY LIGHT)
66
Turn signal and main beam
67
Automatic driving light control
67
LED headlights
68
Light Assist
68
Fog lights/rear fog light
69
Fog lights with CORNER function
69
COMING HOME / LEAVING HOME
69
Hazard warning light system
70
Parking light
70
Entry space lighting
70
Driving abroad
70
Unless otherwise stated, the lights only work when the ignition is switched on.
WARNINGThe automatic driving lamp control only operates as a support and
does not release the driver from his responsibility to check the lights and, if
necessary, to switch on the light depending on the prevailing light condi-
tions.
Note
The headlights may mist up temporarily. When the light is switched on, the
light-emitting surface demists after a short period of time.65Lights and visibility
Page 71 of 344
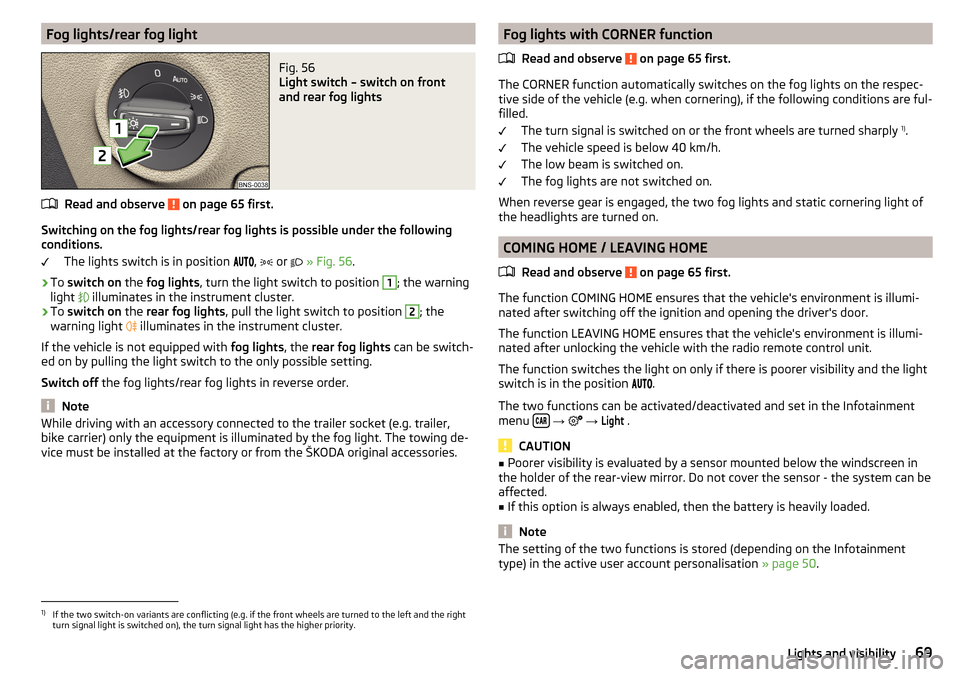
Fog lights/rear fog lightFig. 56
Light switch – switch on front
and rear fog lights
Read and observe on page 65 first.
Switching on the fog lights/rear fog lights is possible under the following
conditions.
The lights switch is in position ,
or
» Fig. 56 .
›
To switch on the fog lights , turn the light switch to position
1
; the warning
light illuminates in the instrument cluster.
›
To
switch on the rear fog lights , pull the light switch to position
2
; the
warning light illuminates in the instrument cluster.
If the vehicle is not equipped with fog lights, the rear fog lights can be switch-
ed on by pulling the light switch to the only possible setting.
Switch off the fog lights/rear fog lights in reverse order.
Note
While driving with an accessory connected to the trailer socket (e.g. trailer,
bike carrier) only the equipment is illuminated by the fog light. The towing de-
vice must be installed at the factory or from the ŠKODA original accessories.Fog lights with CORNER function
Read and observe
on page 65 first.
The CORNER function automatically switches on the fog lights on the respec-tive side of the vehicle (e.g. when cornering), if the following conditions are ful-
filled.
The turn signal is switched on or the front wheels are turned sharply 1)
.
The vehicle speed is below 40 km/h.
The low beam is switched on.
The fog lights are not switched on.
When reverse gear is engaged, the two fog lights and static cornering light of
the headlights are turned on.
COMING HOME / LEAVING HOME
Read and observe
on page 65 first.
The function COMING HOME ensures that the vehicle's environment is illumi-
nated after switching off the ignition and opening the driver's door.
The function LEAVING HOME ensures that the vehicle's environment is illumi-
nated after unlocking the vehicle with the radio remote control unit.
The function switches the light on only if there is poorer visibility and the light
switch is in the position .
The two functions can be activated/deactivated and set in the Infotainment
menu
→
→
Light
.
CAUTION
■
Poorer visibility is evaluated by a sensor mounted below the windscreen in
the holder of the rear-view mirror. Do not cover the sensor - the system can be
affected.■
If this option is always enabled, then the battery is heavily loaded.
Note
The setting of the two functions is stored (depending on the Infotainment
type) in the active user account personalisation » page 50.1)
If the two switch-on variants are conflicting (e.g. if the front wheels are turned to the left and the right
turn signal light is switched on), the turn signal light has the higher priority.
69Lights and visibility
Page 75 of 344
Buttons for the heating (depending on vehicle equipment) » Fig. 62
Switch on/off the rear window heater
Switching the windscreen heater on/off
When the heating is switched on, a light illuminates inside or below the but-
ton.
The heating automatically switches off after ten minutes.
If the engine is switched off when the heating is on and turned back on again
within 10 minutes, the heating is continued.
Note
■ If the on-board voltage decreases, the heating switches off automatically
» page 283 , Automatic consumer shutdown - Discharge protection of the vehi-
cle battery .■
If the lighting inside or below the button flashes, the heater will not work be-
cause of the low charge of the battery.
■
If the Climatronic recognises that the windshield could fog up, the windshield
heating is automatically switched on. This function can be activated / deactiva-
ted on the Climatronic control panel menu
→
.
Front sun visor
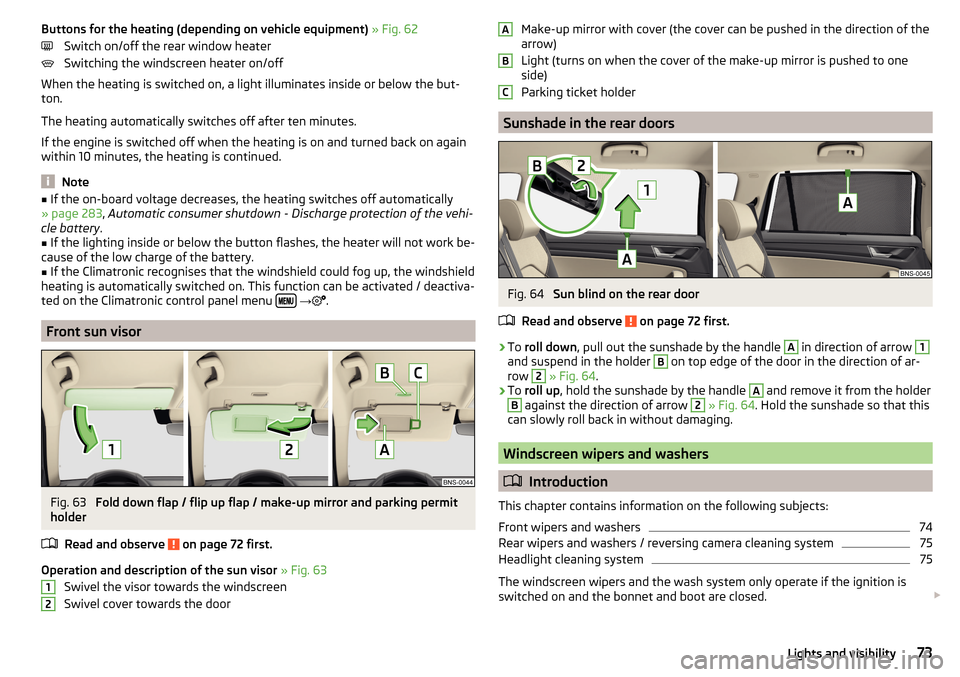
Fig. 63
Fold down flap / flip up flap / make-up mirror and parking permit
holder
Read and observe
on page 72 first.
Operation and description of the sun visor » Fig. 63
Swivel the visor towards the windscreen
Swivel cover towards the door
12Make-up mirror with cover (the cover can be pushed in the direction of the
arrow)
Light (turns on when the cover of the make-up mirror is pushed to one
side)
Parking ticket holder
Sunshade in the rear doors
Fig. 64
Sun blind on the rear door
Read and observe
on page 72 first.
›
To roll down , pull out the sunshade by the handle
A
in direction of arrow
1
and suspend in the holder
B
on top edge of the door in the direction of ar-
row
2
» Fig. 64 .
›
To roll up , hold the sunshade by the handle
A
and remove it from the holder
B
against the direction of arrow
2
» Fig. 64 . Hold the sunshade so that this
can slowly roll back in without damaging.
Windscreen wipers and washers
Introduction
This chapter contains information on the following subjects:
Front wipers and washers
74
Rear wipers and washers / reversing camera cleaning system
75
Headlight cleaning system
75
The windscreen wipers and the wash system only operate if the ignition is
switched on and the bonnet and boot are closed.
ABC73Lights and visibility
Page 217 of 344
Assist systems
General information
Introduction
This chapter contains information on the following subjects:
Radar sensor
215WARNING■ The assistance systems only serve to support the driver and do not re-
lieve the driver of the responsibility for driving the vehicle.■
The increased safety provision, as well as the increased occupant protec-
tion provided by the assistance systems must not tempt you to take risks -
risk of accident!
■
Adjust the speed and driving style to the current visibility, weather, road
and traffic conditions.
■
The assistance systems have physical and system-related limitations. For
this reason, the driver may experience some undesired or delayed system
responses in certain situations. You should therefore always be alert and
ready to intervene!
■
Only enable, disable or set the assistance systems when you have the car
fully under control, in every traffic situation - risk of accident!
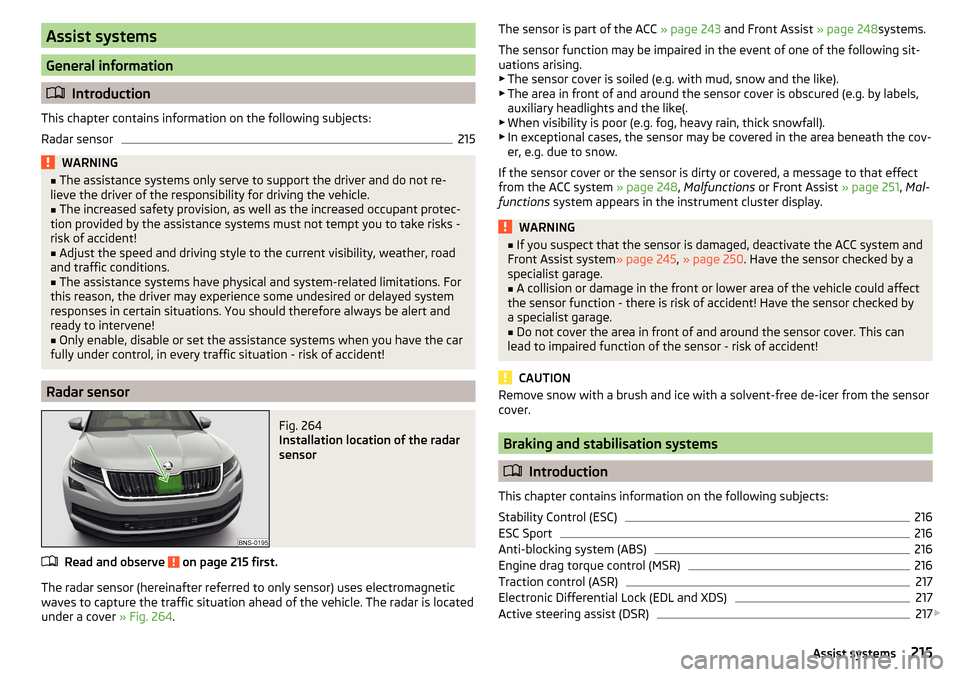
Radar sensor
Fig. 264
Installation location of the radar
sensor
Read and observe on page 215 first.
The radar sensor (hereinafter referred to only sensor) uses electromagnetic
waves to capture the traffic situation ahead of the vehicle. The radar is located
under a cover » Fig. 264.
The sensor is part of the ACC » page 243 and Front Assist » page 248systems.
The sensor function may be impaired in the event of one of the following sit-
uations arising. ▶ The sensor cover is soiled (e.g. with mud, snow and the like).
▶ The area in front of and around the sensor cover is obscured (e.g. by labels,
auxiliary headlights and the like(.
▶ When visibility is poor (e.g. fog, heavy rain, thick snowfall).
▶ In exceptional cases, the sensor may be covered in the area beneath the cov-
er, e.g. due to snow.
If the sensor cover or the sensor is dirty or covered, a message to that effect
from the ACC system » page 248, Malfunctions or Front Assist » page 251, Mal-
functions system appears in the instrument cluster display.WARNING■
If you suspect that the sensor is damaged, deactivate the ACC system and
Front Assist system » page 245, » page 250 . Have the sensor checked by a
specialist garage.■
A collision or damage in the front or lower area of the vehicle could affect
the sensor function - there is risk of accident! Have the sensor checked by
a specialist garage.
■
Do not cover the area in front of and around the sensor cover. This can
lead to impaired function of the sensor - risk of accident!
CAUTION
Remove snow with a brush and ice with a solvent-free de-icer from the sensor
cover.
Braking and stabilisation systems
Introduction
This chapter contains information on the following subjects:
Stability Control (ESC)
216
ESC Sport
216
Anti-blocking system (ABS)
216
Engine drag torque control (MSR)
216
Traction control (ASR)
217
Electronic Differential Lock (EDL and XDS)
217
Active steering assist (DSR)
217
215Assist systems
Page 245 of 344
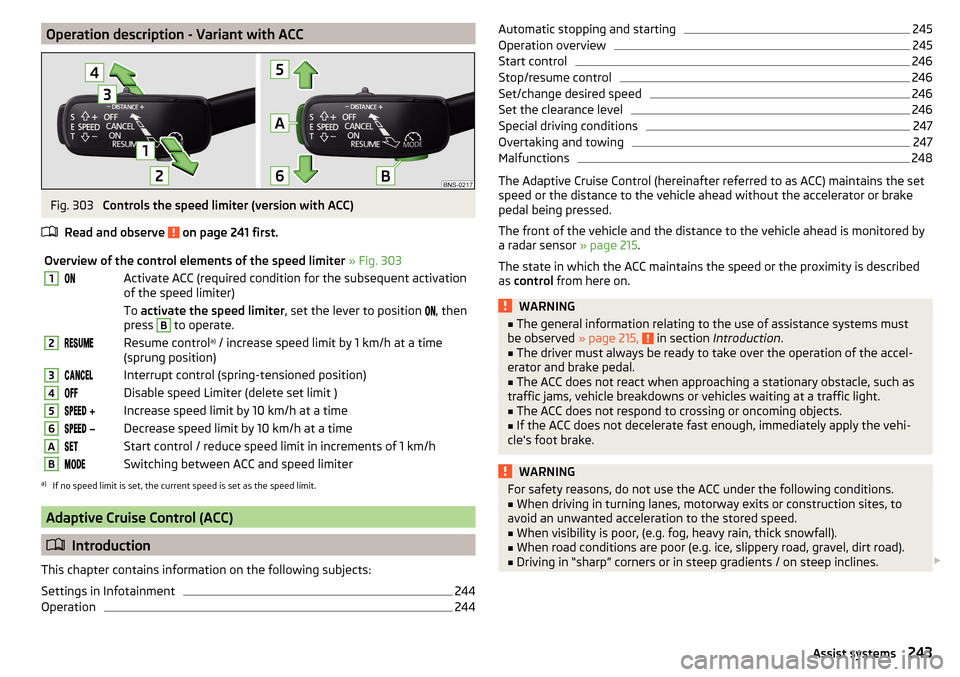
Operation description - Variant with ACCFig. 303
Controls the speed limiter (version with ACC)
Read and observe
on page 241 first.
Overview of the control elements of the speed limiter » Fig. 3031Activate ACC (required condition for the subsequent activation
of the speed limiter) To activate the speed limiter , set the lever to position , then
press B
to operate.
2Resume control a)
/ increase speed limit by 1 km/h at a time
(sprung position)3Interrupt control (spring-tensioned position)4Disable speed Limiter (delete set limit )5 Increase speed limit by 10 km/h at a time6 Decrease speed limit by 10 km/h at a timeAStart control / reduce speed limit in increments of 1 km/hBSwitching between ACC and speed limitera)
If no speed limit is set, the current speed is set as the speed limit.
Adaptive Cruise Control (ACC)
Introduction
This chapter contains information on the following subjects:
Settings in Infotainment
244
Operation
244Automatic stopping and starting245Operation overview245
Start control
246
Stop/resume control
246
Set/change desired speed
246
Set the clearance level
246
Special driving conditions
247
Overtaking and towing
247
Malfunctions
248
The Adaptive Cruise Control (hereinafter referred to as ACC) maintains the set
speed or the distance to the vehicle ahead without the accelerator or brake
pedal being pressed.
The front of the vehicle and the distance to the vehicle ahead is monitored by
a radar sensor » page 215.
The state in which the ACC maintains the speed or the proximity is described
as control from here on.
WARNING■
The general information relating to the use of assistance systems must
be observed » page 215, in section Introduction .■
The driver must always be ready to take over the operation of the accel-
erator and brake pedal.
■
The ACC does not react when approaching a stationary obstacle, such as
traffic jams, vehicle breakdowns or vehicles waiting at a traffic light.
■
The ACC does not respond to crossing or oncoming objects.
■
If the ACC does not decelerate fast enough, immediately apply the vehi-
cle's foot brake.
WARNINGFor safety reasons, do not use the ACC under the following conditions.■When driving in turning lanes, motorway exits or construction sites, to
avoid an unwanted acceleration to the stored speed.■
When visibility is poor, (e.g. fog, heavy rain, thick snowfall).
■
When road conditions are poor (e.g. ice, slippery road, gravel, dirt road).
■
Driving in “sharp” corners or in steep gradients / on steep inclines.
243Assist systems
Page 256 of 344
The first protection level can be deactivated in one of the following ways.
▶ in the menu Infotainment
→ →
Driver assistance
.
▶ Deactivating the TCS » page 217.
▶ By selecting the driving mode
Sport
» page 252 .
Provided that the driving mode
Sport
is not selected, the system is activated
over the two levels of protection after switching the ignition off and on again.
The second level of protection
The system intervenes only if the situation is evaluated as critical, such as
when panic braking at high speeds.
This level of protection cannot be deactivated.
Vehicles with the Front Assist system
Using this information, a system intervention may also occur when there is the danger of a collision with an obstacle detected in front of the vehicle.
Spurhalteassistent (Lane Assist)
Introduction
Fig. 313
Sensor for Lane Assist
This chapter contains information on the following subjects:
Settings in Infotainment
254
Operation
255
Activation / deactivation
256
Malfunctions
256
The lane departure warning (following known as system) helps to keep the ve-
hicle between the boundary lines of a lane.
The system recognises the boundary lines of the lane using a sensor » Fig. 313.
When the vehicle approaches a detected line between lanes, the system
makes a light movement of the steering wheel in the opposite direction to the
boundary line. This corrective steering intervention can be manually overrid-
den at any time.WARNING■ Please take note of the general points relating to the use of assistance
systems » page 215, in section Introduction .■
Lane Assist can help you keep the vehicle within the lane. However, it
does not steer the vehicle for you. The driver retains full responsibility for
steering at all times.
■
Some objects or markings on the road can be recognised as the boundary
lines - an erroneous steering intervention may be the result.
WARNINGThe system may not be able to recognise the boundary line, or recognise it
incorrectly, for example, in the following situations.■
When visibility is poor, (e.g. fog, heavy rain, thick snowfall).
■
When driving in “sharp” bends.
■
The sensor is blinded by the sun or oncoming traffic.
■
The field of view of the sensor is limited by an obstacle or a preceding ve-
hicle.
CAUTION
Do not attach any stickers or similar objects in front of the sensor on the wind-
screen to avoid impairing the functions of the system.
Note
■ The system is designed for driving on motorways and roads with adequate
longitudinal markings.■
The system can detect both continuous and broken lines.
Settings in Infotainment
Read and observe
and on page 254 first.
›
Press the button, then tap on the function surface
→
Driver assistance
.
■ Lane Assist (lane departure warning sys.) - Settings for Lane Assist
■
Active
- Activate/deactivate the assistant
■
Adaptive lane guidance
- Activate/deactivate adaptive lane guidance
254Driving