rims SKODA KODIAQ 2016 1.G Owner's Manual
[x] Cancel search | Manufacturer: SKODA, Model Year: 2016, Model line: KODIAQ, Model: SKODA KODIAQ 2016 1.GPages: 344, PDF Size: 58.96 MB
Page 287 of 344
Disconnect/reconnect and changeRead and observe
and on page 283 first.
The new vehicle battery must have the same capacity, voltage, current and the
same size as the original Battery.
We recommend you have the battery replaced by a specialist garage.
›
To disconnect the battery, switch off the ignition and disconnect first the
negative terminal
, and only after this the positive
.
›
To connect the battery, first connect the positive terminal
, and only after
this the negative terminal
.
After disconnecting and re-connecting the vehicle battery, the following func-
tions or devices are partially or completely inoperative.
Function / deviceOperating measurePower windows» page 63Panorama sliding/tilting roof» page 64Sun screen» page 65Time setting» page 44
CAUTION
■ Disconnect the vehicle battery only with the ignition turned off - there is a
risk of damaging the electrical system of the vehicle.■
Before disconnecting the battery, close the electric tailgate, all the windows,
the sliding / tilting roof and the electric sunshade - otherwise malfunctions of
equipment elements may occur.
■
Under no circumstances must the connection cables be connected incorrect-
ly – risk of fire.
Note
After disconnecting and re-connecting the vehicle battery, we recommend
having the vehicle checked by a specialist to ensure that the full functionality
of all electrical systems is guaranteed.Wheels
Wheels and tyres
Introduction
This chapter contains information on the following subjects:
Advice on tyre/wheel usage
285
Tyre pressure
286
Tyre wear and wheel change
287
Spare wheel
287
Spare wheel
287
Tyre marking
288
Advice on tyre/wheel usage
New tyres , during the first 500 km, new tyres do not offer optimum grip and
appropriate care should therefore be taken when driving.
Always fit tyres with a greater profile depth on the front wheels.
Wheels and bolts are matched to each other in terms of design. We recom-
mend that you use wheel rims and wheel bolts from ŠKODA Original Accesso-
ries.
Always store wheels or tyres in a cool, dry and, where possible, dark place. The
tyres themselves should be stored standing.
Tyre life
Tyres age and lose their original characteristics, even if they are not being
used. Therefore, we recommend not using tyres that are more than 6 years
old.
The manufacturing date is indicated on the tyre sidewall (possibly on the in-
side ). For example, DOT ... 10 16... means, for example, that the tyre was manu-
factured in the 10th week of 2016.
Tyre damage
We recommend checking your tyres and wheel rims for damage (punctures,
cuts, splits and bulges, etc.) on a regular basis.
Remove any foreign objects in the tyre tread immediately (e.g. small stones).
Foreign bodies which have penetrated into the tyre (e.g. screws or nails)
should not be removed. Seek help from a specialist garage.
285Wheels
Page 288 of 344
Installation of new tyres
Only fit radial tyres of the same type, size (rolling circumference) and the same
tread pattern on one axle on all 4 wheels.
When mounting new tires the tires have to be replaced axle by axle.
Unidirectional tyres
Some tires may be directional. The direction of rotation of the tyres is marked by arrows on the wall of the tyre .
The specified running direction must be strictly adhered to, otherwise the fol-
lowing tyre characteristics may be degraded. ▶ Driving stability.
▶ Traction.
▶ Tyre noise and tyre wear.
Tires with increased resistance to air loss when punctured
Some vehicles may be fitted with tyres at the factory that have increased
puncture resistance (so-called “SEAL” tyres). For some countries, vehicles are
equipped with “SEAL” tyres delivered without a spare wheel and appropriate
tools.
If “SEAL”tyres are replaced with standard tyres, the vehicle must be retrofitted
with a puncture repair kit or spare wheel and appropriate hand tools.WARNING■ Never use tyres if you do not know anything about the condition and age.■Never drive with damaged tyres – risk of accident.
CAUTION
■The tyres must be protected from contact with substances such as oil,
grease and fuel, which could damage them. If the tyres come into contact with
these substances, then we recommend you have this checked out in a special-
ist workshop.■
Do not use rims with ground or polished surface in winter conditions - there
is a risk of wheel damage (e.g. from the road grit).
Note
■ We recommend that any work on the wheels or tyres is carried out by a spe-
cialist garage.■
We recommend that you use wheel rims, tyres, full wheel trims and snow
chains from ŠKODA Original Accessories.
Tyre pressureFig. 336
Label with a table of tyre sizes and tyre pressure value / inflate
tyres
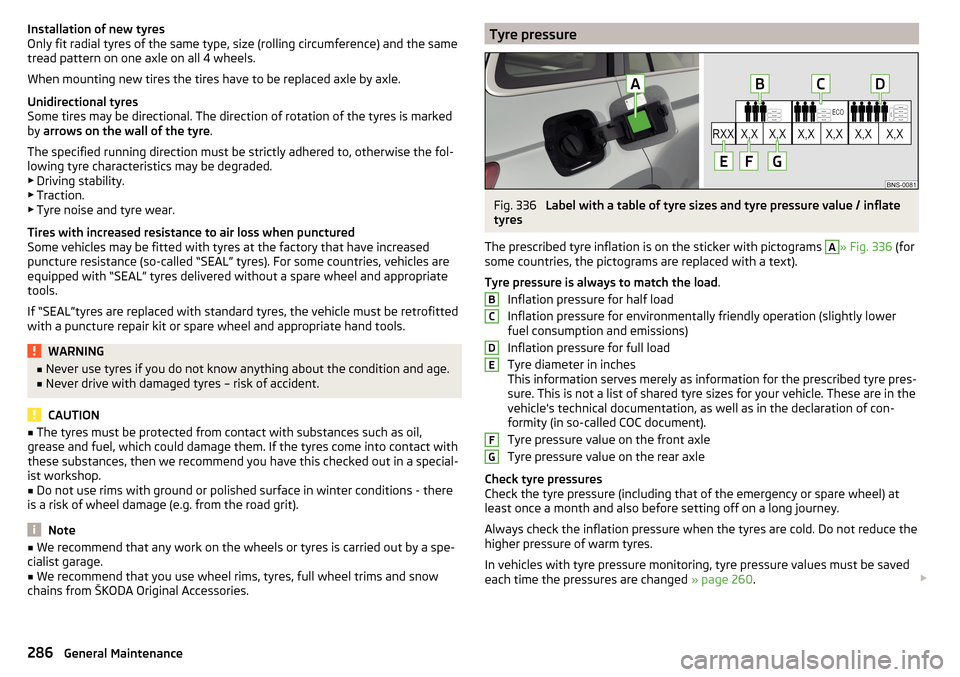
The prescribed tyre inflation is on the sticker with pictograms
A
» Fig. 336 (for
some countries, the pictograms are replaced with a text).
Tyre pressure is always to match the load .
Inflation pressure for half load
Inflation pressure for environmentally friendly operation (slightly lower
fuel consumption and emissions)
Inflation pressure for full load
Tyre diameter in inches
This information serves merely as information for the prescribed tyre pres-
sure. This is not a list of shared tyre sizes for your vehicle. These are in the
vehicle's technical documentation, as well as in the declaration of con-
formity (in so-called COC document).
Tyre pressure value on the front axle
Tyre pressure value on the rear axle
Check tyre pressures
Check the tyre pressure (including that of the emergency or spare wheel) at
least once a month and also before setting off on a long journey.
Always check the inflation pressure when the tyres are cold. Do not reduce the
higher pressure of warm tyres.
In vehicles with tyre pressure monitoring, tyre pressure values must be saved
each time the pressures are changed » page 260.
BCDEFG286General Maintenance
Page 291 of 344
the vehicle in a constantly visible place in the driver’s field of vision. The warn-
ing label (sticker) can be replaced by setting the maximum value of the speed
category supplied for the mounted tyres in Infotainment 1)
. This specification
defines the maximum vehicle speed with mounted all-season or “winter”tyres that may not be exceeded.
Snow chains
The snow chains improve driving in wintry road conditions.
Remove the full wheel trims before installing the snow chains » page 293.
Only fit snow chains with links and locks no larger than 12 mm.
Snow chains must only be fitted on the front wheels and are applicable only to
the following wheel rim / tyre combinations.
Rim sizeImpression depth DTyre size6.5J x 1738 mm215/65 R17WARNINGDo not use chains on snow- and ice-free routes - the driving behaviour may
be affected and there is a risk of a puncture.1)
Applies to some countries.
289Wheels
Page 293 of 344
›To
remove the fire extinguisher, release the safety catches on the two belts
in the direction of arrow » Fig. 340 and remove the fire extinguisher.›
To secure , place the fire extinguisher back in the mount and secure with the
belts.
The Owner´s Manual is fitted next to the fire extinguisher.
Pay attention to the expiration date of the fire extinguisher. After this date,
the correct function of the device is not guaranteed.
WARNINGAlways properly secure the fire extinguisher, there is a risk of injury in the
event of sudden braking or a vehicle collision.
Vehicle tool kit
Fig. 341
Vehicle tool kit
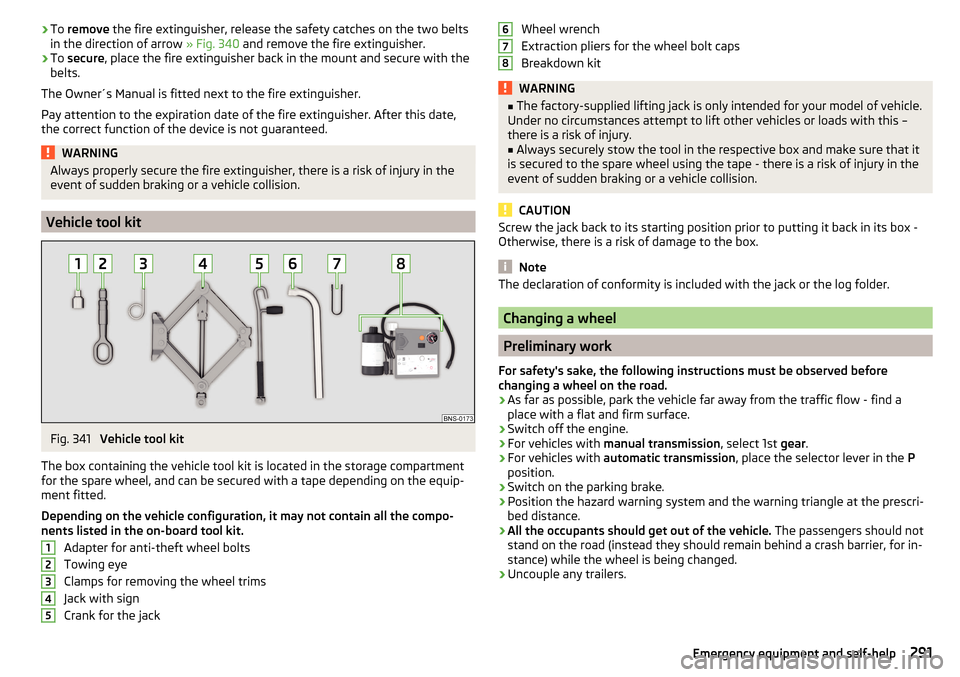
The box containing the vehicle tool kit is located in the storage compartment
for the spare wheel, and can be secured with a tape depending on the equip-
ment fitted.
Depending on the vehicle configuration, it may not contain all the compo-
nents listed in the on-board tool kit.
Adapter for anti-theft wheel bolts
Towing eye
Clamps for removing the wheel trims
Jack with sign
Crank for the jack
12345Wheel wrench
Extraction pliers for the wheel bolt caps
Breakdown kitWARNING■ The factory-supplied lifting jack is only intended for your model of vehicle.
Under no circumstances attempt to lift other vehicles or loads with this –
there is a risk of injury.■
Always securely stow the tool in the respective box and make sure that it
is secured to the spare wheel using the tape - there is a risk of injury in the
event of sudden braking or a vehicle collision.
CAUTION
Screw the jack back to its starting position prior to putting it back in its box -
Otherwise, there is a risk of damage to the box.
Note
The declaration of conformity is included with the jack or the log folder.
Changing a wheel
Preliminary work
For safety's sake, the following instructions must be observed before
changing a wheel on the road.
›
As far as possible, park the vehicle far away from the traffic flow - find a
place with a flat and firm surface.
›
Switch off the engine.
›
For vehicles with manual transmission , select 1st gear.
›
For vehicles with
automatic transmission , place the selector lever in the P
position.
›
Switch on the parking brake.
›
Position the hazard warning system and the warning triangle at the prescri-
bed distance.
›
All the occupants should get out of the vehicle. The passengers should not
stand on the road (instead they should remain behind a crash barrier, for in-
stance) while the wheel is being changed.
›
Uncouple any trailers.
678291Emergency equipment and self-help
Page 295 of 344
›Restore the original position of the third seat row (applies to the seven-seat
version).
CAUTION
■ When handling the wheel, do not put this down on the lining parts in the
area next to the wheel, otherwise there is a risk of damaging these parts.■
Before lowering the seats, unlock the lock tongues of the seat belts (the
straps must be completely rolled up behind the lining of the rear body pillar) -
otherwise there is a risk of damage to the locks, lock tongues as well as the
seats.
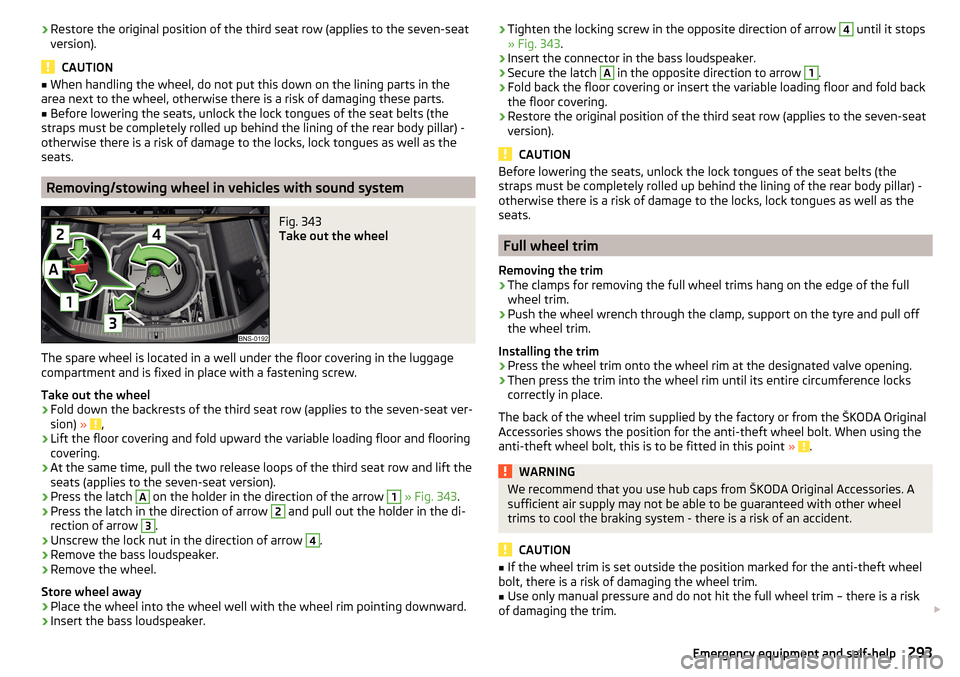
Removing/stowing wheel in vehicles with sound system
Fig. 343
Take out the wheel
The spare wheel is located in a well under the floor covering in the luggage
compartment and is fixed in place with a fastening screw.
Take out the wheel
›
Fold down the backrests of the third seat row (applies to the seven-seat ver-
sion) » ,
›
Lift the floor covering and fold upward the variable loading floor and flooring
covering.
›
At the same time, pull the two release loops of the third seat row and lift the
seats (applies to the seven-seat version).
›
Press the latch
A
on the holder in the direction of the arrow
1
» Fig. 343 .
›
Press the latch in the direction of arrow
2
and pull out the holder in the di-
rection of arrow
3
.
›
Unscrew the lock nut in the direction of arrow
4
.
›
Remove the bass loudspeaker.
›
Remove the wheel.
Store wheel away
›
Place the wheel into the wheel well with the wheel rim pointing downward.
›
Insert the bass loudspeaker.
› Tighten the locking screw in the opposite direction of arrow 4 until it stops
» Fig. 343 .›
Insert the connector in the bass loudspeaker.
›
Secure the latch
A
in the opposite direction to arrow
1
.
›
Fold back the floor covering or insert the variable loading floor and fold back
the floor covering.
›
Restore the original position of the third seat row (applies to the seven-seat
version).
CAUTION
Before lowering the seats, unlock the lock tongues of the seat belts (the
straps must be completely rolled up behind the lining of the rear body pillar) -
otherwise there is a risk of damage to the locks, lock tongues as well as the
seats.
Full wheel trim
Removing the trim
›
The clamps for removing the full wheel trims hang on the edge of the full
wheel trim.
›
Push the wheel wrench through the clamp, support on the tyre and pull off
the wheel trim.
Installing the trim
›
Press the wheel trim onto the wheel rim at the designated valve opening.
›
Then press the trim into the wheel rim until its entire circumference locks
correctly in place.
The back of the wheel trim supplied by the factory or from the ŠKODA Original
Accessories shows the position for the anti-theft wheel bolt. When using the
anti-theft wheel bolt, this is to be fitted in this point »
.
WARNINGWe recommend that you use hub caps from ŠKODA Original Accessories. A
sufficient air supply may not be able to be guaranteed with other wheel
trims to cool the braking system - there is a risk of an accident.
CAUTION
■ If the wheel trim is set outside the position marked for the anti-theft wheel
bolt, there is a risk of damaging the wheel trim.■
Use only manual pressure and do not hit the full wheel trim – there is a risk
of damaging the trim.
293Emergency equipment and self-help
Page 296 of 344
NoteWe recommend that you use hub caps from ŠKODA Original Accessories.
Wheel bolts
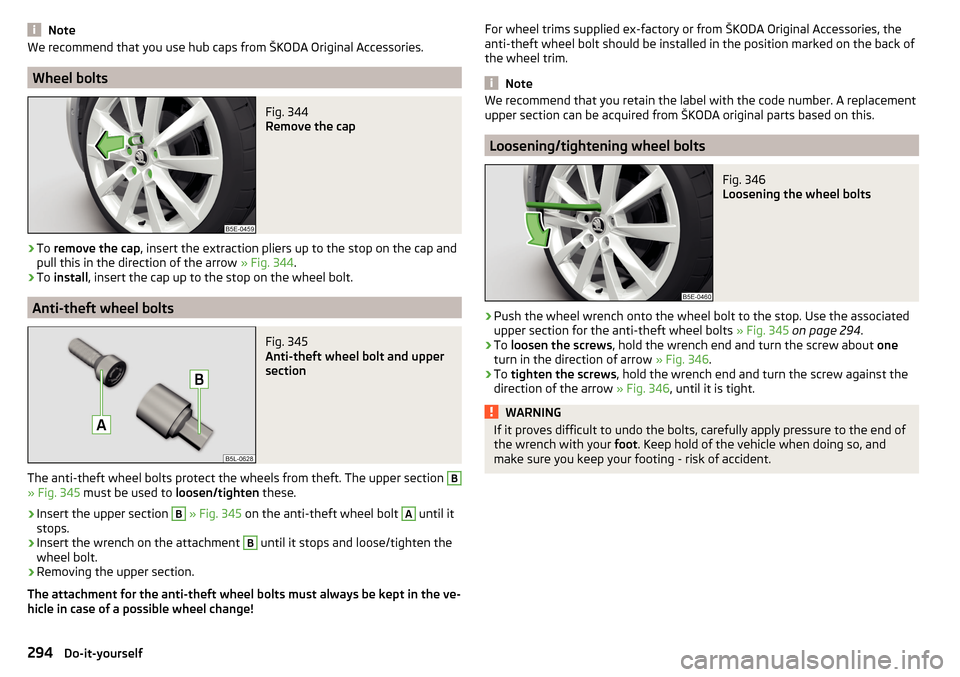
Fig. 344
Remove the cap
›
To remove the cap , insert the extraction pliers up to the stop on the cap and
pull this in the direction of the arrow » Fig. 344.
›
To install , insert the cap up to the stop on the wheel bolt.
Anti-theft wheel bolts
Fig. 345
Anti-theft wheel bolt and upper
section
The anti-theft wheel bolts protect the wheels from theft. The upper section
B
» Fig. 345 must be used to loosen/tighten these.
›
Insert the upper section
B
» Fig. 345 on the anti-theft wheel bolt
A
until it
stops.
›
Insert the wrench on the attachment
B
until it stops and loose/tighten the
wheel bolt.
›
Removing the upper section.
The attachment for the anti-theft wheel bolts must always be kept in the ve-
hicle in case of a possible wheel change!
For wheel trims supplied ex-factory or from ŠKODA Original Accessories, the
anti-theft wheel bolt should be installed in the position marked on the back of
the wheel trim.
Note
We recommend that you retain the label with the code number. A replacement
upper section can be acquired from ŠKODA original parts based on this.
Loosening/tightening wheel bolts
Fig. 346
Loosening the wheel bolts
›
Push the wheel wrench onto the wheel bolt to the stop. Use the associated
upper section for the anti-theft wheel bolts » Fig. 345 on page 294 .
›
To loosen the screws , hold the wrench end and turn the screw about one
turn in the direction of arrow » Fig. 346.
›
To tighten the screws , hold the wrench end and turn the screw against the
direction of the arrow » Fig. 346, until it is tight.
WARNINGIf it proves difficult to undo the bolts, carefully apply pressure to the end of
the wrench with your foot. Keep hold of the vehicle when doing so, and
make sure you keep your footing - risk of accident.294Do-it-yourself
Page 301 of 344
Conditions for towing.Cars with automatic gearboxes must not be towed with the rear wheels
raised - there is a risk of gearbox damage!
If the gearbox has no oil, your vehicle must be towed with the front axle
raised clear of the ground or on a breakdown vehicle or trailer.
The maximum towing speed is 50 km/h.
The vehicle must be transported on a special breakdown vehicle or trailer
if it is not possible to tow in the vehicle in the way described or if the tow-
ing distance is greater than 50 km.
Driver of the tow vehicle›
On vehicles with manual transmission , engage gear slowly when starting.
›
On vehicles with automatic transmission , accelerate with particular care.
›
Only then approach correctly when the rope is taut.
Driver of the towed vehicle
›
If possible, the vehicle should be towed with the engine running. Operate the
brake booster and power steering only if the engine is running, otherwise
the brake pedal must be depressed more strongly and more power has to be
directed to the steering.
›
If it is not possible to start the engine, switch on the ignition so that the
steering wheel is not locked and so that the turn signal lights, windscreen
wipers and windscreen washer system can be used.
›
Take the vehicle out of gear or move the selector lever into position N if the
vehicle is fitted with an automatic gearbox.
›
Always keep the tow rope taut during the towing procedure.
WARNING■ Wound tow ropes must not be used for towing » Fig. 351- , the towing
eye may unscrew out of the vehicle - risk of accident.■
Ensure tow rope is not twisted - risk of accident.
CAUTION
■ Do not tow-start the engine – risk of damaging the engine! The battery from
another vehicle can be used as a jump-start aid » page 297, Jump-starting .■
In the case of off-road towing manoeuvres, for both vehicles there is the risk
that the fastening parts could be overloaded and damaged.
Note
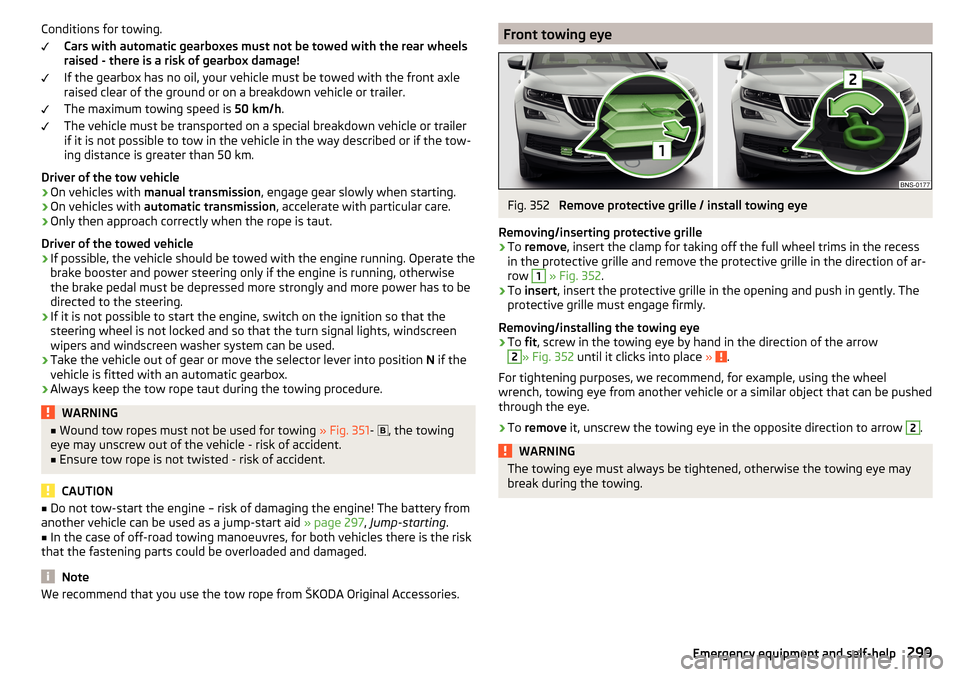
We recommend that you use the tow rope from ŠKODA Original Accessories.Front towing eyeFig. 352
Remove protective grille / install towing eye
Removing/inserting protective grille
›
To remove , insert the clamp for taking off the full wheel trims in the recess
in the protective grille and remove the protective grille in the direction of ar-
row
1
» Fig. 352 .
›
To insert , insert the protective grille in the opening and push in gently. The
protective grille must engage firmly.
Removing/installing the towing eye
›
To fit, screw in the towing eye by hand in the direction of the arrow
2
» Fig. 352 until it clicks into place » .
For tightening purposes, we recommend, for example, using the wheel
wrench, towing eye from another vehicle or a similar object that can be pushed through the eye.
›
To remove it, unscrew the towing eye in the opposite direction to arrow
2
.
WARNINGThe towing eye must always be tightened, otherwise the towing eye may
break during the towing.299Emergency equipment and self-help
Page 333 of 344
Radio station143
Preset buttons143
Radio station logos143
Update133
radio stations Select channels and search
142
Raising the vehicle295
Rear fog light69
Warning light36
Rear seats80
Rear traffic alert224
Rear Traffic Alert Activation / deactivation
226
Malfunctions226
Operation225
Rear View Camera227
Rear view mirror75
Rear window - heating72
Record waypoints197
Refill Windscreen washer fluid
280
refilling AdBlue
277
Refilling Coolant
282
Engine oil281
Reflective vest290
Refuelling275
Fuel275
Register online services ŠKODA Connect133, 139
Regulation Headlight beam
66
Remote control Changing battery
300
Synchronisation process57
Unlocking/locking52
Remote transfer of SIM data163
Removable light106
Changing batteries302
Removable through-loading bag95
Repairs and technical alterations266
Replace Battery
301
Replacing Bulbs
308
Fuses305
Windscreen wiper blades304
Reset counter for distance driven (trip)43
restaurant184
Reversible belt tensioners18
Rims285
Road Signs infotainment display
191
Roller blind See luggage compartment cover
103
Roof Load
108
Roof racks108
route new route
196
Online Route Import196
route list196
Route192
Store route194
Route calculation192
Trailer towing193
Route details194
Route information194
route list196
Route options136
rSAP163
Data Connection171
Run-in Engine
212
Running in Brake pads
206
Tyres285
S
SafeLock
54
Safe removal of the data source132, 139
Safety12
Airbag19
Child safety23
Child seats23
Correct seated position12
Headrests83
I-Size28
ISOFIX27
TOP TETHER28
SAFE, SAFELOCK See SafeLock
54
Save radio Save channel
143
Saving electrical energy212
Saving fuel212
Screen see Infotainment screen
123
Screen display124
SD card148
Safe removal139
search aim
182
Gas station184
Online goals182
parking spot184
restaurant184
Seat belt height adjustment
16
Warning light35, 39
Seat belts15
Belt tensioners18
fastening and unfastening17
Inertia reels18
Seat electrical adjustment78
331Index