wheel size SKODA OCTAVIA 2006 Owner´s Manual
[x] Cancel search | Manufacturer: SKODA, Model Year: 2006, Model line: OCTAVIA, Model: SKODA OCTAVIA 2006Pages: 218, PDF Size: 5.48 MB
Page 56 of 218
Seats and Stowage
Front seats
ä
Introduction
This chapter contains information on the following subjects:
Manually adjusting the front seats 55
Adjusting front seats electrically 55
Storing setting 56
Assigning the remote control key to the memory button 56
Retrieving the seat and exterior mirror settings 56
The driver's seat should be adjusted in such a way that the pedals can be fully
pressed to the floor with slightly bent legs.
The seat backrest on the driver's seat should be adjusted in such a way that the
upper point of the steering wheel can be easily reached with slightly bent arms.
Correct adjustment of the seats is particularly important for:
› safely and quickly reaching the controls;
› a relaxed, fatigue-free body position;
› achieving the maximum protection offered by the seat belts and the airbag
system. WARNING
■ Only adjust the driver's seat when the vehicle is stationary - risk of accident!
■ Caution when adjusting the seat! You may suffer injuries or bruises as a re-
sult of adjusting the seat without paying proper attention. ■ As the electric front seats can also be adjusted when the ignition is switch-
ed off (even when the ignition key is withdrawn), never leave children unat-
tended in the car. ■ The seat backrests must not be angled too far back when driving otherwise
this will affect proper operation of the seat belts and of the airbag system -
risk of injury! ■ Never carry more people than the number of seats in the vehicle. WARNING (Continued)
■ Each occupant must correctly fasten the seat belt belonging to the seat.
Children must be fastened » page 135, Transporting children safely with a
suitable restraint system.
■ The front seats and the head restraints must always be adjusted to match
the body size of the seat occupant as well as the seat belts must always be
correctly fastened in order to provide an optimal protection for you and your
occupants.
■ Always keep your feet in the footwell when the car is being driven - never
place your feet on the instrument panel, out of the window or on the surfaces
of the seats. This is particularly important for the front seat passenger. You
will be exposed to increased risk of injury if it becomes necessary to apply the
brake or in the event of an accident. If an airbag is deployed, you may suffer
fatal injuries when adopting an incorrect seated position!
■ It is important for the driver and front passenger to maintain a distance of at
least 25 cm from the steering wheel or dash panel. Not maintaining this mini-
mum distance will mean that the airbag system will not be able to properly
protect you - hazard!
■ Ensure that there are no objects in the footwell as they may get caught be-
hind the pedals when driving or applying the braking. You would then no lon-
ger be able to operate the clutch, brake or accelerate.
■ Do not transport any objects on the front passenger seat except objects
(e.g. child safety seat) provided for this purpose - risk of accident! Note
After a certain time, play can develop within the adjustment mechanism of the
backrest angle. Ð
54 Using the system
Page 124 of 218
What influences the driving safety?
First read and observe the introductory information and safety warn-
ings on page 121.
The driver is fully responsible for himself and his occupants. If your driving safety
is effected, you place yourself and the oncoming traffic at risk.
The following guidelines must therefore be observed. › Do not get distracted from concentrating on the traffic situation, e.g. by your
passengers or mobile phone calls.
› Never drive when your driving ability is impaired, e.g. through medication, alco-
hol, drugs.
› Keep to the traffic regulations and the permissible speed limit.
› Always adjust the driving speed to the road, traffic and weather conditions.
› Take regular breaks on long journeys – at least every two hours. ÐCorrect seated position
ä
Introduction
This chapter contains information on the following subjects:
Correct seated position for the driver 123
Correct seated position for the front passenger 123
Correct seated position for the occupants on the rear seats 123
Examples of an incorrect seated position 124
WARNING
■ The front seats and the head restraints must always be adjusted to match
the body size of the seat occupant as well as the seat belts must always be
correctly fastened in order to provide an optimal protection for you and your
occupants.
■ Always assume the correct seated position before setting off and do not
change this position while driving. Also advise your passengers to adopt the
correct seated position and not to change this position while the car is mov-
ing.
ä WARNING (Continued)
■ If the occupant adopts an incorrect seated position, he is exposed to life-
threatening injuries, in case he is hit by a deployed airbag.
■ If the occupants on the rear seats are not sitting upright, the risk of injury is
increased due to incorrect routing of the seat belt.
■ The driver must maintain a distance of at least 25 cm to the steering wheel.
The front passenger must maintain a distance of at least 25 cm to the dash
panel. Not maintaining this minimum distance will mean that the airbag sys-
tem will not be able to properly protect you - hazard!
■ When driving, hold the steering wheel with both hands firmly on the outer
edge in the 9
o'clock and 3 o'clock position. Never hold the steering wheel in
the 12 o'clock position or in any other way (e.g. in the middle or inner edge of
the steering wheel). In such cases, you could severely injure the arms, hands
and head when the driver airbag is deployed.
■ The seat backrests must not be angled too far back when driving otherwise
this will affect proper operation of the seat belts and of the airbag system -
risk of injury!
■ Ensure that there are no objects in the driver's footwell as they may get
caught behind the pedals when driving or applying the braking. You would
then no longer be able to operate the clutch, brake or accelerate.
■ Always keep your feet in the footwell when the car is being driven - never
place your feet on the instrument panel, out of the window or on the surfaces
of the seats. You will be exposed to increased risk of injury if it becomes nec-
essary to apply the brake or in the event of an accident. If an airbag is de-
ployed, you may suffer fatal injuries when adopting an incorrect seated posi-
tion! Ð
122 Safety
Page 131 of 218
Airbag system
Description of the airbag system
Introductory information
The operational readiness of the airbag system is monitored electronically. The
airbag warning light comes on for a few seconds each time the ignition is
switched on »
page 24.
The airbags inflate in fractions of a second and at a high speed to offer additional
protection in the event of an accident.
The airbag system (according to vehicle equipment) consists of: › an electronic control unit;
› Front airbags for the driver and front seat passenger
» page 130;
› side airbags » page 131;
› head airbags » page 132;
› an airbag warning light in the instrument cluster
» page 24;
› a key switch for the front seat passenger airbag
» page 133;
› an warning light in the middle of the dash panel to indicate the front seat pas-
senger airbag is switched off » page 133.
A fault in the airbag system exists if:
› the warning light
does not illuminate when the ignition is switched on;
› the warning light
does not go out 4 seconds after the ignition is switched on;
› the warning light
goes out and comes on again after the ignition is switched
on;
› the warning light
comes on or flashes when driving;
› the warning light in the middle of the dash panel for the deactivated front seat
passenger airbag flashes. WARNING
■ The airbag is not a substitute for the seat belt, but instead forms part of the
complete passive vehicle safety concept. Please note that an airbag can only
offer you optimal protection in combination with a seat belt which is fas-
tened.
■ To ensure passengers are protected with the greatest possible effect when
the airbag is deployed, the front seats must be correctly adjusted to match
the body size »
page 122, Correct seated position .
■ If you do not fasten the seat belts when driving, lean too far forward or
adopt an incorrect seated position, you are exposing yourself to increased risk
of injury in the event of an accident. ■ If there is a fault, have the airbag system checked immediately by a ŠKODA
specialist garage. Otherwise, there is a risk of the airbag not being activated in
the event of an accident.
■ No modifications of any kind must be made to parts of the airbag system.
Any work on the airbag system including the installation and removal of sys-
tem components due to other repair work (e.g. removal of the steering wheel)
must only be carried out by a
ŠKODA specialist garage.
■ Never make any changes to the front bumper or bodywork.
■ It is prohibited to manipulate individual parts of the airbag system as this
might result in the airbag being deployed. ■ The protective function of the airbag system is sufficient for only one acci-
dent. The airbag system must then be replaced if the airbag has been de-
ployed.
■ The airbag system needs no maintenance during its working life.
■ If you sell your vehicle, provide the complete vehicle documentation to the
new owner. Please note that the information relating to the possibility of de-
activating the front passenger airbag must be included! ■ When disposing of vehicle or parts of the airbag system, it is important to
comply with the national legal requirements. Ð When are the airbags deployed?
The airbag system is only functional when the ignition is switched on.
In certain accident situations, the several airbags may be deployed simultaneous-
ly.
The airbags are not deployed in the case of minor frontal and side collisions, rear-
end collisions, tilting of the vehicle and vehicle rollover. £
129
Airbag system
Page 133 of 218
The airbag allows the gas to flow out of the inflated airbag in a controlled manner
(depending on the load of the particular car occupant) in order to cushion head
and chest areas. The airbag then deflates subsequently to such an extent, after
an accident, to again provide a clear view forward.
WARNING
■ For the driver and front passenger, it is important to maintain a distance of
at least 25 cm to the steering wheel or dashboard A
» Fig. 117
. Not maintain-
ing this minimum distance will mean that the airbag system will not be able to
properly protect you - hazard! The front seats and the head restraints must
always also be correctly adjusted to match the body size of the occupant.
■ The airbag develops enormous forces when triggered, which can lead to in-
juries if the sitting position or seated position is not correct.
■ There must not by any further persons, animals or objects positioned be-
tween the front seated occupants and the deployment area of the airbag. ■ Never transport children on the front seat of a vehicle without using a prop-
er restraint system. If airbags are deployed in the event of an accident, the
child might suffer severe or even fatal injuries!
■ It is essential to always switch off the front passenger airbag when attach-
ing a child safety seat to the front passenger seat where the child is seated
with its back facing in direction of travel » page 133, Deactivating airbags. If
this is not done, there is a risk of the child suffering severe or even fatal inju-
ries if the front passenger airbag is deployed. When transporting a child on
the front passenger seat, pay attention to any relevant national regulations
regarding the use of child safety seats.
■ The steering wheel and the surface of the airbag module in the dash panel
on the passenger side must not have stickers attached, be covered or modi-
fied in any other way. These parts should only be cleaned with a cloth that is
dry or has been moistened with water. No objects such as cup holders, mobile
phone mounts, etc. must be attached to the covers of the airbag modules or
be located within their immediate vicinity.
■ Never place objects on the surface of the front passenger airbag module in
the dash panel. Ð Side airbags
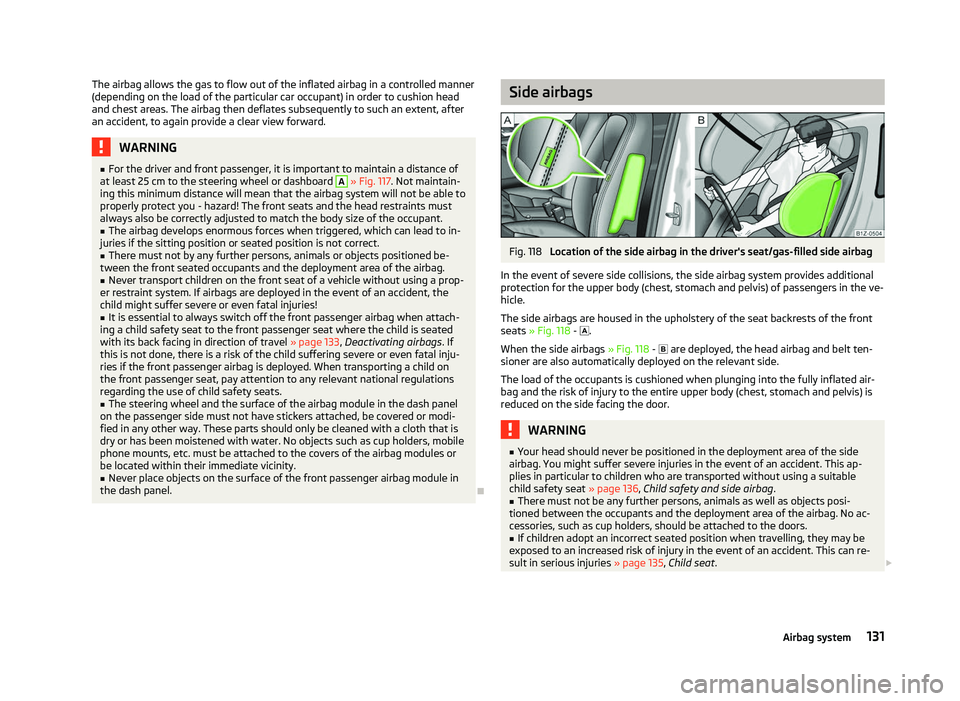
Fig. 118
Location of the side airbag in the driver's seat/gas-filled side airbag
In the event of severe side collisions, the side airbag system provides additional
protection for the upper body (chest, stomach and pelvis) of passengers in the ve-
hicle.
The side airbags are housed in the upholstery of the seat backrests of the front
seats » Fig. 118 - .
When the side airbags » Fig. 118 - are deployed, the head airbag and belt ten-
sioner are also automatically deployed on the relevant side.
The load of the occupants is cushioned when plunging into the fully inflated air-
bag and the risk of injury to the entire upper body (chest, stomach and pelvis) is
reduced on the side facing the door. WARNING
■ Your head should never be positioned in the deployment area of the side
airbag. You might suffer severe injuries in the event of an accident. This ap-
plies in particular to children who are transported without using a suitable
child safety seat » page 136, Child safety and side airbag.
■ There must not be any further persons, animals as well as objects posi-
tioned between the occupants and the deployment area of the airbag. No ac-
cessories, such as cup holders, should be attached to the doors. ■ If children adopt an incorrect seated position when travelling, they may be
exposed to an increased risk of injury in the event of an accident. This can re-
sult in serious injuries » page 135, Child seat. £
131
Airbag system
Page 173 of 218
Note
■ We recommend that any work on the wheels or tyres is carried out by a ŠKODA
Service Partner. ■ We recommend that you use wheel rims, tyres, full wheel trims and snow chains
from
ŠKODA Original Accessories. ÐService life of tyres
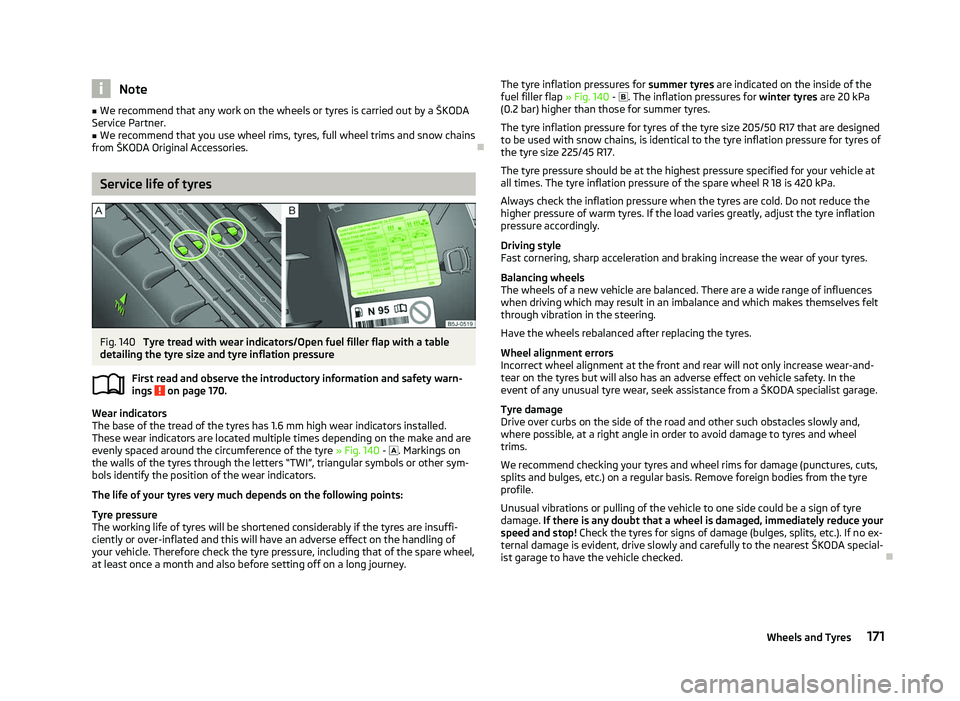
Fig. 140
Tyre tread with wear indicators/Open fuel filler flap with a table
detailing the tyre size and tyre inflation pressure
First read and observe the introductory information and safety warn-
ings on page 170.
Wear indicators
The base of the tread of the tyres has 1.6 mm high wear indicators installed.
These wear indicators are located multiple times depending on the make and are
evenly spaced around the circumference of the tyre » Fig. 140 - . Markings on
the walls of the tyres through the letters
“TWI”, triangular symbols or other sym-
bols identify the position of the wear indicators.
The life of your tyres very much depends on the following points:
Tyre pressure
The working life of tyres will be shortened considerably if the tyres are insuffi-
ciently or over-inflated and this will have an adverse effect on the handling of
your vehicle. Therefore check the tyre pressure, including that of the spare wheel,
at least once a month and also before setting off on a long journey.
ä The tyre inflation pressures for
summer tyres are indicated on the inside of the
fuel filler flap » Fig. 140 - . The inflation pressures for winter tyres are 20 kPa
(0.2
bar) higher than those for summer tyres.
The tyre inflation pressure for tyres of the tyre size 205/50 R17 that are designed
to be used with snow chains, is identical to the tyre inflation pressure for tyres of
the tyre size 225/45 R17.
The tyre pressure should be at the highest pressure specified for your vehicle at
all times. The tyre inflation pressure of the spare wheel R 18 is 420 kPa.
Always check the inflation pressure when the tyres are cold. Do not reduce the
higher pressure of warm tyres. If the load varies greatly, adjust the tyre inflation
pressure accordingly.
Driving style
Fast cornering, sharp acceleration and braking increase the wear of your tyres.
Balancing wheels
The wheels of a new vehicle are balanced. There are a wide range of influences
when driving which may result in an imbalance and which makes themselves felt
through vibration in the steering.
Have the wheels rebalanced after replacing the tyres.
Wheel alignment errors
Incorrect wheel alignment at the front and rear will not only increase wear-and-
tear on the tyres but will also has an adverse effect on vehicle safety. In the
event of any unusual tyre wear, seek assistance from a ŠKODA specialist garage.
Tyre damage
Drive over curbs on the side of the road and other such obstacles slowly and,
where possible, at a right angle in order to avoid damage to tyres and wheel
trims.
We recommend checking your tyres and wheel rims for damage (punctures, cuts,
splits and bulges, etc.) on a regular basis. Remove foreign bodies from the tyre
profile.
Unusual vibrations or pulling of the vehicle to one side could be a sign of tyre
damage. If there is any doubt that a wheel is damaged, immediately reduce your
speed and stop! Check the tyres for signs of damage (bulges, splits, etc.). If no ex-
ternal damage is evident, drive slowly and carefully to the nearest ŠKODA special-
ist garage to have the vehicle checked. Ð
171
Wheels and Tyres
Page 174 of 218
Handling wheels and tyres
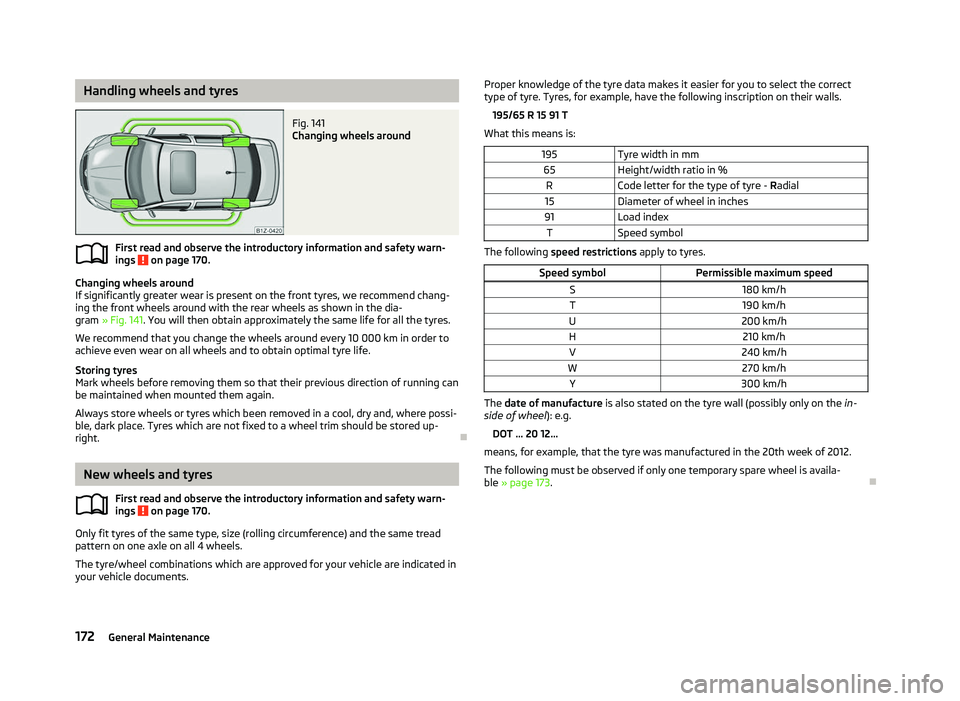
Fig. 141
Changing wheels around
First read and observe the introductory information and safety warn-
ings on page 170.
Changing wheels around
If significantly greater wear is present on the front tyres, we recommend chang-
ing the front wheels around with the rear wheels as shown in the dia-
gram » Fig. 141. You will then obtain approximately the same life for all the tyres.
We recommend that you change the wheels around every 10
000 km in order to
achieve even wear on all wheels and to obtain optimal tyre life.
Storing tyres
Mark wheels before removing them so that their previous direction of running can
be maintained when mounted them again.
Always store wheels or tyres which been removed in a cool, dry and, where possi-
ble, dark place. Tyres which are not fixed to a wheel trim should be stored up-
right. ÐNew wheels and tyres
First read and observe the introductory information and safety warn-
ings on page 170.
Only fit tyres of the same type, size (rolling circumference) and the same tread
pattern on one axle on all 4
wheels.
The tyre/wheel combinations which are approved for your vehicle are indicated in
your vehicle documents.
ä
ä Proper knowledge of the tyre data makes it easier for you to select the correct
type of tyre. Tyres, for example, have the following inscription on their walls.
195/65 R
15 91 T
What this means is:
195 Tyre width in mm
65 Height/width ratio in %
R Code letter for the type of tyre - Radial
15 Diameter of wheel in inches
91 Load index
T Speed symbol The following speed restrictions apply to tyres.
Speed symbol Permissible maximum speed
S 180 km/h
T 190 km/h
U 200 km/h
H 210 km/h
V 240 km/h
W 270 km/h
Y 300 km/h The date of manufacture
is also stated on the tyre wall (possibly only on the in-
side of wheel ): e.g.
DOT ... 20 12...
means, for example, that the tyre was manufactured in the 20th week of 2012.
The following must be observed if only one temporary spare wheel is availa-
ble » page 173 . Ð
172 General Maintenance
Page 178 of 218
Wheel bolts
First read and observe the introductory information and safety warn-
ings on page 170.
Wheels and
wheel bolts are matched to each other in terms of design. Each time
you fit other wheels, e.g. light alloy wheels or wheels with winter tyres, you must
therefore also use the matching wheel bolts of the correct length and shape of
spherical cap. This is essential to ensure that the wheels are tightly fitted and
that the brake system operates properly. ÐWinter tyres
First read and observe the introductory information and safety warn-
ings on page 170.
The handling of your vehicle will be significantly improved when driving on wintry
roads if you fit winter tyres. Summer tyres do not offer the same grip on ice, snow
and at temperatures below 7 °C because of their construction (width, rubber
blend, tread pattern). This particularly applies to vehicles which are equipped with
low-profile tyres
or high-speed tyres (code index H or V on wall of tyre).
To achieve the best possible handling properties, winter tyres must be fitted on
all 4 wheels, the minimum tread depth must be 4
mm and tyres must be no older
than 4 years.
Winter tyres of a lower speed category can be used provided that the permissible
maximum speed of these tyres is not exceeded even if the possible maximum
speed of the vehicle is higher. For the sake of the environment
Fit the summer tyres on again in good time as they provide better handling prop-
erties, a shorter braking distance, less tyre noise, and reduced tyre wear on roads
which are free of snow and ice as well as at temperatures above 7
°C. The fuel
consumption is also lower. ÐSnow chains
First read and observe the introductory information and safety warn-
ings on page 170.ä
ä
ä Snow chains must only be mounted on the front wheels.
When driving on wintry roads, snow chains improve not only traction, but also the
braking performance.
For technical reasons, it is only permissible to fit snow chains with the following
wheel/tyre combinations.
Wheel size Depth (D)Tyre size
6J x 15 a)
47 mm 195/65
6.5J x 15 a)
50 mm 195/65
6J x 16 a)
50 mm 205/55
6J x 17 b)
45 mm 205/50 a)
Only fit snow chains with links and locks not larger than 15 mm.
b) Only fit snow chains with links and locks not larger than 9 mm.
Remove the full wheel trims before installing the snow chains.
Observe the national legal regulations relating to the use of snow chains and the
maximum vehicle speed with snow chains. CAUTION
The chains must be removed when driving on roads which are free of snow. They
adversely affect the handling of your vehicle, damage the tyres and are rapidly
destroyed. Ð176
General Maintenance
Page 184 of 218
›
Position the lifting jack below the jacking point and move it up until its claw is
positioned directly below the vertical web of the lower sill.
› Align the lifting jack so that its claw grasps the web
» Fig. 150 - below the
embossing in the side surface of the lower sill.
› Ensure that the entire surface of the lifting jack base plate rests on level
ground and is located in a vertical position to the area » Fig. 150 where the claw
grasps the web.
› Continue turning up the jack until the wheel is just about lifted off the ground. ÐSecuring wheels against theft
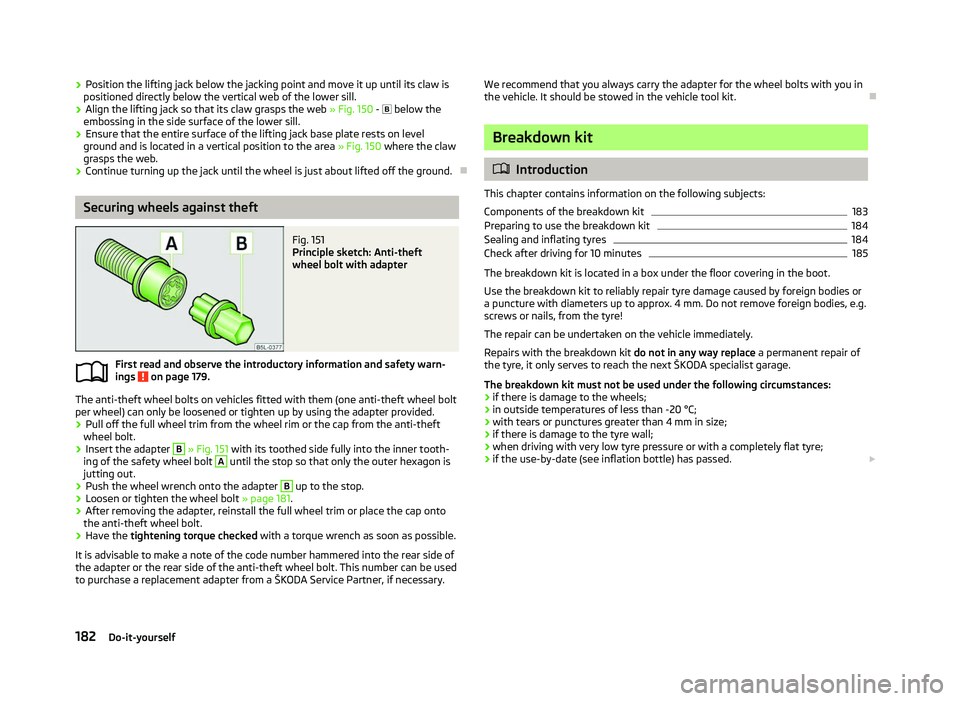
Fig. 151
Principle sketch: Anti-theft
wheel bolt with adapter
First read and observe the introductory information and safety warn-
ings on page 179.
The anti-theft wheel bolts on vehicles fitted with them (one anti-theft wheel bolt
per wheel) can only be loosened or tighten up by using the adapter provided.
› Pull off the full wheel trim from the wheel rim or the cap from the anti-theft
wheel bolt.
› Insert the adapter B
» Fig. 151
with its toothed side fully into the inner tooth-
ing of the safety wheel bolt A
until the stop so that only the outer hexagon is
jutting out.
› Push the wheel wrench onto the adapter B
up to the stop.
› Loosen or tighten the wheel bolt
» page 181.
› After removing the adapter, reinstall the full wheel trim or place the cap onto
the anti-theft wheel bolt.
› Have the
tightening torque checked with a torque wrench as soon as possible.
It is advisable to make a note of the code number hammered into the rear side of
the adapter or the rear side of the anti-theft wheel bolt. This number can be used
to purchase a replacement adapter from a
ŠKODA Service Partner, if necessary.
ä We recommend that you always carry the adapter for the wheel bolts with you in
the vehicle. It should be stowed in the vehicle tool kit. Ð Breakdown kit
ä
Introduction
This chapter contains information on the following subjects:
Components of the breakdown kit 183
Preparing to use the breakdown kit 184
Sealing and inflating tyres 184
Check after driving for 10 minutes 185
The breakdown kit is located in a box under the floor covering in the boot.
Use the breakdown kit to reliably repair tyre damage caused by foreign bodies or
a puncture with diameters up to approx. 4
mm. Do not remove foreign bodies, e.g.
screws or nails, from the tyre!
The repair can be undertaken on the vehicle immediately.
Repairs with the breakdown kit do not in any way replace a permanent repair of
the tyre, it only serves to reach the next ŠKODA specialist garage.
The breakdown kit must not be used under the following circumstances:
› if there is damage to the wheels;
› in outside temperatures of less than -20 °C;
› with tears or punctures greater than 4 mm in size;
› if there is damage to the tyre wall;
› when driving with very low tyre pressure or with a completely flat tyre;
› if the use-by-date (see inflation bottle) has passed.
£
182 Do-it-yourself