aux SKODA OCTAVIA 2007 1.G / (1U) Owner's Manual
[x] Cancel search | Manufacturer: SKODA, Model Year: 2007, Model line: OCTAVIA, Model: SKODA OCTAVIA 2007 1.G / (1U)Pages: 288, PDF Size: 15.19 MB
Page 4 of 288
Contents3
Contents
Layout of this Owner's Manual
(explanations)
. . . . . . . . . . . . . . . . . . . . . . . . . .
Using the system. . . . . . . . . . . . . . . . . . . . . .
Cockpit. . . . . . . . . . . . . . . . . . . . . . . . . . . . . . . . . . . . . . . .
Overview . . . . . . . . . . . . . . . . . . . . . . . . . . . . . . . . . . . .
Instruments and Indicator/Warning Lights. . .
General view of the instrument cluster . . . . . . . . .
Engine revolutions counter . . . . . . . . . . . . . . . . . . . .
Coolant temperature gauge . . . . . . . . . . . . . . . . . . .
Fuel gauge . . . . . . . . . . . . . . . . . . . . . . . . . . . . . . . . . . .
Speedometer . . . . . . . . . . . . . . . . . . . . . . . . . . . . . . . .
Counter for distance driven . . . . . . . . . . . . . . . . . . .
Service Interval Display . . . . . . . . . . . . . . . . . . . . . . .
Digital clock . . . . . . . . . . . . . . . . . . . . . . . . . . . . . . . . . .
Multi-functional indicato r (onboard computer)*
Information display* . . . . . . . . . . . . . . . . . . . . . . . . . .
Audio . . . . . . . . . . . . . . . . . . . . . . . . . . . . . . . . . . . . . . . .
Navigation system* . . . . . . . . . . . . . . . . . . . . . . . . . . .
Auto Check Control* . . . . . . . . . . . . . . . . . . . . . . . . . .
Set-up . . . . . . . . . . . . . . . . . . . . . . . . . . . . . . . . . . . . . . .
Warning lights . . . . . . . . . . . . . . . . . . . . . . . . . . . . . . . .
Unlocking and locking . . . . . . . . . . . . . . . . . . . . . . . .
Key . . . . . . . . . . . . . . . . . . . . . . . . . . . . . . . . . . . . . . . . . .
Key with light* . . . . . . . . . . . . . . . . . . . . . . . . . . . . . . . .
Changing the battery of the radio remote control
Electronic immobiliser . . . . . . . . . . . . . . . . . . . . . . . .
Child safety lock . . . . . . . . . . . . . . . . . . . . . . . . . . . . . .
Central locking system . . . . . . . . . . . . . . . . . . . . . . . .
Remote control* . . . . . . . . . . . . . . . . . . . . . . . . . . . . . .
Synchonisation of the remote control . . . . . . . . . . Anti-theft alarm system* . . . . . . . . . . . . . . . . . . . . . .
Power windows* . . . . . . . . . . . . . . . . . . . . . . . . . . . . .
Electric sliding/tilting roof* . . . . . . . . . . . . . . . . . . . .
Lights and Visibility . . . . . . . . . . . . . . . . . . . . . . . . . . .
Lights . . . . . . . . . . . . . . . . . . . . . . . . . . . . . . . . . . . . . . . .
Interior lighting . . . . . . . . . . . . . . . . . . . . . . . . . . . . . . .
Visibility . . . . . . . . . . . . . . . . . . . . . . . . . . . . . . . . . . . . .
Windshield wiper and wash system . . . . . . . . . . . .
Rear-view mirror . . . . . . . . . . . . . . . . . . . . . . . . . . . . .
Seats and Stowage. . . . . . . . . . . . . . . . . . . . . . . . . . . .
Front seats . . . . . . . . . . . . . . . . . . . . . . . . . . . . . . . . . . .
Adjusting front seats electrically* . . . . . . . . . . . . . .
Head restraints . . . . . . . . . . . . . . . . . . . . . . . . . . . . . . .
Middle rear head restraint* . . . . . . . . . . . . . . . . . . . .
Rear seats . . . . . . . . . . . . . . . . . . . . . . . . . . . . . . . . . . . .
Pedals . . . . . . . . . . . . . . . . . . . . . . . . . . . . . . . . . . . . . . .
luggage compartment . . . . . . . . . . . . . . . . . . . . . . . .
Net partition (Estate)* . . . . . . . . . . . . . . . . . . . . . . . .
The roof rack* . . . . . . . . . . . . . . . . . . . . . . . . . . . . . . . .
Cup holder . . . . . . . . . . . . . . . . . . . . . . . . . . . . . . . . . . .
Note holder . . . . . . . . . . . . . . . . . . . . . . . . . . . . . . . . . .
Ashtray . . . . . . . . . . . . . . . . . . . . . . . . . . . . . . . . . . . . . .
Cigarette lighter*, power sockets . . . . . . . . . . . . . . .
Storage compartments . . . . . . . . . . . . . . . . . . . . . . . .
Heating and air conditioning system. . . . . . . . .
Heating . . . . . . . . . . . . . . . . . . . . . . . . . . . . . . . . . . . . . .
Climatic* (semi-automat ic air conditioning
system) . . . . . . . . . . . . . . . . . . . . . . . . . . . . . . . . . . . . . .
Climatronic* (automatic air conditioning) . . . . . .
Auxiliary heating system (auxiliary heating and
ventilation)* . . . . . . . . . . . . . . . . . . . . . . . . . . . . . . . . .
Starting-off and Driving . . . . . . . . . . . . . . . . . . . . . .
Setting steering wheel position . . . . . . . . . . . . . . . .
Ignition lock . . . . . . . . . . . . . . . . . . . . . . . . . . . . . . . . .
Starting the engine . . . . . . . . . . . . . . . . . . . . . . . . . . .
Switching off the engine . . . . . . . . . . . . . . . . . . . . . .
Shifting (manual gearbox) . . . . . . . . . . . . . . . . . . . . .
Handbrake . . . . . . . . . . . . . . . . . . . . . . . . . . . . . . . . . . .
Rear parking aid* . . . . . . . . . . . . . . . . . . . . . . . . . . . . .
Front and rear parking aid* . . . . . . . . . . . . . . . . . . . .
Cruise control system (CCS)* . . . . . . . . . . . . . . . . . .
Automatic gearbox . . . . . . . . . . . . . . . . . . . . . . . . . . .
6-speed automatic gearbox* . . . . . . . . . . . . . . . . . .
Automatic gearbox DSG. . . . . . . . . . . . . . . . . . . . . .
Automatic gearbox DSG* . . . . . . . . . . . . . . . . . . . . .
Communication . . . . . . . . . . . . . . . . . . . . . . . . . . . . . .
Multifunction steering wheel* . . . . . . . . . . . . . . . . .
Universal telephone preinstallation with voice
control* . . . . . . . . . . . . . . . . . . . . . . . . . . . . . . . . . . . . .
Phone voice phonebook* . . . . . . . . . . . . . . . . . . . . .
Bluetooth™* . . . . . . . . . . . . . . . . . . . . . . . . . . . . . . . . .
Mobile phones and two-way radio systems . . . . .
Input AUX-IN* . . . . . . . . . . . . . . . . . . . . . . . . . . . . . . .
CD changer* . . . . . . . . . . . . . . . . . . . . . . . . . . . . . . . . .
Safety . . . . . . . . . . . . . . . . . . . . . . . . . . . . . . . . . . . . . .
Passive Safety . . . . . . . . . . . . . . . . . . . . . . . . . . . . . . . . .
Basic information . . . . . . . . . . . . . . . . . . . . . . . . . . . .
Correct seated position . . . . . . . . . . . . . . . . . . . . . . .
Seat belts. . . . . . . . . . . . . . . . . . . . . . . . . . . . . . . . . . . . . .
Why seat belts? . . . . . . . . . . . . . . . . . . . . . . . . . . . . . .
The physical principle of a frontal collision . . . . .
6
7
8
8
10
10
10
11
11
11
12
12
14
14
18
20
20
21
22
24
34
34
35
35
36
36
37
41
43 43
45
48
51
51
57
59
61
64
67
67
68
71
72
73
75
76
82
84
86
87
87
88
89
100
100
103
108
113 116
116
117
118
119
119
120
121
122
123
126
126
132
132
138
138
140
145
148
149
150
150
153
153
153
155
158
158
159
NKO A5 20 MR08.book Page 3 Wednesday, April 11, 2007 2:54 PM
Page 20 of 288
Instruments and Indicator/Warning Lights19
Using the systemSafetyDriving TipsGeneral MaintenanceBreakdown assistanceTechnical Data
Main menu
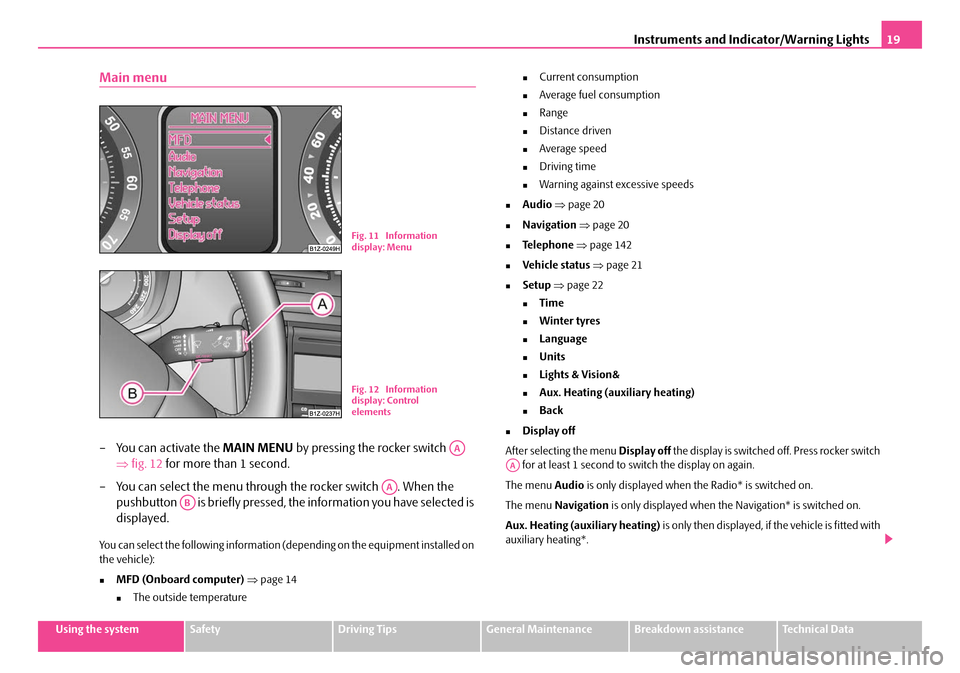
– You can activate the MAIN MENU by pressing the rocker switch
⇒ fig. 12 for more than 1 second.
– You can select the menu through the rocker switch . When the pushbutton is briefly pressed, the information you have selected is
displayed.
You can select the following information (depending on the equipment installed on
the vehicle):
�„MFD (Onboard computer) ⇒ page 14
�„The outside temperature
�„Current consumption
�„Average fuel consumption
�„Range
�„Distance driven
�„Average speed
�„Driving time
�„Warning against excessive speeds
�„Audio ⇒ page 20
�„Navigation ⇒ page 20
�„Te l e p h o n e ⇒ page 142
�„Vehicle status ⇒ page 21
�„Setup ⇒ page 22
�„Time
�„Winter tyres
�„Language
�„Units
�„Lights & Vision&
�„Aux. Heating (auxiliary heating)
�„Back
�„Display off
After selecting the menu Display off the display is switched off. Press rocker switch
for at least 1 second to switch the display on again.
The menu Audio is only displayed when th e Radio* is switched on.
The menu Navigation is only displayed when the Navigation* is switched on.
Aux. Heating (auxiliary heating) is only then displayed, if the vehicle is fitted with
auxiliary heating*.
Fig. 11 Information
display: Menu
Fig. 12 Information
display: Control
elements
AA
AA
AB
AA
NKO A5 20 MR08.book Page 19 Wednesday, April 11, 2007 2:54 PM
Page 23 of 288
Instruments and Indicator/Warning Lights
22
Three successive warning signals will sound if a red symbol appears.
If several operational faults of priority 1 exist, the symbols appear one after the
other and are each illuminated for about 5 seconds.
Yellow symbols
A yellow symbol signals a warning.
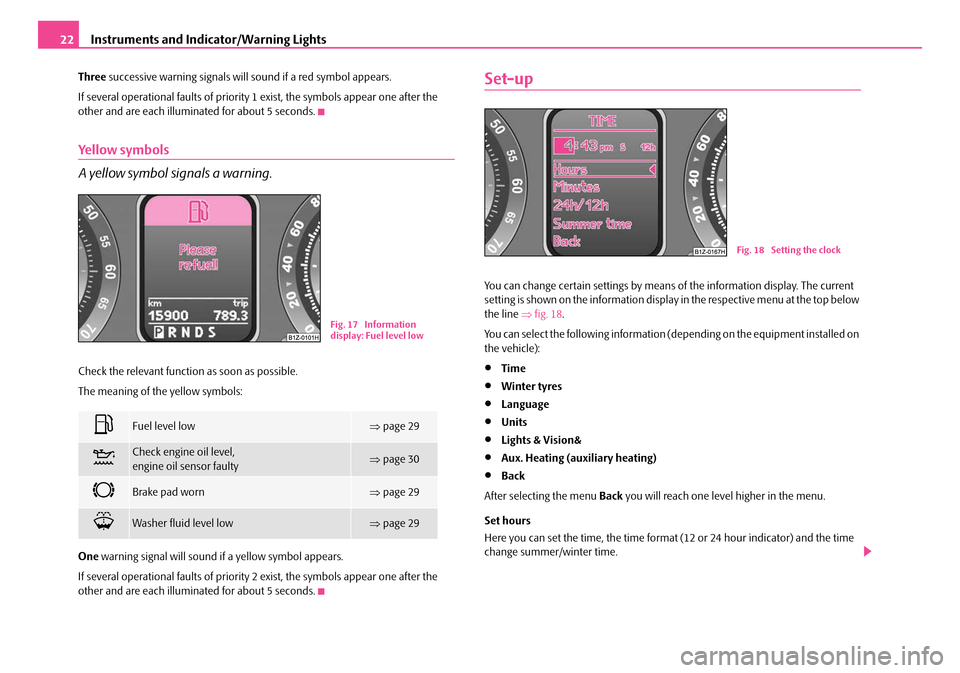
Check the relevant function as soon as possible.
The meaning of the yellow symbols:
One warning signal will sound if a yellow symbol appears.
If several operational faults of priority 2 exist, the symbols appear one after the
other and are each illuminated for about 5 seconds.
Set-up
You can change certain settings by means of the information display. The current
setting is shown on the information display in the respective menu at the top below
the line ⇒fig. 18 .
You can select the following information (depending on the equipment installed on
the vehicle):
•Time
•Winter tyres
•Language
•Units
•Lights & Vision&
•Aux. Heating (auxiliary heating)
•Back
After selecting the menu Back you will reach one level higher in the menu.
Set hours
Here you can set the time, the time format (12 or 24 hour indicator) and the time
change summer/winter time.
Fuel level low⇒ page 29
Check engine oil level,
engine oil sensor faulty⇒page 30
Brake pad worn⇒page 29
Washer fluid level low⇒page 29
Fig. 17 Information
display: Fuel level low
Fig. 18 Setting the clock
NKO A5 20 MR08.book Page 22 Wednesday, April 11, 2007 2:54 PM
Page 60 of 288
Lights and Visibility59
Using the systemSafetyDriving TipsGeneral MaintenanceBreakdown assistanceTechnical Data
Visibility
Rear window heater
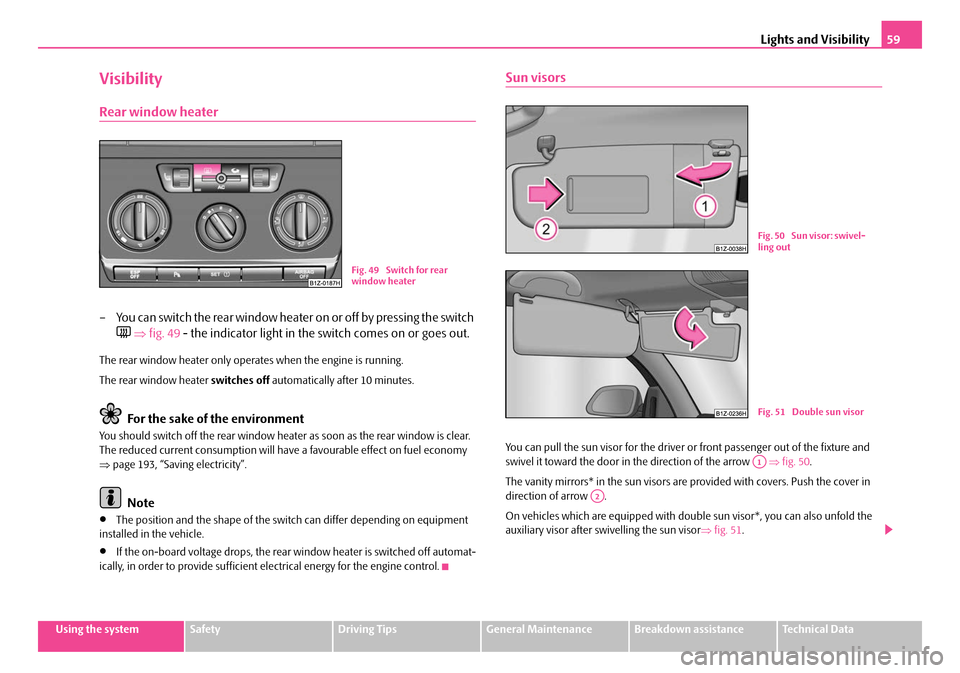
– You can switch the rear window heater on or off by pressing the switch
⇒ fig. 49 - the indicator light in the switch comes on or goes out.
The rear window heater only oper ates when the engine is running.
The rear window heater switches off automatically after 10 minutes.
For the sake of the environment
You should switch off the rear window heater as soon as the rear window is clear.
The reduced current consumption will have a favourable effect on fuel economy
⇒ page 193, “Saving electricity”.
Note
•The position and the shape of the switch can differ depending on equipment
installed in the vehicle.
•If the on-board voltage drops, the rear window heater is switched off automat-
ically, in order to provide sufficient electrical energy for the engine control.
Sun visors
You can pull the sun visor for the driver or front passenger out of the fixture and
swivel it toward the door in the direction of the arrow ⇒fig. 50 .
The vanity mirrors* in the sun visors are provided with covers. Push the cover in
direction of arrow .
On vehicles which are equipped with do uble sun visor*, you can also unfold the
auxiliary visor after swivelling the sun visor ⇒fig. 51 .
Fig. 49 Switch for rear
window heater
Fig. 50 Sun visor: swivel-
ling out
Fig. 51 Double sun visor
A1
A2
NKO A5 20 MR08.book Page 59 Wednesday, April 11, 2007 2:54 PM
Page 101 of 288
Heating and air conditioning system
100
Heating and air conditioning system
Heating
Using the system
The heating system delivers air into the interior of the vehicle and
warms it as required.
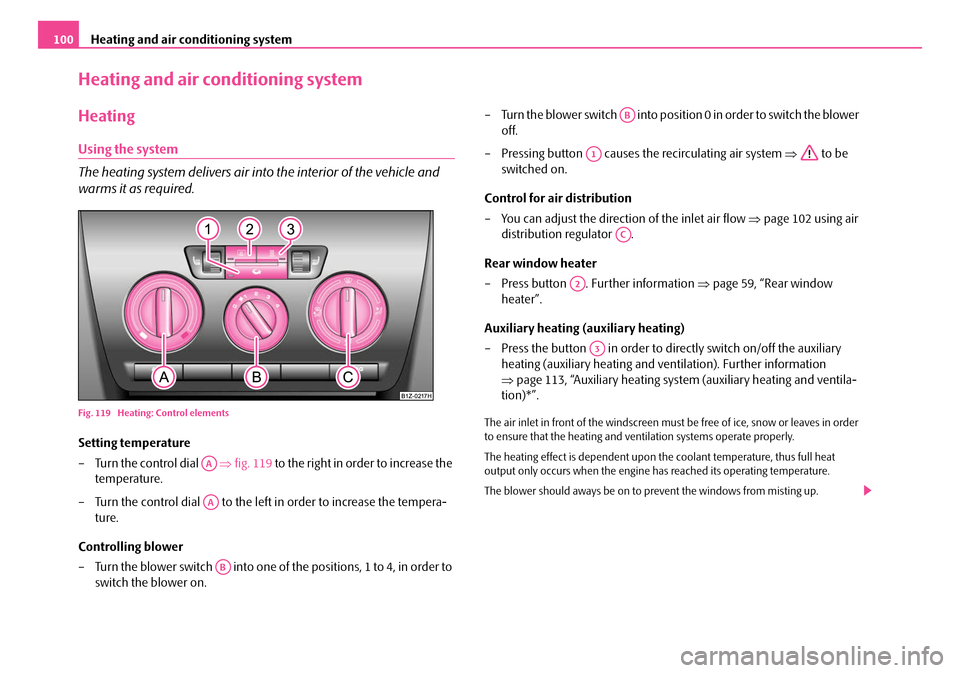
Fig. 119 Heating: Control elements
Setting temperature
– Turn the control dial ⇒fig. 119 to the right in order to increase the
temperature.
– Turn the control dial to the left in order to increase the tempera- ture.
Controlling blower
– Turn the blower switch into one of the positions, 1 to 4, in order to switch the blower on. – Turn the blower switch into positi
on 0 in order to switch the blower
off.
– Pressing button causes the recirculating air system ⇒ to be
switched on.
Control for air distribution
– You can adjust the direction of the inlet air flow ⇒page 102 using air
distribution regulator .
Rear window heater
– Press button . Further information ⇒page 59, “Rear window
heater”.
Auxiliary heating (auxiliary heating)
– Press the button in order to directly switch on/off the auxiliary heating (auxiliary heating and ve ntilation). Further information
⇒ page 113, “Auxiliary heating system (auxiliary heating and ventila-
tion)*”.
The air inlet in front of the windscreen must be free of ice, snow or leaves in order
to ensure that the heating and ventilation systems operate properly.
The heating effect is dependent upon th e coolant temperature, thus full heat
output only occurs when the engine has reached its operating temperature.
The blower should aways be on to prevent the windows from misting up.
AA
AA
AB
AB
A1
AC
A2
A3
NKO A5 20 MR08.book Page 100 Wednesday, April 11, 2007 2:54 PM
Page 105 of 288
Heating and air conditioning system
104
Note
•We recommend that you do not smoke in the vehicle when the recirculating air
mode is operating since the smoke which is drawn at the evaporator from the inte-
rior of the vehicle forms deposits in the evaporator of the air conditioning system.
This produces a permanent odour when the air conditioning system is operating
which can only be eliminated through co nsiderable effort and expense (replace-
ment of compressor).
Using the system
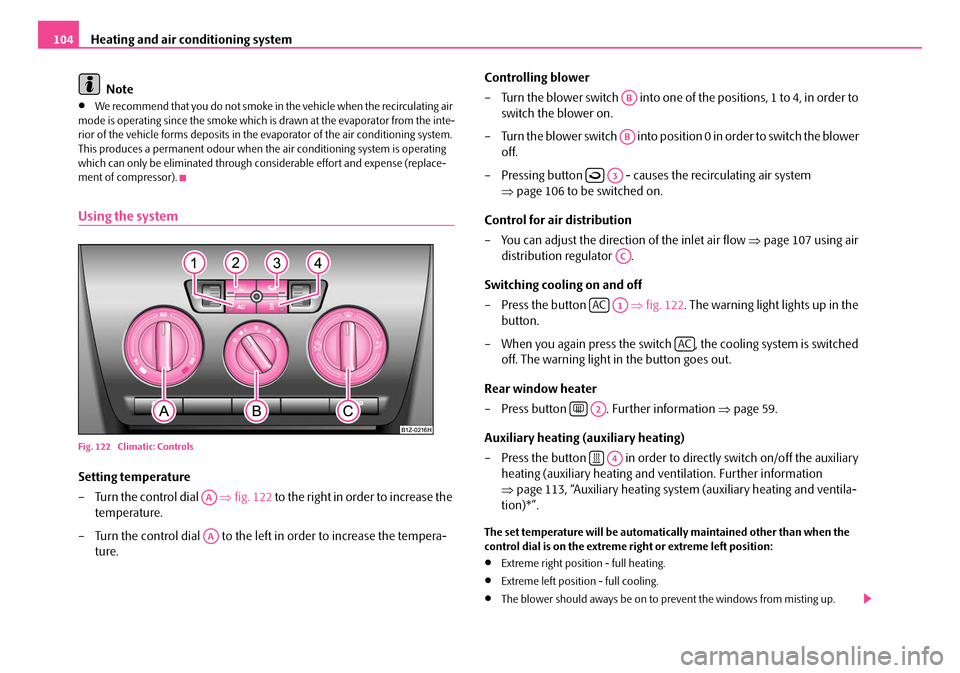
Fig. 122 Climatic: Controls
Setting temperature
– Turn the control dial ⇒fig. 122 to the right in order to increase the
temperature.
– Turn the control dial to the left in order to increase the tempera- ture. Controlling blower
– Turn the blower switch into one of
the positions, 1 to 4, in order to
switch the blower on.
– Turn the blower switch into positi on 0 in order to switch the blower
off.
– Pressing button - causes the recirculating air system ⇒page 106 to be switched on.
Control for air distribution
– You can adjust the direction of the inlet air flow ⇒page 107 using air
distribution regulator .
Switching cooling on and off
– Press the button ⇒fig. 122 . The warning light lights up in the
button.
– When you again press the switch , the cooling system is switched off. The warning light in the button goes out.
Rear window heater
– Press button . Further information ⇒page 59.
Auxiliary heating (auxiliary heating)
– Press the button in order to directly switch on/off the auxiliary heating (auxiliary heating and ve ntilation. Further information
⇒ page 113, “Auxiliary heating system (auxiliary heating and ventila-
tion)*”.
The set temperature will be automatically maintained other than when the
control dial is on the extreme right or extreme left position:
•Extreme right position - full heating.
•Extreme left position - full cooling.
•The blower should aways be on to prevent the windows from misting up.
AA
AA
AB
AB
A3
AC
ACA1
AC
A2
A4
NKO A5 20 MR08.book Page 104 Wednesday, April 11, 2007 2:54 PM
Page 111 of 288
Heating and air conditioning system
110
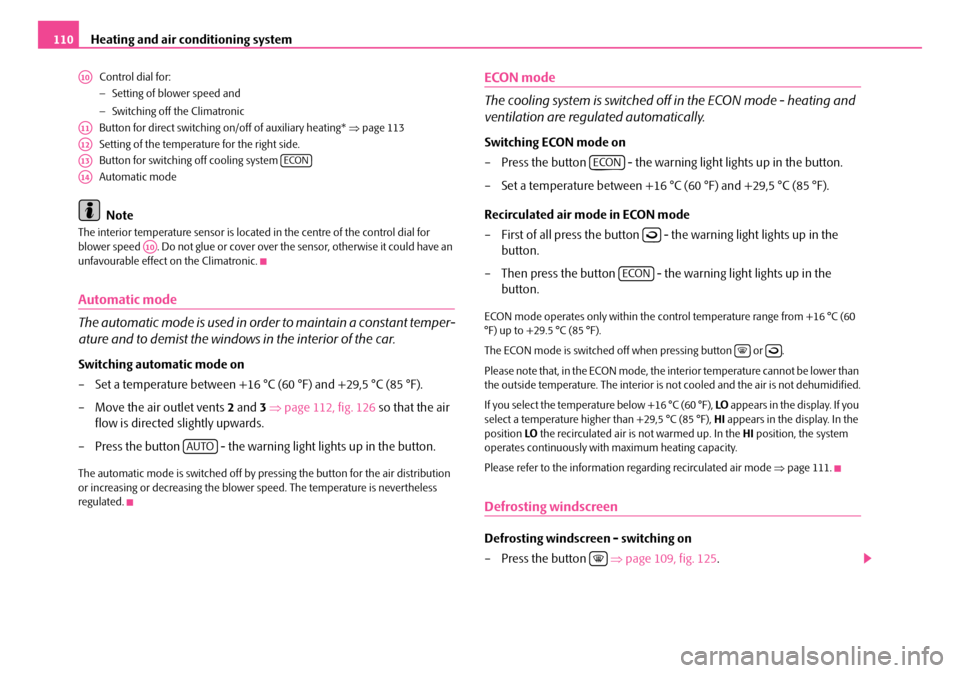
Control dial for:
− Setting of blower speed and
− Switching off the Climatronic
Button for direct switching on/off of auxiliary heating* ⇒page 113
Setting of the temperature for the right side.
Button for switching off cooling system
Automatic mode
Note
The interior temperature sensor is located in the centre of the control dial for
blower speed . Do not glue or cover over the sensor, otherwise it could have an
unfavourable effect on the Climatronic.
Automatic mode
The automatic mode is used in orde r to maintain a constant temper-
ature and to demist the windows in the interior of the car.
Switching automatic mode on
– Set a temperature between +16 °C (60 °F) and +29,5 °C (85 °F).
– Move the air outlet vents 2 and 3 ⇒ page 112, fig. 126 so that the air
flow is directed slightly upwards.
– Press the button - the warning light lights up in the button.
The automatic mode is switched off by pressing the button for the air distribution
or increasing or decreasing the blower speed. The temperature is nevertheless
regulated.
ECON mode
The cooling system is switched off in the ECON mode - heating and
ventilation are regulated automatically.
Switching ECON mode on
– Press the button - the warning light lights up in the button.
– Set a temperature between +16 °C (60 °F) and +29,5 °C (85 °F).
Recirculated air mode in ECON mode
– First of all press the button - the warning light lights up in the button.
– Then press the button - the warning light lights up in the button.
ECON mode operates only within the control temperature range from +16 °C (60
°F) up to +29.5 °C (85 °F).
The ECON mode is switched off when pressing button or .
Please note that, in the ECON mode, the interior temperature cannot be lower than
the outside temperature. The interior is no t cooled and the air is not dehumidified.
If you select the temperature below +16 °C (60 °F), LO appears in the display. If you
select a temperature higher than +29,5 °C (85 °F), HI appears in the display. In the
position LO the recirculated air is not warmed up. In the HI position, the system
operates continuously with maximum heating capacity.
Please refer to the information regarding recirculated air mode ⇒page 111.
Defrosting windscreen
Defrosting windscreen - switching on
– Press the button ⇒ page 109, fig. 125.
A10
A11
A12
A13ECON
A14
A10
AUTO
ECON
ECON
NKO A5 20 MR08.book Page 110 Wednesday, April 11, 2007 2:54 PM
Page 114 of 288
Heating and air conditioning system113
Using the systemSafetyDriving TipsGeneral MaintenanceBreakdown assistanceTechnical Data
Note
The air outlet vents 2 ensure in the ventilation and cooling mode for a comfortable
(no-draught) ventilation of th e interior of the vehicle, also if the air outlet vents 4
are closed.
Auxiliary heating system (auxiliary heating and
ventilation)*
Description
The auxiliary heating (auxiliary heating and ventilation) heats or
supplies the interior of the vehicl e with fresh air independent of the
engine.
Auxiliary heating (auxiliary heating)
The auxiliary heating (auxiliary heating) f unctions in connection with the heater or
with the Climatic or Climatronic.
It can be used when stationa ry, when engine is switched off for preheating of the
vehicle as well as while driving (e.g. during the heating phase of the engine).
The auxiliary heating (auxiliary heating) warms up the coolant during the combus-
tion of fuel from the vehicle tank. The cool ant warms up the air, which (if the blower
speed is not set to zero) flows into the occupant compartment.
6)
Auxiliary ventilation
The auxiliary ventilation enables fresh air to flow into the vehicle interior by
switching on the blower, if the blower speed is not set to zero, whereby the interior
temperature is effectively decreased (e.g. with a vehicle parked in the sun).
Using the system
So that the auxiliary heating (auxiliary heating and ventilation) func-
tions according to your expectations, it is necessary to carry out the
basic setting before its programming.
Basic setting
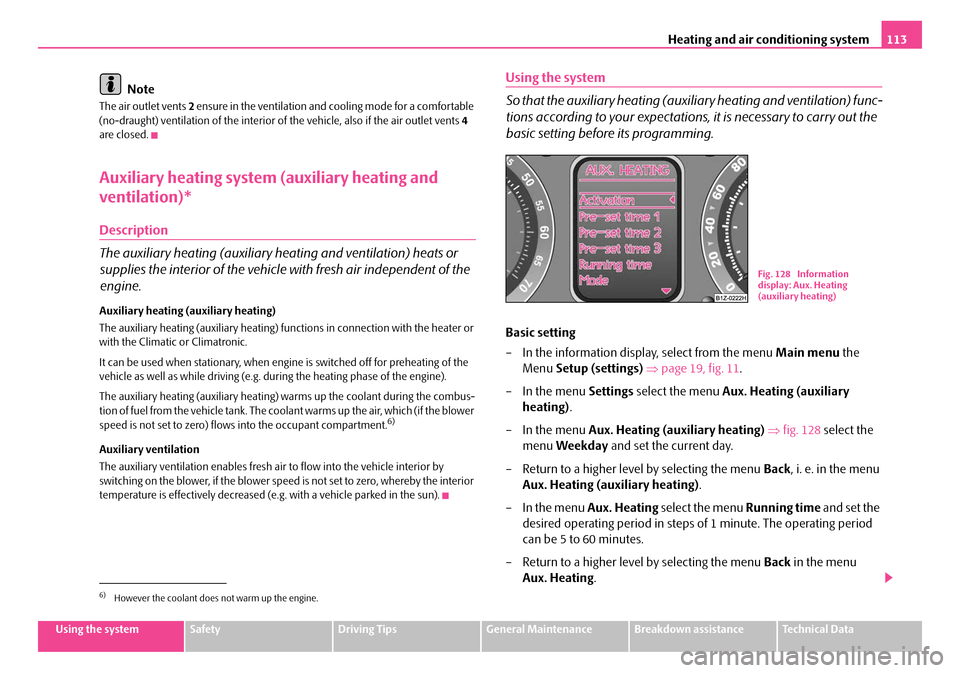
– In the information display, select from the menu Main menu the
Menu Setup (settings) ⇒ page 19, fig. 11 .
– In the menu Settings select the menu Aux. Heating (auxiliary
heating).
– In the menu Aux. Heating (auxiliary heating) ⇒ fig. 128 select the
menu Weekday and set the current day.
– Return to a higher level by selecting the menu Back, i. e. in the menu
Aux. Heating (auxiliary heating) .
– In the menu Aux. Heating select the menu Running time and set the
desired operating period in steps of 1 minute. The operating period
can be 5 to 60 minutes.
– Return to a higher level by selecting the menu Back in the menu
Aux. Heating .
6)However the coolant does not warm up the engine.
Fig. 128 Information
display: Aux. Heating
(auxiliary heating)
NKO A5 20 MR08.book Page 113 Wednesday, April 11, 2007 2:54 PM
Page 115 of 288
Heating and air conditioning system
114
– In the menu Aux. Heating select the menu Mode .
– In the menu Mode select the desired mode Heating or Ventilation .
Programming
For the programming of the auxiliary heatin g (auxiliary heating and ventilation) in
the menu Aux. Heating there are three pre-set times:
•Pre-set time 1
•Pre-set time 2
•Pre-set time 3
In each pre-set time, the day (if necessary each day = daily) and the time (hour and
minute) can be set for the operating period of the auxiliary heating and/or ventila-
tion.
If you leave the pre-se t menu by selecting menu Back or do not operate the display
for longer than 10 seconds, the set values are stored, but the pre-set time is not
active.
Both other pre-set times can be prog rammed and stored in the same way.
If you select the menu Activate after setting the desired values, Pre-set time
(weekday, hours, minute) activated! is displayed in the display and the set pre-
set time is active.
Only one programmed pre-set time can be active.
The last programmed pre-set time remains active.
The active pre-set time can be changed in the menu Aux. Heating in the menu
Activation by selecting a pre-set time.
The prerequisite for the correct switching on of the auxiliary heating (auxiliary
heating and ventilation) according to the programmed pre-set time is the correct
setting of the current time ⇒page 14 and weekday ⇒page 113.
If the system is running, a warning light in the button for direct switching on/off of
the auxiliary heating lights up. The running system deactivates after expiration of the operating period or is deac-
tivated earlier by pressing the button for
direct switching on/off of the auxiliary
heating ⇒page 114.
The deactivation of a desired pre-set time can be performed by selecting the menu
Deactive in the menu Active .
It is possible to re-establish the factory setting using the menu Fa ct or y se t tin g in
the menu Aux. Heating .
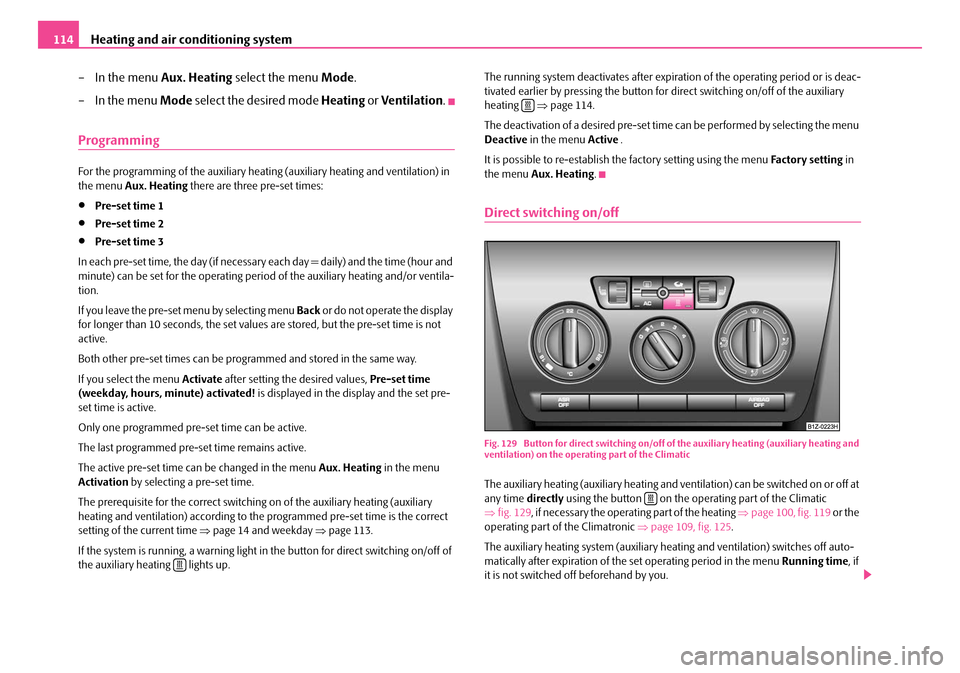
Direct switching on/off
Fig. 129 Button for direct switching on/off of the auxiliary heating (auxiliary heating and
ventilation) on the operating part of the Climatic
The auxiliary heating (auxiliary heating and ve ntilation) can be switched on or off at
any time directly using the button on the operating part of the Climatic
⇒ fig. 129 , if necessary the operating part of the heating ⇒page 100, fig. 119 or the
operating part of the Climatronic ⇒page 109, fig. 125 .
The auxiliary heating system (auxiliary heating and ventilation) switches off auto-
matically after expiration of the set operating period in the menu Running time, if
it is not switched off beforehand by you.
NKO A5 20 MR08.book Page 114 Wednesday, April 11, 2007 2:54 PM
Page 116 of 288
Heating and air conditioning system115
Using the systemSafetyDriving TipsGeneral MaintenanceBreakdown assistanceTechnical Data
WARNING
•The auxiliary heating must never be operated in closed rooms - risk of
poisoning!
•The auxiliary heating must not be running during refueling - risk of fire.
•The exhaust pipe of the auxiliary heating is located on the underside of
the vehicle. Therefore do not place the vehicle, if you wish to operate the
auxiliary heating, in such a way that the exhaust gases of the auxiliary
heating can come easily into contact with inflammable materials (e.g. dry
grass) or easily inflammable su bstances (e.g. fuel run out).
Note
•If the auxiliary heating runs, the fuel consumption comes from the vehicle tank.
Therefore the auxiliary heating should not be operated, if there is very little fuel in
the tank.
•The exhaust pipe of the auxiliary heating, which is located on the underside of
the vehicle, must not be clogged and the exhaust flow must not be blocked.
•If the auxiliary heat ing and ventilation is running, the vehicle battery discharges.
If the auxiliary heating and ventilation has been operated several times over a
longer period, the vehicle must be driven a few kilometers in order to recharge the
vehicle battery.
•The auxiliary heating only sw itches the blower on, if it has achieved a coolant
temperature of approx. 50 °C.
•At low outside temperatures, this can resu lt in a formation of water vapour in
the area of the engine compartment. This is quite normal and is not an operating
problem.
•After switching off the auxiliary heating, the coolant pump runs for a short
period.
•The auxiliary heating and ventilation does not switch on or comes on, if the
vehicle battery indicate s a low loading state.
•The auxiliary heating (auxiliary heating) switches on, if in the information
display: Please refuel! is indicated or was indicated before switching off the igni-
tion.
•When driving, the auxiliary heating can only be switched on, if the exterior
temperature is lower than 5 °C.
•The air inlet in front of the windscreen mu st be free of ice, snow or leaves in
order to ensure that the auxiliary heating operates properly.
•So that the warm air can flow into the vehicle interior after switching on the
auxiliary heating (auxiliary heating), the control dial ⇒page 100, fig. 119 must
be turned up to the stop to the right when heating. With Climatic and Climatronic,
you can maintain the temperature norma lly selected by you (we recommend 22
°C). It is recommended to put the air flow in the position
. For heating and
climatic put the blower switch ⇒page 100, fig. 119 if necessary ⇒page 104,
fig. 122 in the position 2.
•On vehicles with DPF (die sel particle filter) the warm coolant heats up the
engine.
AA
AB
NKO A5 20 MR08.book Page 115 Wednesday, April 11, 2007 2:54 PM