oil light SKODA OCTAVIA 2007 1.G / (1U) Owner's Manual
[x] Cancel search | Manufacturer: SKODA, Model Year: 2007, Model line: OCTAVIA, Model: SKODA OCTAVIA 2007 1.G / (1U)Pages: 288, PDF Size: 15.19 MB
Page 5 of 288
Contents
4
Important safety information regarding the use of seat
belts . . . . . . . . . . . . . . . . . . . . . . . . . . . . . . . . . . . . . . . . .
How are seat belts correctly fastened? . . . . . . . . . .
Belt tensioners . . . . . . . . . . . . . . . . . . . . . . . . . . . . . . .
Airbag system . . . . . . . . . . . . . . . . . . . . . . . . . . . . . . . . .
Description of the airbag system . . . . . . . . . . . . . . .
Front airbag . . . . . . . . . . . . . . . . . . . . . . . . . . . . . . . . . .
Side airbags* . . . . . . . . . . . . . . . . . . . . . . . . . . . . . . . . .
Head airbags* . . . . . . . . . . . . . . . . . . . . . . . . . . . . . . . .
Deactivating an airbag . . . . . . . . . . . . . . . . . . . . . . . .
Transporting children safely . . . . . . . . . . . . . . . . . .
What you should know about transporting children!
Child seat . . . . . . . . . . . . . . . . . . . . . . . . . . . . . . . . . . . .
Attaching a child seat using the “ISOFIX” system .
Attaching child seat using the “Top Tether” system
Driving Tips. . . . . . . . . . . . . . . . . . . . . . . . . . . . . .
Intelligent Technology . . . . . . . . . . . . . . . . . . . . . . . .
Electronic stability programme (ESP)* . . . . . . . . . .
Brakes . . . . . . . . . . . . . . . . . . . . . . . . . . . . . . . . . . . . . . .
Brake booster . . . . . . . . . . . . . . . . . . . . . . . . . . . . . . . .
Antilock brake system (ABS) . . . . . . . . . . . . . . . . . . .
Brake Assist* . . . . . . . . . . . . . . . . . . . . . . . . . . . . . . . . .
Uphill-Start off-Assist* . . . . . . . . . . . . . . . . . . . . . . . .
Electromechanical power steering . . . . . . . . . . . . .
Tyre inflation pressure-control system* . . . . . . . . .
Diesel particle filter* (diesel engine) . . . . . . . . . . . .
Driving and the Environment. . . . . . . . . . . . . . . . .
The first 1 500 kilometres and then afterwards . .
Catalytic converter . . . . . . . . . . . . . . . . . . . . . . . . . . . .
Driving in an economical and environmentally
conscious manner . . . . . . . . . . . . . . . . . . . . . . . . . . . .
Environmental compatibility . . . . . . . . . . . . . . . . . . .
Motoring abroad . . . . . . . . . . . . . . . . . . . . . . . . . . . . .
Avoiding damage to your vehicle . . . . . . . . . . . . . .
Towing a trailer. . . . . . . . . . . . . . . . . . . . . . . . . . . . . . . .
Towing a trailer . . . . . . . . . . . . . . . . . . . . . . . . . . . . . . .
Detachable towing device* . . . . . . . . . . . . . . . . . . . .
General Maintenance. . . . . . . . . . . . . . .
Taking care of your vehicle and cleaning the
vehicle. . . . . . . . . . . . . . . . . . . . . . . . . . . . . . . . . . . . . . . . .
General . . . . . . . . . . . . . . . . . . . . . . . . . . . . . . . . . . . . . .
Care of the exterior of vehicle . . . . . . . . . . . . . . . . . .
Care of the interior of vehicle . . . . . . . . . . . . . . . . . .
Fuel. . . . . . . . . . . . . . . . . . . . . . . . . . . . . . . . . . . . . . . . . . . .
Petrol . . . . . . . . . . . . . . . . . . . . . . . . . . . . . . . . . . . . . . . .
Diesel . . . . . . . . . . . . . . . . . . . . . . . . . . . . . . . . . . . . . . . .
Refuelling . . . . . . . . . . . . . . . . . . . . . . . . . . . . . . . . . . . .
Inspecting and Replenishing. . . . . . . . . . . . . . . . . .
Engine compartment . . . . . . . . . . . . . . . . . . . . . . . . .
Engine oil . . . . . . . . . . . . . . . . . . . . . . . . . . . . . . . . . . . .
Cooling system . . . . . . . . . . . . . . . . . . . . . . . . . . . . . . .
Brake fluid . . . . . . . . . . . . . . . . . . . . . . . . . . . . . . . . . . .
Battery . . . . . . . . . . . . . . . . . . . . . . . . . . . . . . . . . . . . . . .
Windshield washer system . . . . . . . . . . . . . . . . . . . .
Wheels and Tyres. . . . . . . . . . . . . . . . . . . . . . . . . . . . . .
Wheels . . . . . . . . . . . . . . . . . . . . . . . . . . . . . . . . . . . . . .
Accessories, changes and replacement of partsAccessories and replacement parts . . . . . . . . . . . . .
Technical changes . . . . . . . . . . . . . . . . . . . . . . . . . . . .
Breakdown assistance. . . . . . . . . . . . . .
Breakdown assistance . . . . . . . . . . . . . . . . . . . . . . . .
First-aid box* and Warning triangle* (Octavia) . .
First-aid box* and warning triangle* (Estate car) .
Fire extinguisher* . . . . . . . . . . . . . . . . . . . . . . . . . . . . .
Vehicle tool kit . . . . . . . . . . . . . . . . . . . . . . . . . . . . . . . .
Tyre repair kit* . . . . . . . . . . . . . . . . . . . . . . . . . . . . . . . .
Spare wheel . . . . . . . . . . . . . . . . . . . . . . . . . . . . . . . . . . Changing a wheel . . . . . . . . . . . . . . . . . . . . . . . . . . . . .
Jump-starting . . . . . . . . . . . . . . . . . . . . . . . . . . . . . . . .
Tow-starting and towing vehicle . . . . . . . . . . . . . . . .
Fuses and light bulbs. . . . . . . . . . . . . . . . . . . . . . . . . .
Electric fuses . . . . . . . . . . . . . . . . . . . . . . . . . . . . . . . . .
Bulbs . . . . . . . . . . . . . . . . . . . . . . . . . . . . . . . . . . . . . . . .
Technical Data . . . . . . . . . . . . . . . . . . . . . . . . . .
Technical Data. . . . . . . . . . . . . . . . . . . . . . . . . . . . . . . . .
General comments . . . . . . . . . . . . . . . . . . . . . . . . . . . .
Used abbreviations . . . . . . . . . . . . . . . . . . . . . . . . . . .
Performances . . . . . . . . . . . . . . . . . . . . . . . . . . . . . . . . .
Weight . . . . . . . . . . . . . . . . . . . . . . . . . . . . . . . . . . . . . . .
Identification details . . . . . . . . . . . . . . . . . . . . . . . . . .
Fuel consumption according to the regulations
(99/100/EU) . . . . . . . . . . . . . . . . . . . . . . . . . . . . . . . . . .
Dimensions . . . . . . . . . . . . . . . . . . . . . . . . . . . . . . . . . .
1.4 ltr./59 kW - EU4 . . . . . . . . . . . . . . . . . . . . . . . . . . . .
1.6 l/75 kW - EU 4, EU 2 . . . . . . . . . . . . . . . . . . . . . . .
1.6 l/85 kW FSI - EU 4 . . . . . . . . . . . . . . . . . . . . . . . . . .
1.8 l/118 kW TFSI - EU 4 . . . . . . . . . . . . . . . . . . . . . . .
2.0 l/110 kW FSI - EU 4, EU 2 . . . . . . . . . . . . . . . . . . .
2.0 ltr./147 kW - EU 4 . . . . . . . . . . . . . . . . . . . . . . . . . .
1.9 l/77 kW TDI PD - EU 4, EU 3 . . . . . . . . . . . . . . . .
2.0 l/103 kW TDI PD - EU 4 . . . . . . . . . . . . . . . . . . . . .
2.0 l/100 kW TDI PD - EU 4 . . . . . . . . . . . . . . . . . . . . .
2.0 l/125 kW TDI PD DPF - EU 4 . . . . . . . . . . . . . . . .
Index . . . . . . . . . . . . . . . . . . . . . . . . . . . . . . . . . . . . . . . .
159
160
162
163
163
165
167
169
171
173
173
176
179
180
181
181
181
184
185
185
185
186
186
187
188
189
189
190
190
194
194
195 196
196
198
199
199
199
199
204
206
206
206
207
209
209
212
214
217
218
221
223
223
229
229
229
231
231
231
231
231
232
232
233233
238
239
243
243
248
255
255
255
255
255
255
255
256
257
258
260
262
264
266
268
270
272
274
276
279
NKO A5 20 MR08.book Page 4 Wednesday, April 11, 2007 2:54 PM
Page 22 of 288
Instruments and Indicator/Warning Lights21
Using the systemSafetyDriving TipsGeneral MaintenanceBreakdown assistanceTechnical Data
Auto Check Control*
Car state
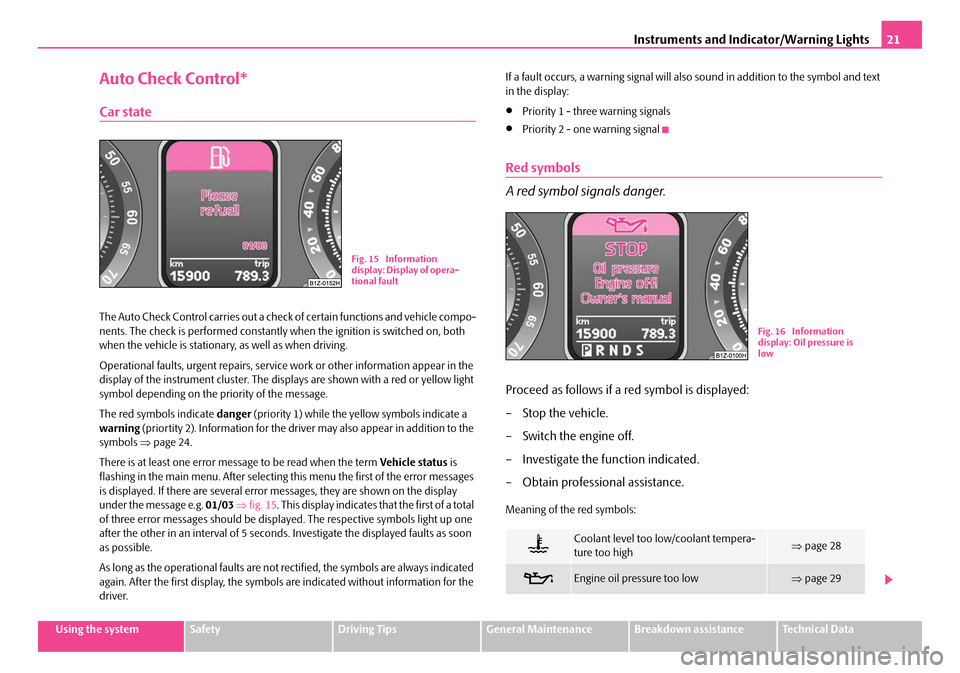
The Auto Check Control carries out a check of certain functions and vehicle compo-
nents. The check is performed constantly when the ignition is switched on, both
when the vehicle is stationary, as well as when driving.
Operational faults, urgent repairs, service work or other information appear in the
display of the instrument cluster. The disp lays are shown with a red or yellow light
symbol depending on the priority of the message.
The red symbols indicate danger (priority 1) while the yellow symbols indicate a
warning (priortity 2). Information for the driver may also appear in addition to the
symbols ⇒page 24.
There is at least one error message to be read when the term Vehicle status is
flashing in the main menu. After selecting this menu the first of the error messages
is displayed. If there are several error messages, they are shown on the display
under the message e.g. 01/03 ⇒ fig. 15 . This display indicates that the first of a total
of three error messages should be displa yed. The respective symbols light up one
after the other in an interval of 5 seconds. Investigate the displayed faults as soon
as possible.
As long as the operational faults are not rectified, the symbols are always indicated
again. After the first display, the symbols are indicated without information for the
driver. If a fault occurs, a warning signal will also sound in addition to the symbol and text
in the display:
•Priority 1 - three warning signals
•Priority 2 - one warning signal
Red symbols
A red symbol signals danger.
Proceed as follows if a red symbol is displayed:
– Stop the vehicle.
– Switch the engine off.
– Investigate the function indicated.
– Obtain professional assistance.
Meaning of the red symbols:
Fig. 15 Information
display: Display of opera-
tional fault
Coolant level too low/coolant tempera-
ture too high⇒
page 28
Engine oil pressure too low⇒page 29
Fig. 16 Information
display: Oil pressure is
low
NKO A5 20 MR08.book Page 21 Wednesday, April 11, 2007 2:54 PM
Page 23 of 288
Instruments and Indicator/Warning Lights
22
Three successive warning signals will sound if a red symbol appears.
If several operational faults of priority 1 exist, the symbols appear one after the
other and are each illuminated for about 5 seconds.
Yellow symbols
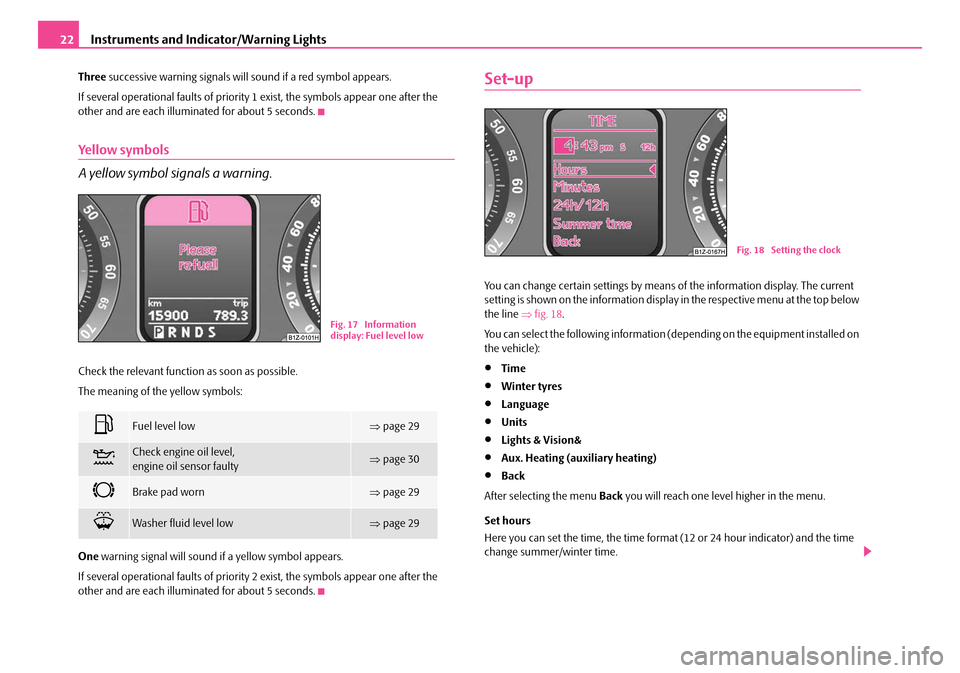
A yellow symbol signals a warning.
Check the relevant function as soon as possible.
The meaning of the yellow symbols:
One warning signal will sound if a yellow symbol appears.
If several operational faults of priority 2 exist, the symbols appear one after the
other and are each illuminated for about 5 seconds.
Set-up
You can change certain settings by means of the information display. The current
setting is shown on the information display in the respective menu at the top below
the line ⇒fig. 18 .
You can select the following information (depending on the equipment installed on
the vehicle):
•Time
•Winter tyres
•Language
•Units
•Lights & Vision&
•Aux. Heating (auxiliary heating)
•Back
After selecting the menu Back you will reach one level higher in the menu.
Set hours
Here you can set the time, the time format (12 or 24 hour indicator) and the time
change summer/winter time.
Fuel level low⇒ page 29
Check engine oil level,
engine oil sensor faulty⇒page 30
Brake pad worn⇒page 29
Washer fluid level low⇒page 29
Fig. 17 Information
display: Fuel level low
Fig. 18 Setting the clock
NKO A5 20 MR08.book Page 22 Wednesday, April 11, 2007 2:54 PM
Page 26 of 288
Instruments and Indicator/Warning Lights25
Using the systemSafetyDriving TipsGeneral MaintenanceBreakdown assistanceTechnical Data
WARNING
•If you do not pay attention to the warning lights coming on and the corre-
sponding descriptions and warning notes, this may result in severe body
injuries or major vehicle damage.
•The engine compartment of your car is a hazardous area. There is a risk
of injuries, scalding, accidents and fire when working in the engine
compartment, e.g. inspecting and replenis hing oil and other fluids. It is also
essential to observe all warnings ⇒page 210.
Note
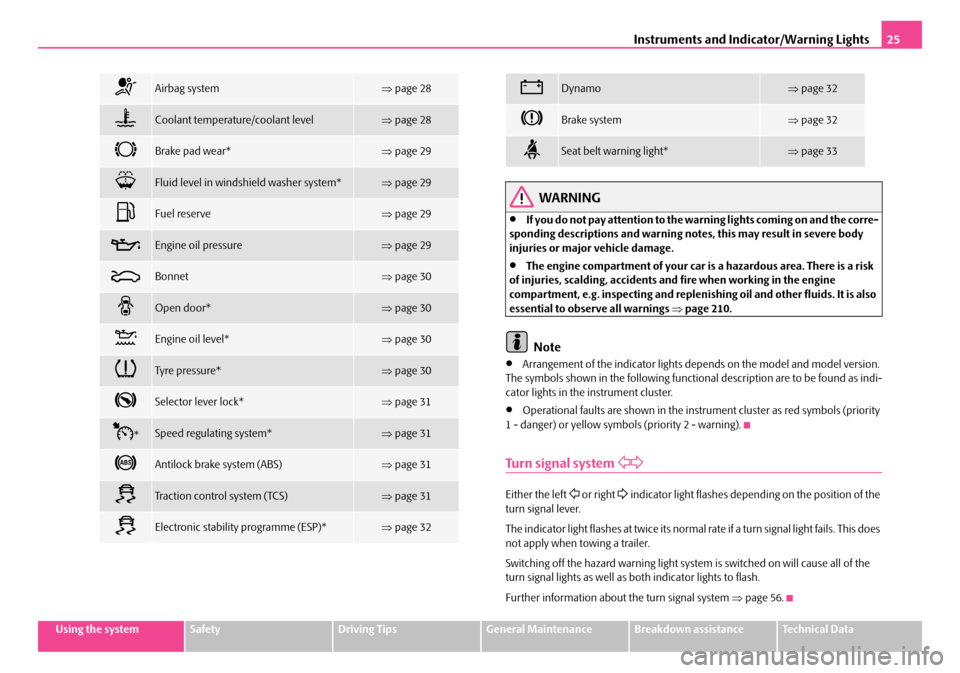
•Arrangement of the indicator lights de pends on the model and model version.
The symbols shown in the following function al description are to be found as indi-
cator lights in the instrument cluster.
•Operational faults are shown in the instrument cluster as red symbols (priority
1 - danger) or yellow symbols (priority 2 - warning).
Turn signal system
Either the left or right indicator light flashes depending on the position of the
turn signal lever.
The indicator light flashes at twice its normal rate if a turn signal light fails. This does
not apply when towing a trailer.
Switching off the hazard warning light system is switched on will cause all of the
turn signal lights as well as both indicator lights to flash.
Further information about the turn signal system ⇒page 56.
Airbag system⇒page 28
Coolant temperature/coolant level⇒page 28
Brake pad wear*⇒page 29
Fluid level in windshield washer system*⇒page 29
Fuel reserve⇒page 29
Engine oil pressure⇒page 29
Bonnet⇒page 30
Open door*⇒page 30
Engine oil level*⇒page 30
Tyre pressure*⇒page 30
Selector lever lock*⇒page 31
*Speed regulating system*⇒page 31
Antilock brake system (ABS)⇒page 31
Traction control system (TCS)⇒page 31
Electronic stability programme (ESP)*⇒page 32
Dynamo⇒page 32
Brake system⇒page 32
Seat belt warning light*⇒page 33
NKO A5 20 MR08.book Page 25 Wednesday, April 11, 2007 2:54 PM
Page 30 of 288
Instruments and Indicator/Warning Lights29
Using the systemSafetyDriving TipsGeneral MaintenanceBreakdown assistanceTechnical Data
The following text will be displayed in the information display*:
STOP Check coolant! Owner's manual (STOP! Check coolant! Owner's
manual)
WARNING
•If you must stop for technical reasons, then park the vehicle at a safe
distance from the traffic and switch off the engine and switch on the hazard
warning light system ⇒page 55.
•Take care when opening the coolant expa nsion bottle. If the engine is hot,
the cooling system is pressurized - risk of scalding! It is best to allow the
engine to cool down before removing the cap.
•Do not touch the coolant fan The coolant fan may switch on automati-
cally even if the ignition is off.
Thickness of the brake pads*
The warning light comes on for a few seconds 3) when the ignition is switched
on.
If the warning light
comes on, contact a specialist garage immediately and have
the brake pads on all of the wheels inspected.
A peep sounds as an addi tional warning signal.
The following text will be displayed in the information display*: Check brake pads!
Windshield washer fluid level*
The warning light comes on when the ignition is switched on if there is insuffi-
cient fluid in the windshield wash er system. Top up with liquid ⇒page 221.
A peep sounds as an addi tional warning signal. The following text will be displayed in the information display*:
To p u p w a s h f l u i d !
Fuel reserve
The warning light comes on, if the fuel level is still below 8 litres.
A peep sounds as an ad ditional warning signal.
The following text will be displayed in the information display*: Please refuel! (Please refuel!)
Note
The Text in the information display* goes out only after refuelling and driving a
short distance.
Engine oil pressure
The warning light comes on for a few seconds 4) when the ignition is switched
on.
Stop the vehicle and switch the engine off if the warning light does not go off
after the engine has started or flashes while driving. Check the oil level and top up
with oil as necessary ⇒page 213.
3 peeps sound as an additional warning signal.
Do not continue your journey if for some reason it is not possible under the
conditions prev ailing to top up with oil. Keep the engine switched off and obtain
professional assistance from a specialist garage, otherwise it could lead to severe
engine damage.
Do not drive any further if the warning light flashes even if the oil is at the correct
level. Do not run the engine not at idling speed either. Contact the nearest specialist
garage to obtain professional assistance.
3)The warning light on vehicles fitted with information display does not come on after
switching the ignition on, but only if a fault exists.4)The warning light on vehicles fitted with information display does not come on after
switching the ignition on, but only if a fault exists or the engine oil level is too low.
NKO A5 20 MR08.book Page 29 Wednesday, April 11, 2007 2:54 PM
Page 31 of 288
Instruments and Indicator/Warning Lights
30
The following text will be displayed in the information display*:
STOP! Oil Pressure Engine off! Owner's manual
WARNING
•If you must stop for technical reasons, then park the vehicle at a safe
distance from the traffic and switch off the engine and switch on the hazard
warning light system ⇒ page 55.
•The red oil pressure light is not an oil level indicator! One should
therefore check the oil level at regular intervals, preferably after every refu-
eling stop.
Bonnet
The warning light comes on if the bonnet is unlocked.
The warning light comes on even when the ignition is switched off. The warning
light goes out about 15 seconds after locking the vehicle.
Open door*
The warning light comes on if one or several door s are opened or if the boot lid
is opened.
The warning light on vehicles fitted wi th information display comes on when
switching the ignition off. The warning li ght goes out about 15 seconds after locking
the vehicle.
The warning light on vehicles fitted wi th information display goes out after
switching the ignition off.
Engine oil level*
Warning light lights up
If the warning light
lights up, the quantity of oil in the engine is probably too low.
Check as soon as possible the oil level or top up ⇒page 213 with engine oil.
A peep sounds as an additional warning signal.
The following text will be displayed in the information display*: Check oil level!
The warning light will go out if the bonnet is left open for more than 30 seconds. If
no engine oil has been replenished, the warning light will come on again after
driving about 100 km.
Warning light
flashes
A fault on the engine oil level sensor is indicated additionally by an audible signal
and the warning light coming on several times after the ignition has been switched
on.
In this case have the engine inspecte d without delay by a specialist garage.
The following text will be displayed in the information display*: Oil sensor workshop!
Tyre inflation pressure*
The warning light lights up, if there is a substantial drop in inflation pressure in
one of the tyres. Reduce the speed and check or correct as soon as possible the
inflation pressure in the tyres ⇒page 223.
A peep sounds as an additional warning signal.
If the warning light flashes, there is a system fault. Visit the nearest specialist garage
and have the fault rectified.
Further information about tyre pressure-control system ⇒page 187.
NKO A5 20 MR08.book Page 30 Wednesday, April 11, 2007 2:54 PM
Page 74 of 288
Seats and Stowage73
Using the systemSafetyDriving TipsGeneral MaintenanceBreakdown assistanceTechnical Data
Rear seats
Folding the rear seats forwards
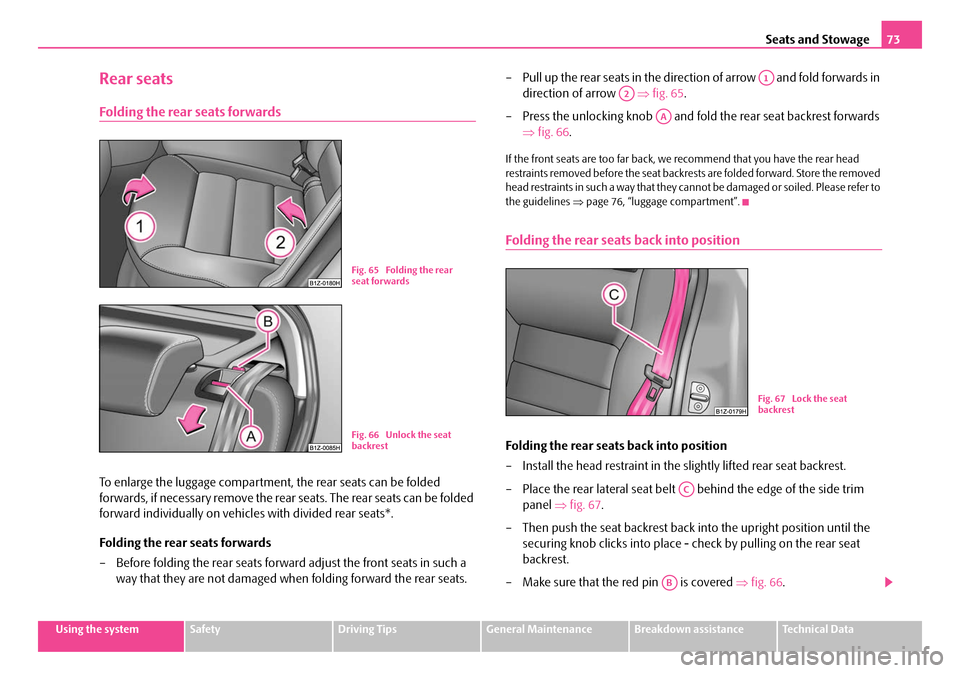
To enlarge the luggage compartment , the rear seats can be folded
forwards, if necessary remove the rear seats. The rear seats can be folded
forward individually on vehicl es with divided rear seats*.
Folding the rear seats forwards
– Before folding the rear seats forwar d adjust the front seats in such a
way that they are not damaged when folding forward the rear seats. – Pull up the rear seats in the direction of arrow and fold forwards in
direction of arrow ⇒ fig. 65.
– Press the unlocking knob and fold the rear seat backrest forwards ⇒fig. 66 .
If the front seats are too far back, we recommend that you have the rear head
restraints removed before the seat backrests are folded forward. Store the removed
head restraints in such a way that they cannot be damaged or soiled. Please refer to
the guidelines ⇒page 76, “luggage compartment”.
Folding the rear seats back into position
Folding the rear seats back into position
– Install the head restraint in the slightly lifted rear seat backrest.
– Place the rear lateral seat belt behind the edge of the side trim
panel ⇒fig. 67 .
– Then push the seat backrest back into the upright position until the
securing knob clicks into place - check by pulling on the rear seat
backrest.
– Make sure that the red pin is covered ⇒fig. 66 .
Fig. 65 Folding the rear
seat forwards
Fig. 66 Unlock the seat
backrest
A1
A2
AA
Fig. 67 Lock the seat
backrest
AC
AB
NKO A5 20 MR08.book Page 73 Wednesday, April 11, 2007 2:54 PM
Page 119 of 288
Starting-off and Driving
118
Starting the engine
General
You can only start the engine only using an original ignition key.
•Place the gearshift lever into neutral (or place the selector lever to the position
P or N in the case of an automatic gearbox) and put on the handbrake firmly before
starting the engine.
•The clutch pedal should be fully depressed when starting the engine which
means that the starter only has to crank the engine.
•Let go of the key as soon as the engine starts otherwise there may be damage
to the starter.
The engine running noises ma y louder at first be louder for a short time after
starting the cold engine until oil pressure can be built up in the hydraulic valve
clearance compensation. This is quite no rmal and is not an operating problem.
If the engine does not start ...
You can use the battery of anothe r vehicle as a jump-start aid ⇒page 238.
It is only possible to tow-start vehicles fitted with a manual gearbox. The tow-
starting distance must not be more than 50 metres ⇒page 242.
WARNING
•Never run the engine in non ventilat ed or enclosed areas. The exhaust
gases of the engine contain besides the odorless and colourless carbon
monoxide a poisonous gas - hazard! Carbon monoxide can cause uncon-
sciousness and death.
•Never leave your vehicle unattended with the engine running.
Caution
•The starter may only be operated (ignition key position ), if the engine is not
running. If the starter is immediately operated after switching off the engine, the
starter or the engine can be damaged.
•Avoid high engine revolutions, full throttle and high engine loads as long as the
engine has not yet reached its normal oper ating temperature - risk of damaging the
engine!
•Vehicles which are fitted with an exhaust gas catalytic conver ter should not be
tow-started over a distance of more than 50 metres.
For the sake of the environment
Never warm up the engine when the vehicle is standing. Drive off right away.
Through this the engine reaches its operating temperature more rapidly and the
pollutant emissions are lower.
Petrol engines
These engines are fitted with a starter system which selects the correct fuel/air
mixture for every external air temperature.
•Do not operate accelerator befo re and when starting engine.
•Interrupt the attempt at starting after 10 seconds if the engine does not start
right awayand wait for about 30 seconds before repeating the attempt.
•It is possible that the fuse on the electrical fuel pump is defect if the engine still
does not start. Check the fuse and replace it if necessary ⇒page 243.
•Contact the nearest specialist garage to obtain professional assistance.
It may be necessary, if the engine is very hot, to slightly depress the accelerator
after the engine has started.
Diesel engines
Glow plug system
Diesel engines are equipped with a glow plug system, the preglow period being
controlled automatically in line with the coolant temperature and outside temper-
ature.
The preglow indicator light
comes on after the igniti on has been switched on.
A3
NKO A5 20 MR08.book Page 118 Wednesday, April 11, 2007 2:54 PM
Page 185 of 288
Intelligent Technology
184
WARNING
Even with this additional function the vehicle cannot be steered automati-
cally! The driver is furthermore fully reponsible for the steering of the
vehicle!
Brakes
What has a negative effect on braking efficiency?
Wear-and-tear
Wear-and-tear to the brake pads is greatly dependent on the operating conditions
of the vehicle and your style of driving. Particularly if you drive a great deal in towns
and over short distances or if you adopt a sporty style of driving, it may be neces-
sary to have the thickness of the brake pads inspected at a specialist garage
between the service inspections.
Wet roads or road salt
There may be a certain delay before the brakes take full effect under certain condi-
tions such as when driving through water, during heavy rain showers or after the
vehicle has been washed in an automatic vehicle wash, since the brake discs and
brake pads may be moist or even have a coating of ice on them in winter. You
should dry the brakes as soon as possib le (by applying and releasing the brakes
several times, if the road conditions and the traffic situation allows it).
There also may be a certain delay before the full braking efficiency is available when
driving on roads which have been treated wi th road salt if you have not used the
brakes for some considerable time beforeha nd. The layer of salt on the brake discs
and brake pads must first be rubb ed off when you apply the brakes.
Corrosion
Corrosion on the brake discs and dirt on th e bake pads occur if the vehicle has been
parked for a long period and if you do not make much use of the braking system.
We recommend cleaning the brake discs by firmly applying the brakes at a fairly
high speed if you do not make much use of the braking system or if surface corro-
sion is present ⇒. Faults in the brake surface
If you notice that the braking distance
has suddenly become longer and that the
brake pedal can be depressed further, it is possible that a brake circuit of the dual-
circuit brake system has failed. Drive, in such cases, to the nearest specialist garage
without delay in order to have the problem rectified. Drive at a reduced speed while
on your way to the dealer and adapt your style of driving to the higher brake pedal
pressure required.
Low brake fluid level
An insufficient level of brake fluid may result in problems in the brake system. The
level of the brake fluid is monitored electronically ⇒page 32, “Brake system ”.
WARNING
•Only apply the brakes for the purpos e of drying and cleaning the brake
discs if the traffic conditions permit this. Do not place any other road users
in jeopardy.
•When retrospectively mounting a front spoiler, solid wheel hubs etc. one
must ensure that the air supply to the front wheel brakes is not reduced
otherwise the braking sy stem could run too hot.
•Allow for the fact that new brake pads do not achieve their full braking
efficiency until approximately 200 kilo metres. New brake pads must be first
“run in” before they develop their optimal friction force. You can, however,
compensate for this slightly reduced braking force by increasing the pres-
sure on the brake pedal. This guidelin e also applies to any new brake pads
installed at a future date.
Caution
•Never allow the brakes to ru b by applying slight pressure if you do not wish to
brake the vehicle. This causes the brakes to overheat and can also result in a longer
braking distance and excessive wear.
•Before negotiating a steep downhill sect ion, please reduce your speed, shift
down into the next lower gear (manual ge arbox) or select a lower driving stage
(automatic gearbox). This enables you to make full use of the braking power of the
NKO A5 20 MR08.book Page 184 Wednesday, April 11, 2007 2:54 PM
Page 193 of 288
Driving and the Environment
192
Avoiding full throttle
Driving more slowly means saving fuel.
Sensitive use of the accelera tor will not only significantly reduce fuel consumption
but also positively influence environmen tal pollution and wear of your vehicle.
You should avoid fully exploi ting the top speed of your vehicle wherever possible.
Fuel consumption, pollutant emissions and vehicle noises increase disproportion-
ally at high speeds.
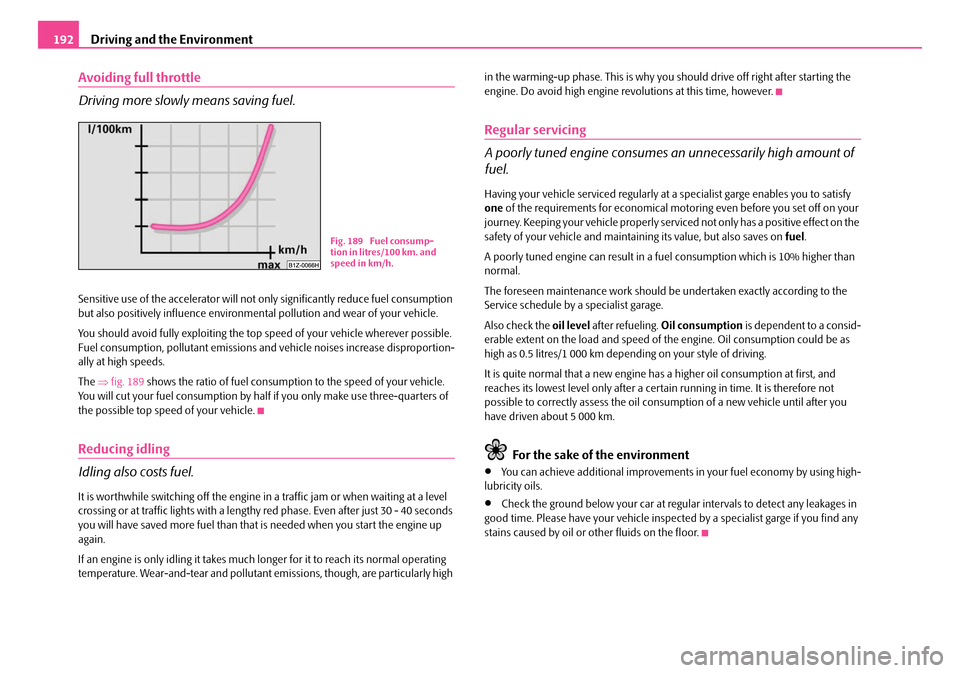
The ⇒fig. 189 shows the ratio of fuel consumption to the speed of your vehicle.
You will cut your fuel consumption by half if you only make use three-quarters of
the possible top speed of your vehicle.
Reducing idling
Idling also costs fuel.
It is worthwhile switching off the engine in a traffic jam or when waiting at a level
crossing or at traffic lights with a length y red phase. Even after just 30 - 40 seconds
you will have saved more fuel than that is needed when you start the engine up
again.
If an engine is only idling it takes much longer for it to reach its normal operating
temperature. Wear-and-tear and pollutant em issions, though, are particularly high in the warming-up phase. This is why you
should drive off right after starting the
engine. Do avoid high engine revolutions at this time, however.
Regular servicing
A poorly tuned engine consumes an unnecessarily high amount of
fuel.
Having your vehicle serviced regularly at a specialist garge enables you to satisfy
one of the requirements for economical moto ring even before you set off on your
journey. Keeping your vehicle properly servic ed not only has a positive effect on the
safety of your vehicle and maintaining its value, but also saves on fuel.
A poorly tuned engine can result in a fu el consumption which is 10% higher than
normal.
The foreseen maintenance work should be undertaken exactly according to the
Service schedule by a specialist garage.
Also check the oil level after refueling. Oil consumption is dependent to a consid-
erable extent on the load and speed of the engine. Oil consumption could be as
high as 0.5 litres/1 000 km depending on your style of driving.
It is quite normal that a new engine ha s a higher oil consumption at first, and
reaches its lowest level only after a certain running in time. It is therefore not
possible to correctly assess the oil cons umption of a new vehicle until after you
have driven about 5 000 km.
For the sake of the environment
•You can achieve additional improvements in your fuel economy by using high-
lubricity oils.
•Check the ground below your car at regula r intervals to detect any leakages in
good time. Please have your vehicle inspected by a specialist garge if you find any
stains caused by oil or other fluids on the floor.
Fig. 189 Fuel consump-
tion in litres/100 km. and
speed in km/h.
NKO A5 20 MR08.book Page 192 Wednesday, April 11, 2007 2:54 PM