door lock SKODA OCTAVIA 2009 2.G / (1Z) Owner's Manual
[x] Cancel search | Manufacturer: SKODA, Model Year: 2009, Model line: OCTAVIA, Model: SKODA OCTAVIA 2009 2.G / (1Z)Pages: 304, PDF Size: 19.56 MB
Page 4 of 304
Contents3
Using the system
Safety
Driving Tips
General Maintenance
Breakdown assistance
Technical Data
ContentsLayout of this Owner's Manual
(explanations)
. . . . . . . . . . . . . . . . . . . . . . . . . .
Using the system
. . . . . . . . . . . . . . . . . . . . . .
Cockpit
. . . . . . . . . . . . . . . . . . . . . . . . . . . . . . . . . . . . . . . .
Overview . . . . . . . . . . . . . . . . . . . . . . . . . . . . . . . . . . . .
The brief instruction
. . . . . . . . . . . . . . . . . . . . . . . . . .
Basic functions and important information . . . . .
Instruments and Indicator/Warning Lights
. . .
General view of the instrument cluster . . . . . . . . .
Engine revolutions counter . . . . . . . . . . . . . . . . . . . .
Speedometer . . . . . . . . . . . . . . . . . . . . . . . . . . . . . . . .
Coolant temperature gauge . . . . . . . . . . . . . . . . . . .
Fuel gauge . . . . . . . . . . . . . . . . . . . . . . . . . . . . . . . . . . .
Counter for distance driven . . . . . . . . . . . . . . . . . . .
Service Interval Display . . . . . . . . . . . . . . . . . . . . . . .
Digital clock . . . . . . . . . . . . . . . . . . . . . . . . . . . . . . . . . .
Multi-functional indicator (onboard computer)*
Information display* . . . . . . . . . . . . . . . . . . . . . . . . . .
Auto Check Control* . . . . . . . . . . . . . . . . . . . . . . . . . .
Warning lights . . . . . . . . . . . . . . . . . . . . . . . . . . . . . . . .
Unlocking and locking
. . . . . . . . . . . . . . . . . . . . . . . .
Key . . . . . . . . . . . . . . . . . . . . . . . . . . . . . . . . . . . . . . . . . .
Changing the battery of the radio remote control
Electronic immobiliser . . . . . . . . . . . . . . . . . . . . . . . .
Child safety lock . . . . . . . . . . . . . . . . . . . . . . . . . . . . . .
Central locking system . . . . . . . . . . . . . . . . . . . . . . . .
Remote control* . . . . . . . . . . . . . . . . . . . . . . . . . . . . . .
Synchonisation of the remote control . . . . . . . . . .
Anti-theft alarm system* . . . . . . . . . . . . . . . . . . . . . . Power windows* . . . . . . . . . . . . . . . . . . . . . . . . . . . . .
Electric sliding/tilting roof* . . . . . . . . . . . . . . . . . . . .
Lights and Visibility
. . . . . . . . . . . . . . . . . . . . . . . . . . .
Lights . . . . . . . . . . . . . . . . . . . . . . . . . . . . . . . . . . . . . . . .
Interior lighting . . . . . . . . . . . . . . . . . . . . . . . . . . . . . . .
Visibility . . . . . . . . . . . . . . . . . . . . . . . . . . . . . . . . . . . . .
Windshield wiper and wash system . . . . . . . . . . . .
Rear-view mirror . . . . . . . . . . . . . . . . . . . . . . . . . . . . .
Seats and Stowage
. . . . . . . . . . . . . . . . . . . . . . . . . . . .
Front seats . . . . . . . . . . . . . . . . . . . . . . . . . . . . . . . . . . .
Adjusting front seats electrically* . . . . . . . . . . . . . .
Head restraints . . . . . . . . . . . . . . . . . . . . . . . . . . . . . . .
Middle rear head restraint . . . . . . . . . . . . . . . . . . . . .
Rear seats . . . . . . . . . . . . . . . . . . . . . . . . . . . . . . . . . . . .
Pedals . . . . . . . . . . . . . . . . . . . . . . . . . . . . . . . . . . . . . . .
luggage compartment . . . . . . . . . . . . . . . . . . . . . . . .
Net partition (Combi)* . . . . . . . . . . . . . . . . . . . . . . . .
The roof rack* . . . . . . . . . . . . . . . . . . . . . . . . . . . . . . . .
Cup holder . . . . . . . . . . . . . . . . . . . . . . . . . . . . . . . . . . .
Note holder . . . . . . . . . . . . . . . . . . . . . . . . . . . . . . . . . .
Ashtray* . . . . . . . . . . . . . . . . . . . . . . . . . . . . . . . . . . . . .
Cigarette lighter*, power sockets . . . . . . . . . . . . . . .
Storage compartments . . . . . . . . . . . . . . . . . . . . . . . .
Overview . . . . . . . . . . . . . . . . . . . . . . . . . . . . . . . . . . . .
Storage compartment on the front passenger side
Cooling of storage compartment on front
passenger side* . . . . . . . . . . . . . . . . . . . . . . . . . . . . . .
Storage compartment on the driver's side . . . . . .
Storage compartment on the dash panel* . . . . . .
Storage compartment in front centre console* . .
Storage net on the front centre console* . . . . . . .
Storage compartment for spectacles* . . . . . . . . . .
Storage compartment in the front doors . . . . . . . . Storage compartment below front passenger
seat* . . . . . . . . . . . . . . . . . . . . . . . . . . . . . . . . . . . . . . . .
Front seat armrest with storage compartment* .
Rear seat armrest with storage compartment* . .
Storage compartment in rear centre console* . .
Seat backrest with opening for skis* . . . . . . . . . . . .
Through-loading bag (Unibag)* . . . . . . . . . . . . . . .
Side compartment* . . . . . . . . . . . . . . . . . . . . . . . . . .
Storage compartment behind the rear seats*
(Combi) . . . . . . . . . . . . . . . . . . . . . . . . . . . . . . . . . . . . .
Clothes hooks* . . . . . . . . . . . . . . . . . . . . . . . . . . . . . .
Heating and air conditioning system
. . . . . . . . .
Air outlet vents . . . . . . . . . . . . . . . . . . . . . . . . . . . . . . .
Heating . . . . . . . . . . . . . . . . . . . . . . . . . . . . . . . . . . . . . .
Climatic* (semi-automatic air conditioning
system) . . . . . . . . . . . . . . . . . . . . . . . . . . . . . . . . . . . . . .
Climatronic* (automatic air conditioning) . . . . . .
Auxiliary heating (auxiliary heating and
ventilation)* . . . . . . . . . . . . . . . . . . . . . . . . . . . . . . . . .
Starting-off and Driving
. . . . . . . . . . . . . . . . . . . . . .
Setting steering wheel position . . . . . . . . . . . . . . . .
Ignition lock . . . . . . . . . . . . . . . . . . . . . . . . . . . . . . . . .
Starting the engine . . . . . . . . . . . . . . . . . . . . . . . . . . .
Switching off the engine . . . . . . . . . . . . . . . . . . . . . .
Shifting (manual gearbox) . . . . . . . . . . . . . . . . . . . . .
Handbrake . . . . . . . . . . . . . . . . . . . . . . . . . . . . . . . . . . .
Rear parking aid* . . . . . . . . . . . . . . . . . . . . . . . . . . . . .
Front and rear parking aid* . . . . . . . . . . . . . . . . . . . .
Cruise control system (CCS)* . . . . . . . . . . . . . . . . . .
Automatic gearbox
. . . . . . . . . . . . . . . . . . . . . . . . . . .
Automatic gearbox* . . . . . . . . . . . . . . . . . . . . . . . . . . 6
7
9
9
11
11
17
17
18
18
18
18
19
20
21
21
26
28
31
42
42
42
43
44
44
49
50
5152
55
58
58
65
67
69
72
75
75
76
79
80
81
84
84
91
93
95
96
96
98
99
99
99
100
100
101
101
101
102
102103
103
104
104
105
105
106
107
107
108
108
109
111
115
119
122
122
123
124
125
125
126
127
128
129
132
132
se0.1.book Page 3 Friday, April 10, 2009 3:19 PM
Page 31 of 304
Instruments and Indicator/Warning Lights
30
After selecting the menu point
Back
you will reach one level higher in the menu.
Displays of the MFA Here you can switch off or on certain displays of the multi-functional indicator. Comfort* You can set the following functions (depen
ding on the equipment installed on the
vehicle):
Lights and Visibility Here you can set how long the light should
stay on for the function Coming/Leaving
Home and the intensity of the footwell li
ghting. Furthermore you can here switch
on or off the function daylight driving lights and convenience turn signal. After selecting the menu point
Fa ct or y se t tin g
the factory setting is established
again. Time Here you can set the time, the time format (12 or 24 hour indicator) and the time change summer/winter time. Winter tyres Here you can set at which speed a warning signal should sound. This function is used for e.g winter tyres with the permissible maximum speed less than the maximum speed of the vehicle. When exceeding the speed, the following is
displayed on the information display*:
Snow tyres max. speed ... km/h (Winter tyres maximum ... km/h)
Language Here you can set in which language the warning and information texts should be displayed. Measures Here you can set the units for temperat
ure, consumption and distance driven.
Assistant Here you can adjust the tones of the acoustic signals of the parking aid*. Second speed Here you can switch on the display of
the second speed in mph or in km/h
3).
Tra v e l m o d e Here you can activate / deactivate the mode “tourist light”. This mode makes it possible to drive in countries with opposing
traffic system, driving on the left/right,
Rain closing
On vehicles with ra
in sensor you can switch on or off the
function for automatic closing of the windows and the sliding/tilting roof in case of
rain and locked vehicle. If it
is not raining and the function is set, the windows including the sliding/tilting roof are closed automatically after approx. 12 hours.
Door open
Here you can switch on or off the functions for opening a single door and automatic closing.
ATA c onfir m
Here you can set if a signal tone should sound addition-ally when activating or deactivating the anti-theft alarm system .
Window op.
Here you can set the convenience mode only for the driver window or for all the windows.
Mirror down
Here you can switch on or off the function for mirror lowering on the front passenger side when engaging the reverse gear
a).
a)This function is only available on vehicles wi
th an electrically adjustable driver seat.
Mirror adjust.
Here you can switch on or off the function for left and right exterior mirror adjustment simultaneously.
Factory setting
After selecting this menu the convenience setting is reset to factory setting. The following is displayed in the information display: Factory setting for convenience is set
3)Valid for countries where the values ar
e indicated in British measuring units.
se0.1.book Page 30 Friday, April 10, 2009 3:19 PM
Page 33 of 304
Instruments and Indicator/Warning Lights
32
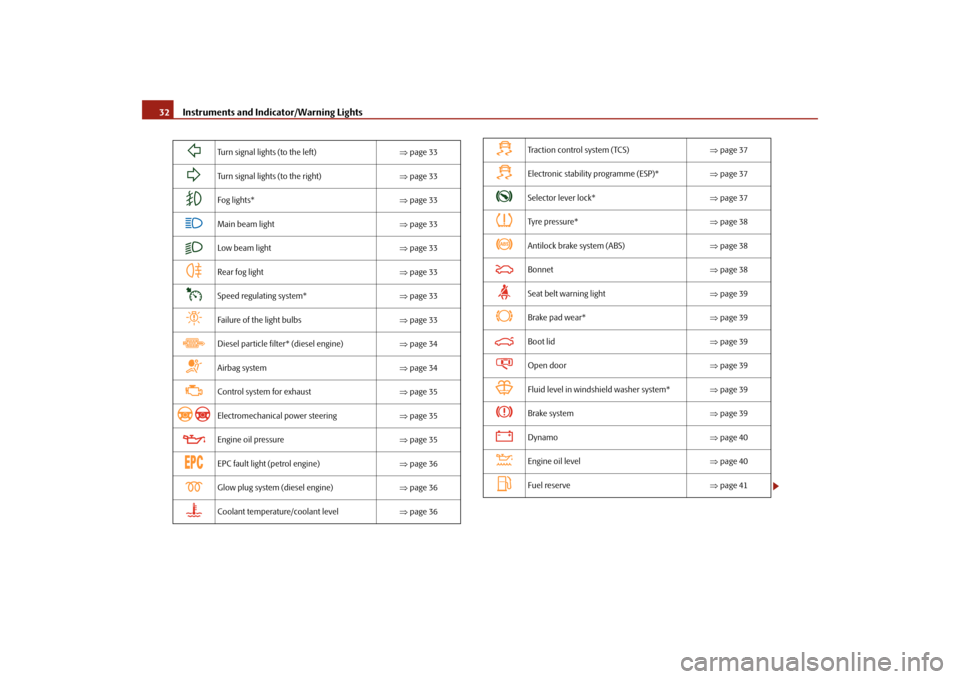
Turn signal lights (to the left)
⇒page 33
Turn signal lights (to the right)
⇒page 33
Fog lights*
⇒page 33
Main beam light
⇒page 33
Low beam light
⇒page 33
Rear fog light
⇒page 33
Speed regulating system*
⇒page 33
Failure of the light bulbs
⇒page 33
Diesel particle filter* (diesel engine)
⇒page 34
Airbag system
⇒page 34
Control system for exhaust
⇒page 35
Electromechanical power steering
⇒page 35
Engine oil pressure
⇒page 35
EPC fault light (petrol engine)
⇒page 36
Glow plug system (diesel engine)
⇒page 36
Coolant temperature/coolant level
⇒page 36
Traction control system (TCS)
⇒page 37
Electronic stability programme (ESP)*
⇒page 37
Selector lever lock*
⇒page 37
Tyre pressure*
⇒page 38
Antilock brake system (ABS)
⇒page 38
Bonnet
⇒page 38
Seat belt warning light
⇒page 39
Brake pad wear*
⇒page 39
Boot lid
⇒page 39
Open door
⇒page 39
Fluid level in windshield washer system*
⇒page 39
Brake system
⇒page 39
Dynamo
⇒page 40
Engine oil level
⇒page 40
Fuel reserve
⇒page 41
se0.1.book Page 32 Friday, April 10, 2009 3:19 PM
Page 45 of 304
Unlocking and locking
44
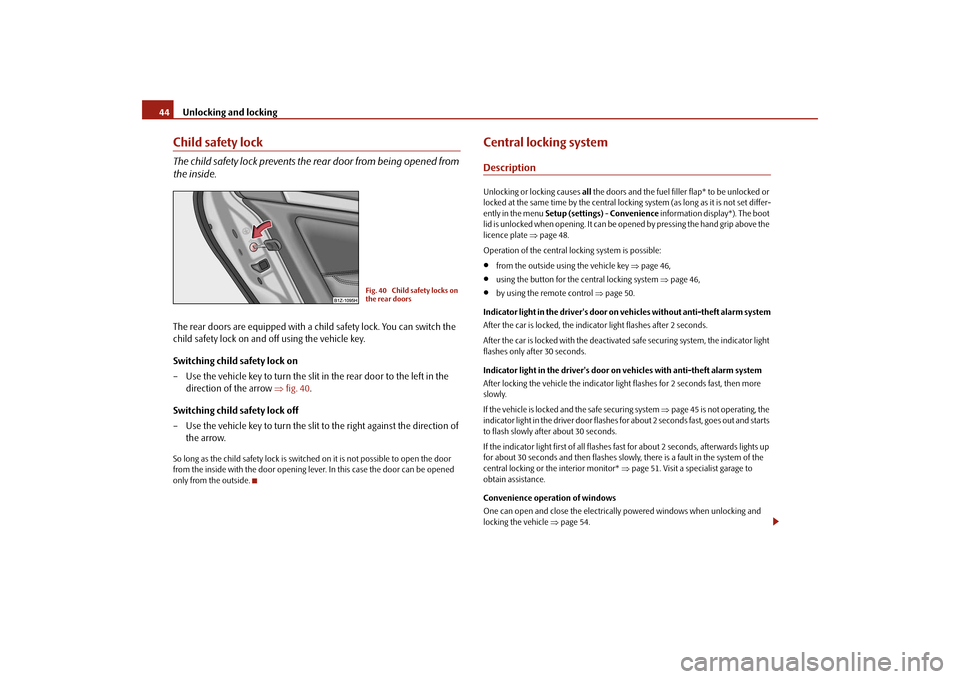
Child safety lockThe child safety lock prevents the
rear door from being opened from
the inside.The rear doors are equipped with a child safety lock. You can switch the child safety lock on and off using the vehicle key. Switching child safety lock on – Use the vehicle key to turn the slit in the rear door to the left in the
direction of the arrow
⇒
fig. 40
.
Switching child safety lock off – Use the vehicle key to turn the slit to the right against the direction of
the arrow.
So long as the child safety lo
ck is switched on it is no
t possible to open the door
from the inside with the door opening lever. In this case the door can be opened only from the outside.
Central locking systemDescriptionUnlocking or locking causes
all the doors and the fuel filler flap* to be unlocked or
locked at the same time by the central lockin
g system (as long as it is not set differ-
ently in the menu
Setup (settings)
- Convenience
information display*). The boot
lid is unlocked when opening. It can be op
ened by pressing the hand grip above the
licence plate
⇒page 48.
Operation of the central locking system is possible:•
from the outside using the vehicle key
⇒page 46,
•
using the button for the central locking system
⇒page 46,
•
by using the remote control
⇒page 50.
Indicator light in the driver's door on vehicles without anti-theft alarm system After the car is locked, the indicator light flashes after 2 seconds. After the car is locked with the deactivate
d safe securing system, the indicator light
flashes only after 30 seconds. Indicator light in the driver's door on vehicles with anti-theft alarm system After locking the vehicle the indicator light flashes for 2 seconds fast, then more slowly. If the vehicle is locked and the safe securing system
⇒page 45 is not operating, the
indicator light in the driver door flashes fo
r about 2 seconds fast, goes out and starts
to flash slowly after about 30 seconds. If the indicator light first of all flashes fast for about 2 seconds, afterwards lights up for about 30 seconds and then flashes slowly
, there is a fault in the system of the
central locking or the interior monitor*
⇒page 51. Visit a specialist garage to
obtain assistance. Convenience operation of windows One can open and close the electrically
powered windows when unlocking and
locking the vehicle
⇒page 54.
Fig. 40 Child safety locks on the rear doors
se0.1.book Page 44 Friday, April 10, 2009 3:19 PM
Page 46 of 304

Unlocking and locking
45
Using the system
Safety
Driving Tips
General Maintenance
Breakdown assistance
Technical Data
Opening a single door* This function allows one to just unlock the driver's door. The other doors and the fuel filler flap* remain locked and are
only unlocked after repetitive unlocking.
If you wish, you can have yo
ur authorised Škoda Service Partner activate the func-
tion of the single door opening mode. Automatic locking* All the doors and the boot lid are locked
automatically once the car reaches a speed
of about 15 km/h. If the ignition key is withdrawn, the ca
r is then automatically unlocked again. In
addition, it is possible for the driver to unl
ock the car by pressing the central locking
button
or by pulling the door opening lever.
If you wish, your Škoda Deal
er can activate the function of the automatic locking
mode.
WARNING
Locking the doors prevents involuntary
opening in an exceptional situation
(an accident). Locked doors prevent unwanted entry into the vehicle from outside, for example at road crossings. Locked doors do, however, make it more difficult for rescuers to get into
the vehicle in an emergency - danger to
life!
Note
•
In the event of an accident in which the airbags are deployed, the locked doors
are automatically unlocked in order to enable
rescuers to gain access to the vehicle.
•
Only the front doors can be unlocked an
d locked using the key if the central
locking system fails. You can lock or unlock manually the other doors and the boot lid.
− Emergency locking of the door
⇒page 47.
− Emergency unlocking of the boot lid
⇒page 48.
Safe securingThe central locking system is equipped with a
safe securing
7) system. Locking the
vehicle from the outside causes the door lock
s to be automatically blocked. It is not
possible to open the doors with the door
handle either from the inside or from the
outside. This acts as an effective deterren
t for attempts to break into your vehicle.
You can deactivate the safe securing sy
stem by locking twice within 2°seconds.
If the safe securing system is not operating, the warning light in the driver door flashes for about 2 seconds fast, goes out and starts to flash slowly again after about 30°seconds. The safe securing system is again activate
d the next time the vehicle is unlocked and
locked again. The doors can be opened from the inside
if the vehicle is locked and the safe
securing system is deactivated:•
The door is unlocked by actuating the door-opening lever.
•
The door opens upon actuating the door-opening lever again.
WARNING
If the vehicle is locked from the outside and the safe securing system is acti-vated, there must not be any person and animals in the vehicle as it is then not possible to open either a door or a window from the inside. The locked doors make it more difficult for rescuers to get into the vehicle in an emer- gency - hazard!
Note
The anti-theft alarm system* is also acti
vated with the deactivated safe securing
system when locking the vehicle. The inte
rior monitor* is however not activated.
7)Only valid for some countries.
se0.1.book Page 45 Friday, April 10, 2009 3:19 PM
Page 47 of 304

Unlocking and locking
46
Unlocking the vehicle using the key– Turn the key in the lock of the driver
's door in the direction of travel
(opening position)
⇒
fig. 41
.
– Pull on the door handle and open the door.•
All the doors (only the driver's door on vehicles with anti-theft alarm system)
and the fuel filler flap* are unlocked.•
The boot lid is then unlocked.
•
The switched on interior lights come on over the door contact.
•
The safe securing system is deactivated.
•
The windows are opened provided the key
is held
in the opening position*. On
vehicles fitted with anti-theft alarm system
the window operation is only possible
45 seconds after deactivation of the warning system.•
The indicator light in the driver's door stops flashing if the vehicle is not fitted
with an anti-theft alarm system*
⇒page 51.
Note
If the vehicle is equipped with an anti-t
heft alarm system*, you must unlock the
vehicle by inserting the key into the driver door you then have to insert the key into the ignition lock and switch the ignition
on within 15 seconds after opening the
door. The
alarm will be triggered
if you do
not switch on
the ignition within 15
seconds.Closing the vehicle with the key– Turn the key in the lock of the driver's door in the opposite direction of
travel (closing position)
⇒
fig. 41
.
•
The doors, the boot lid and the fuel filler flap* are locked.
•
The switched on interior lights wi
ll switch off over the door contact.
•
The windows and the electric sliding/tilting roof* are closed provided the key is
held
in the locking position.
•
The safe securing system is activated immediately.
•
The indicator light in the driver door begins flashing.Note
The opened driver door cannot be locked. It
must be locked separately after closing
it.Button for the central locking system
Fig. 41 Turning the key for unlocking and locking the vehicle
AA
AB
Fig. 42 Centre console: Buttons for central locking
se0.1.book Page 46 Friday, April 10, 2009 3:19 PM
Page 48 of 304
Unlocking and locking
47
Using the system
Safety
Driving Tips
General Maintenance
Breakdown assistance
Technical Data
If the vehicle was not locked from ou
tside, you can also
unlock and lock
it with the rocker switch on the centre console without the ignition switched on. Locking all doors and the boot lid – Press button
⇒
page 46, fig. 42
. The symbol
in the button comes
on.
Unlocking all doors and the boot lid – Press button
⇒
page 46, fig. 42
. The symbol
goes out in the
button.
The following applies if you have lock
ed your vehicle using the button :
•
It is not possible to open the doors or the boot lid from the outside (safety
feature, e.g. when stopping at traffic lights etc.).•
You can unlock the doors individually from
the inside and open them by pulling
the door opening lever.•
As long as one door is opened
8), the vehicle cannot be lo
cked in order to avoid
inadvertently locking the key in the vehicle.•
In the event of an accident in which the airbags are deployed, the locked doors
are automatically unlocked from the inside
in order to enable rescuers to gain
access to the vehicle. By pressing and holding th
e button or , you can conveniently close or open
the windows
⇒page 54.
WARNING
The central locking system al
so operates if the ignition is switched off. All the
doors and the boot lid are locked. Childr
en should never be left unattended
in the vehicle since it is difficult to
provide assistance from the outside when
the doors are locked. Locked doors make
it difficult for rescuers to get into
the vehicle in an emergency - hazard!
Note
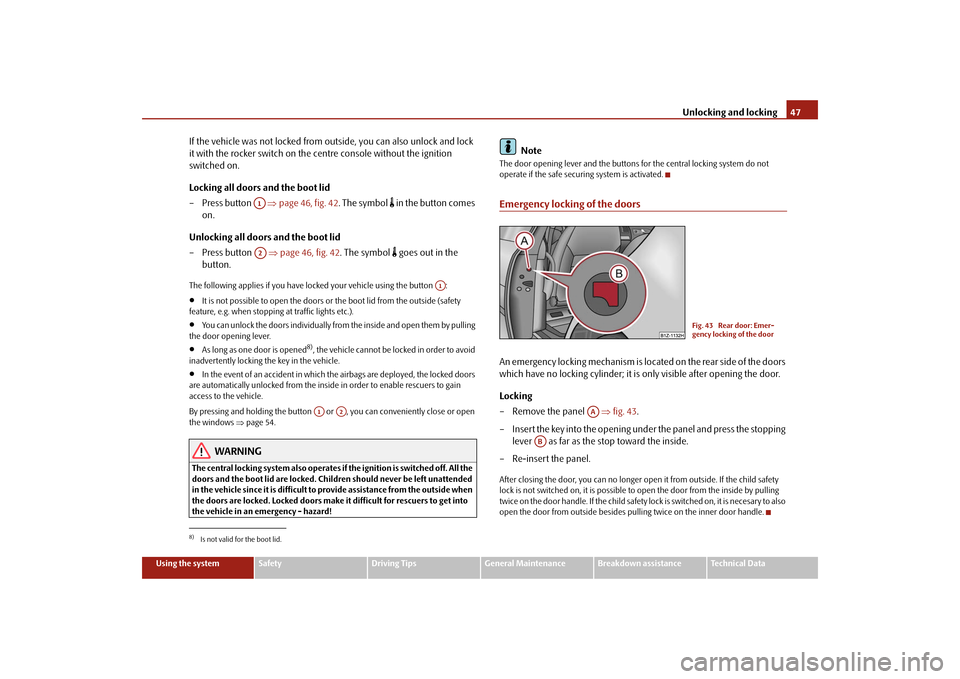
The door opening lever and the buttons for the central locking system do not operate if the safe securing system is activated.Emergency locking of the doorsAn emergency locking mechanism is located on the rear side of the doors which have no locking cyli
nder; it is only visible after opening the door.
Locking – Remove the panel
⇒
fig. 43
.
– Insert the key into the opening under the panel and press the stopping
lever as far as the stop toward the inside.
– Re-insert the panel.After closing the door, you can no longer op
en it from outside. If the child safety
lock is not switched on, it is possible to
open the door from the inside by pulling
twice on the door handle. If the child safety lock is switched on, it is necesary to also open the door from outside besides pu
lling twice on the
inner door handle.
8)Is not valid for the boot lid.
A1A2
A1
A1
A2
Fig. 43 Rear door: Emer- gency locking of the door
AA
AB
se0.1.book Page 47 Friday, April 10, 2009 3:19 PM
Page 49 of 304
Unlocking and locking
48
Boot lidOpen the boot lid by pressing the hand grip above the licence plate after unlocking the vehicle using the ke
y or the radio remote control.
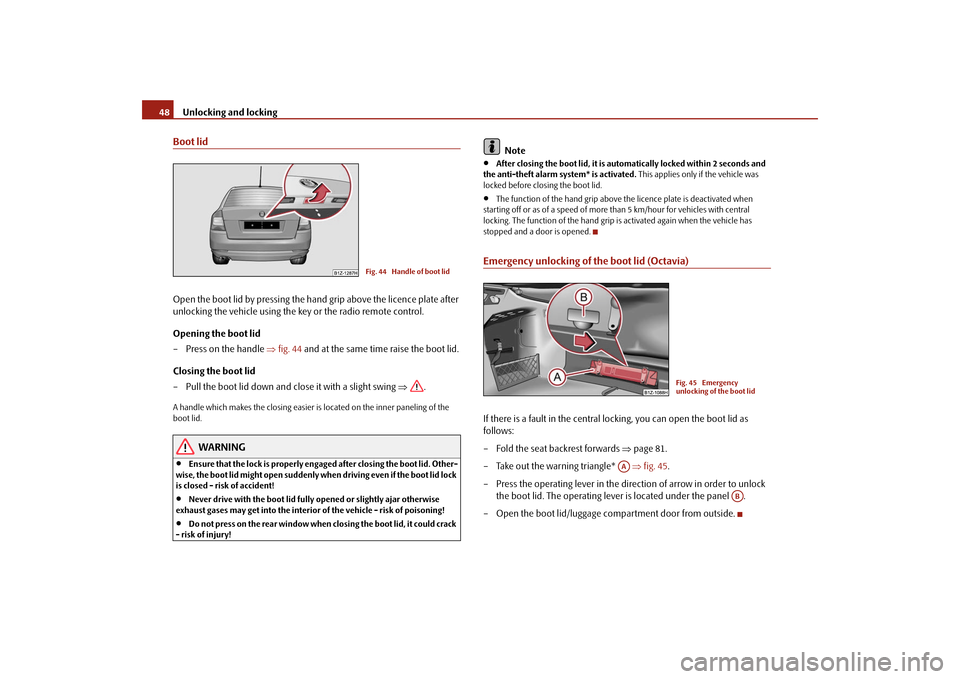
Opening the boot lid – Press on the handle
⇒
fig. 44
and at the same time raise the boot lid.
Closing the boot lid – Pull the boot lid down and close it with a slight swing
⇒
.
A handle which makes the closing easier is
located on the inner paneling of the
boot lid.
WARNING
•
Ensure that the lock is
properly engaged after clos
ing the boot lid. Other-
wise, the boot lid might open suddenly when
driving even if the boot lid lock
is closed - risk of accident!•
Never drive with the boot lid fully opened or slightly ajar otherwise
exhaust gases may get into the interior of the vehicle - risk of poisoning!•
Do not press on the rear window when closing the boot lid, it could crack
- risk of injury!
Note
•
After closing the boot lid, it is automatically locked within 2 seconds and
the anti-theft alarm
system* is activated.
This applies only if the vehicle was
locked before closing the boot lid.•
The function of the hand grip above the licence plate is deactivated when
starting off or as of a speed of more than 5 km/hour for vehicles with central locking. The function of the hand grip
is activated again when the vehicle has
stopped and a door is opened.Emergency unlocking of the boot lid (Octavia)If there is a fault in the central locking, you can open the boot lid as follows: – Fold the seat backrest forwards
⇒
page 81.
– Take out the warning triangle*
⇒
fig. 45
.
– Press the operating lever in the direction of arrow in order to unlock
the boot lid. The operating lever is located under the panel .
– Open the boot lid/luggage compartment door from outside.
Fig. 44 Handle of boot lid
Fig. 45 Emergency unlocking of the boot lid
AA
AB
se0.1.book Page 48 Friday, April 10, 2009 3:19 PM
Page 50 of 304
Unlocking and locking
49
Using the system
Safety
Driving Tips
General Maintenance
Breakdown assistance
Technical Data
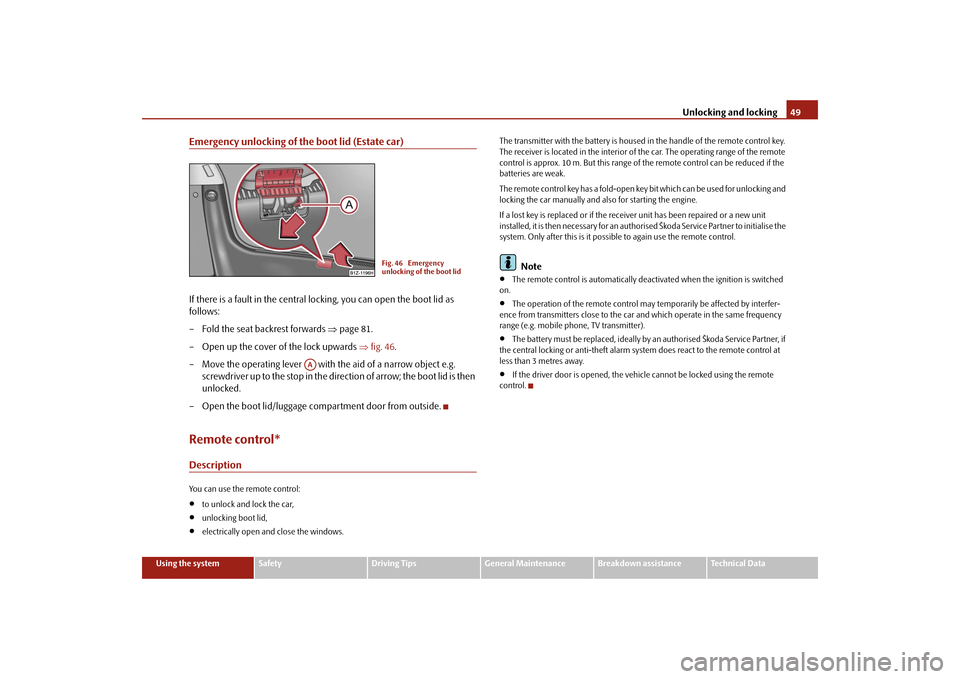
Emergency unlocking of the boot lid (Estate car)If there is a fault in the central lo
cking, you can open the boot lid as
follows: – Fold the seat backrest forwards
⇒
page 81.
– Open up the cover of the lock upwards
⇒
fig. 46
.
– Move the operating lever with th
e aid of a narrow object e.g.
screwdriver up to the stop in the direction of arrow; the boot lid is then unlocked.
– Open the boot lid/luggage compartment door from outside.Remote control*DescriptionYou can use the remote control:•
to unlock and lock the car,
•
unlocking boot lid,
•
electrically open and close the windows.
The transmitter with the battery is housed in the handle of the remote control key. The receiver is located in the interior of
the car. The operating range of the remote
control is approx. 10 m. But this range of
the remote control can be reduced if the
batteries are weak. The remote control key has a fold-open key
bit which can be used for unlocking and
locking the car manually and also for starting the engine. If a lost key is replaced or if the receiv
er unit has been repaired or a new unit
installed, it is then necessary for an authorised Škoda Service Partner to initialise the system. Only after this is it possib
le to again use the remote control.
Note
•
The remote control is automatically deac
tivated when the ignition is switched
on.•
The operation of the remote control may temporarily be affected by interfer-
ence from transmitters close to the car and which operate in the same frequency range (e.g. mobile phone, TV transmitter).•
The battery must be replaced, ideally by
an authorised Škoda Service Partner, if
the central locking or anti-theft alarm system does react to the remote control at less than 3 metres away.•
If the driver door is opened, the vehicle cannot be locked using the remote
control.
Fig. 46 Emergency unlocking of the boot lid
AA
se0.1.book Page 49 Friday, April 10, 2009 3:19 PM
Page 51 of 304
Unlocking and locking
50
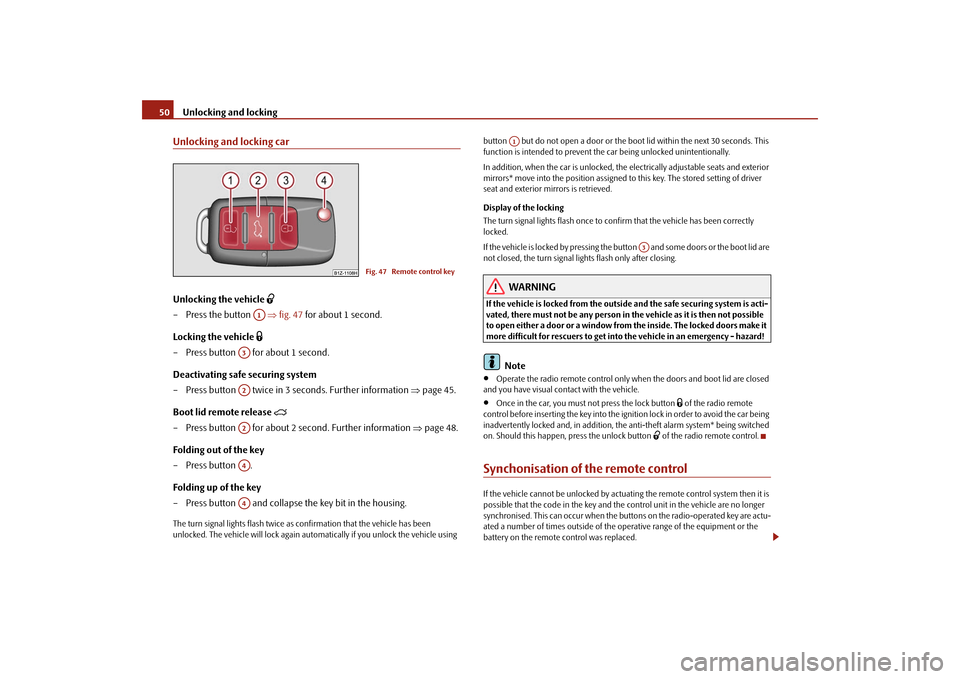
Unlocking and locking carUnlocking the vehicle
– Press the button
⇒
fig. 47
for about 1 second.
Locking the vehicle
– Press button for about 1 second.Deactivating safe securing system – Press button twice in 3 seconds. Further information
⇒
page 45.
Boot lid remote release
– Press button for about 2 second. Further information
⇒
page 48.
Folding out of the key – Press button . Folding up of the key – Press button and collapse the key bit in the housing.The turn signal lights flash twice as
confirmation that the vehicle has been
unlocked. The vehicle will lock again auto
matically if you unlock the vehicle using
button but do not open a door or the b
oot lid within the next 30 seconds. This
function is intended to prevent the car being unlocked unintentionally. In addition, when the car is unlocked, the el
ectrically adjustable seats and exterior
mirrors* move into the position assigned to this key. The stored setting of driver seat and exterior mirrors is retrieved. Display of the locking The turn signal lights flash once to co
nfirm that the vehicle has been correctly
locked. If the vehicle is locked by
pressing the button and some doors or the boot lid are
not closed, the turn signal lights flash only after closing.
WARNING
If the vehicle is locked from the outsid
e and the safe securing system is acti-
vated, there must not be any person in the vehicle as it is then not possible to open either a door or a window from the inside. The locked doors make it more difficult for rescuers to get into
the vehicle in an emergency - hazard!
Note
•
Operate the radio remote control only when the doors and boot lid are closed
and you have visual co
ntact with the vehicle.
•
Once in the car, you must
not press the lock button
of the radio remote
control before inserting the key into the ignition lock in order to avoid the car being inadvertently locked and, in addition, the anti-theft alarm system* being switched on. Should this happen, press the unlock button
of the radio remote control.
Synchonisation of the remote controlIf the vehicle cannot be unlocked by actuatin
g the remote control system then it is
possible that the code in the key and the
control unit in the vehicle are no longer
synchronised. This can occur when the buttons on the radio-operated key are actu- ated a number of times outside of the operative range of the equipment or the battery on the remote control was replaced.
Fig. 47 Remote control key
A1
A3A2A2A4A4
A1
A3
se0.1.book Page 50 Friday, April 10, 2009 3:19 PM