audio SKODA OCTAVIA 2010 2.G / (1Z) Owner's Manual
[x] Cancel search | Manufacturer: SKODA, Model Year: 2010, Model line: OCTAVIA, Model: SKODA OCTAVIA 2010 2.G / (1Z)Pages: 275, PDF Size: 16.43 MB
Page 24 of 275

Instruments and warning lights23
Using the system
Safety
Driving Tips
General Maintenance
Breakdown assistance
Technical Data
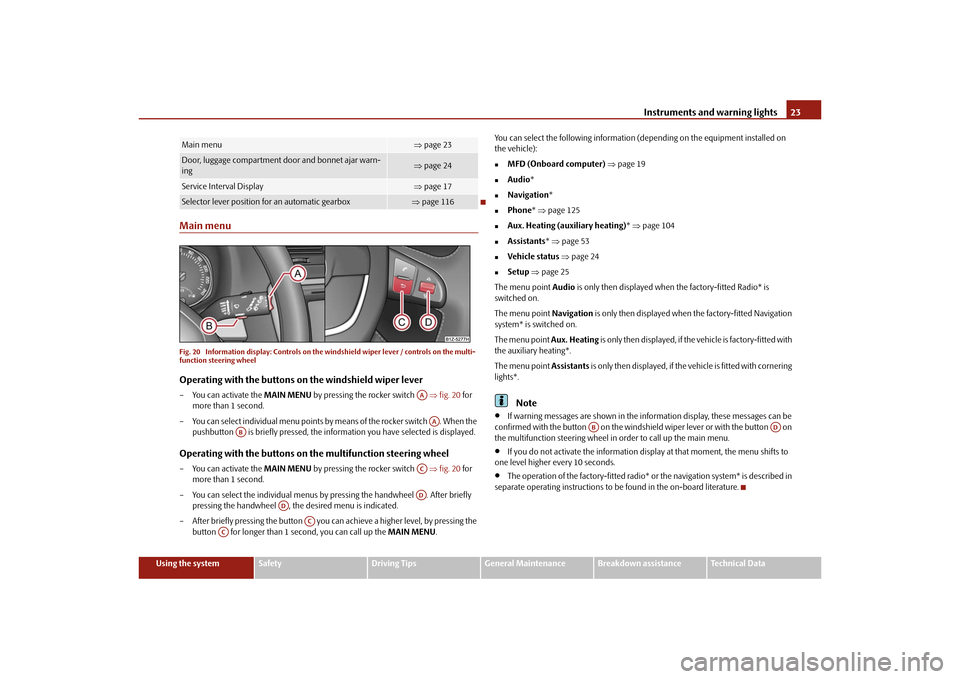
Main menuFig. 20 Information display: Controls on the windshield wiper lever / controls on the multi-
function steering wheelOperating with the buttons on the windshield wiper lever– You can activate the MAIN MENU by pressing the rocker switch fig. 20 for
more than 1 second.
– You can select individual menu points by means of the rocker switch . When the pushbutton is briefly pressed, the info rmation you have selected is displayed.Operating with the buttons on the multifunction steering wheel– You can activate the MAIN MENU by pressing the rocker switch fig. 20 for
more than 1 second.
– You can select the individual menus by pressing the handwheel . After briefly
pressing the handwheel , th e desired menu is indicated.
– After briefly pressing the button you can achieve a higher level, by pressing the button for longer than 1 second, you can call up the MAIN MENU. You can select the following information (d
epending on the equipment installed on
the vehicle):
MFD (Onboard computer) page 19
Audio *
Navigation *
Phone* page 125
Aux. Heating (auxiliary heating) * page 104
Assistants * page 53
Vehicle status page 24
Setup page 25
The menu point Audio is only then displayed when the factory-fitted Radio* is
switched on.
The menu point Navigation is only then displayed when the factory-fitted Navigation
system* is switched on.
The menu point Aux. Heating is only then displayed, if the vehicle is factory-fitted with
the auxiliary heating*.
The menu point Assistants is only then displayed, if the vehicle is fitted with cornering
lights*.Note
If warning messages are shown in the information display, these messages can be
confirmed with the button on the windshie ld wiper lever or with the button on
the multifunction steering wheel in order to call up the main menu.
If you do not activate the information display at that moment, the menu shifts to
one level higher every 10 seconds.
The operation of the factory-fitted radio* or the navigation system* is described in
separate operating instructions to be found in the on-board literature.
Main menu
page 23
Door, luggage compartment door and bonnet ajar warn-
ing
page 24
Service Interval Display
page 17
Selector lever position for an automatic gearbox
page 116AAAA
AB
ACAD
AD
AC
AC
AB
AD
s43s.1.book Page 23 Thursday, May 13, 2010 1:21 PM
Page 125 of 275

Communication
124Button
Action
Radio, traffic information
CD / CD changer / MP3
Navigation
press briefly
Switch off/on tone / activation and deactivation of the voice control
a)
press button for a
long period of time
switch off/on*
without
function
turn upwards
Increase volume
turn downwards
Decrease volume
press briefly
Changing to the next stored radio station
Changing to the next stored traffic information Interrupting the traffic report
Changing to the next title
press button for a
long time
Interruption of the traffic report
fast forward
press briefly
Changing to the previously stored radio station
Changing to the previously stored traffic information
Interrupting the traffic report
Changing to the previous title
press button for a
long time
Interruption of the traffic report
fast rewind
Changing the audio source
press briefly
Calling up the main menu
press button for a long time
press briefly
Interruption of the traffic report
without function
press button for a
long period of time
turn upwards
Display of the stored/accessible stations scroll upwards
Interruption of the traffic report
Changing to the next title
without
function
turn downwards
Display of the stored/accessible stations
scroll downwards
Interruption of the traffic report
Changing to the previous title
A1A1A1A1A2A2A3A3A4A5A5A6A6A6A6
s43s.1.book Page 124 Thursday, May 13, 2010 1:21 PM
Page 140 of 275

Communication139
Using the system
Safety
Driving Tips
General Maintenance
Breakdown assistance
Technical Data
– On the device to be connected, enter the password and follow any instructions
given on this device or in the information display.
– Enter the desired internet address in the internet browser. The operating system requests the entry of the telephone number for the internet access (depending on
the operator, usually “*99#”).
Music playback via Bluetooth
®
The universal telephone preinstallation GSM IIl makes it possible to play back music via
Bluetooth
® from the devices such as MP3 player, mobile phone or notebook.
In order to enable the music playback via Bluetooth
®, it is necessary to connect the
device, which should be connected, with the hands-free system in the menu Phone -
Bluetooth - Media player .
The music playback process is performed on the connected device.
Note
The device to be connected must support the Bluetooth
® profile A2DP, see Owner's
manual of the device to be connected.
MultimediaInputs AUX-IN* and MDI*The input AUX-IN is located below the armrest* of the front seats and is marked with
.
The input MDI is located in the storage compartment on the front passenger side.
The inputs AUX-IN and MDI connect the ex ternal audio sources (e.g. iPod or MP3
player) and play back music fr om these devices via your radio* or navigation system*
installed in the factory.
The description of the operation can be found in the relevant Owner's Manual of your
radio* or your navigation*.
Note
The loudspeakers in the vehicle are matched to a power output of the radio and
navigation system of 4x 20°W.
For the equipment sound system*, the loudspeakers are matched to a power
output of the amplifier of 4x40°W + 6x20 W.
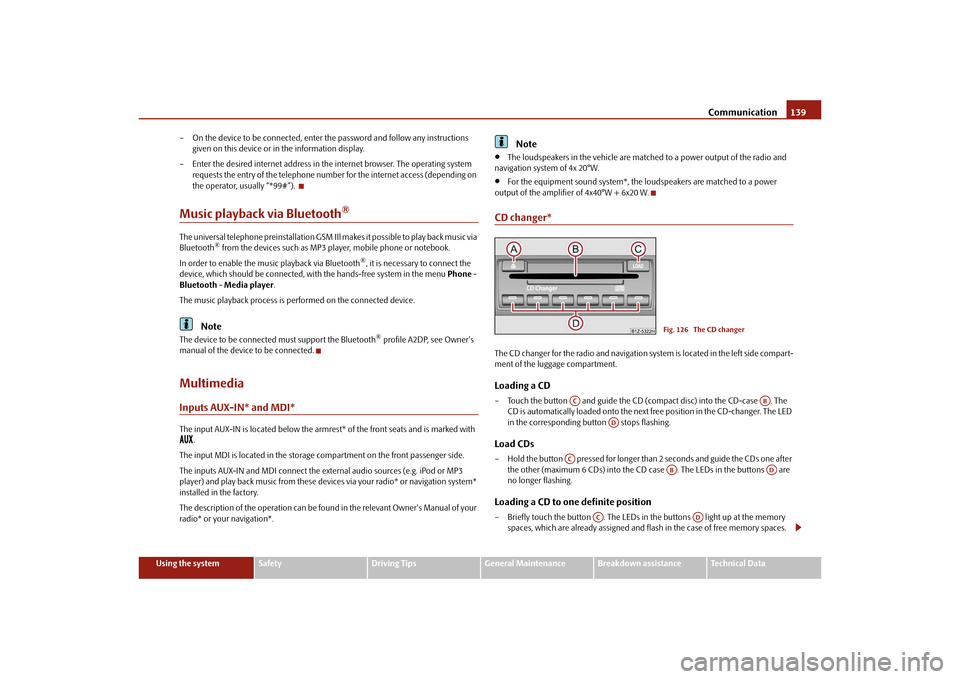
CD changer*The CD changer for the radio and navigation system is located in the left side compart-
ment of the luggage compartment.Loading a CD– Touch the button and guide the CD (compact disc) into the CD-case . The CD is automatically loaded onto the next free position in the CD-changer. The LED
in the corresponding button stops flashing.Load CDs– Hold the button pressed for longer than 2 seconds and guide the CDs one after
the other (maximum 6 CDs) into the CD case . The LEDs in the buttons are
no longer flashing.Loading a CD to one definite position– Briefly touch the button . The LEDs in the buttons light up at the memory spaces, which are already assigned and flash in the case of free memory spaces.
Fig. 126 The CD changer
AC
AB
AD
AC
AB
AD
AC
AD
s43s.1.book Page 139 Thursday, May 13, 2010 1:21 PM