change wheel SKODA OCTAVIA 2010 2.G / (1Z) Owner's Manual
[x] Cancel search | Manufacturer: SKODA, Model Year: 2010, Model line: OCTAVIA, Model: SKODA OCTAVIA 2010 2.G / (1Z)Pages: 275, PDF Size: 16.43 MB
Page 5 of 275
Contents
4
Safety
. . . . . . . . . . . . . . . . . . . . . . . . . . . . . . . . . . . . . . .
Passive Safety
. . . . . . . . . . . . . . . . . . . . . . . . . . . . . . . . .
Basic information . . . . . . . . . . . . . . . . . . . . . . . . . . . . .
Correct seated position . . . . . . . . . . . . . . . . . . . . . . .
Seat belts
. . . . . . . . . . . . . . . . . . . . . . . . . . . . . . . . . . . . . .
Why seat belts? . . . . . . . . . . . . . . . . . . . . . . . . . . . . . . .
The physical principle of a frontal collision . . . . . .
Important safety information regarding the use of seat
belts . . . . . . . . . . . . . . . . . . . . . . . . . . . . . . . . . . . . . . . . .
How are seat belts correctly fastened? . . . . . . . . . .
Airbag system
. . . . . . . . . . . . . . . . . . . . . . . . . . . . . . . . .
Description of the airbag system . . . . . . . . . . . . . . .
Front airbags . . . . . . . . . . . . . . . . . . . . . . . . . . . . . . . . .
Side airbags* . . . . . . . . . . . . . . . . . . . . . . . . . . . . . . . . .
Head airbags* . . . . . . . . . . . . . . . . . . . . . . . . . . . . . . . .
Deactivating an airbag . . . . . . . . . . . . . . . . . . . . . . . .
Transporting children safely
. . . . . . . . . . . . . . . . . .
What you should know about transporting children!
Child seat . . . . . . . . . . . . . . . . . . . . . . . . . . . . . . . . . . . .
Attaching a child seat us ing the “ISOFIX” system .
Attaching child seat using the “Top Tether” system
Driving Tips
. . . . . . . . . . . . . . . . . . . . . . . . . . . . . .
Intelligent Technology
. . . . . . . . . . . . . . . . . . . . . . . .
Electronic stability programme (ESP)* . . . . . . . . . .
Brakes . . . . . . . . . . . . . . . . . . . . . . . . . . . . . . . . . . . . . . .
Brake booster . . . . . . . . . . . . . . . . . . . . . . . . . . . . . . . .
Antilock brake system (ABS) . . . . . . . . . . . . . . . . . . .
Brake Assist* . . . . . . . . . . . . . . . . . . . . . . . . . . . . . . . . .
Uphill Start Assist* . . . . . . . . . . . . . . . . . . . . . . . . . . . .
Electromechanical power steering . . . . . . . . . . . . .
Tyre pressure monitoring system* . . . . . . . . . . . . . .
Diesel particle filter* (diesel engine) . . . . . . . . . . . .
Driving and the Environment
. . . . . . . . . . . . . . . . .
The first 1 500 kilometres and then afterwards . .
Catalytic converter . . . . . . . . . . . . . . . . . . . . . . . . . . . . Driving in an economical and environmentally
conscious manner . . . . . . . . . . . . . . . . . . . . . . . . . . . .
Environmental compatibility . . . . . . . . . . . . . . . . . . .
Motoring abroad . . . . . . . . . . . . . . . . . . . . . . . . . . . . . .
Avoiding damage to your vehicle . . . . . . . . . . . . . . .
Driving through bodies of water on roads . . . . . . .
To w i n g a t r a i l e r
. . . . . . . . . . . . . . . . . . . . . . . . . . . . . . . .
Towing a trailer . . . . . . . . . . . . . . . . . . . . . . . . . . . . . . . .
General Maintenance
. . . . . . . . . . . . . . .
Taking care of your ve hicle and cleaning the
vehicle
. . . . . . . . . . . . . . . . . . . . . . . . . . . . . . . . . . . . . . . . .
General . . . . . . . . . . . . . . . . . . . . . . . . . . . . . . . . . . . . . .
Care of the exterior of vehicle . . . . . . . . . . . . . . . . . .
Care of the interior of vehicle . . . . . . . . . . . . . . . . . .
Fuel
. . . . . . . . . . . . . . . . . . . . . . . . . . . . . . . . . . . . . . . . . . . .
Petrol . . . . . . . . . . . . . . . . . . . . . . . . . . . . . . . . . . . . . . . .
Biofuel Ethanol E85* . . . . . . . . . . . . . . . . . . . . . . . . . .
Diesel . . . . . . . . . . . . . . . . . . . . . . . . . . . . . . . . . . . . . . . .
Refuelling . . . . . . . . . . . . . . . . . . . . . . . . . . . . . . . . . . . .
Inspecting and replenishing
. . . . . . . . . . . . . . . . . . .
Engine compartment . . . . . . . . . . . . . . . . . . . . . . . . . .
Engine oil . . . . . . . . . . . . . . . . . . . . . . . . . . . . . . . . . . . . .
Cooling system . . . . . . . . . . . . . . . . . . . . . . . . . . . . . . .
Brake fluid . . . . . . . . . . . . . . . . . . . . . . . . . . . . . . . . . . . .
Battery . . . . . . . . . . . . . . . . . . . . . . . . . . . . . . . . . . . . . . .
Windshield washer system . . . . . . . . . . . . . . . . . . . . .
Wheels and Tyres
. . . . . . . . . . . . . . . . . . . . . . . . . . . . . .
Wheels . . . . . . . . . . . . . . . . . . . . . . . . . . . . . . . . . . . . . . .
Accessories, changes and replacement of partsAccessories and replacement parts . . . . . . . . . . . . .
Technical changes . . . . . . . . . . . . . . . . . . . . . . . . . . . . .
Vehicles of category N1 . . . . . . . . . . . . . . . . . . . . . . . .
Breakdown assistance
. . . . . . . . . . . . . .
Breakdown assistance
. . . . . . . . . . . . . . . . . . . . . . . .
First-aid box* and Warning triangle* (Octavia) . .
First-aid box* and warning triangle* (Estate car) .
Fire extinguisher* . . . . . . . . . . . . . . . . . . . . . . . . . . . . .
Vehicle tool kit . . . . . . . . . . . . . . . . . . . . . . . . . . . . . . . .
Tyre repair kit* . . . . . . . . . . . . . . . . . . . . . . . . . . . . . . . .
Spare wheel* . . . . . . . . . . . . . . . . . . . . . . . . . . . . . . . . .
Changing a wheel . . . . . . . . . . . . . . . . . . . . . . . . . . . . .
Jump-starting . . . . . . . . . . . . . . . . . . . . . . . . . . . . . . . .
Tow-starting and towing vehicle . . . . . . . . . . . . . . .
Fuses and light bulbs
. . . . . . . . . . . . . . . . . . . . . . . . .
Electric fuses . . . . . . . . . . . . . . . . . . . . . . . . . . . . . . . . .
Bulbs . . . . . . . . . . . . . . . . . . . . . . . . . . . . . . . . . . . . . . . .
Technical Data
. . . . . . . . . . . . . . . . . . . . . . . . . .
Technical Data
. . . . . . . . . . . . . . . . . . . . . . . . . . . . . . . .
General information . . . . . . . . . . . . . . . . . . . . . . . . . .
Used abbreviations . . . . . . . . . . . . . . . . . . . . . . . . . . .
Performances . . . . . . . . . . . . . . . . . . . . . . . . . . . . . . . .
Weight . . . . . . . . . . . . . . . . . . . . . . . . . . . . . . . . . . . . . . .
Identification details . . . . . . . . . . . . . . . . . . . . . . . . . .
Fuel consumption according to the ECE standards and
EU guidelines . . . . . . . . . . . . . . . . . . . . . . . . . . . . . . . .
Dimensions . . . . . . . . . . . . . . . . . . . . . . . . . . . . . . . . . .
Engine oil specifications . . . . . . . . . . . . . . . . . . . . . . .
1.2 ltr./77 kW TSI - EU5 . . . . . . . . . . . . . . . . . . . . . . . .
1.4 ltr./59 kW - EU4 . . . . . . . . . . . . . . . . . . . . . . . . . . .
1.4 ltr./90 kW TSI - EU5 . . . . . . . . . . . . . . . . . . . . . . . .
1.6 ltr./75 kW - EU4, EU2 . . . . . . . . . . . . . . . . . . . . . .
1.8 ltr./118 kW TSI - EU5, EU2 DDK (1.8 ltr./112 kW TSI -
EU5) . . . . . . . . . . . . . . . . . . . . . . . . . . . . . . . . . . . . . . . . .
2.0 ltr./147 kW TSI - EU5, EU2 DDK . . . . . . . . . . . . .
1.6 ltr./77 kW TDI CR - EU5 . . . . . . . . . . . . . . . . . . . .
1.9 ltr./77 kW TDI PD - EU4, EU3 . . . . . . . . . . . . . . .
2.0 ltr./103 kW TDI CR - EU4, EU5 . . . . . . . . . . . . . .
2.0 ltr./125 kW TDI CR - EU5 . . . . . . . . . . . . . . . . . . .
141141141142145145145146147150150151153155157159159161164165167167167170171171171172172172173175175176
176179180180181182182185185185185189192192192194195196196198200202203207208208214214214214
215215215215215216216217217221222226226229237237237237237237237238239240242244246248250252254256258260
s43s.1.book Page 4 Thursday, May 13, 2010 1:21 PM
Page 62 of 275
Lights and Visibility61
Using the system
Safety
Driving Tips
General Maintenance
Breakdown assistance
Technical Data
Windshield wiper and wash systemWindshield wiper
You can operate the windscreen wipers and automatic wipe/wash
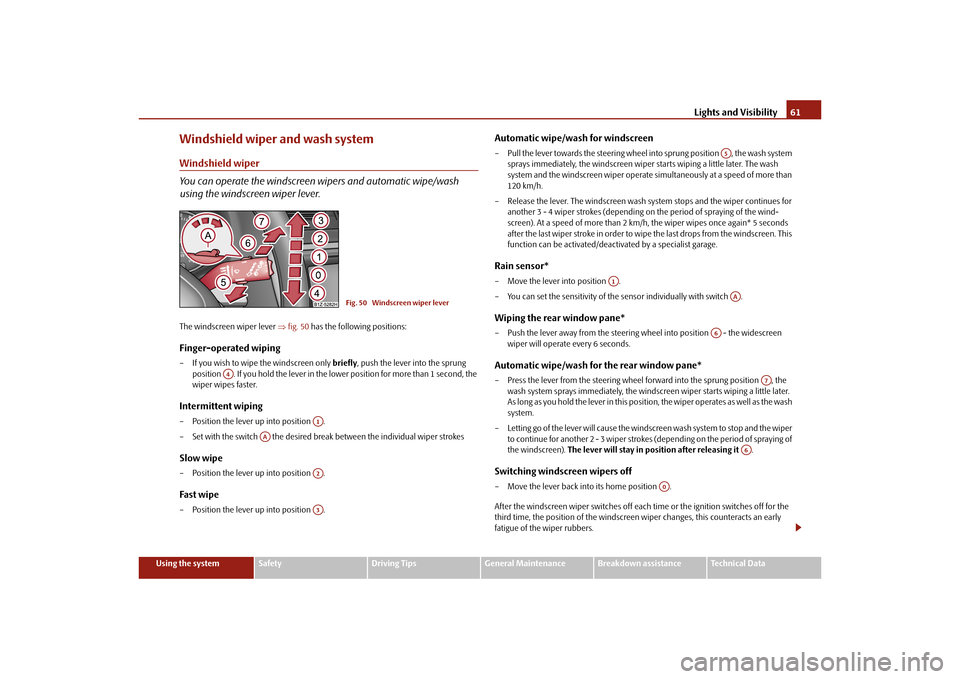
using the windscreen wiper lever.The windscreen wiper lever fig. 50 has the following positions:Finger-operated wiping– If you wish to wipe the windscreen only briefly, push the lever into the sprung
position . If you hold the lever in the lo wer position for more than 1 second, the
wiper wipes faster.Intermittent wiping– Position the lever up into position .
– Set with the switch the desired brea k between the individual wiper strokesSlow wipe– Position the lever up into position .Fast wipe– Position the lever up into position .
Automatic wipe/wash for windscreen– Pull the lever towards the steering wheel into sprung position , the wash system
sprays immediately, the windscreen wiper starts wiping a little later. The wash
system and the windscreen wiper operate simultaneously at a speed of more than
120 km/h.
– Release the lever. The windscreen wash system stops and the wiper continues for another 3 - 4 wiper strokes (depending on the period of spraying of the wind-
screen). At a speed of more than 2 km/h, the wiper wipes once again* 5 seconds
after the last wiper stroke in order to wipe the last drops from the windscreen. This
function can be activated/deacti vated by a specialist garage.Rain sensor*– Move the lever into position .
– You can set the sensitivity of the sensor individually with switch .Wiping the rear window pane*– Push the lever away from the steering wheel into position - the widescreen
wiper will operate every 6 seconds.Automatic wipe/wash for the rear window pane*– Press the lever from the steering wheel forward into the sprung position , the wash system sprays immediately, the windscreen wiper starts wiping a little later.
A s l o n g a s y o u h o l d t h e l e v e r i n t h i s p o s i t i o n, th e w i p e r o p e ra t e s a s w e l l a s t h e w a s h
system.
– Letting go of the lever will cause the windscreen wash system to stop and the wiper to continue for another 2 - 3 wiper strokes (depending on the period of spraying of
the windscreen). The lever will stay in position after releasing it .Switching windscreen wipers off– Move the lever back into its home position .
After the windscreen wiper switches off each time or the ignition switches off for the
third time, the position of the windscreen wiper changes, this counteracts an early
fatigue of the wiper rubbers.
Fig. 50 Windscreen wiper lever
A4
A1
AA
A2A3
A5
A1
AA
A6
A7
A6
A0
s43s.1.book Page 61 Thursday, May 13, 2010 1:21 PM
Page 95 of 275
Heating and air conditioning system
94
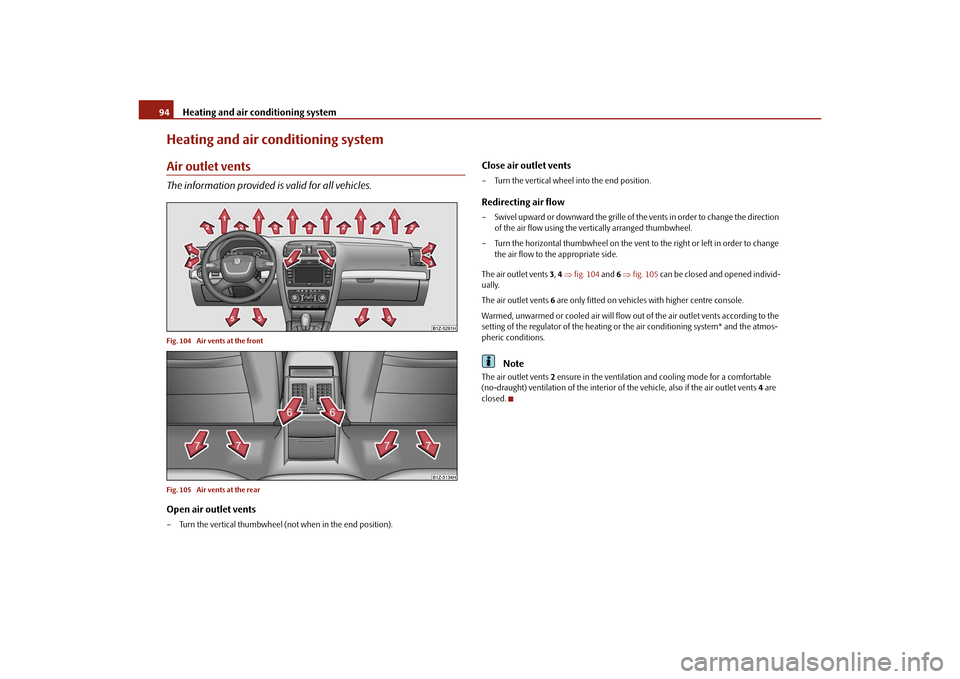
Heating and air conditioning systemAir outlet ventsThe information provided is valid for all vehicles.Fig. 104 Air vents at the front
Fig. 105 Air vents at the rearOpen air outlet vents– Turn the vertical thumbwheel (not when in the end position).
Close air outlet vents– Turn the vertical wheel into the end position.Redirecting air flow– Swivel upward or downward the grille of the vents in order to change the direction
of the air flow using the vertically arranged thumbwheel.
– Turn the horizontal thumbwheel on the vent to the right or left in order to change
the air flow to the appropriate side.
The air outlet vents 3, 4 fig. 104 and 6 fig. 105 can be closed and opened individ-
ually.
The air outlet vents 6 are only fitted on vehicles with higher centre console.
Warmed, unwarmed or cooled air will flow out of the air outlet vents according to the
setting of the regulator of the heating or the air conditioning system* and the atmos-
pheric conditions.
Note
The air outlet vents 2 ensure in the ventilation and cooling mode for a comfortable
(no-draught) ventilation of the interior of the vehicle, also if the air outlet vents 4 are
closed.
s43s.1.book Page 94 Thursday, May 13, 2010 1:21 PM
Page 120 of 275
Automatic gearbox119
Using the system
Safety
Driving Tips
General Maintenance
Breakdown assistance
Technical Data
stationary. The vehicle would otherwise
immediately start off - also when the
handbrake is firmly applied - risk of an accident!
You must move the selector lever into position P and firmly apply the hand-
brake first before you or any other person opens the bonnet and starts working
on the engine when it is running - risk of accident! It is also essential to observe
all warnings page 197, “Working in the engine compartment”.
Selector lever lockAutomatic selector lever lock
With the ignition on, the selector lever is locked when it is in the positions P and N . You
must first of all depress the brake pedal in or der to move the selector lever out of this
position. The warning light
page 33 lights up in the instrument cluster as a
reminder for the driver when the selector lever is in the positions P and N.
A time delay element ensures that the selector lever is not blocked when rapidly
switching over the position N (e.g. from R to D). This does, for example, allow one to
seesaw out a stuck vehicle. The selector lever lo ck will click into place if the lever is in
the N position for more than 2 seconds without the brake pedal being pressed.
The selector lever lock is only active if the vehicle is stationary or moving at speed of
less than 5 km/hour. The lock is swit ched off automatically into position N when the
car is travelling at a higher speed.
Shiftlock button
The Shiftlock button in the hand le of selector lever prevents certain selector lever posi-
tions being engaged inadvertently. The selector lever lock is cancelled when you press
the Shiftlock button.
Keylock - Ignition key withdrawal lock
You can only withdraw the ignition key after switching off the ignition if the selector
lever is in position P. If the ignition key is withdrawn, the selector lever is blocked in
position P.
Kickdown function
The kickdown function provides you with maximum acceleration
power.Fully depressing the a ccelerator pedal allows the kickdown function to be activated in
the desired driving program. This function has precedence over the driving
programme and serves for maximum accelerati on of the vehicle when exploiting the
maximum power potential of the engine wi thout taking into account the current
selector lever position ( D, S or Tiptronic). The gearbox shifts down to one or several
gears in line with the driving state and the vehicle accelerates. The gearbox does not
shift up into the highest gear until the en gine has reached its maximum revolutions for
this gear range.
WARNING
Please note that using the kickdown function can result in the driven wheels
spinning on a smooth or slippery road surface - risk of skidding!Dynamic shift programmeThe automatic gearbox of your vehicle is controlled electronically. Shifting up and
down through the gears is performed automatically on the basis of pre-defined driving
programmes.
Adopting a moderate style of driving will cause the gearbox to select the most
economical driving programme. Shifting up into a higher gear as soon as possible and
shifting down as late as po ssible will have a favourable effect on your fuel consump-
tion.
Adopting a sporty style of driving with rapid movements of the accelerator pedal
combined with sharp acceleration and freque nt changes in speed, exploiting the top
speed of the car or depressing the accele rator pedal (kickdown function), will cause
the gearbox to switch over to this style of driving and shift down earlier with frequent
changes in gears in comparison to the moderate style of driving.
Selecting the most appropriate driving programme for the particular style of driving is
a continuous process. Irrespective of this it is, however, possible to switch or shift down
into a dynamic shift programme by depressi ng the accelerator rapidly. The gearbox
shifts down into a lower gear matching the speed of the car and this allows you to
WARNING (continued)
s43s.1.book Page 119 Thursday, May 13, 2010 1:21 PM
Page 127 of 275
Communication
126
Furthermore the volume can be changed indivi dually during the call at any time with
the button for setting the radio* or navigation system* or with the buttons on the
multifunction steering wheel*.
WARNING
Pay attention primarily to the traffic situation! As the driver you are fully
responsible for road safety. Use the teleph one system only to such an extent, so
that you are in full control of your vehicle at any time.
Note
Please also refer to the additional instructions page 125, “Mobile phones and
two-way radio systems”.
Should you have any questions, please contact an authorised Škoda Service
Par tner.
Phone PhonebookA phone phonebook is part of the mobile ph one preinstallation with voice control. In
the phone phonebook there are 2500 free memory locations available. This phone
phonebook can be used in line with the mobile telephone.
After the first connection of the telephone, the system begins to load the phone book
from the phone and the SIM card into the memory of the control unit.
Each time the telephone has establishe d a new connection with the hands-free
system, an update of the relevant phone b ook is performed. The updating can take a
few minutes. During this time the phone book, which was stored after the last update
was completed, is available. Newly stored telephone numbers are only shown after the
updating has ended.
If the number of contacts loaded exceed s 2 500, the phone book is not complete.
If a telephone event (e.g. incoming or outgoing call, dialogue of the voice control)
occurs during the updating pr ocedure, the updating is interrupted. After the telephone
event has ended, the updating starts anew. Store voice recording of a contact
For each entry in the menu
Phone book, you can store your own voice entry for the
voice control with Voice Tag - Record. You can also store your own voice entry using
voice control in the menu “further options”.
Connection of the mobile phone with the hands-free systemIn order to connect a mobile phone with th e hands-free system, it is necessary to
connect the telephone to the hands-free sy stem. Detailed information on this is
provided in the operating instructions of your mobile phone. The following steps must
be carried out for the connection:
– Activate the Bluetooth
® in your telephone and the visibility of the mobile phone.
– Switch on the ignition.
– Select the menu Phone - Phone search in the information display and wait until
the control unit has ended the search.
– Select your mobile phone in the menu of the units found.
–Confirm the PIN (as standard 1234).
– If the hands-free system announces (as standard Skoda UHV) on the display of the
mobile phone, enter the PIN (as standard 1234) within 30 seconds and wait until
the connection is established
12).
– After ending the connection, confirm in the information display that a new user profile was created.
If no more free space is available for creating a new user profile, delete an existing user
profile.
If you have not managed to connect your mobile phone with the hands-free system
within 3 minutes after switching on the ignition, switch the ignition off and then again
on. The visibility of the hands-free system is established again for 3 minutes. The visi-
bility of the Bluetooth
® device is automatically switched off if the vehicle starts off or
if the mobile phone connects to the device.
12)Some mobile phones have a menu, in which the authorization for establishing a Bluetooth
®
connection is performed via the input of a code. If the input for the authorization is necessary, it
must always be performed when re-e stablishing the Bluetooth connection.
s43s.1.book Page 126 Thursday, May 13, 2010 1:21 PM
Page 131 of 275
Communication
130
the handwheel. You can select the numbers 0 - 9, the symbols +,
, # and the func-
tions Delete, Call, Cancel .
Call register
In the menu point Call register, you can select the following menu points:
Missed calls
Received calls
Last calls
Voice mailbox
In the menu Voice mailbox , it is possible to set the number of the voice mailbox and
then dial the number.
Bluetooth
In the menu Bluetooth you can select the following menu points:
User - the overview of the stored users
New user - Search for new telephones which are in the reception range
Visibility - Switching on the visibility of the telephone unit for other devices
Media player
Active device
Paired devices
Search
Phone name - the possibility to change the name of the telephone unit (pre-set
SKODA UHV)
Settings
In the menu Settings you can select the following menu points:
Phone book
Update
List
Surname
First name
Ring tone Back
Return in the basic menu of the telephone.
Voice controlIntroductionThe period, in which the telephone system is ready to receive voice commands and
carry out the voice commands, is called DIALOGUE. The system gives audible feedback
and guides you if necessary th
rough the relevant functions.
Switch on voice control (dialogue)
You can start the dialogue at any time by briefly pressing the PTT button
on the
adapter* page 128, fig. 123 or on the multifunction steering wheel* page 128.
If the system does not recognise your command, it repeats the first part of the aid and
thus a new entry is possible. After the 2nd error the system repeats the second part of
the aid. After the 3rd error the answer “ Cancel” is given and the dialogue is ended.
Switching off voice control (dialogue)
You can end the dialogue at any time by briefly pressing the PTT button
on the
adapter* page 128, fig. 123 or on the multifunction steering wheel* page 128. If
the system expects a voice command, you can end the dialogue with the command
CANCEL .
Only the message just repeated can be ended by pressing the PTT button during the
message and thus it is possible to pronounce the expected command sooner.
When receiving an incoming call, the dialog ue is immediately interrupted and you can
accept the call by pressing the button
on the multifunction steering wheel* or by
pressing the button for receiving a call directly on your telephone.
Optimum understanding of the voice commands depends on the following
factors:
Speak with a normal tone of voice withou t intonation and excessive voice pauses.
Avoid insufficient articulation.
Close the doors, windows and sliding roof, in order to reduce or stop disturbing
exterior noise.
s43s.1.book Page 130 Thursday, May 13, 2010 1:21 PM
Page 133 of 275
Communication
132
Music playback via Bluetooth
®
The universal telephone preinstallation GSM II makes it possible to play back music via
Bluetooth
® from the devices such as MP3 pl ayer, mobile phone or notebook.
In order to enable the music playback via Bluetooth
®, it is necessary to connect the
device with the handsfree-system in the menu Phone - Bluetooth - Media player .
The operation of the music pl ayback from the connected de vice can be performed via
the hands-free system with the voice control page 131 or directly via the connected
device.
Note
The device to be connected must support the Bluetooth
® profile A2DP, see Owner's
manual of the device to be connected.
Universal telephone preinstallation GSM IIl*IntroductionThe universal telephone preinstallation GSM IlI is a built-in “hands-free system”, it
provides a voice operated convenience mode via the multifunction steering wheel* or
the navigation system*.
All communication between a telephone and the hands-free system of your vehicle
can only be established with the help of the Bluetooth
®, when using HFP - Hands Free
Profile or rSAP - remote SIM Access Profile .
The following functions are included in th e universal telephone preinstallation GSM III:
Phone Phonebook page 132.
Convenience mode with the multifunction steering wheel* page 134 with
display in the information display page 136.
Voice control of the telephone, including the language selection of the telephone
contacts page 137.
Internet connection page 138.
Music playback from the telephone or other multimedia units page 139.
Display of SMS page 136.
The volume can be changed at any time with the control button of the radio* or with
the buttons on the multifunction steering wheel*.
WARNING
Pay attention primarily to the traffic situation! As the driver you are fully
responsible for road safety. Use the telephone system only to such an extent, so
that you are in full control of your vehicle at any time.
Note
Please also refer to the additional instructions page 125, “Mobile phones and
two-way radio systems”.
Should you have any questions, please contact an authorised Škoda Service
Par tner.
Phone PhonebookA phone phonebook is part of the mobile ph one preinstallation with voice control. In
the phone phonebook there are 2000 free me mory locations available. This phone
phonebook can be used in line with the mobile telephone.
After the first connection of the telephone, the system begins to load the phone book
from the phone and the SIM card into the memory of the control unit.
If the telephone book of the mobile phon e contains more than 2 000 entries, the
system announces after downloading Phone book not fully loaded.
Each time the telephone has establishe d a new connection with the hands-free
system, an update of the relevant phone b ook is performed. The updating can take a
few minutes. During this time the phone book, which was stored after the last update
was completed, is available. Newly stored telephone numbers are only shown after the
updating has ended.
If a telephone event (e.g. incoming or outg oing call, dialogue of the voice control)
occurs during the updating procedure, the updating is interrupted. After the telephone
event has ended, the updating starts anew.
s43s.1.book Page 132 Thursday, May 13, 2010 1:21 PM
Page 137 of 275
Communication
136
Operate the telephone via the information display*The display of texts in the menu Phone is possible in the following languages:
German, English, French, Italian, Spanish, Portuguese and Czech.
In the menu Phone you can select the following menu points:
Phone book
Dial number
Call register
Voice mailbox
Messages
14)
Bluetooth
Settings
Back
Phone book
In the menu point Phone book is the list of the loaded contacts from the telephone
memory and the SIM card of the mobile phone. In the phone phonebook there are
2000 free memory locations available.
Dial number
In the menu point Dial number, you can write any telephone number. Select in
sequence the desired digits with the aid of the handwheel and confirm it by pressing
the handwheel. You can select the numbers 0 - 9, the symbols +, *, # and the functions
Delete, Call, Back .
Call register
In the menu point Call register, you can select the following menu points:
Missed calls
Received calls
Last calls
Delete lists Voice mailbox
In the menu
Voice mailbox, it is possible to set the number of the voice mailbox and
then dial the number.
Messages
In the menu point Messages there is a list of received text messages.
Bluetooth
In the menu Bluetooth you can select the fo llowing menu points:
User - the overview of the stored users
New user - Search for users who are in the reception range
Visibility - Switching on the visibility of th e hands-free system for other devices
Media player
Extras
Modem - overview of the active and paired devices for the connection to the
internet
Phone name - the possibility to change the name of the hands-free system (pre-
set SKODA UHV)
Settings
In the menu Settings you can select the following menu points:
Phone book
Update
Select memory
SIM & phone (SIM & Mobile phone)
SIM card
Mobile phone
List
Surname
First name
Own number - the possibility to suppress on e's own number on the unit called
14)Only when connecting the telephone with th e hands-free system via the rSAP profile.s43s.1.book Page 136 Thursday, May 13, 2010 1:21 PM
Page 138 of 275
Communication137
Using the system
Safety
Driving Tips
General Maintenance
Breakdown assistance
Technical Data
Signal settings
Ring tone
Volume
Phone settings
Select operator
Automatic
Manual
Network mode
Off time
SIM mode - applies to telephones with the rSAP profile in which two SIM cards
can be inserted - there is the possibility to select which SIM card may be connected
with the hands-free system and the possibility to select the name for the SIM card.
SIM mode 1
SIM mode 2
GPRS - You can ask a network provider about the settings of the access point for an
internet connection
Switch off ph. - switching off the telephone unit (telephone remains connected)
Back
Return in the main menu of the information display.
Voice controlIntroductionThe period, in which the telephone system is ready to receive voice commands and
carry out the voice commands, is called DI ALOGUE. The system gives audible feedback
and guides you if necessary through the relevant functions.
The volume can be changed at any time with the control button of the radio* or the
navigation system* or with the buttons on the multifunction steering wheel*. Switch on voice control (dialogue)
You can start the dialogue at any time
by briefly pressing the PTT button
on the
multifunction st eering wheel* page 134.
If the system does not recognise your command, it repeats the first part of the aid and
thus a new entry is possible. After the 2nd error the system repeats the second part of
the aid. After the 3rd error the answer “ Procedure cancelled” is given and the dialogue
is ended.
Switching off voice control (dialogue)
You can end the dialogue at an y time by briefly pressing the button on the multifunc-
tion steering wheel* page 134. If the system expects a voice command, you can end
the dialogue with the command CANCEL.
Only the message just repeated can be ended by pressing the PTT button during the
message and thus it is possible to pronounce the expected command sooner.
The dialogue of the incoming call is immediately interrupted and you can accept the
call by pressing the button
on the multifunction steering wheel*.
Optimum understanding of the voice commands depends on the following
factors:
Speak with a normal tone of voice withou t intonation and excessive voice pauses.
Avoid insufficient articulation.
Close the doors, windows and sliding roof, in order to reduce or stop disturbing
exterior noise.
It is recommended to speak louder at higher speeds, so that the tone of your voice
is louder than the increased surrounding noise.
During the dialogue avoid additional noise in the vehicle, e.g. simultaneously
talking occupants.
Do not speak, if the system makes an announcement.
The microphone for voice control is inserted in the moulded headliner and
directed to the driver and front passenger. Therefore the driver and the front passenger
can operate the equipment.
s43s.1.book Page 137 Thursday, May 13, 2010 1:21 PM
Page 147 of 275
Seat belts
146
The speed of the vehicle is, nevertheless, the most important factor. Doubling the
speed of the vehicle from 25 km/h up to 50 km/hour increases the kinetic energy four
times.
The common opinion that it is possible to su pport your body in a minor accident with
your hands, is incorrect. Even in a collision at only a low speed, the forces acting on the
body are such that it is no longer possible to support your body.
Even if you only drive at a speed within the range from 30 km/hour to 50 km/hour, the
forces which are produced on your body in the event of an accident can easily exceed
10.000 N (Newton). This equals a weight of one tonne (1 000 kg).
In the event of a frontal collision, occupants of the vehicle not wearing a seat belt, are
thrown forward and strike in an uncontrolled way parts of the interior of the vehicle,
such as steering wheel, dash panel, windscreen, page 145, fig. 129 - left. The occu-
pants of a vehicle who have not fastened their seat belts may even be thrown out of
the vehicle. This can result in fatal injuries.
It is also important that rear seat occupants fasten their seat belts as they will otherwise
be thrown through the vehicle in an uncontr olled manner in the event of an accident
A rear seat passenger who has not fastened the s eat bel t i s a dang er not o nl y to hims elf
but also for those seated at the front page 145, fig. 129 - right.Important safety information regarding the use of seat beltsThe correct use of the seat belts cons iderably reduces the risk of injury!
WARNING
The belt webbing must not be jammed in-between at any point or twisted,
or chafe against any sharp edges.
It is important that the belt webbing is properly routed if the seat belts are
to offer their maximum protection page 147.
No two persons (also not children) should ever use a single seat belt
together.
The maximum protection which seat belts can offer is only achieved if you
are correctly seated page 142, “Correct seated position”.
The belt webbing must not run across solid or fragile objects (e.g. specta-
cles, ball-point pens, keys etc.) as this may be a cause of injuries.
Bulky, loose clothing (e.g. a winter coat over a jacket) does not allow you to
be correctly seated and impairs proper operation of the seat belts.
It is prohibited to use clamps or other objects to adjust seat belts (e.g. for
shortening the belts for smaller persons).
The lock tongue should only be inserted into the lock which is the correct
one for your seat. Wrong use of the safety belt will reduce its capacity to protect
and the risk of injury increases.
The seat backrests of the front seats must not be tilted too far to the rear
otherwise the seatbelts can lose their effectiveness.
The belt webbing must always be ke pt clean. Soiled belt webbing may
impair proper operation of the inertia reel page 191, “Seat belts”.
The slot of the belt tongue must not be blocked by paper or similar objects
otherwise the belt tongue will not lock in place properly.
Inspect the seat belts regula rly to ensure they are in good condition. If you
find seat belts which have damage to the seat belt webbing, seat belt connec-
tions, to the inertia reels or to the lock, the relevant safety belt must be replaced
by a specialist garage.
The seat belts must not be removed or changed in any way. Do not make an
attempt to repair the seat belts yourself.
Damaged seat belts which have been subjected to stress in an accident and
were therefore stretched, must be replaced - this is best done by a specialist
garage. The anchorage points of the belts must also be inspected. The
anchorage points for the belts should also be checked.
In certain countries it is possible to use seat belts which differ in terms of
their operation from the seat belts which are described on the pages which
follow.WARNING (continued)
s43s.1.book Page 146 Thursday, May 13, 2010 1:21 PM