fuel consumption SKODA OCTAVIA 2010 2.G / (1Z) Owner's Manual
[x] Cancel search | Manufacturer: SKODA, Model Year: 2010, Model line: OCTAVIA, Model: SKODA OCTAVIA 2010 2.G / (1Z)Pages: 275, PDF Size: 16.43 MB
Page 5 of 275
Contents
4
Safety
. . . . . . . . . . . . . . . . . . . . . . . . . . . . . . . . . . . . . . .
Passive Safety
. . . . . . . . . . . . . . . . . . . . . . . . . . . . . . . . .
Basic information . . . . . . . . . . . . . . . . . . . . . . . . . . . . .
Correct seated position . . . . . . . . . . . . . . . . . . . . . . .
Seat belts
. . . . . . . . . . . . . . . . . . . . . . . . . . . . . . . . . . . . . .
Why seat belts? . . . . . . . . . . . . . . . . . . . . . . . . . . . . . . .
The physical principle of a frontal collision . . . . . .
Important safety information regarding the use of seat
belts . . . . . . . . . . . . . . . . . . . . . . . . . . . . . . . . . . . . . . . . .
How are seat belts correctly fastened? . . . . . . . . . .
Airbag system
. . . . . . . . . . . . . . . . . . . . . . . . . . . . . . . . .
Description of the airbag system . . . . . . . . . . . . . . .
Front airbags . . . . . . . . . . . . . . . . . . . . . . . . . . . . . . . . .
Side airbags* . . . . . . . . . . . . . . . . . . . . . . . . . . . . . . . . .
Head airbags* . . . . . . . . . . . . . . . . . . . . . . . . . . . . . . . .
Deactivating an airbag . . . . . . . . . . . . . . . . . . . . . . . .
Transporting children safely
. . . . . . . . . . . . . . . . . .
What you should know about transporting children!
Child seat . . . . . . . . . . . . . . . . . . . . . . . . . . . . . . . . . . . .
Attaching a child seat us ing the “ISOFIX” system .
Attaching child seat using the “Top Tether” system
Driving Tips
. . . . . . . . . . . . . . . . . . . . . . . . . . . . . .
Intelligent Technology
. . . . . . . . . . . . . . . . . . . . . . . .
Electronic stability programme (ESP)* . . . . . . . . . .
Brakes . . . . . . . . . . . . . . . . . . . . . . . . . . . . . . . . . . . . . . .
Brake booster . . . . . . . . . . . . . . . . . . . . . . . . . . . . . . . .
Antilock brake system (ABS) . . . . . . . . . . . . . . . . . . .
Brake Assist* . . . . . . . . . . . . . . . . . . . . . . . . . . . . . . . . .
Uphill Start Assist* . . . . . . . . . . . . . . . . . . . . . . . . . . . .
Electromechanical power steering . . . . . . . . . . . . .
Tyre pressure monitoring system* . . . . . . . . . . . . . .
Diesel particle filter* (diesel engine) . . . . . . . . . . . .
Driving and the Environment
. . . . . . . . . . . . . . . . .
The first 1 500 kilometres and then afterwards . .
Catalytic converter . . . . . . . . . . . . . . . . . . . . . . . . . . . . Driving in an economical and environmentally
conscious manner . . . . . . . . . . . . . . . . . . . . . . . . . . . .
Environmental compatibility . . . . . . . . . . . . . . . . . . .
Motoring abroad . . . . . . . . . . . . . . . . . . . . . . . . . . . . . .
Avoiding damage to your vehicle . . . . . . . . . . . . . . .
Driving through bodies of water on roads . . . . . . .
To w i n g a t r a i l e r
. . . . . . . . . . . . . . . . . . . . . . . . . . . . . . . .
Towing a trailer . . . . . . . . . . . . . . . . . . . . . . . . . . . . . . . .
General Maintenance
. . . . . . . . . . . . . . .
Taking care of your ve hicle and cleaning the
vehicle
. . . . . . . . . . . . . . . . . . . . . . . . . . . . . . . . . . . . . . . . .
General . . . . . . . . . . . . . . . . . . . . . . . . . . . . . . . . . . . . . .
Care of the exterior of vehicle . . . . . . . . . . . . . . . . . .
Care of the interior of vehicle . . . . . . . . . . . . . . . . . .
Fuel
. . . . . . . . . . . . . . . . . . . . . . . . . . . . . . . . . . . . . . . . . . . .
Petrol . . . . . . . . . . . . . . . . . . . . . . . . . . . . . . . . . . . . . . . .
Biofuel Ethanol E85* . . . . . . . . . . . . . . . . . . . . . . . . . .
Diesel . . . . . . . . . . . . . . . . . . . . . . . . . . . . . . . . . . . . . . . .
Refuelling . . . . . . . . . . . . . . . . . . . . . . . . . . . . . . . . . . . .
Inspecting and replenishing
. . . . . . . . . . . . . . . . . . .
Engine compartment . . . . . . . . . . . . . . . . . . . . . . . . . .
Engine oil . . . . . . . . . . . . . . . . . . . . . . . . . . . . . . . . . . . . .
Cooling system . . . . . . . . . . . . . . . . . . . . . . . . . . . . . . .
Brake fluid . . . . . . . . . . . . . . . . . . . . . . . . . . . . . . . . . . . .
Battery . . . . . . . . . . . . . . . . . . . . . . . . . . . . . . . . . . . . . . .
Windshield washer system . . . . . . . . . . . . . . . . . . . . .
Wheels and Tyres
. . . . . . . . . . . . . . . . . . . . . . . . . . . . . .
Wheels . . . . . . . . . . . . . . . . . . . . . . . . . . . . . . . . . . . . . . .
Accessories, changes and replacement of partsAccessories and replacement parts . . . . . . . . . . . . .
Technical changes . . . . . . . . . . . . . . . . . . . . . . . . . . . . .
Vehicles of category N1 . . . . . . . . . . . . . . . . . . . . . . . .
Breakdown assistance
. . . . . . . . . . . . . .
Breakdown assistance
. . . . . . . . . . . . . . . . . . . . . . . .
First-aid box* and Warning triangle* (Octavia) . .
First-aid box* and warning triangle* (Estate car) .
Fire extinguisher* . . . . . . . . . . . . . . . . . . . . . . . . . . . . .
Vehicle tool kit . . . . . . . . . . . . . . . . . . . . . . . . . . . . . . . .
Tyre repair kit* . . . . . . . . . . . . . . . . . . . . . . . . . . . . . . . .
Spare wheel* . . . . . . . . . . . . . . . . . . . . . . . . . . . . . . . . .
Changing a wheel . . . . . . . . . . . . . . . . . . . . . . . . . . . . .
Jump-starting . . . . . . . . . . . . . . . . . . . . . . . . . . . . . . . .
Tow-starting and towing vehicle . . . . . . . . . . . . . . .
Fuses and light bulbs
. . . . . . . . . . . . . . . . . . . . . . . . .
Electric fuses . . . . . . . . . . . . . . . . . . . . . . . . . . . . . . . . .
Bulbs . . . . . . . . . . . . . . . . . . . . . . . . . . . . . . . . . . . . . . . .
Technical Data
. . . . . . . . . . . . . . . . . . . . . . . . . .
Technical Data
. . . . . . . . . . . . . . . . . . . . . . . . . . . . . . . .
General information . . . . . . . . . . . . . . . . . . . . . . . . . .
Used abbreviations . . . . . . . . . . . . . . . . . . . . . . . . . . .
Performances . . . . . . . . . . . . . . . . . . . . . . . . . . . . . . . .
Weight . . . . . . . . . . . . . . . . . . . . . . . . . . . . . . . . . . . . . . .
Identification details . . . . . . . . . . . . . . . . . . . . . . . . . .
Fuel consumption according to the ECE standards and
EU guidelines . . . . . . . . . . . . . . . . . . . . . . . . . . . . . . . .
Dimensions . . . . . . . . . . . . . . . . . . . . . . . . . . . . . . . . . .
Engine oil specifications . . . . . . . . . . . . . . . . . . . . . . .
1.2 ltr./77 kW TSI - EU5 . . . . . . . . . . . . . . . . . . . . . . . .
1.4 ltr./59 kW - EU4 . . . . . . . . . . . . . . . . . . . . . . . . . . .
1.4 ltr./90 kW TSI - EU5 . . . . . . . . . . . . . . . . . . . . . . . .
1.6 ltr./75 kW - EU4, EU2 . . . . . . . . . . . . . . . . . . . . . .
1.8 ltr./118 kW TSI - EU5, EU2 DDK (1.8 ltr./112 kW TSI -
EU5) . . . . . . . . . . . . . . . . . . . . . . . . . . . . . . . . . . . . . . . . .
2.0 ltr./147 kW TSI - EU5, EU2 DDK . . . . . . . . . . . . .
1.6 ltr./77 kW TDI CR - EU5 . . . . . . . . . . . . . . . . . . . .
1.9 ltr./77 kW TDI PD - EU4, EU3 . . . . . . . . . . . . . . .
2.0 ltr./103 kW TDI CR - EU4, EU5 . . . . . . . . . . . . . .
2.0 ltr./125 kW TDI CR - EU5 . . . . . . . . . . . . . . . . . . .
141141141142145145145146147150150151153155157159159161164165167167167170171171171172172172173175175176
176179180180181182182185185185185189192192192194195196196198200202203207208208214214214214
215215215215215216216217217221222226226229237237237237237237237238239240242244246248250252254256258260
s43s.1.book Page 4 Thursday, May 13, 2010 1:21 PM
Page 7 of 275
Layout of this Owner's Manual (explanations)
6
Layout of this Owner's Manual (explanations)The Owner's Manual has been systematically designed, in order to make it easy for you
to find and absorb the information you require.Chapters, table of contents and subject indexThe text of the Owner's manual is divided into relatively short sections which are
combined into easy-to-read chapters. The chapter you are reading at any particular
moment is highlighted at the bottom right of the page.
The Table of contents is arranged according to the chapters and the detailed Subject
index at the end of the Owner's Manual helps you to rapidly find the information you
are looking for.SectionsThe majority of Sections apply to all models.
Since there is a wide range of different equipment and options available it is clearly
unavoidable, despite dividing the contents into sections, that mention may be made
of equipment whic h is not fitted to your vehicle.Brief information and instructionsEach section has a Heading.
This is followed by Brief information (in large italic lettering), which tells you the
subject which is dealt with in this section.
Most of the illustrations are accompanied by an Instruction (in relatively large letters)
which explains to you in a straightforw ard way the action you have to take. Work steps
which have to be carried out are illustrated with a hyphen.Direction indicationsAll direction indications such as “left”, “right”, “front”, “rear” relate to the direction of
travel of the vehicle.Explanation of symbols Equipment which is marked in such a way is only standard on certain vehicle model
versions or only suppliable as opti onal equipment for certain models. End of a section.
The section is continued on the next page.NotesAll four kinds of notes, which are used in th e text, are always stated at the end of the
respective section.
WARNING
The most important notes are marked with the heading WARNING. These
WARNING notes draw your attention to a serious risk of accident or injury.
While reading the text you will frequent ly encounter a double arrow followed
by a small warning symbol. This symbol is intended to draw your attention to a
WARNING note at the end of the section to which you must pay careful atten-
tion.
Caution
A Caution note draws your attention to the possib ility of damage to your vehicle (e.g.
damage to gearbox), or points ou t general risks of an accident.
For the sake of the environment
An Environmental note draws your attention to environmental protection aspects.
This is where you will, for example, find tips aimed at reducing your fuel consumption.
Note
A normal Note draws your attention in a general way to important information.
s43s.1.book Page 6 Thursday, May 13, 2010 1:21 PM
Page 20 of 275
Instruments and warning lights19
Using the system
Safety
Driving Tips
General Maintenance
Breakdown assistance
Technical Data
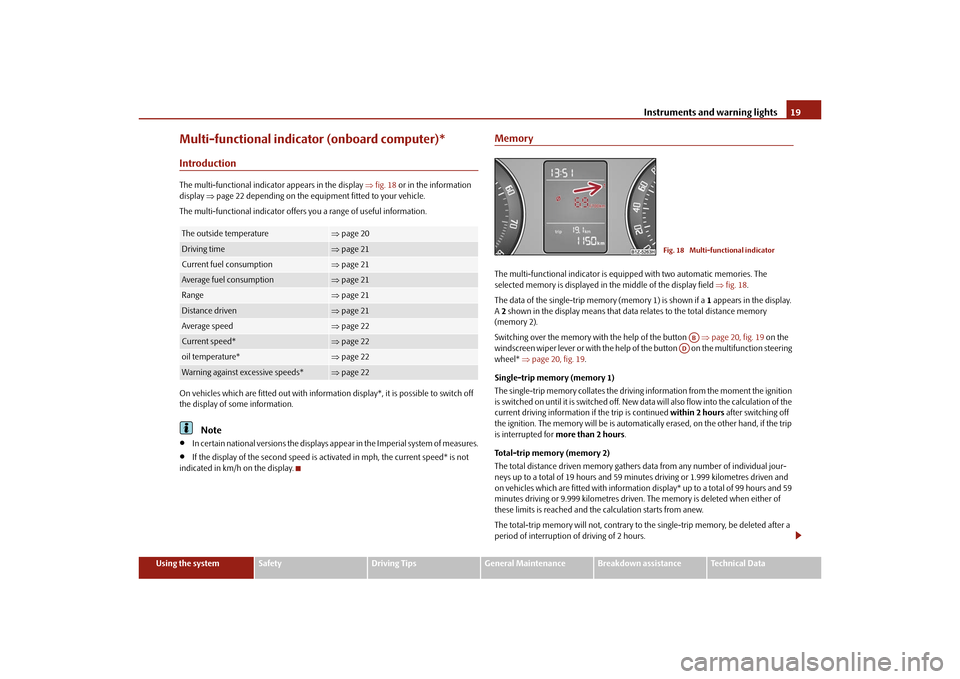
Multi-functional indicator (onboard computer)*IntroductionThe multi-functional indicator appears in the display fig. 18 or in the information
display page 22 depending on the equipm ent fitted to your vehicle.
The multi-functional indicator offers you a range of useful information.
On vehicles which are fitted out with information display*, it is possible to switch off
the display of some information.
Note
In certain national versions th e displays appear in the Imperial system of measures.
If the display of the second speed is ac tivated in mph, the current speed* is not
indicated in km/h on the display.
MemoryThe multi-functional indicator is equipped with two automatic memories. The
selected memory is displayed in the middle of the display field fig. 18 .
The data of the single-trip memory (memory 1) is shown if a 1 appears in the display.
A 2 shown in the display means that data relates to the total distance memory
(memory 2).
Switching over the memory with the help of the button page 20, fig. 19 on the
windscreen wiper lever or with the help of the button on the multifunction steering
wheel* page 20, fig. 19.
Single-trip memory (memory 1)
The single-trip memory collates the driving information from the moment the ignition
is switched on until it is switched off. New data will also flow into the calculation of the
current driving information if the trip is continued within 2 hours after switching off
the ignition. The memory will be is automatica lly erased, on the other hand, if the trip
is interrupted for more than 2 hours .
Total-trip memory (memory 2)
The total distance driven memory gathers data from any number of individual jour-
neys up to a total of 19 hours and 59 minutes driving or 1.999 kilometres driven and
on vehicles which are fitted with informatio n display* up to a total of 99 hours and 59
minutes driving or 9.999 kilometres driven. The memory is deleted when either of
these limits is reached and the calculation starts from anew.
The total-trip memory will not, contrary to the single-trip memory, be deleted after a
period of interruption of driving of 2 hours.
The outside temperature
page 20
Driving time
page 21
Current fuel consumption
page 21
Average fuel consumption
page 21
Range
page 21
Distance driven
page 21
Average speed
page 22
Current speed*
page 22
oil temperature*
page 22
Warning against excessive speeds*
page 22
Fig. 18 Multi-functional indicator
AB
AD
s43s.1.book Page 19 Thursday, May 13, 2010 1:21 PM
Page 21 of 275
Instruments and warning lights
20Note
All information in the memory 1 and 2 is erased if the battery of the vehicle is
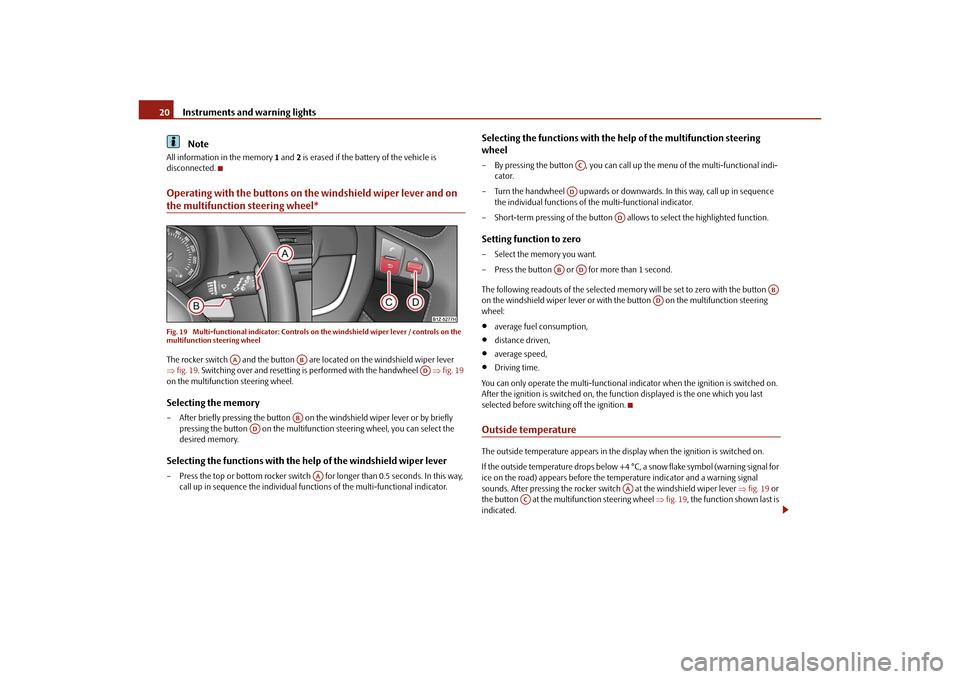
disconnected.Operating with the buttons on the windshield wiper lever and on the multifunction steering wheel*Fig. 19 Multi-functional indicator: Controls on the windshield wiper lever / controls on the
multifunction steering wheelThe rocker switch and the button are located on the windshield wiper lever
fig. 19 . Switching over and resetting is performed with the handwheel fig. 19
on the multifunction steering wheel.Selecting the memory– After briefly pressing the button on the windshield wiper lever or by briefly
pressing the button on the multifunction steering wheel, you can select the
desired memory.Selecting the functions with the he lp of the windshield wiper lever– Press the top or bottom rocker switch for longer than 0.5 seconds. In this way,
call up in sequence the individual func tions of the multi-functional indicator.
Selecting the functions with the help of the multifunction steering
wheel– By pressing the button , you can call up the menu of the multi-functional indi-
cator.
– Turn the handwheel upwards or downward s. In this way, call up in sequence
the individual functions of th e multi-functional indicator.
– Short-term pressing of the button allows to select the highlighted function.Setting function to zero– Select the memory you want.
– Press the button or for more than 1 second.
The following readouts of the selected memo ry will be set to zero with the button
on the windshield wiper lever or with the button on the multifunction steering
wheel:
average fuel consumption,
distance driven,
average speed,
Driving time.
You can only operate the multi-functional in dicator when the ignition is switched on.
After the ignition is switched on, the function displayed is the one which you last
selected before switch ing off the ignition.
Outside temperatureThe outside temperature appears in the display when the ignition is switched on.
If the outside temperature drops below +4 °C, a snow flake symbol (warning signal for
ice on the road) appears before the temperature indicator and a warning signal
sounds. After pressing th e rocker switch at the windshield wiper lever fig. 19 or
the button at the multifunction steering wheel fig. 19 , the function shown last is
indicated.
AA
AB
AD
AB
AD
AA
AC
AD
AD
AB
AD
AB
AD
AA
AC
s43s.1.book Page 20 Thursday, May 13, 2010 1:21 PM
Page 22 of 275
Instruments and warning lights21
Using the system
Safety
Driving Tips
General Maintenance
Breakdown assistance
Technical Data
WARNING
Do not only rely upon the information given on the outside temperature display
that there is no ice on the road. Please note that black ice may also be present
on the road surface even at temperatures around +4°C - warning, drive with
care!Driving timeThe driving time which has elapsed since the memory was last erased, appears in the
display. If you wish to measure the driving ti me as of a particular time, you must set the
memory to zero at this moment in time by pressing the button on the windshield
wiper lever page 20, fig. 19 or the handwheel on the multifunction steering
wheel* page 20, fig. 19 for longer than 1 second.
The maximum time indicated in both memories is 19 hours and 59 minutes and on
vehicles which are fitted with information display*, it is 99 hours and 59 minutes. The
indicator is set back to null if this period is exceeded.Current consumptionThe current fuel consumption level is shown in the display in litres/100 km. This infor-
mation can help you to adapt your style of driving to the fuel consumption you wish to
achieve.
The display appears in litres/hour if the vehicle is stationary or driving at a low speed.
The indicated value will be updated every 0.5 seconds while you are driving.Average fuel consumptionThe average fuel consumption since the memory was last erased is shown in the
display in litres/100 km page 19. This information can he lp you to adapt your style
of driving to the fuel consumption you wish to achieve.
If you wish to determine the average fuel consumption over a cert ain period of time
you must set the memory to zero at the start of the measurement using the button
on the windshield wiper lever page 20, fig. 19 or with the handwheel on the multifunction st
eering wheel* page 20, fig. 19 . A zero appears in the display for the
first 100 m you drive after erasing the memory.
The indicated value will be updated every 5 seconds while you are driving.
Note
The amount of fuel consumed will not be indicated.RangeThe estimated range in kilometres is shown on the display. It indicates the distance you
can still drive with your vehicle based on th e present level of fuel in the tank for the
same style of driving.
The readout is shown in steps of 10 km. Afte r lighting up of the indicator light for the
fuel reserve the display is shown in steps of 5 km.
The fuel consumption for the last 50 km is ta ken as a basis for calculating the range. If
you drive in a more economical manner from this moment on, the range will be
increased accordingly.
If the memory is set to zero (after discon necting the battery), the fuel consumption of
10 ltr./100 km is calculated for the range; afterwards the value is adapted accordingly
to the style of driving.Distance drivenThe distance driven since the memory was last erased appears in the display
page 19. If you wish to measure the distance driven of a particular time, you must
set the memory to zero at this moment in time by pressing the button on the wind-
shield wiper lever page 20, fig. 19 or the handwheel on the multifunction
steering wheel* page 20, fig. 19.
The maximum distance indicated in both memories is 1 999 km or on vehicles with
information display*, it is 9 999 km. The indicator is set back to null if this period is
exceeded.
AB
AD
AB
AD
AB
AD
s43s.1.book Page 21 Thursday, May 13, 2010 1:21 PM
Page 60 of 275
Lights and Visibility59
Using the system
Safety
Driving Tips
General Maintenance
Breakdown assistance
Technical Data
Lighting of the storage compartment on front passenger side*– When opening the flap of the storage comp artment on the front passenger side the
lighting in the storage compartment comes on.
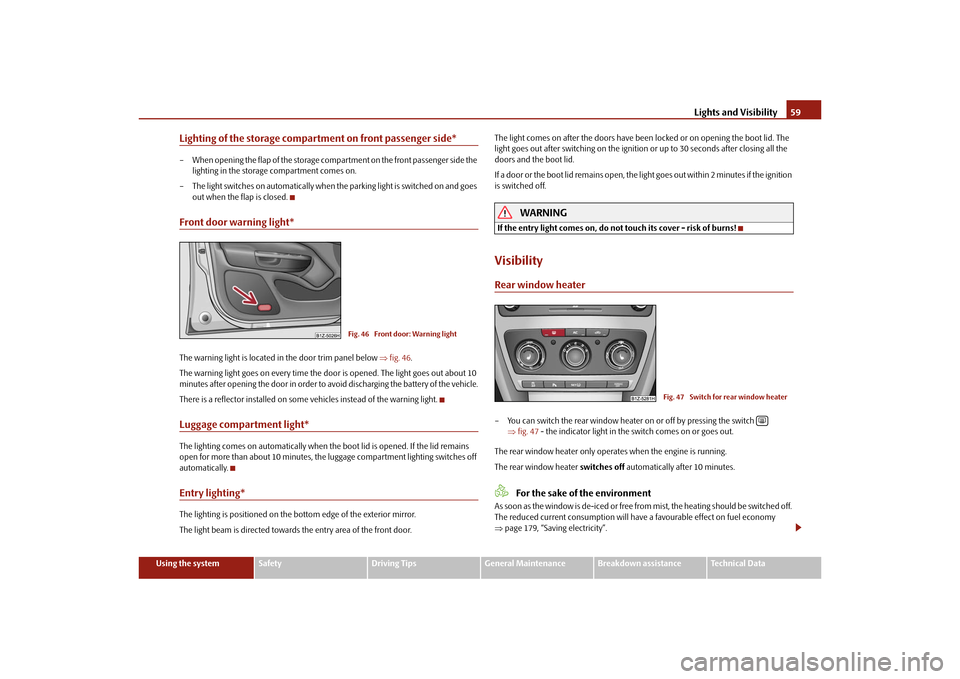
– The light switches on automatically when the parking light is switched on and goes out when the flap is closed.Front door warning light*The warning light is located in the door trim panel below fig. 46 .
The warning light goes on every time the door is opened. The light goes out about 10
minutes after opening the door in order to avoid discharging the battery of the vehicle.
There is a reflector installed on some vehicles instead of the warning light.Luggage compartment light*The lighting comes on automatically when th e boot lid is opened. If the lid remains
open for more than about 10 minutes, the luggage compartment lighting switches off
automatically.Entry lighting*The lighting is positioned on the bottom edge of the exterior mirror.
The light beam is directed towards the entry area of the front door. The light comes on after the doors have been
locked or on opening the boot lid. The
light goes out after switching on the ignition or up to 30 seconds after closing all the
doors and the boot lid.
If a door or the boot lid remains open, the light goes out within 2 minutes if the ignition
is switched off.
WARNING
If the entry light comes on, do not touch its cover - risk of burns!VisibilityRear window heater– You can switch the rear window heater on or off by pressing the switch
fig. 47 - the indicator light in the switch comes on or goes out.
The rear window heater only operates when the engine is running.
The rear window heater switches off automatically after 10 minutes.
For the sake of the environment
As soon as the window is de-iced or free from mist, the heating should be switched off.
The reduced current consumption will have a favourable effect on fuel economy
page 179, “Saving electricity”.
Fig. 46 Front door: Warning light
Fig. 47 Switch for rear window heater
s43s.1.book Page 59 Thursday, May 13, 2010 1:21 PM
Page 82 of 275
Seats and Stowage81
Using the system
Safety
Driving Tips
General Maintenance
Breakdown assistance
Technical Data
Pay attention that the rear seat backrest is correctly interlocked. It is only
then that the three-point seat belt for th e middle seat can reliably fulfil its func-
tion.
First check for yourself that the cross road is inserted into the mounts in
the front position!
Removing and installing the luggage net partition housingRemoving– Fold the rear seats forwards page 72.
– Open the right rear door.
– Push the luggage net partition housing fig. 78 in the direction of arrow
and take it out of the mount of the rear seats in the direction of arrow .Installing– Position the luggage net partition housing into the mounts in the rear seat back- rests.
– Push the luggage net partition housing in the opposite direction of arrow as far as the stop.
– Fold the rear seats back into their original position.
The roof rack*DescriptionPay attention to the following points if you wish to transport luggage or other items on
the roof of your vehicle:
A special roof luggage rack system was de veloped for the vehicle, that is why you
should only use a roof luggage rack which has been released for use by Škoda Auto.
The base carrier is the basis for a comple te roof luggage rack system. Separate
additional holders are required for safety reasons for transporting luggage, bikes, surf-
boards, skis and boats.
The basic version of the roof luggage rack system and further components are
obtainable as accessories from the authorised Škoda Service Partners.Caution
If you use other roof rack systems or if the roof bars are not properly fitted, then any
damage which may result to your car is not covered by the warranty agreements. It is
therefore essential to pay attention to the fitting instructions supplied with the roof
luggage rack system.
On models fitted with a power sliding/ tilting roof, ensure that the opened
sliding/tilting roof does not strike any items of luggage transported on the roof.
Ensure that the opened boot lid do es not collide with the roof load.For the sake of the environment
The increased aerodynamic drag results in a higher fuel consumption. One should
therefore take off the roof bar system after use.
Note
A roof rail is obtainable from a specialist garage if hasn't been fitted onto an estate car
at the works, which carries out the professional fitting.
WARNING (continued)
AC
Fig. 78 Rear seats: Luggage net parti-
tion housing
AA
A1
A2A1
s43s.1.book Page 81 Thursday, May 13, 2010 1:21 PM
Page 101 of 275
Heating and air conditioning system
100
Recirculated air mode
In recirculated air mode air is sucked out of the interior of the vehicle
and then fed back into the interior.Recirculated air mode prevents polluted air outside the vehicle from getting into the
vehicle, for example when driving through a tunnel or when standi ng in a traffic jam.Switching recirculated air mode on– Press the button page 98, fig. 107 the warning light lights up in the
button.Switching recirculated air mode off– Press again the button - the warning light in the button goes out.
The recirculated air mode is switched off automatically if the air distribution control
is in position
page 98, fig. 107. You can also switch recirculated air mode on
again from this setting by repeatedly pressing button .
WARNING
You should not leave recirculated air mode on over a longer period of time, as
“stale” air may result in fatigue in the driver and occupants, divert your atten-
tion and also cause the windows to mist up. The risk of having an accident
increases. Switch recirculated air mode off as soon as the windows begin
misting up.Using the air conditioning system economicallyThe compressor on the air conditioning syst em uses power from the engine when in
cooling mode which will effect the fuel consumption.
It recommended to open the windows or the doors of a vehicle for which the interior
has been strongly heated through the effect of direct sunlight in order to allow the
heated air to escape.
The cooling system should not be switched on while travelling when the window is
open. The desired interior temperature can also be achieved without switching in the cooling
system just by switching to fresh air mode.
For the sake of the environment
When you economize on fuel, you
also reduce pollutant emissions.Operational malfunctionsIf the cooling system does not operate at outside temperatures higher than +5 °C,
there is a problem in the system. The reasons for this may be:
The fuse on the air conditioning system has blown. Check the fuse, replace it if
necessary page 226.
The cooling system has switched off auto matically for a short time because the
coolant temperature of the engine is too hot page 16.
If you are not able to rectify the operational problem yourself, or if the cooling capacity
decreases, switch the cooling system off. Contact a specialist garage.
Climatronic* (automatic air conditioning)Description
The Climatronic system is a combinat ion of an automatic heating, fresh
air and cooling system which provides optimal comfort for the occu-
pants of the car.The Climatronic maintains fully automatically a convenience temperature. This is
achieved by automatically varying the temperature of the outflowing air, the blower
stages and the air distribution. The system also takes into account sunlight which elim-
inates the need to alter the settings manually. The automatic mode page 102
ensures maximum wellbeing of the occupants at all times of the year.
Description of Climatronic system
The cooling operates only if the following conditions are met:
engine running,
A4
AC
s43s.1.book Page 100 Thursday, May 13, 2010 1:21 PM
Page 106 of 275
Heating and air conditioning system105
Using the system
Safety
Driving Tips
General Maintenance
Breakdown assistance
Technical Data
WARNING
The auxiliary heating must never be operated in closed rooms - risk of
poisoning!
The auxiliary heating must not be runn ing during refueling - risk of fire.
The exhaust pipe of the auxiliary heating is located on the underside of the
vehicle. Therefore do not place the vehicl e, if you wish to operate the auxiliary
heating, in such a way that the exhaust gases of the auxiliary heating can come
easily into contact with inflammable mate rials (e.g. dry grass) or easily inflam-
mable substances (e.g. fuel run out).Note
If the auxiliary heating runs, the fuel consumption comes from the vehicle tank.
Therefore the auxiliary heating should not be op erated, if there is very little fuel in the
tank.
The exhaust pipe of the auxiliary heating, which is located on the underside of the
vehicle, must not be clogged and the exhaust flow must not be blocked.
If the auxiliary heating and ventilation is running, the vehicle battery discharges. If
the auxiliary heating and ventilation has be en operated several times over a longer
period, the vehicle must be driven a few ki lometers in order to recharge the vehicle
battery.
The auxiliary heating only switches the blower on, if it has achieved a coolant
temperature of approx. 50 °C.
At low outside temperatures, this can result in a formation of water vapour in the
area of the engine compartment. This is quite normal and is not an operating problem.
After switching off the auxiliary heating, the coolant pump runs for a short period.
The auxiliary heating and ventilation does not switch on or comes on, if the vehicle
battery indicates a low loading state.
The auxiliary heating (auxiliary heating) does not switch on, if the following was
shown in the information display or before switching off the ignition: Please refuel!
(Please refuel!) .
The air inlet in front of the windscreen must be free of ice, snow or leaves in order
to ensure that the auxiliary heating operates properly.
So that warm air can flow into the vehicl e interior after switching on the auxiliary
heating, you must maintain the temperature normally selected by you (we recom-
mend 22°C). It is recommended to put the air flow in the position
.
On vehicles with DPF (diesel particle filter) the warm coolant heats up the engine.
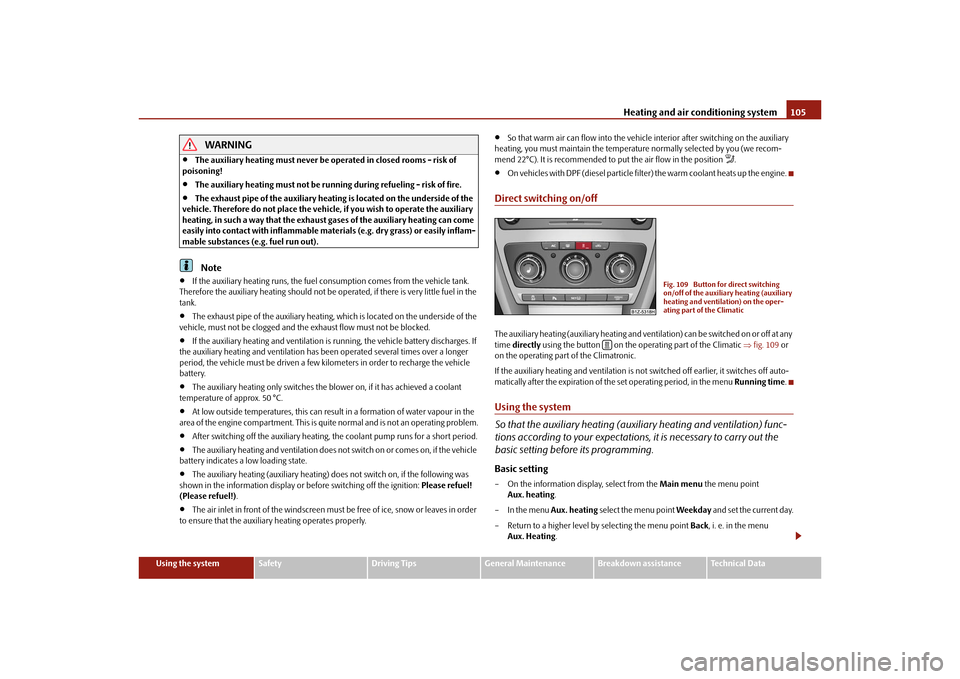
Direct switching on/offThe auxiliary heating (auxiliary heating and vent ilation) can be switched on or off at any
time directly using the button on the operating part of the Climatic fig. 109 or
on the operating part of the Climatronic.
If the auxiliary heating and ventilation is not switched off earlier, it switches off auto-
matically after the expiration of the set operating period, in the menu Running time.Using the system
So that the auxiliary heating (auxiliary heating and ventilation) func-
tions according to your expectations, it is necessary to carry out the
basic setting before its programming.Basic setting– On the information display, select from the Main menu the menu point
Aux. heating .
– In the menu Aux. heating select the menu point Weekday and set the current day.
– Return to a higher level by selecting the menu point Back, i. e. in the menu
Aux. Heating .
Fig. 109 Button for direct switching
on/off of the auxiliary heating (auxiliary
heating and ventilation) on the oper-
ating part of the Climatic
s43s.1.book Page 105 Thursday, May 13, 2010 1:21 PM
Page 117 of 275
Automatic gearbox
116
Automatic gearboxAutomatic gearbox*Information for driving with the 6-speed automatic gearbox*
Your car is equipped with a conv entional 6-speed automatic gearbox.The maximum speed is reached in the 5th gear. The 6th gear serves as an economic
driving programme, which is intended to redu ce the fuel consumption. Shifting up and
down through the gears is performed automa tically. You can also, however, switch the
gearbox over into the Tiptronic mode. This mode makes it possible for you to also shift
gears manually page 120.Starting-off and Driving– Depress the brake pedal fully and keep it depressed.
– Press the Shiftlock button (button in ha ndle of the selector lever), move the
selector lever into the desired position, e.g. D page 118, and then release the
Shiftlock button.
– Wait a moment until the gearbox has shif ted (a slight engagement nudge can be
felt).
– Release the brake pedal and depress the accelerator .Stop– The selector lever position N does not have to be selected when stopping just for
a short time, such as at a cross roads. It is absolutely sufficient to hold the stopped
vehicle stationary by depressing the foot brake. The engine can, however, be
allowed just to idle.Parking– Depress the brake pedal and hold it depressed.
– Apply the handbrake firmly.
– Press and Shiftlock button in the selector lever, move the selector lever to P and
then release the Shiftlock button. The engine can only be
started when the selector lever is in position P or N
page 108.
It is sufficient to engage selector lever position P when parking on a flat surface. When
parking on a slope you should first apply the handbrake firmly and then move the
selector lever into position P. This is to ensure that there is no excessive pressure acting
on the lock mechanism and that it is easier to subsequently move the selector lever out
of position P.
If the selector lever position N is selected by accident while driving it is first necessary
to release pressure on the accelerator pedal and wait for idling speed of the engine to
be reached before engaging a driv e position in the selector lever.
WARNING
Do not depress the accelerator when changing the position of the selector
lever if the car is stationary and the engine is running - risk of accident!
Never move the selector lever into position R or P when driving - risk of an
accident!
When the engine is running and the vehi cle is stationary, it is necessary to
hold the car with the brake pedal in all the positions of the selector lever (except
P and N) since the power transmission is never completely interrupted, also not
when the engine is idling - the vehicle creeps.
Information for driving with the automatic gearbox DSG*
The abbreviation DSG means Direct shift gearbox (Direct shift gearbox). Two independent clutches are needed for the power transmission between the engine
and the gearbox. These replace the torque converter of the conventional automatic
gearbox. Their shifting is matched in such a way that there are no jerks when shifting
the gear and the power transmission of the engine to the front wheels is not inter-
rupted. Shifting up and down through the gears is performed automatically. You can
also, however, switch the gearbox over into the Tiptronic mode. This mode makes it
possible for you to also shift gears manually page 120.
s43s.1.book Page 116 Thursday, May 13, 2010 1:21 PM