trailer SKODA OCTAVIA 2010 2.G / (1Z) Technical Change
[x] Cancel search | Manufacturer: SKODA, Model Year: 2010, Model line: OCTAVIA, Model: SKODA OCTAVIA 2010 2.G / (1Z)Pages: 22, PDF Size: 0.95 MB
Page 3 of 22
“START - STOP”*
2
In the start-stop mode, the engine automatica lly switches to the vehicle's idle phase,
e.g. when stopped at traffic lights.
Information regarding the current state of th e “START-STOP” system is indicated in the
display of the instrument cluster.Automatic engine shut down (stop phase)– Stop the vehicle (where nece ssary, apply the handbrake).
– Take the vehicle out of gear.
– Take your foot off the clutch.Automatic engine restart (start phase).– Push down on the clutch.Switching the “START-STOP” system on and offYou can switch the “START STOP” system on/off by pressing the button page 1, fig. 2 .
When start-stop mode is deactivated, the warning light in the button lights up.
If the vehicle is in the stop phase when ma nually switching off the system, the engine
starts immediately.
The “START-STOP” system is very complex. Some of the procedures are hard to check
without servicing. The general conditions for the proper functioning of the “START-
STOP” system are listed in the following overview.
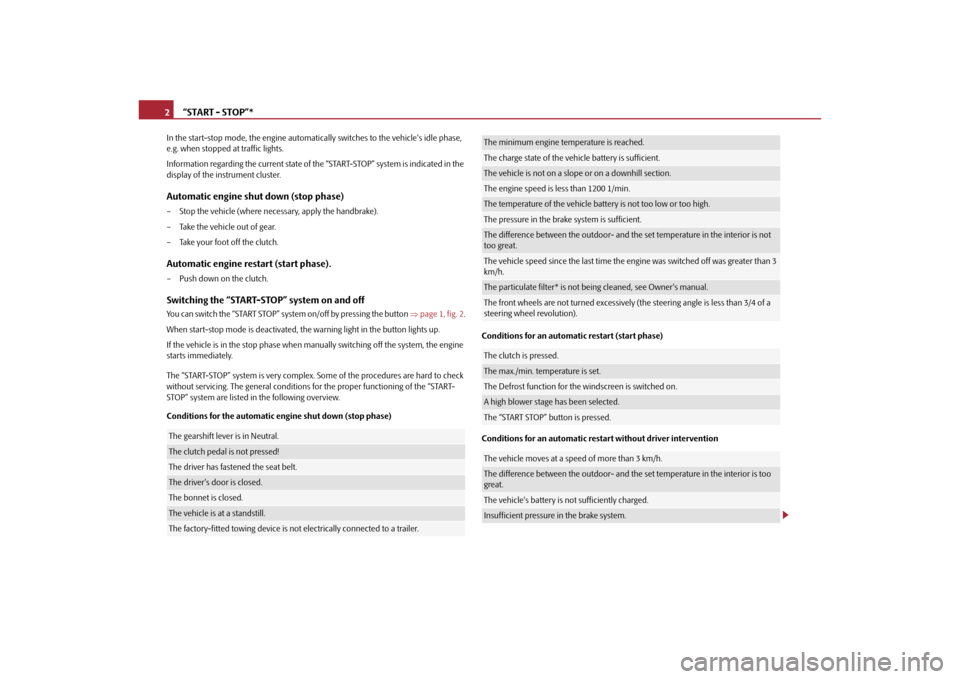
Conditions for the automatic engine shut down (stop phase) Conditions for an automatic restart (start phase)
Conditions for an automatic restart without driver interventionThe gearshift lever is in Neutral.The clutch pedal is not pressed!The driver has fastened the seat belt.The driver's door is closed.The bonnet is closed.The vehicle is at
a standstill.The factory-fitted towing device is no t electrically connected to a trailer.
The minimum engine temperature is reached.The charge state of the vehicle battery is sufficient.The vehicle is not on a slope or on a downhill section.The engine speed is less than 1200 1/min.The temperature of the vehicle battery is not too low or too high.The pressure in the brake system is sufficient.The difference between the outdoor- and the set temperature in the interior is not
too great.The vehicle speed since the last time the engine was switched off was greater than 3
km/h.The particulate filter* is not be ing cleaned, see Owner's manual.The front wheels are not turned excessively (t he steering angle is less than 3/4 of a
steering wheel revolution).The clutch is pressed.The max./min. temperature is set.The Defrost function for the windscreen is switched on.A high blower stage has been selected.The “START STOP” button is pressed.The vehicle moves at a speed of more than 3 km/h.The difference between the outdoor- and the set temperature in the interior is too
great.The vehicle's battery is not sufficiently charged.Insufficient pressure in the brake system.
s1ec.5.book Page 2 Friday, September 24, 2010 10:46 AM
Page 7 of 22
Tyre repair kit*
6
•
Check the tyre inflation pressure after driving 10 minutes.
•
Sealant is hazardous to heath. Remove immediately if it comes into contact
with the skin.For the sake of the environment
Used or aged sealant must be disposed of in accordance with environmental protec-
tion regulations.
Note
•
Observe the manufacturer's usage instructions for the tyre repair kit.
•
You can purchase a new bottle of sealant from the range of the Škoda original
accessories.
•
Change the wheel that was repaired using the tyre repair kit or consult a specialist
garage about possibilities for getting repairs done.
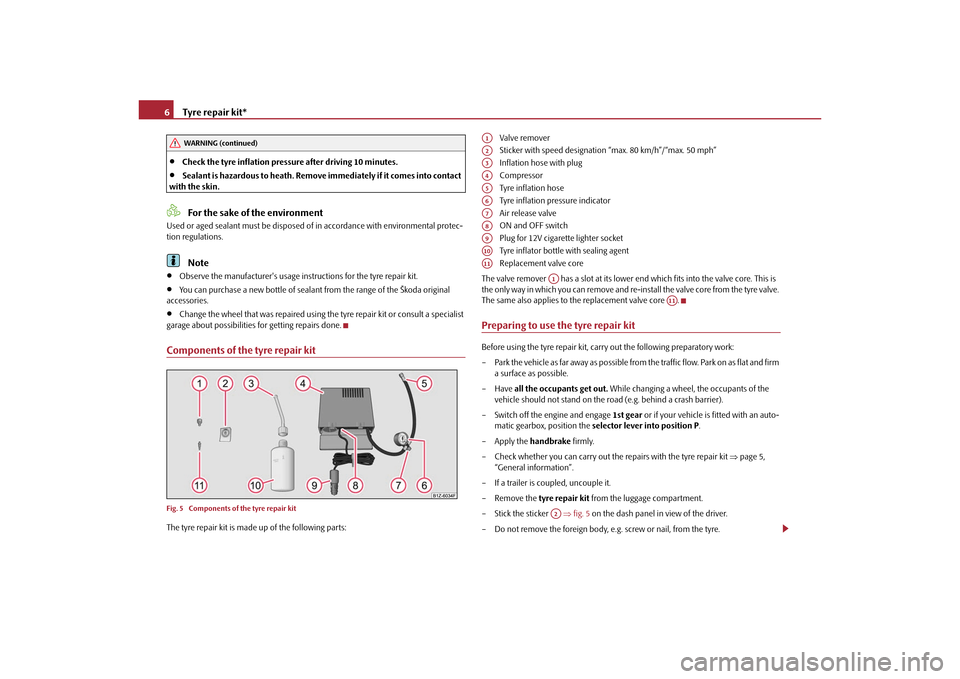
Components of the tyre repair kitFig. 5 Components of the tyre repair kitThe tyre repair kit is made up of the following parts: Valve remover
Sticker with speed designation “max. 80 km/h”/“max. 50 mph”
Inflation hose with plug
Compressor
Tyre inflation hose
Tyre inflation pressure indicator
Air release valve
ON and OFF switch
Plug for 12V cigarette lighter socket
Tyre inflator bottle with sealing agent
Replacement valve core
The valve remover has a slot at its lower end which fits into the valve core. This is
the only way in which you can remove and re-i nstall the valve core from the tyre valve.
The same also applies to the replacement valve core .
Preparing to use the tyre repair kitBefore using the tyre repair kit, carry out the following preparatory work:
– Park the vehicle as far away as possible from the traffic flow. Park on as flat and firm a surface as possible.
–Have all the occupants get out. While changing a wheel, the occupants of the
vehicle should not stand on the ro ad (e.g. behind a crash barrier).
– Switch off the engine and engage 1st gear or if your vehicle is fitted with an auto-
matic gearbox, position the selector lever into position P .
– Apply the handbrake firmly.
– Check whether you can carry out the repairs with the tyre repair kit page 5,
“General information”.
– If a trailer is coupled, uncouple it.
– Remove the tyre repair kit from the luggage compartment.
– Stick the sticker fig. 5 on the dash panel in view of the driver.
– Do not remove the foreign body, e.g. screw or nail, from the tyre.
WARNING (continued)
A1A2A3A4A5A6A7A8A9A10A11
A1
A11
A2
s1ec.5.book Page 6 Friday, September 24, 2010 10:46 AM
Page 13 of 22
Technical Data
12
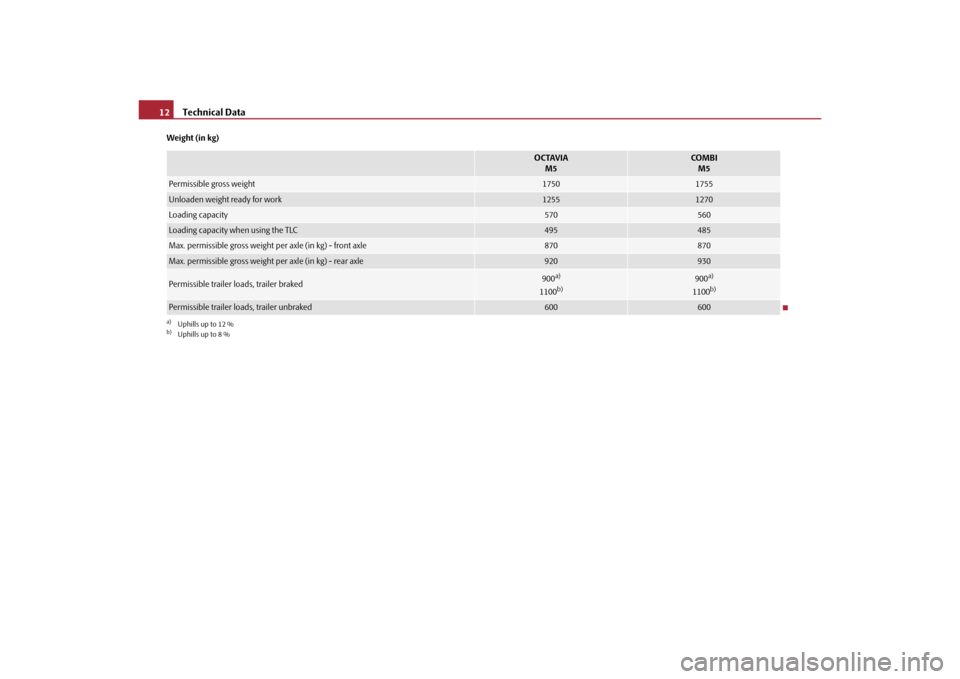
Weight (in kg)
OCTAVIA
M5
COMBIM5
Permissible gross weight
1750
1755
Unloaden weight ready for work
1255
1270
Loading capacity
570
560
Loading capacity when using the TLC
495
485
Max. permissible gross weight per axle (in kg) - front axle
870
870
Max. permissible gross weight per axle (in kg) - rear axle
920
930
Permissible trailer loads, trailer braked
900
a)
1100
b)
a)Uphills up to 12 %b)Uphills up to 8 %
900
a)
1100
b)
Permissible trailer loads, trailer unbraked
600
600
s1ec.5.book Page 12 Friday, September 24, 2010 10:46 AM
Page 15 of 22
Technical Data
14
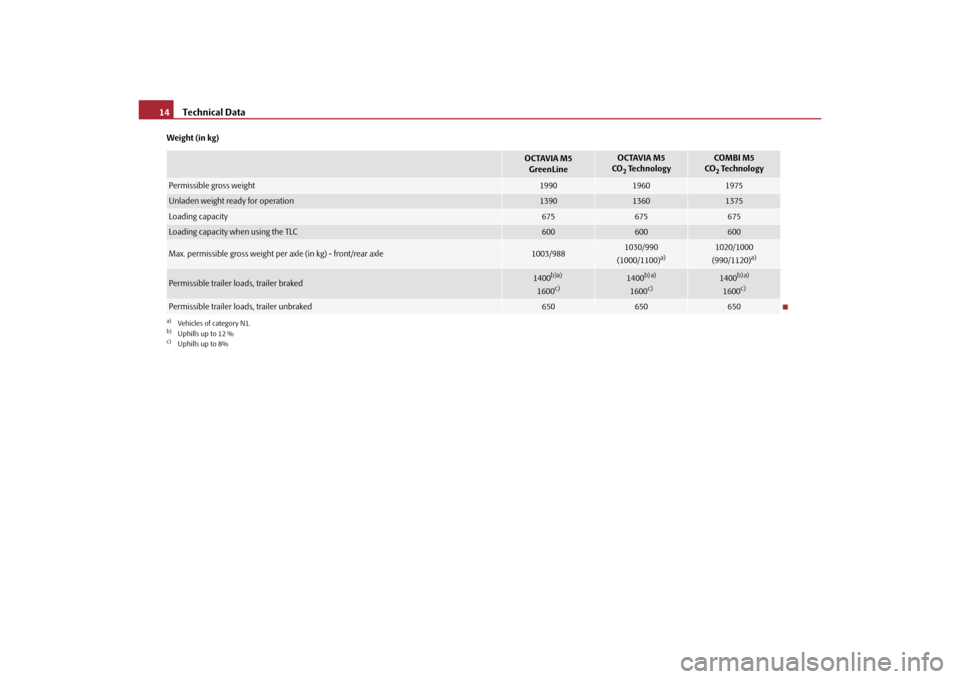
Weight (in kg)
OCTAVIA M5
GreenLine
OCTAVIA M5
CO2 Technology
COMBI M5
CO2 Technology
Permissible gross weight
1990
1960
1975
Unladen weight ready for operation
1390
1360
1375
Loading capacity
675
675
675
Loading capacity when using the TLC
600
600
600
Max. permissible gross weight pe r axle (in kg) - front/rear axle
1003/988
1030/990
(1000/1100)
a)
a)Vehicles of category N1.
1020/1000
(990/1120)
a)
Permissible trailer loads, trailer braked
1400
b)a)
1600
c)
b)Uphills up to 12 %c)Uphills up to 8%
1400
b) a)
1600
c)
1400
b) a)
1600
c)
Permissible trailer loads, trailer unbraked
650
650
650
s1ec.5.book Page 14 Friday, September 24, 2010 10:46 AM
Page 17 of 22
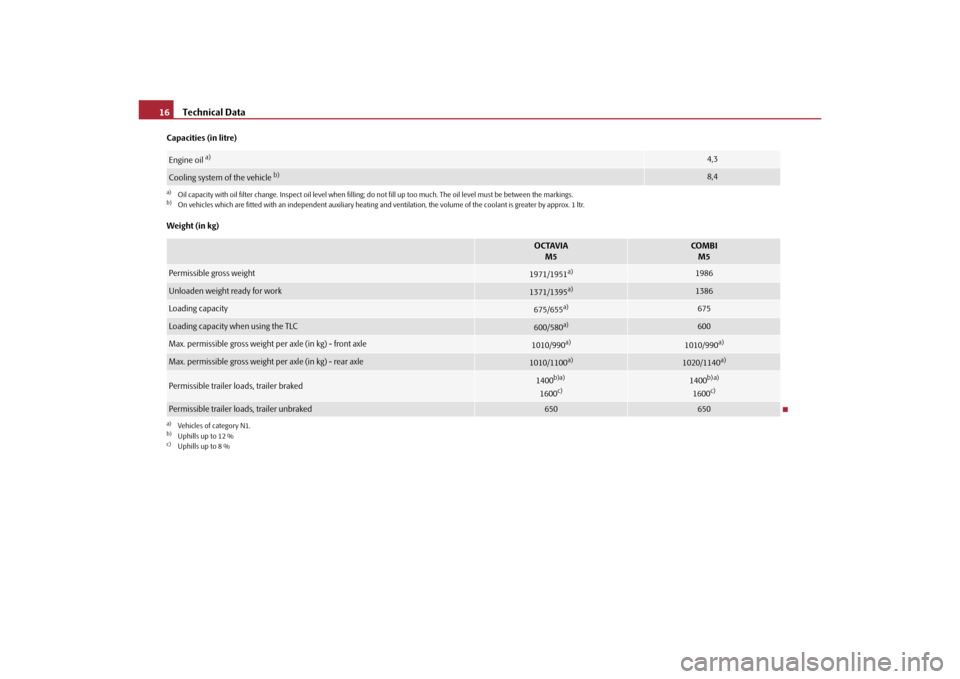
Technical Data
16
Capacities (in litre)
Weight (in kg)Engine oil
a)
a)Oil capacity with oil filter change. Inspec t oil level when filling; do not fill up too much. The oil level must be between the markings.
4,3
Cooling system of the vehicle
b)
b)On vehicles which are fitted with an independent auxiliary heating and ventilation, the volume of the coolant is greater by approx. 1 ltr.
8,4
OCTAVIA
M5
COMBIM5
Permissible gross weight
1971/1951
a)
a)Vehicles of category N1.
1986
Unloaden weight ready for work
1371/1395
a)
1386
Loading capacity
675/655
a)
675
Loading capacity when using the TLC
600/580
a)
600
Max. permissible gross weight per axle (in kg) - front axle
1010/990
a)
1010/990
a)
Max. permissible gross weight per axle (in kg) - rear axle
1010/1100
a)
1020/1140
a)
Permissible trailer loads, trailer braked
1400
b)a)
1600
c)
b)Uphills up to 12 %c)Uphills up to 8 %
1400
b) a)
1600
c)
Permissible trailer loads, trailer unbraked
650
650
s1ec.5.book Page 16 Friday, September 24, 2010 10:46 AM
Page 19 of 22
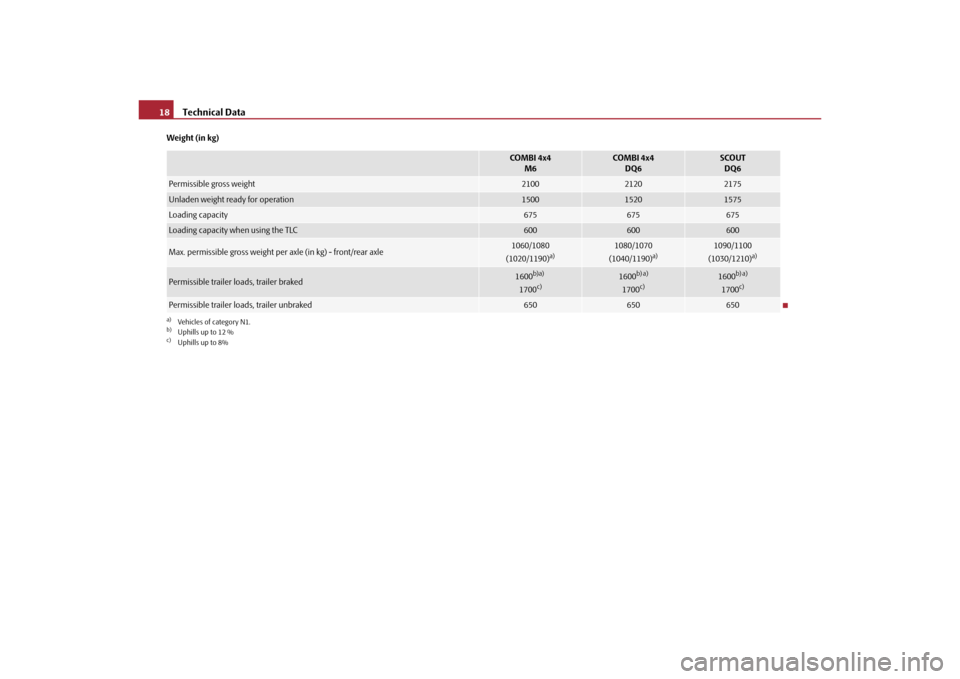
Technical Data
18
Weight (in kg)
COMBI 4x4
M6
COMBI 4x4 DQ6
SCOUTDQ6
Permissible gross weight
2100
2120
2175
Unladen weight ready for operation
1500
1520
1575
Loading capacity
675
675
675
Loading capacity when using the TLC
600
600
600
Max. permissible gross weight pe r axle (in kg) - front/rear axle
1060/1080
(1020/1190)
a)
a)Vehicles of category N1.
1080/1070
(1040/1190)
a)
1090/1100
(1030/1210)
a)
Permissible trailer loads, trailer braked
1600
b)a)
1700
c)
b)Uphills up to 12 %c)Uphills up to 8%
1600
b) a)
1700
c)
1600
b) a)
1700
c)
Permissible trailer loads, trailer unbraked
650
650
650
s1ec.5.book Page 18 Friday, September 24, 2010 10:46 AM