ESP SKODA OCTAVIA 2012 2.G / (1Z) Amundsen Navigation System Manual
[x] Cancel search | Manufacturer: SKODA, Model Year: 2012, Model line: OCTAVIA, Model: SKODA OCTAVIA 2012 2.G / (1Z)Pages: 31, PDF Size: 2.89 MB
Page 7 of 31
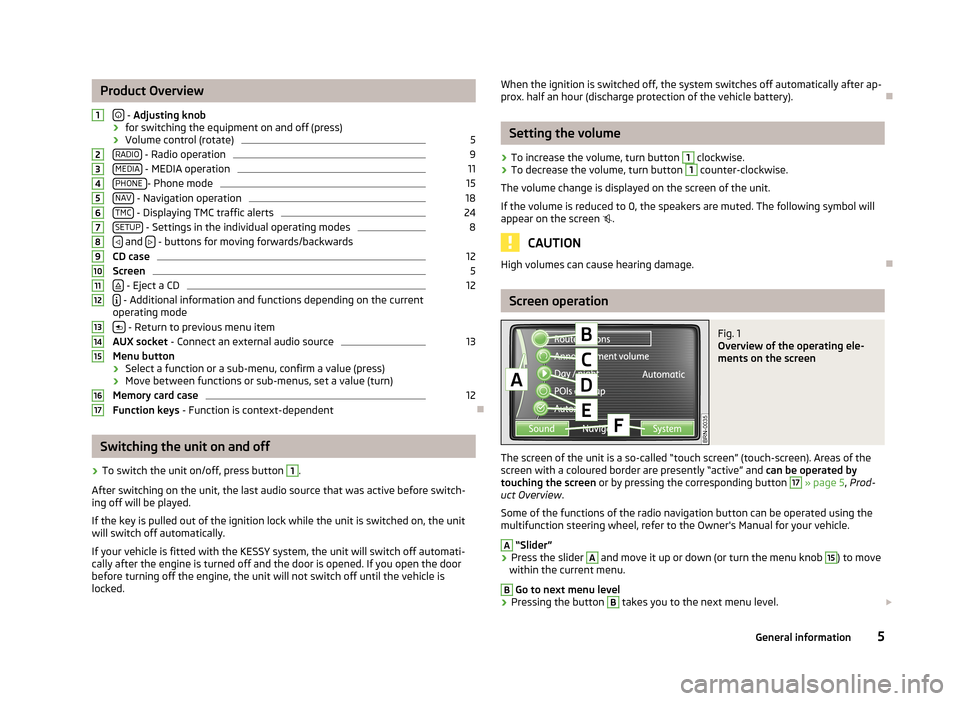
Product Overview
- Adjusting knob
› for switching the equipment on and off (press)
› Volume control (rotate)
5
RADIO - Radio operation
9
MEDIA - MEDIA operation
11
PHONE - Phone mode
15
NAV - Navigation operation
18
TMC - Displaying TMC traffic alerts
24
SETUP - Settings in the individual operating modes
8
and
- buttons for moving forwards/backwards
CD case
12
Screen
5
- Eject a CD
12
- Additional information and functions depending on the current
operating mode
- Return to previous menu item
AUX socket - Connect an external audio source
13
Menu button
› Select a function or a sub-menu, confirm a value (press)
› Move between functions or sub-menus, set a value (turn)
Memory card case
12
Function keys - Function is context-dependent
Ð
Switching the unit on and off
›
To switch the unit on/off, press button
1
.
After switching on the unit, the last audio source that was active before switch- ing off will be played.
If the key is pulled out of the ignition lock while the unit is switched on, the unit
will switch off automatically.
If your vehicle is fitted with the KESSY system, the unit will switch off automati-
cally after the engine is turned off and the door is opened. If you open the door
before turning off the engine, the unit will not switch off until the vehicle is
locked.
1234567891011121314151617When the ignition is switched off, the system switches off automatically after ap-
prox. half an hour (discharge protection of the vehicle battery).Ð
Setting the volume
›
To increase the volume, turn button
1
clockwise.
›
To decrease the volume, turn button
1
counter-clockwise.
The volume change is displayed on the screen of the unit.
If the volume is reduced to 0, the speakers are muted. The following symbol will appear on the screen .
CAUTION
High volumes can cause hearing damage.Ð
Screen operation
Fig. 1
Overview of the operating ele-
ments on the screen
The screen of the unit is a so-called “touch screen” (touch-screen). Areas of the
screen with a coloured border are presently “active” and can be operated by
touching the screen or by pressing the corresponding button
17
» page 5 , Prod-
uct Overview .
Some of the functions of the radio navigation button can be operated using the
multifunction steering wheel, refer to the Owner's Manual for your vehicle.
A
“Slider”
›
Press the slider
A
and move it up or down (or turn the menu knob
15
) to move
within the current menu.
B
Go to next menu level
›
Pressing the button
B
takes you to the next menu level.
5General information
Page 8 of 31
Return to the previous menu level with the button 13.C
Set value
›
Pressing the button
C
opens an additional screen in which it is possible to set
the required value by turning the menu knob
15
, e.g. treble.
D
“Pop-up window”
›
Pressing the function key
D
opens a so-called “Pop-up window” with addition-
al menu points.
›
Briefly press one of the available menu points. The pop-up window will disap-
pear and the newly selected menu point is displayed in the function key.
If none of the available menu points is chosen, the “pop-up window” will disap-
pear after around 5 seconds.
A DAB ensemble appears in the list of DAB stations after pressing this function
key » page 10 , Digital radio DAB .
E
“Checkbox”
Some functions can only be switched on or off. There is a so-called “Check box” in front of a function which can only be switched on or off:
- Function is switched on.
- Function is switched off.
›
To switch a function on or off, briefly press the corresponding function once.
F
Variable function keys
The key function is context-dependent. The function currently being offered can
be selected by pressing the appropriate function key
F
(or using button
17
).
Sample menu in the Instruction Manual
Press the keys ABC
→ DEF - these keys must be pressed one after the other.
■ XYZ
- Description of a function key in the first menu level
■ XYZ - Description of a function key in the second menu level
■ XYZ - Description of a function key in the second menu level
■ XYZ - Description of a function key in the first menu level
Ð
Input screen with keypadFig. 2
An example of an input screen
with keypad
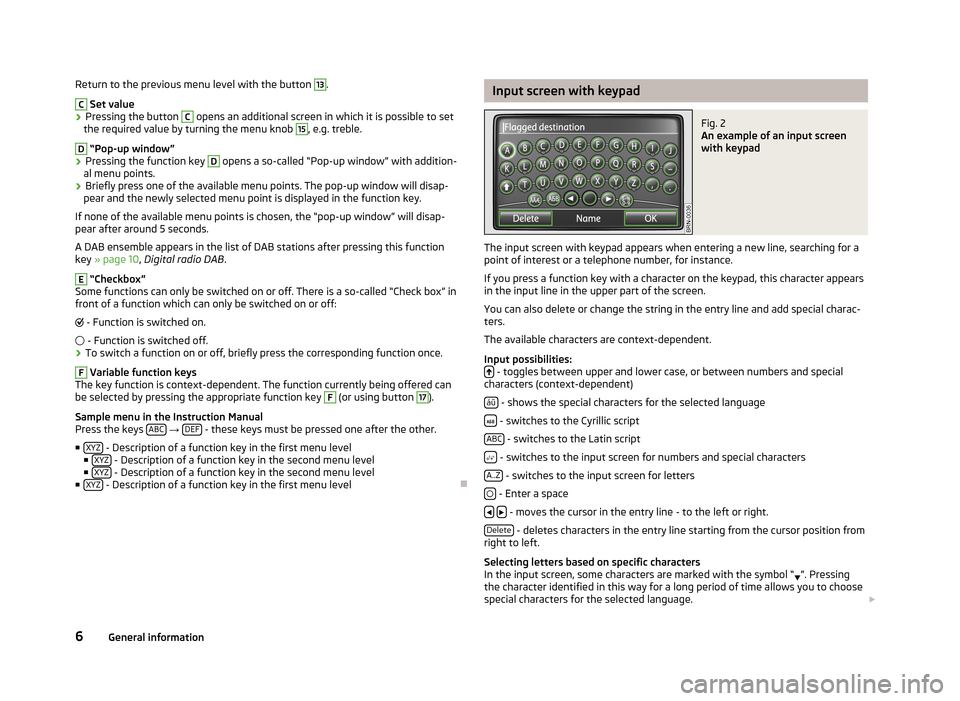
The input screen with keypad appears when entering a new line, searching for a
point of interest or a telephone number, for instance.
If you press a function key with a character on the keypad, this character appears
in the input line in the upper part of the screen.
You can also delete or change the string in the entry line and add special charac-ters.
The available characters are context-dependent.
Input possibilities:
- toggles between upper and lower case, or between numbers and special
characters (context-dependent)
áü
- shows the special characters for the selected language
- switches to the Cyrillic script
ABC
- switches to the Latin script
- switches to the input screen for numbers and special characters
A..Z
- switches to the input screen for letters
- Enter a space
- moves the cursor in the entry line - to the left or right.
Delete
- deletes characters in the entry line starting from the cursor position from
right to left.
Selecting letters based on specific characters
In the input screen, some characters are marked with the symbol “ ”. Pressing
the character identified in this way for a long period of time allows you to choose
special characters for the selected language.
6General information
Page 12 of 31
Digital radio DAB
DAB (Digital Audio Broadcasting) is the digital transmission of radio programmes
based on the DAB, DAB+ or DMB standards. It allows multiple stations to be
transmitted in a single frequency in the form of a so-called ensemble. It also al-
lows for the transmission of additional data and information (e.g. messages,
sport, weather, warnings, etc.)
In regions without DAB coverage, the following symbol appears in DAB Radio
mode .
List of DAB stations
Press the button RADIO
→ Band
→ DAB/List.
XYZ
- an ensemble of DAB stations
XYZ
- DAB station with the name XYZ
XYZ
- DAB station with the name XYZ which is currently not in range
XYZ (FM)
- DAB station with the name XYZ which is currently only in range in the
FM frequency band
DAB programme tracking
If a DAB station is a member of several ensembles, when the signal is poor, the
same station is searched in a different ensemble.
Auto-change DAB -FM
If the DAB signal is poor, the unit will try to find a corresponding FM station for
the DAB station you are currently listening to.
For auto-change to work, the DAB and FM stations must send a sender ID.
While the station is being received via the FM frequency band, (FM) will appear
next to the station name . When the corresponding DAB station is in range again, the (FM) display disappears.
If a DAB station is also not available in the FM frequency band due to poor recep-
tion, the radio will be switched to mute.
If you do not want automatic station change (e.g. when driving through tunnels,when reception may be lost temporarily), you can deactivate this func-tion » page 9 , Settings in RADIO mode .
Ð
Traffic Programme TP
The display “ TP” in combination with a station name (e.g. in the station or preset
list), indicates a traffic programme station.
Irrespective of which radio station you are listening to, an additional receiver part
in the unit ensures that a traffic programme station can always be received as
long as the traffic programme function is switched on. During media mode, the
unit always searches for an available traffic program station in the background.
The availability of traffic programme monitoring is identified by the letters “ TP” at
the top right of the screen.
If no traffic programme station can be received because, for example, radio recep- tion is interrupted in general, “ No TP” will be displayed instead of “ TP”.
Ð
10RADIO mode
Page 13 of 31
MEDIA mode
Main menu MEDIA
Press the button MEDIA.
Selectable audio sources in the menu MEDIA CD - changes over to an inserted CD
CD 1-6 - changes over to a connected external CD changer
SD card - changes over to an inserted memory card
AUX, MDI or changes over to a connected external audio source. Operating anexternally connected audio source is possible, with certain restrictions, via the ra-dio navigation unit and depends primarily on the type of the connected unit.
Buttons for operating current audio sourcesPress - to start current track
Briefly press twice - to start the previous track
Press and hold - “back to start” - fast rewind
Press - to start next track
Press and hold -fast forward
Setting the time or track displayPress the button - to switch between the display of playback time or track titleor track info.
Ð
Settings in MEDIA mode
Press the button MEDIA → SETUP.
Function keys in the menu Setup – Media■Traffic program (TP) - switches traffic programme on/off■Scan/mix/repeat inc. - switches on/off the track play function in the “Scan”, “Mix”and “Repeat” modes including sub-directories » page 11, Playback options■AUX volume1) - Input volume for an external audio source at the multimedia sock-et AUX-IN
■MDI volume1 ) - Input volume for iPod™ or iPhone™ units at the multimedia socketMDI or an external audio source AUX at the multimedia socket MDI■Bluetooth settings - Settings for the Bluetooth® - function » page 17, Settings inPHONE mode■Activate AUX 2 input – Activates the external audio source AUX via the inputMDI. » page 13, AUX and MDI input■BT volume1 ) - Input volume for an external Bluetooth audio source®
Ð
Playback options
Open selection menu for the available audio sourcesPress the button MEDIA and select one of the available audio sources.
■Select - Display the title list for the audio source currently being played. The cur-rently played track is shown as highlighted.■Up - opens the higher-level folder (press again to switch up to the root direc-tory)■Play - Plays the selected track
Playback modesPress the button MEDIA → Extras – additional functions will be displayed.
■Scan - All the tracks of the current media source are played for approximately 10seconds■in “Scan” mode Scan - return to normal playback■Mix folder - all tracks in the current folder are played in random order■in the “Mix folder” mode Mix folder - return to normal playback■Mix all - all tracks in the current audio source are played in random order■in the “Mix all” mode Mix all - return to normal playback■Repeat track - repeats the track currently being played■In “Repeat track” mode Repeat trk. - returns to normal playback■Repeat folder - all tracks in the current folder are repeated■in “Repeat folder” mode Repeat - returns to the normal playback
Ð1)
Used to adjust the playback volume with the other audio sources.
11MEDIA mode
Page 20 of 31
NAV mode (Navigation)
Introductory information
The route is recalculated each time if you ignore driving recommendations orchange the route. This process takes only a few seconds. Driving recommenda-tions can only then be re-transmitted.
In regions that are not or only partially digitalised and stored on the navigationDVD, the radio navigation system will continue to try to provide guidance to thedestination. Please note that under these circumstances the guidance to the des-tination may not be completely correct if, for example, one-way streets and roadcategories (motorway, country road, etc.) are not or only partially included in thenavigation data used.
When entering an address (city, street), only those letters or symbols which makeup a logical entry will be presented. A list of possible names will be shown. Do notforget to enter the blank space in names made up of more than one word, suchas High Wycombe.
The last voice output can be repeated by pressing the button or the menu button
15
. The volume of a navigation recommendation can be changed whilst it is beingmade.
The GPS satellites will not be able to reach the aerial if you are in a tunnel or un-derground garage. In these cases, the unit uses only the vehicle's sensors and aninternal gyroscope for navigation.
WARNING■Please concentrate fully at all times on your driving! Driver inattention canlead to accidents and injuries. As the driver you are fully responsible for roadsafety. Only use the functions of the radio navigation system in such a waythat you are always in full control of your vehicle in all traffic situations!
■
The following must always have priority over the driving recommendations:
■the road traffic legislation, even if the driving recommendations contradictthe StVO,■the actual acknowledgement of traffic signs, light signals or signs placedby the police at the relevant location,■the facts and circumstances prevailing at the relevant location.
WARNING (Continued)■Please observe the respective traffic regulations when driving.■Traffic signs and traffic regulations always have priority over the driving rec-ommendations provided by the navigation system.
■
Route guidance is subject to constant changes, particularly to informationrelating to one-way streets, pedestrian zones etc. stored in the navigation da-ta. Information on traffic lights, stop and right of way signs, parking and stop-ping restrictions as well as lane constrictions and speed restrictions is not in-cluded in the radio navigation system.
■
Adjust your speed to suit weather, road and traffic conditions. No not letyourself be tempted by the radio navigation system, for example, to drive toofast in the fog – risk of accident!
■
Only if the traffic situation allows it should you operate the radio navigationsystem with its wide range of possibilities.
■
The driving recommendations provided may vary from current situations,e.g. due to road works or out of date navigation data. In such a case, alwaysobserve the traffic regulations and ignore the driving recommendations.
■
Adjust the volume to ensure that acoustic signals from outside, e.g. sirensfrom vehicles which have the right of way, such as police, ambulance and firebrigade vehicles, can be heard at all time.
Note
■It is not necessary to enter the destinations (country, city, road, point of interestnames) including all country-specific (or language-specific for points of interest)special characters.
■
Depending on the country, some functions of the radio navigation system canno longer be selected on the screen at certain speeds. This is not a malfunction,but corresponds to the legal requirements of the particular country.
Ð
Navigation data and the memory card
The navigation data are already available after the memory of the radio naviga-tion system is switched on first and can be used directly for navigation.
Update navigation data
›
Remove the mechanical copy protection from the memory card.
›
Insert a memory card » page 12, Memory card
18NAV mode (Navigation)
Page 22 of 31
Home add. - Starting a route guidance to a stored Home address. During routeguidance, the function key Stop appears here.
SD destinationsBy using a web application that can be found on ŠKODA's web site, it is possibleto create destinations as visiting cards or pictures. These destinations can theneasily be imported via the SD card into the radio navigation system.
Ð
Settings in the (NAV) Navigation mode
Press the button NAV → SETUP.
Function keys in the menu°-°Navigation■Route options - setting for route options■Route criteria - specify the criteria for calculating the route■Fast - calculates the fastest route to the destination, even if a detour is nec-essary.■Economical - calculates the quickest route possible over the shortest route■Short - shortest route to the destination even if a longer driving time is re-quired. The route guidance may include unusual sections, such as dirt roads.■Dynamic route - switches on/off the usage of TMC traffic notifications for routeguidance » page 23, Dynamic route guidance with TMC use■Avoid motorways - switches on/off the use of motorways in the route calcula-tion■Avoid toll roads - switches on/off the use of toll roads in the route calculation■Avoid ferries - switches on/off the use of ferries in the route calculation If noother route is available (e.g. an island can only reached by a ferry), this routetype is included in the route calculation despite being excluded before.■Avoid toll Avoid toll sticker routes - opens a list of countries where toll stickers aremandatory. A check means that all streets in the selected country for which atoll sticker is mandatory are excluded.■Announcement volume - Setting the volume of the navigation announcements.■Day/Night - switches between the day/night and auto map display modes. Auto-matic display depends on switching the low beam on or off.■POIs on map -shows points of interest in the map view (car parks, petrol stations,and Škoda workshops only)■Autozoom - changes the map scale automatically depending on the speed andthe driven route (Motorway trip: small map scale - City centre: large map scale)■Traffic sign display - switches on/off the speed restrictions in the current routesection (top left on the screen)
■Time display - switches between the following information during route guidance■ETA - displays the expected time to destination■Travel time - displays the expected remaining trip time to the destination■Time display to - switch to the arrival time at:■destination - displays the expected arrival time at the final destination■stopover - displays the expected arrival time at the stopover destina-tion » page 21, Entering a stopover destination■Enter home address - Enter home address■Position - saves the current position as a home address■Address - enter or change an address as your home address■Demo mode - switches on/off the demo mode. If the demo mode is selected, youcan specify at the start of route guidance whether route guidance should becarried out in normal mode (“real” route guidance) or in Demo mode (virtualroute guidance). For the route guidance in the Demo mode, you only travelalong the route virtually. Virtual route guidance will be repeated after reachingthe fictitious travel destination.■Demo mode starting point - Entering a fictive (invented) starting point in the demomode.■Delete destination memory - Deleting the destination memory or the list of the lastdestinations.■All - deletes all destinations from the memory■Last destins. - deletes all destinations from the list of last destinations■Navigation data basis - displays information about the navigation data stored inthe radio navigation system or on the memory card or when using navigationdata directly from the memory card » page 18, Navigation data and the memorycard.
Ð
Destinations
Entering and saving destinations
Manually entering and saving destinationsPress the button NAV → .
When entering the address, first choose the country, then the city or the postalcode. Afterwards it is possible to specify the address in more detail by enteringthe street and house number or an intersection. This address information isspecified in the following input screens.
If the entries are sufficient for the route guidance, the function key Status will ap-pear. You can now begin route guidance or you can enter additional details forthe destination.
20NAV mode (Navigation)
Page 25 of 31
■Congestion ahead - turn the menu button 15 to select the length of the stretch to
be blocked from the current position. The length of the currently blocked stretch of the journey is shown in the lower line of the screen. When reachingthe maximum blockable length, the word “ (Max)” will appear next to the length
entry.
■ OK
- confirms the length of the blocked stretch
To cancel the blocking of the stretch ahead, press the button
→ Route.
■ Lift cong. excl.
- manually remove blocked stretch
Blocking stretches of the journey using the route list
Press the button
→ Route.
■ Route list
- List of route sections
■ Exclude - select the start of the stretch to be blocked
■ Exclude to - select the end of the stretch to be blocked
To cancel the blocking of the stretch ahead, press the button
→ Route.
■ Lift cong. excl.
- remove the blocked stretch
Ð
Displaying stretches of the journey
Pop-ups during route guidance
Press the button
→ Route.
■ The list of the points (street names, street descriptions and stretches of the
road) still to be driven, is displayed in the Route list
.
■ Details - show details of the selected stretch of the journey.
Ð
Dynamic route guidance with TMC use
Requirements for a dynamic route guidance
TMC (Traffic Message Channel) is a digital radio data service for continuous trans-
mission of traffic information.
If a TMC traffic radio station is available for current location, the TMC traffic re-
ports are updated continuously in the background. Received TMC traffic reports are shown in a list » page 24, Displaying TMC traffic reports .
The quality of the transmitted traffic reports depends on the traffic editing car- ried out by the radio station. The reception of the TMC traffic reports cannot be
switched on or off.
The station you are listening to does not have to be a TMC station.
When the function Dynamic Route » page 20
, Settings in the (NAV) Navigation
mode is activated and the radio navigation system calculates a time advantage
for driving around the traffic disruption along the route, an alternative route is
calculated automatically.
TMC traffic reports can only be evaluated and displayed by the unit if the naviga-
tion data for the currently driven area is stored in the unit's memory or can be re-
trieved from an inserted navigation DVD.
The current TMC traffic reports can be displayed by pressing the range selectorkey TMC
.
Traffic problems received via TMC which affect the route are displayed in the map
by means of a coloured symbol. Traffic problems, which do not affect the route,
are displayed in the map by means of a grey symbol. The positioning of the TMC
symbol shows the beginning of a traffic disruption and the direction, when the
TMC traffic report is able to clearly define both.
When the function Dynamic Route » page 20, Settings in the (NAV) Navigation
mode is activated and the radio navigation system calculates a time advantage
for driving around the traffic disruption along the route, an alternative route is
calculated automatically.
When recalculating the route, a corresponding navigation announcement is out-
put. The same announcement is made when there was a traffic disruption in the
original route calculation which has since been removed.
Note
■ Making a diversion from a traffic jam based on TMC traffic reports may not al-
ways offer a time advantage, e.g. if the diversion route is also congested.■
If a traffic disruption was not yet entered via the TMC traffic reports, route dis-
ruptions can also be entered manually » page 22, Manually blocking a stretch of
the route .
Ð
23NAV mode (Navigation)
Page 26 of 31
TMC mode
Displaying TMC traffic reports
TMC traffic reports are used to optimise the route during route guidance whenthere are traffic disruptions » page 23, Dynamic route guidance with TMC use
You can browse through all the traffic information received in the detailed dis-play, in sequence by using the function keys.
Press the button TMC - displays a list of current traffic reports
■Details - display the details for a selected traffic report
Press the button - displays the name of the TMC station currently being re-ceived.
Traffic problems are illustrated in the detailed display and in the map by a corre-sponding symbol. The direction, in which the traffic problem is found in the map,is displayed in colour. A traffic problem which is located on the route (in directionof travel) is marked in red, a traffic problem in the opposite direction is marked ingrey.
Note
■If a TMC traffic radio station is available for current location, the TMC traffic re-ports are updated continuously in the background. The station you are listeningto does not have to be a TMC station.
■
TMC traffic reports can only be evaluated and saved by the radio navigation sys-tem when navigation data are available for the driven area.
■
The accuracy of the dynamic route guidance depends on the transmitted trafficreports. The radio stations broadcasting this information are responsible for thecontent.
■
TMC traffic reports are necessary for the dynamic route guidance.
■
Making a diversion from a traffic jam based on TMC traffic reports may not al-ways offer a time advantage, e.g. if the diversion route is also congested.
Ð
TP traffic information and TMC traffic reports
settings
Press the button TMC → SETUP.
■Traffic programme (TP) - switches traffic programme on/off■Dynamic route - switches on/off the usage of TMC traffic reports for route guid-ance » page 23, Dynamic route guidance with TMC use
Ð
24TMC mode