lock SKODA OCTAVIA 2012 2.G / (1Z) Amundsen Navigation System Manual
[x] Cancel search | Manufacturer: SKODA, Model Year: 2012, Model line: OCTAVIA, Model: SKODA OCTAVIA 2012 2.G / (1Z)Pages: 31, PDF Size: 2.89 MB
Page 5 of 31
General information
Operating instructions
These operating instructions describe all possible equipment variants withoutidentifying them as special equipment, model variants or market-dependentequipment.
Consequently, this vehicle does not need to contain all of the equipment compo-nents described in these operating instructions.
The scope of equipment for your vehicle is described in the sales documentationyou were given when purchasing the car. For more information, contact your localŠKODA retailer.
Ð
Explanation of symbols
Ð End of a section.
The section is continued on the next page.
→ Transition to next button.
Ð
Important information
Safety information
WARNING■Concentrate fully at all times on your driving! As the driver you are fully re-sponsible for road safety. Only use the system so that you are in full control ofyour vehicle in every traffic situation - risk of accident!
■
Adjust the volume to ensure that acoustic signals from outside, e.g. sirensfrom vehicles which have the right of way, such as police, ambulance and firebrigade vehicles, can be heard at all time.
■
High volumes can cause hearing damage.
Ð
Warranty
The equipment warranty terms and conditions apply to this unit just like to newvehicles - see the service schedule.
Ð
Screen cleaning
CAUTION
■Do not use solvents such as benzine or turpentine, which may damage thescreen surface.■
Treat the screen with care, as finger pressure or contact with sharp objects maycause dents and scratches on the surface.
Note
The screen can be cleaned with a soft cloth and alcohol if necessary.Ð
Signal receipt
Car parks, tunnels, tall buildings or mountains can disrupt the radio and GPS sig-nal even causing it to fail completely.
Ð
Anti-theft protection
The anti-theft coding of your radio navigation system prevents an operation ofthe system after a voltage interruption, e.g. during a vehicle repair or after theft.After disconnecting the battery, disconnecting the radio navigation system fromthe on-board voltage of the vehicle or after a fuse failure, the code must be en-tered before the system can be used again. The code number can only be re-trieved “online” via the ŠKODA system, as this guarantees even more effectiveanti-theft protection. Please contact your authorised ŠKODA Service Partner, ifnecessary.
Enter codeIf a keypad appears after switching on with the command to enter the code, theunit must be unlocked by entering the correct four-digit code.
›
Enter the four-digit code using the function keys 0 to 9. The digit is acceptedin the entry line.
3General information
Page 6 of 31
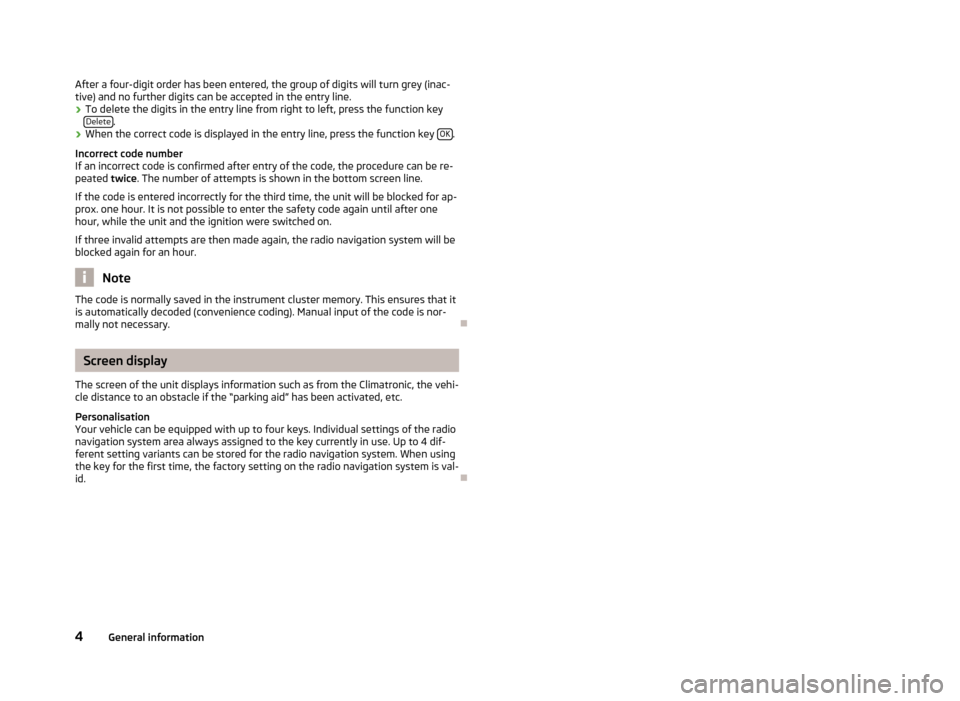
After a four-digit order has been entered, the group of digits will turn grey (inac-tive) and no further digits can be accepted in the entry line.›
To delete the digits in the entry line from right to left, press the function key Delete.
›
When the correct code is displayed in the entry line, press the function key OK.
Incorrect code number
If an incorrect code is confirmed after entry of the code, the procedure can be re- peated twice. The number of attempts is shown in the bottom screen line.
If the code is entered incorrectly for the third time, the unit will be blocked for ap-
prox. one hour. It is not possible to enter the safety code again until after one
hour, while the unit and the ignition were switched on.
If three invalid attempts are then made again, the radio navigation system will be
blocked again for an hour.
Note
The code is normally saved in the instrument cluster memory. This ensures that it
is automatically decoded (convenience coding). Manual input of the code is nor-
mally not necessary.Ð
Screen display
The screen of the unit displays information such as from the Climatronic, the vehi-
cle distance to an obstacle if the “parking aid” has been activated, etc.
Personalisation
Your vehicle can be equipped with up to four keys. Individual settings of the radio navigation system area always assigned to the key currently in use. Up to 4 dif-
ferent setting variants can be stored for the radio navigation system. When using
the key for the first time, the factory setting on the radio navigation system is val-
id.
Ð
4General information
Page 7 of 31
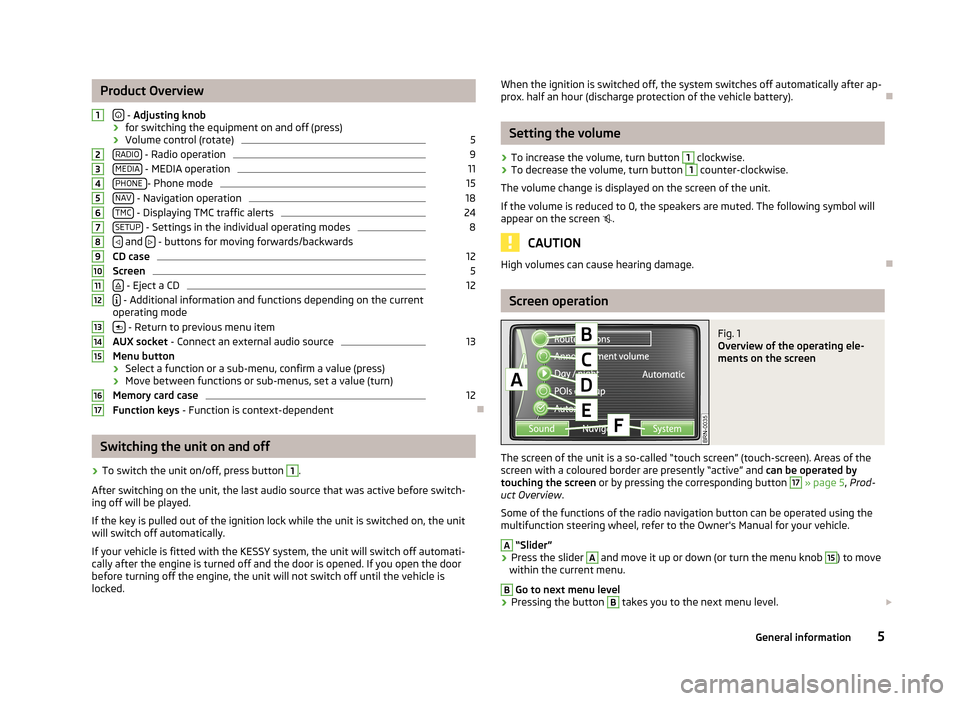
Product Overview
- Adjusting knob
› for switching the equipment on and off (press)
› Volume control (rotate)
5
RADIO - Radio operation
9
MEDIA - MEDIA operation
11
PHONE - Phone mode
15
NAV - Navigation operation
18
TMC - Displaying TMC traffic alerts
24
SETUP - Settings in the individual operating modes
8
and
- buttons for moving forwards/backwards
CD case
12
Screen
5
- Eject a CD
12
- Additional information and functions depending on the current
operating mode
- Return to previous menu item
AUX socket - Connect an external audio source
13
Menu button
› Select a function or a sub-menu, confirm a value (press)
› Move between functions or sub-menus, set a value (turn)
Memory card case
12
Function keys - Function is context-dependent
Ð
Switching the unit on and off
›
To switch the unit on/off, press button
1
.
After switching on the unit, the last audio source that was active before switch- ing off will be played.
If the key is pulled out of the ignition lock while the unit is switched on, the unit
will switch off automatically.
If your vehicle is fitted with the KESSY system, the unit will switch off automati-
cally after the engine is turned off and the door is opened. If you open the door
before turning off the engine, the unit will not switch off until the vehicle is
locked.
1234567891011121314151617When the ignition is switched off, the system switches off automatically after ap-
prox. half an hour (discharge protection of the vehicle battery).Ð
Setting the volume
›
To increase the volume, turn button
1
clockwise.
›
To decrease the volume, turn button
1
counter-clockwise.
The volume change is displayed on the screen of the unit.
If the volume is reduced to 0, the speakers are muted. The following symbol will appear on the screen .
CAUTION
High volumes can cause hearing damage.Ð
Screen operation
Fig. 1
Overview of the operating ele-
ments on the screen
The screen of the unit is a so-called “touch screen” (touch-screen). Areas of the
screen with a coloured border are presently “active” and can be operated by
touching the screen or by pressing the corresponding button
17
» page 5 , Prod-
uct Overview .
Some of the functions of the radio navigation button can be operated using the
multifunction steering wheel, refer to the Owner's Manual for your vehicle.
A
“Slider”
›
Press the slider
A
and move it up or down (or turn the menu knob
15
) to move
within the current menu.
B
Go to next menu level
›
Pressing the button
B
takes you to the next menu level.
5General information
Page 10 of 31
Basic settings
System and sound settings
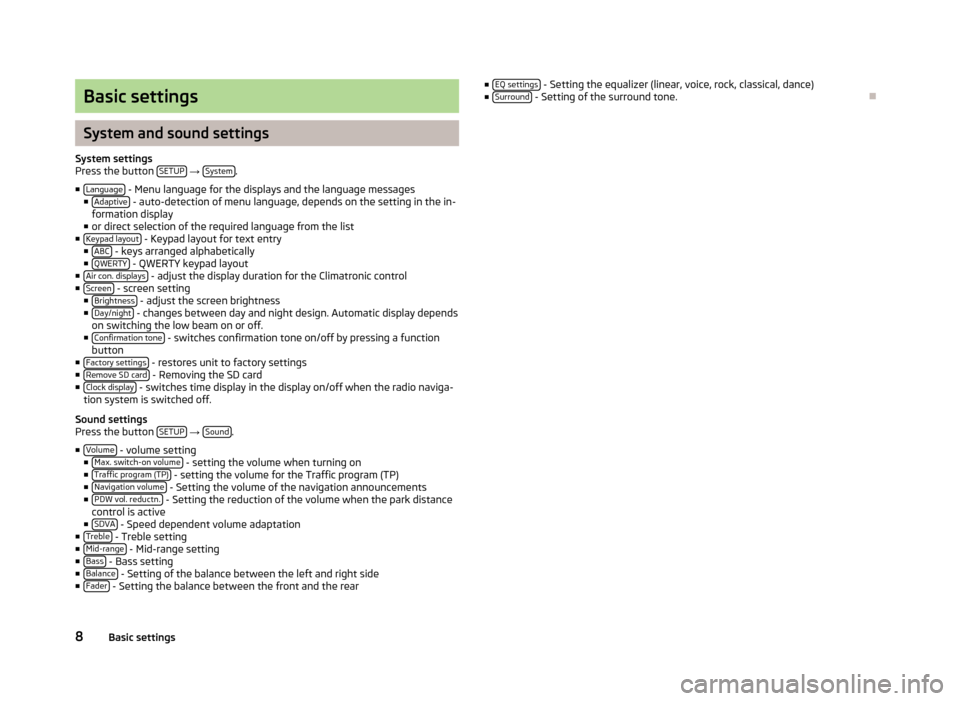
System settingsPress the button SETUP → System.
■Language - Menu language for the displays and the language messages■Adaptive - auto-detection of menu language, depends on the setting in the in-formation display■or direct selection of the required language from the list■Keypad layout - Keypad layout for text entry■ABC - keys arranged alphabetically■QWERTY - QWERTY keypad layout■Air con. displays - adjust the display duration for the Climatronic control■Screen - screen setting■Brightness - adjust the screen brightness■Day/night - changes between day and night design. Automatic display dependson switching the low beam on or off.■Confirmation tone - switches confirmation tone on/off by pressing a functionbutton■Factory settings - restores unit to factory settings■Remove SD card - Removing the SD card■Clock display - switches time display in the display on/off when the radio naviga-tion system is switched off.
Sound settingsPress the button SETUP → Sound.
■Volume - volume setting■Max. switch-on volume - setting the volume when turning on■Traffic program (TP) - setting the volume for the Traffic program (TP)■Navigation volume - Setting the volume of the navigation announcements■PDW vol. reductn. - Setting the reduction of the volume when the park distancecontrol is active■SDVA - Speed dependent volume adaptation■Treble - Treble setting■Mid-range - Mid-range setting■Bass - Bass setting■Balance - Setting of the balance between the left and right side■Fader - Setting the balance between the front and the rear
■EQ settings - Setting the equalizer (linear, voice, rock, classical, dance)■Surround - Setting of the surround tone.
Ð
8Basic settings
Page 14 of 31
Introductory information about the CD mode
Insert CD›
Insert a CD, with the labelled side facing up, into the CD slot
9
until it is auto-
matically drawn in. The play function will start automatically.
Eject CD
›
Press the button – die CD is ejected.
If the ejected CD is not taken out within 10 seconds, it will be retracted again for safety reasons.
CD not legible
If a CD is inserted which cannot be read by the unit, a pop-up window is displayed with a note. Press the function key OK
, the CD is moved to the removal position.
CD to jump
Uneven road surfaces and strong vibrations may cause the CD to jump.
Formation of condensation
When it is cold and after rain showers, moisture can deposit in the CD drive (con-
densate). This can effect the CD jump or impair the play function. In such cases,
wait until the moisture has dissipated.
Notes for the care of the CDs
If a CD is soiled, never clean the CD with circular movements but rather from the
inside to the outside with a soft lint-free cloth. In case of severe layers of dirt we
recommend to clean the CD with a commercially available CD cleaner. Also in thiscase, do not clean the CD with circular movements but rather from the inside to
the outside, and then let it dry.
WARNINGThe CD player is a class 1 laser device. Opening the CD player produces a risk
of injury through non-visible laser radiation.
CAUTION
■ Only audio-CDs (CD-A) and MP3-CDs can be played in the internal drive. Never
place DVDs into the internal drive – irreparable damage may result.■
Never insert CDs with the designation “Do not insert in drives without a drawer”
or Eco Disc into the internal drive.
■
Inserting a second CD while a CD is being ejected can damage the CD drive in
the unit. After pressing the Eject button there is a delay of a few seconds be-
fore the CD is ejected. During this time the lock in front of the CD case is open. Be
sure to wait until the CD has been fully ejected before you try to insert a new CD.■
If the CD has mechanical damage or is incorrectly or not fully inserted, the fol-
lowing message appears on the screen “ Error: CD”. Check the CD and insert in
properly into the drive. if the message “ Error: CD” appears, try using another CD
and visit a specialist garage
■
If the inside temperature of the unit is too high, no CDs will be accepted. The
unit switches into the last active operating mode.
■
Never use liquids such as benzine, paint thinner or record cleaner, otherwise
the surface of the CD may be damaged!
■
Never expose the CD to direct sun light!
■
Only write on the CD with appropriate writing tools.
■
Do not affix anything to the CD!
Note
■ If the function key CD is inactive, no Audio CD has been inserted or the inserted
Audio CD is not readable.■
It is possible that CDs protected by copyright and self-made CD-R and CD-RW
are not returned at all or only in certain circumstances.
■
The national copyright laws that apply in your country must be observed.
■
The CD player contains no parts that need servicing or that can be repaired. If
the CD player is defective, visit a specialist garage.
Ð
Memory card
Inserting a memory card
›
Push the memory card into the memory card lose
16
with the trimmed edge to
the front right until it “locks into place”. The play function will start automatical-
ly.
Taking out a memory card
›
In the “System and sound settings” menu, choose the menu point “Remove SD
card” » page 8 , System and sound settings .
›
Press the inserted memory card. The memory card “jumps” into the initial posi-
tion.
12MEDIA mode
Page 24 of 31
›Position;›latitude and longitude;›height above seal level (if at least 4 satellites are available);›GPS status (GPS_FIX - the position can be determined, GPS_FIX_3D - the heightcan be determined);›The number of available and tracked satellites (the number of available satel-lites determines the GPS status).
If route guidance is active, a pop-up of the destination appears.
■Flagged destination - saves the current position as a “Flagged destination”.
Ð
Route guidance
Starting route guidance
Press the button NAV → Map - to open the map view.
Guidance is started by pressing the function key Start.
The route guidance can also be started from other menu points » page 20, Enter-ing and saving destinations
Ð
Orientation in the map during route guidance
Fig. 4
An example of the map display
Map symbols - Compass (in the top right corner of the screen), the arrow points to North.Pressing the symbol allows you to switch between two-dimensional (2D) andthree-dimensional (3D) map display.
- current vehicle position and direction of travel
- distance to destination (in the bottom left-hand corner of the screen)
- distance to stopover (in the bottom left-hand corner of the screen) - only dis-played when the route guidance and display of the expected arrival time at thestopover are active » page 20, Settings in the (NAV) Navigation mode
- expected time of arrival at the destination of driving time (in the bottomright-hand corner of the screen)
The bottom left-hand corner of the screen displays additional information, e.g. ar-row pointing in the direction of travel, speed restrictions, etc.
Setting optionsTurn the menu knob
15
- changes the scale.
Press the menu knob
15
- repeats the last navigation announcement.
Touch the screen - displays the function keys Extras and Stop » page 22, Stop-ping route guidance.
■Extras - edits options for the map display■2D north - two-dimensional, view from above towards north■2D heading - two-dimensional, view from above in the direction of travel■3D heading - three-dimensional, view at an angle from the front (“bird's-eyeperspective”)■Overview map - the calculated route is displayed from the current position tothe destination in an overview map (during active route guidance)■Route list - List of route sections » page 23, Displaying stretches of the jour-ney
Ð
Stopping route guidance
During route guidance, press the button NAV (or touch the screen) → Stop -stops route guidance.
Resuming route guidancePress the button NAV → Start - resumes route guidance from the current vehiclelocation.
Ð
Manually blocking a stretch of the route
Manually blocking a stretch of the route ahead (e.g. due to a reported trafficimpairment)Press the button → Route.
22NAV mode (Navigation)
Page 25 of 31
■Congestion ahead - turn the menu button 15 to select the length of the stretch to
be blocked from the current position. The length of the currently blocked stretch of the journey is shown in the lower line of the screen. When reachingthe maximum blockable length, the word “ (Max)” will appear next to the length
entry.
■ OK
- confirms the length of the blocked stretch
To cancel the blocking of the stretch ahead, press the button
→ Route.
■ Lift cong. excl.
- manually remove blocked stretch
Blocking stretches of the journey using the route list
Press the button
→ Route.
■ Route list
- List of route sections
■ Exclude - select the start of the stretch to be blocked
■ Exclude to - select the end of the stretch to be blocked
To cancel the blocking of the stretch ahead, press the button
→ Route.
■ Lift cong. excl.
- remove the blocked stretch
Ð
Displaying stretches of the journey
Pop-ups during route guidance
Press the button
→ Route.
■ The list of the points (street names, street descriptions and stretches of the
road) still to be driven, is displayed in the Route list
.
■ Details - show details of the selected stretch of the journey.
Ð
Dynamic route guidance with TMC use
Requirements for a dynamic route guidance
TMC (Traffic Message Channel) is a digital radio data service for continuous trans-
mission of traffic information.
If a TMC traffic radio station is available for current location, the TMC traffic re-
ports are updated continuously in the background. Received TMC traffic reports are shown in a list » page 24, Displaying TMC traffic reports .
The quality of the transmitted traffic reports depends on the traffic editing car- ried out by the radio station. The reception of the TMC traffic reports cannot be
switched on or off.
The station you are listening to does not have to be a TMC station.
When the function Dynamic Route » page 20
, Settings in the (NAV) Navigation
mode is activated and the radio navigation system calculates a time advantage
for driving around the traffic disruption along the route, an alternative route is
calculated automatically.
TMC traffic reports can only be evaluated and displayed by the unit if the naviga-
tion data for the currently driven area is stored in the unit's memory or can be re-
trieved from an inserted navigation DVD.
The current TMC traffic reports can be displayed by pressing the range selectorkey TMC
.
Traffic problems received via TMC which affect the route are displayed in the map
by means of a coloured symbol. Traffic problems, which do not affect the route,
are displayed in the map by means of a grey symbol. The positioning of the TMC
symbol shows the beginning of a traffic disruption and the direction, when the
TMC traffic report is able to clearly define both.
When the function Dynamic Route » page 20, Settings in the (NAV) Navigation
mode is activated and the radio navigation system calculates a time advantage
for driving around the traffic disruption along the route, an alternative route is
calculated automatically.
When recalculating the route, a corresponding navigation announcement is out-
put. The same announcement is made when there was a traffic disruption in the
original route calculation which has since been removed.
Note
■ Making a diversion from a traffic jam based on TMC traffic reports may not al-
ways offer a time advantage, e.g. if the diversion route is also congested.■
If a traffic disruption was not yet entered via the TMC traffic reports, route dis-
ruptions can also be entered manually » page 22, Manually blocking a stretch of
the route .
Ð
23NAV mode (Navigation)
Page 27 of 31
Index
A
Anti-theft protection3AUX13
C
Car park21CDEject12Insert12CD modeCD not legible12
D
DAB10DestinationFlagged destination21Input20Point of interest21Route guidance22Save20DisplayCleaning3DTMF16DTMF key tones16Dynamic route guidance23
E
External inputAUX13MDI13External sources13
G
General information3
I
Input screen with keypad6iPod13
M
Main menuMEDIA11Navigation19RADIO9TELEPHONE15MDI13MediaMain menu11Pairing Bluetooth device15Playback options11Requirements for audio files14Requirements for media sources14Settings11Memory card12Mobile phoneFunctions during a telephone call16Pairing mobile phone with Bluetooth15Phonebook16Settings17Telephone call16ModeMEDIA11NAVIGATION18PHONE15RADIO9TMC24
N
NavigationDisplaying stretches of the journey23Enter and save destination20Main menu19Manually block22Navigation from the SD card18Orientation in the map22Settings20Starting route guidance22Stopping route guidance22Updating the navigation data18
O
OperationSETUP8
P
Petrol station21Product Overview5
R
RadioDAB10Deletes the stored stations9Main menu9Save station9Select frequency band9Settings9RDS9
S
Safety information3Screen3Operation5
25Index