heating SKODA OCTAVIA 2012 2.G / (1Z) Blues Car Radio Manual
[x] Cancel search | Manufacturer: SKODA, Model Year: 2012, Model line: OCTAVIA, Model: SKODA OCTAVIA 2012 2.G / (1Z)Pages: 24, PDF Size: 2.13 MB
Page 16 of 24

Vehicle systems setup
Main menu
First and foremost, pay attention to the safety instructions » page 3 , Safety in-
structions .
Select and confirm all functions as described at the beginning of this man- ual » page 4 , Unit overview and operation .
Accessing the main menu for vehicle systems setup
›
Press the button CAR.
■ Deactivate traction control (ASR) - Traction control (ASR) off » page 14
■ Vehicle status - Vehicle status » page 14
■ Auxiliary heater - Sets the auxiliary heater and ventilation » page 14
■ Assistants - Sets the driving assistants » page 15
■ Lights - Sets the lights » page 15
■ Vision - Adjusts the mirrors and windshield wipers » page 16
■ Opening/closing - Adjusts opening and closing » page 16
■ Seats - Adjusts the seats » page 16
■ Driving data - Display of data from the multi-function display on/off » page 16
■ Winter tyres limit - Sets the winter tyres limit » page 16
■ Service - Service interval display, VIN » page 16
■ Factory settings - Resets to factory settings » page 17
Note
■
The individual systems are described in the » Vehicle Owner's Manual .■If the functions of some systems are switched off, some functions, such as
parts of the ESC system » Vehicle Owner's Manual , are switched on again auto-
matically for security reasons, after switching the ignition off and on.
Ð
Deactivating traction control (TCS)
›
Press the button CAR
→ Deactivate traction control (ASR) - Deactivation of
traction control (ASR) on/off
Ð
Vehicle status›
Press the button CAR
→ Vehicle status .
■ Convenience consumers - Displays up to three consumers which have the larg-
est share of fuel consumption and displays the fuel consumption to run all con-
venience consumers » Vehicle Owner's Manual
■ Tyre pressure monitoring - Starts a new calibration process of the tyre pressure
monitor
■ Start-stop status - Displays information about the status of the START-STOP
system
Ð
Auxiliary heater and ventilation
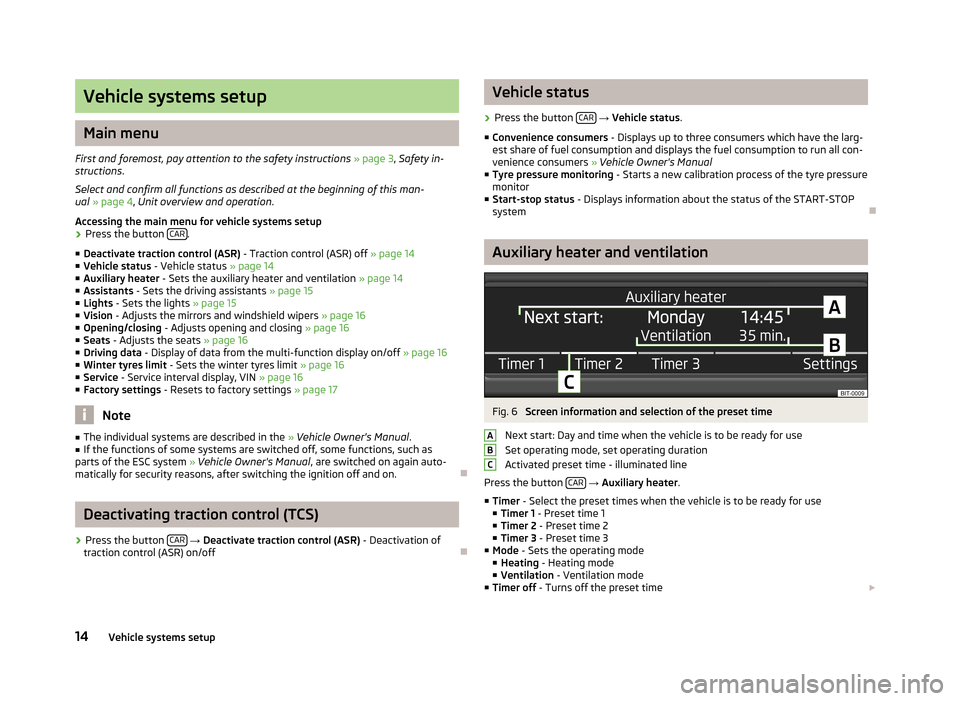
Fig. 6
Screen information and selection of the preset time
Next start: Day and time when the vehicle is to be ready for use
Set operating mode, set operating duration
Activated preset time - illuminated line
Press the button CAR
→ Auxiliary heater .
■ Timer - Select the preset times when the vehicle is to be ready for use
■ Timer 1 - Preset time 1
■ Timer 2 - Preset time 2
■ Timer 3 - Preset time 3
■ Mode - Sets the operating mode
■ Heating - Heating mode
■ Ventilation - Ventilation mode
■ Timer off - Turns off the preset time £
ABC14Vehicle systems setup
Page 21 of 24

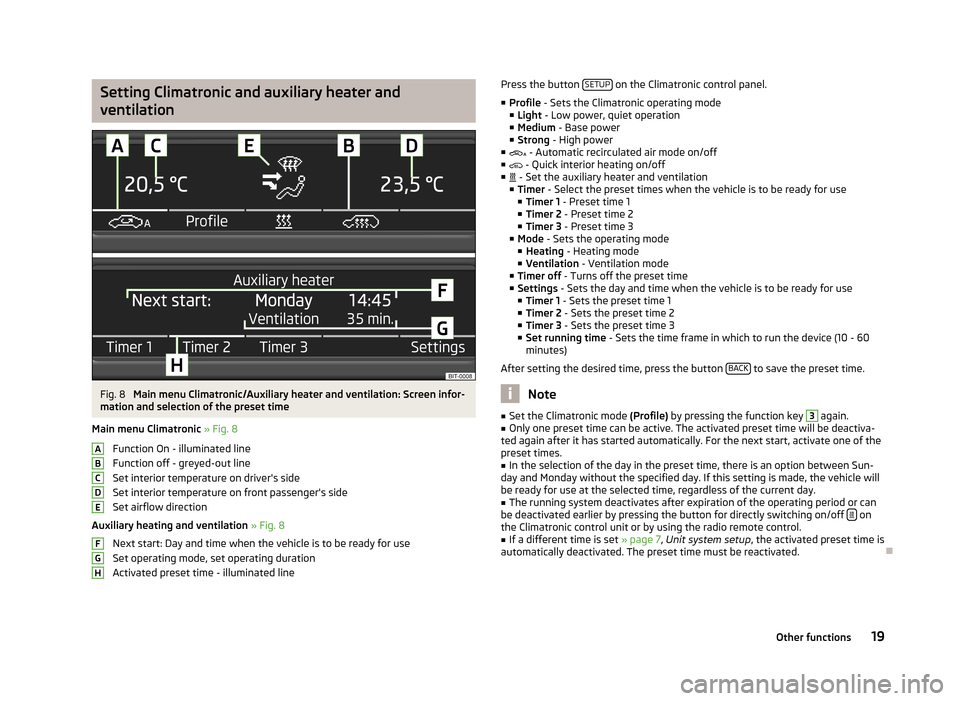
Setting Climatronic and auxiliary heater andventilationFig. 8
Main menu Climatronic/Auxiliary heater and ventilation: Screen infor-
mation and selection of the preset time
Main menu Climatronic » Fig. 8
Function On - illuminated line
Function off - greyed-out line
Set interior temperature on driver's side
Set interior temperature on front passenger's side Set airflow direction
Auxiliary heating and ventilation » Fig. 8
Next start: Day and time when the vehicle is to be ready for use
Set operating mode, set operating duration
Activated preset time - illuminated line
ABCDEFGHPress the button SETUP on the Climatronic control panel.
■ Profile - Sets the Climatronic operating mode
■ Light - Low power, quiet operation
■ Medium - Base power
■ Strong - High power
■ - Automatic recirculated air mode on/off
■ - Quick interior heating on/off
■ - Set the auxiliary heater and ventilation
■ Timer - Select the preset times when the vehicle is to be ready for use
■ Timer 1 - Preset time 1
■ Timer 2 - Preset time 2
■ Timer 3 - Preset time 3
■ Mode - Sets the operating mode
■ Heating - Heating mode
■ Ventilation - Ventilation mode
■ Timer off - Turns off the preset time
■ Settings - Sets the day and time when the vehicle is to be ready for use
■ Timer 1 - Sets the preset time 1
■ Timer 2 - Sets the preset time 2
■ Timer 3 - Sets the preset time 3
■ Set running time - Sets the time frame in which to run the device (10 - 60
minutes)
After setting the desired time, press the button BACK
to save the preset time.
Note
■
Set the Climatronic mode (Profile) by pressing the function key 3 again.■Only one preset time can be active. The activated preset time will be deactiva-
ted again after it has started automatically. For the next start, activate one of the preset times.■
In the selection of the day in the preset time, there is an option between Sun-
day and Monday without the specified day. If this setting is made, the vehicle will
be ready for use at the selected time, regardless of the current day.
■
The running system deactivates after expiration of the operating period or can
be deactivated earlier by pressing the button for directly switching on/off on
the Climatronic control unit or by using the radio remote control.
■
If a different time is set » page 7, Unit system setup , the activated preset time is
automatically deactivated. The preset time must be reactivated.
Ð
19Other functions