bulb SKODA OCTAVIA 2012 2.G / (1Z) User Guide
[x] Cancel search | Manufacturer: SKODA, Model Year: 2012, Model line: OCTAVIA, Model: SKODA OCTAVIA 2012 2.G / (1Z)Pages: 222, PDF Size: 13.52 MB
Page 205 of 222
WARNING (Continued)■Bulbs H7 H8 and H15 are pressurised and may burst when changing the bulb
- risk of injury! We therefore recommended wearing gloves and safety glasses
when changing a bulb.■
Gas discharge bulbs (xenon bulbs) operate with a high voltage, professional
knowledge is required - danger to life!
CAUTION
■ Do not take hold of the glass bulb with naked fingers (even the smallest
amount of dirt reduces the working life of the light bulb). Use a clean cloth, nap-
kin, or similar.
Note
■ This Owner's Manual only describes the replacement of bulbs where it is possi-
ble to replace the bulbs on your own without any complications arising. Other light bulbs should be changed by a ŠKODA specialist garage.■
We recommend that a box of replacement bulbs be always carried in the vehi-
cle. Replacement bulbs can be purchased from ŠKODAOriginal Accessories.
■
We recommend that the headlight settings are checked by a ŠKODA specialist
garage after replacing a bulb in the main or low beam, or the fog lights.
■
Gas discharge bulbs and LED diodes are replaced by a ŠKODA specialist garage.
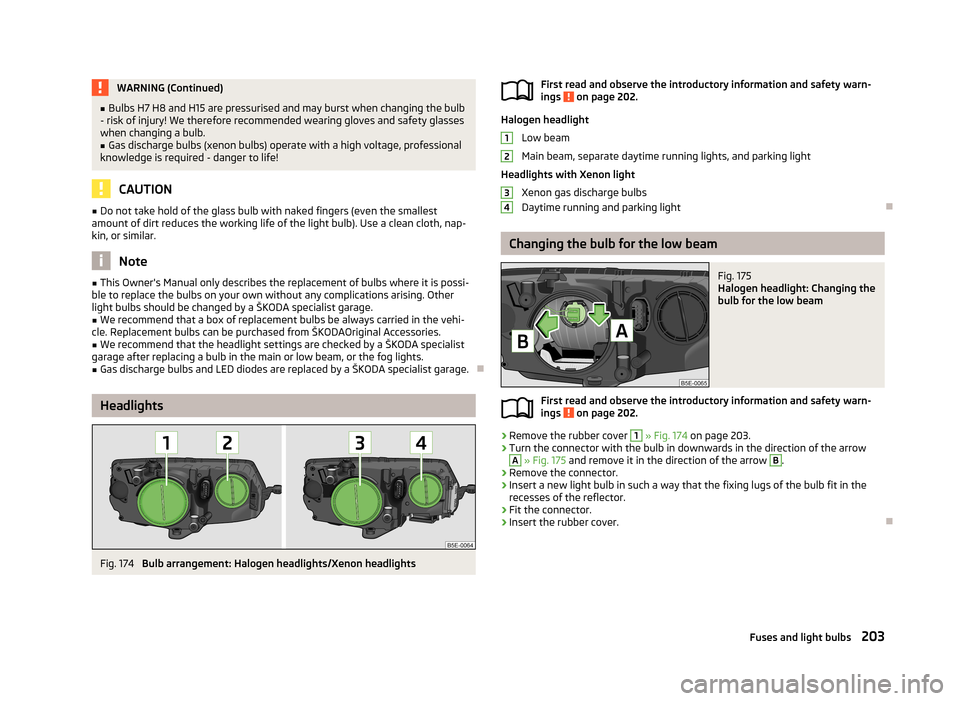
Headlights
Fig. 174
Bulb arrangement: Halogen headlights/Xenon headlights
First read and observe the introductory information and safety warn- ings on page 202.
Halogen headlight
Low beam
Main beam, separate daytime running lights, and parking light
Headlights with Xenon light Xenon gas discharge bulbs
Daytime running and parking light
Changing the bulb for the low beam
Fig. 175
Halogen headlight: Changing the
bulb for the low beam
First read and observe the introductory information and safety warn- ings on page 202.
›
Remove the rubber cover
1
» Fig. 174 on page 203.
›
Turn the connector with the bulb in downwards in the direction of the arrow
A
» Fig. 175 and remove it in the direction of the arrow
B
.
›
Remove the connector.
›
Insert a new light bulb in such a way that the fixing lugs of the bulb fit in the
recesses of the reflector.
›
Fit the connector.
›
Insert the rubber cover.
1234203Fuses and light bulbs
Page 206 of 222
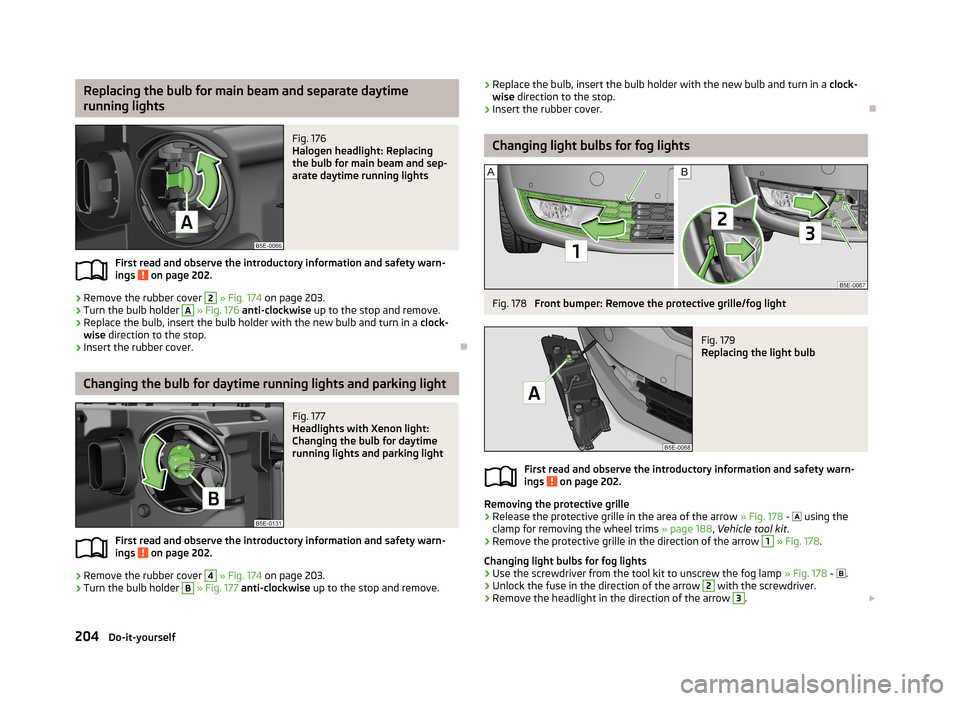
Replacing the bulb for main beam and separate daytime
running lightsFig. 176
Halogen headlight: Replacing
the bulb for main beam and sep-
arate daytime running lights
First read and observe the introductory information and safety warn-
ings on page 202.
›
Remove the rubber cover
2
» Fig. 174 on page 203.
›
Turn the bulb holder
A
» Fig. 176 anti-clockwise up to the stop and remove.
›
Replace the bulb, insert the bulb holder with the new bulb and turn in a clock-
wise direction to the stop.
›
Insert the rubber cover.
Changing the bulb for daytime running lights and parking light
Fig. 177
Headlights with Xenon light:
Changing the bulb for daytime
running lights and parking light
First read and observe the introductory information and safety warn-
ings on page 202.
›
Remove the rubber cover
4
» Fig. 174 on page 203.
›
Turn the bulb holder
B
» Fig. 177 anti-clockwise up to the stop and remove.
›Replace the bulb, insert the bulb holder with the new bulb and turn in a
clock-
wise direction to the stop.›
Insert the rubber cover.
Changing light bulbs for fog lights
Fig. 178
Front bumper: Remove the protective grille/fog light
Fig. 179
Replacing the light bulb
First read and observe the introductory information and safety warn-
ings on page 202.
Removing the protective grille
›
Release the protective grille in the area of the arrow » Fig. 178 -
using the
clamp for removing the wheel trims » page 188, Vehicle tool kit .
›
Remove the protective grille in the direction of the arrow
1
» Fig. 178 .
Changing light bulbs for fog lights
›
Use the screwdriver from the tool kit to unscrew the fog lamp » Fig. 178 -
.
›
Unlock the fuse in the direction of the arrow
2
with the screwdriver.
›
Remove the headlight in the direction of the arrow
3
.
204Do-it-yourself
Page 207 of 222
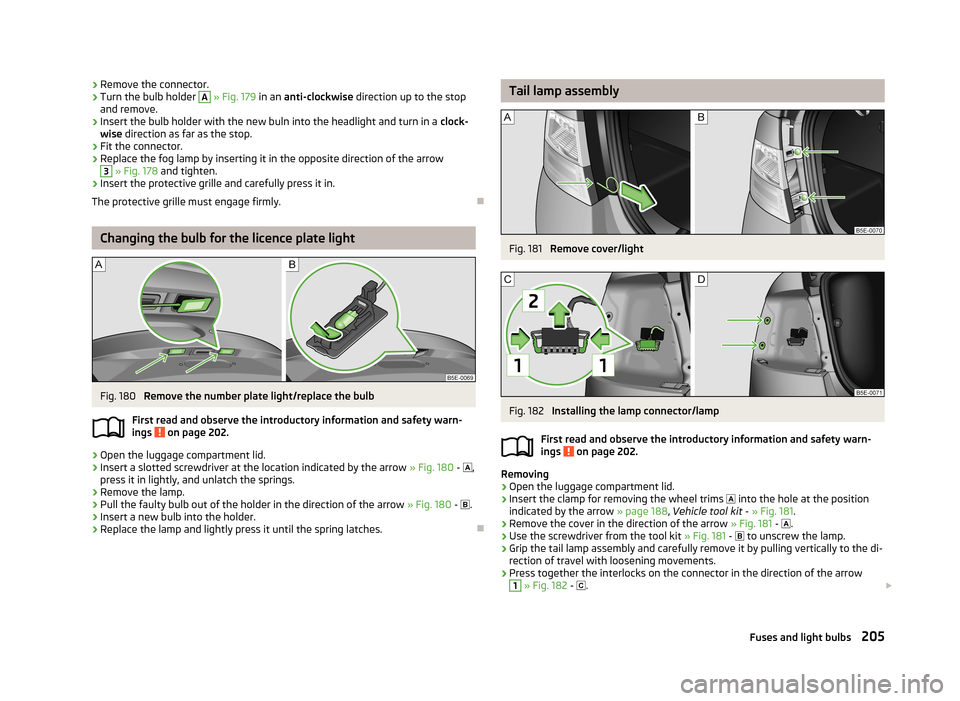
›Remove the connector.›Turn the bulb holder A
» Fig. 179 in an anti-clockwise direction up to the stop
and remove.›
Insert the bulb holder with the new buln into the headlight and turn in a clock-
wise direction as far as the stop.
›
Fit the connector.
›
Replace the fog lamp by inserting it in the opposite direction of the arrow
3
» Fig. 178 and tighten.
›
Insert the protective grille and carefully press it in.
The protective grille must engage firmly.
Changing the bulb for the licence plate light
Fig. 180
Remove the number plate light/replace the bulb
First read and observe the introductory information and safety warn- ings
on page 202.
›
Open the luggage compartment lid.
›
Insert a slotted screwdriver at the location indicated by the arrow » Fig. 180 -
,
press it in lightly, and unlatch the springs.
›
Remove the lamp.
›
Pull the faulty bulb out of the holder in the direction of the arrow » Fig. 180 -
.
›
Insert a new bulb into the holder.
›
Replace the lamp and lightly press it until the spring latches.
Tail lamp assemblyFig. 181
Remove cover/light
Fig. 182
Installing the lamp connector/lamp
First read and observe the introductory information and safety warn-
ings
on page 202.
Removing
›
Open the luggage compartment lid.
›
Insert the clamp for removing the wheel trims
into the hole at the position
indicated by the arrow » page 188, Vehicle tool kit - » Fig. 181 .
›
Remove the cover in the direction of the arrow » Fig. 181 -
.
›
Use the screwdriver from the tool kit » Fig. 181 -
to unscrew the lamp.
›
Grip the tail lamp assembly and carefully remove it by pulling vertically to the di-
rection of travel with loosening movements.
›
Press together the interlocks on the connector in the direction of the arrow
1
» Fig. 182 -
.
205Fuses and light bulbs
Page 208 of 222

›Carefully remove the connector from the tail lamp assembly in the direction of
the arrow 2.
Install›
Insert the connector into the lamp and lock it securely.
›
Insert the light vertically into the mounts on the bodywork » Fig. 182 - .
›
Carefully press the tail lamp assembly into the bodywork so that the bolts
1
» Fig. 183 on page 206 on the light latch with the mounts in the body » .
›
Be careful not to pinch the cable bundle between the bodywork and light.
›
Screw the tail lamp into place and install the cover.
Ensure that the cover engages firmly.
CAUTION
■ Ensure that the cable bundle is not pinched when re-installing it between the
bodywork and the light - risk of damage to the electric installation and water in-
gress.■
If you are not sure whether the cable bundle was not pinched, we recomment
you have the connection to the light checked by a ŠKODA partner.
Replacing the bulbs in the tail lamp assembly
Fig. 183
Outer part of the light: Basic light/light with LED diodes
Fig. 184
Inner part of the light: Basic light/light with LED diodes
First read and observe the introductory information and safety warn-
ings
on page 202.
Outer part of the light
›
Turn the bulb holder
2
» Fig. 183 anti-clockwise remove it from the lamp hous-
ing.
›
Replace the bulb, insert the holder with the bulb into the lamp housing and turn
in a clockwise direction to the stop.
Inner part of the light
›
Unscrew the lamp holder » Fig. 183 -
or
with the screwdriver from the car
tool kit, and remove the lamp holder from the tail light assembly.
›
Turn the bulb holder anti-clockwise up to the stop and remove it from the lamp
housing » Fig. 183 -
or
.
›
Replace the bulb, insert the holder with the bulb into the lamp housing and turn
in a clockwise direction to the stop.
›
Insert the bulb holder in the tail lamp assembly.
›
Screw on the lamp holder carefully.
206Do-it-yourself
Page 214 of 222
Index
A
ABS Function
113
Warning light17
Accessories165
Active driver-steering recommendation (DSR)112
Adjusting Exterior mirror
58
Interior mirror57
Adjusting seats139
Adjustment Seat
60
Aerial160
see Radio reception162
Airbag146
Deployment146
Front airbag147
Head airbag150
Knee airbag148
Side airbag149
Airbag system146
Air conditioning system Air outlets
82
Climatronic86
Manual air conditioning system84
Air outlets82
Alarm35
Anti-theft alarm system35
Antilock brake system113
Armrest Front
76
rear64
Ashtray70
Assist systems ABS
17, 113
Cruise control systems (CCS)119
EDL114
ESC17, 112
Headlight assist47
Lane Assist126
Park Assist116
Parking aid114
ProActive passenger protection125
Select driving mode124
START/STOP121
TCS16, 113
Auto Check Control12
Automatic driving lamp control45
Automatic gearbox Dynamic shift programme
132
Emergency programme132
Kickdown132
Selector lever-emergency unlocking133
Selector lever lock131
Selector lever positions130
Starting-off and driving130
Tiptronic131
Automatic load deactivation180
Automatic transmission129
Auxiliary heating and cooling system Switching on/off
89
Auxiliary heating (auxiliary heating and ventila- tion)
88
setting90
B
Ball rod Check attachment
108
installing107
Ready position107
removing108
Battery Replacing the battery in the remote control(aux-
iliary heating)
91
Before setting off138
Belt tensioners145
Bonnet Closing171
Opening171
Boot Cover
67
Fastening elements65
Fixing of the floor covering66
Light65
see Boot lid37
Boot lid37
Automatic locking38
Brake booster97
Brake fluid Checking
175
Brake pads Indicator light
20
Brakes Brake assist systems
112
Brake booster97
Handbrake98
Running in100
Warning light14
Braking Brake fluid
175
Information for braking97
Breakdown kit192
Break recommendation see Fatigue detection
27
Bulbs Replacing
202
Button in the driver's door Electrical power windows
38
C
Car computer see Multifunction display
22
Car jack188
Carrier68
Catalytic converter100
Central locking button32
212Index
Page 217 of 222
Hazard warning light system49
Headlight beam adjustment44
Headlight flasher45
Main beam45
parking light45
Parking light44
Rear fog light48
Replacing bulbs202
Tourist light46
Turn signal light45
Lights Low beam
44
switching on and off44
Warning lights12
Loads207
Locking Remote control
32
Locking and unlocking from the inside32
Lock the vehicle Keys
31
Luggage compartment Emergency unlocking
38
Fixing nets66
Folding double hooks66
Unlocking the luggage compartment lid38
M
Mirror Exterior mirror
58
Vanity53
Mobile phone134
Multicollision brake112
Multifunction display Functions
22
Memory22
Select data22
Multimedia135
AUX137
MEDIA IN137
USB137
N
Nets
66
O
Oil refer to Engine oil
172
Onboard computer see Multifunction display
22
Operation in winter De-icing windows
162
Diesel fuel169
Vehicle battery179
Outside temperature21
Overview Engine compartment
172
Warning lights12
P
Paint see Paint damage
161
Paint damage161
Parking automatic brake assist
116
Manoeuvring out of a parallel parking space116
Park Assist116
Parking aid114
Parking ticket holder80
Passive Safety138
Pedals99
Petrol refer to Fuel
168
Polishing the paintwork refer to Taking care of your vehicle
161
Power sockets 12 V
71
230 V71
Power steering93
Power windows Button in the front passenger door40
Preservation refer to Taking care of your vehicle
161
ProActive passenger protection125
R
Radiator fan
175
Radio reception Aerial
162
Functional fault162
Raise vehicle191
Rear mirror56
Exterior mirror58
Interior mirror57
Rear seats Seat backrest
63
Rear window - heating52
Recirculated air mode Climatronic
87
Manual air conditioning system85
Recommended gear21
Refuelling167
Fuel167
Regulation Headlight beam
44
Remote control32
Auxiliary heating (auxiliary heating)90
Synchronisation process33
Remote control key Replacing the battery
28
Replacement of parts165
replacing Vehicle battery
179
Replacing bulbs
202
Fuses199
The rear window wiper blade56
Wiper blades56
215Index