change time SKODA OCTAVIA 2012 2.G / (1Z) User Guide
[x] Cancel search | Manufacturer: SKODA, Model Year: 2012, Model line: OCTAVIA, Model: SKODA OCTAVIA 2012 2.G / (1Z)Pages: 222, PDF Size: 13.52 MB
Page 138 of 222
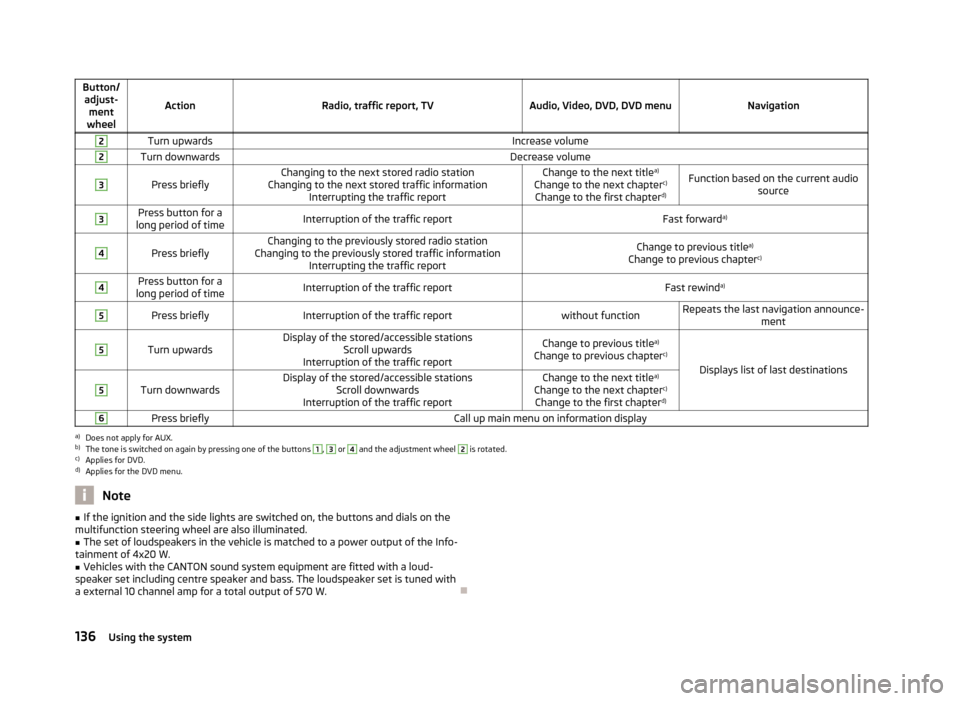
Button/adjust- ment
wheel
ActionRadio, traffic report, TVAudio, Video, DVD, DVD menuNavigation
2Turn upwardsIncrease volume2Turn downwardsDecrease volume3
Press brieflyChanging to the next stored radio station
Changing to the next stored traffic information Interrupting the traffic reportChange to the next title a)
Change to the next chapter c)
Change to the first chapter d)Function based on the current audio
source3Press button for a
long period of timeInterruption of the traffic reportFast forward a)4
Press brieflyChanging to the previously stored radio station
Changing to the previously stored traffic information Interrupting the traffic reportChange to previous title a)
Change to previous chapter c)4Press button for a
long period of timeInterruption of the traffic reportFast rewind a)5Press brieflyInterruption of the traffic reportwithout functionRepeats the last navigation announce-
ment5
Turn upwardsDisplay of the stored/accessible stationsScroll upwards
Interruption of the traffic reportChange to previous title a)
Change to previous chapter c)
Displays list of last destinations
5
Turn downwardsDisplay of the stored/accessible stations
Scroll downwards
Interruption of the traffic reportChange to the next title a)
Change to the next chapter c)
Change to the first chapter d)6Press brieflyCall up main menu on information displaya)
Does not apply for AUX.
b)
The tone is switched on again by pressing one of the buttons
1
,
3
or
4
and the adjustment wheel
2
is rotated.
c)
Applies for DVD.
d)
Applies for the DVD menu.
Note■
If the ignition and the side lights are switched on, the buttons and dials on the
multifunction steering wheel are also illuminated.■
The set of loudspeakers in the vehicle is matched to a power output of the Info-
tainment of 4x20 W.
■
Vehicles with the CANTON sound system equipment are fitted with a loud-
speaker set including centre speaker and bass. The loudspeaker set is tuned with
a external 10 channel amp for a total output of 570 W.
136Using the system
Page 141 of 222
What influences the driving safety?First read and observe the introductory information and safety warn-ings
on page 138.
The driver is fully responsible for himself and his occupants. If your driving safety is effected, you place yourself and the oncoming traffic at risk.
The following guidelines must therefore be observed. › Do not get distracted from concentrating on the traffic situation, e.g. by your
passengers or mobile phone calls.
› Never drive when your driving ability is impaired, e.g. through medication, alco-
hol or drugs.
› Keep to the traffic regulations and the permissible speed limit.
› Always adjust the driving speed to the road, traffic and weather conditions.
› Take regular breaks on long journeys – at least every two hours.
Correct seated position
Introduction
This chapter contains information on the following subjects:
Correct seated position for the driver
140
Correct seated position for the front passenger
140
Correct seated position for the occupants on the rear seats
140
Examples of an incorrect seated position
140WARNING■ At all times, the front seats and head restraints must be adjusted to match
the person's body size and the seat belt must be attached properly to provide
the most effective levels of protection to passengers.■
Always assume the correct seated position before setting off and do not
change this position while driving. Also advise your passengers to adopt the
correct seated position and not to change this position while the car is mov-
ing.
■
If the occupant adopts an incorrect seated position, he is exposed to life-
threatening injuries, in case he is hit by a deployed airbag.
WARNING (Continued)■ If the occupants on the rear seats are not sitting upright, the risk of injury is
increased due to incorrect routing of the seat belt.■
The driver must maintain a distance of at least 25 cm from the steering
wheel, and a distance of at least 10 cm between the legs and the dash panel at the height of the knee airbag. The front passenger must maintain a dis-
tance of at least 25 cm to the dash panel. Not maintaining this minimum dis-
tance will mean that the airbag system will not be able to properly protect you
– hazard!
■
When driving, hold the steering wheel with both hands firmly on the outer
edge in the 9 o'clock and 3 o'clock position. Never hold the steering wheel in
the 12 o'clock position or in any other way (e.g. in the middle or inner edge of
the steering wheel). In such cases, you could severely injure the arms, hands
and head when the driver airbag is deployed.
■
The seat backrests must not be angled too far back when driving otherwise
this will affect proper operation of the seat belts and of the airbag system –
risk of injury!
■
Ensure that there are no objects in the driver's footwell as they may get
caught behind the pedals when driving or applying the braking. You would
then no longer be able to operate the clutch, brake or accelerate.
■
Always keep your feet in the footwell when the car is being driven – never
place your feet on the instrument panel, out of the window or on the surfaces
of the seats. You will be exposed to increased risk of injury if it becomes nec-essary to apply the brake or in the event of an accident. If an airbag is de-
ployed, you may suffer fatal injuries when adopting an incorrect seated posi-
tion!
139Passive Safety
Page 145 of 222
WARNING (Continued)■It is prohibited to use clamps or other objects to adjust seat belts (e. g. for
shortening the belts for smaller persons).■
The seat belts for the rear seats can only fulfil their function reliably when
the seat backrests are correctly locked into position » page 63, Rear seats .
■
The belt webbing must always be kept clean. Soiled belt webbing may im-
pair proper operation of the inertia reel » page 165, Seat belts .
■
The seat belts must not be removed or changed in any way. Do not attempt
to repair the seat belts yourself.
■
Check the condition of all the seat belts on a regular basis. If any damage to
the seat belts, seat belt connections, inertia reel or the lock is detected, the
relevant seat belt must be replaced by a ŠKODA specialist garage.
■
Damaged seat belts which have been subjected to stress in an accident and
were therefore stretched, must be replaced - this is best done by a ŠKODA specialist garage. The anchorage points for the belts should also be checked.
Note
The national legal requirements must be observed when using seat belts.
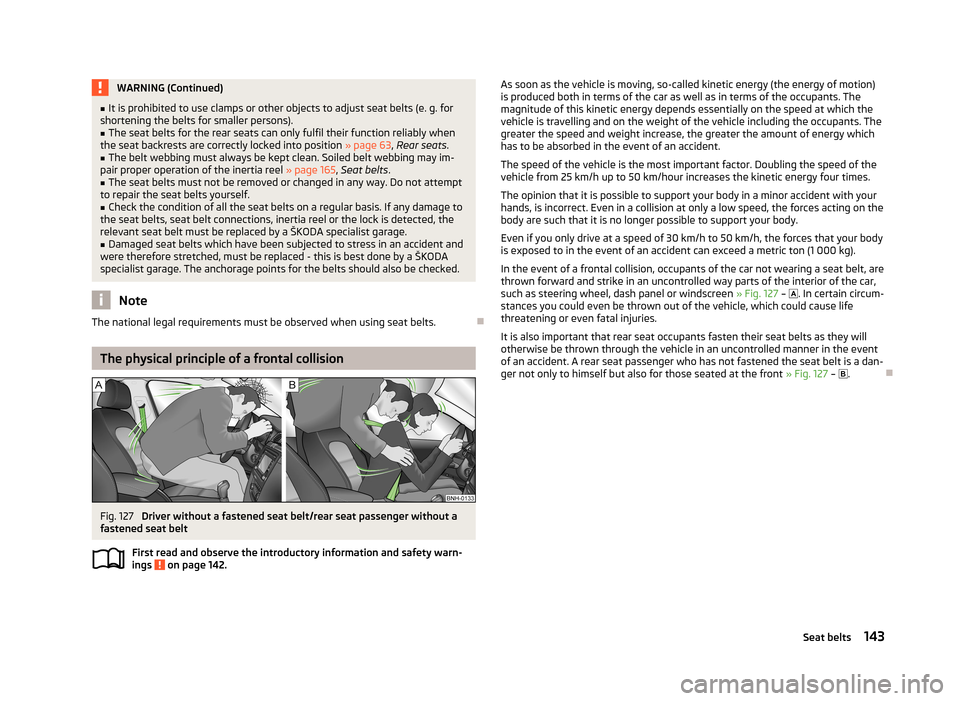
The physical principle of a frontal collision
Fig. 127
Driver without a fastened seat belt/rear seat passenger without a
fastened seat belt
First read and observe the introductory information and safety warn-ings
on page 142.
As soon as the vehicle is moving, so-called kinetic energy (the energy of motion)
is produced both in terms of the car as well as in terms of the occupants. The magnitude of this kinetic energy depends essentially on the speed at which the
vehicle is travelling and on the weight of the vehicle including the occupants. The
greater the speed and weight increase, the greater the amount of energy which
has to be absorbed in the event of an accident.
The speed of the vehicle is the most important factor. Doubling the speed of the
vehicle from 25 km/h up to 50 km/hour increases the kinetic energy four times.
The opinion that it is possible to support your body in a minor accident with your
hands, is incorrect. Even in a collision at only a low speed, the forces acting on the
body are such that it is no longer possible to support your body.
Even if you only drive at a speed of 30 km/h to 50 km/h, the forces that your body
is exposed to in the event of an accident can exceed a metric ton (1 000 kg).
In the event of a frontal collision, occupants of the car not wearing a seat belt, are
thrown forward and strike in an uncontrolled way parts of the interior of the car,
such as steering wheel, dash panel or windscreen » Fig. 127 –
. In certain circum-
stances you could even be thrown out of the vehicle, which could cause life
threatening or even fatal injuries.
It is also important that rear seat occupants fasten their seat belts as they will otherwise be thrown through the vehicle in an uncontrolled manner in the event
of an accident. A rear seat passenger who has not fastened the seat belt is a dan-
ger not only to himself but also for those seated at the front » Fig. 127 –
.
143Seat belts
Page 167 of 222
Leather care
Treat the leather roughly every six months with a suitable leather care product.
Apply only a small amount of the cleaning and care product.
Dry off the leather with a soft, dry cloth.
Use a care cream with light blocker and impregnation effect on a regular basis and each time after cleaning. The cream nourishes the leather, allows it to
breathe and keeps it supple and also provides moisture. It also creates surface
protection.
Clean the leather every 2 to 3 months, remove any fresh stains as they occur. Also look after the leather dye. Refresh any areas with a special coloured leather cream as required.
The leather is a natural material with specific properties. During the use of the ve- hicle, minor visible changes can occur on the leather parts of the covers (e. g wrin- kles or creases as a result of the stress of the covers).
CAUTION
■ Avoid leaving the vehicle for lengthy periods in bright sunlight to avoid the
leather from bleaching. If the vehicle is parked in the open for lengthy periods,
protect the leather from direct sunlight by covering it.■
Sharp-edged objects on items of clothing such as zip fasteners, rivets, sharp-
edged belts, jewellery and pendants may leave permanent scratches or signs of
rubbing on the surface.
■
The use of a mechanical steering wheel lock may damage the leather surface of
the steering wheel.
Seat belts
First read and observe the introductory information and safety warn-
ings
on page 159.
Keep the seat belts clean!
Clean dirty seat belts using a mild soapy solution and remove coarse dirt with a soft brush!
Check the condition of all the seat belts on a regular basis. Belt webbing which has become severely soiled may prevent the inertia reel from
reeling up the belt properly.
WARNING■ The seat belts must not be removed for cleaning.■Never clean the seat belts chemically as chemical cleaning products could
destroy the fabric. The seat belts must also not be allowed to come into con-
tact with corrosive liquids (such as acids etc.).■
Seat belts which have damage to the webbing, connections, inertia reel or
lock should be replaced by a ŠKODA specialist garage.
■
Inertia reel belts must be completely dried before being reeled up.
Accessories, changes and replacement of parts
Introduction
This chapter contains information on the following subjects:
Repairs and technical modifications
166
Changes and impairments of the airbag system
166
If you want to retrofit your vehicle with accessories, if a vehicle part is to be re-
placed with a new one, or when needing to make technical changes, the follow-
ing instructions must be observed.
› Always seek advice from a ŠKODA Partner
before purchasing any accessories or
parts and before making any technical changes »
.
› Technical modifications must satisfy the latest guidelines and advice issued by
ŠKODA.
› We recommend you have any modifications and adjustments on the vehicle car-
ried out by a ŠKODA Partner. Partners can provide more detailed information
and also carry out all the necessary work professionally and correctly.
› Only install such parts whose version and properties meet factory-installed
parts on the vehicle.
Adhering to the advice given will prevent any kind of damage to the vehicle, and
its travelling and operating safety will be maintained. The vehicle also complies
with German road transport regulations (StVZO).
165Taking care of and cleaning the vehicle
Page 178 of 222
Brake fluid changeFirst read and observe the introductory information and safety warn-
ings
on page 169.
Brake fluid absorbs moisture. Over time it therefore absorbs moisture from the
environment.
Excessive water in the brake fluid may be the cause of corrosion in the brake sys-
tem.
The water content lowers the boiling point of the brake fluid.
The brake fluid must comply with the following standards or specifications: › VW 50114;
› FMVSS 116 DOT4.
WARNINGDo not use used brake fluid - the function of the brake system may be im-
paired - risk of accident!
CAUTION
Brake fluid damages the paintwork of the vehicle.
Note
The brake fluid is replaced as part of a proscribed Inspection service carried out by
a ŠKODA Partner.
Windscreen washer system
Fig. 152
Engine compartment: Wind-
screen washer fluid reservoirFirst read and observe the introductory information and safety warn-
ings on page 169.
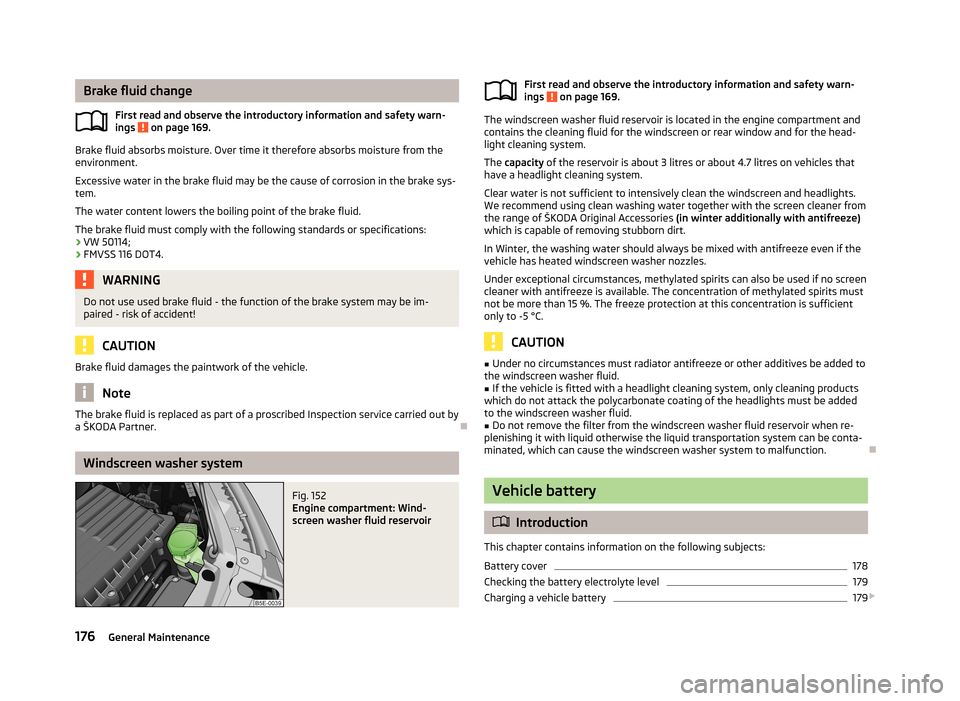
The windscreen washer fluid reservoir is located in the engine compartment and
contains the cleaning fluid for the windscreen or rear window and for the head-
light cleaning system.
The capacity of the reservoir is about 3 litres or about 4.7 litres on vehicles that
have a headlight cleaning system.
Clear water is not sufficient to intensively clean the windscreen and headlights.
We recommend using clean washing water together with the screen cleaner from
the range of ŠKODA Original Accessories (in winter additionally with antifreeze)
which is capable of removing stubborn dirt.
In Winter, the washing water should always be mixed with antifreeze even if the
vehicle has heated windscreen washer nozzles.
Under exceptional circumstances, methylated spirits can also be used if no screen
cleaner with antifreeze is available. The concentration of methylated spirits must
not be more than 15 %. The freeze protection at this concentration is sufficient
only to -5 °C.
CAUTION
■ Under no circumstances must radiator antifreeze or other additives be added to
the windscreen washer fluid.■
If the vehicle is fitted with a headlight cleaning system, only cleaning products
which do not attack the polycarbonate coating of the headlights must be added
to the windscreen washer fluid.
■
Do not remove the filter from the windscreen washer fluid reservoir when re-
plenishing it with liquid otherwise the liquid transportation system can be conta-
minated, which can cause the windscreen washer system to malfunction.
Vehicle battery
Introduction
This chapter contains information on the following subjects:
Battery cover
178
Checking the battery electrolyte level
179
Charging a vehicle battery
179
176General Maintenance
Page 181 of 222

Checking the battery electrolyte levelFig. 154
Vehicle battery: Electrolyte level
indicator
First read and observe the introductory information and safety warn-
ings on page 176.
On vehicles with a vehicle battery fitted with a colour indicator, the so-called magic eye » Fig. 154, the electrolyte level can be determined by looking at the
change in colour.
Air bubbles can influence the colour of the indicator. For this reason carefully
knock on the indicator before carrying out the check.
› Black colour – electrolyte level is correct.
› Colourless or light yellow colour – electrolyte level too low, the battery must be
replaced.
For technical reasons, on vehicles with the description “AGM”, the electrolyte lev- el cannot be checked.
Vehicles with a START-STOP system are fitted with a battery control unit for checking the energy level for the recurring engine start.
We recommend you have the electrolyte level checked by a ŠKODA specialist ga-
rage from time to time, especially in the following cases.
› High external temperatures.
› Longer day trips.
› After each charge.
Winter time
The vehicle battery only has a proportion of the starting power in lower tempera- tures. A discharged vehicle battery may already freeze at temperatures just be-
low 0 °C .
We therefore recommend that you have the battery checked and, if necessary, re-
charged by a ŠKODA Partner before the start of the winter.
NoteThe battery electrolyte level is periodically checked by a ŠKODA Partner as part of
the Inspection Service.
Charging a vehicle battery
First read and observe the introductory information and safety warn-ings
on page 176.
A properly charged vehicle battery is essential for reliably starting the engine.
›
Switch off the ignition and all of the electrical components.
›
Only when performing a “quick-charge”, disconnect both battery cables (first of
all “negative”, then “positive”).
›
Attach the terminal clamps of the charger to the battery terminals (red = “posi-
tive”, black = “negative”).
›
Plug the mains cable of the charger into the power socket and switch on thedevice.
›
After charging has been successful: Switch off the charger and remove themains cable from the power socket.
›
Only then disconnect the charger's terminal clamps.
›
Reconnect the cables to the battery (first of all “positive”, then “negative”).
It is not necessary to disconnect the cables of the battery if you recharge the ve- hicle battery using low amperages (for example from a mini-charger). Refer to the
instructions of the charger manufacturer .
A charging current of 0.1 multiple of the total vehicle battery capacity (or lower) must be used until full charging is achieved.
It is necessary to disconnect both cables before charging the battery with high
amperages, so-called “ quick-charging”.
The vent plugs of the vehicle battery should not be opened for charging.
Replacing the vehicle battery
When replacing a battery, the new vehicle battery must have the same capacity,
voltage, amperage and be the same size. Suitable types of vehicle batteries can
be purchased from a ŠKODA Partner.
We recommend that the battery is replaced by a ŠKODA Partner, where the new
vehicle battery will be installed properly and the original battery will be disposed
of in accordance with national regulations.
179Inspecting and replenishing
Page 185 of 222
Always check the inflation pressure when the tyres are cold. Do not reduce the
higher pressure of warm tyres.
With greater payload, adjust the tyre inflation pressure accordingly.
Driving style
Fast cornering, sharp acceleration and braking increase the wear of your tyres.
Balancing wheels
The wheels of a new vehicle are balanced. When driving, there are a wide range
of influences which may result in an imbalance. This may make itself felt by a vi-
bration in the steering.
Have the wheels rebalanced after replacing the tyres.
Wheel alignment errors
An incorrect wheel alignment at the front or rear leads to excess wear on the tyres.
Tyre damage
Drive over curbs and other such obstacles slowly and, where possible, at a right
angle in order to avoid damage to tyres and wheel trims.
We recommend checking your tyres and wheel rims for damage (punctures, cuts,
splits and bulges, etc.) on a regular basis. Remove foreign bodies (e.g. small
stones) from the tyre profile immediately.
Changing wheels around
If significantly greater wear is present on the front tyres, we recommend chang-
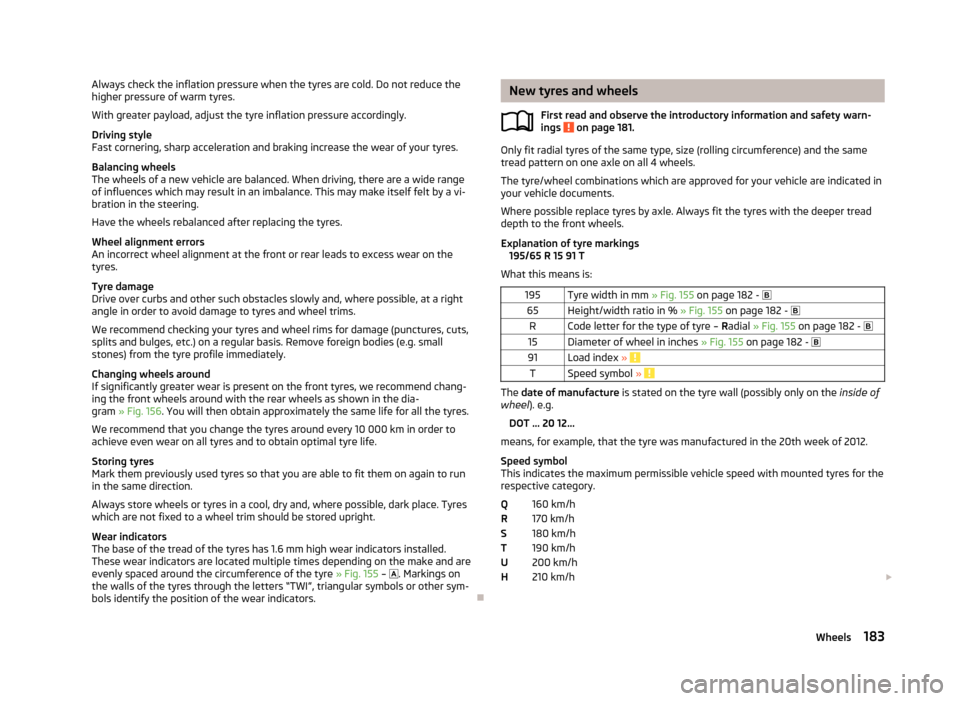
ing the front wheels around with the rear wheels as shown in the dia- gram » Fig. 156 . You will then obtain approximately the same life for all the tyres.
We recommend that you change the tyres around every 10 000 km in order to
achieve even wear on all tyres and to obtain optimal tyre life.
Storing tyres
Mark them previously used tyres so that you are able to fit them on again to run in the same direction.
Always store wheels or tyres in a cool, dry and, where possible, dark place. Tyres which are not fixed to a wheel trim should be stored upright.
Wear indicators
The base of the tread of the tyres has 1.6 mm high wear indicators installed.
These wear indicators are located multiple times depending on the make and are evenly spaced around the circumference of the tyre » Fig. 155 –
. Markings on
the walls of the tyres through the letters “TWI”, triangular symbols or other sym-
bols identify the position of the wear indicators.
New tyres and wheels
First read and observe the introductory information and safety warn-
ings
on page 181.
Only fit radial tyres of the same type, size (rolling circumference) and the same
tread pattern on one axle on all 4 wheels.
The tyre/wheel combinations which are approved for your vehicle are indicated in
your vehicle documents.
Where possible replace tyres by axle. Always fit the tyres with the deeper tread
depth to the front wheels.
Explanation of tyre markings 195/65 R 15 91 T
What this means is:
195Tyre width in mm » Fig. 155 on page 182 - 65Height/width ratio in % » Fig. 155 on page 182 - RCode letter for the type of tyre – Radial » Fig. 155 on page 182 - 15Diameter of wheel in inches » Fig. 155 on page 182 - 91Load index » TSpeed symbol »
The date of manufacture is stated on the tyre wall (possibly only on the inside of
wheel ). e.g.
DOT ... 20 12...
means, for example, that the tyre was manufactured in the 20th week of 2012.
Speed symbol
This indicates the maximum permissible vehicle speed with mounted tyres for the respective category.
160 km/h
170 km/h
180 km/h
190 km/h
200 km/h
210 km/h
QRSTUH183Wheels
Page 188 of 222
While pressing the button, the warning light lights up. At the same time the
system memory is erased and the new calibration is started, which is confirmed
with an audible signal and then the warning light goes out.
If the warning light does not go out after the calibration, this indicates a sys-
tem fault. Seek help from a ŠKODA specialist garage.
The rolling circumference of the tyre can change if: › the tyre inflation pressure is too low;
› the structure of the tyre is damaged;
› the vehicle is loaded on one side;
› the wheels of an axle are loaded heavily (e.g. when towing a trailer or when
driving uphill or downhill);
› snow chains are mounted;
› the spare wheel is mounted;
› one wheel per axle was changed.WARNING■
When the warning light illuminates, immediately reduce the speed and
avoid sudden steering and brake manoeuvres. Stop the vehicle as soon as
possible and inspect the tyres and their inflation pressure.■
Under certain circumstances (e.g. sporty style of driving, wintry or unpaved
roads) the warning light can be delayed or does not light up at all.
Wheel bolts
First read and observe the introductory information and safety warn-ings
on page 181.
Wheels and wheel bolts are matched to each other in terms of design. Each time
you fit other wheels, e.g. light alloy wheels or wheels with winter tyres, you must
also use the matching wheel bolts of the correct length and shape of spherical cap. This is essential to ensure that the wheels are tightly fitted and that the
brake system operates properly.
Winter tyres
First read and observe the introductory information and safety warn-
ings
on page 181.
The handling of your vehicle will be significantly improved when driving on wintry roads if you fit winter tyres. Summer tyres on ice, snee and at temperatures be-
low 7 °C have less grip. This is especially true of low-profile tyres or high-speed
tyres .
To achieve the best possible handling properties, winter tyres must be fitted on
all 4 wheels, the minimum tread depth must be 4 mm and tyres must be no older than 4 years.
Winter tyres of a lower speed category can be used provided that the permissible
maximum speed of these tyres is not exceeded even if the possible maximum
speed of the vehicle is higher.
The winter tyres speed limit is set in the menu » operating instructions for Info-
tainment , chapter Setting vehicle systems (CAR button) .
For the sake of the environment
Fit the summer tyres on again in good time as they provide better handling prop-
erties, a shorter braking distance, less tyre noise, and reduced tyre wear on roadswhich are free of snow and ice as well as at temperatures above 7 °C. The fuelconsumption is also lower.
Snow chains
First read and observe the introductory information and safety warn-
ings
on page 181.
When driving on wintry roads, snow chains improve not only traction, but also the
braking performance.
Snow chains must only be mounted on the front wheels.
For technical reasons, it is only permissible to fit snow chains with the following wheel/tyre combinations.
Wheel sizeDepth (D)Tyre size6J x 15 a)43 mm195/65 R156J x 16 b)48 mm205/55 R166J x 17b)48 mm205/50 R17a)
Only fit snow chains with links and locks not larger than 13 mm.
b)
Only fit snow chains with links and locks not larger than 12 mm.
Remove the full wheel trims before installing the snow chains.
186General Maintenance
Page 204 of 222
Fuse assignment in engine compartmentNo.Power consumerF1Control unit for ESCF2Control unit for ESC, ABSF3Engine control unitF4Engine control unit, relay for electric auxiliary heatingF5Engine componentsF6Brake sensor, engine componentsF7Coolant pump, engine componentsF8Lambda probeF9Ignition, control unit for glow plug system, engine componentsF10Control unit for fuel pump, ignitionF11Electrical auxiliary heating systemF12Electrical auxiliary heating systemF13Control unit for automatic gearboxF14Windscreen heater - leftF15HornF16IgnitionF17Control unit for ABS, ESC, engine control unitF18Data bus control unitF19Windscreen wipersF20AlarmF21ABSF22Engine control unitF23StarterF24Electrical auxiliary heating systemF31Not assignedF32Not assignedF33Not assignedF34Windscreen heater - rightF35Not assignedF36Not assignedNo.Power consumerF37Control unit for auxiliary heatingF38Not assigned
Bulbs
Introduction
This chapter contains information on the following subjects:
Headlights
203
Changing the bulb for the low beam
203
Replacing the bulb for main beam and separate daytime running lights
204
Changing the bulb for daytime running lights and parking light
204
Changing light bulbs for fog lights
204
Changing the bulb for the licence plate light
205
Tail lamp assembly
205
Replacing the bulbs in the tail lamp assembly
206
Some manual skills are required to change a bulb. For this reason, if uncertain, we recommend that bulbs are replaced by a ŠKODA specialist garage or other experthelp is sought.
› Switch off the ignition and all of the lights before replacing a bulb.
› Faulty bulbs must only be replaced with the same type of bulbs. The designa-
tion is located on the light socket or the glass bulb.
› A stowage compartment for replacement bulbs is located in a plastic box in the
spare wheel or underneath the floor covering in the luggage compartment.
WARNING■ Accidents can be caused if the road in front of the vehicle is not sufficiently
illuminated and the vehicle cannot or can only be seen with difficulty by other
road users.■
Always read and observe the warnings before completing any work in the
engine compartment » page 169.
202Do-it-yourself
Page 205 of 222
WARNING (Continued)■Bulbs H7 H8 and H15 are pressurised and may burst when changing the bulb
- risk of injury! We therefore recommended wearing gloves and safety glasses
when changing a bulb.■
Gas discharge bulbs (xenon bulbs) operate with a high voltage, professional
knowledge is required - danger to life!
CAUTION
■ Do not take hold of the glass bulb with naked fingers (even the smallest
amount of dirt reduces the working life of the light bulb). Use a clean cloth, nap-
kin, or similar.
Note
■ This Owner's Manual only describes the replacement of bulbs where it is possi-
ble to replace the bulbs on your own without any complications arising. Other light bulbs should be changed by a ŠKODA specialist garage.■
We recommend that a box of replacement bulbs be always carried in the vehi-
cle. Replacement bulbs can be purchased from ŠKODAOriginal Accessories.
■
We recommend that the headlight settings are checked by a ŠKODA specialist
garage after replacing a bulb in the main or low beam, or the fog lights.
■
Gas discharge bulbs and LED diodes are replaced by a ŠKODA specialist garage.
Headlights
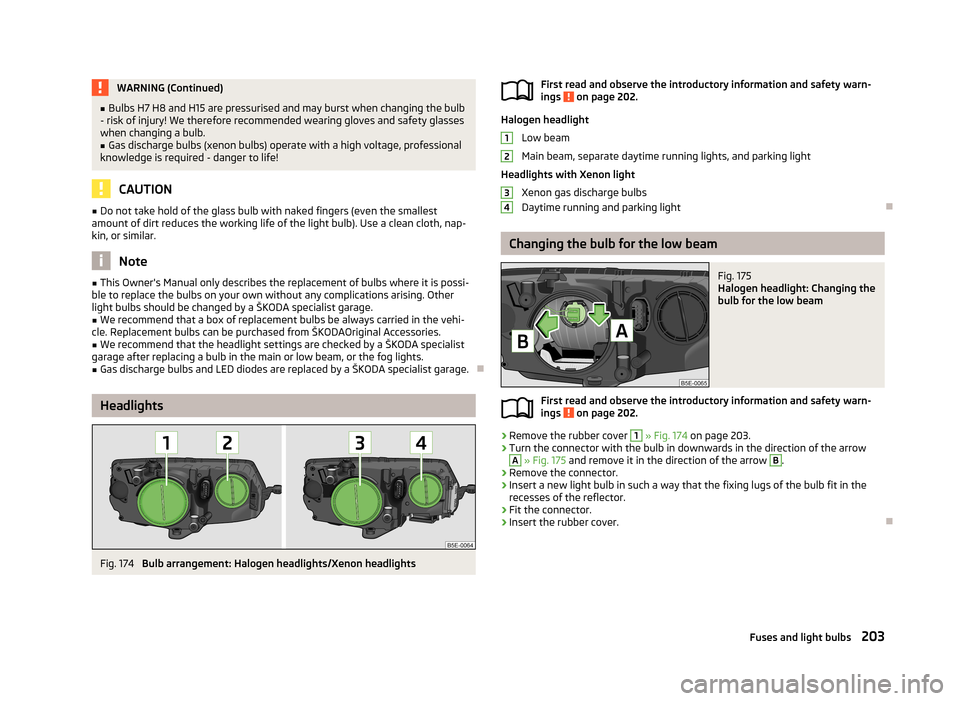
Fig. 174
Bulb arrangement: Halogen headlights/Xenon headlights
First read and observe the introductory information and safety warn- ings on page 202.
Halogen headlight
Low beam
Main beam, separate daytime running lights, and parking light
Headlights with Xenon light Xenon gas discharge bulbs
Daytime running and parking light
Changing the bulb for the low beam
Fig. 175
Halogen headlight: Changing the
bulb for the low beam
First read and observe the introductory information and safety warn- ings on page 202.
›
Remove the rubber cover
1
» Fig. 174 on page 203.
›
Turn the connector with the bulb in downwards in the direction of the arrow
A
» Fig. 175 and remove it in the direction of the arrow
B
.
›
Remove the connector.
›
Insert a new light bulb in such a way that the fixing lugs of the bulb fit in the
recesses of the reflector.
›
Fit the connector.
›
Insert the rubber cover.
1234203Fuses and light bulbs