engine coolant SKODA OCTAVIA 2012 2.G / (1Z) User Guide
[x] Cancel search | Manufacturer: SKODA, Model Year: 2012, Model line: OCTAVIA, Model: SKODA OCTAVIA 2012 2.G / (1Z)Pages: 222, PDF Size: 13.52 MB
Page 174 of 222
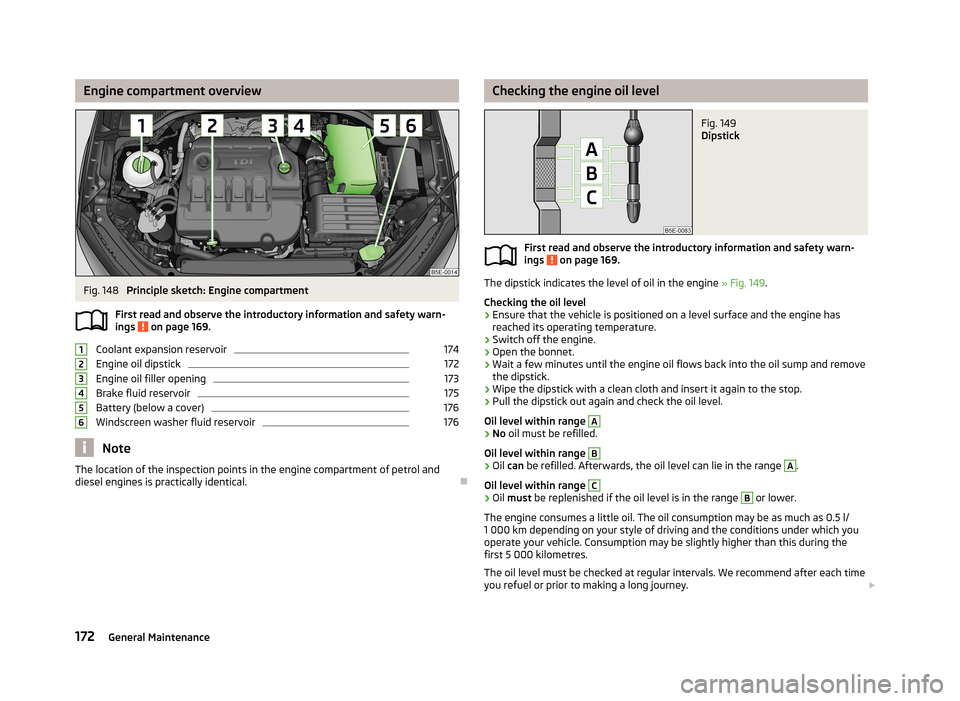
Engine compartment overviewFig. 148
Principle sketch: Engine compartment
First read and observe the introductory information and safety warn- ings
on page 169.
Coolant expansion reservoir
174
Engine oil dipstick
172
Engine oil filler opening
173
Brake fluid reservoir
175
Battery (below a cover)
176
Windscreen washer fluid reservoir
176
Note
The location of the inspection points in the engine compartment of petrol and
diesel engines is practically identical.
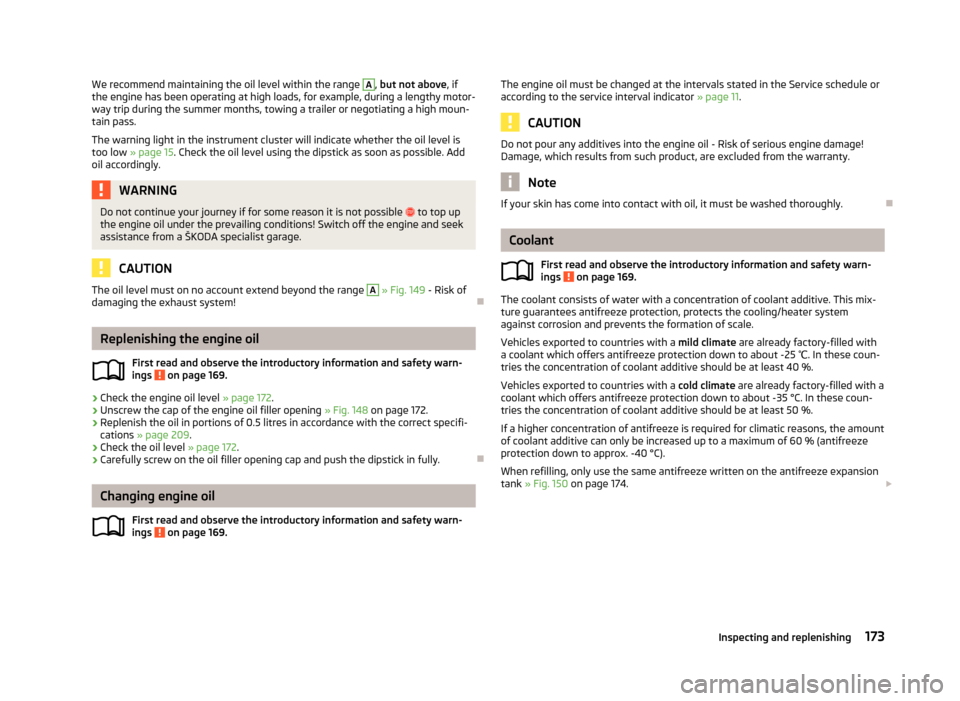
123456Checking the engine oil levelFig. 149
Dipstick
First read and observe the introductory information and safety warn- ings on page 169.
The dipstick indicates the level of oil in the engine » Fig. 149.
Checking the oil level
›
Ensure that the vehicle is positioned on a level surface and the engine has reached its operating temperature.
›
Switch off the engine.
›
Open the bonnet.
›
Wait a few minutes until the engine oil flows back into the oil sump and remove
the dipstick.
›
Wipe the dipstick with a clean cloth and insert it again to the stop.
›
Pull the dipstick out again and check the oil level.
Oil level within range
A›
No oil must be refilled.
Oil level within range
B›
Oil can be refilled. Afterwards, the oil level can lie in the range
A
.
Oil level within range
C›
Oil must be replenished if the oil level is in the range
B
or lower.
The engine consumes a little oil. The oil consumption may be as much as 0.5 l/ 1 000 km depending on your style of driving and the conditions under which you
operate your vehicle. Consumption may be slightly higher than this during the
first 5 000 kilometres.
The oil level must be checked at regular intervals. We recommend after each time
you refuel or prior to making a long journey.
172General Maintenance
Page 175 of 222
We recommend maintaining the oil level within the range A, but not above , if
the engine has been operating at high loads, for example, during a lengthy motor-
way trip during the summer months, towing a trailer or negotiating a high moun- tain pass.
The warning light in the instrument cluster will indicate whether the oil level is too low » page 15 . Check the oil level using the dipstick as soon as possible. Add
oil accordingly.WARNINGDo not continue your journey if for some reason it is not possible to top up
the engine oil under the prevailing conditions! Switch off the engine and seek
assistance from a ŠKODA specialist garage.
CAUTION
The oil level must on no account extend beyond the range A » Fig. 149 - Risk of
damaging the exhaust system!
Replenishing the engine oil
First read and observe the introductory information and safety warn-
ings
on page 169.
›
Check the engine oil level » page 172.
›
Unscrew the cap of the engine oil filler opening » Fig. 148 on page 172.
›
Replenish the oil in portions of 0.5 litres in accordance with the correct specifi-
cations » page 209 .
›
Check the oil level » page 172.
›
Carefully screw on the oil filler opening cap and push the dipstick in fully.
Changing engine oil
First read and observe the introductory information and safety warn-
ings
on page 169.
The engine oil must be changed at the intervals stated in the Service schedule or
according to the service interval indicator » page 11.
CAUTION
Do not pour any additives into the engine oil - Risk of serious engine damage!
Damage, which results from such product, are excluded from the warranty.
Note
If your skin has come into contact with oil, it must be washed thoroughly.
Coolant
First read and observe the introductory information and safety warn-ings
on page 169.
The coolant consists of water with a concentration of coolant additive. This mix-
ture guarantees antifreeze protection, protects the cooling/heater system
against corrosion and prevents the formation of scale.
Vehicles exported to countries with a mild climate are already factory-filled with
a coolant which offers antifreeze protection down to about -25 ℃. In these coun-
tries the concentration of coolant additive should be at least 40 %.
Vehicles exported to countries with a cold climate are already factory-filled with a
coolant which offers antifreeze protection down to about -35 °C. In these coun-
tries the concentration of coolant additive should be at least 50 %.
If a higher concentration of antifreeze is required for climatic reasons, the amount
of coolant additive can only be increased up to a maximum of 60 % (antifreeze
protection down to approx. -40 °C).
When refilling, only use the same antifreeze written on the antifreeze expansion tank » Fig. 150 on page 174.
173Inspecting and replenishing
Page 176 of 222
Coolant capacity1)Petrol enginesCapacities (in litres)1.2 ltr./63 kW TSI8.91.4 ltr./103 kW TSI10.21.8 ltr./132 kW TSI7.8Diesel enginesCapacities (in litres)1.6 ltr./77 kW TDI CR8.42.0 l/110 kW TDI CR - MG/DSG11,6 / 11,9
CAUTION
■
The amount of coolant additive in the coolant must never be allowed to be less
than 40 %.■
Over 60 % of coolant additive in the coolant reduces the antifreeze protection
and coolant effectiveness.
■
Other coolant additives that do not comply with the correct specifications can
above all significantly reduce the anticorrosion effect.
■
Any faults resulting from corrosion may cause a loss of coolant and can conse-
quently result in major engine damage!
Checking the coolant level
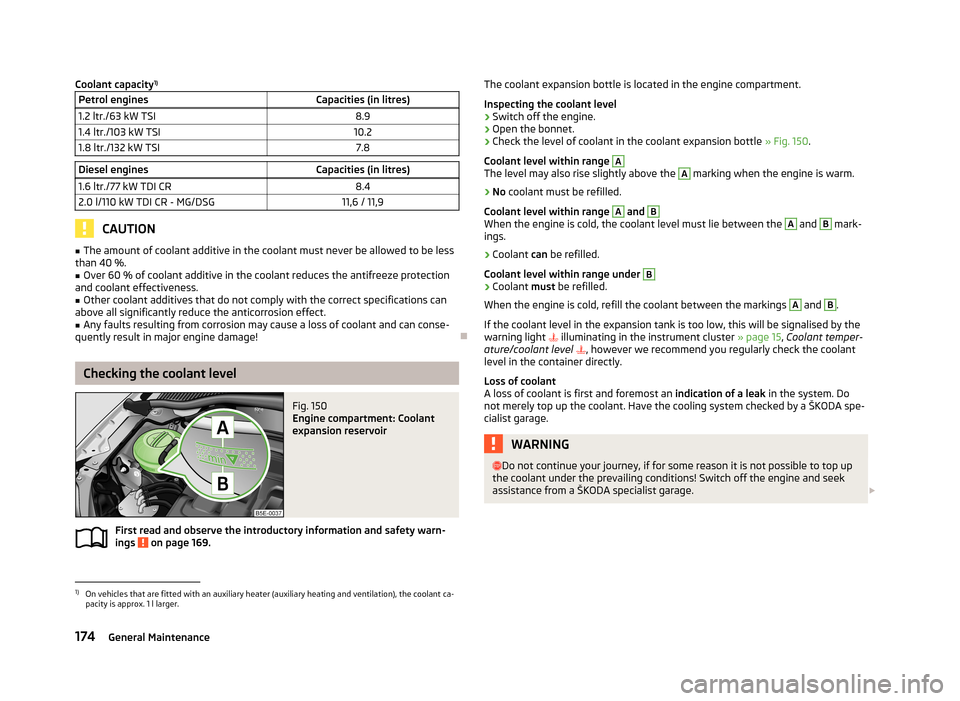
Fig. 150
Engine compartment: Coolant
expansion reservoir
First read and observe the introductory information and safety warn-
ings on page 169.
The coolant expansion bottle is located in the engine compartment.
Inspecting the coolant level›
Switch off the engine.
›
Open the bonnet.
›
Check the level of coolant in the coolant expansion bottle » Fig. 150.
Coolant level within range
A
The level may also rise slightly above the
A
marking when the engine is warm.
›
No coolant must be refilled.
Coolant level within range
A
and
B
When the engine is cold, the coolant level must lie between the
A
and
B
mark-
ings.
›
Coolant can be refilled.
Coolant level within range under
B›
Coolant must be refilled.
When the engine is cold, refill the coolant between the markings
A
and
B
.
If the coolant level in the expansion tank is too low, this will be signalised by the warning light
illuminating in the instrument cluster » page 15, Coolant temper-
ature/coolant level
, however we recommend you regularly check the coolant
level in the container directly.
Loss of coolant
A loss of coolant is first and foremost an indication of a leak in the system. Do
not merely top up the coolant. Have the cooling system checked by a ŠKODA spe- cialist garage.
WARNING Do not continue your journey, if for some reason it is not possible to top up
the coolant under the prevailing conditions! Switch off the engine and seek
assistance from a ŠKODA specialist garage. 1)
On vehicles that are fitted with an auxiliary heater (auxiliary heating and ventilation), the coolant ca-
pacity is approx. 1 l larger.
174General Maintenance
Page 177 of 222
CAUTION■Do not fill the coolant above the mark A » Fig. 150 .■If a fault causes the engine to overheat, we recommend visiting a ŠKODA Part-
ner, otherwise serious engine damage may occur.
Replenishing the coolant
First read and observe the introductory information and safety warn-ings
on page 169.
Only refill with new coolant.
›
Switch off the engine.
›
Allow the engine to cool.
›
Place a cloth over the cap of the coolant expansion reservoir and unscrew the
cap carefully .
›
Replenish the coolant.
›
Turn the cap until it clicks into place.
Do not use an alternative additive if the specified coolant is not available in an emergency. In this case, just use water and have the correct mixing ratio of water
and the coolant additive restored by a ŠKODA specialist garage as soon as possi-
ble.
Radiator fan
First read and observe the introductory information and safety warn-
ings
on page 169.
After switching off the ignition, the fan can intermittently continue to operate for
approx. 10 minutes.
The radiator fan is powered by an electric motor. Operation is controlled accord-
ing to the temperature of the coolant.
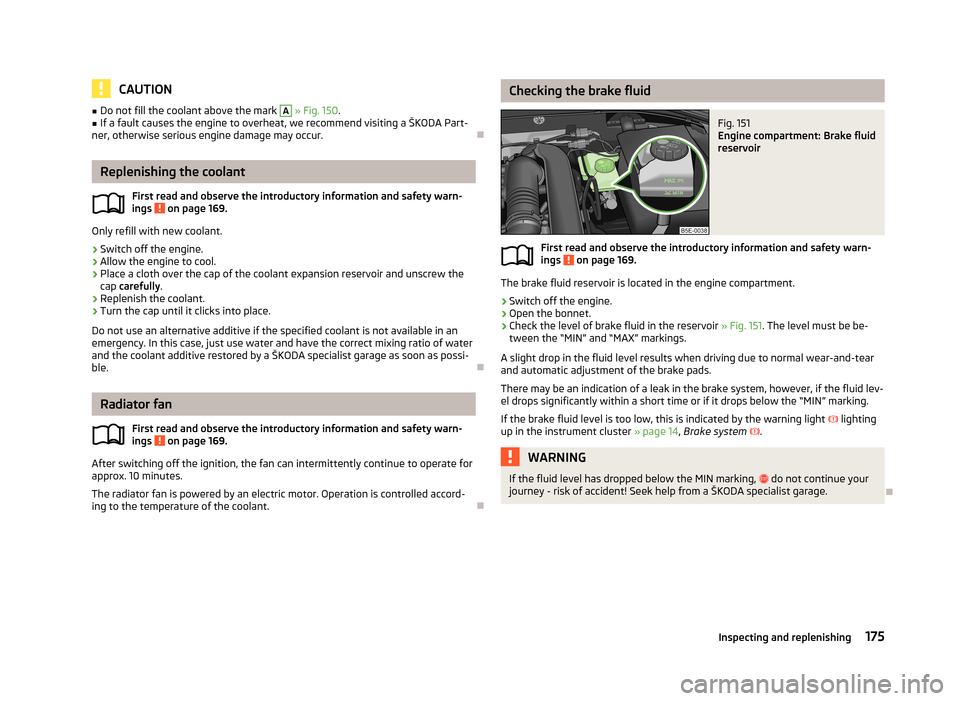
Checking the brake fluidFig. 151
Engine compartment: Brake fluid
reservoir
First read and observe the introductory information and safety warn-
ings on page 169.
The brake fluid reservoir is located in the engine compartment.
›
Switch off the engine.
›
Open the bonnet.
›
Check the level of brake fluid in the reservoir » Fig. 151. The level must be be-
tween the “MIN” and “MAX” markings.
A slight drop in the fluid level results when driving due to normal wear-and-tear and automatic adjustment of the brake pads.
There may be an indication of a leak in the brake system, however, if the fluid lev-
el drops significantly within a short time or if it drops below the “MIN” marking.
If the brake fluid level is too low, this is indicated by the warning light
lighting
up in the instrument cluster » page 14, Brake system
.
WARNINGIf the fluid level has dropped below the MIN marking, do not continue your
journey - risk of accident! Seek help from a ŠKODA specialist garage.
175Inspecting and replenishing
Page 204 of 222
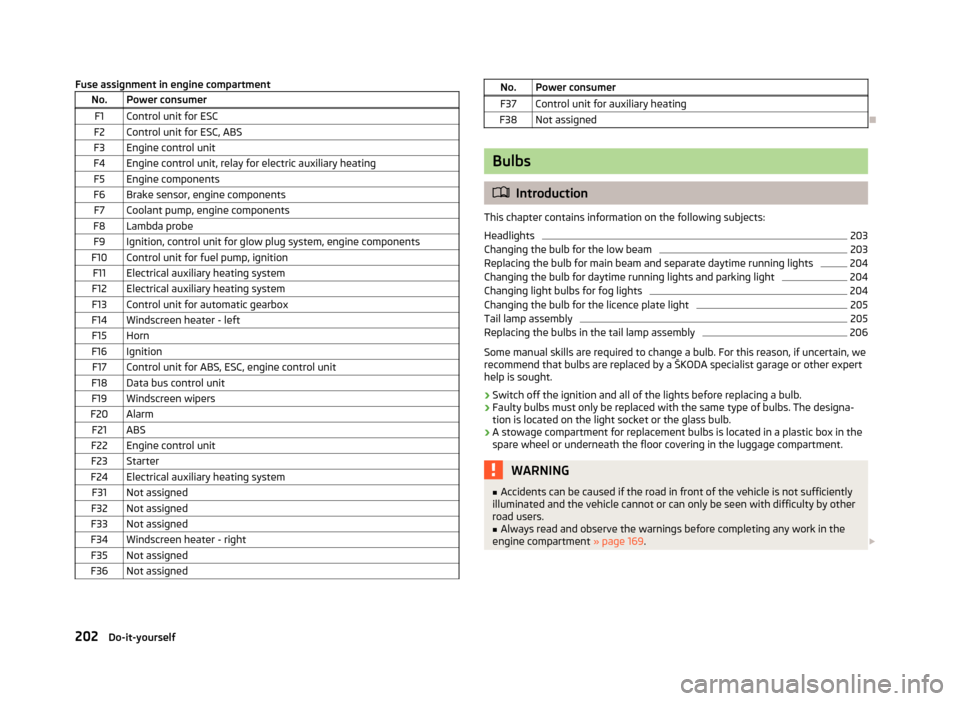
Fuse assignment in engine compartmentNo.Power consumerF1Control unit for ESCF2Control unit for ESC, ABSF3Engine control unitF4Engine control unit, relay for electric auxiliary heatingF5Engine componentsF6Brake sensor, engine componentsF7Coolant pump, engine componentsF8Lambda probeF9Ignition, control unit for glow plug system, engine componentsF10Control unit for fuel pump, ignitionF11Electrical auxiliary heating systemF12Electrical auxiliary heating systemF13Control unit for automatic gearboxF14Windscreen heater - leftF15HornF16IgnitionF17Control unit for ABS, ESC, engine control unitF18Data bus control unitF19Windscreen wipersF20AlarmF21ABSF22Engine control unitF23StarterF24Electrical auxiliary heating systemF31Not assignedF32Not assignedF33Not assignedF34Windscreen heater - rightF35Not assignedF36Not assignedNo.Power consumerF37Control unit for auxiliary heatingF38Not assigned
Bulbs
Introduction
This chapter contains information on the following subjects:
Headlights
203
Changing the bulb for the low beam
203
Replacing the bulb for main beam and separate daytime running lights
204
Changing the bulb for daytime running lights and parking light
204
Changing light bulbs for fog lights
204
Changing the bulb for the licence plate light
205
Tail lamp assembly
205
Replacing the bulbs in the tail lamp assembly
206
Some manual skills are required to change a bulb. For this reason, if uncertain, we recommend that bulbs are replaced by a ŠKODA specialist garage or other experthelp is sought.
› Switch off the ignition and all of the lights before replacing a bulb.
› Faulty bulbs must only be replaced with the same type of bulbs. The designa-
tion is located on the light socket or the glass bulb.
› A stowage compartment for replacement bulbs is located in a plastic box in the
spare wheel or underneath the floor covering in the luggage compartment.
WARNING■ Accidents can be caused if the road in front of the vehicle is not sufficiently
illuminated and the vehicle cannot or can only be seen with difficulty by other
road users.■
Always read and observe the warnings before completing any work in the
engine compartment » page 169.
202Do-it-yourself
Page 215 of 222
Central locking system29
Changes165
Changing Engine oil
173
Wheels189
Charge level indicator of the vehicle battery
11
Charge level indicator vehicle battery
11
Charging a vehicle battery179
Checking Battery electrolyte level
179
Brake fluid175
Coolant level174
Engine oil172
Oil level172
Windscreen washer fluid176
Children and safety154
Child safety Side airbag
156
Child safety lock29
Child safety seat Use of child safety seats
156
Child seat Classification
156
ISOFIX157
on the front passenger seat155
TOP TETHER158
Use of child seats157
Chrome parts refer to Taking care of your vehicle
161
Cigarette lighter70
Cleaning159
Alcantara164
Artificial leather164
Cloths164
Headlight lenses162
Material coverings164
Natural leather164
Plastic parts162
Wheels163
Climatronic86
Clock11
Clothes hooks79
Cockpit Ashtray
70
Cigarette lighter70
General view7
Light51
Sockets71
Storage compartments72
Compartments72
Computer see Multifunction display
22
Coolant Checking
174
Replenishing175
Coolant temperature gauge display
10
Correct seated position139
Counter for distance driven11
Cruise control system (CCS)119
D
Daylight driving light
44
De-icing the windscreen and rear window52
Deactivating an airbag
151
Deactivating an airbag151
Delayed locking of the boot lid see Boot lid
38
Diesel refer to Fuel
169
Diesel fuel Operation in winter
169
Diesel particulate filter18
Digital clock11
Dipstick172
Display Service interval
11
Distance driven11
Door Child safety lock
29
Door locking Emergency
36
Doors Emergency locking
36
Driving Abroad
104
Driving through water on the street104
Emissions207
Fuel consumption207
Driving mode see Select driving mode
124
E
Economical and environmentally friendly driving
101
EDL114
Electrical power windows Button in the driver's door
38, 39
Button in the rear doors40
Central locking system40
Operational faults41
Electronic differential lock (EDL)114
Electronic immobiliser93
Emergency Automatic gearbox
133
Changing a wheel189
Door locking36
Hazard warning light system49
Jump-starting195
KESSY - start engine97
Locking the driver's door36
Towing the vehicle196
Tyre repair192
Unlocking the driver's door36
Unlocking the luggage compartment lid38
Emissions207
213Index
Page 216 of 222
EngineRunning in100
Starting and stopping the engine92
Engine compartment Brake fluid
175
Coolant173
Overview172
Vehicle battery176
Engine oil Capacity
209
Changing173
Checking172
Replenishing173
Specification209
Engine revolutions counter10
Environment101
Environmental compatibility103
Environmentally friendly driving101
ESC Function
112
Warning light17
F
Fatigue detection
27
Fire extinguisher188
First-aid kit188
Footmats99
Force limiter40
Front airbag147
Front seats59
Fuel167
Diesel169
Fuel gauge display10
refer to Fuel167
Refuelling167
Unleaded petrol168
Fuel consumption101
Fuel gauge display
10
FusesAssignment199
Replacing199
G
Gear Recommended gear
21
General view Cockpit
7
Glow plug system Warning light
18
H
Handbrake
98
Head airbag150
Headlight assist47
Headlight cleaning system Headlight cleaning system
55
Headlights Driving abroad
104
Headlight cleaning system55
Head restraint63
Heating Defrosting windows
83
Exterior mirror58
operating83
Recirculated air mode84
Seats62
Windscreen and rear window52
Hill hold control (HHC)112
Horn7
Hydraulic Brake Assist (HBA)112
I
Ignition see Ignition lock
94
Ignition lock94
Immobiliser93
Inertia reel145
Information display25
Instrument cluster9
see Instrument cluster9
Interior monitor36
ISOFIX157
J
Jacking points Raise vehicle
191
Jump-starting195
K
KESSY see Kessy system
33
Starting95
KESSY system Starting
95
Unlocking the vehicle33
Keys Lock the vehicle
31
Unlock the vehicle31
Knee airbag148
L
Lane Assist
126
Lever Main beam
45
Turn signal light45
Windscreen wipers54
Light Adaptive headlights (AHL)
46
Automatic driving lamp control45
Cockpit51
COMING HOME/LEAVING HOME function49
Daylight driving light44
Fog lights48
Fog lights with the function CORNER48
214Index
Page 218 of 222
ReplenishingCoolant175
Engine oil173
Windscreen washer fluid176
Roof luggage rack Attachment points
69
Roof rack system68
Roof load69
Running-in the first 1 500 km
100
Running in Brake pads
100
Engine100
Tyres100
S
Safe securing system
30
Safety138
Child safety154
Child safety seats154
Head restraints63
ISOFIX157
TOP TETHER158
Save electrical energy101
Seat Adjusting electrically
60
Manually adjusting60
Seat belt Warning light
14, 15
Seat belt height adjuster145
Seat belts Belt tensioners
145
Cleaning165
fastening and unfastening144
Height adjustment145
Seatbelts Inertia reels
145
Seatsfolding forward63
Head restraints63
Heating62
see automatic gearbox Manual shifting of gears on the multifunction steering wheel
131
Select driving mode124
Selector lever see selector lever positions
130
Selector lever positions130
Service display11
setting Auxiliary heating (auxiliary heating and ventila- tion)
90
Setting Manual air conditioning system
85
Steering wheel93
Setting the clock11
Shifting Diving economically
101
Gearshift lever99
Side airbag149
Sliding/tilting roof Closing
41
Opening and tilting41
Operating41
Snow chains186
Spare wheel184
Speedometer10
Speed symbol see Wheels
183
Stabilisation Control (ESC)112
START/STOP Function
121
Starting engine Jump-starting
195
Starting the engine92
START STOP Jump-starting
196
Steering force assistance93
Steering wheel93
Stopping off the engine92
Storage72
Storage compartments72
Sun screen53
Sun visors53
Switching lights on and off44
T
Tachometer see Speedometer
10
Taking care of the vehicle Material coverings
164
Natural leather164
Seat belts165
Taking care of your vehicle159
Automatic car wash system160
Chrome parts161
Cleaning the wheels163
Door lock cylinders163
Headlight lenses162
High-pressure cleaner161
Plastic parts162
Polishing the paintwork161
Preservation161
Rubber seals163
Washing160
Washing by hand160
Wash system160
TCS Function
113
Warning light16
Technical data207
Through-loading bag77
Through-loading channel77
Tiptronic131
Tool188
TOP TETHER158
216Index