turn signal SKODA OCTAVIA 2012 2.G / (1Z) User Guide
[x] Cancel search | Manufacturer: SKODA, Model Year: 2012, Model line: OCTAVIA, Model: SKODA OCTAVIA 2012 2.G / (1Z)Pages: 222, PDF Size: 13.52 MB
Page 47 of 222
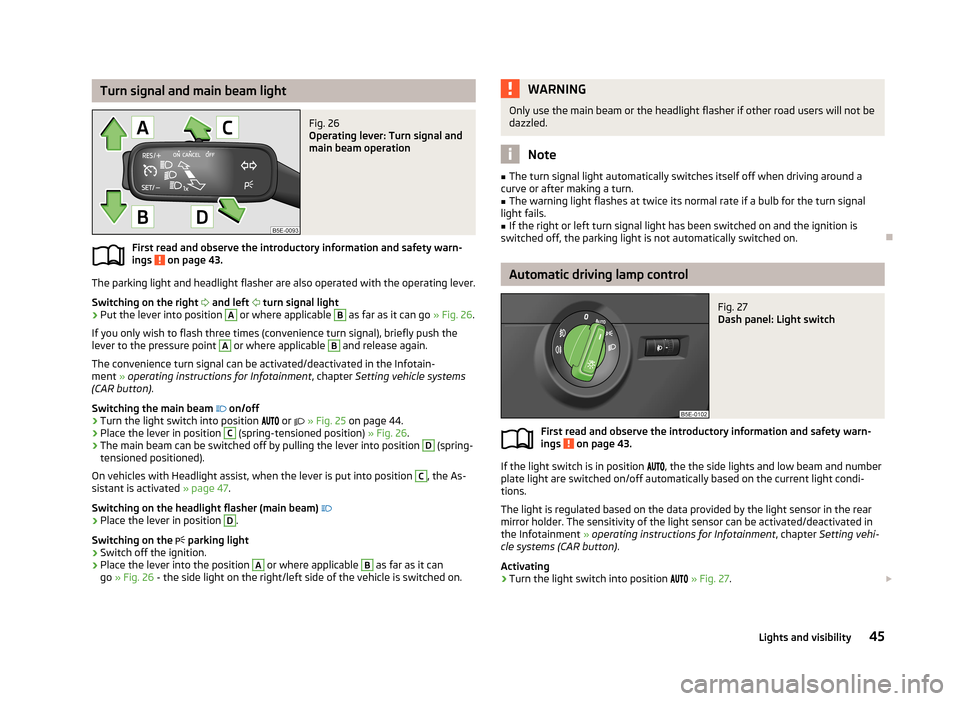
Turn signal and main beam lightFig. 26
Operating lever: Turn signal and
main beam operation
First read and observe the introductory information and safety warn-
ings on page 43.
The parking light and headlight flasher are also operated with the operating lever.
Switching on the right
and left
turn signal light
›
Put the lever into position
A
or where applicable
B
as far as it can go » Fig. 26.
If you only wish to flash three times (convenience turn signal), briefly push the
lever to the pressure point
A
or where applicable
B
and release again.
The convenience turn signal can be activated/deactivated in the Infotain-
ment » operating instructions for Infotainment , chapter Setting vehicle systems
(CAR button) .
Switching the main beam
on/off
›
Turn the light switch into position
or
» Fig. 25 on page 44.
›
Place the lever in position
C
(spring-tensioned position) » Fig. 26.
›
The main beam can be switched off by pulling the lever into position
D
(spring-
tensioned positioned).
On vehicles with Headlight assist, when the lever is put into position
C
, the As-
sistant is activated » page 47.
Switching on the headlight flasher (main beam)
›
Place the lever in position
D
.
Switching on the
parking light
›
Switch off the ignition.
›
Place the lever into the position
A
or where applicable
B
as far as it can
go » Fig. 26 - the side light on the right/left side of the vehicle is switched on.
WARNINGOnly use the main beam or the headlight flasher if other road users will not be
dazzled.
Note
■ The turn signal light automatically switches itself off when driving around a
curve or after making a turn.■
The warning light flashes at twice its normal rate if a bulb for the turn signal
light fails.
■
If the right or left turn signal light has been switched on and the ignition is
switched off, the parking light is not automatically switched on.
Automatic driving lamp control
Fig. 27
Dash panel: Light switch
First read and observe the introductory information and safety warn-
ings on page 43.
If the light switch is in position
, the the side lights and low beam and number
plate light are switched on/off automatically based on the current light condi- tions.
The light is regulated based on the data provided by the light sensor in the rear
mirror holder. The sensitivity of the light sensor can be activated/deactivated in the Infotainment » operating instructions for Infotainment , chapter Setting vehi-
cle systems (CAR button) .
Activating
›
Turn the light switch into position
» Fig. 27 .
45Lights and visibility
Page 50 of 222
WARNINGHeadlight assist only functions as a support and does not relieve the driver of
his responsibility to check the headlights and light beam and, if necessary, to
switch on the lights depending on the light conditions. Manual operation may be required in the following situations:■
in poor visibility conditions, e.g. fog, heavy rain, thick snowfall;
■
on A roads or motorways when oncoming traffic is partially obscured;
■
when passing poorly lit traffic, e.g. cyclists;
■
around sharp curves;
■
on sharp slopes up/down;
■
while driving through poorly-lit villages;
■
while driving over highly reflective surfaces;
■
when the windscreen around the camera is dirty, iced up, misted up, or cov-
ered up by stickers;
■
when an external navigation system is attached to the windscreen.
CAUTION
■ Do not attach any stickers or similar objects to the windscreen to avoid impair-
ing the functions of the Assist system.
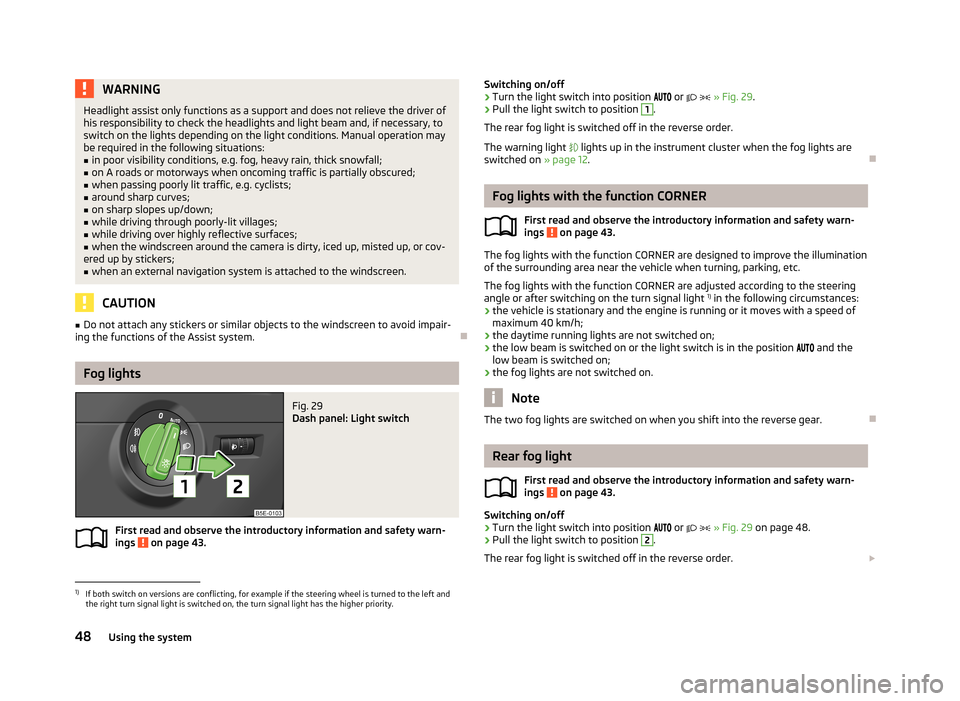
Fog lights
Fig. 29
Dash panel: Light switch
First read and observe the introductory information and safety warn- ings on page 43.
Switching on/off›Turn the light switch into position or » Fig. 29 .›
Pull the light switch to position
1
.
The rear fog light is switched off in the reverse order.
The warning light lights up in the instrument cluster when the fog lights are
switched on » page 12.
Fog lights with the function CORNER
First read and observe the introductory information and safety warn-
ings
on page 43.
The fog lights with the function CORNER are designed to improve the illumination
of the surrounding area near the vehicle when turning, parking, etc.
The fog lights with the function CORNER are adjusted according to the steeringangle or after switching on the turn signal light 1)
in the following circumstances:
› the vehicle is stationary and the engine is running or it moves with a speed of
maximum 40 km/h;
› the daytime running lights are not switched on;
› the low beam is switched on or the light switch is in the position
and the
low beam is switched on;
› the fog lights are not switched on.
Note
The two fog lights are switched on when you shift into the reverse gear.
Rear fog light
First read and observe the introductory information and safety warn-
ings
on page 43.
Switching on/off
›
Turn the light switch into position
or
» Fig. 29 on page 48.
›
Pull the light switch to position
2
.
The rear fog light is switched off in the reverse order.
1)
If both switch on versions are conflicting, for example if the steering wheel is turned to the left and
the right turn signal light is switched on, the turn signal light has the higher priority.
48Using the system
Page 52 of 222
All the turn signal lights on the vehicle flash at the same time when the hazard
warning light system is switched on. The warning light for the turn signals and
the warning light in the button also flash at the same time. The hazard warning
light system can also be operated if the ignition is switched off.
If one of the airbags is deployed, the hazard warning light system will switch on
automatically.
When the turn signal is switched on while the hazard warning light system is on
(ignition on), only the turn signal light for the selected driving direction will flash
while the turn signal is switched on.
Note
The hazard warning light system must be switched on if, for example:■you encounter a traffic congestion;■
your car breaks down.
50Using the system
Page 92 of 222
After switching off the auxiliary heating, the coolant pump runs for a short period.
The auxiliary heater does not switch on: › when the following appears in the instrument cluster display, or the the follow-
ing was displayed before the ignition was turned off: Please refuel. Range: ...
km or PLEASE REFUEL ;
› when the charge state of the vehicle battery is too low;
› when no pre-set time is activated.
setting
First read and observe the introductory information and safety warn-
ings
on page 88.
Information on the setting » Bedienungsanleitung Infotainment, chapter Setting
vehicle systems (CAR button) .
Before the setting is started, check the correct time and date settings.
Checking the settings
When the departure time is activated, the indicator light in the button
lights up
for around 10 seconds after the ignition is turned off.
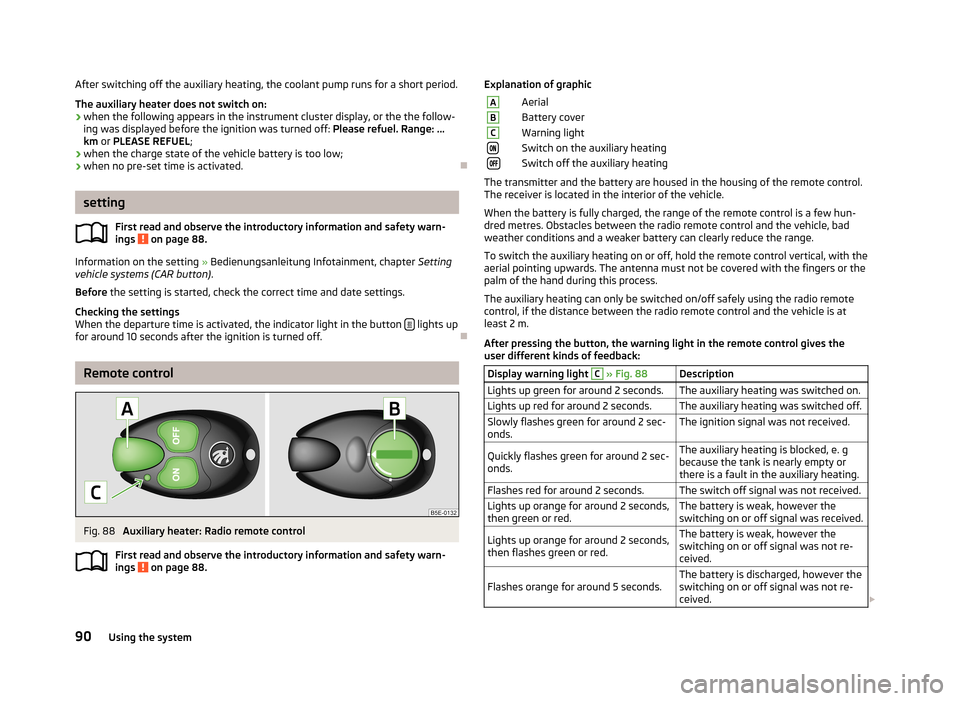
Remote control
Fig. 88
Auxiliary heater: Radio remote control
First read and observe the introductory information and safety warn-
ings
on page 88.
Explanation of graphicAAerialBBattery coverCWarning lightSwitch on the auxiliary heatingSwitch off the auxiliary heating
The transmitter and the battery are housed in the housing of the remote control.
The receiver is located in the interior of the vehicle.
When the battery is fully charged, the range of the remote control is a few hun-
dred metres. Obstacles between the radio remote control and the vehicle, bad
weather conditions and a weaker battery can clearly reduce the range.
To switch the auxiliary heating on or off, hold the remote control vertical, with the
aerial pointing upwards. The antenna must not be covered with the fingers or the palm of the hand during this process.
The auxiliary heating can only be switched on/off safely using the radio remote control, if the distance between the radio remote control and the vehicle is at
least 2 m.
After pressing the button, the warning light in the remote control gives the
user different kinds of feedback:
Display warning light C » Fig. 88DescriptionLights up green for around 2 seconds.The auxiliary heating was switched on.Lights up red for around 2 seconds.The auxiliary heating was switched off.Slowly flashes green for around 2 sec-
onds.The ignition signal was not received.Quickly flashes green for around 2 sec-
onds.The auxiliary heating is blocked, e. g
because the tank is nearly empty or
there is a fault in the auxiliary heating.Flashes red for around 2 seconds.The switch off signal was not received.Lights up orange for around 2 seconds,
then green or red.The battery is weak, however the
switching on or off signal was received.Lights up orange for around 2 seconds,
then flashes green or red.The battery is weak, however the
switching on or off signal was not re-
ceived.Flashes orange for around 5 seconds.The battery is discharged, however the
switching on or off signal was not re-
ceived. 90Using the system
Page 118 of 222
CAUTION■If a warning signal sounds for about 3 seconds after activating the system and
there is no obstacle close to your car, this indicates a system fault. The fault is
confirmed additionally when the symbol flashes in the button
.
! is displayed
in the error area of the Infotainment display. Have the fault rectified by a ŠKODA
specialist garage.
■
The sensors must be kept clean (free of ice, etc.) to enable the parking aid to
operate properly.
Note
■ The signal tones for front obstacle recognition are factory-set to be higher than
for rear obstacle recognition.■
If not all fields around the vehicle are shown after the system is activated, the
vehicle will need to be moved a few metres forwards or in reverse.
■
If the parking aid is activated and the selector lever of the automatic gearbox is
in the position P (the vehicle cannot move), the warning signal is interrupted and
no obstacles are displayed.
■
Additional mounted modules, such as a bicycle carrier, can impair the function of
the parking aid.
Park Assist
Introduction
This chapter contains information on the following subjects:
finding a parking space
117
Parking the vehicle
117
Manoeuvring out of a parallel parking space
118
Automatic brake assist
118
Information for the driver
119
The parking aid is part of the park assist system, therefore the information and
safety guidelines » page 114, Parking aid must be read and observed.
Park Assist (in the following referred to as the system) helps drivers park in suita- ble parallel and perpendicular parking places and also to manoeuvre out of paral- lel parking spaces.
The system only operates if the ignition is switched on.
During the parking procedure the system only takes over the steering move- ments, the pedals continue to be operated by the driver.
When the system is activated,
the warning light
» Fig. 109 on page 117 -
lights up in the button.
The traction control system (TCS) must always be switched on when parking.
The function of the system is based on: › the measurement and evaluation of the size of parking spaces when driving,
› the determination of the correct position of the vehicle for parking,
› the calculation of the line on which the vehicle drives backwards into the park-
ing space or forwards from the parking space;
› the automatic turning of the front wheels when parking in, or manoeuvring out
of the parking space.
WARNING■ The system does not exempt the driver from his/her responsibility for park-
ing in and manoeuvring out of the parking space.■
External sound sources can have a detrimental effect on parking in and ma-
noeuvring out of the parking space. Under unfavourable conditions, objects or
people may not be recognised.
■
When parking in, and manoeuvring out of parking spaces, the system auto-
matically executes quick steering movements. While it is doing so, do not place your hands between the steering wheel - risk of injury!
CAUTION
■ If other vehicles are parked behind or on the kerb, the system guides your vehi-
cle beyond the kerb or onto it. Ensure that the wheels or the wheel rims of your
vehicle are not damaged and if necessary intervene in time.■
Under certain circumstances, surfaces or structures of certain objects such as
wire mesh fences, powder snow, etc., cannot be recognised by the system.
■
The evaluation of the parking space and the parking procedure depends on the
circumference of the wheels. The system only works correctly if the vehicle is fit-
ted with the wheel size approved by the manufacturer. If wheels other than those approved by the manufacturer are mounted, the resulting position of the
vehicle in the parking space can differ slightly. This can be avoided by readjusting
the system at a ŠKODA specialist garage. Under certain circumstances, the sys-
tem may not function correctly, for example, if the vehicle is fitted with snow chains or a temporary spare wheel.
116Using the system
Page 119 of 222
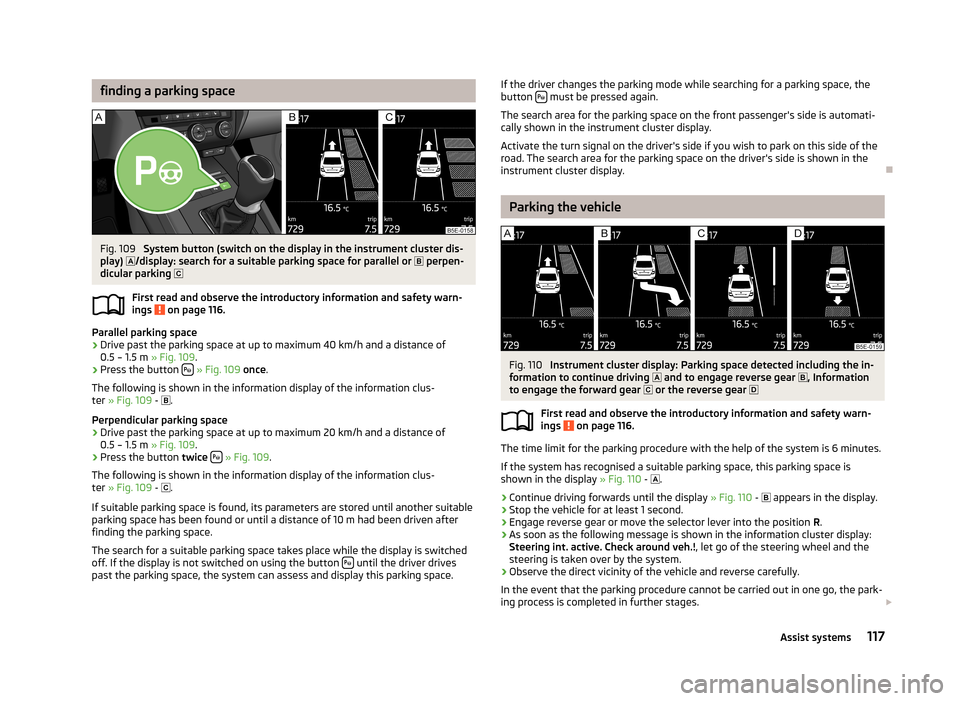
finding a parking spaceFig. 109
System button (switch on the display in the instrument cluster dis-
play) /display: search for a suitable parking space for parallel or
perpen-
dicular parking
First read and observe the introductory information and safety warn- ings
on page 116.
Parallel parking space
›
Drive past the parking space at up to maximum 40 km/h and a distance of 0.5 – 1.5 m » Fig. 109.
›
Press the button
» Fig. 109 once .
The following is shown in the information display of the information clus- ter » Fig. 109 -
.
Perpendicular parking space
›
Drive past the parking space at up to maximum 20 km/h and a distance of 0.5 – 1.5 m » Fig. 109.
›
Press the button twice
» Fig. 109 .
The following is shown in the information display of the information clus-
ter » Fig. 109 -
.
If suitable parking space is found, its parameters are stored until another suitable
parking space has been found or until a distance of 10 m had been driven after finding the parking space.
The search for a suitable parking space takes place while the display is switched
off. If the display is not switched on using the button
until the driver drives
past the parking space, the system can assess and display this parking space.
If the driver changes the parking mode while searching for a parking space, the
button must be pressed again.
The search area for the parking space on the front passenger's side is automati-
cally shown in the instrument cluster display.
Activate the turn signal on the driver's side if you wish to park on this side of the road. The search area for the parking space on the driver's side is shown in the
instrument cluster display.
Parking the vehicle
Fig. 110
Instrument cluster display: Parking space detected including the in-
formation to continue driving and to engage reverse gear
, Information
to engage the forward gear or the reverse gear
First read and observe the introductory information and safety warn- ings
on page 116.
The time limit for the parking procedure with the help of the system is 6 minutes.
If the system has recognised a suitable parking space, this parking space is
shown in the display » Fig. 110 -
.
›
Continue driving forwards until the display » Fig. 110 -
appears in the display.
›
Stop the vehicle for at least 1 second.
›
Engage reverse gear or move the selector lever into the position R.
›
As soon as the following message is shown in the information cluster display:
Steering int. active. Check around veh.! , let go of the steering wheel and the
steering is taken over by the system.
›
Observe the direct vicinity of the vehicle and reverse carefully.
In the event that the parking procedure cannot be carried out in one go, the park- ing process is completed in further stages.
117Assist systems
Page 120 of 222
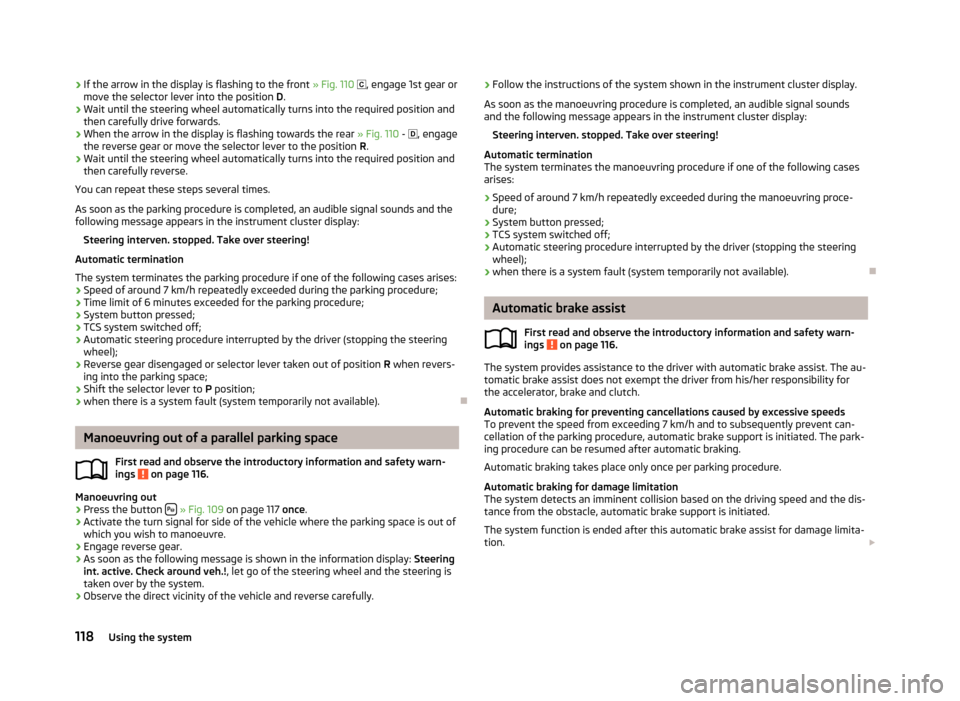
›If the arrow in the display is flashing to the front
» Fig. 110 , engage 1st gear or
move the selector lever into the position D.›
Wait until the steering wheel automatically turns into the required position and
then carefully drive forwards.
›
When the arrow in the display is flashing towards the rear » Fig. 110 - , engage
the reverse gear or move the selector lever to the position R.
›
Wait until the steering wheel automatically turns into the required position and
then carefully reverse.
You can repeat these steps several times.
As soon as the parking procedure is completed, an audible signal sounds and the
following message appears in the instrument cluster display:
Steering interven. stopped. Take over steering!
Automatic termination
The system terminates the parking procedure if one of the following cases arises: › Speed of around 7 km/h repeatedly exceeded during the parking procedure;
› Time limit of 6 minutes exceeded for the parking procedure;
› System button pressed;
› TCS system switched off;
› Automatic steering procedure interrupted by the driver (stopping the steering
wheel);
› Reverse gear disengaged or selector lever taken out of position
R when revers-
ing into the parking space;
› Shift the selector lever to
P position;
› when there is a system fault (system temporarily not available).
Manoeuvring out of a parallel parking space
First read and observe the introductory information and safety warn-
ings
on page 116.
Manoeuvring out
›
Press the button
» Fig. 109 on page 117 once.
›
Activate the turn signal for side of the vehicle where the parking space is out of
which you wish to manoeuvre.
›
Engage reverse gear.
›
As soon as the following message is shown in the information display: Steering
int. active. Check around veh.! , let go of the steering wheel and the steering is
taken over by the system.
›
Observe the direct vicinity of the vehicle and reverse carefully.
› Follow the instructions of the system shown in the instrument cluster display.
As soon as the manoeuvring procedure is completed, an audible signal sounds
and the following message appears in the instrument cluster display:
Steering interven. stopped. Take over steering!
Automatic termination
The system terminates the manoeuvring procedure if one of the following cases
arises:
› Speed of around 7 km/h repeatedly exceeded during the manoeuvring proce-
dure;
› System button pressed;
› TCS system switched off;
› Automatic steering procedure interrupted by the driver (stopping the steering
wheel);
› when there is a system fault (system temporarily not available).
Automatic brake assist
First read and observe the introductory information and safety warn-
ings
on page 116.
The system provides assistance to the driver with automatic brake assist. The au-
tomatic brake assist does not exempt the driver from his/her responsibility for
the accelerator, brake and clutch.
Automatic braking for preventing cancellations caused by excessive speeds
To prevent the speed from exceeding 7 km/h and to subsequently prevent can-
cellation of the parking procedure, automatic brake support is initiated. The park-
ing procedure can be resumed after automatic braking.
Automatic braking takes place only once per parking procedure.
Automatic braking for damage limitationThe system detects an imminent collision based on the driving speed and the dis-
tance from the obstacle, automatic brake support is initiated.
The system function is ended after this automatic brake assist for damage limita-tion.
118Using the system
Page 121 of 222
WARNING■Automatic brake assist only works as an element of the assist function. The
driver must always be ready to brake the vehicle him/herself.■
Automatic brake assist is ended after around 1.5 seconds. Depress the brak-
ing pedal so that the vehicle does not start moving by itself.
Information for the driver
First read and observe the introductory information and safety warn-ings
on page 116.
The information for the driver appears in the instrument cluster display.
Park Assist stopped. Speed too high.
The speed under 40 km/h (parallel parking) /20 km/h (perpendicular parking). This
message is only displayed at speeds up to around 50 km/h. When the speed ex-
ceeds 50 km/h, activate the system again with the button
.
Speed too high. Take over steering!
The parking procedure was ended because the speed was exceeded. Park with a
max. speed of 7 km/h.
Park Assist stopped. Driver steer. intervent.
The parking procedure is terminated due to a driver steering intervention.
Park Assist stopped. ASR deactivated.
The parking procedure cannot be carried out because the TCS system is deactiva-
ted. Activate the TCS.
ASR deactivated. Take over steering!
The parking procedure was ended because TCS was deactivated during the park-
ing procedure.
Trailer: Park Assist stopped.
The parking procedure cannot be carried out because a trailer is hitched.
Time limit exceeded. Take over steering! The parking procedure was ended because the time limit of 6 minutes waspassed.
Park Assist currently not available.
The system cannot be activated because a fault exists on the vehicle. Seek help
from a ŠKODA specialist garage.
Park Assist stopped. currently not available.
The parking procedure was ended because a fault exists on the vehicle. Seek help
from a ŠKODA specialist garage.
Park Assist faulty. Workshop!
The parking procedure is not possible because a fault exists in the system. Seek help from a ŠKODA specialist garage.
Park Assist stopped. Take over steering!
Assume control of the steering. Complete the parking procedure without using the system.
ASR intervention. Take over steering!
The parking procedure is terminated by a TCS intervention.
Park Assist: indicate and engage reverse!
The prerequisites for manoeuvring out of a parking space using the system have
been met. Switch on the turn signals and shift into reverse.
Please take over steering and drive on.
The manoeuvring procedure out of a parallel parking space has ended. Assume
control of the steering.
Aut. parking space exit not possible. Space too small.
The manoeuvring procedure using the system is not possible. The parking gap is
too small.
Braking intervention. Speed too high.
The driving speed during the parking procedure was too high - automatic brake
assist is initiated.
Cruise control system (CCS)
Introduction
This chapter contains information on the following subjects: Storing a speed
120
Changing a stored speed
120
Switching off the cruise control system temporarily
121
Switching off the cruise control system completely
121
Displays in the instrument cluster display
121
119Assist systems
Page 129 of 222
Where necessary, the system only performs a steering intervention when the
boundary line is detected on at least one side of the lane.
If the turn signal is switched on prior to driving over the boundary line (e.g. whenmaking a turn), no steering intervention takes place when the vehicle approaches
the boundary line. The system regards the situation as an intended lane change.
The system works above speeds of 65 km/h and is designed for driving on motor-ways and streets with high-quality markings (the boundary lines must have high
visibility).
Adaptive lane assist
Using steering intervention, the system helps to keep the selected distance from the boundary lines on both sides of the vehicle. A steering intervention is only
made when the boundary lines are detected on both sides of the vehicle.
If the position within the lane is changed, the system quickly adapts and holds
the newly-selected position.
Adaptive lane assist can be activated/deactivated in the Infotainment » operating
instructions for Infotainment , chapter Setting vehicle systems (CAR button) .
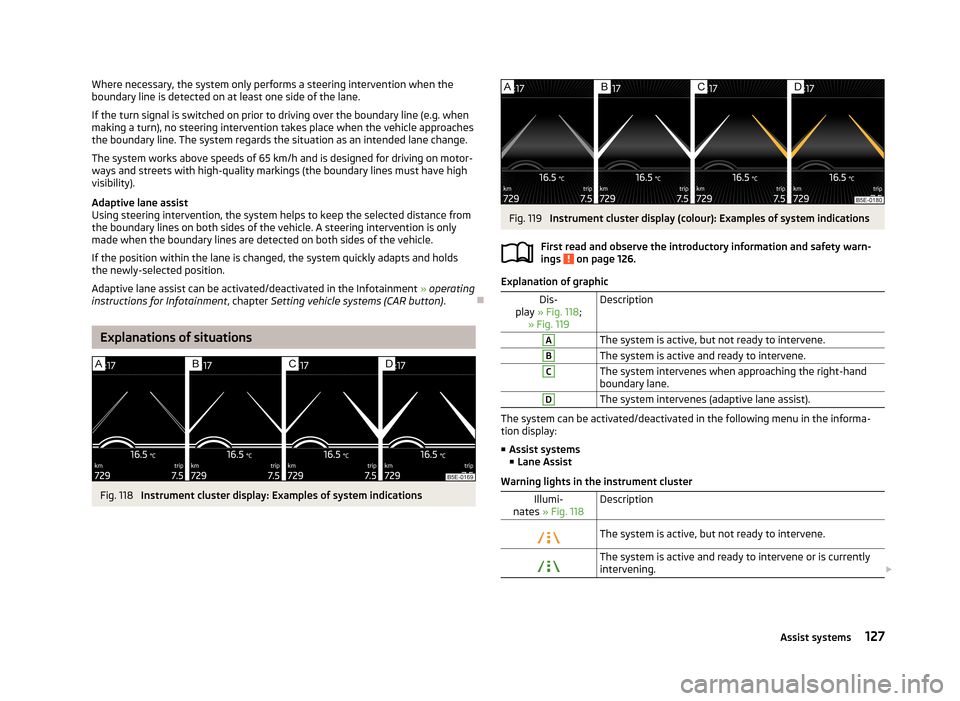
Explanations of situations
Fig. 118
Instrument cluster display: Examples of system indications
Fig. 119
Instrument cluster display (colour): Examples of system indications
First read and observe the introductory information and safety warn-
ings
on page 126.
Explanation of graphic
Dis-
play » Fig. 118 ;
» Fig. 119DescriptionAThe system is active, but not ready to intervene.BThe system is active and ready to intervene.CThe system intervenes when approaching the right-hand boundary lane.DThe system intervenes (adaptive lane assist).
The system can be activated/deactivated in the following menu in the informa-
tion display:
■ Assist systems
■ Lane Assist
Warning lights in the instrument cluster
Illumi-
nates » Fig. 118DescriptionThe system is active, but not ready to intervene.The system is active and ready to intervene or is currently
intervening. 127Assist systems
Page 140 of 222
Safety
Passive Safety
General information
Introduction
This chapter contains information on the following subjects:
Safety equipment
138
Before setting off
138
What influences the driving safety?
139
In this section you will find important information, tips and notes on the subject
of passive safety in your vehicle. We have combined everything here which you
should be familiar with, for example, regarding seat belts, airbags, child seats and safety of children. It is therefore important, in particular, to comply with the notes
and warnings in this section for your own interest and in the interest of those
travelling with you.
WARNING■ This chapter contains important information on how to use the vehicle for
the driver and his occupants. You will find further information on safety, which concerns you and those travelling with you, in the following chapters of this
Owner's Manual.■
The complete on-board literature should always be in the vehicle. This ap-
plies in particular, if you rent out or sell the vehicle.
Safety equipment
First read and observe the introductory information and safety warn-ings
on page 138.
The following list contains part of the safety equipment in your vehicle:
› three-point seat belts for all the seats;
› belt force limiters for the front seats;
›
belt tensioners for front seats;
› seat belt height adjusters for front seats;
› Front airbag for the driver and the front seat passenger;
› driver’s knee airbag;
› front side airbags;
› rear side airbags;
› head airbags;
› anchoring points for child seat using the ISOFIX system;
› anchoring points for child seat using the TOP TETHER system;
› head restraints adjustable for height;
› adjustable steering column.
The specified safety equipment works together, in order to optimally protect you
and those travelling with you in accident situations. The safety equipment does
not protect you or the people travelling with you, if you or your occupants adopt
an incorrect seated position or the equipment is not correctly adjusted or used. If
the seat belt is not fastened properly, this may result in injuries during an acci-
dent caused by the deployed airbag.
Before setting off
First read and observe the introductory information and safety warn-
ings
on page 138.
For your own safety and the safety of the people travelling with you, please pay
attention to the following points before setting off.
› Ensure that the lighting and the turn signal system are functioning properly.
› Check the tyre inflation pressure.
› Ensure that all of the windows offer good visibility to the outside.
› Secure all items of luggage
» page 64, Boot .
› Ensure that no objects can obstruct the pedals.
› Adjust the mirrors, the front seat and head restraint to your body size.
› Advise your passengers to adjust the head restraints to their body size.
› Protect children in suitable child seats with correctly fastened seat
belts » page 154 , Transporting children safely .
› Adopt the correct seated position
» page 139, Correct seated position . Tell your
passengers to assume the correct seated position.
› Correctly fasten the seat belt. Also inform passengers to fasten the seat belt
correctly » page 142 , Seat belts .
138Safety