ECO mode SKODA OCTAVIA 2012 3.G / (5E) Owner's Guide
[x] Cancel search | Manufacturer: SKODA, Model Year: 2012, Model line: OCTAVIA, Model: SKODA OCTAVIA 2012 3.G / (5E)Pages: 222, PDF Size: 13.52 MB
Page 89 of 222
Switch automatic mode on/off » page 87
Switch the cooling system on/off » page 87
Note
The interior temperature sensor is located between the buttons and SETUP.
Do not stick anything on or cover the sensor, otherwise it could have an unfav-
ourable effect on the Climatronic.
Automatic mode
Automatic mode works in three modes - weak, medium, and intensive.
Information on the setting » Bedienungsanleitung Infotainment, chapter Addi-
tional functions (CAR button) .
Switching on
›
Set the temperature between +16 °C and +29 °C using the control dials
A
and
C
» Fig. 86 on page 86.
›
Press the button AUTO and the indicator light in the button illuminates.
Switching off
›
Press any button for the air distribution or increase/reduce the blower speed.
After the Climatronic is switched on, it works in the last selected mode. The currently selected mode is displayed in the Infotainment display.Climatronic is set to the medium setting by default.
Note
We recommend that you adjust the air outlet vents 3 and 4 » Fig. 82 on page 82,
so that the air flow is directed slightly upwards.
Switch cooling system on/off
›
Press the button and the indicator light in the button illuminates.
›
Pressing the button
again switches off the cooling system - the indicator
light in the button goes out.
After the cooling system is switched off, only the ventilation function remains ac-
tive whereby the minimum temperature that can be reached is the outside tem-
perature.
AUTOSetting temperature
The interior temperature for the left and right side can be set separately or to-
gether.
For both sides›
Turn the control dial
A
» Fig. 86 on page 86 to the left or right to increase or
decrease the temperature.
The warning light in the button DUAL
goes out.
For the right side
›
Turn the control dial
C
» Fig. 86 on page 86 to the left or right to increase or
decrease the temperature.
The indicator light lights up in the DUAL
button.
If the indicator light in the button DUAL
is illuminated, the temperature for both
sides cannot be set with the control dial
A
. This function can be restored by
pressing the button DUAL. The warning light in the button goes out.
The interior temperature can be set between +16 ℃ and +29 ℃. The interior tem-
perature is regulated automatically within this range.
If a temperature lower than +16 ℃ is selected, a blue symbol lights up on the con-
trol dial.
If a temperature higher than +29 ℃ is selected, a red symbol lights up on the con-
trol dial.
At both end positions, Climatronic runs at maximum cooling/heating output and
the temperature is automatically not regulated.
CAUTION
Lengthy and uneven distribution of the air flow out of the vents (especially
around the feet) and large differences in temperature, for example, when getting
out of the vehicle, can cause susceptible individuals to catch a cold.
Automatic recirculated air mode
Recirculated air mode largely prevents polluted air from outside the vehicle get- ting into the vehicle, for example, when driving through a tunnel or when stand-
ing in a traffic jam.
87Heating and air conditioning system
Page 90 of 222
If a considerable increase in concentration of pollutants is recognised by the air
quality sensor, recirculated air mode will temporarily be switched off.
If the concentration of pollutants decreases to the normal level, the air distribu-
tion control is automatically switched off so that fresh air can be guided into the
vehicle interior.
In recirculated air mode air is sucked out of the interior of the vehicle and then
fed back into the interior. When the automatic air distribution control is switched on, an air quality sensor measures the concentration of pollutants in the drawn inair.
If the air quality sensor does not switch on automatic recirculated air mode when there is an unpleasant smell, you can switch in on manually.
Switching on/off›
Press the button and the warning light underneath the button illuminates.
›
Press the button again, the warning light underneath the button goes out,
where necessary press the button AUTO.
You can also switch the system on/off in he Infotainment » Bedienungsanleitung
Infotainment, chapter Setting vehicle systems (CAR button) .
WARNINGDo not leave recirculated air mode on over a longer period of time, as “stale”
air can cause fatigue of the driver and passengers, reduce attention levels and
also cause the windows to mist up. The risk of having an accident increases.
Switch off recirculated air mode as soon as the windows start to mist up.
Note
■ If the windscreen mists up, press the button . Press the button AUTO when
the windscreen is demisted.■
The automatic air distribution control operates only if the outside temperature
is higher than approx. 2 °C.
Controlling blower
The blower stage can be manually adapted to suit your particular needs.
›
Turn the control dial
B
» Fig. 86 on page 86 to the left or right to increase or
decrease the blower speed.
If the blower speed is reduced to a minimum, Climatronic is switched off.
The set blower speed is displayed in the control dial B when the respective num-
ber of warning lights come on.WARNING■ “Stale air” may result in fatigue in the driver and occupants, reduce attention
levels and also cause the windows to mist up. The risk of having an accident
increases.■
Do not switch off the Climatronic system for longer than necessary.
■
Switch on the Climatronic system as soon as the windows mist up.
Defrosting windscreen
Switching on/off
›
Press the button
» Fig. 86 on page 86.
›
Press the button or the button
AUTO again.
More air flows out of the air outlet vents 1 » Fig. 82 on page 82. The temperature
control is controlled automatically.
Auxiliary heating (auxiliary heating and ventilation)
Introduction
This chapter contains information on the following subjects:
Switching on/off
89
setting
90
Remote control
90
Replacing the battery in the remote control
91
Function prerequisites when switching on:
› Comfort temperature has been set;
› The blower is switched on;
› the air outlet vents are opened;
› The air outlet is set to position
or
.
Auxiliary heating (parking heating) › It can be used when stationary, when the engine is switched off to preheat the
vehicle and while driving (e.g. during the heating phase of the engine);
› It works in tandem with the hearer, air-conditioning system or Climatronic;
88Using the system
Page 95 of 222
Note■The engine can only be started with a genuine ŠKODA key with the matching
code.■
The engine running noises may louder at first be louder for a short time after
starting the cold engine. This is quite normal and is not an operating problem.
■
After switching off the ignition, the radiator fan can intermittently continue to
operate for approx. 10 minutes.
■
If the engine also does not start after the second attempt, the fuse for the elec-
tric fuel pump (in petrol engines) or the control unit for the glow plug system or
glow plug system relay and fuel pump (in diesel engines) could be faulty. Check
the fuse and replace, if necessary » page 199 or seek assistance from a ŠKODA
specialist garage.
■
We recommend locking the steering wheel whenever leaving the vehicle. This
acts as a deterrent against the attempted theft of your car.
Adjusting the steering wheel position
Fig. 89
Adjustable steering wheel: Lever below the steering wheel/safe dis-
tance to the steering wheel
First read and observe the introductory information and safety warn-
ings
on page 92.
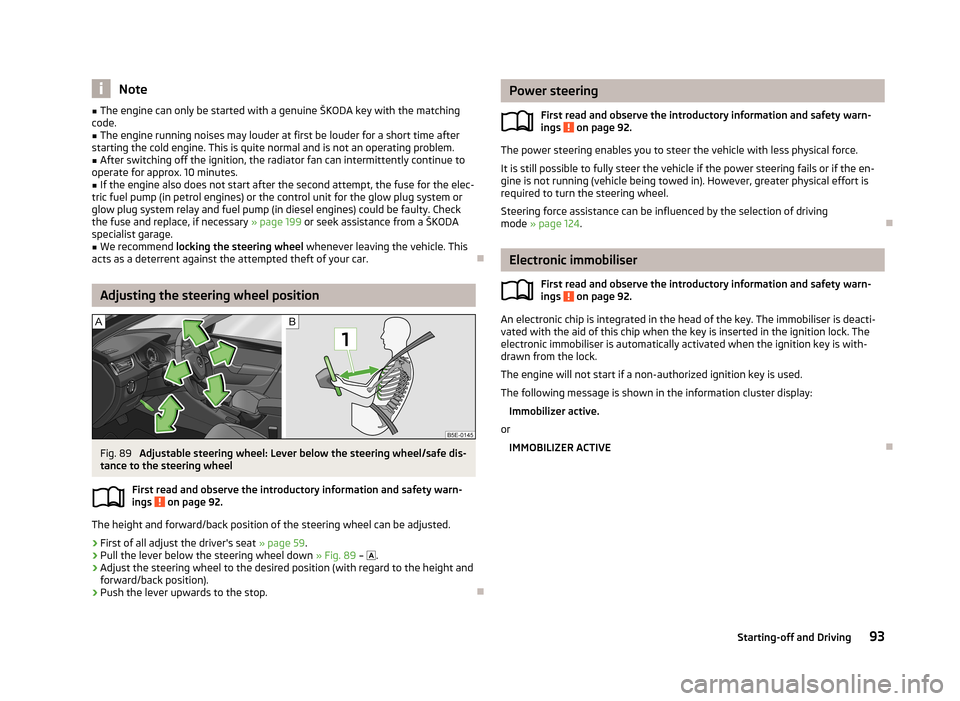
The height and forward/back position of the steering wheel can be adjusted.
›
First of all adjust the driver's seat » page 59.
›
Pull the lever below the steering wheel down » Fig. 89 –
.
›
Adjust the steering wheel to the desired position (with regard to the height and
forward/back position).
›
Push the lever upwards to the stop.
Power steering
First read and observe the introductory information and safety warn-ings
on page 92.
The power steering enables you to steer the vehicle with less physical force.
It is still possible to fully steer the vehicle if the power steering fails or if the en- gine is not running (vehicle being towed in). However, greater physical effort is
required to turn the steering wheel.
Steering force assistance can be influenced by the selection of driving
mode » page 124 .
Electronic immobiliser
First read and observe the introductory information and safety warn-
ings
on page 92.
An electronic chip is integrated in the head of the key. The immobiliser is deacti-
vated with the aid of this chip when the key is inserted in the ignition lock. The
electronic immobiliser is automatically activated when the ignition key is with-
drawn from the lock.
The engine will not start if a non-authorized ignition key is used.
The following message is shown in the information cluster display: Immobilizer active.
or
IMMOBILIZER ACTIVE
93Starting-off and Driving
Page 119 of 222
finding a parking spaceFig. 109
System button (switch on the display in the instrument cluster dis-
play) /display: search for a suitable parking space for parallel or
perpen-
dicular parking
First read and observe the introductory information and safety warn- ings
on page 116.
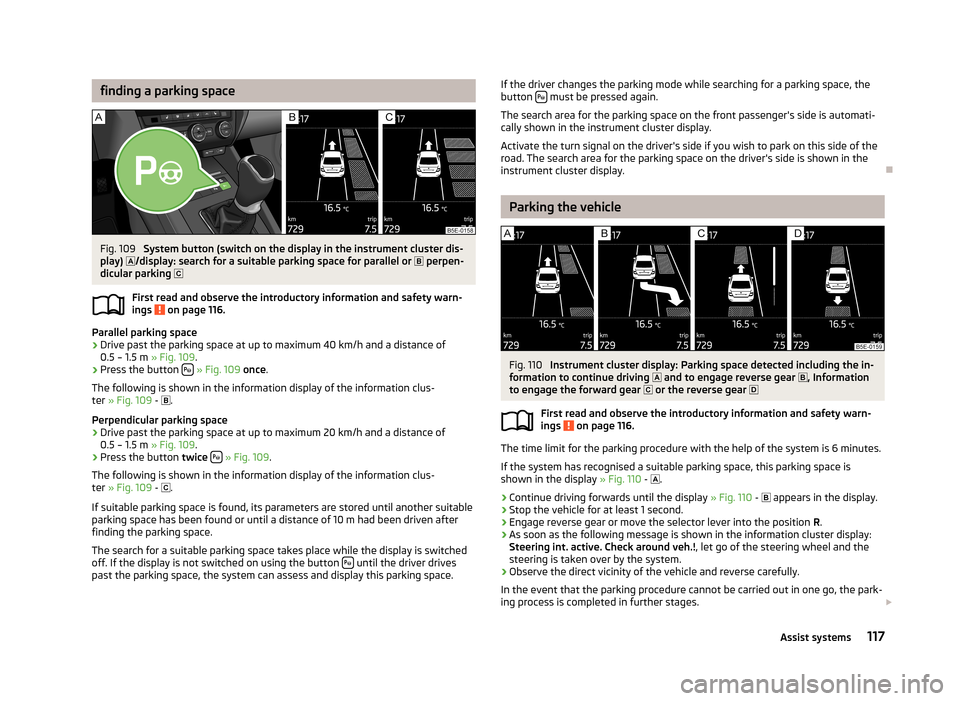
Parallel parking space
›
Drive past the parking space at up to maximum 40 km/h and a distance of 0.5 – 1.5 m » Fig. 109.
›
Press the button
» Fig. 109 once .
The following is shown in the information display of the information clus- ter » Fig. 109 -
.
Perpendicular parking space
›
Drive past the parking space at up to maximum 20 km/h and a distance of 0.5 – 1.5 m » Fig. 109.
›
Press the button twice
» Fig. 109 .
The following is shown in the information display of the information clus-
ter » Fig. 109 -
.
If suitable parking space is found, its parameters are stored until another suitable
parking space has been found or until a distance of 10 m had been driven after finding the parking space.
The search for a suitable parking space takes place while the display is switched
off. If the display is not switched on using the button
until the driver drives
past the parking space, the system can assess and display this parking space.
If the driver changes the parking mode while searching for a parking space, the
button must be pressed again.
The search area for the parking space on the front passenger's side is automati-
cally shown in the instrument cluster display.
Activate the turn signal on the driver's side if you wish to park on this side of the road. The search area for the parking space on the driver's side is shown in the
instrument cluster display.
Parking the vehicle
Fig. 110
Instrument cluster display: Parking space detected including the in-
formation to continue driving and to engage reverse gear
, Information
to engage the forward gear or the reverse gear
First read and observe the introductory information and safety warn- ings
on page 116.
The time limit for the parking procedure with the help of the system is 6 minutes.
If the system has recognised a suitable parking space, this parking space is
shown in the display » Fig. 110 -
.
›
Continue driving forwards until the display » Fig. 110 -
appears in the display.
›
Stop the vehicle for at least 1 second.
›
Engage reverse gear or move the selector lever into the position R.
›
As soon as the following message is shown in the information cluster display:
Steering int. active. Check around veh.! , let go of the steering wheel and the
steering is taken over by the system.
›
Observe the direct vicinity of the vehicle and reverse carefully.
In the event that the parking procedure cannot be carried out in one go, the park- ing process is completed in further stages.
117Assist systems
Page 124 of 222
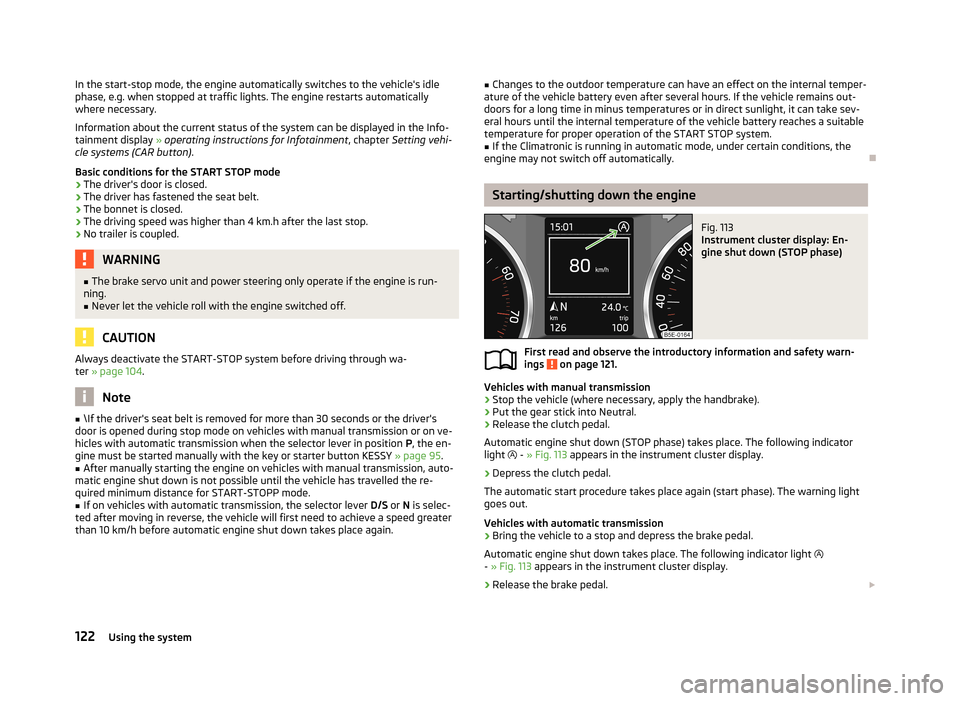
In the start-stop mode, the engine automatically switches to the vehicle's idle
phase, e.g. when stopped at traffic lights. The engine restarts automatically
where necessary.
Information about the current status of the system can be displayed in the Info-
tainment display » operating instructions for Infotainment , chapter Setting vehi-
cle systems (CAR button) .
Basic conditions for the START STOP mode
› The driver's door is closed.
› The driver has fastened the seat belt.
› The bonnet is closed.
› The driving speed was higher than 4 km.h after the last stop.
› No trailer is coupled.WARNING■
The brake servo unit and power steering only operate if the engine is run-
ning.■
Never let the vehicle roll with the engine switched off.
CAUTION
Always deactivate the START-STOP system before driving through wa-
ter » page 104 .
Note
■
\If the driver's seat belt is removed for more than 30 seconds or the driver's
door is opened during stop mode on vehicles with manual transmission or on ve-
hicles with automatic transmission when the selector lever in position P, the en-
gine must be started manually with the key or starter button KESSY » page 95.■
After manually starting the engine on vehicles with manual transmission, auto-
matic engine shut down is not possible until the vehicle has travelled the re-
quired minimum distance for START-STOPP mode.
■
If on vehicles with automatic transmission, the selector lever D/S or N is selec-
ted after moving in reverse, the vehicle will first need to achieve a speed greater
than 10 km/h before automatic engine shut down takes place again.
■ Changes to the outdoor temperature can have an effect on the internal temper-
ature of the vehicle battery even after several hours. If the vehicle remains out-
doors for a long time in minus temperatures or in direct sunlight, it can take sev-
eral hours until the internal temperature of the vehicle battery reaches a suitable temperature for proper operation of the START STOP system.■
If the Climatronic is running in automatic mode, under certain conditions, the
engine may not switch off automatically.
Starting/shutting down the engine
Fig. 113
Instrument cluster display: En-
gine shut down (STOP phase)
First read and observe the introductory information and safety warn-
ings on page 121.
Vehicles with manual transmission
›
Stop the vehicle (where necessary, apply the handbrake).
›
Put the gear stick into Neutral.
›
Release the clutch pedal.
Automatic engine shut down (STOP phase) takes place. The following indicator
light
- » Fig. 113 appears in the instrument cluster display.
›
Depress the clutch pedal.
The automatic start procedure takes place again (start phase). The warning light
goes out.
Vehicles with automatic transmission
›
Bring the vehicle to a stop and depress the brake pedal.
Automatic engine shut down takes place. The following indicator light
- » Fig. 113 appears in the instrument cluster display.
›
Release the brake pedal.
122Using the system
Page 126 of 222
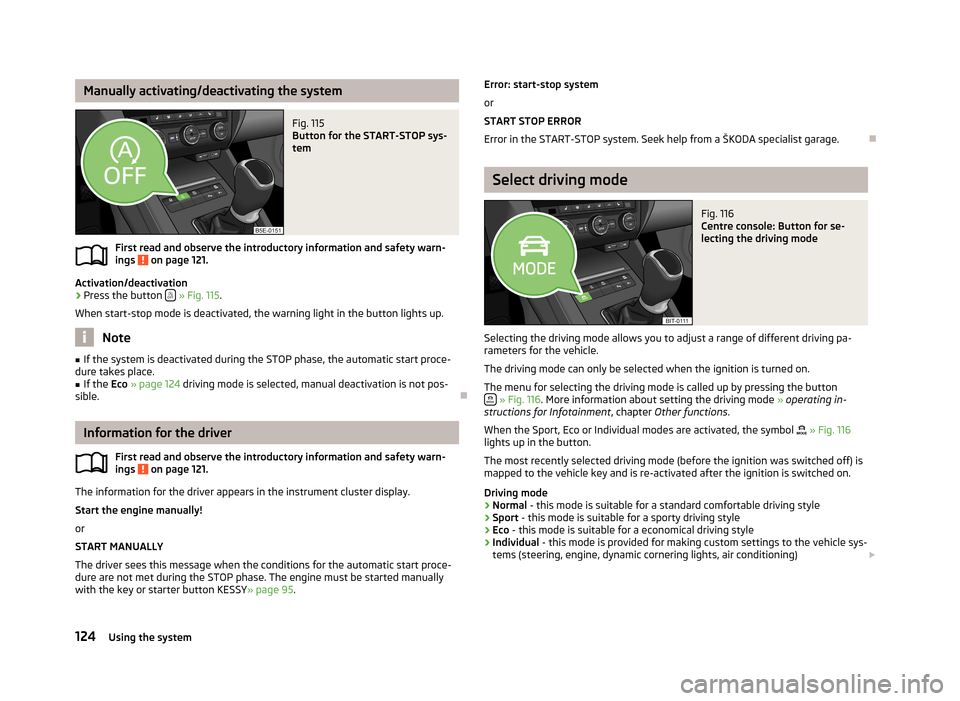
Manually activating/deactivating the systemFig. 115
Button for the START-STOP sys-
tem
First read and observe the introductory information and safety warn-
ings on page 121.
Activation/deactivation
›
Press the button
» Fig. 115 .
When start-stop mode is deactivated, the warning light in the button lights up.
Note
■ If the system is deactivated during the STOP phase, the automatic start proce-
dure takes place.■
If the Eco » page 124 driving mode is selected, manual deactivation is not pos-
sible.
Information for the driver
First read and observe the introductory information and safety warn-ings
on page 121.
The information for the driver appears in the instrument cluster display.
Start the engine manually!
or
START MANUALLY
The driver sees this message when the conditions for the automatic start proce-
dure are not met during the STOP phase. The engine must be started manually
with the key or starter button KESSY » page 95.
Error: start-stop system
or
START STOP ERROR
Error in the START-STOP system. Seek help from a ŠKODA specialist garage.
Select driving mode
Fig. 116
Centre console: Button for se-
lecting the driving mode
Selecting the driving mode allows you to adjust a range of different driving pa-
rameters for the vehicle.
The driving mode can only be selected when the ignition is turned on. The menu for selecting the driving mode is called up by pressing the button
» Fig. 116 . More information about setting the driving mode » operating in-
structions for Infotainment , chapter Other functions .
When the Sport, Eco or Individual modes are activated, the symbol
» Fig. 116
lights up in the button.
The most recently selected driving mode (before the ignition was switched off) is
mapped to the vehicle key and is re-activated after the ignition is switched on.
Driving mode
› Normal
- this mode is suitable for a standard comfortable driving style
› Sport
- this mode is suitable for a sporty driving style
› Eco
- this mode is suitable for a economical driving style
› Individual
- this mode is provided for making custom settings to the vehicle sys-
tems (steering, engine, dynamic cornering lights, air conditioning)
124Using the system
Page 127 of 222
Steering
In the Sport driving mode, the steering force assistance » page 93 is reduced
somewhat. This helps keep the vehicle on the best possible track when driving in
a sporty driving style.
Engine (drive)
The engine and transmission respond more dynamically or more relaxed to move- ments of the gas pedal based on what driving mode was set. In the Eco driving
mode, automatic transmission allows you to drive in the Neutral posi- tion » page 130 . When the Cruise Control System is active, the selected driving
mode can have an influence on driving behaviour when accelerating.
Dynamic cornering lights
The headlights adjust to the more dynamic driving style in the Sport driving
mode. Dynamic cornering lights is deactivated in the Eco driving mode.
Air conditioning (Climatronic)
In the Eco driving mode, the air conditioning system works more efficiently whilst
still maintaining the desired interior temperature.WARNING■ Setting the driving mode while driving can distract you from other traffic -
risk of accident.■
Concentrate fully at all times on your driving! As the driver you are fully re-
sponsible for the operation of your vehicle.
■
Adjust the speed and driving style to the current visibility, weather, road and
traffic conditions.
Note
■ The Eco driving mode is not available when towing a trailer. When the vehicle is
connected electrically to a trailer and is in the Eco driving mode, the Normal driv-
ing mode is configured automatically.■
On vehicles with automatic transmission, the gear is automatically set to mode
S » page 129 when selecting driving mode Sport or, in Eco driving mode, to mode
E .
■
The driver can change some vehicle functions irrespective of the selected driv-
ing mode. For instance, in the driving mode Eco , the driver can switch the auto-
matic transmission to the mode S.
ProActive passenger protection
ProActive passenger protection increases the protection offered to passengers in situations which could lead to a collision or rollover.
The system is automatically activated each time the ignition is switched on and
works at speeds of over 30 km/h.
In critical driving situations (e.g. during an emergency brake or sudden change in direction), the following steps can be taken separately or combined in order to re-
duce the risk of serious injury:
› Front passenger seatbelt or front passenger and driver's seatbelts are automat-
ically tensioned strongly over the body;
› Door panels in the side doors and the sliding/tilting roof (if open) are automati-
cally closed up to a gap of around 5 cm from the edge.
Once the critical driving situation has passed, the tension on the seatbelts will be released again.
All functions of the system are available when:
› the system is activated in Infotainment
» operating instructions for Infotain-
ment , chapter Setting vehicle systems (CAR button) ;
› the TCS is switched on
» page 113;
› the
Sport driving mode is not selected » page 124.
If the system cannot function correctly, the following message will appear in the
instrument cluster display:
ProActive passenger protection not available.
or ProActive passenger protection: funct. restricted.
Seek help from a ŠKODA specialist garage.WARNING■ Adjust the speed and driving style to the current visibility, weather, road and
traffic conditions. The increased safety offered by ProActive passenger pro-
tection must not tempt you to take greater risks than otherwise – risk of an
accident! 125Assist systems
Page 131 of 222
Automatic gearbox
Automatic transmission
Introduction
This chapter contains information on the following subjects:
Introductory information
129
Starting-off and driving
130
Selector lever positions
130
Manual shifting of gears (Tiptronic)
131
Selector lever lock
131
Kickdown function
132
Dynamic shift programme
132
Emergency programme
132
Selector lever-emergency unlocking
133WARNING■ Do not depress the accelerator if changing the position of the selector lever
when the vehicle is stationary and the engine is running – risk of accident!■
Never move the selector lever into position R or P when driving – risk of an
accident!
■
When the vehicle is stationery and the engine is running, stopping the vehi-
cle requires you pressing the brake pedal in all selector lever settings. When
the engine is idling, the power transmission is never completely interrupted -
the vehicle creeps.
■
The selector lever must be placed into position P and the handbrake firmly
applied before the bonnet can be opened and work on the running engine can
be completed – risk of accident! The safety guidelines must always be ob-
served » page 169 , Engine compartment .
■
If stopping on a hill (downhill gradient), never try to maintain the vehicle sta-
tionary with the gear engaged by means of the accelerator pedal, i.e. by let-
ting the clutch slip - This can lead to overheating of the clutch. If there is a risk
of overheating of the clutch due to overload, the clutch is opened automati-
cally and the vehicle rolls backward – risk of accident!
WARNING (Continued)■ If you have to stop on a slope, depress and hold the brake pedal to prevent
the vehicle from rolling back.■
On a smooth or slippery road surface using the kickdown function can cause
the driven wheels to spin – risk of skidding!
Note
If the driving mode Sport or Eco » page 124 is selected and the selector lever is in
position D/S, the gearbox is automatically set to mode S or E. The mode is indica-
ted in the instrument cluster display » Fig. 120 on page 130.
Introductory information
First read and observe the introductory information and safety warn-
ings
on page 129.
Starting
The engine can only be started when the selector lever is in position P or N .
When the steering is locked, when the ignition is turned on or off, or when start-
ing the engine, If the selector lever is not in the positions P or N, the following
message appears in the instrument cluster display Move the selector lever to Po-
sition P/N! or ENGAGE N OR P .
Shifting gears
Shifting up and down through the gears is performed automatically. The gearbox
can also be switched to Tiptronic mode. This mode makes it possible for you to
also shift gears manually » page 131.
If the selector lever position N is accidentally selected while driving, it is first nec-
essary to release pressure on the accelerator pedal and wait for the idling speed of the engine to be reached before the selector lever can be engaged in the driveposition.
At temperatures below -10 °C the engine can only be started in the selector lever position P.
Parking
When parking on a level road surface, it suffices to engage selector lever position
P .
129Automatic gearbox
Page 132 of 222
When parking on a slope, the handbrake should be applied firmly before the park
position P is selected. This ensures that there is no excessive pressure on the
lock mechanism and that it is subsequently easier to move the selector lever out of position P.
Starting-off and driving
First read and observe the introductory information and safety warn-
ings
on page 129.
Starting off
›
Firmly depress and hold the brake pedal.
›
Press the Shiftlock button (button in the selector lever handle), move the selec-
tor lever into the desired position » page 130 and then release the Shiftlock
button.
›
Release the brake pedal and accelerate.
Stop
The selector lever position N does not have to be selected when stopping for a
short time, such as at a cross roads.
›
Fully depress and hold the brake pedal until driving is resumed.
Parking
›
Fully depress and hold the brake pedal and bring the vehicle to a stop.
›
Firmly apply the handbrake.
›
Press and Shiftlock button in the selector lever, move the selector lever to P
and then release the Shiftlock button.
Driving in Neutral
›
Select the Eco driving mode » page 124, Select driving mode .
›
Take the foot of the accelerator (selector lever in position D/S).
The vehicle moves without the braking effect of the engine.
Idling can be interrupted by briefly pressing down on the accelerator pedal or
pressing the rocker switch -
on the multifunction steering wheel
» page 131.
Selector lever positionsFig. 120
Selector lever/Instrument cluster display
First read and observe the introductory information and safety warn- ings
on page 129.
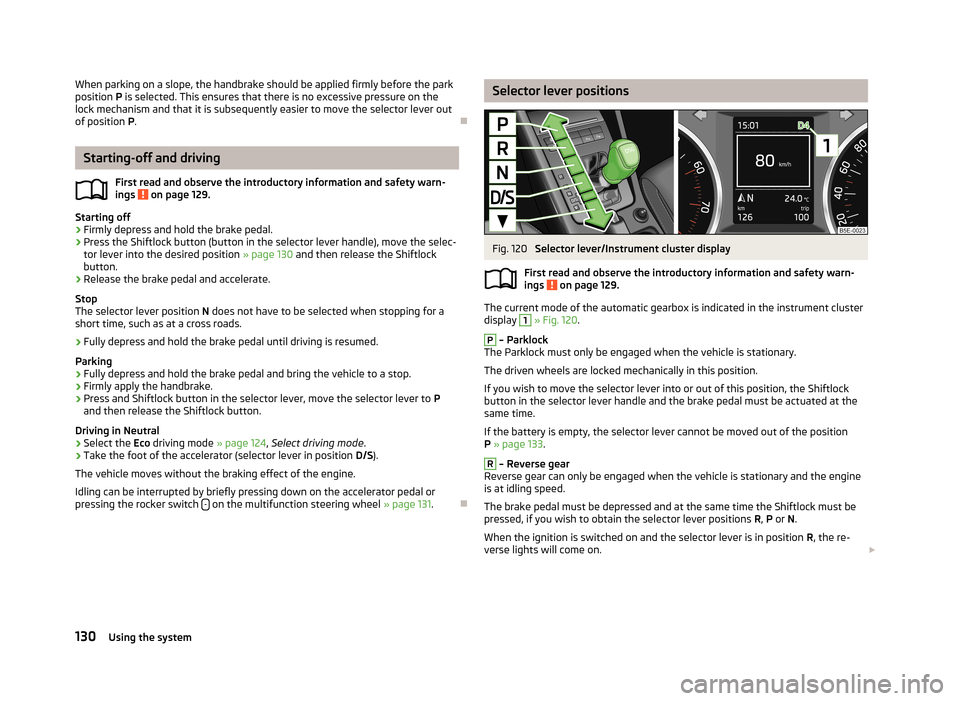
The current mode of the automatic gearbox is indicated in the instrument cluster display
1
» Fig. 120 .
P
– Parklock
The Parklock must only be engaged when the vehicle is stationary.
The driven wheels are locked mechanically in this position.
If you wish to move the selector lever into or out of this position, the Shiftlock
button in the selector lever handle and the brake pedal must be actuated at the
same time.
If the battery is empty, the selector lever cannot be moved out of the position
P » page 133 .
R
– Reverse gear
Reverse gear can only be engaged when the vehicle is stationary and the engine
is at idling speed.
The brake pedal must be depressed and at the same time the Shiftlock must be
pressed, if you wish to obtain the selector lever positions R, P or N.
When the ignition is switched on and the selector lever is in position R, the re-
verse lights will come on.
130Using the system
Page 133 of 222
N – Neutral
The brake pedal must be depressed to move the selector lever out of the position
N (if the lever is in this position for longer than 2 seconds) into the position D/S or
R when the vehicle is travelling at less than 5 km/h and the ignition is switched
on.D/S
- mode for driving forward (Normal program)/mode for driving forward
(Sport program)
The system switches from one mode to the other by moving the selector lever in- to the spring-tensioned position » Fig. 120 .
In the D or S mode, the forward gears are shifted up and down, depending on the
selected driving mode, engine load, driving speed and dynamic shifting program.
In the S mode, shifting up later into a higher gear makes it possible to fully exploit
the power potential of the engine. The gearbox also then shifts down at higher engine speeds as in the position D.
The brake pedal must be depressed to move the selector lever into position D/S
from Nwhen the vehicle is travelling at less than 5 km/h.
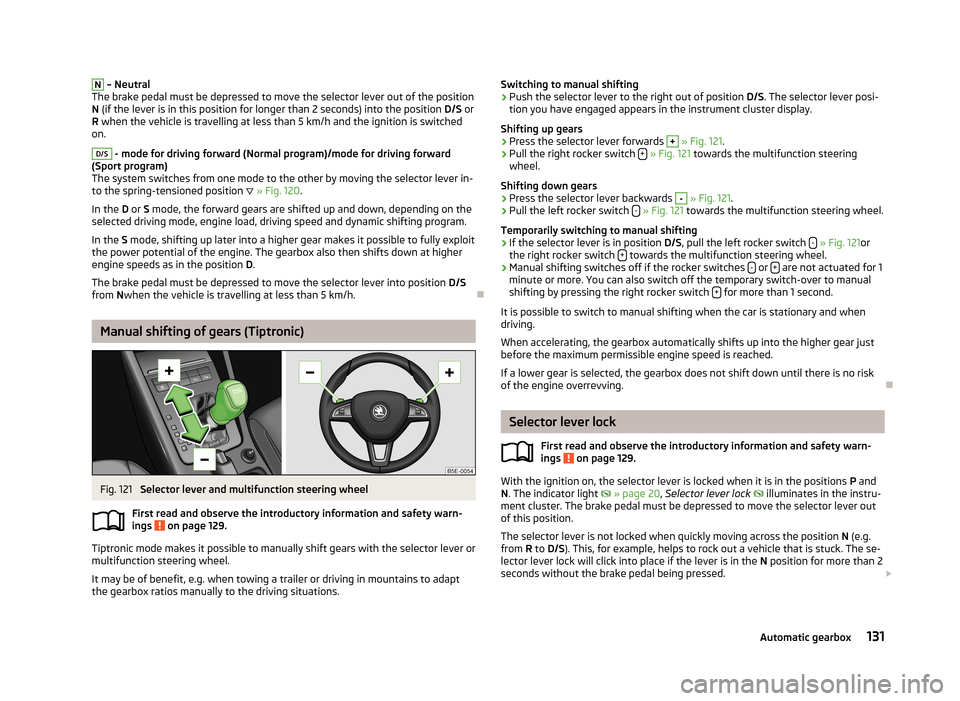
Manual shifting of gears (Tiptronic)
Fig. 121
Selector lever and multifunction steering wheel
First read and observe the introductory information and safety warn-
ings
on page 129.
Tiptronic mode makes it possible to manually shift gears with the selector lever or
multifunction steering wheel.
It may be of benefit, e.g. when towing a trailer or driving in mountains to adapt
the gearbox ratios manually to the driving situations.
Switching to manual shifting›Push the selector lever to the right out of position D/S. The selector lever posi-
tion you have engaged appears in the instrument cluster display.
Shifting up gears›
Press the selector lever forwards
+
» Fig. 121 .
›
Pull the right rocker switch +
» Fig. 121 towards the multifunction steering
wheel.
Shifting down gears
›
Press the selector lever backwards
-
» Fig. 121 .
›
Pull the left rocker switch -
» Fig. 121 towards the multifunction steering wheel.
Temporarily switching to manual shifting
›
If the selector lever is in position D/S, pull the left rocker switch -
» Fig. 121 or
the right rocker switch + towards the multifunction steering wheel.
›
Manual shifting switches off if the rocker switches
- or + are not actuated for 1
minute or more. You can also switch off the temporary switch-over to manual shifting by pressing the right rocker switch +
for more than 1 second.
It is possible to switch to manual shifting when the car is stationary and when
driving.
When accelerating, the gearbox automatically shifts up into the higher gear just before the maximum permissible engine speed is reached.
If a lower gear is selected, the gearbox does not shift down until there is no risk
of the engine overrevving.
Selector lever lock
First read and observe the introductory information and safety warn-ings
on page 129.
With the ignition on, the selector lever is locked when it is in the positions P and
N . The indicator light
» page 20 , Selector lever lock
illuminates in the instru-
ment cluster. The brake pedal must be depressed to move the selector lever out
of this position.
The selector lever is not locked when quickly moving across the position N (e.g.
from R to D/S ). This, for example, helps to rock out a vehicle that is stuck. The se-
lector lever lock will click into place if the lever is in the N position for more than 2
seconds without the brake pedal being pressed.
131Automatic gearbox