buttons SKODA OCTAVIA 2012 3.G / (5E) Owner's Manual
[x] Cancel search | Manufacturer: SKODA, Model Year: 2012, Model line: OCTAVIA, Model: SKODA OCTAVIA 2012 3.G / (5E)Pages: 222, PDF Size: 13.52 MB
Page 9 of 222
Using the system
Cockpit
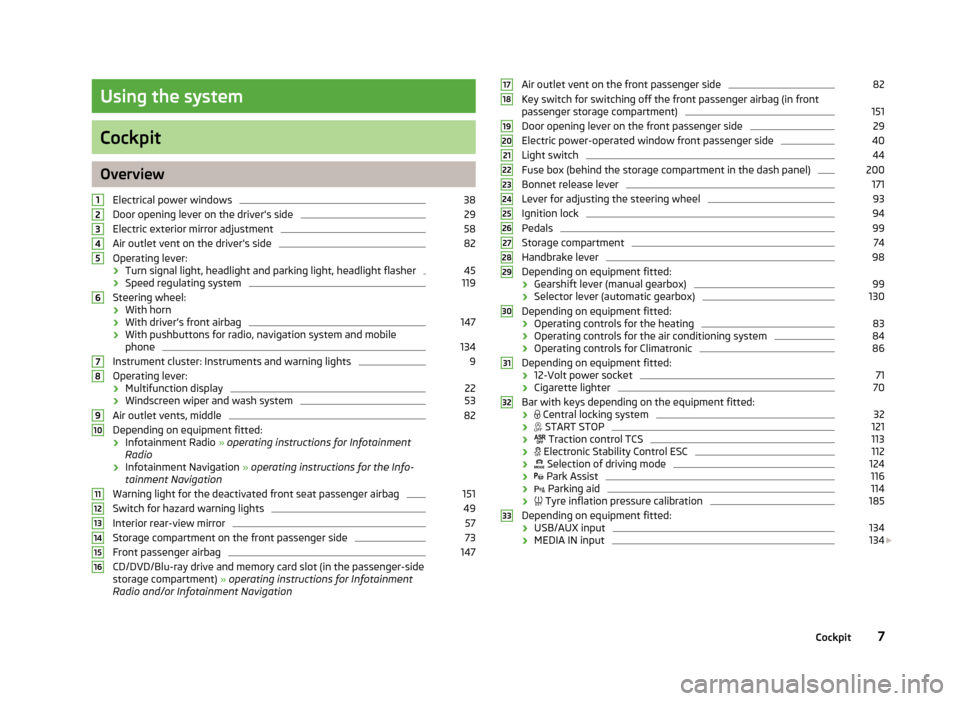
OverviewElectrical power windows
38
Door opening lever on the driver's side
29
Electric exterior mirror adjustment
58
Air outlet vent on the driver's side
82
Operating lever:
› Turn signal light, headlight and parking light, headlight flasher
45
›Speed regulating system
119
Steering wheel:
› With horn
› With driver’s front airbag
147
›With pushbuttons for radio, navigation system and mobile
phone
134
Instrument cluster: Instruments and warning lights
9
Operating lever:
› Multifunction display
22
›Windscreen wiper and wash system
53
Air outlet vents, middle
82
Depending on equipment fitted:
› Infotainment Radio
» operating instructions for Infotainment
Radio
› Infotainment Navigation
» operating instructions for the Info-
tainment Navigation
Warning light for the deactivated front seat passenger airbag
151
Switch for hazard warning lights
49
Interior rear-view mirror
57
Storage compartment on the front passenger side
73
Front passenger airbag
147
CD/DVD/Blu-ray drive and memory card slot (in the passenger-side
storage compartment) » operating instructions for Infotainment
Radio and/or Infotainment Navigation
12345678910111213141516Air outlet vent on the front passenger side82Key switch for switching off the front passenger airbag (in front
passenger storage compartment)151
Door opening lever on the front passenger side
29
Electric power-operated window front passenger side
40
Light switch
44
Fuse box (behind the storage compartment in the dash panel)
200
Bonnet release lever
171
Lever for adjusting the steering wheel
93
Ignition lock
94
Pedals
99
Storage compartment
74
Handbrake lever
98
Depending on equipment fitted:
› Gearshift lever (manual gearbox)
99
›Selector lever (automatic gearbox)
130
Depending on equipment fitted:
› Operating controls for the heating
83
›Operating controls for the air conditioning system
84
›
Operating controls for Climatronic
86
Depending on equipment fitted:
› 12-Volt power socket
71
›Cigarette lighter
70
Bar with keys depending on the equipment fitted:
›
Central locking system
32
›
START STOP
121
›
Traction control TCS
113
›
Electronic Stability Control ESC
112
›
Selection of driving mode
124
›
Park Assist
116
›
Parking aid
114
›
Tyre inflation pressure calibration
185
Depending on equipment fitted:
› USB/AUX input
134
›MEDIA IN input
134
17181920212223242526272829303132337Cockpit
Page 24 of 222
Driving data (Multifunction display)
Introduction
This chapter contains information on the following subjects:
Select data from the multifunction display
22
Memory
22
Multifunction display details
23
Warning against excessive speeds
24
The multifunction display only operates if the ignition is switched on. After the ig- nition is switched on, the function displayed is the one which you last selected
before switching off the ignition.
Individual menu items can be shown or hidden » Bedienungsanleitung Infotain-
ment, chapter Setting vehicle systems (CAR button) .
WARNINGConcentrate fully at all times on your driving! As the driver you are fully re-
sponsible for the operation of your vehicle.
Note
In certain countries the displays appear in the Imperial system of measures.
Select data from the multifunction displayFig. 3
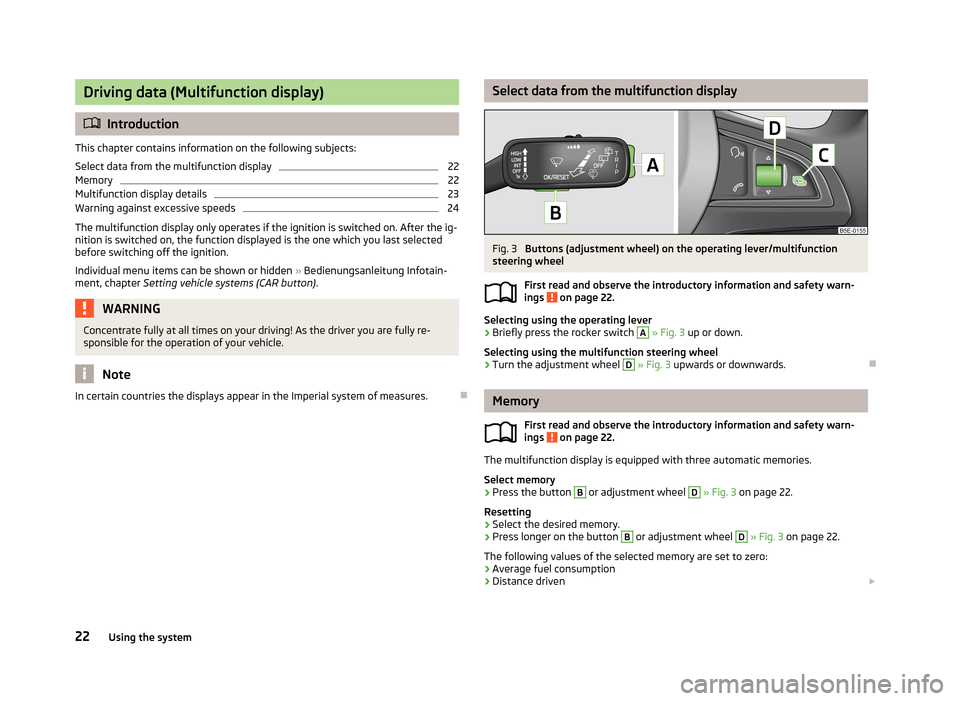
Buttons (adjustment wheel) on the operating lever/multifunction
steering wheel
First read and observe the introductory information and safety warn-
ings
on page 22.
Selecting using the operating lever
›
Briefly press the rocker switch
A
» Fig. 3 up or down.
Selecting using the multifunction steering wheel
›
Turn the adjustment wheel
D
» Fig. 3 upwards or downwards.
Memory
First read and observe the introductory information and safety warn-
ings
on page 22.
The multifunction display is equipped with three automatic memories.
Select memory
›
Press the button
B
or adjustment wheel
D
» Fig. 3 on page 22.
Resetting
›
Select the desired memory.
›
Press longer on the button
B
or adjustment wheel
D
» Fig. 3 on page 22.
The following values of the selected memory are set to zero:
› Average fuel consumption
› Distance driven
22Using the system
Page 26 of 222
Average speed
The average speed since the memory was last erased is shown in the display
in km/hour » page 22. To determine the average speed over a certain period of
time, set the memory to zero at the start of the measurement » page 22.
After erasing the memory, no average speed data will appear for approx. the first
300 m driven.
The display is updated regularly while you are driving. The average speed data is updated regularly while you are driving.
Distance travelled
The distance driven since the memory was last erased appears in the display.
If you want to measure the distance travelled from a particular moment in time on, at this moment, reset the memory by setting the button to zero » page 22.
The maximum distance indicated in both memories is 9 999 km. The indicator is
automatically set back to zero if this period is exceeded.
Driving time
The driving time which has elapsed since the memory was last erased, appears in
the display. If you want to measure the time travelled from a particular moment intime on, at this moment, reset the memory by setting the button tozero » page 22 .
The maximum distance indicated in both memories is 99 hours and 59 minutes. The indicator is set back to zero if this period is exceeded.
Convenience consumers
The consumption display for the convenience consumers in l/h.
Together with the consumption display, a list of three convenience consumers with the highest consumption is also displayed.
Warning against excessive speedsFig. 4
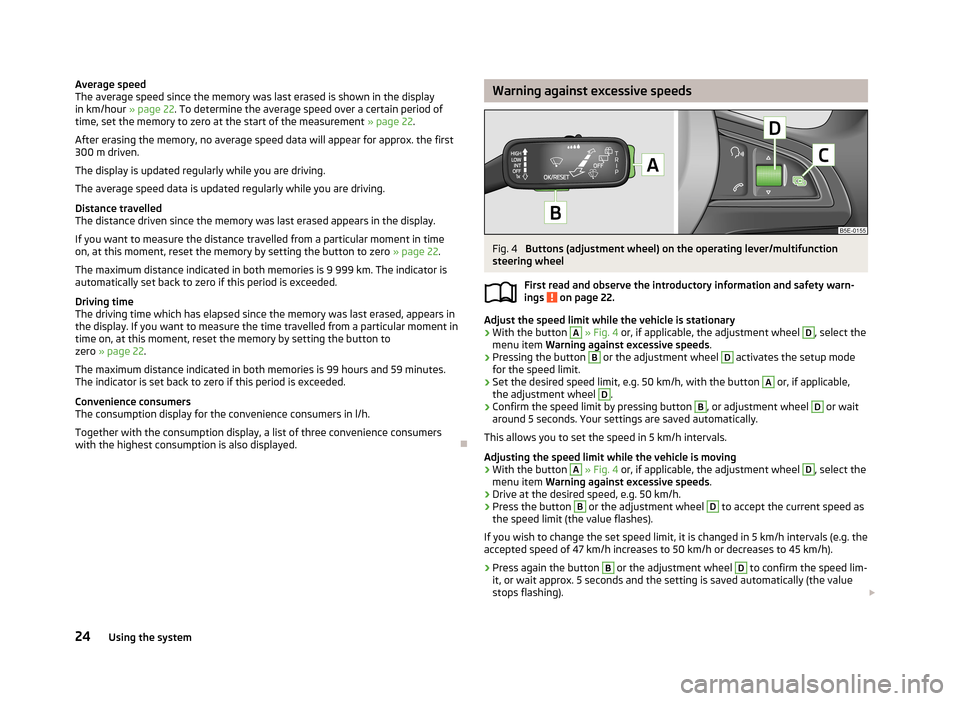
Buttons (adjustment wheel) on the operating lever/multifunction
steering wheel
First read and observe the introductory information and safety warn-ings
on page 22.
Adjust the speed limit while the vehicle is stationary
›
With the button
A
» Fig. 4 or, if applicable, the adjustment wheel
D
, select the
menu item Warning against excessive speeds .
›
Pressing the button
B
or the adjustment wheel
D
activates the setup mode
for the speed limit.
›
Set the desired speed limit, e.g. 50 km/h, with the button
A
or, if applicable,
the adjustment wheel
D
.
›
Confirm the speed limit by pressing button
B
, or adjustment wheel
D
or wait
around 5 seconds. Your settings are saved automatically.
This allows you to set the speed in 5 km/h intervals.
Adjusting the speed limit while the vehicle is moving
›
With the button
A
» Fig. 4 or, if applicable, the adjustment wheel
D
, select the
menu item Warning against excessive speeds .
›
Drive at the desired speed, e.g. 50 km/h.
›
Press the button
B
or the adjustment wheel
D
to accept the current speed as
the speed limit (the value flashes).
If you wish to change the set speed limit, it is changed in 5 km/h intervals (e.g. the
accepted speed of 47 km/h increases to 50 km/h or decreases to 45 km/h).
›
Press again the button
B
or the adjustment wheel
D
to confirm the speed lim-
it, or wait approx. 5 seconds and the setting is saved automatically (the value stops flashing).
24Using the system
Page 27 of 222
Change or delete speed limit›With the button A » Fig. 4 or, if applicable, the adjustment wheel D, select the
menu item Warning against excessive speeds .›
Pressing the button
B
or the adjustment wheel
D
deletes the speed limit.
›
Pressing the button
B
or the adjustment wheel
D
again activates change
mode for the speed limit.
If the pre-set speed is exceeded, an acoustic signal appears as a warning tone
and a warning message appears in the instrument cluster display, e.g.:
Speed 50 exceeded.
or SPEED TOO HIGH
The set speed limit value remains stored even after switching off the ignition. Af-
ter a gap between driving exceeding 2 hours, the pre-set speed limit is deleted.
Information display
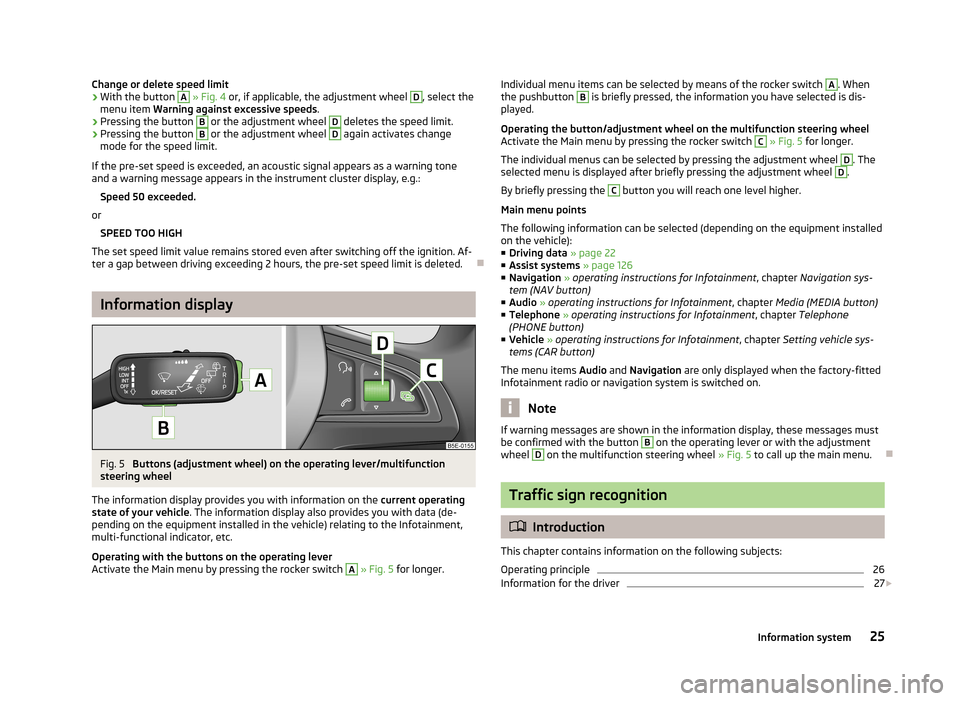
Fig. 5
Buttons (adjustment wheel) on the operating lever/multifunction
steering wheel
The information display provides you with information on the current operating
state of your vehicle . The information display also provides you with data (de-
pending on the equipment installed in the vehicle) relating to the Infotainment,
multi-functional indicator, etc.
Operating with the buttons on the operating lever
Activate the Main menu by pressing the rocker switch
A
» Fig. 5 for longer.
Individual menu items can be selected by means of the rocker switch A. When
the pushbutton B is briefly pressed, the information you have selected is dis-
played.
Operating the button/adjustment wheel on the multifunction steering wheel
Activate the Main menu by pressing the rocker switch C
» Fig. 5 for longer.
The individual menus can be selected by pressing the adjustment wheel
D
. The
selected menu is displayed after briefly pressing the adjustment wheel
D
.
By briefly pressing the
C
button you will reach one level higher.
Main menu points
The following information can be selected (depending on the equipment installed on the vehicle):
■ Driving data » page 22
■ Assist systems » page 126
■ Navigation » operating instructions for Infotainment , chapter Navigation sys-
tem (NAV button)
■ Audio » operating instructions for Infotainment , chapter Media (MEDIA button)
■ Telephone » operating instructions for Infotainment , chapter Telephone
(PHONE button)
■ Vehicle » operating instructions for Infotainment , chapter Setting vehicle sys-
tems (CAR button)
The menu items Audio and Navigation are only displayed when the factory-fitted
Infotainment radio or navigation system is switched on.
Note
If warning messages are shown in the information display, these messages must
be confirmed with the button B on the operating lever or with the adjustment
wheel D
on the multifunction steering wheel » Fig. 5 to call up the main menu.
Traffic sign recognition
Introduction
This chapter contains information on the following subjects:
Operating principle
26
Information for the driver
27
25Information system
Page 34 of 222
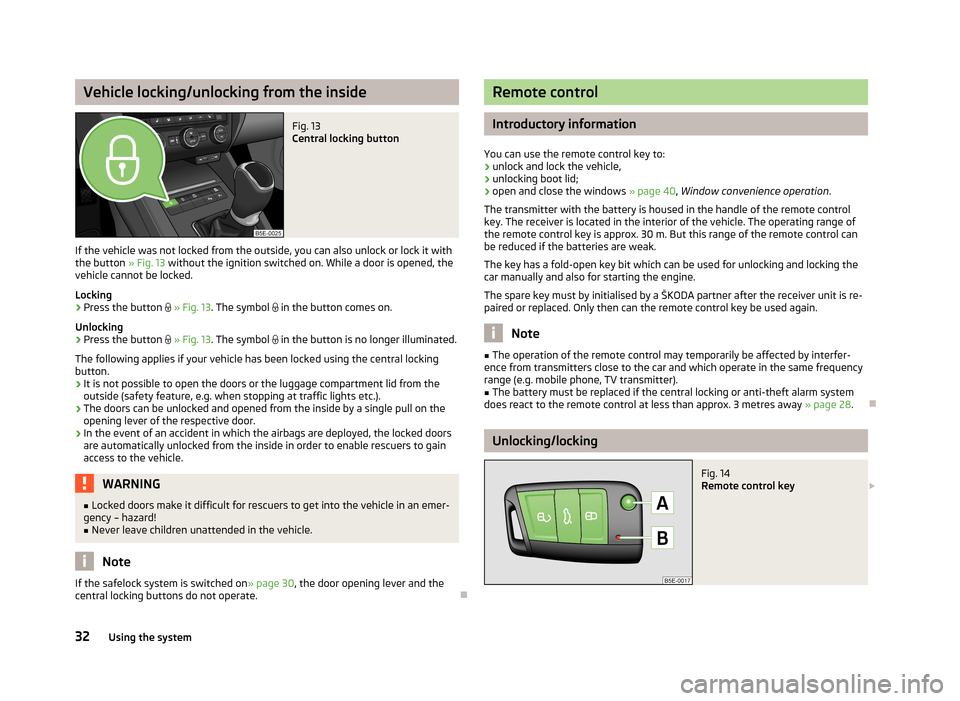
Vehicle locking/unlocking from the insideFig. 13
Central locking button
If the vehicle was not locked from the outside, you can also unlock or lock it with
the button » Fig. 13 without the ignition switched on. While a door is opened, the
vehicle cannot be locked.
Locking
›
Press the button
» Fig. 13 . The symbol
in the button comes on.
Unlocking
›
Press the button
» Fig. 13 . The symbol
in the button is no longer illuminated.
The following applies if your vehicle has been locked using the central locking button.
› It is not possible to open the doors or the luggage compartment lid from the
outside (safety feature, e.g. when stopping at traffic lights etc.).
› The doors can be unlocked and opened from the inside by a single pull on the
opening lever of the respective door.
› In the event of an accident in which the airbags are deployed, the locked doors
are automatically unlocked from the inside in order to enable rescuers to gain access to the vehicle.
WARNING■ Locked doors make it difficult for rescuers to get into the vehicle in an emer-
gency – hazard!■
Never leave children unattended in the vehicle.
Note
If the safelock system is switched on » page 30
, the door opening lever and the
central locking buttons do not operate.
Remote control
Introductory information
You can use the remote control key to:
› unlock and lock the vehicle,
› unlocking boot lid;
› open and close the windows
» page 40, Window convenience operation .
The transmitter with the battery is housed in the handle of the remote control
key. The receiver is located in the interior of the vehicle. The operating range of
the remote control key is approx. 30 m. But this range of the remote control can
be reduced if the batteries are weak.
The key has a fold-open key bit which can be used for unlocking and locking the
car manually and also for starting the engine.
The spare key must by initialised by a ŠKODA partner after the receiver unit is re-
paired or replaced. Only then can the remote control key be used again.
Note
■ The operation of the remote control may temporarily be affected by interfer-
ence from transmitters close to the car and which operate in the same frequency
range (e.g. mobile phone, TV transmitter).■
The battery must be replaced if the central locking or anti-theft alarm system
does react to the remote control at less than approx. 3 metres away » page 28.
Unlocking/locking
Fig. 14
Remote control key
32Using the system
Page 35 of 222
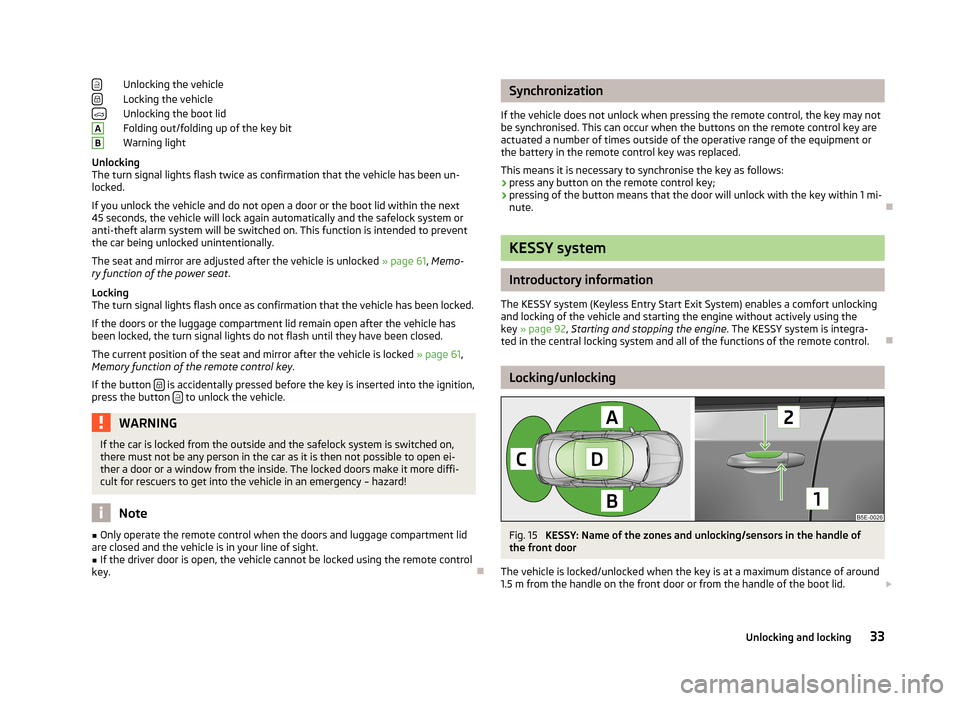
Unlocking the vehicle
Locking the vehicle
Unlocking the boot lid
Folding out/folding up of the key bit
Warning light
Unlocking
The turn signal lights flash twice as confirmation that the vehicle has been un-
locked.
If you unlock the vehicle and do not open a door or the boot lid within the next
45 seconds, the vehicle will lock again automatically and the safelock system or
anti-theft alarm system will be switched on. This function is intended to prevent
the car being unlocked unintentionally.
The seat and mirror are adjusted after the vehicle is unlocked » page 61, Memo-
ry function of the power seat .
Locking
The turn signal lights flash once as confirmation that the vehicle has been locked.
If the doors or the luggage compartment lid remain open after the vehicle has
been locked, the turn signal lights do not flash until they have been closed.
The current position of the seat and mirror after the vehicle is locked » page 61,
Memory function of the remote control key .
If the button
is accidentally pressed before the key is inserted into the ignition,
press the button to unlock the vehicle.
WARNINGIf the car is locked from the outside and the safelock system is switched on,
there must not be any person in the car as it is then not possible to open ei-
ther a door or a window from the inside. The locked doors make it more diffi-
cult for rescuers to get into the vehicle in an emergency – hazard!
Note
■ Only operate the remote control when the doors and luggage compartment lid
are closed and the vehicle is in your line of sight.■
If the driver door is open, the vehicle cannot be locked using the remote control
key.
ABSynchronization
If the vehicle does not unlock when pressing the remote control, the key may not be synchronised. This can occur when the buttons on the remote control key areactuated a number of times outside of the operative range of the equipment or
the battery in the remote control key was replaced.
This means it is necessary to synchronise the key as follows:
› press any button on the remote control key;
› pressing of the button means that the door will unlock with the key within 1 mi-
nute.
KESSY system
Introductory information
The KESSY system (Keyless Entry Start Exit System) enables a comfort unlocking
and locking of the vehicle and starting the engine without actively using the
key » page 92 , Starting and stopping the engine . The KESSY system is integra-
ted in the central locking system and all of the functions of the remote control.
Locking/unlocking
Fig. 15
KESSY: Name of the zones and unlocking/sensors in the handle of
the front door
The vehicle is locked/unlocked when the key is at a maximum distance of around
1.5 m from the handle on the front door or from the handle of the boot lid.
33Unlocking and locking
Page 41 of 222
CAUTION■Keep the windows clean to ensure the correct functionality of the electric win-
dows.■
In the event that the windows are frozen, first of all eliminate the
ice » page 162 , De-icing windows and exterior mirrors and only then operate the
electrical power windows. Otherwise, the electrical power window mechanism
could be damaged.
■
When leaving the locked vehicle make sure that the windows are closed at all
times.
For the sake of the environment
At high speeds, you should keep the windows closed to prevent unnecessarily
high fuel consumption.
Note
The window lift system is equipped with protection against overheating. Repea-
ted opening and closing of the window can cause this mechanism to overheat. If
this happens, it will not be possible to operate the window for a short time. You
will be able to operate the window again as soon as the overheating protection
has cooled down.
Opening/closing the window from the driver seat
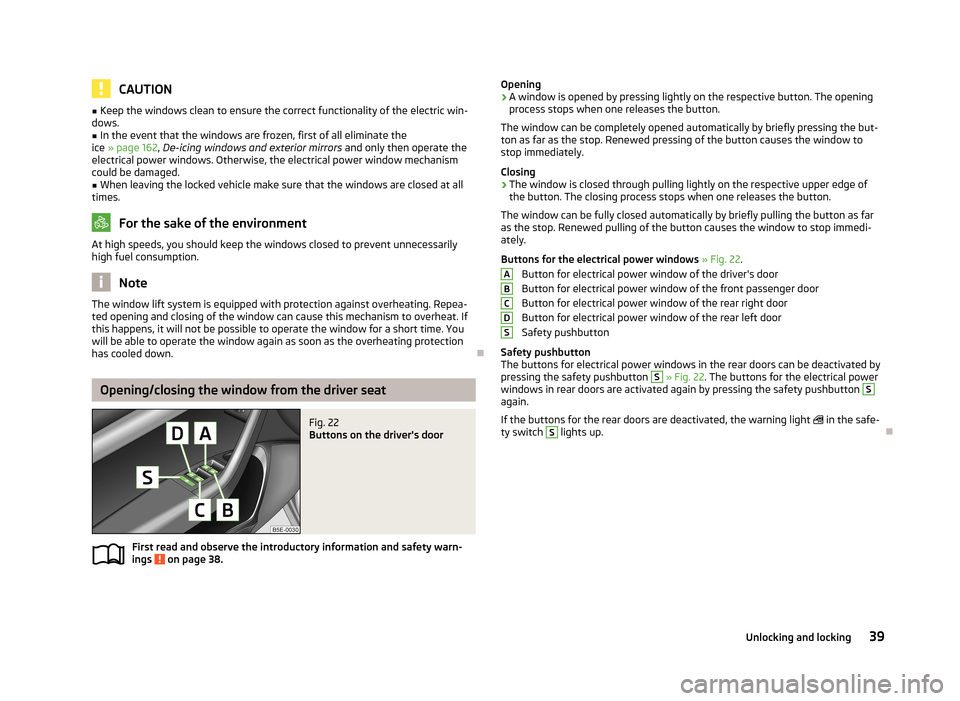
Fig. 22
Buttons on the driver's door
First read and observe the introductory information and safety warn-
ings on page 38.
Opening›A window is opened by pressing lightly on the respective button. The opening
process stops when one releases the button.
The window can be completely opened automatically by briefly pressing the but- ton as far as the stop. Renewed pressing of the button causes the window tostop immediately.
Closing›
The window is closed through pulling lightly on the respective upper edge of the button. The closing process stops when one releases the button.
The window can be fully closed automatically by briefly pulling the button as far as the stop. Renewed pulling of the button causes the window to stop immedi-
ately.
Buttons for the electrical power windows » Fig. 22 .
Button for electrical power window of the driver's door
Button for electrical power window of the front passenger door
Button for electrical power window of the rear right door
Button for electrical power window of the rear left doorSafety pushbutton
Safety pushbutton
The buttons for electrical power windows in the rear doors can be deactivated by pressing the safety pushbutton
S
» Fig. 22 . The buttons for the electrical power
windows in rear doors are activated again by pressing the safety pushbutton
S
again.
If the buttons for the rear doors are deactivated, the warning light
in the safe-
ty switch
S
lights up.
ABCDS39Unlocking and locking
Page 54 of 222

Switching the light on/off›Press the button » Fig. 33 - .
Switching the reading light on/off›
Press the button or
» Fig. 33 - .
Front door warning light
Fig. 34
Front door: Warning light
The warning light is located in the lower door trim panel » Fig. 34.
The light switches on/off when the front door is opened or closed.
Note
If the door is open and the ignition switched off, the light will extinguish auto-
matically after around 10 minutes.
Entry lighting
The lighting is positioned on the bottom edge of the exterior mirror and illumi- nates the entry area of the front door.
The light comes on after the vehicle has been unlocked or on opening the front
door. The lighting goes out within around 30 seconds after the front door is
closed or the ignition is switched on.
WARNINGIf the entry light is on, do not touch its cover - risk of burns!NoteIf the door is open and the ignition switched off, the light will extinguish auto-
matically after around 10 minutes.
Visibility
Windscreen and rear window heater
Fig. 35
Buttons for the front and rear window heater/manual air-condition-
ing system, heating
Switching the windscreen heater on/off
›
Press the button
» Fig. 35 .
The indicator light in or underneath the button lights up/goes out.
Switching the rear window heater on/off
›
Press the button
» Fig. 35 .
The indicator light in or underneath the button lights up/goes out.
The windscreen and rear window heater only operates when the engine is run- ning.
The windscreen and rear window heater automatically switches off after approxi-
mately 10 minutes.
52Using the system
Page 63 of 222
Reducing or increasing the curvature of the lumbar support›Push the switch A » Fig. 45 in the region of one of the arrows 2.
Raising or lowering the curvature of the lumbar support›
Push the switch
A
» Fig. 45 in the region of one of the arrows 1.
The adjusted driver's seat position can be set in the memory of the
seat » page 61 or the remote control key » page 61.
Note
If the setting procedure is interrupted, you will need to press the button again.
Memory function of the power seat
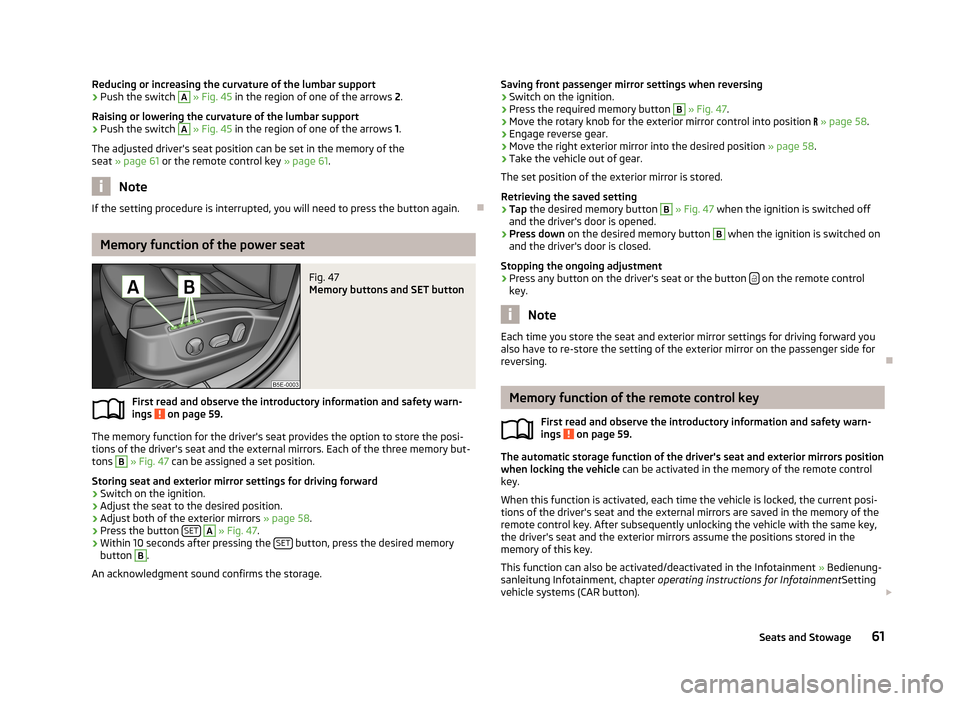
Fig. 47
Memory buttons and SET button
First read and observe the introductory information and safety warn-
ings on page 59.
The memory function for the driver's seat provides the option to store the posi- tions of the driver's seat and the external mirrors. Each of the three memory but-
tons
B
» Fig. 47 can be assigned a set position.
Storing seat and exterior mirror settings for driving forward
›
Switch on the ignition.
›
Adjust the seat to the desired position.
›
Adjust both of the exterior mirrors » page 58.
›
Press the button SET
A
» Fig. 47 .
›
Within 10 seconds after pressing the SET button, press the desired memory
button
B
.
An acknowledgment sound confirms the storage.
Saving front passenger mirror settings when reversing›Switch on the ignition.›
Press the required memory button
B
» Fig. 47 .
›
Move the rotary knob for the exterior mirror control into position » page 58 .
›
Engage reverse gear.
›
Move the right exterior mirror into the desired position » page 58.
›
Take the vehicle out of gear.
The set position of the exterior mirror is stored.
Retrieving the saved setting
›
Tap the desired memory button
B
» Fig. 47 when the ignition is switched off
and the driver's door is opened.
›
Press down on the desired memory button
B
when the ignition is switched on
and the driver's door is closed.
Stopping the ongoing adjustment
›
Press any button on the driver's seat or the button on the remote control
key.
Note
Each time you store the seat and exterior mirror settings for driving forward you
also have to re-store the setting of the exterior mirror on the passenger side for
reversing.
Memory function of the remote control key
First read and observe the introductory information and safety warn-ings
on page 59.
The automatic storage function of the driver's seat and exterior mirrors position
when locking the vehicle can be activated in the memory of the remote control
key.
When this function is activated, each time the vehicle is locked, the current posi-
tions of the driver's seat and the external mirrors are saved in the memory of the remote control key. After subsequently unlocking the vehicle with the same key,the driver's seat and the exterior mirrors assume the positions stored in the
memory of this key.
This function can also be activated/deactivated in the Infotainment » Bedienung-
sanleitung Infotainment, chapter operating instructions for Infotainment Setting
vehicle systems (CAR button).
61Seats and Stowage
Page 89 of 222
Switch automatic mode on/off » page 87
Switch the cooling system on/off » page 87
Note
The interior temperature sensor is located between the buttons and SETUP.
Do not stick anything on or cover the sensor, otherwise it could have an unfav-
ourable effect on the Climatronic.
Automatic mode
Automatic mode works in three modes - weak, medium, and intensive.
Information on the setting » Bedienungsanleitung Infotainment, chapter Addi-
tional functions (CAR button) .
Switching on
›
Set the temperature between +16 °C and +29 °C using the control dials
A
and
C
» Fig. 86 on page 86.
›
Press the button AUTO and the indicator light in the button illuminates.
Switching off
›
Press any button for the air distribution or increase/reduce the blower speed.
After the Climatronic is switched on, it works in the last selected mode. The currently selected mode is displayed in the Infotainment display.Climatronic is set to the medium setting by default.
Note
We recommend that you adjust the air outlet vents 3 and 4 » Fig. 82 on page 82,
so that the air flow is directed slightly upwards.
Switch cooling system on/off
›
Press the button and the indicator light in the button illuminates.
›
Pressing the button
again switches off the cooling system - the indicator
light in the button goes out.
After the cooling system is switched off, only the ventilation function remains ac-
tive whereby the minimum temperature that can be reached is the outside tem-
perature.
AUTOSetting temperature
The interior temperature for the left and right side can be set separately or to-
gether.
For both sides›
Turn the control dial
A
» Fig. 86 on page 86 to the left or right to increase or
decrease the temperature.
The warning light in the button DUAL
goes out.
For the right side
›
Turn the control dial
C
» Fig. 86 on page 86 to the left or right to increase or
decrease the temperature.
The indicator light lights up in the DUAL
button.
If the indicator light in the button DUAL
is illuminated, the temperature for both
sides cannot be set with the control dial
A
. This function can be restored by
pressing the button DUAL. The warning light in the button goes out.
The interior temperature can be set between +16 ℃ and +29 ℃. The interior tem-
perature is regulated automatically within this range.
If a temperature lower than +16 ℃ is selected, a blue symbol lights up on the con-
trol dial.
If a temperature higher than +29 ℃ is selected, a red symbol lights up on the con-
trol dial.
At both end positions, Climatronic runs at maximum cooling/heating output and
the temperature is automatically not regulated.
CAUTION
Lengthy and uneven distribution of the air flow out of the vents (especially
around the feet) and large differences in temperature, for example, when getting
out of the vehicle, can cause susceptible individuals to catch a cold.
Automatic recirculated air mode
Recirculated air mode largely prevents polluted air from outside the vehicle get- ting into the vehicle, for example, when driving through a tunnel or when stand-
ing in a traffic jam.
87Heating and air conditioning system